Appbox配置使用指南
- 格式:docx
- 大小:463.73 KB
- 文档页数:14
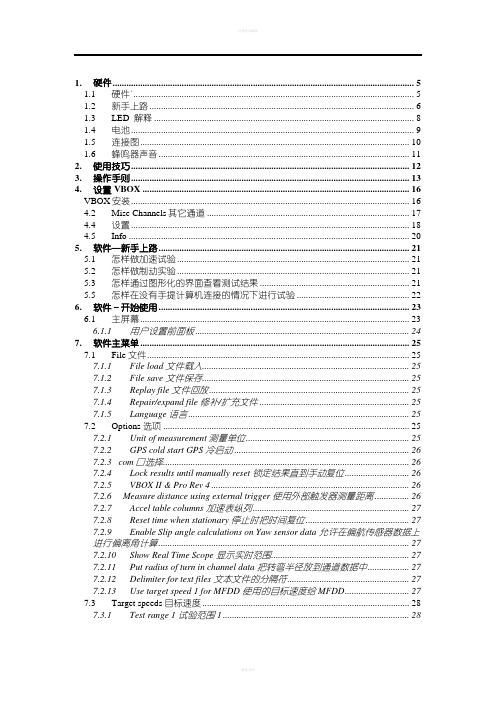
1. 硬件 (5)1.1 硬件` (5)1.2 新手上路 (6)1.3 LED 解释 (8)1.4 电池 (9)1.5 连接图 (10)1.6 蜂鸣器声音 (11)2. 使用技巧 (12)3. 操作手则 (13)4. 设置 VBOX (16)VBOX安装 (16)4.2 Misc Channels其它通道 (17)4.4 设置 (18)4.5 Info (20)5. 软件—新手上路 (21)5.1 怎样做加速试验 (21)5.2 怎样做制动实验 (21)5.3 怎样通过图形化的界面查看测试结果 (21)5.5 怎样在没有手提计算机连接的情况下进行试验 (22)6. 软件–开始使用 (23)6.1 主屏幕 (23)6.1.1 用户设置前面板 (24)7. 软件主菜单 (25)7.1 File 文件 (25)7.1.1 File load 文件载入 (25)7.1.2 File save 文件保存 (25)7.1.3 Replay file 文件回放 (25)7.1.4 Repair/expand file 修补/扩充文件 (25)7.1.5 Language 语言 (25)7.2 Options 选项 (25)7.2.1 Unit of measurement测量单位 (25)7.2.2 GPS cold start GPS 冷启动 (26)7.2.3 com口选择 (26)7.2.4 Lock results until manually reset 锁定结果直到手动复位 (26)7.2.5 VBOX II & Pro Rev 4 (26)7.2.6 Measure distance using external trigger 使用外部触发器测量距离 (26)7.2.7 Accel table columns 加速表纵列 (27)7.2.8 Reset time when stationary 停止时把时间复位 (27)7.2.9 Enable Slip angle calculations on Yaw sensor data 允许在偏航传感器数据上进行偏离角计算 (27)7.2.10 Show Real Time Scope 显示实时范围 (27)7.2.11 Put radius of turn in channel data 把转弯半径放到通道数据中 (27)7.2.12 Delimiter for text files 文本文件的分隔符 (27)7.2.13 Use target speed 1 for MFDD 使用的目标速度给MFDD (27)7.3 Target speeds 目标速度 (28)7.3.1 Test range 1 试验范围1 (28)7.3.2 Test range 2试验范围2 (28)7.3.3 0 to 100 to 0 range 零到100到零范围 (28)7.4 Real time plot 实时绘图 (28)7.5 Select Run 选择运行 (30)7.5.1 Default setups 缺省设置 (31)7.5.2 Manual setup 手动设置 (32)7.6 VBOX Setup VBOX 设置 (32)7.7 Graph 图形 (32)7.8 Start Finish 起点终点 (32)7.8.1 Load start finish line and splits载入起/终点线和分离位置 (33)7.8.2 Save start/finish line and splits保存起/终点线和分离位置 (33)7.8.3 Start finish line length起/终点线的长度 (33)7.8.4 Start finish line tolerance起终点线的公差 (33)7.8.5 Accumulative split times 累计分离时间 (33)7.9.1 Enable log file creation 允许记录文件产生 (33)7.9.2 Include MFDD in logfile 在记录文件中包括MFDD (33)7.9.3 Include test range 2 in logfile 在记录文件中包括试验范围2 (33)7.10 Help 帮助 (33)8. GRAPH图形 (34)8.1 概述 (34)8.2 选择通道 (35)8.3 设置外部输入信号的比例大小 (36)8.4 键盘和鼠标指令 (37)8.5 快捷键 (37)8.6 定义起点/终点线和分离点。

1.虚拟机服务端配置 (2)1.1虚拟机服务端安装 (2)1.2虚拟机服务端配置 (2)2.UTM安装 (4)2.1操作系统安装 (4)2.2 UTM软件安装 (5)3.APPBOX安装与配置 (7)3.1操作系统安装 (7)3.2终端服务安装与激活 (8)3.2.1终端服务授权安装 (8)3.2.2终端服务器授权激活 (11)3.3应用安装 (14)3.3.1 Oracle客户端 (14)3.3.2 DB2客户端 (16)3.3.3 Informix客户端 (17)3.3.4 Sybase客户端 (20)3.3.5 Sqlserver客户端 (20)3.3.6 KVM客户端 (23)3.3.7 AS400客户端 (23)3.3.8 VNC客户端 (23)3.3.9 mysql客户端 (24)3.3.10其它客户端 (24)3.4 windows配置 (24)3.4.1系统用户设置 (24)3.4.2组策略设置 (25)3.4.3设置数据执行保护 (26)3.4.4关闭屏幕保护 (27)3.4.5禁用windows自动更新 (27)3.4.6配置完成,重启计算机 (27)1.虚拟机服务端配置1.1虚拟机服务端安装将ESXI光盘映像文件刻录成光盘,将该ESXI光盘插入光驱,默认安装,安装完毕,进入ESXI控制台,为ESXI配置管理IP,接入网线将设备接入网络1.2虚拟机服务端配置使用客户端VMware vSphere Client远程连接ESXI,安装虚拟机linux与windows(参照后面UTM与APPBOX操作系统安装)虚拟机网卡设置参考交换机网络配置UTM虚拟机网卡配置,网络适配器1、2、3分别对应UTM网卡eth0、eth1、eth2APPBOX虚拟机网卡配置2.UTM安装2.1操作系统安装1、操作系统版本要求Red Hat Enterprise Linux 4 Advanced Server Update82、安装需要注意以下几点:(1)当硬盘容量不超过500G时分两个区:一个主分区,挂载点“/”类型ext3容量为除开swap分区容量的所有硬盘容量;一个交换分区swap 容量为实际内存2倍(例如实际内存512M交换分区设置1G)当硬盘容量超过500G时分三个区:一个主分区,挂载点“/”类型ext3容量50G,一个交换分区swap 容量为实际内存2倍,最后一个分区挂载点/usr/local/httpd/htdocs/sms/vsms/sessions类型ext3 容量为剩余所有空间。

日本語VISUAL PRESENTER Accessories取扱説明書ご使用になる前に本取扱説明書をよくお読みください。
INSTRUCTION MANUALPlease read this instruction manual carefully before using this product.MANUEL D'INSTRUCTIONSVeuillez lire attentivement ce manuel d’instructions avant d’utiliser ce produit.BEDIENUNGSANLEITUNGBitte lesen Sie dieses Bedienungshandbuch aufmerksam durch, bevor Sie dieses Produkt benutzen.■ Read InstructionsAll the safety and operating instructions should be read before the appliance is operated.■R etain InstructionsThe safety and operating instructions should be retained for future reference.■H eed WarningsAll warnings on the product and in the operating instructions should be adhered to.■ Follow InstructionsAll operating and use instructions should be followed.■ CleaningUnplug this product from the wall outlet before cleaning. Do not use liquid cleaners or aerosol cleaners. Use a damp cloth for cleaning.■ AttachmentsDo not use attachments not recommended by the product manufacturer as they may cause hazards.■ Water and MoistureDo not use this product near water - for example, near a bath tub, wash bowl, kitchen sink, or laundry tub, in a wet basement, or near a swimming pool, and the like.■ PlacementDo not place this product on an unstable cart, stand, tripod, bracket, or table. The product may fall, causing serious injury to a child or adult, and serious damage to the product. Use only with a cart, stand, tripod, bracket, or table recommended by the manufacturer, or sold with the product. Any mounting of the product should follow the manufacturer’s instructions, and should use a mounting accessory recommended by the manufacturer.■ VentilationSlots and openings in the cabinet are provided for ventilation and to ensure reliable operation of the product and to protect it from overheating, and these openings must not be blocked or covered. The openings should never be blocked by placing the product on a bed, sofa, rug, or other similar surface. This product should not be placed in a built-in installation such as a bookcase or rack unless proper ventilation is provided or the manufacturer’s instructions have been adhered to.■ Power SourcesThis product should be operated only from the type of power source indicated on the marking label. If you are not sure of the type of power supply to your home consult your appliance dealer or local power company. For products intended to operate from battery power, or other sources, refer to the operating instructions.■ Grounding or PolarizationThis product may be equipped with either a polarized 2-wire AC line plug (a plug having oneblade wider than the other) or a 3-wire grounding type plug, a plug having a third (grounding) pin. The 2-wire polarized plug will outlet, try reversing the plug. If the plug still fails to fit, contact your electrician to replace your obsolete outlet. Do not defeat the safety purpose of the polarized plug. The 3-wire grounding type plug will fit into a grounding type power outlet. This is a safety feature. If you are unable to insert the plug into the outlet, contact your electrician to replace your obsolete outlet. Do not defeat the safety purpose of the grounding type plug. ■ Power-Cord ProtectionPower-supply cords should be routed so that they are not likely to be walked on or pinched by items placed upon or against them, paying particular attention to cords at plugs, convenience receptacles, and the point where they exit from the product. ■ LightningFor added protection for this product during a lightning storm, or when it is left unattended and unused for long periods of time, unplug it from the wall outlet and disconnect the antenna or cable system. This will prevent damage to the product due to lightning and power-line surges. ■ OverloadingDo not overload wall outlets, extension cords, or integral convenience receptacles as this can result in a risk of fire or electric shock.■ A product and cart combination should be moved with care. Quick stops, excessive force, and uneven surfaces may cause the product and cart combination to overturn. ■ Object and Liquid EntryNever push objects of any kind into this product through openings as they may touch dangerous voltage points or short-out parts that could result in a fire or electric shock. Never spill liquid of any kind on the product. ■ ServicingDo not attempt to service this product yourself as opening or removing covers may expose you to dangerous voltage or other hazards. Refer all servicing to qualified service personnel. ■ Damage Requiring ServiceUnplug this product from the wall outlet and refer servicing to qualified service personnel under the following conditions:• When the power -supply cord or plug is damaged.• If liquid has been spilled, or objects have fallen into the product. • If the product has been exposed to rain or water.• If the product does not operate normally by following the operating instructions. Adjust only those controls that are covered by the operating instructions as an improper adjustment of other controls may result in damage and will often require extensive work by a qualified technician to restore the product to its normal operation. • If the product has been dropped or damaged in any way.• When the product exhibits a distinct cha nge in performance - this indicates a need for service.■ Replacement PartsWhen replacement parts are required, be sure the service technician has used replacement parts specified by the manufacturer or have the same characteristics as the original part. Unauthorized substitutions may result in fire, electric shock or other hazards.■ Safety CheckUpon completion of any service or repairs to this product, ask the service technician to perform safety checks to determine that the product is in proper operating condition.■ HeatThe product should be situated away from heat sources such as radiators, heat registers, stoves, or other products (including amplifiers) that produce heat.■ This product includes a Fluorescent Lamps component that contains mercury. Please consult your state and local regarding proper disposal or recycling, and do not place in the trash.The lightning flash with arrowhead symbol, within an equilateraltriangle, is intended to alert the user to the presence of uninsulated“dangerous voltage” within the product’s enclosure that may be ofsufficient magnitude to constitute a risk of electric shock to persons.The exclamation point within an equilateral triangle is intended toalert the user to the presence of important operating andmaintenance (servicing) instructions in the literatureSA 1965FOR UNITED STATES USERS: INFORMATIONThis equipment has been tested and found to comply with the limits for a Class A digital device, pursuant to Part 15 of the FCC Rules. These limits are designed to provide reasonable protection against harmful interference when the equipment is operated in a commercial environment. This equipment generates, uses, and can radiate radio frequency energy and, if not installed and used in accordance with the instruction manual, may cause harmful interference to radio communications. Operation of this equipment in a residential area is likely to cause harmful interference in which case the user will be required to correct the interference at his own expense.USER-INSTALLER CAUTION:Your authority to operate this FCC verified equipment could be voided if you make changes ormodifications not expressly approved by the party responsible for compliance to Part 15 of the FCC rules.WARNINGTO REDUCE THE RISK OF FIRE OR ELECTRIC SHOCK, DO NOT EXPOSE THIS PRODUCT TO RAIN OR MOISTURE.The connection of a non-shielded equipment interface cable to this equipment will invalidate the FCC Certification or Declaration of this device and may cause interference levels which exceed the limits established by the FCC for this equipment. It is the responsibility of the user to obtain and use a shielded equipment interface cable with this device. If this equipment has more than one interface connector, do not leave cables connected to unused interfaces. Changes or modifications not expressly approved by the manufacturer could void the user’s authority to operate the equipment.■Be sure to use the connection cable and the AC adapter supplied with the product.■The supplied power cable, the AC adapter, and expansion cable are designed to be used for the product only. Do not use them for other products.■Be sure to use the AC adapter applicable to your local power specifications. If the product was sold in Japan, use the AC adapter sold with the product with 100 VAC and 50 or 60 Hz.■When storing the product, do not leave it under direct sunlight or by heaters. It may be discolored, deformed, or damaged.■Do not place the product in any humid, dusty, salt bearing wind, or vibrating locations.Use it under the following environmental conditions:Temperature: 0°C - 40°CHumidity: 30% - 85% (No condensation)■Use a soft, dry cloth for cleaning.Do not use any volatile solvent such as thinner or benzene.■Follow the guidelines below to prevent the product from dropping or overturning.• Use the product on a stable base, desk, or table. Do not place the product on an unstable base or slanted location.• Place or wire the product to preve nt the power cable, the AC adapter or the video cable from pulling.■Pay careful attention when using (including setting-up and storing) or carrying the product.■If the product is used for longer than the warranty period, its performance and quality may deteriorate due to the lifetime of its parts. For parts replacement (on chargeable basis), consult the dealer from whom you purchased the product or our branch/office near your location.■The contents of this document are subject to change without notice. The latest version can be obtained from the following MX-1 Official Website:https:///■It is prohibited under copyright law to use or copy any part or the whole of this document without our prior written consent.■ELMO shall not be liable for any claim for damage or loss of earnings or any claim raised by a third person due to the use, malfunction or repair of the product.■ IMPORTANT SAFEGUARDS (14)BEFORE YOU USE ............................................................................................................................................. 18 ■ TABLE OF CONTENTS ..................................................................................................................................... 19 ➊ PACKAGE CONTENTS . (20)■ABOUT MX-1 CONNECT BOX (20)➋ CONNECTING THE MX-1 CONNECT BOX (21)■VIDEO OUTPUT AND CAPTURE SIZE ........................................................................................................... 22 ■CONNECTING TO A PROJECTOR OR MONITOR (23)➌ TROUBLE SHOOTING (24)■SYMPTOMS AND CONFIRMATION (24)➍ SPECIFICATIONS ................................................................................................................................................ 25 ➎ TRADEMARKS AND LICENSES .. (26)The items below are included with the product. If any item is missing, contact the dealer from whom you purchased the product.■ABOUT MX-1 CONNECT BOXBy connecting the MX-1 to the MX-1 CONNECT BOX, you can display the camera image to a projector or monitor. The MX-1 does not have HDMI port and RGB port. The MX-1 CONNECT BOX allows you to use HDMI port and RGB port with the MX-1.REAR■VIDEO OUTPUT AND CAPTURE SIZEThe video output of the MX-1 varies according to the status of the Resolution/Output mode and whether the MX-1 CONNECT BOX is used or not. The MX-1 can capture aspect ratio ①. Pay attention to the shooting conditions.◆Video output when using the MX-1 CONNECT BOX◆RGB output and HDMI output when using the MX-1 CONNECT BOX・The video output is automatically set to 720p when a monitor which does not support 1080p is connected.・When HDMI output is possible, both RGB output and HDMI output are output in the same※When video output is HDMI, works as the selection switch between Full and Normal.※Setting method of arms, The maximum angle of view capture will change.NormalFullAspect ratio■CONNECTING TO A PROJECTOR OR MONITORBy using the MX-1 CONNECT BOX, you can connect the MX-1 to a projector or monitor.①Connect a projector or monitor to the MX-1 CONNECT BOX via the HDMI cable or RGB cable.②Connect the supplied DC power cable to [ ]. Connect the USB plug to the AC adapter. Then connect it to the wall outlet.③Connect the MX-1 to the MX-1 CONNECT BOX via the supplied Expansion cable. ④The MX-1 and MX-1 CONNECT BOX will be powered on. (LED of MX-1: Blue lighting)■SYMPTOMS AND CONFIRMATIONCheck the following items. If any abnormality is found, consult the dealer from whom you purchased the product or our nearest branch/office.on the Operating panel of the MX-1. Cancel the freezeAbout long-term usage of this productDue to the lifetime of its parts, if the product is used for longer than the warranty period, its performance and quality may deteriorate. In this case, we will replace the parts for a charge. Consult the dealer from whom you purchased the product or our nearest branch/office.、Image Mate are the registered trademarks of ELMO Co., Ltd. HDMI、logo and High-Definition Multimedia interface are trademarks or registered trademarks of HDMI Licensing LLC.All other company/product names described in this manual are trademarks or registered trademarks of their respective companies. This product is licensed under the AVC Visual Patent Portfolio License (AVC Video) for the personal andnon-commercial use of a consumer to (i) play AVC Video that was recorded by a consumer engaged in a personal and a non-commercial activity and/or, (ii) play AVC Video that was obtained from a video provider licensed from MPEG-LA, LLC. Additional information including that relating to promotional and commercial uses may be obtained from MPEG-LA, LLC.6X1VLBA11 R0-Nix。

ENCN1. Open WiFi network setting on iPhone or Android.2. Join Smartbox_xxxxxx WiFi network.1. 點選 iPhone 或Android WiFi 網路設定2. 選取 Smartbox_xxxxxx WiFi 無線網路連線Connect to Smart Box over WiFiTW建立 WiFi 連線至Smart Box1. 点选 iPhone 或 Android WiFi 网络设定。
2. 选取 Smartbox_xxxxxx WiFi 无线网络联机1. iPhone やAndroid のW-fi ネットワークの設定を開きます2. 表示されているネットワークの中から Smartbox_xxxxxx ( デフォル トのSSID) を選択しますJPWiFi を経由してSmart Box に接続する建立 WiFi 联机至Smart BoxSmart Box is on and connecting to smart phone or tablet:1. Plug smart phone to Smart Box USB2.2. Press the power button and Smart Box will start charging phone.Smart Box is on and plugged to USB2.0 portable storage:1. Plug portable storage to Sma rt Box USB A-type 1.2. Smart Box start sharing portable storage data via WiFi.當Smart Box 電源為開啟狀態連接手機或平板電腦:1. 將智慧型手機連接至Smart Box USB2。
2. 按開關後Smart Box 開始為手機充電。

绿色软件打包工具BoxedApp Packer使用说明编译王立群一、概览BoxedApp Packer是一款打包exe文件、DLL文件、ActiveX和其它文件为一个独立的可执行文件的打包应用程序。
用户可以放置exe文件所依赖的库、ActiveX控件和所有类型的文件到这个可执行文件中。
BoxedApp Packer解决的主要问题是创建不需要安装的应用程序。
而与此同时,用户将自由地选择所创建应用程序的组件。
用户可以使用任何第三方的DLL,任何ActiveX控件,简单地赋给BoxedApp Packer打包应用程序的这些信息,它将生成一个自主运行的exe文件。
这种方法所打包的可执行文件在磁盘上不创建临时文件,它不修改注册表但确保所有嵌入的文件仿佛真实存在那样地运行。
当ActiveX/COM库在虚拟注册表中被注册时,嵌入的文件被直接提取到内存。
此外,用户可以通过为这个可执行文件创建插件——指定的DLL进一步地拓展该应用程序的功能。
插件在应用程序启动时被调用。
插件提供特定的API——BoxedApp SDK API,它允许在运行时创建虚拟文件,用虚拟注册表工作,等等。
这样,用户就可以创建真正灵活的应用程序。
例如,用户的应用程序,当它启动的时候,能够加载必要的DLL到整个网络或整个Internet,然后仿佛它们真正在硬盘上一样地使用。
1、虚拟文件虚拟文件是仅生存在当前进程的文件。
BoxedApp的核心是在所谓的用户模式下调用操作系统的截取机制。
与在内核模式下运行系统不同,BoxedApp不要求安装驱动程序,就有系统管理员的权限。
尤其是BoxedApp 截取有利于使用文件系统的应用程序的所有调用。
BoxedApp引进了虚拟文件的概念。
虚拟文件是不实际存在于磁盘上的文件,但是,应用程序运行时仿佛文件存在于这里。
例如,当应用程序通过分配各自的调用打开虚拟文件“C:\backslash\1.dll”时,BoxedApp获取控制权并检测被打开文件,如果路径指向虚拟文件,那么代替调用打开函数的原始文件,BoxedApp返回指向虚拟文件的虚拟句柄。

TVBox多仓v1.1.1版,详细使用教程,并送5个多源仓库接口01—提示与说明•所有软件和资源都有时效性,不能保证可长期使用,如果遇到软件资源失效、无法打开或者闪退等问题,请在本号下载其他软件代替,或者留言反馈。
•在APP使用中,任何要求加群、付费,请不要相信,遇到此类情况,请果断卸载,并在本号获取最新可用APP。
02—前言消息灵通的小伙伴们都知道,最近TVBox的多仓版本开始被很多人提及,甚至有民间高手开始更新版本,更是得到了一部分人的喜爱,粉丝中也有人多次提及这个APP,今天大聪明就给大家分享一下TVBox影视仓库这款软件,现在市面上关于此软件的的魔改和内置有很多,而且本身这个软件也不是TVBox团队的作品,所以软件本身也加入了不少广告引流那就很正常了,请注意分辨。
03—软件摘要•软件名称:TVBox影视仓库••软件版本:1.1.1(打开软件后,软件内标注是1.0.8,可能作者马虎忘记改了吧)•适用设备:Android(手机+TV)•影视仓库版就是大家所谓的多仓,是一种可以添加多个仓库和接口的版本,对于传统的TVBox而言,多仓版的优势在于可以将多条接口集成到一个仓库上,然后再将多个仓库形成一个汇总的接口,当然也可以添加多个汇总接口仓库,这个关系不知道大家能否听明白,我画下图,大家看看,最下方是我们常用的TVBox接口。
04—软件使用教程•软件同样是个空壳,需要添加多仓的接口以后才能使用,下面我来演示如何添加,首先软件打开后,进入设置界面,找到“切换多源仓库”功能,其他的不用点。
•点开后就是配置多仓接口的界面,在仓库名字处输入“多仓”两个字,注意,务必要输入这两个字,这是硬性要求,输入别的可以添加进去,但是打不开,提示json解析失败或者仓库已被删除,此处还可以扫码输入地址。
•输入好以后,效果如下,随意点击一个仓库就可以进入该仓库的接口选择列表。
••比如我选择2号仓库,点击进入后弹出选择线路。
About the T utorialFlexbox (flexible box) is a layout mode of CSS3. Using this mode, you can easily create layouts for complex applications and web pages. Flexbox layout gives complete control over the direction, alignment, order, size of the boxes.In this tutorial, we are going to learn how to use the various features available in Flexbox. AudienceThis tutorial has been prepared for beginners to make them understand the basics of Flexbox library. It will help the readers in aligning the contents of a webpage easily.PrerequisitesFor this tutorial, it is assumed that the readers have a prior knowledge of CSS and HTML Copyright & Disclaimer© Copyright 2017 by Tutorials Point (I) Pvt. Ltd.All the content and graphics published in this e-book are the property of Tutorials Point (I) Pvt. Ltd. The user of this e-book is prohibited to reuse, retain, copy, distribute or republish any contents or a part of contents of this e-book in any manner without written consent of the publisher.We strive to update the contents of our website and tutorials as timely and as precisely as possible, however, the contents may contain inaccuracies or errors. Tutorials Point (I) Pvt. Ltd. provides no guarantee regarding the accuracy, timeliness or completeness of our website or its contents including this tutorial. If you discover any errors on our website or in this tutorial, please notify us at **************************T able of ContentsAbout the Tutorial (i)Audience (i)Prerequisites (i)Copyright & Disclaimer (i)Table of Contents .......................................................................................................................................... i i 1.FLEXBOX ─ OVERVIEW (1)What is Flexbox? (1)Features of Flexbox (1)Supporting browsers (2)2.FLEXBOX ─ FLEX CONTAINERS (3)Flex (3)Inline flex (5)3.FLEXBOX ─ FLEX-DIRECTION (7)row (7)row-reverse (9)column (10)column-reverse (12)4.FLEXBOX ─ FLEX-WRAP (15)wrap (16)wrap-reverse (17)wrap (column) (19)wrap-reverse (column) (21)5.FLEXBOX ─ JUSTIFYING CONTENTS (23)flex-start (24)flex-end (25)center (26)space-between (28)space-around (29)space-evenly (31)6.FLEXBOX ─ ALIGN ITEM S (33)flex-start (33)flex-end (35)center (36)stretch (38)baseline (40)7.FLEXBOX ─ ALIGN CONT ENT (42)center (42)flex-start (44)flex-end (46)stretch (48)space-around (50)space-between (52)8.FLEXBOX ─ F LEX-ORDER (55)9.FLEXBOX ─ FLEXIBILIT Y (58)flex-basis (58)flex-grow (59)flex-shrink (60)flex (61)10.FLEXBOX ─ ALIGN SELF (62)flex-start (62)flex-end (64)center (65)stretch (67)Flexbox5C ascading S tyle S heets (CSS) is a simple design language intended to simplify the process of making web pages presentable. CSS handles the look and feel part of a web page.Using CSS, you can control the color of the text, the style of fonts, the spacing between paragraphs, how columns are sized and laid out, what background images or colors are used, layout designs, variations in display for different devices and screen sizes as well as a variety of other effects.To determine the position and dimensions of the boxes, in CSS, you can use one of the layout modes available –∙ The block layout : This mode is used in laying out documents. ∙ The inline layout : This mode is used in laying out text. ∙ The table layout : This mode is used in laying out tables.∙The positioned layout : This mode is used in positioning the elements.All these modes are used to align specific elements like documents, text, tables, etc., however, none of these provides a complete solution to lay out complex websites. Initially this is used to be done using a combination of floated elements, positioned elements, and table layout (often). But floats only allow to horizontally position the boxes.In addition to the above-mentioned modes, CSS3 provides another layout mode Flexible Box, commonly called as Flexbox .Using this mode, you can easily create layouts for complex applications and web pages. Unlike floats, Flexbox layout gives complete control over the direction, alignment, order, size of the boxes.Following are the notable features of Flexbox layout:∙Direction: You can arrange the items on a web page in any direction such as left to right, right to left, top to bottom, and bottom to top.∙ Order: Using Flexbox, you can rearrange the order of the contents of a web page.∙Wrap: In case of inconsistent space for the contents of a web page (in single line), you can wrap them to multiple lines (both horizontally) and vertically.∙Alignment: Using Flexbox, you can align the contents of the webpage with respect to their container.1.Flexbox6∙Resize: Using Flexbox, you can increase or decrease the size of the items in the page to fit in available space.Supporting browsersFollowing are the browsers that support Flexbox.∙Chrome 29+∙Firefox 28+∙Internet Explorer 11+∙Opera 17+∙Safari 6.1+∙Android 4.4+∙iOS 7.1+7To use Flexbox in your application, you need to create/define a flex container using the display property. Usage:This property accepts two values –∙ flex: Generates a block level flex container.∙inline-flex: Generates an inline flex container box.Now, we will see how to use the display property with examples.FlexOn passing this value to the display property, a block level flex container will be created. It occupies the full width of the parent container (browser).The following example demonstrates how to create a block level flex container. Here, we are creating six boxes with different colors and we have used the flex container to hold them.It will produce the following result –Since we have given the value flex to the display property, the container uses the width of the container (browser).You can observe this by adding a border to the container as shown below.It will produce the following result –Inline flexOn passing this value to the display property, an inline level flex container will be created. It just takes the place required for the content.The following example demonstrates how to create an inline flex container. Here, we are creating six boxes with different colors and we have used the inline-flex container to hold them.10It will produce the following result –Since we have used an inline flex container, it just took the space that is required to wrap its elements.11End of ebook previewIf you liked what you saw…Buy it from our store @ https://。
NetBox使用方法-baobao的日志-网易博客NetBox使用方法电脑技术 2010-03-22 00:43:59 阅读292 评论0 字号:大中小第一步、安装1、先将NETBOX安装。
一路点下一步。
安装好不要去打开主程序2、我们首先创建一个空目录,如D:\web(或随便什么目录都行,桌面下都行,但最好是空的,因为方便打包),然后在在目录中创建一个新文件,并命名为:main.box,(也就是在web文件夹里加一个,main.box的文件。
)修改其内容如下:Dim httpdShell.Service.RunService "NBWeb", "NetBox Web Server", "NetBoxHttp ServerSample"Sub OnServiceStart()Set httpd = CreateObject("NetBox.HttpServer")If httpd.Create("", 80) = 0 ThenSet host = httpd.AddHost("", "\www")host.EnableScript = truehost.AddDefault "index.htm"host.AddDefault "index.asp"host.AddDefault "default.htm"host.AddDefault "default.asp"httpd.StartelseShell.Quit 0end ifEnd SubSub OnServiceStop()httpd.CloseEnd SubSub OnServicePause()httpd.StopEnd SubSub OnServiceResume()httpd.StartEnd Sub最后保存!说明:(1):如果你成功安装了网络盒子,那么他的后缀是可以被识别的,图标为红色.b 的样子(2):我把上面代码的主要内容讲一下:httpd.Create("",80)是指使用80端口开设服务器,如果不喜欢,可以更改为别的!那么访问地址后面必须加 :端口号才能正常访问Set host = httpd.AddHost("", "\www")中的www就是你放网站程序的目录。
MyBox:简易工具箱用户手册 - 数据工具作者:Mara版本:6.7.1日期:2023-3-13内容目录1 简介 (8)1.1 主菜单 (8)1.2 资源地址 (9)1.3 文档 (10)1.4 工具的菜单 (12)2 二维存储结构的数据 (13)2.1 数据对象 (13)2.2 功能菜单 (14)2.3 定义数据列 (15)2.3.1 数据列的管理界面 (15)2.3.2 列的类型 (16)2.3.3 列的格式 (17)2.3.3.1 数字的格式 (17)2.3.3.2 日期时间/日期的格式 (18)2.3.3.3 纪元的格式 (19)2.3.3.4 定义枚举型 (20)2.3.4 对于非法值的处理 (20)2.4 列的应用 (21)2.4.1 加载数据 (21)2.4.2 显示数据 (21)2.4.3 编辑控件 (22)2.4.4 编辑数据单元 (23)2.4.5 保存数据 (25)2.4.6 计算数据 (25)2.4.7 数据排序 (26)2.4.8 列的颜色 (26)2.5 编辑数据 (27)2.5.1 表格编辑模式 (27)2.5.2 CSV编辑模式 (28)2.5.3 保存与恢复 (29)2.6 查看数据 (30)2.6.1 数据的网页 (30)2.6.2 数据的CSV (31)2.7 定义数据属性 (32)2.8 行表达式 (33)2.8.1 行表达式的作用 (33)2.8.2 编辑行表达式 (33)2.8.3 计算行表达式 (34)2.8.4 示例 (34)2.9 行过滤 (35)2.9.1 行过滤的作用 (35)2.9.2 编辑行过滤 (35)2.10 行分组 (37)2.10.1 分组前后 (37)2.10.2 分组的作用 (37)2.10.3 分组的方式 (37)2.10.4 等值分组 (38)2.10.4.1 分组方式 (38)2.10.4.2 实现原理 (38)2.10.4.3 分组的结果 (39)2.10.5 值范围分组 (40)2.10.5.1 分组方式 (40)2.10.5.2 对于时间/纪元进行分割 (41)2.10.5.3 编辑起止列表 (42)2.10.5.4 实现原理 (43)2.10.5.5 分组的结果 (43)2.10.6 时间分组 (44)2.10.6.1 分组方式 (44)2.10.6.2 实现原理 (44)2.10.6.3 分组的结果 (45)2.10.7 表达式分组 (46)2.10.7.1 分组方式 (46)2.10.7.2 实现原理 (46)2.10.7.3 分组的结果 (47)2.10.8 条件分组 (48)2.10.8.1 分组方式 (48)2.10.8.2 实现原理 (48)2.10.8.3 分组结果 (49)2.10.9 行号分组 (50)2.10.9.1 分组方式 (50)2.10.9.2 实现原理 (50)2.10.9.3 分组的结果 (51)2.11 修改数据 (52)2.11.1 添加行 (53)2.11.2 赋值 (54)2.11.3 删除 (55)2.11.4 设置风格/标识异常值 (56)2.11.4.1 管理风格 (56)2.11.4.2 数据范围 (57)2.11.4.3 定义风格 (58)2.11.4.4 应用风格 (59)2.11.5 粘贴系统粘贴板的内容 (60)2.11.6 粘贴MyBox粘贴板的内容 (61)2.12 整理数据 (62)2.12.1 复制/过滤/查询/转换 (63)2.12.2 排序 (64)2.12.3 转置 (65)2.12.5 分割/分组 (67)2.13 数据计算 (68)2.13.1 行表达式 (69)2.13.2 描述性统计 (70)2.13.3 分组统计 (71)2.13.3.1 计算的选项 (71)2.13.3.2 分组数据 (72)2.13.3.3 统计数据 (72)2.13.3.4 图数据 (73)2.13.3.5 XY图 (74)2.13.3.6 饼状图 (75)2.13.4 简单线性回归 (76)2.13.4.1 实现的基础 (76)2.13.4.2 计算的选项 (76)2.13.4.3 回归 (76)2.13.4.4 模型 (77)2.13.4.5 拟合图 (78)2.13.4.6 残差图 (79)2.13.5 简单线性回归-组合 (80)2.13.6 多重线性回归 (81)2.13.6.1 回归 (81)2.13.6.2 模型 (82)2.13.7 多重线性回归-组合 (83)2.13.8 频数分布 (84)2.13.9 数值百分比 (85)2.14 数据图 (86)2.14.1 XY图 (87)2.14.1.1 数据 (87)2.14.1.2 条图 (88)2.14.1.3 堆叠条图 (88)2.14.1.4 线图 (89)2.14.1.5 散点图 (89)2.14.1.6 气泡图 (90)2.14.1.7 面积图 (91)2.14.1.8 堆叠面积图 (91)2.14.1.9 图数据的参数 (92)2.14.1.10 布局 (93)2.14.1.11 类别轴 (94)2.14.1.12 数值轴 (95)2.14.2 饼图 (96)2.14.3 箱线图 (97)2.14.3.1 计算方式 (97)2.14.3.2 数据选项 (98)2.14.3.3 统计数据 (98)2.14.3.4 图选项 (99)2.14.4.2 数据选项 (100)2.14.4.3 图选项 (100)2.14.5 相比较条图 (102)2.14.5.1 计算方式 (102)2.14.5.2 数据选项 (102)2.14.5.3 图选项 (102)2.14.6 XYZ图 (104)2.14.6.1 三维散点图 (105)2.14.6.2 曲面图 (106)2.14.7 位置分布图 (108)2.14.7.1 数据选项 (108)2.14.7.2 地图数据 (108)2.14.7.3 地图选项 (109)2.14.7.4 播放选项 (110)2.15 分组图 (111)2.15.1 通用处理 (112)2.15.1.1 数据分组 (112)2.15.1.2 分组结果 (113)2.15.1.3 图的显示选项 (114)2.15.1.4 播放选项 (114)2.15.2 分组数据 – XY图 (115)2.15.2.1 图的特定生成选项 (115)2.15.2.2 图的特定显示选项 (115)2.15.3 分组数据 – 饼图 (116)2.15.3.1 图的特定生成选项 (116)2.15.4 分组数据 – 箱线图 (117)2.15.4.1 图的特定生成选项 (117)2.15.4.2 图的特定显示选项 (117)2.15.5 分组数据 – 自比较条图 (118)2.15.5.1 图的特定生成选项 (118)2.15.5.2 图的特定显示选项 (118)2.15.6 分组数据 – 相比较条图 (119)2.15.6.1 图的特定生成选项 (119)2.15.6.2 图的特定显示选项 (119)2.16 输入数据 (120)2.16.1 加载系统粘贴板的内容 (120)2.16.2 导入示例 (121)2.16.2.1 个人数据 (121)2.16.2.2 中国的统计数据 (122)2.16.2.3 回归相关的数据 (123)2.16.2.4 位置数据 (124)2.17 输出数据 (125)2.17.1 导出 (126)2.17.1.1 数据源 (126)2.17.2 转换为数据库表 (128)2.18 管理数据 (129)2.19 拼接数据 (130)2.20 数据文件 (131)2.20.1 CSV文件 (131)2.20.2 文本文件 (132)2.20.3 Excel文件 (133)2.20.4 批量转换/分割数据文件 (134)2.20.5 合并数据文件 (135)2.21 系统粘贴板中数据 (136)2.22 MyBox粘贴板中的数据 (137)2.23 矩阵 (138)2.23.1 管理和编辑矩阵 (138)2.23.2 矩阵的一元计算 (139)2.23.3 矩阵的二元计算 (140)2.24 数据库表 (141)2.24.1 管理数据库表 (141)2.24.2 SQL标识符的限制 (142)2.24.3 数据库SQL (143)2.24.4 SQL查询 (144)3 脚本与表达式 (145)3.1 JShell(Java交互编程工具) (145)3.1.1 关于JShell (145)3.1.2 图形化运行JShell (145)3.2 JEXL(Java表达式语言) (147)3.2.1 关于JEXL (147)3.2.2 图形化运行JEXL (147)3.3 Javascript (149)4 数学函数 (150)4.1 定义函数: (150)4.2 计算函数 (150)4.3 数据集 (152)4.4 一元函数的XY图 (153)4.5 二元函数的XYZ图 (154)5 位置数据 (155)5.1 数据约束 (155)5.1.1 无效值 (155)5.1.2 坐标系统 (155)5.1.3 坐标值 (155)5.1.4 时间 (155)5.1.4.1 时间格式 (155)5.1.4.2 纪元 (155)5.1.4.3 有效的时间示例 (156)5.2 数据操作 (156)5.4 地理编码 (159)5.4.1 数据定义 (159)5.4.2 数据约束 (159)5.4.3 编辑数据 (159)5.4.4 定义条件 (159)5.4.5 导入数据 (159)5.4.5.1 内置的预定义数据 (159)5.4.5.2 CSV格式 (159)5.4.5.3 来自的位置数据: (160)5.4.6 设置 (160)5.5 地图上的位置 (161)5.6 位置工具 (162)6 其它 (163)6.1 编码条码 (163)6.2 解码条码 (163)6.3 消息摘要 (163)6.4 编码/解码Base64 (163)6.5 从ttc文件中提取ttf文件 (163)1 简介这是利用JavaFx开发的图形化桌面应用,目标是提供简单易用的功能。
AppBox配置使用指南
目录
一、安装 (3)
二、配置 (3)
三、安全加固 (10)
四、安全恢复 (10)
一、安装
在应用托管中心(AppBox)上安装AppBox-setup.exe,勾选“创建桌面快捷方式”,其他均使用默认安装选项,完成安装。
二、配置
1.点击桌面图标,对AppBox进行配置。
2.输入登录配置界面密码。
密码请联系我方工程师获得。
3.“服务器名”处填写所对应的堡垒机的ip地址,并勾选“使用SSL加密”,
SSL端口默认为443。
然后可以点击“点击打开浏览器访问服务器,测试
通信是否正常”来连接上方ip所对应的堡垒机。
“下一步”
4.App应用配置。
点击“新应用”添加新的App应用。
可以手动配置应用,也可使用预置的应用。
预置7项应用,包括SQLServer、Oracle、MySql、radmin、goglobal、IE。
此7项应用的“应用名”“应用程序路径”“代填程序”均已事先设置。
5.SQLServer应用配置
7.Oracle应用配置
8.MySql应用配置
注:MySql使用内置的”mysqlfront”访问,所以“应用程序路径”一栏为空。
9.radmin应用配置
10.goglobal应用配置
11.IE应用配置
12.完成应用配置之后,点击“下一步”进入“数据库审计配置”
选择相应的网络适配器,点击“完成”。
注:此时请不要点击“启动数据库审计服务”
13.完成后退出,再次点击点击桌面图标,来到“数据库审计配置”,
点击“启动数据库审计服务”,当服务运行状态变为如图所示时,表示数据库审计服务已经开启。
14.点击“完成”。
至此,应用托管中心(AppBox)上的配置全部完成。
三、安全加固
安装完成之后,请在cmd环境下,进入c:\vdesktop\,输入localconfig.exe /replaceshell,即可完成一键式安全加固。
四、安全恢复
安全加固完成之后,托管一个cmd,方法如下:
使用某运维用户登陆运维用户web界面,如下图所示:
点击应用中心后的图标,连接至应用中心。
点击虚拟应用中心,文件(F)中的配置,如下图:
输入密码,密码请与我方工程师联系获得。
启动之后可以看到应用中心的配置向导,点击下一步,跳过服务器配置,进入app应用配置界面,点击新应用,如下图:
点击后跳出如下图所示界面,输入如下图所示信息,
点击确定,之后一直下一步,知道向导结束。
退出应用托管中心。
使用管理员登陆运维管理审计系统管理web界面。
点击“应用服务”->“应用类型管理”,添加cmd管理类型。
如下图:
点击“应用服务”->“添加应用服务”,添加一个如下图所示的应用:
添加完成后,设置访问规则,确定某一用户能够访问cmd。
如下图所示:
使用该运维用户登陆运维用户web界面,如下图所示:
点击应用中心后的图标,连接至应用中心。
点击cmd图标,进入c:\vdesktop\,输入命令localconfig.exe /resumeshell,即可恢复到之前的安全性设置。
注意!完成安全加固与安全恢复操作,请尽快删除cmd应用及应用类型。