Valupak Maxon燃烧器 DYD
- 格式:pdf
- 大小:1.80 MB
- 文档页数:11

ANALYSEURS DE COMBUSTIONApplications industrielles / domestiques / tertiaireswww.sauermann.frAnalyseurs de combustionApplications industrielles / domestiques / tertiaires. Mesures sur tous combustibles.La gamme comprend trois instruments qui permettent de mesurer de nombreux gaz : O 2, CO, CO 2, NO, NO 2, SO 2 et/ou CxHy. Ils sont également dotés d’une application mobile et bénéficient de la fonctionnalité Bluetooth ®.Robustes, ergonomiques et compacts, lesanalyseurs de combustion sont faciles à utiliser. Leurs fonctions Tout-en-un : analyse des gaz de combustion, mesure du tirage, de la pression et de la température différentielle, surveillance duCO ambiant en font un partenaire idéal.Si-CA 120Si-CA 220Si-CA 320Imprimante sans-fil ApplicationsPC et mobile• Remplacement des pièces mécaniques*• Remplacement des pièces électroniques*• Remplacement des cellules**Non inclus : coûts d’envoi au fabricant, sonde et flexible, éléments manquants, consommables (filtres et pot à• Remplacement des piècesmécaniques*• Remplacement des piècesélectroniques*• Remplacement des cellules*• Rappel automatique de la dated’étalonnage• Rappel annuel de l’appareil• Main d’oeuvre• Certificat d’étalonnage Garantie 5 ans en optioncomprenant :Entretien 5 ans en optioncomprenant :ParamètreCelluleGamme de mesureRésolution ExactitudeSi-CA 120Si-CA 220Si-CA 320Références Si-CA 220Références Si-CA 320Normes et directives • NF EN 50379-1• NF EN 50379-2• 2012/19/UE DEEE• 2011/65/UE RoHS 2Sonde standard Si-CA 120• Sonde 180 mm • 400 °C max• Tuyau double de 1.5 mSonde standard Si-CA 220 et 320Contenu des Kits• Sonde 300 mm • 800 °C max • Tuyau double de 3 m• Batterie longue durée rechargeable & chargeur CA • Sonde et tuyau de prélèvement de gaz • Pot à condensat avec cartouche filtrante• Coque de protection aimantée • Logiciel PC & câble USB • Manuel d'utilisation & Guide rapide• Certificat de calibration • Sac de transport• Garantie 2 ans (analyseur et cellules)Sonde longue Si-CA 220 et 320• Sonde 750 mm • 800 °C max • Tuyau double de 3 mSonde longue Haute temp. & tuyau Si-CA 220 et 320• Sonde 1 m • 1200 °C max• Tuyau double 3 mExtensions de tuyau• 3 m de longueur disponibleOptionsApplicationsPC et mobile• Affichage des données d’identification de l’instrument.• Configuration de l’instrument.• Affichage à distance de l’analyse en temps réelprovenant de l’analyseur portable et sauvegarde des données acquises.• Affichage et/ou exportation ou suppression des analyses en mémoire.• Lecture des données en temps-réel • Sauvegarde des données • Création de rapports • Scanner de QR codeMobilePCServicesEtalonnage / Hotline / Maintenance En complément de notre gamme d’instruments de mesure, une équipe de plus de 40 personnes propose un large éven-tail de prestations : d’étalonnage et vérifications, après-。

奥林燃烧器说明书(总51页) -CAL-FENGHAI.-(YICAI)-Company One1-CAL-本页仅作为文档封面,使用请直接删除操作和维护说明书 燃气燃烧器GP-130 H GP-130 T GP-140 H GP-140 T GP-150 H GP-150 TOILON OYFIN-15801 LAHTI FINLAND +358-3-85 761 FAX +358-3-857 623940119817GB目录1. 本书常用语................................................................................................. (1)2. 概述................................................................................................. (2)3. 燃烧器技术参数................................................................................................. (4)4. 燃烧器的安装 ................................................................................................ (6)4.1. 燃烧器的安装....................................................................................................... (6)4.2. 铰接燃烧器外壳 ...................................................................................................... (6)4.3. 电路连接 ...................................................................................................... (6)4.4. 供气管路安装示例....................................................................................................... (6)4.5. 气压调节装置....................................................................................................... (8)5. 燃烧器运行................................................................................................. (9)5.1. 二段式燃烧器(”H”型) .......................................................................................... (9)5.2. 三段式燃烧器(”T”型) .......................................................................................... (12)6. 燃烧器自动控制................................................................................................. (14)6.1. 时序图, ”H”型 ........................................................................................... (14)6.2. 运行 ........................................................................................... (15)6.3. 时序控制图, ”T”型 ........................................................................................... (17)6.4.运行 ................................................................................................................................... 18 7. 燃烧器的调节 ........ ........... ........... ........... ........... ........... ........... ........... ........... ........... ........... (21)7.1.负荷调节 ............................................. (21)气阀(连体) MB-ZRDLE, 二段式燃烧器(”H”型) (21)连体阀 ZRDLE, 二段式燃烧器(”H”型) (22)三段火燃烧器(“T”型) ..................................................................................... (23)7.2. 燃烧空气调节,可调凸轮 ........................................................................................... (24)7.3. 燃烧空气调节............................................................................................ (25)二段火燃烧器(”H”型) ..................................................................................... (25)三段式燃烧器(”T”型)...................................................................................... (26)7.4. 燃烧头调节............................................................................................ (27)7.5. 燃烧头拆卸 (29)和 GP-140 H/T (29) (30)7.6. 拆卸气体喷嘴 (31)7.7. 燃烧器马达更换说明 (32)7.8. 安装控制设备 (33)7.9. 压力开关 (33)气体压力开关 (33)空气压差开关 (34)8. 开关面板 (35)9. 气体检漏器 (36)9.1. VPS 504 (36)9.2. VDK 200 A S02 (37)运行 (37)安装 (38)电路连接 (38)管子连接点 (38)9.2.5. 技术参数 (38)10. 控制装置 LFL1.322 (39)10.1. 内部回路 (39)10.2. 主程序图 (40)10.3. 失效状态及锁定指示控制程序 (41)40119817GB10.4. 火焰探测器QRA..的探测电流和连接 (42)10.5. 技术参数 (42)11. 维修... (43)12. 失效状态及程序 (44)13. 说明... (47)40119817GB1. 本书常用语 1在安装、使用和维修燃烧器之前,先认真阅读说明,对于指定的说明,心须遵守。

麦克森XPO™低温燃烧器,适用于间接液体加热应用,包含:MAXON XPO™ burners are low temperature burners for use in liquid backed applications, including:XPO™燃烧器要求很低的过剩空气,所以运行效率高。
其设计旨在更方便地对现有的液体加热应用进行改造。
XPO™ burners provide high efficiency operation with low excess air requirements. They are designed for ease of retrofitting into existing liquid backed applications.XPO™燃烧器有两种基础版本可供选择:XPO™ burners are available in two basic versions: 配备整体风机的一体式燃烧器(PB )版本Packaged (PB) with integral combustion air blower为扩大燃烧能力,使用外部气源的外部风机(EB )版本External blower (EB) for use with an externalcombustion air source for extended capacities无论是一体式版本(PB )还是外部风机版本(EB ),其风管长度均有两种不同选择:610毫米或1220毫米。
火管长度的选择,可根据穿墙深度或火管的非液体冷却部分长度。
Both packaged (PB) and external blower (EB) versionsinclude two different choices for blast tube lengths.A 2 foot or 4 foot long blast tube is available. Blasttube length should be selected based on the wallpenetration depth or non-liquid cooled portion of firetube.一体式版本(PB )中包含了风机电压和空/燃比控制执行器。

Co-Linear Venting—existing fireplace cavity66-1/4”3” intake4” exhaust collar on the centerline3” min. bend radius for intake liner and Installation Into Existing Fireplace CavityThe appliance must not be connected to a chimney fl ue serving a separate solid-fuel burning appliance.Requires the Valor Co-Axial to Co-Linear appliance Adapter 1156CLA, two lengths of 2-ply fl exible chimney liner both approved for venting gas appliances: one 3” diameter liner for intake and one 4” diameter liner for exhaust, a 3 x 4 co-linear termination kit and fl ashing. Firebox zero clearance stando ff s supplied with the heater may be removed to suit this application .Rules for Co-Linear Venting• Maximum 40 feet vertical pipe• Minimum 10 feet vertical • Maximum o ff set 8 feet with liners at minimum 45 degrees from horizontal plane• Restrictor: Not required when using co-linear venting.InstallationFor installation of the adapter to the appliance, see the instructions supplied with the 1156CLA.Note: Co-linear fl exible aluminum venting should be professionally inspected periodically for corrosion and damage and replaced when necessary. If the installation does not allow for future inspection or replacement of the fl exible aluminum venting, then stainless steel vent liners should be used.Note: Co-linear portion of vent system may only be installed within a solid-fuel burning fi replace and chimney.collar adapterREAR1156CLA Co-Linear Vent AdapterCo-Linear Venting partially into existing cavityFlashing1 x 3”intake liner and 1 x 4”exhaust liner3” min. bend radius for intake liner and 4” min. bend radius for exhaust liner3” intake 4” exhaust liner1156Co-linear adapterEngineApproved 3 x 4co-linear termination Clearances to combustible materials listed elsewhere in thismanual applyFramed wallCo-Linear installation partially into existing fi replaceNote: Co-linear fl exible aluminum venting should beprofessionally inspected periodically for corrosion and damage and replaced when necessary. If the installation does not allow for future inspection or replacement of the fl exible aluminum venting, then stainless steel vent liners should be used.Note: Co-linear portion of vent system may only be installed within a solid-fuel burning fi replace and chimney.Installation Partially Into Fireplace CavityThe appliance can be adapted to co-linear applications using an existing chimney. The appliance must not be connected to a chimney fl ue serving a separate solid-fuel burning appliance.Requires the Valor Co-Axial to Co-Linear appliance Adapter 1156CLA, 46DVA-GCL34 or equivalent, two lengths of 2-ply fl exible chimney liner both approved for venting gas appliances: one 3” diameter liner for intake and one 4” diameter liner for exhaust, a 3 x 4 co-linear termination kit and fl ashing.The appliance must be fully enclosed while maintaining clearances to combustibles detailed elsewhere in this manual.Rules for Co-Linear Venting• Maximum 40 feet vertical pipe • Minimum 10 feet vertical • Maximum o ff set 8 feet with liners at minimum 45 degrees from horizontal plane• Restrictor: Not required when using co-linear venting.Co-Linear Venting into existing adjacent chimneyNote: Co-linear fl exible aluminum venting should be professionally inspected periodically for corrosion and damage and replaced when necessary. If the installation does not allow for future inspection or replacement of the fl exible aluminum venting, then stainless steel vent liners should be used.Note: Co-linear portion of vent system may only be installed within a solid-fuel burning fi replace and chimney.Installation Into Existing Adjacent ChimneyThe appliance can be adapted to co-linear applications using an existing chimney. The appliance must not be connected to a chimney fl ue serving a separate solid-fuel burning appliance.Requires the Co-Axial to Co-Linear appliance Adapter 46DVA-34CLAA or equivalent, two lengths of 2-ply fl exible chimney liner both approved for venting gas appliances: one 3” diameter liner for intake and one 4” diameter liner for exhaust, a 3 x 4 co-linear termination kit and fl ashing.The appliance must be fully enclosed while maintaining clearances to combustibles detailed elsewhere in this manual.Rules for Co-Linear Venting• Maximum 40 feet vertical pipe• Minimum 10 feet vertical • Maximum o ff set 8 feet with liners at minimum 45 degrees from horizontal plane• Restrictor: Not required when using co-linear venting.Framed wall med lFlashing2 x 3”liners3” min.bend radiusCo-linear liners46DVA-CLAA (or 46DVA-GCL)Co-linear adapterEngineterminationInstallation using 46DVA-CLAACo-Linear Venting—Example of accessories46DVA-GCL34Co-linear Termination Kits46DVA-34CLAACo-linear Terminal ConfigurationsCo-axial to Co-linear Appliance Adapters10”10”CollarscollarFlashing KitCo-Linear Terminal (typical).A 3” - 4”adapter may be usedfor exhaust liner.Co-axial Terminal CapCo-Linear to Co-With...Alternate Co-linear to Co-axial Conversionat TerminalNote: Co-linear fl exible aluminum venting should beprofessionally inspected periodically for corrosionand damage and replaced when necessary. If theinstallation does not allow for future inspection orreplacement of the fl exible aluminum venting, thenstainless steel vent liners should be used.。
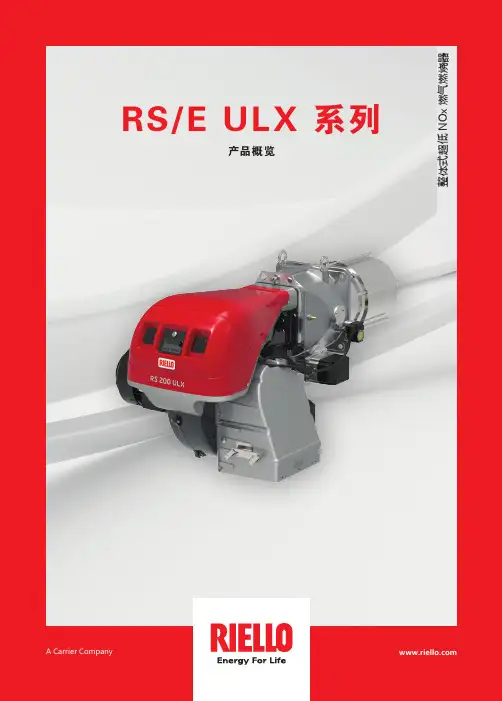
整体式超低 N O x 燃气燃烧器RS/E ULX 系列产品概览A Carrier Company RS/E ULX 系列 | 整体式超低 NOx 燃烧器氮氧化物排放能够低于40mg/Nm 3 @ 3,5% O 2(无 FGR, 需要合适的炉膛尺寸)对于一些应用,NO x 排放可以达到 30mg/Nm 3 @ 3.5% O 2 以下,但需要利雅路工程师确认。
超低 NOX整体式燃气燃烧器RS 68 - 510/E ULX 系列2RS 68/E ULXRS 120/E ULXRS 200/E ULXRS 310/E ULXRS 510/E ULX3RS/E ULX 系列 | 整体式超低 NOx 燃烧器为了满足日益增长的对极低 NOx 排放的要求,利雅路基于创新的 ULX 燃烧技术,开发了整体式的新系列燃烧器。
ULX 燃烧技术可以控制燃烧过程中产生的烟气量,从而达到最严格的排放限制。
在无需FGR装置以及从烟囱到燃烧器管道的情况下,ULX 燃烧技术可以使得氮氧化物排放低于40mg/Nm3 @3.5% O2 (无FGR,需要合适的炉膛尺寸)。
对于一些应用,NOx排放可以达到30mg/Nm3 @ 3.5% O2 以下,但需要利雅路工程师确认。
近年来,由于污染大幅度增加,全球各地特别是所有高度工业化国家,都对产品的性能、能效和排放物的减排更加关注。
ULX 燃烧技术—环境可持续发展的新里程碑新型 ULX 燃烧头采用燃气分级燃烧和废气内部再循环技术,极大地降低了 NOx 排放。
这种新型燃烧头体现了利雅路产品一贯的坚固性和可靠性。
集成的燃烧器数字控制系统,通过独立的伺服马达,可以控制每个出力点的空气和燃料比例,以达到非常低的 NOx 排放,同时使燃烧器保持极高的运行可靠性和安全性。
4>使用 ULX 燃烧技术后,无需再安装 FGR 系统通常所需要的管道系统,因此燃烧器的安装也更加方便。
>无需在锅炉房中安装管道,可以节省空间、时间和安装成本。

H5 + H6NEW V-CLASS BURNER MAXIMIZES RADIANT HEAT TECHNOLOGY.OF W ARMTH ™RADIANT HEATWe put radiant warmth i nto every fire. You can feel it.ADJUSTABLE HEATAdjustable flame for constant, even warmth without having to cycle the fire on and off.CERAMIC GLASSDurable and robust ceramic glass improves radiant performance.REALISTIC LOGSHigh definition, low mass fiber ceramic logs heat up and glow quickly, radiating warmth.ALUMINIZED STEELLightweight, high temperaturea luminized steel firebox delivers efficient warmth and prevents rust and wear.EFFICIENCYRadiant heat and zone heating technology are up to 30% more e fficient than central forced air systems.CONVECTIVE HEATSecondary heat exchanger naturallyimproves convective heat—without a fan.ENHANCED FLAMEOur fires create realistic, soothing flames and ambient glowing e mbers that radiate heat.HeatShift TM SYSTEMValued artwork, a TV or construction materials stay cooler despite the heat of our fireplaces.V-CLASS BURNERThe high temperature precision stainless steel of our new V-Class burner creates a new level of radiant fire and aesthetics.SAFETYOur fires are put throughr igorous safety testing in our in-house CSA approved lab.H5A large format fireplace, compact in design, with a generous viewing area— fits where the H6 can't.H6BIRCH 1400BLKFLUTED BLACK LINER 1425FBL CLEAN INSTALL KIT 1430CIK HEATSHIFT 38" LDK4 + LDK5LINERSLiners may vary in appearance, depending on whether the fire is on or off, and what fire bed you choose.H5BIRCH 1100BLKPLAIN BLACK LINER 1160PBL CRAFTSMAN AGED STEEL 1184ECASFINISHESWhether it's a powder-coated or plated trim, ourfinishes are made to last.Ask your Valor dealerto see a finish samplein person.CRAFTSMANAGED STEELCRAFTSMANPEWTERBLACKZERO CLEARANCE (ZC)Always a great addition to yournew home or majorreno. H5 OK as an insert too!HEATSHIFT TM H6TRADITIONAL LOGS 1400LSKV2PLAIN BLACK LINER 1460PBLCLEAN INSTALL KIT 1430CIKHEATSHIFT 48" LDK1 + LDK2 Find out more at /heatshiftDo everything you can do with your Valor 10 remote—and more—with our Valor 10 app.DIMENSIONS Header4-3/8”(110 mm)non-combustible boardHD• Total length of vent pipe can't exceed 40 feet.• Minimum vent rise after first elbow: H5, 12" minimum; H6, 24" minimum.• Maximum of 4 x 90 degrees elbows orequivalent (2 x 45 degrees—90 degrees).•Colinear venting into existing chimneys with H5.OPTIONSCopyright Miles Industries Ltd. 2023 Designed and manufactured by Miles Industries Ltd.。

豪麦德甲醇燃烧器工作原理:豪麦德甲醇燃料燃烧器采用独家专利技术最先进的分离式甲醇泵,可耐腐蚀及橡胶融
涨特性,稳定性强、适用用间断式工作方式,不会因为机器放置时间长而出故障(同电磁泵燃烧器比较);甲醇燃料燃烧器的头部是实现喷甲醇雾化、点火、燃烧的部分,它由燃烧头、旋流器、甲醇喷嘴、点火电极、送风短管等组成。
从风机送来的助燃空气由送风短管进入燃烧机头部,在流入燃烧头烧,在燃烧头内形成一个高温烟气的回流区,它对稳定火焰起着极为关键的作用,当经过旋流器的空气占助燃空气的比例越高,则火焰的稳定性越好,能实现真正达到〞零排放〝的理想境界.
豪麦德甲醇燃烧器安全性能:本着安全生产的原则,豪麦德甲醇燃烧器除了本身配备了安全电磁阀、安全控制器外还率先对最容易故障漏油的甲醇泵采用与燃烧器本体分离
的制作工艺;本分离式甲醇泵由专利结构体及变频电动机构成,主要用于配套的豪麦德甲醇燃烧器广泛应用于烤漆房车间、锅炉房、焚烧炉、热风炉等,分离式甲醇泵的有效输送距离可达100米,可远离火源是保证生产和人身安全的重要设备。
豪麦德甲醇燃烧器可应用在各种工业燃烧上使用: (一)
暖房(二)制腌用(三) 储槽加热(四) 热处理用(五)镀锌用(六) 掺碳用(七) 模铸用(八) 心线烤干用(九) 模具干燥(十) 纺织品处理(十一) 锌网版印刷(十二) 铸造用(十三)延压用(十四) 陶瓷窑(十五) 空间加热用(十六)熔解炉(十七) 压铸炉(十八) 粉体烤漆
豪麦德甲醇燃烧器规格: 本公司出产的甲醇燃烧器共有
高压喷雾式、气压喷雾式、虹吸汽混式、..等不同机型,从20万大卡到800万大卡均能应满足客户各种不同须求, 另外可配合客户需求搭配氧气、氢气、纳米催化剂或是天然气、柴油等多燃料混合使用,是实现工业锅炉节能减排最专业产品。

Modular Boiler Submittal DataA Caravan modular boiler system consists of two or more compact cast-iron boilers that offer significant advantages in terms of installed cost, efficiency and reliability.Caravan systems are based on step-firing just enough modules to meet heatingdemands. GXHT systems are available in 600,000 to multi-million Btuh gross input.For additional information, see Caravan Engineering Manual, pub. C-30.Standard EquipmentOne per module unless otherwise noted Pre-assembled cast-iron heat exchanger with insulated jacket.Base.Flue Collector.Gas burners, gas orifices and manifold assembly.Combination gas valve including manual shutoff and pressure regulator.System pressure gauge and siphon (unmounted, one per system).Module pressure gauge and siphon (unmounted).Optional EquipmentVent dampers.Internal tankless heater.ASME Package—includes:MM PS-802 Low water cutoff (67 iftankless coil is used) (one per module)PA404A Pressure control (one per mod.)ASME REQUIRED STEAM SYSTEM CONTROLS (One per bank)Order Separately.67M Low water cutoff (one per system)L4079B Manual reset pressure control (one per system)Module pressure gauge and siphon (unmounted).Module pressure relief valve (ASME)(unmounted). 15 psi.Draft hood (unmounted).Drain cock (unmounted).Water level sight glass (unmounted).Spark ignition system.GXHT SERIES—Gas-fired/SteamGXHT -600HZ ¶260047881.00358149214.7816.812153"GXHT -900HZ ¶390071781.00537223821.4225.218053"GXHT -1200HZ ¶4120095681.00716298328.5633.623955"GXHT -1500HZ ¶51500119581.00895372935.7042.029856"Model No.*No. of ModulesInput MBHGrossOutput MBH NetOutput MBH †Sq. Ft.Steam ‡Horse-powerBoiler Water Content (gal.)Recom-mended Header SizeWeight with WaterThermal CombustionEfficiency Ratings for Natural and L.P . Propane GasesCSAAHRI FOR LARGER SIZES, USE MULTIPLES OF THE ABOVE.†Net ratings are based on piping and pick-up allowance of 1.33. Slant/Fin should be consulted before selecting a boiler for installation having unusual piping and/or pick-up requirements. Ratings must be reduced by 4% at 2,000feet elevation and additional 4% for every additional 1,000feet elevation over 2,000 feet.‡Net ratings in square feet based on emission rate of 240 Btuh/sq.ft. at 215°steam temperature.¶For use with natural gas. For L.P . Propane consult factory.Modules in excess of 5 should be piped in parallel in two or more banks.®SLANT/FIN CORPORATION, Greenvale, N.Y. 11548 • Phone: (516) 484-2600FAX: (516) 484-5921•Canada: Slant/Fin LTD/LTEE , Mississauga, OntarioMax. ASME Working Pressure:15 psiPower Requirements:120 volts, 60 HZ,.34 amps per moduleModel No.Dimensions*GXHT -600HZ-2261⁄16591⁄891117⁄324'-111⁄8"GXHT -900HZ-3261⁄16591⁄891117⁄327'-83⁄16"GXHT -1200HZ-4261⁄16591⁄891117⁄3210'-51⁄4"GXHT -1500HZ-5261⁄16591⁄891117⁄3213'-25⁄16"ALBCD* Inches, except “L ” which is feet/inches.。


Inspired by contractors.Typical 14 hourrun time with standard Li-Ion rechargable or use 4x AA batteriesor AC power .Organize records in folder structure for later viewing and downloads.1000 Memory2- Holds up to 4 sensors at once.- Automatic Sensor Protection.- CO-H2 compensatedof 10,000 ppm.- Smart Sensors: Includes a chip to tell the instrument the gas and calibration curve.Advanced®and easy-to-see results.Large Color text, bar graph, tile or trending format making it easier to interpret results.Enhanced Data Includes common fuels like natual gas, oil, propane and kerosene.10 Standard Fuels cal gases with simple, pre-cali-brated sensor exchange using Near Field Communication (NFC).B-SMART ®Pre-Calibrated PRODUCT SHOWN ACTUAL SIZEPCA 400 Portable Combustion & Emissions Analyzeror VITON TM tubing formost accurate NOx and SOx measurements.Sample Lineextended 15 ft sample lines.Sample Line Length OptionsInspired By Contractors.You spoke. We listened. SoBacharach delivered the PCA 400, an easy-to-use, feature-rich industrial combustion analyzer.Designed By Bacharach.The PCA 400 was designed for a wide variety of combustion applications. Whether tuning boilers or spot-checkingemissions, it provides accurate,reliable, repeatable results in a cost-effective package.Built on Reputation.Bacharach’s reputation includes over 100 years of American made products and ingenuity. This foundation combined with our extensive combustion analysis experience, brings the PCA 400 to life.Provides a quick, simple robust con-nection to the analyzer.4Data can be viewed in list (text), tile, bar graph and trending formats to easily analyze yourinformation and results. You can further customize the PCA 400 to show all the parameters in the order you prefer.Enhanced Data Viewing CapabilitiesTHE COMPLETE SOLUTION . . . FOR PORTABLEThe PCA 400 provides accurate readings for CO, O NO with our standard probe. Optional Viton and thermo-electric sample conditioner ensure accu-rate results in any application including NO measurements.Sample Conditioning for Accurate Measurements1Windows PCs, Android and iOS devices only. See website for details.5Rugged and ReliableDesigned for commercial and industrial environments, the PCA 400 is rugged and reliable for everyday use. With a rugged one-step probe connection and automatic sensor protection to extend the safe operating range the PCA 400 remains ready at your side.Bacharach’s B-SMART™ pre-calibrated sensorseliminate field calibrations. or allow the user to add a new sensor type in the field. With NFC technology, in -stalling a B-SMART™ sensor takes just a few seconds. The B-SMART™ exchange program is available so you don’t have to remember when your instrument needs calibration.B-SMART™ Pre-Calibrated Sensors Easy to Service and MaintainThe PCA 400 is designed to make maintenance easy. With quick access to sensors, batteries, probes and other consumable parts, cost of ownership and down time are significantly reduced.Multiple Sensor OptionsThe PCA 400 can be configured with up to 4 gas sensors. Pick from the CO-H 2 compensated or CO high-range sensor, then add NO, NO 2 and SO 2 asneeded. NOx is calculated from the NO reading if NOx and SOx are both required.COMBUSTION AND EMISSION ANALYSISHigh-Flow Pump with Fresh Air PurgeFor the toughest applications the PCA 400 has options to enable a higher pump flow and perform fresh air sensor purges while the probe is still in the flue.6From commercial boilers to the oil and gas industry —Bacharach’s PCA 400 is designed for you.The PCA 400 is perfect for spot-checking and tuning your engines with the high range CO sensor (with dilution capabilities for CO of up to 80,000 ppm ensuring the sensor is not overranging) and available sample conditioner. Whether it’s natural gas, stationary gensets or mobile diesel fleet vehicles, monitoring your emissions is fast, easy and accurate.ENGINES:The PCA 400 offers you everything you and your technicians need to commission,tune, maintain and certify any boiler, anywhere. With customized reporting and a simple user interface, boiler tuning and commissioning has never been so simple.COMMERCIAL AND INDUSTRIAL BOILERS:Whether gearing up for a compliance test or doing a quick spot check, the PCA 400 is always at the ready. Bluetooth ® data streaming and customizable reporting options provide all of the necessary information for reliable test reporting.MIDSTREAM OIL AND GAS:SPECIFICATIONSATTRIBUTE DESCRIPTIONDisplay 4.3 in. (10.9 cm) color touch panel LCDPower Rechargeable Li-Ion battery pack, 4x AA batteries or wall adapter (5V USB)Run Time 12 to 14 hours (typical, w/ included LI-Ion battery pack)Size (HxWxD) 10 x 3.8 x 2.5 in, (25.4 x 9.7 x 6.4 cm)Weight 1.5 lb. (0.68 kg) w/ Li-Ion battery packFuels (1) Natural gas, coal, oil 2-4 or 6, propane, wood/biofuel, kerosene, bagasse, digester gas, B5, pellets, KOKS, LEG, LPG,butane, wood chips Warm-up Time 60 secondsMemory1,000 sets of recordsCommunications USB 2.0 (micro-B), IrDA, Bluetooth ® 4.0 Approvals CE MarkWarranty2 years for instrument, 5 years for O 2 sensor Sample Flow Rate 0.6 to 0.7 L/min (standard)1.0 L/min (high flow mode)Storage Conditions 20 to 50° C (-4 to 122° F), 15 to 90% RH, non-condensing, 1 Atmosphere ± 10%,Normal Operating 0 to 45° C (23 to 113° F), 15 to 95% RH, non-condensing, 1 atmosphere ± 10%,Conditions(1)Depending upon combustion equation setting (North American or Siegert) - see manual for details7MEASUREMENTSO 2 0 to 20.9 %0.1% +/- 0.3% (on flue gas) T90 < 20 sec Standard CO-H 2 compensated 0 to 10,000 ppm 1 ppm +/- 10 ppm (0 to 200) T90 < 40 secOptional+/- 5% of reading (201 to 2,000) +/- 10% of reading (2,001 to 10,000)CO (high) 0 to 40,000 ppm 10 ppm +/- 10 ppm (0 to 100) T90 < 75 sec Optional +/- 10% of reading (101 to 40,000)NO 0 to 3,000 ppm 0.1 ppm (0 to 50) +/- 3 ppm (0 to 50) T90 < 75 sec Optional +/- 5% (51 to 2000) 1 ppm (> 50) +/- 10% of reading (> 2000)NO 2 0 to 500 ppm 0.1 ppm (0 to 50) +/- 3 ppm (0 to 50) T90 < 40 secOptional1 ppm (> 50) +/- 5% (51 to 500) SO2 0 to 5000 ppm 1 ppm +/- 10 ppm (0 to 200) T90 < 30 sec Optional+/- 5% of reading (201 to 2,000) +/- 10% of reading (2001 to 5000)Ambient -20 to 537 °C 0.1 °C +/- 1 °C (0 to 100 °C) T90 < 70 sec Standard Temperature (-4 to 999 °F) (0.1 °F)Stack -20 to 1200 °C 1 °C +/- 2 °C (0 to 124 °C) T90 < 50 secStandardTemperature (-4 to 2192 °F) (1 °F) +/- 3 °C (125 to 249 °C) +/- 4 °C (250 to 400 °C)Differential +/- 600 °C 0.1 °C N/A N/A Standard Temperature (+/- 1112 °F) (0.1 °F) Pressure +/- 179 mB 0.01 mB +/- 0.03 mB (-1 to 1 mB) N/AStandard/ Differential (+/- 72 inwc) (0.01 inwc) +/- 0.05 mB (from -2.5 to -1 and +1 to +2.5) Pressure +/- -3% of reading (from 100 to -2.5 and +2.5 to +100)Flow 0 to 1 LPM0.05 LPM +/- 0.1 LPMN/A StandardCALCULATED READINGSEfficiency (HHV) 0.1 to 100% 0.1% North American, Siegert CO 2 (dry basis) 0.1 to a fuel dependent max in % 0.1%North American, Siegert NO x 0 to 3500 ppm 0.1 ppm (0 to 50) North American, Siegert 1 ppm (> 50) CO Ref to O 2 0 to 9999 ppm 1 ppm North American, Siegert NO Ref to O 2 0 to 9999 ppm 1 ppm North American, Siegert NO 2 Ref to O 2 0 to 9999 ppm 1 ppm North American, Siegert NO x Ref to O 2 0 to 9999 ppm 1 ppm North American, Siegert SO 2 Ref to O 2 0 to 9999 ppm 1 ppm North American, Siegert Excess Air 1 to 250% 1% North American CO/CO 2 Ratio 0.0001 to fuel dependent max 0.0001 Siegert ETA (LHV) 0 to 115% 0.1% Siegert Stack Loss 0.1 to 100% 0.1% Siegert Lambda 1 to 9.550.01Siegert8Bacharach621 Hunt Valley Circle,New Kensington, PA 15068 USA|********************Ordering Information1 = CO-H 1 = 7.5 ft. STD tubing2 = 15 ft. STD tubing3 = 7.5 ft. VITON tubing4 = 15 ft. VITON tubing2 = 24 in. probe3 = 36 in. probe2410-1110PCA 400 w/ O 2, CO, 12 in. probe with 7.5 ft. STDtubing and standard case2410-1112 PCA 400 w/ O 2, CO, 12 in. probe with 7.5 ft. STD tubing, standard case and Bluetooth ® printer 2411-1110 PCA 400 w/ O 2, CO, NO, 12 in. probe with 7.5 ft. STD tubing and standard case2411-1112 PCA 400 w/ O 2, CO, NO, 12 in. probe with 7.5 ft. STD tubing, standard case and Bluetooth ® printer2412-1310 PCA 400 w/ O 2, CO, NO, NO 2, 12 in. probe with 7.5 ft. VITON TM tubing and standard case2412-1312 PCA 400 w/ O 2, CO, NO, NO 2, 12 in. probe with 7.5 ft. VITON M tubing, standard case and Bluetooth ® printer2413-1310 PCA 400 w/ O 2, CO, NO, SO 2, 12 in. probe with 7.5 ft. VITON M tubing and standard case2413-1312 PCA 400 w/ O 2, CO, NO, SO 2, 12 in. probe with 7.5 ft. VITON M tubing, standard case and Bluetooth ® printerAccessories0024-1400 Bluetooth ® printer kit 0021-7006 Tru Spot ® Smoke Kit0104-1797 Thermocouple - 10 ft. for combustion air temperature0104-1798 Thermocouple - 1 in. for ambient air temperature 0024-8242 Differential Pressure and Temperature Kit 0024-3150 High-temperature particulate filterProbe and Hose Assemblies0024-3231 Probe Handle Assembly with 12 in. probe tube 0024-3232 Probe Handle Assembly with 24 in. probe tube 0024-3233 Probe Handle Assembly with 36 in. probe tube 0024-3234 Hose Assembly, Standard tubing, 7.5 ft 0024-3235 Hose Assembly, Standard tubing, 15 ft. 0024-3236 Hose Assembly, Viton TM , 7.5 ft.0024-3237Extended Hose Assembly, Viton TM , 15 ft.Common Configurations For more information about the PCA 400 and other Bacharach products scan here.HOW TO CONTACT US:Bacharach US Customer Service: +1 724 334 5000Bacharach EU Customer Service: +353 1 284 PCA 400 is a trademark of Bacharach, Inc.。
24 Napoleon Road, Barrie, Ontario, Canada L4M 0G8 • 214 Bayview Drive, Barrie, Ontario, Canada L4N 4Y8Fireplaces, Heating and Cooling: 705-721-1212 • Grills: 705 726-4278 • ASCENT™ 30 DIRECT VENT GAS FIREPLACEW415-1883 / 10.25.18SpecificationsFront OptionsRough Framing Finish FramingABMinimum rough framing dimensions14 1/2” * (36.8cm)DESSUS DE L’ENCEIN TE1 13/16"46mmDESSUSDE L’ENCEIN TEMATÉRIAU DE FINITIONRACCORDE MENT ÉLECTRIQU EEMPLACEM ENT DE L’ENTRÉE DU GAZ18 9/16"471mm6 15/16"176mmm EMPLACEM ENT DE L’ENTRÉE DU GAZ76mmm m35 1/2"902m m35"889mm24 Napoleon Road, Barrie, Ontario, Canada L4M 0G8 • 214 Bayview Drive, Barrie, Ontario, Canada L4N 4Y8Fireplaces, Heating and Cooling: 705-721-1212 • Grills: 705 726-4278 • ASCENT™ 30 DIRECT VENT GAS FIREPLACEProduct information provided is not complete and is subject to change without notice. Please consult the installation manual for the most up to date installation information.W415-1883 / 10.25.18[25mm-254mm]ÉVENTSCOMBUSTIBLEDo not put objects in front of the appliance(minimum distance of 4 feet)24 Napoleon Road, Barrie, Ontario, Canada L4M 0G8 • 214 Bayview Drive, Barrie, Ontario, Canada L4N 4Y8Fireplaces, Heating and Cooling: 705-721-1212 • Grills: 705 726-4278 • FOYER À GAZ VENTILÉ DIRECTE ASCENT MD30W415-1883 / 10.25.18SpécificationsFaçades DécorativesOssature approximatif Ossature finiABMinimum rough framing dimensions14 1/2” * (36.8cm)DESSUS DE L’ENCEIN TE1 13/16"46mmDESSUS DE L’ENCEIN TEMATÉRIAU DE FINITIONRACCORDE MENT ÉLECTRIQU EEMPLACEM ENT DE L’ENTRÉE DU GAZ18 9/16"471mm6 15/16"176mmm EMPLACEM ENT DE L’ENTRÉE DU GAZ76mmm m35 1/2"902m m35"889mmFOYER À GAZ VENTILÉ DIRECTE ASCENT MD30Information du produit fourni n’est pas complet et est sujet de changer sans préavis. Consultez le manuel d’installation pour info-formation d’installation actuel.W415-1883 / 10.25.18Do not put objects in front of the appliance(minimum distance of 4 feet)。
OPERATING, INSTALLATION,SERVICE & PARTS MANUALFOR MEDIUM DUTYGAS CHAR BROILERSMGB-A SERIESVULCAN-HART COMPANY, P.O. BOX 696, LOUISVILLE, KY 40201-0696, TEL.(502)778-2791MGB-A OPERATING, INSTALLATION, SERVICE & PARTSMGB-A OPERATING, INSTALLATION, SERVICE & PARTS IMPORTANT NOTES FOR ALL VULCAN APPLIANCES1.These units are produced with the best possible workmanship and material. Proper installation is vital if bestperformance and appearance are to be achieved. Installer must follow the installation instructions carefully. rmation on the construction and installation of ventilating hoods may be obtained from the “Standard for theinstallation of equipment for the removal of smoke and grease laden vapors from commercial cooking equipment,”NFPA No 96 (latest edition) available from the National Fire Protection Association, Battery March Park, Quincy MA 02269.3.For an appliance equipped with a flexible electric supply cord, the cord is equipped with a three prong (grounding)plug. This grounding plug is for your protection against shock hazard and should be plugged directly into a properly grounded three prong recepticle. Do not cut or remove the grounding prong from this plug If the appliance is not equipped with a grounding plug, and electric supply is needed, ground the appliance by using the ground lug provided (refer to the wiring diagram).(FOR GAS APPLIANCES ONLY)4.Do not obstruct the air flow into and around the appliance. This air flow is necessary for proper combustion ofgases and for ventilation of the appliance. Provisions for ventilation of incoming air supply for the equipment in the room must be in accordance with National Fuel Gas Code ANSI Z223.1 (latest edition).5.Do not obstruct the flow of flue gases from the flue duct (when so equipped) located on the rear (or sides) of theappliance. It is recommended that the flue gases be ventilated to the outside of the building through a ventilation system installed by qualified personnel.6.For an appliance equipped with casters, (1) the installation shall be made with a connector that complies with theStandard for Connectors for Movable Gas Appliances, ANSI Z21.69 (latest edition), and Addenda, Z21.69a (latest edition), and a quick-disconnect device that complies with the Standard for Quick-Disconnect Devices for Use With Gas Fuel, ANSI Z21.41 (latest edition), and Addenda, Z21.41a (latest edition) and Z21.41b (latest edition), and (2) adequate means must be provided to limit the movement of the appliance without depending on the connector and the quick-disconnect device or its associated piping to limit the appliance movement.If disconnection of the restraint is necessary, reconnect this restraint after the appliance has been returned to its originally installed position.7.The appliance and its individual shutoff valve must be disconnected from the gas supply piping system during anypressure testing of that system at test pressures in excess of 1⁄2 psig (3.45 k Pa).8.The appliance must be isolated from the gas supply system by closing its individual manual shutoff valve duringany pressure testing of the gas supply system at test pressures equal to or less than 1⁄2 psig (3.45 k Pa).CAUTIONSFOR YOUR SAFETYDO NOT STORE OR USE GASOLINE OR OTHER FLAMMABLE VAPORS AND LIQUIDS IN THE VICINITY OF THIS EQUIPMENT OR ANY OTHER APPLIANCE.1.KEEP THE APPLIANCE FREE AND CLEAR FROM ALL COMBUSTIBLESUBSTANCES.2.IN THE EVENT A GAS ODOR IS DETECTED, SHUT UNIT(S) DOWN ATTHE MAIN SHUTOFF VALVE A ND CONTACT THE LOCAL GAS COMPANY OR GAS SUPPLIER FOR SERVICE.3.POST IN A PROMINENT LOCATION, INSTRUCTIONS TO BE FOLLOWEDIN THE EVENT THE SMELL OF GAS IS DETECTED. THIS INFORMATION MAY BE OBTAINED FROM A LOCAL GAS SUPPLIER.MGB-A OPERATING, INSTALLATION, SERVICE & PARTSMEDIUM DUTY GAS CHAR BROILER - OPERATING, INSTALLATION, SERVICE AND PARTS MANUAL INDEXYour Medium Duty Gas Char Broiler is produced with the best possible workmanship and material. Proper usage and maintenance will result in many years of satisfactory performance. The manufacturer suggests that you thoroughly read this entire manual and carefully follow all of the instructions provided.DESCRIPTION PAGE DEFINITIONS OF PERSONNEL (Operating, Installation & Service) andSHIPPING DAMAGE CLAIM PROCEDURE(Inside Front Cover) IMPORTANT NOTES3 INDEX4A. PREPARING FOR INSTALLATION5B. GAS SUPPLY5C. LIGHTING AND ADJUSTMENT6-7D. SERVICE8E. REPLACEMENT PARTS LIST— MGB-A9-11F. OPERATING AND MAINTENANCE12MGB-A OPERATING, INSTALLATION, SERVICE & PARTS A. PREPARING FOR INSTALLATION1.Carefully open carton. Lift foam packing material andprotective plastic covering.2.Remove packing bag containing adjustable legs,from inside carton.3.Lift the appliance out of carton.4.Lift the grates and radiants out of carton.5.The broiler shipped as a complete unit, and does notrequire field assembly except the supporting legs, crates and Radiants.Screw the legs on four corners of the unit, into perma-nently fastened nuts. Hand tighten the legs and set unit in place. Turn adjustment screw at bottom of leg, to level unit.6.Place unit in location it is to occupy, and pipe gassupply to unit. Be sure gas supply and gas type, as shown on unit name plate, agree. Unit installation must conform with the National Fuel Gas Code, ANSI Z 223.1.1984 (copies may be obtained from American Gas Association, 1515 Wilson Blvd., Arlington, Va.22209) and in accordance with applicable local codes.Unit requires front clearance of 32 inches minimum for proper servicing and operation.CAUTION: The unit must only be installed in fire resistive locations. Suitable and fire-safe provisions must be made to exhaust the fumes which will rise from the food being broiled. In the absence of local codes, installation must comply with ANSI/NFPA 96-1980.B. GAS SUPPLY1.Pipe gas supply to unit installation of a manualshut-off valve (supplied with the unit) in supply line is mandatory to permit complete shut-down of unit for service. Following precautions must be observed.(a)Check that the type of gas supply agrees with thetype of gas indicated on the rating plate. The ratingplate is located on the inside of front panel.(b)Pipe joining sealing compound used must beresistant to action of L.P. (Liquified Petroleum)gases.(c)Check pipe joints for gas leaks with soap solution. CAUTION: Do not use an open flame to check for leaks.(d)The appliance and its individual shutoff valvemust be disconnected from the gas supply pipingsystem during any pressure testing of that systemat test pressures in excess of 1⁄2 psig (3.45 kPa).(e)The appliance must be isolated from the gassupply piping system by closing its individualmanual shutoff valve during any pressure testingof the gas supply piping system at test pressuresequal to or less than 1⁄2 psig (3.4566 kPa).2.All units are equipped with fixed orifices for usewith Natural or Propane Gas, and no adjustments necessary.3.Units for operation on Natural or Propane Gas, arealso equipped with a factory preset pressure regulator with an outlet pressure of 3.7". Water Column for Natural Gas supply, and 10" Water column for Pro-pane Gas Supply; and should not require further adjustment.MGB-A OPERATING, INSTALLATION, SERVICE & PARTS1.Lighting instructions are inside the front panel. To open the panel to reach the manifold.a.Remove thumb screws from upper front panel,lift upper front panel until it clears the lower front panel.b .To install the upper front panel, place panel above lower front panel, slip upper panel down so it engages lower front panel.2.LIGHTING PILOT: If the pilot goes out, an automatic shut-off valve turns off the gas supply to the burners.To relight the pilot follow procedure.a.Turn the control valve to “off”. Wait a sufficient length of time to allow gas which may have accumu-lated in the burner compartment to escape (at least five minutes).b.Turn on the main shut-off valve.c.Depress and hold in on the red button “A” on the automatic shut-off valve while lighting the pilot burner.d.When gas at pilot has been running for about 45seconds, release the red button. If pilot does not remain lighted, repeat the operation allowing more time before releasing red reset button.3.MAIN BURNER AIR SUPPLYFor efficient burner operation, it is important that a proper balance of gas volume and primary air supply is main-tained, resulting complete combustion. Insufficient air supply results in a yellow streaming flame. Check flames with control knob turned to “HI”, and radiants and top grates removed. Primary air supply is controlled by air shutter on front of the burner.Loosen the hexagonal head screws on front of the burner, and adjust the air shutter to obtain a sharp flame without lifting. Lock the air shutter in place tightening the screws. Repeat this procedure with all burners.Do not permit fans to blow directly at the unit and wherever possible avoid open windows next to the unit sides and back. Avoid wall type fans which create air cross currents within the room.It is also necessary the sufficient air should be allowed to enter the room to compensate for the amount of air removed by any ventilating system. Otherwise, a subnor-mal atmosphere pressure will occur, affecting operation adversely and causing undesirable conditions.A properly designed and installed hood will act as the heart of the ventilating system for the room or area in which the unit is installed, and will leave the unit indepen-dent of changing draft conditions.C. LIGHTING AND ADJUSTMENTFIGURE 1e.To adjust the pilot flame, remove pilot adjustment cap “B” (Figure 1) to expose the adjusting screw.Rotate the adjusting screw clockwise to reduce the gas flow; and counterclockwise to increase the gas flow, to provide a properly sized pilot flame (approximately 1⁄2" to 3⁄4" long) Replace the adjust-ment cap “B”.MGB-A OPERATING, INSTALLATION, SERVICE & PARTS4. RADIANTSPlace the radiants in their position as shown in Figure 2.Make sure that radiants nestle properly on front and rear supports.NOTE: Do not drop radiants on supports.C. LIGHTING AND ADJUSTMENT (Continued)5. GRID GRATESPlace the top grid grates in place with the grid bars sloping toward the front as shown in Figure 3, or with grid bars horizontal. These two positions can be obtained by turning the grid grates upside down.NOTE:When grid grates are placed sloping toward the front, groves on top will guide excess fat drippings into the grease trough.6. EXTENDED SHUTDOWNTurn the manual shut-off valve to “off” position and shut off the pilot flame by turning the adjusting screw on the pilot valve.MGB-A OPERATING, INSTALLATION, SERVICE & PARTSD. SERVICE1.In order to remove burner for cleaning or replace-ment:(a)Remove the top grates(b)Remove the radiants(c)Remove the burners(d)Reverse procedure for reassembly2.To remove burner drawer:(a)Turn off main shutoff valve(b)Disconnect union(c)Remove burner drawer screws, slide burnerdrawer forward.SERVICE TROUBLE SHOOTING GUIDEPROBLEM POSSIBLE CAUSEWHEN HEAT DOES NOT COME ON GAS VALVE BADWHEN CONTROL VALVE IS TURNED-ON PILOT BURNER NOT LITPILOT BURNER WILL NOT LIGHT MANUAL OR SAFETY SYSTEM GAS SYSTEM GASVALVE NOT TURNED ONOBSTRUCTED PILOT ORIFICEPILOT GAS TURNED OFF AT AUTOMATIC PILOT VALVEAUTOMATIC VALVE BADPILOT BURNER WILL NOT STAY LIT THERMOCOUPLE BADTHERMOCOUPLE NOT HOT ENOUGHOBSTRUCTED OR WRONG SIZE PILOT ORIFICEGAS SUPPLY NOT PURGED OF AIRAIR BLOWING PILOT OUTAUTOMATIC PILOT VALVE BADMGB-A OPERATING, INSTALLATION, SERVICE & PARTS E. REPLACEMENT PARTS LIST — MGB-3A, 4A, 5A OR 6APART NO.DESCRIPTION QTY.1.804133TOPGRID 3 or 4 or 5 or 62.804132RADIANT 3 or 4 or 5 or 63.820133“S” BURNER 3A, 6A & 5A R.H.14.820133-1“S” BURNER 6ALH.15.820134-1“U” BURNER 4A&5AL.H.16.820134“U” BURNER 4A R.H.17.920313PILOT BURNER18.920331-11PILOT BURNER ORIFICE (NAT)1OR920331-12PILOT BURNER ORIFICE (PROP)19.920325THERMOCOUPLE110.805921-13HI-LOW CONTROL VALVE 1 or 211.920601MANUAL SHUT OFF VALVE112.920442AUTOMATIC PILOT VALVE113.920669-11PRESSURE REGULATOR (NAT)1OR920669-12PRESSURE REGULATOR (PROP)114.802389-18#31 BURNER ORIFICE FITTING (NAT) 3A & 6A 1 or 2OR802389-15#51 BURNER ORIFICE FITTING (PROP) 3A, 5A & 6A 1 or 2802389-22#41 BURNER ORIFICE FITTING (NAT) 4A & 5A 1 or 2802389-27#54 BURNER ORIFICE FITTING (PROP) 4A & 5A 1 or 2802389-28#32 BURNER ORIFICE FITTING (NAT) 3A, 5A & 6A 1 or 215.820312GREASE TRAY ASSY. 3A, 5A, 6A 1 or 216.820118TRAY HANDLE 3A,5A,6A 1 or 2820322GREASE TRAY ASSY. 4A1820118-1TRAY HANDLE 4A117.820309CONTROL VALVE KNOB 1 or 218.804405ADJUSTABLE FOOT4920573-1WIRE BRUSH ASSY.1NOTE: Order just the quantity of parts that need to be replaced.The plant is in the process of converting computer part records; to avoid confusion please specify both numbers.MGB-A OPERATING, INSTALLATION, SERVICE & PARTSE. REPLACEMENT PARTS LIST — MGB-3A, 4A, 5A, 6A, ContMGB-A OPERATING, INSTALLATION, SERVICE & PARTS E. REPLACEMENT PARTS LIST — MGB-3A, 4A, 5A, 6A, ContMGB-A OPERATING, INSTALLATION, SERVICE & PARTS1.Since all burners are lit from constantly burning pilots,turn control knobs to “HI” to ignite the burners.2.Turn control knobs to “HI” about 25-30 minutes before cooking time. After this period of pre-heat, grid temperatures will be in the range of 600° F. for best broiling results. The control knobs should then be adjusted to “LO” position to maintain the grid temperature between 575° F. and 625° F.NOTE: Do not leave the burners on, with knobs in “HI”position for any extended period of time beyond the recommended pre-heat time or “burn-off” time.3.Always be careful when working on the broiler,because all areas will be hot.4.In order to minimize gas usage, only those burners needed for cooking load need to be operated.5.At least once a day, remove the grease pan, empty and wash it out in the same way you would any cooking utensil.Grease in the grease pan will not get hot enough to be ignited by burners. However, under some use conditions,flaming particles may drop into the grease drawer and cause it to ignite. Only if your use conditions warrant, add a 1/16 inch deep layer of water in the grease pan to prevent this from happening.6.Once a Week: Thoroughly clean the exposed sur-faces of broiler-sides, front, and top grease trough, with a damp cloth, then polish with a soft dry cloth. A detergent may be used for cleaning. To remove discolorations, use a non-abrasive cleaner.7.Grate “Burn Off”. The grease build-up on the grates should be cleaned daily or as dictated by use. Follow the procedure outlined in (a) through (h):(a)CAUTION: When handling grates or radiants,always use insulated gloves to prevent burns.(b)WARNING: Do not cover the top of the grid grates during a burn-off operation. Restricting the air flow by covering the grid grates, may cause them to wrap.F. OPERATING AND MAINTENANCE(c)Place grates on broiler, with grid bars horizontal,facing down.(d)Turn control knobs to “HI” for approximately 45 minutes.(e)Turn off the broiler and allow it to cool for 20 minutes.(f)Clean top and bottom surfaces of grate with a wire brush to remove animal fats and carbonized grease.(g)Clean channels on grates with a scraper.(h)Remove grates from broiler. Clean top surface of radiants with the wire brush. They may be cleaned in place.8.Once a Week: After completing step 7 (a) through (h), remove the radiants. Clean reflecting drip shield (Figure 3) of any dust or debris, with a brush.9.NOTE: Top grid grates and radiants are heavy. They may break if dropped or bumped.10. Burner air shutter openings must be kept clean.11.Burner ports must be kept clean. To clean burners,boil them in a strong solution of lye water for fifteen to twenty minutes. Then, either brush with a wire brush or clean gas ports with a sharp pointed metal instrument to insure open ports.Do not permit fans to blow directly at the unit and wherever possible avoid open windows next to the unit sides or back. Avoid wall type fans which create air cross currents within the room.All valves and thermostats must be checked and lubricated periodically. Check with your Service Agency.12.In order to remove burners for cleaning replace-ment:(a) Remove the top grates (b) Remove the radiants (c) Remove the burners(d) Reverse procedure for reassemblyTHISPAGE INTENTIONALLYLEFTBLANKTHISPAGE INTENTIONALLYLEFTBLANKMANUAL PART NO.: 99-05-03AFOR MODELS:MGB-3A, 4A, 5A, 6AMEDIUM DUTYCHAR BROILERS DESCRIPTION:OPERATING,INSTALLATION, SERVICEAND PARTS MANUALREV. BLOCK REV.#DATE SIGN 112/85NWK206/87VW309/88VWTHISPAGE INTENTIONALLYLEFTBLANK。
Premier90THIS MODEL92.144041201005(9/2001)Model Number*9MPT050F12*9MPT075F12*9MPT100J16*9MPT125L20INPUT HIGH FIRE(BTUH)LOW FIRE(BTUH)50,00035,00075,00053,000100,00070,000125,00087,500HTG.CAP.HIGH FIRE(BTUH)LOW FIRE(BTUH)46,00036,20069,00048,80092,00064,400114,00080,500AFUE%(ICS)92.192.192.192.1 CSE%84.985.185.585.2 NOx(Ng/J)<40<40<40<40TEMP.RISE RANGE High Fire(o F)Low Fire(o F)35--6525--5540--7030--6040--7030--6040--7030--60VENT SIZE^2²--3²OD2²--3²OD3²OD3²OD VOLTS/PH/HZ115/60/1115/60/1115/60/1115/60/1 MIN./MAX.VOLTAGE97/13297/13297/13297/132 F.L.A. 5.37.59.212.0 TRANSFORMER(V.A.)40404040 GAS PIPE SIZE(IN.)1/21/21/21/2 COOLING CAP.(TONS) 3.0 3.0 4.0 5.0 FILTER SIZE(IN.)16X25X1(1)16X25X1(1)16X25X1(1)16X25X1(2) DIMENSIONS(in.)HEIGHT40404040 WIDTH X DEPTH191/8x29191/8x29223/4x29241/2x29 WEIGHT(Lbs.)150158182203^Vent size may vary depending on length,number of elbows,standard vent or direct vent.See Installation Instructions.Model Number*9MPT050F12*9MPT075F12*9MPT100J16*9MPT125L20 BLOWER TYPE AND SIZE11--811--811--1011--10 MOTOR H.P.(TYPE)1/2PSC1/2PSC1/2PSC3/4PSC MOTOR SPEEDS4444LOW826706823172010IN W C MEDIUM LOW108391711091910.10ESP IN.W.C.MEDIUM HIGH1301116315272127 HIGH1408136818502315LOW8046777951686 MEDIUM LOW105087510871881 .20ESP IN.W.C.MEDIUM HIGH1242112014822087 HIGH1347131917912268LOW7706367471644 MEDIUM LOW102884010561833 .30ESP IN.W.C.MEDIUM HIGH1195107614262024 HIGH1295128317202201LOW7355956771600 MEDIUM LOW98581210161777 .40ESP IN.W.C.MEDIUM HIGH1153103113821961 HIGH1237120216482131LOW6985466171533 MEDIUM LOW9527669701720 .50ESP IN.W.C.MEDIUM HIGH109398713171891 HIGH1183114815752029LOW6574905441494 MEDIUM LOW9097028541647 .60ESP IN.W.C.MEDIUM HIGH104088912451804 HIGH1118107714851948LOW------------------1413 MEDIUM LOW8636307631571 .70ESP IN.W.C.MEDIUM HIGH93582111541708 HIGH105398914011820 *Denotes Brand(T,H or C)SPECIFICATIONS SUBJECT TO CHANGE WITHOUT NOTICESPECIFICATIONS SUBJECT TO CHANGE WITHOUT NOTICE^Must be ordered from Service Parts *Denotes Brand (T,H or C)*9M PT075F12A1Brand Identifier Engineering Rev.*=Brand Denotes minor changesMarketing Digit Model IdentifierDenotes minor change8=Non--Condensing,80+%Gas Furnace Cooling Airflow 9=Condensing,90+%Gas Furnace 08=800CFM 12=1200CFM Installation Configuration 14=1400CFM UP =Upflow DN =DownflowUH =Upflow/Horizontal16=1600CFM HZ =HorizontalDH =Downflow/Horizontal20=2000CFM MP =Multiposition,Up/Down/Horizontal Cabinet Width Major Design Feature B =15.5²Wide1=One (Single)Pipe N =Single Stage F =19.1²Wide 2=Two Pipe P =PVC Vent J =22.8²Wide D =1or 2Pipe T =Two Stage L =24.5²WideL =Low NOxV =Variable SpeedInput (Nominal MBTUH)Model Number DescriptionUsed With Models1011787^Gas Conversion Kits (2--Stage)--LP (Propane)to natural gas conversion kit.Allows field conversion to natural gas.*9MPT 1011789^Gas Conversion Kits (2--Stage)--Natural gas to LP (propane)conversion Kit (includes LP high altitude kit).Allows field conversion to LP (propane)gas.*9MPTNAHA001PS 1009522^LP Low Pressure Switch --For detecting low line pressure.Opens at 6.5²W.C.(included in NAHF002LP)All LP *9MPT ModelsNAHA001FF Filter Kits --External filter frame.16²x 25²Side Return (All Furnaces)Bottom Return (All 19F d NAHA001FP External filter frame.16²x 25²(Bulk Pack Kit --Qty 10)()(“F”1/8²Furnaces under 1650CFM)NAHA002FF Filter Kits --Bottom return filter frame kit 20²x 25²(All “J”223/²Furnaces)NAHA002FP Bottom return filter frame kit 20²x 25²(Bulk Pack Kit --Qty 10)(4)NAHA003FF Filter Kits --Bottom or side return filter frame kit 14²x 25².(All “B”151/²Furnaces)NAHA003FP Bottom or side return filter frame kit 14²x 25²(Bulk Pack Kit --Qty 10)(2)NAHA001TKDuct Standoff Filter Kit.To adapt 20²x 25²filter for single side return.Side Return (All single return applications with1650CFM or greater)Bottom Return (All “F”191/8²Furnaces under1650CFM)NAHA001NK612833^Condensate neutralizer kit --for condensing gas furnaces All *9MPT Furnaces If RequiredNAHA036VA Blower Upgrade Kit --Variable speed blower upgrade (consists *9MPT050NAHA042VA pg p pg (of blower motor and electronics for 2--stage furnaces ONLY),*9MPT075NAHA060VA *9MPT100/125NAHH002SB Combustible Floor Subbase --Furnace ONLY:All 191/4²wide furnace models *9MPT050/075NAHH003SB Combustible Floor Subbase --Furnace ONLY:All 223/4²wide furnace models*9MPT100NAHH010SB Combustible Floor Subbase --Furnace ONLY:All 241/2²wide furnace models*9MPT125NAHH005SB Subbase --Furnacew/191/4²casedcoil*9MPT050/075Counterflow furnace w/191/4²cased coil NAHH006SB Subbase --Furnace w/223/4²cased coil *9MPT100Counterflow furnace w/223/4²cased coilNAHH009SB Subbase --Furnace w/241/2²cased coil*9MPT125NAHA001CV 1011129^3²Concentric vent kit --allows single wall penetration for 2pipe direct vent applications (90+).*9MPT100/125NAHA002CV 2²Concentric vent kit allows --single wall penetration for 2pipe direct vent applications (90+).*9MPT050/075NAHA001CACoil Adapter for Downflow FurnacesAll Downflow ModelsSPECIFICATIONS SUBJECT TO CHANGE WITHOUT NOTICE。
GAS OVEN SERVICE MANUAL MODELS: MB42, MB60, MB236, MB260, MB866,SD236, SD248, SD260, SD448, SD660, SD1048, SD1060, SD866, SD10866, WF42, WF60©2018 Marsal 42 Allen Martin Drive, Essex Junction, VT 05452 (802) 658-6600 TABLE OF CONTENTSI TESTING OF COMPONENTSAUTOMATIC SAFETY PILOT VALVE (TSII) #55127 (3)MAIN MANUAL CONTROL VALVE #70380 (3)THERMOSTAT FDTH #71880 (3)II MAINTENANCE INSTRUCTIONSADJUSTMENTS (4)PILOT BURNER ADJUSTMENT #70101 (4)MAIN BURNER ADJUSTMENTS (4)BYPASS (MINIMUM BURNER FLAME) ADJUSTMENTS (5)THERMOSTAT CALIBRATION (5)PARTS REMOVAL & REPLACEMENT (6)MAIN BURNER REMOVAL (6)PILOT BURNER REMOVAL: #70101 (6)OVEN LIGHT BULB REMOVAL (MB SERIES ONLY) (7)GAS CONTROL AND PIPING CONTROL STACK ASSEMBLY REMOVAL (7)AUTOMATIC SAFETY PILOT VALVE, MAIN MANUAL CONTROL VALVE,AND THERMOSTAT REMOVAL (7)PRESSURE REGULATOR REPLACEMENT #71881 (N) OR #71882 (P) (8)III TROUBLESHOOTING (8)TESTING OF COMPONENTSAUTOMATIC SAFETY PILOT VALVE (TSII) #55127Pilot gas is supplied from the main valve inlet through a drilled passageway to the pilot burner. Pushing the red reset button temporarily allows gas to flow to the pilot burner for ignition of the pilot burner flame. When the bulb heats up, the main valve opens to allow gas to flow to the main burner. The red reset button is then released.If the pilot burner flame fails and cannot be reactivated the following test can be performed:• Pilot burner adjustment: Refer to following page.•Clean Pilot burner’s limiting orifice as follows:a. Disconnect gas tubing at the pilot burner body b. Remove cup shaped orifice from pilot burner body c. Clean orifice by blowing any foreign matter out the orifice hole. Take care not to enlarge orifice hole.d. Replace components in reverse order. If the pilot burner still does not operate or the main burner comes with a low flame, or will not come at all, replace the Automatic Safety Pilot Valve (TSII)MAIN MANUAL CONTROL VALVE #70380The main manual control valve is a simple ball valve. Due to its sim-plicity, failures of this type of valve are practically non-existent. For difficulties associated with this control, it would be best to replace the valve.THERMOSTAT FDTH #71880For any suspected thermostat problems the following procedures should be reviewed in this manual:• Thermostat adjustment• Bypass (Minimum Burner Flame) adjustment.•Thermostat calibration. Most thermostat failures will generally fall into one of the following three catego-ries:1. If thermostat is in a runaway condition and will not shut off at set temperature, replace the thermostat.2. If thermostat will not maintain calibration after adjustment, replace thermostat.3. If thermostat bulb or capillary are cut, bent, or unnecessarily flattened, replace thermostat. (This is NOTcovered under the warranty!)Figure 1MAINTENANCE INSTRUCTIONSADJUSTMENTSMany malfunctions attributed to defective material or faulty workmanship may be rectified by the adjust-ment of pilot burners, main burners, or thermostats. It is therefore wise to attempt to correct operational difficulties through adjustment rather than the immediate replacement of parts.PILOT BURNER ADJUSTMENT #70101A commonly diagnosed malfunction of the safety pilot valve is the pilot burner/flame sensing bulb relation-ship resulting from:• Improper draft• Low gas pressure. (Natural Gas 4.5” WC – Propane Gas 11”WC)• Clogged pilot burner orifice from dirt and debris from unpurged gas lines.• Incorrect adjustment of pilot burner flame.When working correctly, the flame must engulf the safety pilot probe tip.Pilot HoodSafety PilotProbeFigure 2MAIN BURNER ADJUSTMENTSSatisfactory oven performance and burner life are dependent on correct burner adjustment. Before ship-ment, burners have been adjusted for proper operation with the type specified on the rating plate located inside the control compartment above the light switch. If further adjustment is necessary proceed as follows:• Adjust primary air shutter at the front of the burner compartment to obtain a stable and quiet flame.• If too much primary air is present, flames will lift from the burner parts. A reduction in primary air will correct this condition.• Too little primary air will cause yellow tipping or an entire yellow flame to appear. This condition indi-cates incomplete combustion and may cause carbon sooting to appear on metal parts near the flame.• When a flame raises off the burner it is important to determine if it is a “lifting flame” or a “floating flame”:LIFTING FLAMES - rise from the ports to burn some distance above the ports. In some cases these flames will drop back to the port and lift again intermittently. They are caused by too much primary air.Decreasing the shutter opening will stop lifting flames.FLOATING FLAMES - are long and lazy in appearance, poorly defined, quiet flames which roll around the combustion chamber sometimes completely off the ports. Floating flames result from too little second-ary air. Lack of secondary air is caused by incorrect venting, clogged flueways, blocked secondary air inlet openings, or lack of natural room makeup air to the oven.BYPASS (MINIMUM BURNER FLAME) ADJUSTMENTSA Robertshaw FDTH 300° - 650° F (149° - 343° C) type thermostat is used. This is a throttling type gas thermo-stat with bypass flame adjustment control. For bypass adjustment proceed as follows:1. Preheat oven to 500° F (260° C). When thermostat has throttled to bypass the glame on the main burnershould have decreased to a flame no larger than 1/8” (6mm)2. If flame is too high, remove dial, insert screwdriver in screw marked “B” on the thermostat and turn screwclockwise to lower flame.3. If flame is too low, remove dial, insert screwdriver in screw marked “B” on the thermostat and turn screwcounterclockwise to increase flame.THERMOSTAT CALIBRATION1. Attach pyrometer lead to thermostat bulb in the baking compartment. If a pyrometer is not available,place a reliable mercury type oven thermometer in the center of the baking deck (approximately 1”above the surface).2. Preheat the oven to at least 400° F (204° C).3. When the burner reaches bypass or minimum flame, take the temperature reading. If the temperature iswithin 10° F (6° C) of the thermostat setting, do not change the thermostat settings. If the temperature differs more than 10° F (6° C) from the thermostat setting, adjust the thermostat as follows:a. Pull thermostat dial straight off without turning.b. Hold calibration plate on thermostat and loosen the two calibration lock screws until the plate canbe moved without moving the control.c. Turn calibration plate so that pyrometer reading is set in line with the indicator mark at the 12 o’clockposition. Temperature variation will be 50° F (28° C) between the letters.d. Adjust the calibration plate as follows: Turn calibration plate counterclockwise if pyrometer or ther-mometer reading is higher than the dial reading OR clockwise if the pyrometer or thermometer read-ing is lower than the dial reading.e. Hold calibration plate and tighten two screws firmly.f. Replace thermostat dial.By-Pass Adjustment ScrewCalibration ScrewsPilot Adjustment Screw(not applicable)Calibration PlateFigure 3PARTS REMOVAL & REPLACEMENTMAIN BURNER REMOVAL1. Open combustion compartment door.2. Remove the burner door by removing its hinges.3. Remove the heat shields by removing the three screws that hold it together.4. Remove the two screws that hold the pilot burner to the bracket.5. Move the entire pilot burner assembly with capillary and pilot gas tubing forward out of work area.6. Disconnect union at manifold.7. Remove three (3) bolts which hold the burner assembly to the floor of the burner compartment andremove the tee support for the flame deflectors.8. Replace burners in replace order from removal.PILOT BURNER REMOVAL: #701011. Open combustion compartment door.2. Remove the burner door by removing its hinges.3. Remove the heat shields by removing the three screws that hold it together.4. Remove the screw that holds the pilot burner to the bracket.5. Remove the capillary bulb.6. Disconnect gas supply tubing from pilot burner.7. Replace pilot burner in reverse order from removal.OVEN LIGHT BULB REMOVAL (MB SERIES ONLY)CAUTION!! Parts will be hot!GLASS #70019 – LIGHT BULB #70071 – BULB HOLDER #718931. Open the control door and remove the screw located at the back of the light box (Figure 4 on next page).2. Remove the light box out through the control door (Figure 5 on next page).3. Remove the light bulb and replace with new bulb. (ONLY USE 100W 120VAC or 500W 240 VAC BULBS!) MARSAL OFFERS A 500W 240 VOLT BULB THAT IS ALMOST THE SAME ILLUMINATION AS A 100W BUT MORE DURABLE.Figure 4 Figure 5GAS CONTROL AND PIPING CONTROL STACK ASSEMBLY REMOVAL1. Open baking compartment door and remove thermostat bulb from the top of the chamber. Slide thecapillary tube to the left and into the control door area.2. Disconnect pilot tubing at safety valve on control stack.3. Disconnect the thermocouple from the safety valve.4. Disconnect upper and lower unions on control stack.5. Pull control stack assembly forward.6. Replace control stack in reverse order from removal.AUTOMATIC SAFETY PILOT VALVE, MAIN MANUAL CONTROL VALVE, AND THERMO-STAT REMOVAL1. Remove Control Stack Assembly (see above).2. Remove respective control from Control Stack Assembly.3. Replace new control and other components in Control Stack Assembly in reverse order. ATTENTION: THE TSII SAFETY VALVE CAN BE REPLACED BY REPLACING THE HEAD ONLY, LEAVING THE BODY STILL ATTACHED TO THE CONTROL STACK ASSEMBLY.PRESSURE REGULATOR REPLACEMENT #71881 (N) OR #71882 (P)The pressure regulator is located just above the control stack in the control compartment. Before replace-ment, gas service to this point must be shut off before disconnecting.TROUBLESHOOTING• Check the diameter of your gas connections. Flex lines or hard plumbing MUST BE ¾” or bigger.• A stainless steel flue pipe MUST BE installed on all ovens that are venting into a hood.• A draft diverter MUST BE installed on all ovens being directly vented into the ceiling.。