西铁城光动能说明书
- 格式:docx
- 大小:17.50 KB
- 文档页数:5
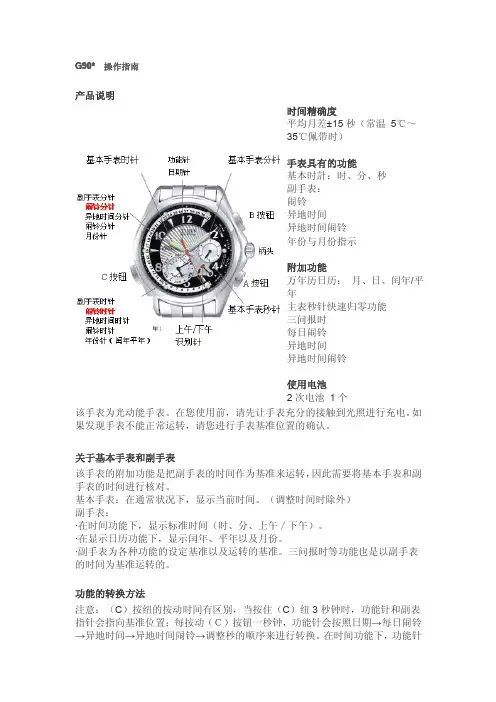
1西铁城光动能手表使用指南机芯型号:G62※、G67※1.产品特点这是一只利用光作为能源的光动能手表,在表盘下有一个太阳能感光板,它可将光能转换为电能并储存在手表内的二次充电电池中,本表还具备以下功能: ● 充电不足警告功能:当剩余电量不足以支持手表运行8天时,此功能启动(分针每一分钟跳动一次,每次跳动一分钟刻度)。
●指针调校警告功能:停止的手表经过充电再启动之后,此功能启动,提示用户需要重新调整校正指针(分针)。
● 防止过度充电功能:当充电电池的电量已经充足时,该功能将启动,这是为了避免过度为电池充电,以防止电池的性能劣化 。
2.手表各部位名称(见右图)3.时间的调整方法将柄头拉出到(1)位置,转动,把时分针调整到当前时刻,推回柄头,手表调整完毕。
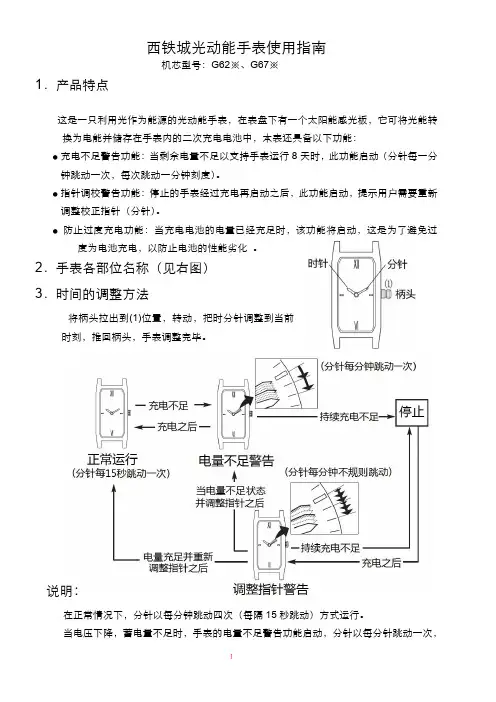
说明:在正常情况下,分针以每分钟跳动四次(每隔15秒跳动)方式运行。
当电压下降,蓄电量不足时,手表的电量不足警告功能启动,分针以每分针跳动一次,每次跳动一分钟幅度的方式运行,当遇到此现象请立即给予充电,否则将运行约8日后电量耗尽而停止。
当重新为手表充电之后,手表指针会重新启动,但是指针会在每分钟以不规则的方式跳动一次,每次一分钟幅度,此现象为指针调整警告功能,提示用户手表时间尚不准确,在未经过调整之前,指针始终按此方式运行,直到调整指针之后为止。
4、手表的充电时间建议用户每天为手表充电,当长期不用时也要每月为手表充电一次以免二次充电电池亏电导致性能下降。
手表的充电时间因表盘的颜色不同而异,下列表格仅供参考供一天使用:补充手表正常运行一天消耗的电量,所需要的充电时间。
由空白到充满:将电池的电量从空白一直到充足所需要的时间。
从停止到分针能正常运行:分针从每分钟跳动一次到恢复正常运行,所需要的充电时间。
5、手表使用维护注意事项一、防水问题:为了保证手表在设计的限度内使用,请先查对你手表表面和表壳上标示的防水等级并参考下表。
•3气压防水:(表盘或表底盖标有:WATER RESIST)这类表可抵抗轻微沾水。

感谢您购买本款西铁城⼿表。
使⽤⼿表前,请认真阅读本说明⼿册以便您正确使⽤。
阅读完本⼿册后,请妥善保存以便随后参阅。
✳不同型号⼿表的表壳功能有所不同。
本⼿册中不包含表壳功能的详情,请参阅“ h ttp://www.citizenwatch.jp/support/default.htm”了解详情。
1本⼿册可能包含某些安全建议。
任何时候使⽤⼿表都应该遵循这些建议以确保获得⼿表的最佳性能,防⽌伤害⾃⼰,他⼈和/或财产损失。
■ 安全建议在本⼿册中按如下所⽰进⾏分类和描述:■重要指⽰在本⼿册中按如下所⽰进⾏分类和描述:2使⽤⼿表前请务必先做下列事项:检查剩余电量 8 页检查⼿表的电量⽔平。
检查时间信号接收 9 页检查时间信号的接收结果。
设置城市 10 页选择您想要显⽰时间和⽇期的城市。
3使⽤⼿表前 (3)⼿表的部位名称 (6)检查剩余电量 (8)检查时间信号接收 (9)设置城市 .............................10时间信号接收说明.. (14)⼿动接收时间信号 (22)处于夏令时季节 (24)重新给⼿表充电 (30)⼿动调整时间/⽇历 (34)4检查并调整基准位置 (38)故障排除 (42)太阳能⼿表使⽤的注意事项 (48)防⽔功能 .............................52注意事项 .. (55)维护 (60)信息 (61)规格 (62)58 1. 确保柄头处于位置 2. 按下右下按钮 A 。
• 当⼿表电量低时,秒针逆时针⽅向旋转四分之⼀圈。
您需要给⼿表充电。
请参阅第 30 页。
3. 按下右下按钮 A 。
当前时间显⽰。
• 即使没有按下按钮,10 秒钟后也会⾃动显⽰当前时间。
本步骤结束时秒针指向“OK ”或“NO ”以显⽰时间信号的接收结果。
911页到第13页。
29页。
续接下页1112有关每个信号站的详情,请参阅第16页到第19页。
13接收时间信号接收时间信号的⽅式有三种:秒针显⽰接收结果(OK/NO)。
841849852854856858863864866868874880·····································································································································································································································································································································································································································································································································································································································································································································································································································································································································································································································································································1.您的手表2.使用之前•检查基准位置3.基本手表操作电波接收4.电波接收5.接收较差区域6.接收时显示7.确认接收状态8.接收区域说明9.世界城市显示10.充电程度显示目录843842 882884886888892896900902906908912912914918················································································································································································································································································································································································································································································································································································································································································································································································································································································································································································································································································································································································每个模式的操作11.更改模式12.使用主时间和世界时间13.使用日光节约时间14.设定时间(TME )15.设定日历(CAL )16.使用定时器(TMR )17.使用记时器(CHR )18.使用世界时间设置(WT-S )19.使用世界时间闹钟(AL-1和2)20.使用接收设置(RX-S )21. LED 灯22.重新设定您的手表23.调节基准位置使用计算尺表圈932934936938939940942944948950956···························································································································································································································································································································································································································································································································································································································································································································································································································································································································································································太阳能24.太阳能功能25.太阳能手表的特性A .节能功能B .充电不足警告功能C .防过度充电功能D .充电时间指南E .操作太阳能手表疑难排解电波接收功能光动能(Eco-Drive )注意事项26.规格祝贺并感谢您选择西铁城光动能(Eco-Drive)手表。
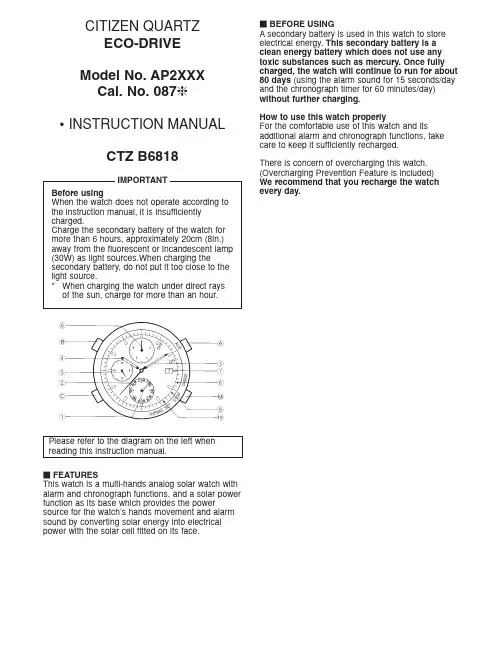
FEATURESThis watch is a multi-hands analog solar watch with alarm and chronograph functions, and a solar power function as its base which provides the powersource for the watch’s hands movement and alarm sound by converting solar energy into electrical power with the solar cell fitted on its face.Please refer to the diagram on the left when reading this instruction manual.ⅥFUNCTIONS OF SOLAR POWERED WATCH These functions are only found in the solar power watch. If the watch becomes insufficiently charged, a warning comes into operation and the display changes, as below.Insufficient Charge Warning FunctionIf the watch is put in the undercharged state during any display mode, it switches to the time display when in the other display modes, then the second hand moves to the ᮡCHARGE position, indicating the shortage of electricity. (Electric power shortage warning display) Even then, the time (hour, minute and24-hour hands) runs accurately.* The alarm does not ring even if it is set.* If the chronograph is being used, measurement stops and it is reset.* The push button does not function.Refer to, “ⅥIn These Cases”. Stop Warning FunctionIf the watch is left intact in the undercharged state, about 5 days later the second hand will move to the ᮡSTOP position, indicating that the watch hasstopped due to electric power shortage. (Stop warning display) The other hands (hour, minute and 24-hands) also stop.* In this condition, all functions stop.Refer to, “ⅥIn These Cases”. Time Setting Warning FunctionWhen the watch is recharged by exposing it to light after once stopped, the second hand moves to the ᮡSET position, indicating that the watch does not keep correct time. (Time setting warning display)* The hour, minute and 24-hour hands run at the incorrect time.Refer to, “ⅥIn These Cases”. Overcharge Prevention FunctionYou can recharge without worry.When the secondary battery is fully recharged, the overcharging prevention function works so that the secondary battery is not overcharged.Ⅵ NOTES ON USEPlease take care to charge your watch during use. Please note that if you wear long sleeves, the watch can easily become insufficiently charged because it is hidden and not exposed to light.• When you take off the watch, try to place it in as bright a place as possible, and it will always continue to run properly.CAUTIONNever use another battery apart from the secondary battery (Titanium Lithium Ion Battery) used in this watch.The watch structure is so designed that a different kind of battery other than that specified cannot be used to operate it. However, in case a different battery such as a silver battery is used by some chance, there is a danger that it will be overcharged to burst, causing damage to the watch and even the human body.When you replace the secondary battery, be sure to use a designated secondary battery.NOTES ON CHARGING• The watch will be damaged during recharging if it gets too hot (over about 60ЊC/140ЊF). Avoid recharging at high temperatures.(eg) Charging the watch near a light source that easily becomes hot, such as an incandescentlamp or a halogen lamp.Charging in a place that easily becomes hotsuch as a dashboard.• Note that full charging is difficult in a place irradiated by only weak light.• When you charge the watch by an incandescent lamp, take a distance about 50cm (20in.) from the light source to prevent extremely high temperature.Ⅵ NAMES OF PARTSPlease see the watch illustration at the beginning.➇: If the second hand moves to ᮡCHARGE position, this shows that the Insufficient ChargeWarning function is operating.➈: If the second hand moves to ᮡSTOP position, this shows that the Stop Warning Function isoperating.➉: If the second hand moves to ᮡSET position, this shows that the Time Setting Warning function is operating.Ⅵ TIME REQUIRED FOR CHARGINGTime required for recharge may vary according to the design (colour of the dial, etc.) and operating environment. The following table will serve you as a rough reference. *The recharging time is the time when the watch is continuously exposed to radiation.Full recharging time...The time from when watch (Empty to full)stopped to when it is fullyrecharged stopped.One day usage..........The recharging time requiredfor the watch to run for oneday.ⅥCHANGING THE MODESOther than the time display, this watch has alarm and chronograph main display functions.ⅥSETTING THE TIMECheck that the mode hand is indicating <TME> and the watch is in time mode.1. Pull the button ࠗM out, so that the second hand stops at the “0” position. When the watch is adjusted by button operation,the time setting is completed by electromagnetic correction.1.Time setting synchronizes the minute hand ➝hour hand ➝24-hour hand. When adjusting the hour hand, check the 24-hour hand position (am/pm).2.Set the time by pressing the button ࠗB or button ࠗC .Each time button ࠗB is pressed…The watch advances 1 minute in a clockwise direction.Each time button ࠗC is pressed…The watch turns back 1 minute in a counterclockwise direction.Depress button ࠗB or button ࠗC continuously, the hands move rapidly. turn the hands in the direction that is closest to the set time.3.After setting the time, push the button ࠗM to the normal position and the watch will start at the correct time.ⅥSETTING THE CALENDARPress button M to switch to calendar mode <CAL>.1. Pull button ࠗM out.2. Press button ࠗA to correct the month number.Correction can be made by advancing by one month each time button ࠗA is pressed.The month number can be read directly from the normal hour positions.2.(Example: 3:00 ➝March, 1:00 ➝January)Correction can be made rapidly by holding button ࠗA down.3. Press button ࠗB to correct the date.Correction can be made by advancing one day each time button ࠗB is pressed. The dateadvances one day when the function hand makes four turns. Correction can be made rapidly by holding button ࠗB down.4. Push button ࠗM in to the normal position.*Since the date and function hand are synchronized with each other, the function hand will turn at when correcting the date.*Date correction at the end of each month is not required. However, since February is set at 28days, date correction must be performed only for February in leap years.Leap Year Adjustment 1.Press button ࠗM to change the mode to <CAL>.2.Pull out the button M by one click.3.Press button ࠗC for more than two seconds to set/cancel the leap year.•The leap year is set if button ࠗC is continuously pressed when March 1 is displayed.•The leap year is cancelled if button ࠗC is continuously pressed when February 29 is displayed.4.Push button ࠗM back into normal position.*Once the leap year is set, February 29 is displayed once in every four years.Displays present time in hours, minutes, seconds and 24-hours.Use the 24-hour hand to confirm am/pm.Displays current date by second hand (month)and date. Since the date and function hand are syncronized with each other, the function hand will turn at when correcting the date.Display alarm set time.The alarm setting is in 1 minute. Confirm of am/pm with the 24-hour hand. If the alarm is ON, it will ring at the set time for 15 seconds once every day.Measures up to amaximum 60 minutes in 1/20 seconds, and displays split times. A confirmation rings when you start/stop or measure a split time.Each press of the M button changes Time <TME>➝Calendar <CAL> ➝Chronograph <CHR>.Confirm the change with the mode hand.After that it returns to the time <TME> display.ⅥUSING THE ALARMThe alarm sounds once a dayfor 15 seconds at the alarmtime set.Pressing any buttons ࠗA,ࠗB orࠗC stops the alarm ringing.Setting the AlarmAlarm setting is on a 24-hour system in 1 minute.The hands are moved thus: minute hand ➝hourhand➝24-hour hand.1.Press button ࠗM to set the mode hand to <ALM>and switch to the alarm mode.2.Pull button ࠗM out, to the alarm set time adjustingstate.3.Press button ࠗB orࠗC to set the minute, hour and24-hour hands to the desired time.•Each time button ࠗB is pressed…The watchadvances 1 minute in a clockwise direction.•Each time button ࠗC is pressed…The watch turnsback 1 minute in a counterclockwise direction.*Depress button ࠗB or button ࠗC continuously, thehands move rapidly.Switching the Alarm ON and OFFEach time button ࠗA is pressed in the alarm mode,the alarm switches ON and OFF.Alarm Sound MonitorOn the alarm mode (button ࠗM in normal position),pressing button ࠗA will sound the alarm for 5seconds.NOTE•There may be some variation in the volume ofthe alarm sound, depending on how much thesecond battery is charged.•The alarm sound volume gets rather lower in thedisplays other than the time display (calendar,alarm, chronograph, “0” position confirmation,and each display’s adjustment state).Once the alarm time has been set, use the watchnormally in time display mode.ⅥUSING THE CHRONOGRAPHChronograph measurement is taken in 1/20 (0.05)seconds and can continue for 60 minutes max. Over60 minutes, the watch enters the chronograph resetstate.Reading the Chronograph Hands•Function hand ➝Chrono minutes or Chrono 1/20seconds.* The function hand moves every one minute.Pressing button ࠗB while in chrono stop or splitdisplay, switches the function hand to showchrono 1/20 seconds.•Second hand ➝Chrono second hand.Chronograph MeasurementChronograph standard oraccumulated elapsed timemeasurement1. Press button ࠗM to set themode hand to <CHR> andget the chronograph display.At this time, the secondhand and the functionhand will return to the “0”position.*The hour, minute and 24-hour hands show thepresent time.2.Each time button ࠗA is pressed, it repeatedlystarts or stops the chronograph, along with aconfirmation sound.How to read each chronograph hand if themeasured time when the chronograph is stopped isover 1 minute.➀Read the number of minutes with the functionhand➁Read the number of seconds with the secondhand.➂While pressing button ࠗB continuously, the functionhand switches to 1/20 (0.05) second handmeasurement, so read the value at that time.When button ࠗB is released, the function handresumes showing chronograph minutes.3.While the chronograph is stopped state, pressingbuttonࠗC resets the function hand and thesecond hand to the 0 position.Chronograph Split MeasurementPressing button ࠗC during chronographmeasurement causes the chronograph split time toappear on display with a beep for confirmation.Press button ࠗC again, the next chronograph splittime is displayed, along with a confirmation sound.The split time display is automatically cancelledafter about 10 seconds, and the chronographreturns to the measurement state.During either chronograph split time display ormeasurement, pressing button ࠗA causes thechronograph stop to appear on display.In the chronograph stop state, pressing button ࠗCcauses the chronograph reset.* During split timemeasurement or whilesplit time display, eachtime you press button ࠗCthe next split time isdisplayed.ⅥIN THESE CASESWhen shown the Insufficient Charge WarningDisplayIf the watch is put in the underchargedstate during any display mode, itswitches to the time display when inother display modes, then the secondhand moves to the ᮡCHARGEposition, indicating insufficientlycharged.In such a case, expose the watch to sufficient lightfor the warning state to be cancelled. (The secondhand returns to 1 second movement)It takes about 30 minutes to complete charging;from starting to expose the watch to light until thiswarning state is cancelled. The charging time variesdepending on the light (light source) that radiatesover the watch.When Shown the Stop Warning DisplayIf the watch is left intact in theundercharged state, about 5 dayslater the second hand will move totheᮡSTOP position, indicating thatthe watch has stopped due toinsufficient recharge.* All functions are stopped in this state.In such a case, expose the watch to sufficient lightfor the warning state to be cancelled.After carrying out sufficient charging, it is necessaryto reset the alarm time.When Shown the Time Setting Warning DisplayIf you expose a watch which hasstopped once to light and recharge it,the second hand will move to the ᮡSET position to let you know that thetime is incorrect.In such a case, readjust the hour,minute and 24-hour hands to keepthe correct time.Without adjusting the time hands after the watch isfully recharged, you cannot use such functions asalarm, chronograph, etc. properly.* Be careful because if the watch is not sufficientlycharged during the Time Setting Warning Displaystate, and if light is blocked from it, the secondhand will change to the ᮡSTOP position and thewatch will stop running.ⅥCHECKING AND ADJUSTING EACH HAND’S“0” POSITIONThe watch’s display may go wrong due to the effectof static electricity, strong shock, etc.In such a case, check and adjust the “0” postion ofeach of the following hands.“0” Position Checking1.Press button ࠗM to set themode hand at <CHR> positionfor chronograph function.2.Pull out button ࠗM by one clickand check to see if each hour,minute, second, 24-hour andfunction hands quickly movesto “0” position (12 o’clock position) while datehand quickly moves to “1” position.If any hand returns wrong out of the correctposition “0” or “1”, the watch needs [“0” positionadjustment].“0” Position Adjustment1.For adjusting the second handto “0” postion:•Press button ࠗA.2.For adjusting hour, minute and24-hour hands to “0” position:•Press button ࠗC.3.For adjusting date and functionhand to position “1” and “0” respectively:•Press button ࠗB.•“0” position for function hand is equivalent to12 o’clock position just after the date has beenset at “1” position.•With four turns of a function hand, date indicationis adjusted by a day.•If button ࠗA,ࠗC orࠗB is continuously pressed, thehand corresponding to the button moves quickly.4.When “0” position adjustment is complete, pushbuttonࠗM into the original position.*Make sure to reset time, calendar, alarm timecorrectly following “0” position adjustment.2.Avoid temperature extremesAvoid leaving your watch in extremely warm or cold locations for long periods of time.• This may cause your watch to gain or lose time and affect its other function.• The watch restores its original accuracy if it is placed in normal temperature.3.Avoid strong shockThis watch will withstand the bumps and jars normally incurred while playing and during sports activities.Avoid dropping your watch on the ground or subjecting the watch to severe shock which may cause malfunction or damage.4.Avoid strong magnetic fieldsKeep your watch out of the immediate vicinity of strong magnets. Generally, your watch is not affected by magnetic fields from such household appliances as television sets and stereo equipment.7.Keep your watch cleanIt may become difficult to pull out the crown due to dirt and dust getting caught between the crown and the watch case when the watch is worn for long periods of time. To help prevent this from happening, turn the crown freely back and forth occasionally while it is in the normal set position.Wipe off any water and moisture that adheres to the case, glass and band with a soft, clean cloth. Any dirt left on the case or band may cause skin rash.A watchband will easily become soiled with dust and perspiration because it is in direct contact with the skin. Even a stainless or gold-plated band may begin to corrode if it has not been cleaned for a long period of time.Mesh bands, because the meshes are very fine, will lose their particular “flexibility” if they are left soiled for a long time.Metal watch bands should be washed periodically to keep them looking beautiful at all times.Metal watchbands are usually washed with a brushⅥSPECIFICATIONS1.Type......................Multi-Hand Analog SolarPower Watch2.Caliber No.............0870/08753.Time Accuracy.......±20sec per month (temp.5°C/41°F to +35°C/95°F)4.Operational temperaturerange.....................-10°C ~ +60°C/14°F ~ 140°F 5.Display Functions:Time..............Hour, minute, second and24 hour handsCalendar.........Month, dateAlarm..............Hour, minute and 24-hourhands, alarm ON/OFFChronograph..Minute, second and 1/20(0.05) second hands6.Additional functions:Alarm..............Daily alarm (sounds for about15 seconds)Alarm monitor (Sounds forabout 5 seconds)Chronograph..Measurement is taken in 1/20seconds and for 60 minutesmax. (A beep for start/stop/splitconfirmation will sound whenthe associated button ispressed.)Insufficient Charge Warning FunctionStop Warning FunctionTime Setting Warning FunctionOvercharge Prevention Function7.Secondary BatteryUsed......................Titanium lithium ionsecondary batteryWater ResistanceThe water-resistant quality of our timepieces is offered in varying degrees depending on the model. This ranges from non-water resistant models to those suitable for SCUBA diving. Water resistance of our timepieces is measured in BAR or Barometric Pressure. Each BAR of pressure is equal to 14.5 pounds per square inch of pressure.Water resistance is measured when the watch is at a static, or motionless state. As the watch is moved in water, such as from the motion of swimming, pressure is added from velocity. While you may be swimming ina pool at surface level, the watch may be experiencing forces equal to that of 100 feet of water pressure(3 BAR). Diving into a pool can cause forces on the watch to exceed those pressures. As such, youshould always allow a margin of safety when exposing your watch to moisture. Never "push the limit" ofthe degree of water resistance of your timepiece.A primary factor to keep in mind about water resistance is that periodic maintenance is needed tomaintain original factory specifications for water resistance. When a watch is new, it meetsspecifications for water resistance as indicated on the case back. However, as the watch ages, the gaskets that seal the watch become dry and brittle, diminishing its water resistant quality. Exposure to environments such as chlorinated pools, salt water or soaps from showering can accelerate drying of the gaskets. We recommend that the gaskets be changed at least every 18 to 24 months to maintain the water resistant quality of your timepiece. If the watch is frequently exposed to chlorinated pools, soaps salt water, etc., we recommend that the gaskets be changed on a yearly basis.From time to time, you may notice condensation that appears then goes away after a short period of time. This is a normal occurrence and happens primarily from sudden temperature changes. When there are sudden temperature changes such as entering a cool building from the hot out of doors, or jumping into pool on a hot day the watch may fog. Conversely, if you go to the cold outdoors from a warm building, fogging may occur. As long as the fogging clears in a short period of time, there is no need for concern.Be sure the crown is completely pushed in prior to any contact with moisture. If your model is equipped with a screw down crown, be sure it is properly seated against the case. Do not operate the crown or any push button when the watch is wet as this may allow the entrance of moisture. . If at anytime, you notice moisture in your timepiece that does not clear in a short period of time, you should send your timepiece as soon as possible to the nearest Authorized Service Center for inspection.You can determine the level of water resistance of our watches from the markings on your case-back. Additionally, models that are water resistant to 100 or 200 meters have an indication on the dial as well. The case-backs and dials are normally marked as follows:The case back has no indication of water resistanceThis indicates the watch is a non water-resistant model and is not designed for contact with moisture at all. Caution should be exercised to avoid any contact with moisture, such as when washing your hands or from a rainstorm.“Water Resist”This watch is designed to withstand water from accidental splashing, such as from washing your hands or rain. Any submersion into water may result in the entrance of moisture.“Water Resist 10BAR” or “W.R. 10BAR”, Dial marked “WR100”This watch is designed to withstand water pressure up to 333 feet. This includes water exposure from accidental splashing and rain, but also from showering, swimming in a pool and snorkeling. Be sure to rinse the watch with fresh water after exposure to a chlorinated pool, salt water, soaps, etc. After rinsing with fresh water, be sure to dry the exterior with a soft cloth.“Water Resist 20BAR” or “W.R. 20BAR”, Dial marked “WR200”This watch is designed to withstand water pressure up to 666 feet. This includes all exposure to water up to and including recreational SCUBA diving. Be sure to rinse the watch with fresh water after exposure to a chlorinated pool, salt water, soaps, etc. After rinsing with fresh water, be sure to dry the exterior with a soft cloth.Special Note about Jacuzzis and Hot TubsThe various components used in the manufacture and assembly of your watch expand at various rates. This results in a loss of the sealing capabilities of gaskets, which may allow moisture to enter. In addition, heat from these sources can cause deformation of certain materials leading to mechanical failures. For these reasons, you should remove your watch before entering a hot tub or Jacuzzi.。
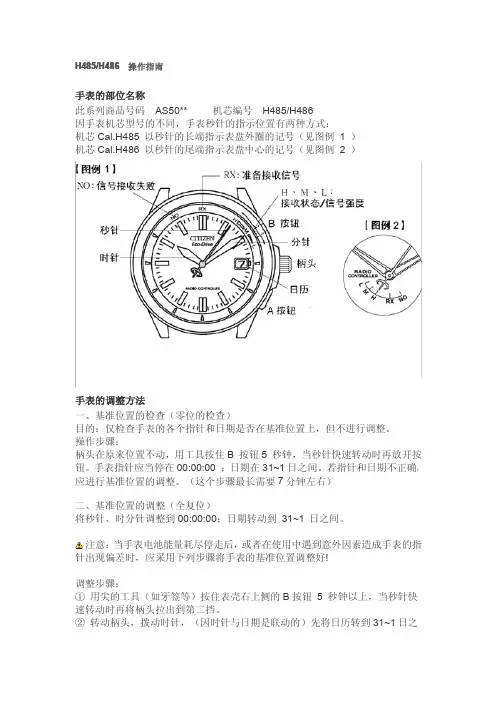
H485/H486操作指南手表的部位名称此系列商品号码AS50**机芯编号H485/H486因手表机芯型号的不同,手表秒针的指示位置有两种方式:机芯Cal.H485以秒针的长端指示表盘外圈的记号(见图例1)机芯Cal.H486以秒针的尾端指示表盘中心的记号(见图例2)手表的调整方法一、基准位置的检查(零位的检查)目的:仅检查手表的各个指针和日期是否在基准位置上,但不进行调整。
操作步骤:柄头在原来位置不动,用工具按住B按钮5秒钟,当秒针快速转动时再放开按钮。
手表指针应当停在00:00:00;日期在31~1日之间。
若指针和日期不正确,应进行基准位置的调整。
(这个步骤最长需要7分钟左右)二、基准位置的调整(全复位)将秒针、时分针调整到00:00:00;日期转动到31~1日之间。
注意:当手表电池能量耗尽停走后,或者在使用中遇到意外因素造成手表的指针出现偏差时,应采用下列步骤将手表的基准位置调整好!调整步骤:①用尖的工具(如牙签等)按住表壳右上侧的B按钮5秒钟以上,当秒针快速转动时再将柄头拉出到第二挡。
②转动柄头,拨动时针,(因时针与日期是联动的)先将日历转到31~1日之间,再把时针对到12点整。
③按动A钮,转动柄头,将秒针及分针都对准到12点。
(秒针与分针是联动的)④将柄头推回正常位置,再按一下B钮,基准位置调整完毕。
⑤将柄头推回到正常位置,基准的位置已调整好,请进行一次“手动接收”后即可使用(无信号地区需再调整时间和日期后才能正常使用)注意:在柄头拉出到第二挡后,按动A钮可以来回切换[时针/日期]与[秒针/分针]的调整。
三、日期和时针的调整方法①将柄头拉出到第二挡,此时秒针会自动停到12点处。
②按一下A按钮。
③每转动柄头一次,时针会移动一小时;当快速转动柄头(感觉到“嗒嗒”两声以上时)可以使时针快速转动。
④当经过夜间10点到凌晨2点时,日期会移动一天,根据上述日历变化,可区分手表指针的上或下午,避免发生中午跳日历的现象。

感谢您购买本款西铁城⼿表。
使⽤⼿表前,请认真阅读本说明⼿册以便您正确使⽤。
阅读完⼿册后,请妥善保存以便随后参阅。
1安全预防注意事项本⼿册可能包含某些安全建议。
任何时候使⽤⼿表都应该遵循这些建议以确保获得⼿表的最佳性能,防⽌伤害⾃⼰,他⼈以及造成财产损失。
■ 安全建议在本⼿册中按如下所⽰进⾏分类和描述:2■ 重要指⽰在本⼿册中按如下所⽰进⾏分类和描述:<使⽤之前的注意事项—保护贴膜>⼿表出⼚前,部分表玻璃,表壳,⾦属表带和扣环的⾦属部件均覆盖了贴膜,保护⼿表在从⼯⼚运输到商店的过程中不被印上指纹或刮花。
如果不先剥去贴膜就佩戴⼿表,汗⽔或⽔汽可能会进⼊保护贴膜和⼿表部件之间的缝隙⽽产⽣⼀些污垢,导致⽪肤出现红疹或⾦属部件被腐蚀。
因此,请务必在佩戴⼿表前剥去贴膜。
3使⽤⼿表前使⽤⼿表前请务必先做下列事项:第16 页检查⼿表的电量。
第18 页选择您想要显⽰时间和⽇期的城市或时差。
第17 页检查电波信号的接收结果。
45使⽤⼿表前 (4)⼿表各部位名称 (8)关于充电 (10)检查⼿表剩余电量 (16)检查电波信号接收 (17)设置世界时间 (18)电波信号接收说明............26⼿动接收电波信号(强制接收) (34)切换夏令时和标准时间 (36)⼿动调整时间/⽇历 (42)检查并调整指针基准位置 (46)⽬录6故障排除 (50)复位⼿表—全复位 (54)Eco-Drive(光动能)⼿表使⽤的注意事项 (56)防⽔功能 (60)注意事项 (63)维护 .......................................68信息 (69)规格 (70)7关于充电本表有⼀个充电电池,让阳光或荧光直接照射到表盘即可Array充电。
取下⼿表后,放置时请让表盘朝向亮光处,如靠窗附近。
1011此外,为了获得最佳性能,请执⾏以下操作:• 每⽉⾄少⼀次让表盘在阳光下照射五⾄六⼩时。
• 长期将⼿表保存于暗处之前,请确保对其完全充电。
西铁城光动能手表简化说明书把的位置:平时为原位,拉出时分别为位置1、位置2。
按钮:把的上方为按钮A,把的下方为按钮B。
表盘下方为模式指针,TME—时间,CAL—日历,ALM—闹铃,L-TM—本地时间。
切换模式时先将把的拉出位置1。
一、基准位置的确认与调整1、将把拉出位置1,秒针会停止在30秒位置,将模式指针对准L-TM。
2、将把的按回原位。
3、按住A钮10秒以上,各指针开始连续转动后松开A钮。
指针停止转动后显示基准位置。
正确的基准位置为:24小时指针:24:00时针分针秒针:00:00功能针:SUN日期:1日4、基准位置调整:秒针:上接3,功能针停止转动时将把的拉出位置2,顺时针转动把的将秒针调至0。
分针和时针:按A钮,分针进行示范转动后,分针和时针进入调整状态。
可以顺转和反转,慢转和快转。
将分针和时针最终对准12:00。
日历:按A钮,功能针及日期进行示范转动。
手表进入日历调整状态。
转动把的调整(略)。
结束基准位调整:将把的按回原位并按A钮。
二、时间设定1、将把的拉出位置1。
2、模式针对准TME。
3、将把的拉出位置2,秒针会停在0秒位置。
4、转动把的设定时间。
设定完后将把的按回原位。
三、日期设定1、将把的拉出位置1。
2、转动把的将模式针对准CAL。
3、将把的拉出位置2,秒针显示月份。
以下依次设定:4、设定年份。
转动把的开始年份改变:LY(闰年)、+1、+2、+3。
5、按A钮,秒针转一周后进入月份调整状态(月份只能顺时针调整)。
6、按A钮,进入日期调整状态。
转动把的设定日期。
7、按A钮,转动把的设定星期。
年月日星期设定完毕,将把的按回原位,将模式指针调回TME。
四、本地时间设定将把的拉出位置1,模式指针对准L-TM。
再将把的拉出位置2,转动把的设24小时当地时间,与时针同步,以小时为单位设定。
附:闰年。
闰年(LY)4年一轮,为2008、2012、2016……,闰年后依次为+1、+2、+3、LY……。
西铁城光动能说明书篇一:E870西铁城万年历光动能手表简易调时间说明S1钮S2钮E870机芯调整方法:(光动能万年历)功能针说明:TME:显示时间CAL:显示年月ALM:闹铃功能L-TM:异地时间1.零位置确认:柄头1段,把功能针调到L-TM状态,柄头正常位置,按S1钮10秒钟以上,针回零位置。
2.零位置调整:柄头一档,转柄头把功能针调到L-TM位置,柄头拔到二档,同时按S1、S2钮听声音,试运针。
转柄头把大秒针调到12点,按S1钮,时分针摆动,转柄头把时分针调到12点,24小时针调到24正中间。
按S1钮,机能针动,转柄头把机能针调到日历1号第二圈的SUN上。
(正、反转都可以),柄头调回正常位置,大秒针一秒运针。
3.对时间调整:柄头一档,转柄头把功能针调到TME位置,柄头拔到二档,对到正常时间。
4.年月日调整:柄头一档,转柄头把功能针调到CAL位置,柄头拔到二档,机能针停在L.Y(润年)位置上,转柄头调到当年。
按S1钮,大秒针停在1点(1月)位置上,转柄头调到当月。
按S1钮,机能针停在SUN上,转柄头调到当前日期(正、反调都可以)。
按S1钮,机能针动一下,转柄头调到当前星期。
5.闹铃检查:柄头一档,转柄头把功能针调到ALM位置,时、分、秒针自动转到12点机能针停在OFF上,柄头推回正常位置,按S2钮,确认声音。
柄头二档,机能针停在ON位置,按S2钮,OFF与ON的转换。
6.时差调整:柄头一档,把功能针调到L-TM位置,时间会自动追赶到现在时间,柄头二段,轻轻旋转柄头正转快一小时,反转逆一小时。
篇二:西铁城H415说明书日期、小时的调整:柄头零段,按B钮时针摆动,转柄头使时针带动日历转到当前的日期和时间,请您了解!一、基准位置确认:柄头1段,按B钮5秒,指针转动停止后时、分、秒针停在12(24)点,日期回1号。
二、基准位置调整:柄头2段,每按A钮可以切换时针、秒针、日期摆动,转动柄头调整到时、分、秒针停在12(24)点,日期回1号。
修理除了表带之外,本表的所有修理均应由西铁城进行以维持本表质量。
因为本表的修理、检查和调节需要特殊技术和设备。
手表需要修理或其他服务时,请与西铁城维修服务中心联系。
1本电波手表接收中华人民共和国播送的标准时间电波●仅接收中华人民共和国播送的标准时间电波(BPC)。
●本电波手表不会影响人体和医疗器械。
使用本表前,请先将其置于充足的光线下充满电充电不足时,秒针会每两秒走动一下。
按照“充电时间通用参考”(第44页)一节中的说明,给手表充电。
时间。
345本表不影响人体或医疗器械,可以无此顾虑地使用(手表不发射电波)。
◎本表是光动能(Eco-Drive)电波手表,具有将光能转换为电能来驱动手表的光电发电功能。
本表也具有节能功能,当表盘不受光线照射时减少手表的电能消耗。
◎本表具有「表针校正功能」,如果强烈撞击或磁力等外界因素导致手表不准确,可自动校正时间。
◎本表具有时差校正功能,便于在海外使用。
当前往不同时区的地区或国家时,该功能便于将手表设置为当地时间。
《螺丝锁定表把的操作步骤》《持续转动表针》快速持续转动表把(两下或多下)当表把在第一段或第二段时,请快速持续向右或向左转动表把(两下或多下)以持续转动表针(时针、分针或秒针)和日历(星期、日期)。
向右或向左转动表把一次(一下)以停止表针转动。
※转动表把时,指尖能感觉到轻微的卡嗒一声。
特征操作表把• •表把弹出一些至正常位置。
67【插图1∶以秒针短臂显示接收结果等的机型】【插图2∶以秒针长臂显示接收结果等的机型】*您所购买之手表与本手册中的插图可能会有所不同。
■部件名称■●本手册提供的操作说明基于以秒针短臂显示接收结果等的机型。
如果手表为以秒针长臂显示接收结果等的机型,使用本手册时请参考插图2。
接收程度/接收结果M、L)8■使用手表前请检查下列事项■【以秒针短臂显示接收结果等的机型】【以秒针长臂显示接收结果等的机型】M∶L∶/中低1011间和日期。
《接收步骤》●从手腕上取下手表,将其置于如窗子附近的易于接收电波信号的稳定平面上,并将9点位置(接收电波信号的天线)对准电波发讯基地台方向。
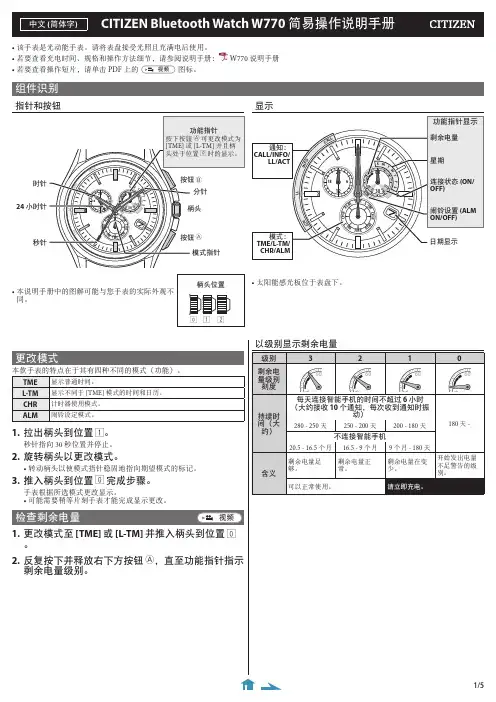
• 该手表是光动能手表。
请将表盘接受光照且充满电后使用。
• W770 说明手册• 若要查看操作短片,请单击 PDF 上的图标。
组件识别指针和按钮1. 拉出柄头到位置 1。
秒针指向 30 秒位置并停止。
2. 旋转柄头以更改模式。
• 转动柄头以使模式指针稳固地指向期望模式的标记。
3. 推入柄头到位置 0 完成步骤。
手表根据所选模式更改显示。
• 可能需要稍等片刻手表才能完成显示更改。
1. 更改模式至 [TME] 或 [L-TM] 并推入柄头到位置 0。
2. 反复按下并释放右下方按钮 A ,直至功能指针指示剩余电量级别。
显示您可以在以下网站查看有关兼容的智能手机(运行 Android OS 5.1/iOS 9.3 或更高版本温馨提示,本商品适用于iPhone 5以上的机型。
)和专门应用程序的信息: /support/• 本款手表在一定程度上可通过专门应用程序操作,并且其部分功能仅可通过此应用程序使用。
注意在飞机等限制使用电子设备的场所,应终止与智能手机的连接,并将手表模式更改为 [CHR]。
时间信息接收本款手表可以从智能手机接收时间信息,并自动调整时间和日历(自动接收时间信息)。
每天第一次取消节能状态时(手表 [TME] 模式下 3:00 AM 之后),执行时间信息的自动接收。
• 即使手表与可连接的智能手机断开,也会临时与此手机保持连接状态并获取时间信息。
自动接收时间信息功能在以下情况下不可用:• 手表模式不是 [TME] 或 [L-TM] 时。
• 专门应用程序的[时间同步]设置未启用时。
手表上的通知显示• 仅当手表模式为 [TME] 或 [L-TM] 且柄头处于 0 位置时,才会显示秒针的通知显示。
手表收到上述以外状态的通知时,将推迟显示通知,直到状态更改为上述任意状态。
• 如果手表在显示一个通知时又收到一个新通知,将取消旧通知并显示新通知。
通知声音和振动可使用应用程序上的 [Notification] 设置为秒针的指示激活通知声音和振动。
西铁城光动能NH8343-03W操作指南光动能电波表的工作原理是是以原子钟为基础,通过腕表内藏的天线接收电波塔发出的标准时间电波信号,自动调整时间和日期。
由于电波塔的时计是用稀有的铯原子(Cesium)所制,所以能准确的保持标准时间,拥有10万年误差1秒的惊人效能。
电波校对不仅省却了对时之烦,而且走时非常精准,可以说是分秒不差。
即使有几秒误差,每天两次自动校对,立刻恢复零误差的正确时间。
光动能电波表分为单局时区接收和多局时区接收两种类型。
多局时区接收电波表可以接收到位于中国、日本、美国、德国等地的电波塔信号,无论走到何处都会自动调整为当地的标准时间。
单局时区接收电波表只能接收本国区域内覆盖的的电波信号,而且频段各不相同,互不通用。
西铁城的手表调时间注意事项1、西铁城手表星期日历跳格,由于制格不同分为快慢两种,第一种±5分钟内日历跳格完成,第二种在3小时内日历跳格完成。
2、如遇采用螺旋式表冠的西铁城手表,切勿硬拔,请先逆时针方向旋转打开锁紧之表冠,在调整好时间后,将西铁城表表冠顺时针方向转动并推入锁紧,以免进水。
3、如遇带日历的西铁城表需调节日期,请先将日历调到您所需要日期的前一天,之后转动时针来调节日期,当时针经过午夜12点时日期会变更,这样可以避免直接调节日期造成日夜的混淆。
4、西铁城手表的日历,星期,月相之调整切勿在手表时间21:00PM---3:00AM之间操作,此期间日历功能正在进行运作,同时也是齿轮啮合度较低的时候,频繁的动作会损伤手表的内部零件。
另外专家提醒:必须要注意西铁城电波表的检测和维修是一项非常专业的技术,需要一系列专用的检测设备和仪器,一般的修理店不具备这些设备和技术。
一旦发现出现故障的光动能电波表一定要送到西铁城指定公司进行检测维修。
以上就是西铁城光动能手表怎么调时间的方法,希望能为西铁城光动能手表的使用者提供一些帮助。
光动能手表,不仅节电,号称环保手表,而且时间方面非常精准,实现了美、工艺、技术三结合!。
1. 产品特长2. 使用前须知3. 表盘及按钮说明4. 光动能手表特有的功能•充电不足警告功能•快速启动功能•本表因电量不足而停止运作时•过度充电防止功能5. 充电时间的参考6. 使用注意事项•务必请经常为本表充电7. 充电电池的更换8. 时间及日期的设定•设定时间•设定日期9. 秒表的使用10. 秒表秒针的0位调整11. 注意事项12. 规格目录199200201202207208210211214216218224本表是一个使用光动能运作的手表。
在手表玻璃下装有一个光动能电池,可将光能转变为电能。
本表设有多个实用功能,包括24小时时间显示及能以1秒为单位进行60分钟计时的秒表功能。
................................................................................................................................................................................................................................................................................................................................................................................................................................................................................................................................................................................................................................................................................................................................................................................................................................................................................................................................................................................................................................................................................................................................................................................................1. 产品特长1981992002013. 表盘及按钮说明本表是一个使用光动能运作的手表。
多谢您惠购西铁城手表。
在使用手表之前 请详读本说明书 以确保正确使用 阅读后请妥善保管 以便将来查询目录1.产品特长 (5)2.使用前须知 (6)3.部位名称 (11)4.指针基准位置的确认及调整 (20)• 基准位置的确认• 如何在基准位置确认后返回异地时间模式• 基准位置的调整5.切换手表指针的模式 (33)6.时间的设定 (36)• 时间设定操作步骤7.日期的设定 (40)• 日期设定操作步骤8.闹铃的使用 (51)• 闹铃时间的设定• 闹铃的打开与关闭• 闹铃音监听器• 闹铃音的停止• 闹铃的开/关确认9.设定异地时间 (58)• 异地时间设定步骤10.光动能手表特有的功能 (62)• 充电不足警告功能• 充电过度防止功能• 节电功能11.参考充电时间 (71)12.光动能手表使用注意事项 (75)• 充电注意事项• 请妥善保管充电电池• 只使用专用充电电池13.有关更换充电电池的问题 (78)14.系统复位 (79)• 系统复位操作步骤15.注意事项 (82)16.规格 (93)1.产品特长本表是一款使用光能做能源的手表。
在手表表盘下设有一个太阳能感光板,可将光能转变为电能。
本表还配备有多种实用功能,其中包括日期自动变更的万年历(直到2100年2月28日为止,包括闰年在内,从上一次闰年后经过的年、月、日及星期会自动改变),24小时制的每日闹铃,以及能以一小时为单位设定时差的异地时间功能。
2.使用前须知切换模式时请注意柄头的位置。
将柄头拉出至位置1时可以改变本表的模式。
若将柄头拉出至位置2,秒针将移动至0秒位置,同时手表会进入各模式的调整状态(在时间模式或闹铃模式时;在日期模式中时秒针改为用于显示月份,而在异地时间模式中时秒针将以1秒为间隔持续转动)。
在时间模式中将柄头拉出至位置2时,时间会由于秒针的停止而变得不准确。
除此之外,若在各模式中将柄头拉出至位置2,则柄头转动时,设定的时间、日期、闹铃时间等都会改变,因此请注意将柄头拉出时不要用力过大。
您的手表1. 特征时间和日期校正3. 设定时间和日期太阳能4. 太阳能功能<带有秒针的型号>C. 快速启动(仅涉及带有秒针的型号)如果手表因充电不足而停止,表面若约十秒接受光照(大约500 lx),秒针会开始每两秒走动一下。
(表针重新走动需要的时间根据型号而变。
)注意此时电池并未充足电。
D. 充电时间指南充电时间因机型(包括表面的颜色)而异。
下列数据仅供参考。
*充电时间基于连续接收光源的时间。
走动一天所需的充电时间‧在正常走动的情况下,手表走动一天所需的充电时间。
充足电的时间‧‧‧‧‧‧‧因充电不足而使手表停下后所需的充足电的时间。
40分钟12分钟2分钟30 W荧光灯下20厘米阴天在盛夏直射阳光下35小时9.5小时1小时-----70小时10小时照度(lx)环境3,00010,000100,000走动一天所需的充电时间从停止到恢复每秒走动一下的时间充足电的时间充电时间(大约)197196199198【注】充足电的电池可驱动手表走动九个月而不需再次充电。
如果手表因充电不足而停止,注意每天充电。
另外,推荐每月一次地将手表较长时间置于直射阳光下充电。
<没有秒针的型号>40分钟12分钟 2分钟30 W 荧光灯下20厘米阴天在盛夏直射阳光下14小时4.5小时25分钟-----60小时11小时照度(lx)环境3,00010,000100,000走动一天所需的充电时间从停止到恢复每秒走动一下的时间充足电的时间充电时间(大约)201200注意充电须知◆请勿在高温环境(约60℃以上)下给手表充电。
充电时如果出现过热的情况,可能会使手表外壳褪色、手表变形或机芯损坏。
例∶•在易于发热的白炽灯、卤素灯或其它光源附近充电。
•在汽车仪表板等易于发热的平面上充电。
◆当用易于发热的白炽灯、卤素灯或其它光源充电时,请将手表远离光源至少50厘米,以防过热。
E . 操作您的手表警告充电电池处理方法◆除非不可避免,请勿自行从手表中取出充电电池。
西铁城bu2023-12e男士光动能手表说明书产品参数:名称:西铁城BU2023-12E男士光动能手表型号:BU2023-12E品牌:西铁城机芯类型:光动能产品介绍:西铁城BU2023-12E男士光动能手表具备的节电功能,能够保证手表在充足电的状态下在黑暗中保持运行6个月至10年不等,遇光后,时间显示即可自动追至当前正常时间。
光动能不但易于使用,而且功能齐备。
此外,由于无需定期更换电池,有助于推动环保,为地球环境做出很大的贡献。
手表的调整方法:一、基准位置的检查(零位的检查):目的:仅检查手表的各个指针和日期是否在基准位置上,但不进行调整。
操作步骤:柄头在原来位置不动,用工具按住 B 按钮5秒钟,当秒针快速转动时再放开按钮。
手表指针应当停在00:00:00;日期在1~31日之间。
若指针和日期不正确,应进行基准位置的调整。
二、基准位置的调整(全复位):目的:将秒针、时分针调整到00:00:00;日期转动到1~31日之间。
注意:当手表电池能量耗尽停走后,或者在使用中遇到意外因素造成手表的指针出现偏差时,应采用下列步骤将手表的基准位置调整好。
调整步骤:①用尖的工具(如牙签等)按住表壳右上侧的 B 按钮5秒钟以上,当秒针快速转动时再将柄头拉出到第二挡。
②转动柄头,拨动时针,(因时针与日期是联动的)先将日历转到1~31日之间,再把时针对到12点整。
③按动 A 钮,转动柄头,将秒针及分针都对准到12点。
④将柄头推回正常位置,再按一下 B 钮,基准位置调整完毕。
⑤将柄头推回到正常位置,基准的位置已调整好,请进行一次“手动接收”后即可使用。
西铁城光动能说明书
篇一:E870西铁城万年历光动能手表简易调时间说明S1钮
S2钮
E870机芯调整方法:(光动能万年历)
功能针说明:
TME:显示时间
CAL:显示年月
ALM:闹铃功能
L-TM:异地时间
1.零位置确认:
柄头1段,把功能针调到L-TM状态,柄头正常位置,按S1钮10秒钟以上,针回零位置。
2.零位置调整:
柄头一档,转柄头把功能针调到L-TM位置,柄头拔到二档,同时按S1、S2钮听声音,试运针。
转柄头把大秒针调到12点,按S1钮,
时分针摆动,转柄头把时分针调到12点,24小时针调到24正中间。
按S1钮,机能针动,转柄头把机能针调到日历1号第二圈的SUN上。
(正、反转都可以),柄头调回正常位置,大秒针一秒运针。
3.对时间调整:
柄头一档,转柄头把功能针调到TME位置,柄头拔到二档,对到正常时间。
4.年月日调整:
柄头一档,转柄头把功能针调到CAL位置,柄头拔到二档,机能针停在L.Y(润年)位置上,转柄头调到当年。
按S1钮,大秒针停在1点(1月)位置上,转柄头调到当月。
按S1钮,机能针停在SUN上,转柄头调到当前日期(正、反调都可以)。
按S1钮,机能针动一下,转柄头调到当前星期。
5.闹铃检查:
柄头一档,转柄头把功能针调到ALM位置,时、分、秒针自动转到12点
机能针停在OFF上,柄头推回正常位置,按S2钮,确认声音。
柄头二档,机能针停在ON位置,按S2钮,OFF与ON的转换。
6.时差调整:
柄头一档,把功能针调到L-TM位置,时间会自动追赶到现在时间,柄头二段,轻轻旋转柄头正转快一小时,反转逆一小时。
篇二:西铁城H415说明书
日期、小时的调整:柄头零段,按B钮时针摆动,转柄头使时针带动日历转到当前的日期和时间,请您了解!
一、基准位置确认:柄头1段,按B钮5秒,指针转动停止后时、分、秒针停在12(24)点,日期回1号。
二、基准位置调整:柄头2段,每按A钮可以切换时针、秒针、日期摆动,转动柄头调整到时、分、秒针停在12(24)点,日期回1号。
三、时间调整:柄头1段,秒针指在当前城市名,转动柄头调秒针到所需城市,时针会自动转动到需要城市的时间。
柄头2段,秒针指在夏令时显示。
按A钮,秒针指0点可转动柄头调分针时间(分针和秒针连动)。
再按A钮时针摆,可调时针。
再按A钮可调整日期到当前。
再按A钮可调整年、月。
其它功能: 1.电量检查:按A钮秒针正走-停止是有电,秒针逆走需充电。
没电情况下,秒针只停在12点。
2.自动接收信号时间为凌晨的2点、3点和4点。
如有不明,您可以拨打西铁城客服热线400-650-1958咨询。
因为女装手表的表盘面积比较小,吸收光线比男装手表少,所以充电时间要长些。
在光线较弱的环境下充电,建议将表把拔出后再充电。
光动能不能自动调整日期,只是说明手表的表盘能吸收光能转化在电能而已。
4月30天时,也是按31天走的,到了1号,把原来的31拔多一天就行了。
光波手表才能自己调整日期的。
一、基准位置确认:柄头零段,按B钮10秒钟以上,
各指针停在原记忆位置,时、分、秒针停在11(23)点,日期停在31号~1号之间。
二、时差调整: 1.柄头一段,转柄头将时针停在11(23)点。
2.柄头零段,按B钮调整完毕。
三、基准位置调整: 1.柄头2段,同时按AB扭,转柄头将日期调至到31~1号之间时针停在11(23)点。
时针和日期连动。
柄头0段,按B扭,转柄头将日期调到31-1号之间时针停在23点。
2.柄头二段,同时按AB扭,转柄头将分针、秒针调至12点。
3.柄头零段,按B钮调整完毕。
四、时间、日期、年月的调整: 1、日期、小时的调整:柄头零段,按B钮时针摆动,转柄头使时针带动日历转到当前的日期和时间(注意区分上下午) 2、分钟的调整:柄头二段,转表把将分针调到当前时间。
(分针、秒针连转) 3、年、月的调整:柄头一段,秒针停在1点位置(1月),转柄头将秒针调至当年当月。
整刻度上为闰年,切分1、2、3分别为平年的1、2、3年。
西铁城H415机芯的手表怎样调整时差,比北京时间快一个小时
如果是普通石英表,拔出表把到第二档(第一档是调日期)往后调慢一小时就可以。
如果是电波表,那得到西铁城专柜调。
篇三:西铁城手表c652说明书。