华为交换机命令大全
- 格式:doc
- 大小:77.50 KB
- 文档页数:7

华为路由器交换机配置命令大全华为路由器交换机配置大全本文提供XXX路由器交换机的配置命令,包括计算机命令和交换机命令。
一、计算机命令以下是一些常用的计算机命令:shutdown-hnow;关机init 0;关机logout;用户注销login;用户登录ifconfig;显示IP地址ifconfig eth0 netmask;设置IP地址ifconfig eht0 netmask down;禁用IP地址route add 0.0.0.0 gw;设置网关route del 0.0.0.0 gw;删除网关route add default gw;设置网关route del default gw;删除网关route;显示网关ping;发ECHO包;远程登录二、XXX路由器交换机配置命令以下是一些常用的XXX路由器交换机配置命令:Quidway]dis cur;显示当前配置Quidway]display n;显示当前配置Quidway]display interfaces;显示接口信息Quidway]display vlan;显示vlan信息Quidway]display n;显示版本信息Quidway]super password;修改特权用户密码Quidway]sysname;交换机命名Quidway]XXX;进入接口视图Quidway]interface vlan x;进入接口视图Quidway-Vlan-interface x]ip address 10.65.1.1 255.255.0.0;配置VLAN的IP地址Quidway]Ip route-static 0.0.0.0 0.0.0.0 10.65.1.2;静态路由=网关Quidway]rip;rip协议Quidway]local-user ftpQuidway]user-interface vty 0 4;进入虚拟终端S3026-ui-vty0-4]n-mode password;设置口令模式首先,这篇文章需要进行重新排版和编辑,以便更清晰地传达信息。


华为路由器交换机常用命令一、设备管理命令1.登录管理命令- ssh [ip地质] -p [端口号]:通过SSH协议登录设备。
- telnet [ip地质]:通过Telnet协议登录设备。
- logout:退出设备。
2.用户管理命令- display current-configuration:显示当前设备配置信息。
- save:保存当前配置。
- undo save:取消保存的配置。
- super:切换到超级用户模式。
- user-interface console 0:配置控制台终端的参数。
- user-interface vty 0 4:配置远程登录终端的参数。
3.设备操作命令- reboot:重启设备。
- reset saved-configuration:恢复出厂配置。
- display version:显示设备的硬件和软件版本信息。
- display device:显示设备的基本信息。
- display interface[接口名称]:显示指定接口信息。
- display ip routing-table:显示IP路由表信息。
二、网络配置命令1.IP配置命令- interface [接口名称]:进入指定接口。
- ip address [IP地质] [子网掩码]:配置接口IP地质。
- undo ip address:取消接口IP地质配置。
- ip route-static [目标网络] [子网掩码] [下一跳地质]:配置静态路由。
- undo ip route-static [目标网络] [子网掩码] [下一跳地质]:取消静态路由配置。
2.VLAN配置命令- vlan [VLAN ID]:创建指定VLAN。
- quit:退出VLAN配置模式。
- interface vlan [VLAN ID]:进入指定VLAN接口。
- ip address [IP地质] [子网掩码]:为VLAN接口配置IP地质。

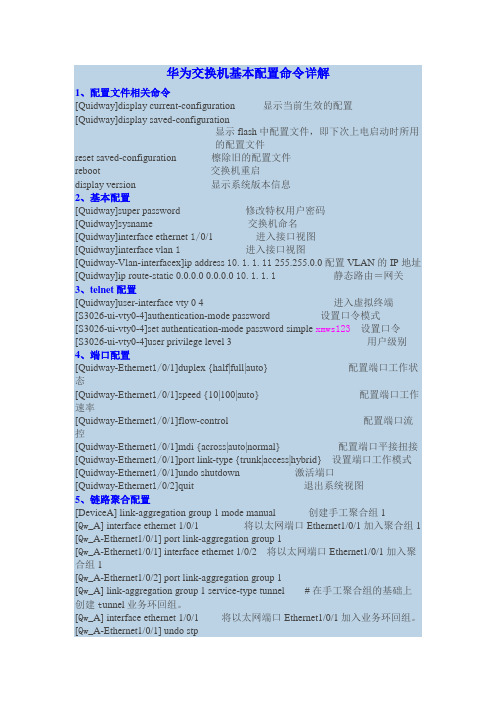
华为交换机基本配置命令详解1、配置文件相关命令[Quidway]display current-configuration 显示当前生效的配置[Quidway]display saved-configuration显示flash中配置文件,即下次上电启动时所用的配置文件reset saved-configuration 檫除旧的配置文件reboot 交换机重启display version 显示系统版本信息2、基本配置[Quidway]super password 修改特权用户密码[Quidway]sysname 交换机命名[Quidway]interface ethernet 1/0/1 进入接口视图[Quidway]interface vlan 1进入接口视图[Quidway-Vlan-interfacex]ip address 10.1.1.11 255.255.0.0配置VLAN的IP地址[Quidway]ip route-static 0.0.0.0 0.0.0.0 10.1.1.1静态路由=网关3、telnet配置[Quidway]user-interface vty 0 4 进入虚拟终端[S3026-ui-vty0-4]authentication-mode password 设置口令模式[S3026-ui-vty0-4]set authentication-mode password simple xmws123设置口令[S3026-ui-vty0-4]user privilege level 3 用户级别4、端口配置[Quidway-Ethernet1/0/1]duplex {half|full|auto} 配置端口工作状态[Quidway-Ethernet1/0/1]speed {10|100|auto} 配置端口工作速率[Quidway-Ethernet1/0/1]flow-control 配置端口流控[Quidway-Ethernet1/0/1]mdi {across|auto|normal} 配置端口平接扭接[Quidway-Ethernet1/0/1]port link-type {trunk|access|hybrid} 设置端口工作模式[Quidway-Ethernet1/0/1]undo shutdown 激活端口[Quidway-Ethernet1/0/2]quit 退出系统视图5、链路聚合配置[DeviceA] link-aggregation group 1 mode manual 创建手工聚合组1[Qw_A] interface ethernet 1/0/1 将以太网端口Ethernet1/0/1加入聚合组1 [Qw_A-Ethernet1/0/1] port link-aggregation group 1[Qw_A-Ethernet1/0/1] interface ethernet 1/0/2 将以太网端口Ethernet1/0/1加入聚合组1[Qw_A-Ethernet1/0/2] port link-aggregation group 1[Qw_A] link-aggregation group 1 service-type tunnel # 在手工聚合组的基础上创建t unnel业务环回组。

1.进入管理界面:system-view2.设置用户登录时需要进行口令验证,且验证口令为huawei。
[Quidway] user-interface 0[Quidway-ui0] authentication-mode password[Quidway-ui0] set authentication password simple huawei3. 设置从用户界面登录后可以访问的命令级别: user privilege level level恢复从用户界面登录后可以访问的命令级别为缺省级别: undo user privilege level4.系统IP配置:a.创建并进入管理VLAN接口视图:interface vlan-interface vlan-id删除管理VLAN :undo interface vlan-interface vlan-idb.配置管理VLAN接口IP地址:ip address ip-address net-mast删除管理VLAN接口IP地址:undo ip address [ip-address net-mast]5. 进入Ethernet0/1以太网端口视图。
[Quidway] interface ethernet0/16. 配置端口Ethernet0/1为Trunk端口,并允许2、6到50、100等VLAN通过。
[Quidway-Ethernet0/1] port link-type trunk[Quidway-Ethernet0/1] port trunk permit vlan 2 6 to 50 100创建VLAN 100。
[Quidway] vlan 100配置端口Ethernet0/1的缺省VLAN ID为100。
[Quidway-Ethernet0/1] port trunk pvid vlan 1007. 创建VLAN并进入VLAN视图: vlan vlan_id删除已创建的VLAN: undo vlan{ vlan_id [ to vlan_id ] | all }8. 为指定的VLAN增加以太网端口: port interface_list删除指定的VLAN的某些以太网端口: undo port interface_list创建VLAN2并进入其视图。
一、清空配置:<HUAWEI> reset saved-configuration(清楚下次启动时使用的配置文件信息)然后重启设备,重启设备室提示保存信息,选择“NO”。
<HUAWEI> reset saved-configurationWarning: The action will delete thesaved configuration in the device.The configuration will be erased to reconfigure. Continue? [Y/N]:yWarning: Now clearing the configuration inthe device.Info: Succeeded in clearing the configuration in the device.<HUAWEI> rebootInfo: The system is now comparing the configuration, pleasewait.Warning: The configuration has been modified, and it will be saved tothe next startup saved-configuration file flash:/vrpcfg.zip. Continue?[Y/N]:n //此处请选择“N”Info: If want to reboot with saving diagnosticinformation, input 'N' and then execute 'reboot save diagnostic-information'.System will reboot! Continue?[Y/N]:y二、通过STelnet/Telnet登录交换机设置新的Console口登录密码# 以登录用户界面的认证方式为密码认证,密码为Huawei@123为例,配置如下。
华为交换机基本配置命令详解1、配置文件相关命令[Quidway]display current-configuration 显示当前生效的配置[Quidway]display saved-configuration显示flash中配置文件,即下次上电启动时所用的配置文件reset saved-configuration 檫除旧的配置文件reboot 交换机重启display version 显示系统版本信息2、基本配置[Quidway]super password 修改特权用户密码[Quidway]sysname 交换机命名[Quidway]interface ethernet 1/0/1 进入接口视图[Quidway]interface vlan 1进入接口视图[Quidway-Vlan-interfacex]ip address 10.1.1.11 255.255.0.0配置VLAN的IP地址[Quidway]ip route-static 0.0.0.0 0.0.0.0 10.1.1.1静态路由=网关3、telnet配置[Quidway]user-interface vty 0 4 进入虚拟终端[S3026-ui-vty0-4]authentication-mode password 设置口令模式[S3026-ui-vty0-4]set authentication-mode password simple xmws123设置口令[S3026-ui-vty0-4]user privilege level 3 用户级别4、端口配置[Quidway-Ethernet1/0/1]duplex {half|full|auto} 配置端口工作状态[Quidway-Ethernet1/0/1]speed {10|100|auto} 配置端口工作速率[Quidway-Ethernet1/0/1]flow-control 配置端口流控[Quidway-Ethernet1/0/1]mdi {across|auto|normal} 配置端口平接扭接[Quidway-Ethernet1/0/1]port link-type {trunk|access|hybrid} 设置端口工作模式[Quidway-Ethernet1/0/1]undo shutdown 激活端口[Quidway-Ethernet1/0/2]quit 退出系统视图5、链路聚合配置[DeviceA] link-aggregation group 1 mode manual 创建手工聚合组1[Qw_A] interface ethernet 1/0/1 将以太网端口Ethernet1/0/1加入聚合组1 [Qw_A-Ethernet1/0/1] port link-aggregation group 1[Qw_A-Ethernet1/0/1] interface ethernet 1/0/2 将以太网端口Ethernet1/0/1加入聚合组1[Qw_A-Ethernet1/0/2] port link-aggregation group 1[Qw_A] link-aggregation group 1 service-type tunnel # 在手工聚合组的基础上创建t unnel业务环回组。
交换机命令---华为路由器配置1.在基于IOS的交换机上设置主机名/系统名:switch(config)# hostname hostname在基于CLI的交换机上设置主机名/系统名:switch(enable) set system name name-string2.在基于IOS的交换机上设置登录口令:switch(config)# enable password level 1 password在基于CLI的交换机上设置登录口令:switch(enable) set passwordswitch(enable) set enalbepass3.在基于IOS的交换机上设置远程访问:switch(config)# interface vlan 1switch(config-if)# ip address ip-address netmaskswitch(config-if)# ip default-gateway ip-address在基于CLI的交换机上设置远程访问:switch(enable) set interface sc0 ip-address netmaskbroadcast-addressswitch(enable) set interface sc0 vlanswitch(enable) set ip route default gateway4.在基于IOS的交换机上启用和浏览CDP信息:switch(config-if)# cdp enableswitch(config-if)# no cdp enable为了查看Cisco邻接设备的CDP通告信息:switch# show cdp interface [type modle/port] switch# show cdp neighbors [type module/port] [detail]在基于CLI的交换机上启用和浏览CDP信息: switch(enable) set cdp {enable|disable} module/port 为了查看Cisco邻接设备的CDP通告信息: switch(enable) show cdp neighbors[module/port] [vlan|duplex|capabilities|detail]5.基于IOS的交换机的端口描述:switch(config-if)# description description-string基于CLI的交换机的端口描述:switch(enable)set port name module/number description-string6.在基于IOS的交换机上设置端口速度:switch(config-if)# speed{10|100|auto}在基于CLI的交换机上设置端口速度:switch(enable) set port speed moudle/number{10|100|auto}switch(enable) set port speed moudle/number{4|16|auto}7.在基于IOS的交换机上设置以太网的链路模式: switch(config-if)# duplex {auto|full|half}在基于CLI的交换机上设置以太网的链路模式: switch(enable) set port duplex module/number {full|half}8.在基于IOS的交换机上配置静态VLAN: switch# vlan databaseswitch(vlan)# vlan vlan-num name vlaswitch(vlan)# exitswitch# configure teriminalswitch(config)# interface interface module/number switch(config-if)# switchport mode accessswitch(config-if)# switchport access vlan vlan-num switch(config-if)# end在基于CLI的交换机上配置静态VLAN:switch(enable) set vlan vlan-num [name name] switch(enable) set vlan vlan-num mod-num/port-list9. 在基于IOS的交换机上配置VLAN中继线: switch(config)# interface interface mod/portswitch(config-if)# switchport mode trunkswitch(config-if)# switchport trunk encapsulation {isl|dotlq}switch(config-if)# switchport trunk allowed vlan remove vlan-listswitch(config-if)# switchport trunk allowed vlan add vlan-list在基于CLI的交换机上配置VLAN中继线: switch(enable) set trunk module/port[on|off|desirable|auto|nonegotiate]Vlan-range [isl|dotlq|dotl0|lane|negotiate] 10.在基于IOS的交换机上配置VTP管理域: switch# vlan databaseswitch(vlan)# vtp domain domain-name在基于CLI的交换机上配置VTP管理域: switch(enable) set vtp [domain domain-name]11.在基于IOS的交换机上配置VTP 模式: switch# vlan databaseswitch(vlan)# vtp domain domain-name switch(vlan)# vtp {sever|cilent|transparent} switch(vlan)# vtp password password在基于CLI的交换机上配置VTP 模式: switch(enable) set vtp [domain domain-name] [mode{ sever|cilent|transparent }][password password]12. 在基于IOS的交换机上配置VTP版本: switch# vlan databaseswitch(vlan)# vtp v2-mode在基于CLI的交换机上配置VTP版本: switch(enable) set vtp v2 enable13. 在基于IOS的交换机上启动VTP剪裁: switch# vlan databaseswitch(vlan)# vtp pruning在基于CL I 的交换机上启动VTP剪裁: switch(enable) set vtp pruning enable14.在基于IOS的交换机上配置以太信道:switch(config-if)# port group group-number[distribution {source|destination}]在基于CLI的交换机上配置以太信道:switch(enable) set port channel moudle/port-rangemode{on|off|desirable|auto}15.在基于IOS的交换机上调整根路径成本:switch(config-if)# spanning-tree [vlan vlan-list] costcost在基于CLI的交换机上调整根路径成本:switch(enable) set spantree portcost moudle/portcostswitch(enable) set spantree portvlancost moudle/port[cost cost][vlan-list]16.在基于IOS的交换机上调整端口ID:switch(config-if)# spanning-tree[vlan vlan-list]port-priority port-priority在基于CLI的交换机上调整端口ID:switch(enable) set spantree portpri {mldule/port}priority switch(enable) set spantree portvlanpri {module/port}priority [vlans]17. 在基于IOS的交换机上修改STP时钟:switch(config)# spanning-tree [vlan vlan-list] hello-time secondsswitch(config)# spanning-tree [vlan vlan-list] forward-time seconds` switch(config)# spanning-tree [vlan vlan-list] max-age seconds在基于CLI的交换机上修改STP时钟:switch(enable) set spantree hello interval[vlan]switch(enable) set spantree fwddelay delay [vlan]switch(enable) set spantree maxage agingtiame[vlan] 18. 在基于IOS的交换机端口上启用或禁用Port Fast 特征:switch(config-if)#spanning-tree portfast在基于CLI的交换机端口上启用或禁用Port Fast 特征: switch(enable) set spantree portfast {module/port}{enable|disable}19. 在基于IOS的交换机端口上启用或禁用UplinkFast 特征:switch(config)# spanning-tree uplinkfast [max-update-rate pkts-per-second]在基于CLI的交换机端口上启用或禁用UplinkFast 特征: switch(enable) set spantree uplinkfast {enable|disable}[rate update-rate] [all-protocols off|on]20. 为了将交换机配置成一个集群的命令交换机,首先要给管理接口分配一个IP地址,然后使用下列命令: switch(config)# cluster enable cluster-name21. 为了从一条中继链路上删除VLAN,可使用下列命令: switch(enable) clear trunk module/port vlan-range22. 用show vtp domain 显示管理域的VTP参数.23. 用show vtp statistics显示管理域的VTP参数.24. 在Catalyst交换机上定义TrBRF的命令如下:switch(enable) set vlan vlan-name [name name] type trbrf bridge bridge-num[stp {ieee|ibm}]25. 在Catalyst交换机上定义TrCRF的命令如下:switch (enable) set vlan vlan-num [name name] type trcrf {ring hex-ring-num|decring decimal-ring-num} parent vlan-num26. 在创建好TrBRF VLAN之后,就可以给它分配交换机端口.对于以太网交换,可以采用如下命令给VLAN分配端口:switch(enable) set vlan vlan-num mod-num/port-num27. 命令show spantree显示一个交换机端口的STP状态.28. 配置一个ELAN的LES和BUS,可以使用下列命令:ATM (config)# interface atm number.subint multiointATM(config-subif)# lane serber-bus ethernet elan-name 29. 配置LECS:ATM(config)# lane database database-nameATM(lane-config-databade)# name elan1-name server-atm-address les1-nsap-addressATM(lane-config-databade)# name elan2-name server-atm-address les2-nsap-addressATM(lane-config-databade)# name …30. 创建完数据库后,必须在主接口上启动LECS.命令如下:ATM(config)# interface atm numberATM(config-if)# lane config database database-nameATM(config-if)# lane config auto-config-atm-address31. 将每个LEC配置到一个不同的ATM子接口上.命令如下:ATM(config)# interface atm number.subint multipointATM(config)# lane client ethernet vlan-num elan-num32. 用show lane server 显示LES的状态.33. 用show lane bus显示bus的状态.34. 用show lane database显示LECS数据库可内容.35. 用show lane client显示LEC的状态.36. 用show module显示已安装的模块列表.37. 用物理接口建立与VLAN的连接:router# configure terminalrouter(config)# interface media module/portrouter(config-if)# description description-stringrouter(config-if)# ip address ip-addr subnet-maskrouter(config-if)# no shutdown38. 用中继链路来建立与VLAN的连接:router(config)# interface module/port.subinterfacerouter(config-ig)# encapsulation[isl|dotlq] vlan-number router(config-if)# ip address ip-address subnet-mask39. 用LANE 来建立与VLAN的连接:router(config)# interface atm module/port router(config-if)# no ip addressrouter(config-if)# atm pvc 1 0 5 qsaalrouter(config-if)# atm pvc 2 0 16 ilnirouter(config-if)# interface atm module/port.subinterface multipointrouter(config-if)# ip address ip-address subnet-maskrouter(config-if)# lane client ethernet elan-numrouter(config-if)# interface atm module/port.subinterface multipointrouter(config-if)# ip address ip-address subnet-namerouter(config-if)# lane client ethernet elan-namerouter(config-if)# …40. 为了在路由处理器上进行动态路由配置,可以用下列IOS命令来进行:router(config)# ip routingrouter(config)# router ip-routing-protocolrouter(config-router)# network ip-network-numberrouter(config-router)# network ip-network-number41. 配置默认路由:switch(enable) set ip route default gateway42. 为一个路由处理器分配VLANID,可在接口模式下使用下列命令:router(config)# interface interface numberrouter(config-if)# mls rp vlan-id vlan-id-num43. 在路由处理器启用MLSP:router(config)# mls rp ip44. 为了把一个外置的路由处理器接口和交换机安置在同一个VTP域中:router(config)# interface interface numberrouter(config-if)# mls rp vtp-domain domain-name45. 查看指定的VTP域的信息:router# show mls rp vtp-domain vtp domain name46. 要确定RSM或路由器上的管理接口,可以在接口模式下输入下列命令:router(config-if)#mls rp management-interface47. 要检验MLS-RP的配置情况:router# show mls rp48. 检验特定接口上的MLS配置:router# show mls rp interface interface number49. 为了在MLS-SE上设置流掩码而又不想在任一个路由处理器接口上设置访问列表:set mls flow [destination|destination-source|full]50. 为使MLS和输入访问列表可以兼容,可以在全局模式下使用下列命令:router(config)# mls rp ip input-acl51. 当某个交换机的第3层交换失效时,可在交换机的特权模式下输入下列命令:switch(enable) set mls enable52. 若想改变老化时间的值,可在特权模式下输入以下命令:switch(enable) set mls agingtime agingtime53. 设置快速老化:switch(enable) set mls agingtime fast fastagingtime pkt_threshold54. 确定那些MLS-RP和MLS-SE参与了MLS,可先显示交换机引用列表中的内容再确定:switch(enable) show mls include55. 显示MLS高速缓存记录:switch(enable) show mls entry56. 用命令show in arp显示ARP高速缓存区的内容。
华为交换机命令大全system-view 进入系统视图quit 退到系统视图sysname 交换机命名vlan 20 创建vlan(进入vlan20)display vlan 显示vlanazundo vlan 20 删除vlan20display vlan 20 显示vlan里的端口20Interface e1/0/24 进入端口24portlink-type access vlan 20 把当前端口放入vlan20undo porte1/0/10 删除当前VLAN端口10display current-configuration 显示当前配置0 2配置交换机支持TELNETinterfacevlan 1 进入VLAN1ip address192.168.3.100 255.255.255.0 配置IP地址user-interfacevty 0 4 进入虚拟终端authentication-modepassword (aut password) 设置口令模式setauthentication password simple 222 (set aut pass sim 222) 设置口令userprivilege level 3(use priv lev 3) 配置用户级别dispcurrent-configuration (disp cur) 查看当前配置display ipinterface 查看交换机VLANIP配置resetsaved-configuration(reset saved) 删除配置(必须退到用户模式)reboot重启交换机0 3跨交换机VLAN的通讯在sw1上:vlan 10建立VLAN 10interfacee1/0/5 进入端口5Portdefault vlan 10 把端口5加入vlan10vlan 20建立VLAN 20interfacee1/0/15 进入端口15portdefault vlan 20 把端口15加入VLAN20interfacee1/0/24 进入端口24portlink-type trunk 把24端口设为TRUNK端口port trunkpermit vlan all 所有端口都能经过此路径在SW2上:vlan 10建立VLAN 10interfacee1/0/20 进入端口20portdefault vlan 10 把端口20放入VLAN10interfacee1/0/24 进入端口24portlink-type trunk 把24端口设为TRUNK端口port trunkpermit vlan all (port trunk permit vlan 10 只能为vlan10使用)24端口为所有VLAN使用displayinterface e1/0/24 查看端口24是否为TRUNKundo porttrunk permit vlan all 删除该句0 4路由器的基础命令汇总dispaly version 显示系统软件版本及硬件信息system-view 切换到系统视图quit 返回interface +接口进入接口视图ip address +IP +mask 配置IP和子网掩码return 返回用户视图<Ctrl+Z> 返回用户视图sysname R1 修改路由器名称为R1display current-configuration 查看路由器当前配置dispaly interface +接口查看路由器接口的状态信息save 保存当前配置display ip interface brief 查看接口与IP相关摘要信息display ip routing-table 查看路由表0 5telnet远程登陆配置user-interface vty 0 4 进入0~4前五个的VTY用户界面进行整体配置authentication-mode password 设置验证方式为密码user privilege level 3 设置用户登陆级别aaa 进入aaa视图local-user admin password cipher hello privilege level 3在aaa视图下设置账号密码和用户级别local-user admin service-type telnet 配置该用户接入类型为aaaq 退回到用户视图user-interface vty 0 4 进入到VTY用户视图authentication-mode aaa 设置验证方式aaa0 6配置Stelnet配置SSHserver:rsalocal-key-pair create 生成本地RSA主机密钥对display rsa local-key-pair public 查看本地密钥对中的公钥信息user-interface vty 0 4 进入VTY用户视图authentication-mode aaa 设置用户验证方式为aaa授权验证方式protocol inbound ssh 指定VTY用户只支持sshq 返回到系统视图aaa 进入aaa视图local-user huawei1 password cipher huawei1 创建用户和设置用户密码local-user huawei1 service-type ssh 配置本地用户接入类型为sshq 退回到用户视图ssh user huawei1 authentication-type password新建ssh用户指定ssh用户认证方式为passwordaaa 进入aaa视图local-user huawei1 privilege level 3 设置huawei1用户级别为3级别范围0~15 stelnet server enable 开启ssh功能display ssh user-information huawei1 查看ssh用户配置信息不指定用户默认查看所有用户display ssh server status 查看ssh服务器全局配置信息0 7STP配置和选路规则stp enable 在交换机上启用STPstp mode stpdis stp 查看stp配置dis stp brief 查看接口摘要信息stp priority 4096 修改交换机优先级为4096stp root primary 设置交换机为主根交换机stp root secondary 命令配置备份交换机display stp interface Ethernet 0/0/2 查看e0/0/2接口的开销值int e0/0/2stp cost 2000 配置接口e0/0/2的带价值为2000stp timer forward-delay 3000 修改STP的ForwardDelay时间为3000cs也就是30sstp bridge-diameter 3 命令设置网络的直径为3stp mode rstp 启用RSTP使用RSTP可以缩短收敛时间int e0/0/1stp edged-port enable 配置接口e0/0/1为边缘端口不参与生成树的计算0 8配置MSTP多实例stp region-configuration 进入MST域视图region-name huawei 配置MST域名为huaweirevision-level 1 配置MSTP的修订级别为1instance 1 vlan 10 指定VLAN10映射到MSTI1active region-configuration 激活MST域配置display stp region-configuration 查看交换机上当前生效的MST域配置信息dis stp instance 0 brief 查看实例0中的生成树状态和统计的摘要信息stp instance 2 priority 0 配置交换机成位实例2中的根交换机0 9RIP路由协议配置rip 创建开启协议进程network + ip 对指定网段接口使能RIP功能IP地址是与路由器直连的网段debugging rip 1 查看RIP定期更新情况terminal debuggingterminal monitor 在屏幕上显示debug信息undo debugging rip 1undo debug all 命令关闭debug调试功能在上面的配置基础上配置RIP2rip 进入子视图模式version 2 配置版本或者直接配置rip 1version 2network + ip10OSPF单区域配置ospf 1 进入ospf视图1代表进程号area 0 创建区域并进入OSPF区域视图,输入要创建的区域ID,骨干区域即区域0network +IP +匹配码display ospf interface 命令查看OSPF接口通告是否正确、display ospf peer 查看OSPF邻居状态display ip routing-table protocol ospf 查看OSPF路由表11配置OSPF区域明文认证ospf 1area 1authentication-mode simple plain huawei plain是口令以明文方式显示authentication-mode md5 1 huawei 配置区域密文认证12配置链路认证int g0/0/1ospf authentication-mode md5 1 huawei 在一条链路中的两个接口配置要相同13配置抑制接口ospf 1silent-interface GigabitEthernet 0/0/1 禁止接口g0/0/1接收和发送ospf报文14技巧对多个接口配置接口抑制ospf 1silent-interface all 抑制所有接口undisplay ip routing-table 10.0.1.1 查看10.0.1.1所在网段的路由条目15基于接口修改int g0/0/0ospf network-type p2mp 修改ospf的网络类型为多到多点ospf network-type broadcast 修改ospf的网络类型为广播ospf dr-priority 100 修改g0/0/0接口的DR优先级为100reset ospf process 重启ospf进程ospf cost 1000 修改ospf的开销值为1000ospf timer hello 20 修改HELLO计时器为20sospf timer dead 80 修改dead计时器为80sospf 1preference 110 修改ospf优先级为110值越大优先级越低16路由引入ospf 1import-route rip 1 在ospf进程中引入ripdefault-route-advertise always 在ospf进程中引入默认路由ripimport-route ospf 1 在rip进程中引入ospfimport-route ospf cost 3 ospf 引入rip时配置开销值default-route originate 在RIP进程中发布默认路由17vrrp(虚拟路由器冗余协议)基本配置int g0/0/0vrrp vrid 1 virtual-ip 172.16.1.254创建VRRP备份组,备份组号为1,配置虚拟IP为172.16.1.254vrrp vrid 1 priority 120 修改优先级为120display vrrp 查看vrrp信息display vrrp briefdisplay vrrp interface g0/0/0 查看VRRP的工作状态18配置VRRP多备份组int g0/0/0vrrp vrid 1 virtual-ip 172.16.1.254创建VRRP备份组,备份组号为1,配置虚拟IP为172.16.1.254vrrp vrid 1 priority 120 修改优先级为120vrrp vrid 2 virtual-ip 172.16.1.253创建VRRP备份组,备份组号为2,配置虚拟IP为172.16.1.253int g0/0/0vrrp vrid 1 virtual-ip 172.16.1.254创建VRRP备份组,备份组号为1,配置虚拟IP为172.16.1.254vrrp vrid 2 virtual-ip 172.16.1.253创建VRRP备份组,备份组号为2,配置虚拟IP为172.16.1.253vrrp vrid 2 priority 120 修改优先级为120vrrp vrid 2 preempt-mode disable 开启非抢占方式19配置VRRP的跟踪接口及认证int g0/0/1vrrp vrid 1 track interface GigabitEthernet 0/0/0 reduced 50监视上行接口G0/0/0,当此接口断掉时,裁减优先级50,使优先级为70vrrp vrid 1 authentication-mode md5 huawei 认证配置20配置基本的访问控制表acl 2000 创建一个编号型ACL,基本ACL的范围是2000~29999rule 5 permit source 1.1.1.1 0指定规则ID为5,允许数据源地址为1.1.1.1的报文通过,反掩码全为0,即精确匹配rule 10 deny source any 指定ID为10,拒绝任意源地址的数据包通过display acl all 查看设备上所有的访问控制列表。
华为交换机基本配置命令详解1、配置文件相关命令[Quidway]display current-configuration 显示当前生效的配置[Quidway]display saved-configuration显示flash中配置文件,即下次上电启动时所用的配置文件reset saved-configuration 檫除旧的配置文件reboot 交换机重启display version 显示系统版本信息2、基本配置[Quidway]super password 修改特权用户密码[Quidway]sysname 交换机命名[Quidway]interface ethernet 1/0/1 进入接口视图[Quidway]interface vlan 1进入接口视图[Quidway-Vlan-interfacex]ip address 10.1.1.11 255.255.0.0配置VLAN的IP地址[Quidway]ip route-static 0.0.0.0 0.0.0.0 10.1.1.1静态路由=网关3、telnet配置[Quidway]user-interface vty 0 4 进入虚拟终端[S3026-ui-vty0-4]authentication-mode password 设置口令模式[S3026-ui-vty0-4]set authentication-mode password simple xmws123设置口令[S3026-ui-vty0-4]user privilege level 3 用户级别4、端口配置[Quidway-Ethernet1/0/1]duplex {half|full|auto} 配置端口工作状态[Quidway-Ethernet1/0/1]speed {10|100|auto} 配置端口工作速率[Quidway-Ethernet1/0/1]flow-control 配置端口流控[Quidway-Ethernet1/0/1]mdi {across|auto|normal} 配置端口平接扭接[Quidway-Ethernet1/0/1]port link-type {trunk|access|hybrid} 设置端口工作模式[Quidway-Ethernet1/0/1]undo shutdown 激活端口[Quidway-Ethernet1/0/2]quit 退出系统视图5、链路聚合配置[DeviceA] link-aggregation group 1 mode manual 创建手工聚合组1[Qw_A] interface ethernet 1/0/1 将以太网端口Ethernet1/0/1加入聚合组1 [Qw_A-Ethernet1/0/1] port link-aggregation group 1[Qw_A-Ethernet1/0/1] interface ethernet 1/0/2 将以太网端口Ethernet1/0/1加入聚合组1[Qw_A-Ethernet1/0/2] port link-aggregation group 1[Qw_A] link-aggregation group 1 service-type tunnel # 在手工聚合组的基础上创建t unnel业务环回组。
[Qw_A] interface ethernet 1/0/1 将以太网端口Ethernet1/0/1加入业务环回组。
[Qw_A-Ethernet1/0/1] undo stp[Qw_A-Ethernet1/0/1] port link-aggregation group 16、端口镜像[Quidway]monitor-port 指定镜像端口[Quidway]port mirror 指定被镜像端口[Quidway]port mirror int_list observing-port int_type int_num 指定镜像和被镜像7、VLAN配置[Quidway]vlan 4创建VLAN [Quidway-vlan4]port ethernet 1/0/1 to ethernet 1/0/4 在VLAN中增加端口①配置基于access的VLAN[Quidway-Ethernet1/0/2]port access vlan 4 当前端口加入到VLAN 注意:缺省情况下,端口的链路类型为Access类型,所有Access端口均属于且只属于VLAN1②配置基于trunk的VLAN[Quidway-Ethernet1/0/24]port link-type trunk 设置当前端口为trunk [Quidway-Ethernet1/0/24]port trunk permit vlan {ID|All} 设trunk允许的VLAN 注意:所有端口缺省情况下都是允许VLAN1的报文通过的[Quidway-Ethernet1/0/2]port trunk pvid vlan 34设置trunk端口的PVID ③配置基于Hybrid端口的VLAN[Quidway-Ethernet1/0/2]port link-type hybrid 配置端口的链路类型为Hybrid类型[Quidway-Ethernet1/0/2]port hybrid vlan vlan-id-list { tagged | untagged } 允许指定的VLAN通过当前Hybrid端口注意:缺省情况下,所有Hybrid端口只允许VLAN1通过[Quidway-Ethernet1/0/2]port hybrid pvid vlan vlan-id 设置Hybrid端口的缺省VLAN注意:缺省情况下,Hybrid端口的缺省VLAN为VLAN1④VLAN描述[Quidway]description string 指定VLAN描述字符[Quidway]undo description 删除VLAN描述字符[Quidway]display vlan [vlan_id] 查看VLAN设置⑤私有VLAN配置[Qw_A-vlanx]isolate-user-vlan enable 设置主vlan[Qw_A]Isolate-user-vlan secondary 设置主vlan包括的子vlan [Quidway-Ethernet1/0/2]port hybrid pvid vlan 设置vlan的pvid [Quidway-Ethernet1/0/2]port hybrid pvid 删除vlan的pvid [Quidway-Ethernet1/0/2]port hybrid vlan vlan_id_list untagged 设置无标识的vlan如果包的vlan id与PVId一致,则去掉vlan信息. 默认PVID=1。
所以设置PVID为所属vlan id, 设置可以互通的vlan为untagged.8、STP配置[Quidway]stp {enable|disable} 设置生成树,默认关闭[Quidway]stp mode rstp 设置生成树模式为rstp [Quidway]stp priority 8192设置交换机的优先级[Quidway]stp root {primary|secondary} 设置为根或根的备份[Quidway-Ethernet0/1]stp cost 200 设置交换机端口的花费MSTP配置:# 配置MST域名为info,MSTP修订级别为1,VLAN映射关系为VLAN2~VLAN10映射到生成树实例1上,VLAN20~VLAN30映射生成树实例2上。
system-view[Sysname] stp region-configuration[Sysname-mst-region] region-name info[Sysname-mst-region] instance 1 vlan 2 to 10[Sysname-mst-region] instance 2 vlan 20 to 30[Sysname-mst-region] revision-level 1[Sysname-mst-region] active region-configuration9、MAC地址表的操作①在系统视图下添加MAC地址表项[Quidway]mac-address { static | dynamic | blackhole } mac-address interface interfac e-type interface-number vlan vlan-id ;添加MAC地址表项在添加MAC地址表项时,命令中interface参数指定的端口必须属于vlan参数指定的VLAN,否则将添加失败。
如果vlan参数指定的VLAN是动态VLAN,在添加静态MAC地址之后,会自动变为静态VLAN。
②在以太网端口视图下添加MAC地址表项[Quidway-Ethernet1/0/2]mac-address { static | dynamic | blackhole } mac-address vla n vlan-id在添加MAC地址表项时,当前的端口必须属于命令中vlan参数指定的VLAN,否则将添加失败;如果vlan参数指定的VLAN是动态VLAN,在添加静态MAC地址之后,会自动变为静态VLAN。
[Quidway]mac-address timer { aging age | no-aging } 设置MAC地址表项的老化时间注意:缺省情况下,MAC地址表项的老化时间为300秒,使用参数no-aging时表示不对MAC地址表项进行老化。
③MAC地址老化时间的配置对所有端口都生效,但地址老化功能只对动态的(学习到的或者用户配置可老化的)MAC地址表项起作用。
[Quidway-Ethernet1/0/2]mac-address max-mac-count count 设置端口最多可以学习到的MAC地址数量;注意:缺省情况下,没有配置对端口学习MAC地址数量的限制。
反之,如果端口启动了MAC地址认证和端口安全功能,则不能配置该端口的最大MAC地址学习个数。
[Quidway-Ethernet1/0/2]port-mac start-mac-address 配置以太网端口MAC地址的起始值在缺省情况下,E126/E126A交换机的以太网端口是没有配置MAC地址的,因此当交换机在发送二层协议报文(例如STP)时,由于无法取用发送端口的MAC 地址,将使用该协议预置的MAC地址作为源地址填充到报文中进行发送。