ionic2.0教程
- 格式:doc
- 大小:37.00 KB
- 文档页数:5

ionice 手册IONICE 是一个命令行工具,用于管理系统 I/O 调度策略。
通过使用IONICE,用户可以更好地控制文件和目录的 I/O 调度策略,从而提高系统的性能和稳定性。
以下是 IONICE 命令的基本概念、用法和应用场景:1. 基本概念:IONICE 命令用于设置文件或目录的 I/O 优先级。
在 Linux 系统中,I/O 调度策略对于文件和目录的读写操作至关重要。
通过使用IONICE,用户可以控制哪些进程或任务可以获得更高的 I/O 优先级,以便更快地完成操作。
2. 用法:IONICE 命令的基本语法如下:```cssionice [-c prio] [-p pid] [-t type] [-- class] [--pid pid] [--class class] [--type type] [file ...]```其中,各个选项的含义如下:`-c prio`:设置进程的 I/O 优先级。
prio 表示优先级值,取值范围为 0 到7。
`-p pid`:设置指定进程的 I/O 优先级。
pid 表示进程 ID。
`-t type`:设置指定类型的 I/O 优先级。
type 可以是进程、文件或目录。
`-- class`:设置指定类别的 I/O 优先级。
类别可以是 realtime、best-effort 或 idle。
`--pid pid`:设置指定进程的 I/O 优先级。
pid 表示进程 ID。
`--class class`:设置指定类别的 I/O 优先级。
类别可以是 realtime、best-effort 或 idle。
`--type type`:设置指定类型的 I/O 优先级。
type 可以是进程、文件或目录。
`file ...`:指定要设置I/O 优先级的文件或目录。
可以指定多个文件或目录,用空格分隔。
3. 应用场景:IONICE 可以应用于多种场景,例如提高备份、视频编辑、大型游戏等任务的性能。

Ionic2使用第三方cordova插件(非Ionic2官方支持的nativecordova插件)注:找了一个晚上,这篇文章的解决方案才是最靠谱的,已验证Ionic2官方提供了丰富的native cordova插件,比如:Camera、Device等等,使用方式也很简单:1、添加插件支持:ionic plugin add cordova-plugin-device;2、在页面ts文件中声明: import { Device } from 'ionic-native';3、在相关方法中调用:getDeviceInfo(){console.log('Device UUID is: ' + Device.uuid);}Ionic2native组件虽然丰富,但是实际开发过程中,我们总是会遇到使用非官方支持cordova组件的情况,比如:微信支付、支付宝等。
以一个获取本机IP地址的cordova插件为例,简单讲解一下非官方支持的cordova插件的用法:1、添加插件:ionic plugin add cordova-plugin-networkinterface;2、打开插件配置文件的my-iconic2-project\plugins\cordova-plugin-networkinterface\config.xml:.....<js-module src="www/networkinterface.js" name="networkinterface"><clobbers target="workinterface" /></js-module>......可以看到该插件的target为workinterface,所以,在app运行期该插件对象应该声明并绑定在window对象上。

ionic2 toast用法-回复标题:Ionic 2 中的Toast 用法详解在Ionic 2(以及其后续版本Ionic 3、4、5)中,Toast是一个非常实用的组件,它主要用于在应用程序中显示短暂的通知或信息。
这些通知通常会在一段时间后自动消失,不需要用户进行任何操作。
本文将详细解析Ionic 2中Toast的使用方法。
一、安装Ionic Native Toast插件在开始使用Toast之前,我们需要先安装Ionic Native的Toast插件。
这个插件提供了一个易于使用的接口,让我们可以在Angular应用中轻松调用设备的原生Toast功能。
打开终端,导航到你的Ionic项目目录,然后运行以下命令来安装Toast 插件:bashionic cordova plugin add cordova-plugin-x-toastnpm install save ionic-native/toast二、导入和配置Toast模块在你打算使用Toast的页面的TypeScript 文件中,你需要首先导入并配置Toast 插件。
以下是如何在`app.module.ts` 文件中进行导入和配置的示例:typescriptimport { IonicModule } from 'ionic-angular';import { Toast } from 'ionic-native/toast';NgModule({declarations: [...],imports: [IonicModule.forRoot(MyApp),],providers: [Toast,...]})export class AppModule { }三、在页面中使用Toast现在,我们已经在项目中安装并配置了Toast插件,接下来就可以在需要的地方使用它了。
以下是一个基本的使用示例:typescriptimport { Toast } from 'ionic-native/toast';export class MyPage {constructor(private toast: Toast) { }showToast() {this.toast.show('这是一个Toast消息', '5000', 'center').subscribe( toast => {console.log(toast);});}}在这个例子中,我们在`MyPage` 的构造函数中注入了`Toast` 服务。

AngularJS 2.0入门指南AngularJS 2.0学习Angular 2当越来越多的web app 使用Angular 1构建的时候,更快更强大的Angular 2 将会很快成为新的标准。
Angular的新约定使得它更容易去学习、更快的去开发app。
通过本教程学习更快速。
更强大的Angular 版本。
Angular一个跨移动和桌面的框架快速开始本指南指导你如何构建一个简单Angular app。
可以使用typescript/ JavaScript / Dart任意一种语言来编写Angular app,本教程采用JavaScript。
看它运行运行实例是学习一个Angular app 如何实现的最快的方式。
点击链接启动一个浏览器,会使用plunker来加载运行一个简单的示例。
文件的组织结构:对我们来说,它只是一个index.html,style.css和包含三个JavaScript文件的app 文件夹组成的简单的Web 目录。
当然,我们仅在plunker只能构建简单的示例。
我们关掉它开始一个真实的实践。
1.搭建我们的开发环境;2.为我们的app 编写Angular 根组件;3.添加Angular 模块;4.引导它去控制主页面;5.编写主页面(即index.html);6.添加CSS 样式(style.css);如果我们跟着指南的步骤一步步去实践,那么我们可以在5 分钟内创建一个入门项目。
但是,大多数人总会陷入“why”和“how”中,花掉许多时间。
开发环境我们需要一个地方去容纳你的项目文件,你的编辑。
∙创建新的文件夹:mkdir angular-startcd angular-start∙添加需要的函数库我们推荐使用npm包管理器来获得和管理我们的开发库。
不会使用npm,点击链接开始学习,因为本教程是通过它来创建的。
∙添加package.json文件,直接copy:{"name": "angular2-quickstart","version": "1.0.0","scripts": {"start": "npm run lite","lite": "lite-server"},"license": "ISC","dependencies": {"@angular/common": "2.0.0","@angular/compiler": "2.0.0","@angular/core": "2.0.0","@angular/forms": "2.0.0","@angular/http": "2.0.0","@angular/platform-browser": "2.0.0","@angular/platform-browser-dynamic": "2.0.0", "@angular/router": "3.0.0","@angular/upgrade": "2.0.0","core-js": "^2.4.1","reflect-metadata": "^0.1.3","rxjs": "5.0.0-beta.12","zone.js": "^0.6.23","angular2-in-memory-web-api": "0.0.20","bootstrap": "^3.3.6"},"devDependencies": {"concurrently": "^2.0.0","lite-server": "^2.2.0"}}通过npm命令安装这些包。

Cordova&Ionic安装操作详细步骤武深龙2017-07-06备注:本文档所介绍安装的软件,建议运行PC机是64位,建议PC的内存配置至少4G以上,本人最初用32位虚拟机,3G内存的win7配置下面步骤,吃尽了苦头特此说明;另外当本人重新安装64位虚拟win7后,由于心慈手软竟然只分配了40G的磁盘空间,结果完成下面操作后40G硬盘空间竟然所剩无几,因此建议项目组其他成员在执行下述过程时,尽量选择较大磁盘空间;另外第一次安装并执行命令时,有许多支持包需要在线下载,所以务请选择网速较好时进行第一次操作,否则由于网络延迟造成命令执行失败,则容易出现第二次执行仍然失败现象,切记!切记!!!。
1.打开浏览器登录网址如下https:///en/download/current/下载最新的Node.js版本2.本文档以下载8.1.3版本为例说明双击所下载文件进行安装,本文档安装在c:\nodejs目录下,安装成功的标识如下图所示3.在Node.js基础上安装Cordova,安装命令如下c:\nodejs> npm install -g cordova安装过程可能会比较慢,具体的快慢取决于网速和当前网络环境,不排除网站已经被屏蔽的可能性,如果中途安装失败还是一个比较麻烦的事,因为第一次安装失败可能会造成无法进行第二次安装,需要完全卸载Node.js并且将目录删除干净,重新安装Node.js后再执行上述操作,总之耐心等待,都是网络屏蔽惹的祸没办法,具体如下图所示:Cordova安装成功的标志如下图所示4.下载安装JDK并配置环境变量安装过程略过,安装完成后首先配置JAVA_HOME如下图所示配置PATH如下图所示配置CLASSPATH如下图所示:配置完全正确的检验方法如下图:5.安装ADT首先下载ADT具体网址如下:/index.php/sdk 本文档以安装在C:\ android-sdk为例,如下图所示:安装后进入进度如下界面,为了让后面的操作步骤顺畅,此处建议选择全部安装,只是全部安装占用空间较大,而且下载需要花费很长时间,如下图所示:在环境变量path中配置如下:C:\android-sdk\platform-tools;C:\android-sdk\tools,具体如下图所示:6.安装ant下载地址如下:/bindownload.cgi下载后解压到c:\ apache-ant目录下配置环境变量如下:Ant安装成功的标志是在dos窗口下执行命令,返回大致如下图所示:7.下载配置Gradle下载网址如下:https:///releases/本文档以安装在c:\gradle目录下为例来说明首先配置GRADLE_HOME如下图所示然后在path中加入c:\gradle\bin,如下图所示:此部分配置成功的标志是执行如如下命令,dos窗口返回如下:8.用cordova创建项目此时在c:\myproject目录下创建一个完整的cordova工程,如下图所示:文档作者将已经开发的demo放置在www目录下,如下图所示:9.添加安卓平台执行如下图所示命令10.首次编译输入命令如下图所示:c:\myproject\zsyy\cordova build android第一次编译需要下载指定版本的Gradle,由于从国外网站下载可能网速会比较慢,因此可能会造成编译不成功,我就下载了好多次未成,最终选择一个早晨网速很好的时候重新执行方才下载完成,页面截图大致如下:11.将Crosswalk集成到工程当中上述配置过程打出的包优点是比较小,缺点是需要调用系统中的webview,由于各种老旧webview对HTML5/CSS3支持的不好,在android各版本调试CSS 兼容性简直就是噩梦,因此需要安装Crosswalk。

Ionic框架入门教程Ionic是一款基于HTML、CSS和JavaScript的开源移动应用框架,用于构建跨平台的混合移动应用程序。
它结合了AngularJS等流行的前端框架,为开发人员提供了快速构建高质量移动应用的工具。
1. 介绍Ionic框架Ionic框架是由美国一家初创公司Drifty Co.开发的。
它使用HTML5和CSS3构建应用,通过Ionic CLI (Command Line Interface)进行应用程序的创建和管理。
Ionic提供了丰富的UI组件库和预定义的CSS类,使得开发者可以快速构建出美观的移动应用界面。
2. 安装和配置Ionic首先,确保你的系统已经安装了Node.js和npm (Node包管理器)。
然后,在命令行中运行以下命令安装Ionic CLI:```npm install -g @ionic/cli```安装完成后,你可以使用Ionic CLI创建和管理Ionic应用。
运行以下命令创建一个新的Ionic应用程序:```ionic start myApp blank```此命令将创建一个名为"myApp"的Ionic应用,使用"blank"模板。
在项目目录中,可以运行以下命令启动应用程序:```cd myAppionic serve```这将启动一个本地开发服务器,你可以在浏览器中预览和调试你的应用程序。
3. 构建界面Ionic提供了丰富的UI组件,可以帮助你快速构建出漂亮的移动应用界面。
你可以在Ionic官方文档中查找各种组件的用法和示例代码。
例如,使用Ionic的按钮组件可以轻松创建按钮:```html<ion-button>Click me</ion-button>```此外,Ionic还提供了各种样式指令和CSS类,可以自定义组件的外观和行为。
你可以使用Sass或CSS来定义自己的样式。

、安装截止到2016.01.03,angular 2还处于beta版阶段,所以ionic 2 也还是在 nightly版本。
1.1 安装环境要求:node.js 4.2.xnpm 3.x1.2 开始安装在国内环境下要想快速安装请用下面的指令(注意:不要键入’$’符号,这是一个占位符,也就是你的shell提示符)$ npm install -g ionic@beta --registry=https://registry.npm.taobao.or g使用了npm淘宝镜像,安装应该进行的比较快。
1.3 建立你的第一个ionic 2项目下面的命令会建立一个名为MyIonic2Tour的目录,并且初始化了项目$ ionic start MyIonic2Tour tutorial --v2 /--registry=https://registry. 1.4 运行项目进到刚才建立的MyIonic2Tour目录,运行项目$ cd MyIonic2Project/$ ionic serve然后你就会看到浏览器里自动弹出一个窗口,你的第一个 ionic 2 项目已经启动起来了2、项目结构Markdown和扩展Markdown简洁的语法*- 代码块高亮- 图片链接和图片上传- LaTex数学公式- UML序列图和流程图- 离线写博客- 导入导出Markdown文件- 丰富的快捷键快捷键∙加粗Ctrl + B∙斜体Ctrl + I∙引用Ctrl + Q∙插入链接Ctrl + L∙插入代码Ctrl + K∙插入图片Ctrl + G∙提升标题Ctrl + H∙有序列表Ctrl + O∙无序列表Ctrl + U∙横线Ctrl + R∙撤销Ctrl + Z∙重做Ctrl + YMarkdown及扩展Markdown 是一种轻量级标记语言,它允许人们使用易读易写的纯文本格式编写文档,然后转换成格式丰富的HTML页面。
—— [ 维基百科]使用简单的符号标识不同的标题,将某些文字标记为粗体或者斜体,创建一个链接等,详细语法参考帮助?。

Windows下Ionic开发环境搭建Ionic 介绍⾸先,Ionic 是什么。
Ionic 是⼀款基于 Cordova 及 Angular 开发 Hybrid/Web APP 的前端框架,类似的其他框架有:Intel XDK等。
简单来说就是可以将你的 Web 应⽤打包发布成 IOS/Android APP,并且提供了 Cordova 之外很多强⼤的服务和新的特性。
听起来还是很诱⼈的,事实上这也是⽬前最⽕的⼀种 Hybrid APP 开发⽅式。
接下来介绍如何在 Windows 下搭建 Ionic 开发环境。
在开始之前我假设你已经了解了如下概念:Java JDKApache AntAndroid SDKNodeJS以上名词这⾥就不赘述,如果有不清楚的可以⾃⾏查阅安装步骤Ionic 官⽅教程:以下内容参考官⽅教程得出:下载 JDK 并配置好 Java 运⾏环境下载地址:(请注意选择您电脑的对应版本)Java 环境变量的配置:参看:下载 Apache Ant 并将其 bin ⽬录路径添加进 Path 路径下载地址:下载完成后解压该⽂件⾄某个安全的⽬录下,然后将改⽂件夹内的bin⽂件夹路径添加⾄系统 Path 环境变量中,如存放在 C 盘 Program Files ⽬录下则 Path 中添加如下值C:\Program Files\apache-ant-1.9.4\bin;(添加⽅法和 java 配置 path 变量是⼀样的,注意以;隔开每个环境变量的值)下载 Android SDK 并配置好 SDK 运⾏环境下载地址:这⾥可以只下载 Android SDK 不需要⼀并下载 Android Studio。
下载完成并安装然后向系统Path环境变量中添加两个值。
分别是 Android SDK 中 tools ⽬录的路径和 platform-tools 的路径。
例如:C:\Program Files (x86)\Android\android-sdk\tools;C:\Program Files (x86)\Android\android-sdk\platform-tools;在这⾥我发现 Android SDK 安装⽬录中并没有platform-tools这个⽂件夹,运⾏ tools ⽬录下的 android.bat ⽂件,然后在出现的界⾯中勾选Android SDK Platform-tools 然后安装。

使用Ionic进行混合应用开发的调试与错误处理技巧在移动应用开发领域,Ionic框架已成为开发者们的首选。
Ionic是一个基于HTML、CSS和JavaScript的开源框架,用于构建跨平台的混合移动应用。
虽然Ionic提供了丰富的功能和工具,但在开发过程中,我们仍然会遇到一些调试和错误处理的问题。
本文将介绍一些使用Ionic进行混合应用开发的调试和错误处理技巧,帮助开发者们更高效地进行开发。
###1. 开启调试模式在Ionic应用的开发过程中,开启调试模式是非常重要的。
通过开启调试模式,我们可以查看应用程序的运行日志以及实时的报错信息。
在Ionic项目的根目录下运行以下命令,即可开启调试模式:```ionic cordova run android --livereload --consolelogs```此命令将在浏览器中启动应用,并在开发者工具的控制台中展示运行日志。
当应用发生错误时,我们可以通过控制台输出的信息进行定位和调试。
同时,调试模式还可以实时更新应用的代码,无需重新编译和部署。
###2. 使用Chrome开发者工具作为Web开发者们熟悉的工具,Chrome开发者工具也可以用于调试Ionic应用。
在运行应用的同时,我们可以通过在Chrome浏览器中输入`chrome://inspect`来打开开发者工具。
通过开发者工具的Elements面板,我们可以直接查看和编辑HTML和CSS代码。
通过Console面板,我们可以查看应用程序的控制台输出,并进行错误信息的定位和调试。
通过Network面板,我们可以监控应用程序的网络请求,并分析请求的细节和结果。
Chrome开发者工具提供了丰富的功能和工具,让我们能够更加方便地进行Ionic应用的调试和错误处理。
###3. 打印调试信息在开发过程中,我们可以通过在合适的地方打印调试信息来帮助我们定位和解决问题。
Ionic框架提供了一个方便的工具——`console.log()`函数。

About the T utorialIonic is open source framework used for developing mobile applications. It provides tools and services for building Mobile UI with native look and feel. Ionic framework needs native wrapper to be able to run on mobile devices.This is an introductory tutorial, which covers the basics of the Ionic Open Source Framework and explains how to deal with its various components and sub-components. AudienceThis tutorial is created for JavaScript developers that are new to mobile development. It provides simple, easy to understand explanations with useful working examples. We will go through most of the Ionic Framework so you can also use this as a reference for your projects.This tutorial is intended to make you comfortable in getting started with the Ionic Open Source Framework and its various functions.PrerequisitesSince Ionic is built on top of AngularJS and Apache Cordova, you will need to have basic knowledge about these technologies. You also need to be familiar with HTML, CSS and JavaScript, if you want to understand all the information provided.Copyright and DisclaimerCopyright 2018 by Tutorials Point (I) Pvt. Ltd.All the content and graphics published in this e-book are the property of Tutorials Point (I) Pvt. Ltd. The user of this e-book is prohibited to reuse, retain, copy, distribute or republish any contents or a part of contents of this e-book in any manner without written consent of the publisher.We strive to update the contents of our website and tutorials as timely and as precisely as possible, however, the contents may contain inaccuracies or errors. Tutorials Point (I) Pvt. Ltd. provides no guarantee regarding the accuracy, timeliness or completeness of our website or its contents including this tutorial. If you discover any errors on our website or in this tutorial, please notify us at **************************T able of ContentsAbout the Tutorial (i)Audience (i)Prerequisites (i)Copyright and Disclaimer (i)Table of Contents (ii)IONIC − BASICS (1)1.Ionic – Overview (2)Ionic Framework Features (2)Ionic Framework Advantages (2)Ionic Framework Limitations (3)2.Ionic – Environment Setup (4)Installing Cordova and Ionic (4)Creating Apps (4)Tabs App (5)Blank App (7)Side Menu App (9)Test App in Browser (11)Project Folder Structure (12)IONIC – CSS COMPONENTS (14)3.Ionic – Colors (15)Ionic Color Classes (15)Ionic Color Usage (15)Customizing Colors with CSS (16)Customizing Colors using SASS (17)4.Ionic – Content (19)5.Ionic – Header (20)Adding Header (20)Header Colors (21)Header Elements (22)Sub Header (23)6.Ionic – Footer (26)Adding Footer (26)Footer Colors (27)Footer Elements (28)7.Ionic – Buttons (30)Block Buttons (30)Button Size (31)Button Colors (31)Button Outline (33)Adding Icons (34)Button Bar (35)8.Ionic – Lists (36)Creating Ionic List (36)Inset List (37)Item Dividers (37)Adding Icons (39)Adding Avatars and Thumbnails (40)9.Ionic – Cards (42)Adding Cards (42)Card Header and Footer (43)Complete Card (44)10.Ionic – Forms (46)Using Input Form (46)Ionic Labels (47)Stacked Label (48)Floating Label (49)Inset Inputs (50)11.Ionic – Toggle (52)Using Toggle (52)Multiple Toggles (53)Styling Toggle (55)12.Ionic – Checkbox (59)Adding Checkbox (59)Multiple Checkboxes (60)Styling Checkbox (61)13.Ionic – Radio Button (64)Adding Radio Buttons (64)Multiple Radio Button Groups (66)14.Ionic – Range (68)Using Range (68)Adding Icons (69)Styling Range (70)15.Ionic – Select (72)Using Select (72)Styling Select (73)16.Ionic – Tabs (78)Simple Tabs (78)Adding Icons (79)Striped Tabs (82)17.Ionic – Grid (83)Simple Grid (83)Column Sizes (84)Horizontal and Vertical Positioning (86)Responsive Grid (88)18.Ionic – Icons (91)How to use Icons? (91)19.Ionic – Padding (93)IONIC − JAVASCRIPT C OMPONENTS (95)20.Ionic – JavaScript Action Sheet (96)Using Action Sheet (96)21.Ionic – JavaScript Backdrop (100)Using Backdrop (100)22.Ionic – JavaScript Content (102)23.Ionic – JavaScript Forms (103)Using ion-checkbox (103)Using ion-radio (106)Using ion-toggle (107)24.Ionic – JavaScript Events (110)Using Events (111)25.Ionic – JavaScript Header (112)Using JavaScript Header (112)Styling Header (112)Adding Elements (113)Adding Sub Header (114)26.Ionic – JavaScript Footer (116)Using Footer (116)Adding Elements (117)Adding Sub Footer (117)27.Ionic – JavaScript Keyboard (119)Using Keyboard (119)28.Ionic – JavaScript List (123)Using List (123)Delete Button (124)Reorder Button (125)Option Button (127)Other Functions (129)29.Ionic – JavaScript Loading (130)Using Loading (130)Loading Config (132)30.Ionic – JavaScript Modal (134)Using Modal (134)31.Ionic – JavaScript Navigation (140)Using Navigation (140)Creating Navigation Menu (141)Adding Navigation Elements (143)Other Navigation Attributes (144)Caching (144)Controlling the Navigation Bar (145)Tracking History (145)32.Ionic – JavaScript Popover (148)Using Popover (148)33.Ionic – JavaScript Popup (153)Using Show Popup (153)Using Confirm Popup (155)Using Alert Popup (157)Using Prompt Popup (159)34.Ionic – JavaScript Scroll (162)Using Scroll (162)Infinite Scroll (166)Scroll Delegate (167)35.Ionic – JavaScript Side Menu (172)Using Side Menu (172)Side Menu Delegate (174)36.Ionic – JavaScript Slide Box (176)Using Slide Box (176)Slide Box Delegate (179)37.Ionic – JavaScript Tabs (181)Using Tabs (181)IONIC − ADVANCED CON CEPTS (184)38.Ionic – Cordova Integration (185)Installing ngCordova (185)39.Ionic – Cordova AdMob (186)Using AdMob (186)40.Ionic – Cordova Camera (190)Using Camera (190)41.Ionic ─ Cordova Facebook (197)Installing Facebook Plugin (197)Angular Service (198)42.Ionic − Cordova InAppBrowser (202)Using Browser (202)43.Ionic – Cordova Native Audio (205)Using Native Audio (205)44.Ionic – Cordova Geolocation (207)Using Geolocation (207)45.Ionic – Cordova Media (209)Using Media (209)46.Ionic − Cordova Icon & Splash Screen (212)Adding Splash Screen and Icon (212)Ionic − BasicsIonic1.Ionic is a front-end HTML framework built on top of AngularJS and Cordova. As per their official document, the definition of this Ionic Open Source Framework is as follows: Ionic is an HTML5 Mobile App Development Framework targeted at building hybrid mobile apps. Think of Ionic as the front-end UI framework that handles all the look and feel and UI interactions your app needs to be compelling. Kind of like "Bootstrap for Native", but with the support for a broad range of common native mobile components, slick animations and a beautiful design.Ionic Framework FeaturesFollowing are the most important features of Ionic:∙AngularJS: Ionic is using AngularJS MVC architecture for building rich single page applications optimized for mobile devices.∙CSS Components: With the native look and feel, these components offer almost all elements that a mobile application needs. The components’ default styling can be easily overridden to accommodate your own designs.∙JavaScript Components: These components are extending CSS components with JavaScript functionalities to cover all mobile elements that cannot be done only with HTML and CSS.∙Cordova Plugins: Apache Cordova plugins offer API needed for using native device functions with JavaScript code.∙Ionic CLI: This is NodeJS utility powered with commands for starting, building, running and emulating Ionic applications.∙Ionic View: Very useful platform for uploading, sharing and testing your application on native devices.∙Licence: Ionic is released under MIT license.Ionic Framework AdvantagesFollowing are some of the most commonly known Ionic Framework Advantages: ∙Ionic is used for Hybrid App Development. This means that you can package your applications for IOS, Android, Windows Phone and Firefox OS, which can save youa lot of working time.∙Starting your app is very easy since Ionic provides useful pre-generated app setup with simple layouts.∙The apps are built in a very clean and modular way, so it is very maintainable and easy to update.∙Ionic Developers Team have a very good relationship with the Google Developers Team and they are working together to improve the framework. The updates are coming out regularly and Ionic support group is always willing to help when needed.IonicIonic Framework LimitationsFollowing are some of the most important Ionic Framework Limitations: ∙Testing can be tricky since the browser does not always give you the right information about the phone environment. There are so many different devices as well as platforms and you usually need to cover most of them.∙It can be hard to combine different native functionalities. There will be many instances where you would run into plugin compatibility issues, which leads to build errors that are hard to debug.∙Hybrid apps tend to be slower than the native ones. However, since the mobile technologies are improving fast this will not be an issue in the future.In the next chapter, we will understand the environment setup of the Ionic Open Source Framework.Ionic This chapter will show you how to start with Ionic Framework. The following table contains the list of components needed to start with Ionic.Installing Cordova and IonicWe will use the Windows command prompt for this tutorial. The same steps can be applied to the OSX terminal. Open your command window to install Cordova and Ionic: Creating AppsWhile creating apps in Ionic, you can choose from the following three options to start with: ∙Tabs App ∙Blank App ∙ Side menu appIn your command window, open the folder where you want to create the app and try one of the options mentioned below.2.T abs AppIf you want to use the Ionic tabs template, the app will be built with the tab menu, header and a couple of useful screens and functionalities. This is the default Ionic template. Open your command window and choose where you want to create your app.This command will change the working directory. The app will be created on the Desktop.Ionic Start command will create a folder named myApp and setup Ionic files and folders.Now, we want to access the myApp folder that we just created. This is our root folder. Let us now add the Cordova project for the Android Platform and install the basic Cordova plugins as well. The following code allows us to run the app on the Android emulator or a device.The next step is to build the app. If you have building errors after running the following command, you probably did not install the Android SDK and its dependencies.The last step of the installation process is to run your app, which will start the mobile device, if connected, or the default emulator, if there is no device connected. Android Default Emulator is slow, so I suggest you to install Genymotion or some other popular Android Emulator.This will produce below result, which is an Ionic Tabs App.Blank AppIf you want to start from the scratch, you can install the Ionic blank template. We will use the same steps that have been explained above with the addition of ionic start myApp blank instead of ionic start myApp tabs as follows.The Ionic Start command will create a folder named myApp and setup the Ionic files and folders.Let us add the Cordova project for the Android Platform and install the basic Cordova plugins as explained above.The next step is to build our app:Finally, we will start the App as with the following code:This will produce the following result, which is a Ionic Blank App.Side Menu AppThe third template that you can use is the Side Menu Template. The steps are the same as the previous two templates; we will just add sidemenu when starting our app as shown in the code below.The Ionic Start command will create a folder named myApp and setup the Ionic files and folders.Let us add the Cordova project for the Android Platform and install the basic Cordova plugins with the code given below.The next step is to build our app with the following code.Finally, we will start the App with the code given below.This will produce the following result, which is an Ionic Side Menu App.T est App in BrowserSince we are working with the JavaScript, you can serve your app on any web browser. This will speed up your building process, but you should always test your app on native emulators and devices. Type the following code to serve your app on the web browser.The above command will open your app in the web browser. Google Chrome provides the device mode functionality for mobile development testing. Press F12 to access the developer console.The top left corner of the console window click has the "Toggle Device Mode" icon. The next step will be to click "Dock to Right" icon in the top right corner. Once the page is refreshed, you should be ready for testing on the web browser.Project Folder StructureIonic creates the following directory structure for all type of apps. This is important for any Ionic developer to understand the purpose of every directory and the files mentioned below:Let us have a quick understanding of all the folders and files available in the project folder structure shown in the image above.∙Hooks: Hooks are scripts that can be triggered during the build process. They are usually used for the Cordova commands customization and for building automated processes. We will not use this folder during this tutorial.∙Platforms: This is the folder where Android and IOS projects are created. You might encounter some platform specific problems during development that will require these files, but you should leave them intact most of the time.∙Plugins: This folder contains Cordova plugins. When you initially create an Ionic app, some of the plugins will be installed. We will show you how to install Cordova plugins in our subsequent chapters.∙Resources: This folder is used for adding resources like icon and splash screen to your project.∙Scss: Since Ionic core is built with Sass, this is the folder where your Sass file is located. For simplifying the process, we will not use Sass for this tutorial. Our styling will be done using CSS.∙www: www is the main working folder for Ionic developers. They spend most of their time here. Ionic gives us their default folder structure inside 'www', but the developers can always change it to accommodate their own needs. When this folder is opened, you will find the following sub-folders:o The css folder, where you will write your CSS styling.o The img folder for storing images.o The js folder that contains the apps main configuration file (app.js) and AngularJS components (controllers, services, directives). All your JavaScriptcode will be inside these folders.o The libs folder, where your libraries will be placed.o The templates folder for your HTML files.o Index.html as a starting point to your app.∙Other Files: Since this is a beginner’s tutorial, we will just mention some of the other important files and their purposes as well.o.bowerrc is the bower configuration file.o.editorconfig is the editor configuration file.o.gitignore is used to instruct which part of the app should be ignored when you want to push your app to the Git repository.o bower.json will contain the bower components and dependencies, if you choose to use the bower package manager.o gulpfile.js is used for creating automated tasks using the gulp task manager.o config.xml is the Cordova configuration file.o package.json contains the information about the apps, their dependencies and plugins that are installed using the NPM package manager.In the next chapter, we will discuss the different colors available in Ionic open source framework.Ionic Ionic – CSS ComponentsIonicBefore we start with actual elements available in the Ionic framework, let us have a little understanding on how Ionic makes use of colors for different elements.Ionic Color ClassesIonic framework gives us a set of nine predefined color classes . You can use these colors or you can override it with your own styling.The following table shows the default set of nine colors provided by Ionic. We will use these colors for styling different Ionic elements in this tutorial. For now, you can check all the colors as shown below:Ionic Color UsageIonic makes use of different classes for each element. For example, a header element will have bar class and a button will have a button class. To simplify the usage, we use different colors by prefixing element class in a color name.3.For example, to create a blue color header, we will use a bar-calm as follows:Similarly, to create a grey color button, we will use button-stable class as follows.You can also use Ionic color class like any other CSS class. We will now style two paragraphs with a balanced (green) and an energized (yellow) color.The above code will produce the following screen:We will discuss in detail in the subsequent chapters, when we create different elements using different classes.Customizing Colors with CSSWhen you want to change some of the Ionic default colors using CSS, you can do it by editing the lib/css/ionic.css file. In some cases, this approach is not very productive because every element (header, button, footer...) uses its own classes for styling. Therefore, if you want to change the color of the "light" class to orange, you would need to search through all the elements that use this class and change it. This is useful whenyou want to change the color of a single element, but not very practical for changing color of all elements because it would use too much time.Customizing Colors using SASSSASS (which is the short form of –Software as a Service) provides an easier way to change the color for all the elements at once. If you want to use SASS, open your project in the command window and type:This will set up SASS for your project. Now you can the change default colors by opening the scss/ionic.app.scss file and then typing in the following code before this line –@import "www/lib/ionic/scss/ionic";We will change the balanced color to dark blue and the energized color to orange. The two paragraphs that we used above are now dark blue and orange.Now, if you use the following example:The above code will produce the following screen:All the Ionic elements that are using these classes will change to dark blue and orange. Take into consideration that you do not need to use Ionic default color classes. You can always style elements the way you want.Important NoteThe www/css/style.css file will be removed from the header of the index.html after you install SASS. You will need to link it manually if you still want to use it. Open index.html and then add the following code inside the header.Ionic4.Almost every mobile app contains some fundamental elements. Usually those elements include a header and a footer that will cover the top and the bottom part of the screen. All the other elements will be placed between these two. Ionic provides ion-content element that serves as a container that will wrap all the other elements that we want to create. This container has some unique characteristics, but since this is a JavaScript based component which we will cover in the later part of this tutorial.IonicEnd of ebook previewIf you liked what you saw…Buy it from our store @ https://。

使用Ionic开发混合移动应用的实践指南混合移动应用开发已经成为现代移动应用开发的一种常见选择。
相比于传统的原生应用开发,混合应用开发可以在多个平台上快速构建应用,并且可以采用统一的代码库进行维护。
而Ionic框架作为一种流行的混合移动应用开发框架,提供了一系列的工具和组件,帮助开发者更加便捷地构建跨平台的移动应用。
一、Ionic框架简介Ionic是一个免费的、开源的HTML5移动应用开发框架。
它基于AngularJS和Apache Cordova构建,并且使用HTML、CSS和JavaScript进行应用开发。
Ionic提供了大量的UI组件库,使得开发者可以轻松构建具有现代化外观和流畅交互的应用。
同时,Ionic还提供了一套命令行工具,用于帮助开发者快速创建、测试和发布应用。
二、Ionic开发环境的搭建要开始使用Ionic开发应用,首先需要搭建相应的开发环境。
首先,确保你已经安装了Node.js和Git。
然后,通过Node.js的包管理器npm安装Ionic CLI(命令行工具)。
运行以下命令:```npm install -g @ionic/cli```安装完成后,使用以下命令检查Ionic CLI是否安装成功:```ionic --version```如果能够正确显示版本号,则说明开发环境已经搭建成功。
三、创建新的Ionic应用项目使用Ionic CLI创建新的应用项目非常简单。
通过以下命令创建一个新的Ionic应用:```ionic start myApp blank```上述命令会创建一个名为"myApp"的新项目,使用"blank"模板。
除了"blank"模板外,Ionic提供了许多其他模板,适用于不同类型的应用。
比如,"tabs"模板适用于具有多个标签页的应用,"sidemenu"模板适用于具有侧边菜单的应用等。

noi linux2.0 用法Linux是一种开放源代码的操作系统,具有高度的可定制性和灵活性。
在Linux系统下,有许多版本可供选择,其中NOI Linux2.0是一款基于Linux 内核的特定版本。
本文将介绍NOI Linux2.0的基本用法,并逐步解释如何使用该版本的Linux操作系统。
第一部分:NOI Linux2.0的安装和配置1. 下载和制作NOI Linux2.0安装媒介:首先,从NOI Linux官方网站下载NOI Linux2.0的ISO文件。
接下来,使用制作启动盘的软件(如Rufus或UNetbootin)将ISO文件写入可启动的USB驱动器中。
2. 安装NOI Linux2.0:将制作好的USB驱动器插入计算机,并在开机时按下相应的键(通常是F12),选择从USB设备启动。
进入NOI Linux2.0的安装界面后,按照提示进行安装。
用户可以选择完全覆盖现有操作系统,或在新分区上进行安装。
3. 基本配置:安装完成后,重新启动计算机。
首次进入NOI Linux2.0系统时,会要求用户进行基本配置,例如选择系统语言、设置时区和键盘布局等。
根据个人需求完成配置后,系统将进入一般用户桌面。
第二部分:NOI Linux2.0的基本界面和功能1. 桌面环境:NOI Linux2.0默认使用GNOME桌面环境,其具有直观的用户界面和丰富的功能。
用户可以在桌面的任务栏中找到各种常用应用程序的图标,并通过单击图标来启动相应的应用程序。
2. 文件管理:NOI Linux2.0配备了一个名为Nautilus的文件管理器,可以通过点击桌面上的“文件”图标或从应用程序菜单中选择“文件”来打开。
Nautilus 可以方便地浏览和管理文件和文件夹,用户可以通过复制、剪切和粘贴等操作来管理和组织文件。
3. 应用程序和软件包管理:NOI Linux2.0预装了一些常用的应用程序,例如文本编辑器、终端模拟器、浏览器等。

ionic2 toast用法-回复Ionic 2 Toast用法在移动应用开发中,Toast是一种比较简洁、轻便的消息提示组件,用于向用户显示临时的非关键性信息。
Ionic 2提供了内置的Toast组件,使得在应用中添加和使用Toast变得非常简单。
本文将详细介绍Ionic 2中Toast的用法,以帮助开发者更好地使用这一功能。
第一步:安装Ionic 2在开始使用Ionic 2中的Toast组件之前,首先要确保在开发环境中已经正确安装了Ionic 2。
在命令行中执行以下命令,全局安装Ionic:npm install -g ionic然后,在自己的工作目录中创建一个新的Ionic 2项目:ionic start myApp blank type=ionic-angular以上命令将创建一个名为"myApp"的Ionic 2项目。
第二步:导入Toast组件在使用Toast组件之前,需要先在项目代码中导入Toast组件。
打开"app.module.ts"文件,在"imports"数组中添加如下代码:typescriptimport { ToastController } from 'ionic-angular';这样就成功导入了Toast组件,接下来就可以在项目中使用了。
第三步:创建并显示Toast在需要显示Toast的页面中,结合Ionic 2提供的ToastController,可以创建并显示自定义的Toast。
打开要使用Toast的页面的组件代码(通常是在".ts"文件中),添加如下代码:typescriptconstructor(public toastCtrl: ToastController) {}presentToast() {let toast = this.toastCtrl.create({message: 'This is a toast message.',duration: 3000,position: 'bottom'});toast.present();}以上代码中,我们在构造函数中注入了ToastController,然后在presentToast()方法中创建了一个Toast对象。
Ionic2开发环境搭建教程
关于⽹络环境:ionic开发环境不需要FQ。
我这⾥没有设置FQ,亲测可⾏。
但是angular2的开发环境搭建,则需要FQ⽹络,否则很多包会安装失败。
建议⼤家在搭建开发环境的时候,不要参考百度出来的各种博客,太零碎,重要的是时间久,也不⼀定写的对。
强烈建议参考官⽹引导教程。
1.下载安装Node.js。
,我安装的是v7.10.0版本。
2.安装完成后通过命令⾏ node -v 可查看安装的版本。
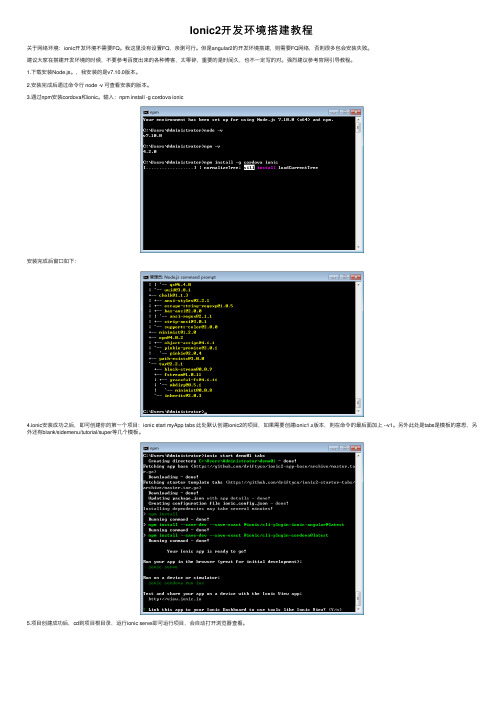
3.通过npm安装cordova和ionic。
输⼊:npm install -g cordova ionic
安装完成后窗⼝如下:
4.ionic安装成功之后,即可创建你的第⼀个项⽬:ionic start myApp tabs 此处默认创建ionic2的项⽬,如果需要创建ionic1.x版本,则在命令的最后⾯加上 --v1。
另外此处是tabs是模板的意思,另外还有blank/sidemenu/tutorial/super等⼏个模板。
5.项⽬创建成功后,cd到项⽬根⽬录,运⾏ionic serve即可运⾏项⽬,会⾃动打开浏览器查看。
整个Ionic2项⽬的⽬录结构如下图所⽰:
以上就是本⽂的全部内容,希望对⼤家的学习有所帮助,也希望⼤家多多⽀持。

noi linux2.0 用法-回复作者:智能助手【noi linux2.0 用法】导语:Linux作为一个开源的操作系统,受到许多人的喜爱和追捧。
作为Linux 中的一个发行版,noi linux2.0是一个非常受欢迎的选择。
然而,对于初学者来说,使用noi linux2.0可能会感到略有困惑。
因此,在这篇文章中,我将一步一步地回答关于noi linux2.0的使用方法,帮助你更好地了解这个操作系统。
第一步:安装noi linux2.0首先,你需要下载noi linux2.0的安装文件。
你可以在其官方网站或其他可靠来源上找到这个安装文件。
下载完成后,将其保存到你的计算机上。
然后,你需要创建一个启动盘,你可以使用一些专门的工具来做到这一点。
将启动盘插入计算机并重新启动。
第二步:启动noi linux2.0在计算机重新启动后,你将看到一个菜单界面。
使用键盘上的方向键选择“noi linux2.0”并按回车键进入系统。
此时,你将进入noi linux2.0的桌面环境。
第三步:了解noi linux2.0的桌面环境noi linux2.0的桌面环境基于GNOME,它提供了一个直观而强大的界面。
在桌面上你会看到一些常用的图标,比如文件管理器、终端等。
你可以像在其他操作系统中一样使用这些工具。
另外,你还可以根据自己的喜好进行自定义设置,比如更改桌面背景、字体等。
第四步:使用终端对于那些比较熟悉Linux操作系统的用户来说,终端是一个非常重要的工具。
在noi linux2.0中,你可以通过点击任务栏上的终端图标来打开终端。
在终端中,你可以执行许多命令来管理和操作系统。
比如,你可以使用"ls"命令来列出当前目录下的文件和文件夹,使用"cd"命令来切换目录,使用"mkdir"命令创建新的目录等等。
熟悉这些基本命令将会对你的使用体验有所帮助。
第五步:安装软件包noi linux2.0默认安装了一些基本的应用程序,比如文本编辑器、浏览器等。

ionic2 toast用法-回复[ionic2 toast用法]Ionic是一个流行的混合移动应用开发框架,它的第二个版本Ionic2引入了许多新的特性和组件,包括一个弹出消息通知组件,称为“toast”。
本文将详细介绍Ionic2 toast的用法,并提供逐步说明。
第一步:安装Ionic2并创建一个新的应用程序在开始之前,请确保已经安装了Node.js和Ionic CLI。
如果还没有安装,请先进行安装。
完成之后,我们可以通过以下命令创建一个新的Ionic2应用程序:ionic start myApp blankcd myApp这个命令将创建一个名为“myApp”的Ionic2应用程序,并进入该目录。
第二步:导入ToastControllerIonic2 toast组件是通过ToastController来控制和显示的。
为了使用toast组件,我们需要在我们的应用程序中导入ToastController。
打开名为“appponent.ts”的文件,并在文件的开头添加以下代码行:import { ToastController } from 'ionic-angular';第三步:初始化ToastController在构造函数中,我们需要初始化ToastController。
在“appponent.ts”的构造函数中添加以下代码行:constructor(public toastCtrl: ToastController) { }第四步:创建并显示toast现在我们已经准备好创建一个toast了。
在Ionic2中,我们可以使用ToastController的create方法来创建一个toast。
以下是一个基本的创建和显示toast的例子:let toast = this.toastCtrl.create({message: 'Hello, this is a toast message',duration: 3000});toast.present();在上面的代码中,我们首先使用ToastController的create方法创建了一个toast。
Ionic既是一个CSS框架也是一个Javascript UI库。
许多组件需要Javascript才能产生神奇的效果,尽管通常组件不需要编码,通过框架扩展可以很容易地使用,比如我们的AngularIonic扩展。
Ionic遵循视图控制模式,通俗的理解和Cocoa 触摸框架相似。
在视图控制模式中,我们将界面的不同部分分为子视图或包含其他视图的子视图控制器。
然后视图控制器“驱动”内部视图来提供交互和UI功能。
一个很好的例子就是标签栏(Tab Bar)视图控制器处理点击标签栏在一系列可视化面板间切换。
浏览我们的API文档来了解视图控制器和Ionic中可用的Javascript实用工具。
Ionic 是目前最有潜力的一款HTML5 手机应用开发框架。
通过SASS 构建应用程序,它提供了很多UI 组件来帮助开发者开发强大的应用。
它使用JavaScript MVVM 框架和AngularJS 来增强应用。
提供数据的双向绑定,使用它成为Web 和移动开发者的共同选择。
快速学习ionic也可以观看ionic免费视频教程Ionic教程
Ionic主要特点:
1.Ionic为性能而生-追求性能运行速度快
2.轻量级框架
3.Ionic完美的融合下一代移动框架AngularJS 基于Angularjs,支持Angularjs的特性,MVC ,代码易维护
4.漂亮的设计让你立马爱上它,通过SASS 构建应用程序,它提供了很多UI 组件来帮助开发者开发强大的应用。
5.Ionic让你看不出混合应用和原生的区别-专注原生
6.强大的命令行工具
7.基于angular语法简单易学
Ionic+Angularjs课程目录(更新中):
1.phonegap 结合crosswall 性能优化以及phonegap + Angularjs +ionic 介绍
2.第二讲ionic项目简介以及Angularjs 基础-html5 框架+Crosswalk 打包app以及angular基础介绍(1)
3.第二讲ionic项目简介以及Angularjs 基础-angularjs 指令表达式模块介绍(2)
4.第二讲ionic以及Angularjs 基础-angularjs $http请求数据以及angularjs filter简介(3)
5.第三讲Angularjs MVC 以及$scope作用域Angularjs模块的run方法以及依赖注入中代码压缩问题
6.第四讲Angularjs $scope里面的$apply方法和$watch方法
7.第五讲Angularjs 工具方法以及angularjs中使用jquery
8.第六讲Angularjs 事件指令input相关指令和样式指令DOM操作指令详解(1)
9.第六讲Angularjs 事件指令input相关指令和样式指令DOM操作指令详解(2)
10.第六讲Angularjs include指令详解(3)11.第七讲Angularjs filter过滤器以及自定义filter过滤器详解
12.第八讲Angularjs自定义服务provide里provider方法以及factory、service方法(1)
13.第八讲Angularjs自定义服务provide 供应商详解(2)
14.第九讲Angularjs 常用服务$http $location $cacheFactory $interpolate $timeout $log $res服务(1)
15.第九讲Angularjs 常用服务$http $location $cacheFactory $interpolate $timeout $log $res服务(2)
16.第十讲angularjs ngSanitize ngRoute ngAnimate插件(1)
17.第十讲angularjs ngSanitize ngRoute ngAnimate插件(2)
18.第十讲angularjs ngSanitize ngRoute ngAnimate插件(3)
19.第十一讲ngResource 数据交互插件(1)
20.第十一讲ngResource 数据交互插件(2)
21.第十二讲手机app 开发的几种方式ionic 学习思路以及ionic 新建的项目分析
22.第十三讲ionic css布局介绍(1) ionic基本布局色彩、图标和边距
23.第十三讲ionic css布局介绍(2) 界面组件列表按钮
24.第十三讲ionic css布局介绍(3)
25.第十三讲ionic css布局介绍(4)
26.第十四讲ionic js指令布局介绍使用
27.第十五讲ionic路由页面切换详解(1)
28.第十五讲ionic路由结合ionic-tabs 页面切换详解(2)
29.第十五讲ionic路由结合ionic-tabs 页面切换详解(3)
29.第十五讲ionic路由结合ionic-tabs 页面切换详解(3)
30第十七讲ionic侧边栏ion-side-menus 以及ion-tap结合侧边栏详解31.第十八讲ionic列表ion-list 以及高性能的ng-repeat
32.第十九讲ionic表单输入ion-checkbox ion-radio ion-toggle
ion-spinner
33第二十讲ionic动态组件$ionicModal $ionicActionSheet $ionicPopup $ionicPopover $ionicLoading $ionicBackdrop 指令
34第二十讲ionic动态组件$ionicPopover $ionicLoading $ionicBackdrop 指令(2)
35第十一讲ionic幻灯指令ion-slide-box
36.第二十二讲APP产品原型设计工具(POP)详解实战项目功能演示
37.第二十三讲ionic discuz app项目实战框架搭建
38.第二十四讲ionic discuz app底部修改以及首页搭建
39.第二十五讲ionic discuz app全局变量设置以及服务端数据请求
40.第二十五讲ionic discuz app上拉下拉更新数据(2)
41.第二十六讲ionic discuz app 顶部tab选项卡布局以及详情页面显示
42.第二十七讲ionic discuz app文章列表文章详情加载优化、帖子列表以及帖子详情显示(1)
43第二十七讲ionic discuz app帖子列表以及帖子详情显示(2)
44第二十八讲详情页面ion-tabs中使用tabs-item-hide样式隐藏底部菜单以及ionic页面加载加载完成销毁执行的广播
45第二十九讲ionic discuz app用户中心登陆退出登录以及浏览器Resource Post数据提示CORS问题以及服务端处理post json(1)
46第二十九讲ionic discuz app用户中心登陆退出登录以及浏览器Resource Post数据提示CORS问题以及服务端处理post json(2)
47第三十讲ionic discuz app上拉加载中图片显示以及重复请求数据问题解决,发布帖子签名验证逻辑
48第三十一讲ionic discuz app 发表帖子
49.第三十二讲ng-cordova介绍以及使用
50第三十三讲cordova3.X+消息推送以及指定设备推送详解-极光推送android (1)
51第三十四讲cordova3.X+消息推送以及指定设备推送详解-极光推送IOS 证书申请(2)
52第三十四讲cordova3.X+消息推送以及指定设备推送详解-极光推送IOS 消息推送(3)。