linux下编译安装openssh-rhel5.8实测
- 格式:doc
- 大小:5.07 MB
- 文档页数:5
Linux下OpenSSH版本升级在运营商对各个系统的安全扫描的过程中,经常会遇到如下OpenSSH安全漏洞:这一安全漏洞通常需要到ftp:///pub/OpenBSD/OpenSSH/portable/下载openssh-5.0p1以上的版本,然后进行软件升级才能解决这一问题。
一、OpenSSH升级前需要准备的工作如下:(1)开启telnet的服务,关闭SSH服务,详见《Linux下telnet开启和关闭服务》文档;如果是在本机上直接操作就不需要开启。
(2)将下载好的OpenSSH包上传到需要升级的服务器上。
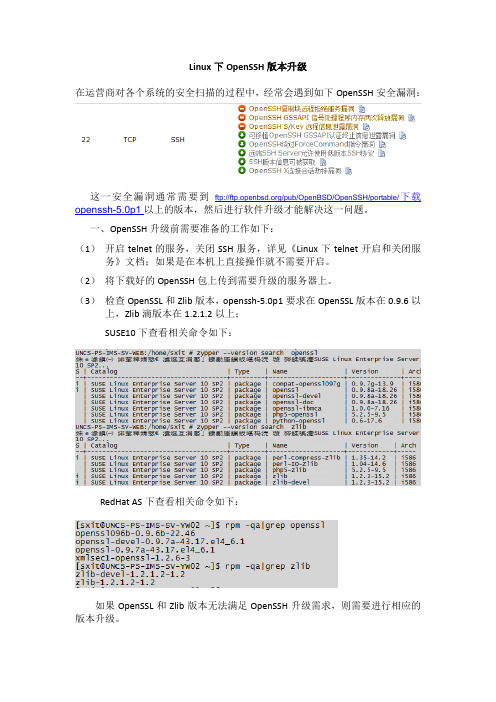
(3)检查OpenSSL和Zlib版本,openssh-5.0p1要求在OpenSSL版本在0.9.6以上,Zlib滴版本在1.2.1.2以上;SUSE10下查看相关命令如下:RedHat AS下查看相关命令如下:如果OpenSSL和Zlib版本无法满足OpenSSH升级需求,则需要进行相应的版本升级。
二、OpenSSH升级(1)备份好之前SSH的相关配置文件,也可以cd /etc,直接tar整个ssh目录。
(2)service sshd stop或者/etc/init.d/sshd stop关闭ssh服务(3)tar zxvf openssh-5.0p1.tar.gz(4)cd openssh-5.0p1./configure --prefix=/usr --sysconfdir=/etc/ssh --without-zlib-version-check指定安装目录,同时不检查zlib版本。
注:在配置的过程中一定要确保没有错误提示,这样才能进行后续的编译。
(5)make //编译(6)make install //安装(7)使用命令ssh –V验证升级是否成功。
OpenSSH_5.0p1, OpenSSL 0.9.8a 11 Oct 2005(8)vi /etc/ssh/sshd_config指定Protocol 2,指定PermitRootLogin no(9)service sshd start或者/etc/init.d/sshd start开启ssh服务(10)关闭telnet服务,详见《Linux下telnet开启和关闭服务》文档。
1、官网获取光盘镜像登录,找到相关的光盘镜像并下载:rhel-server-7.3-x86_64-dvd.iso(大约3.7GB)2、通过ftp工具以二进制方式传输光盘镜像到目标服务器例如:ftp传到/tmp/rhel-server-7.1-x86_64-dvd.iso3、挂载光盘镜像例如:[root@omcr63 ~]# mkdir /mnt/iso[root@omcr63 ~]# mount -o,loop /tmp/rhel-server-7.1-x86_64-dvd.iso /mnt/iso/mount: /dev/loop0 写保护,将以只读方式挂载4、更新yum源vi编辑/etc/yum.repos.d/local.repo文件加入如下内容;例如:[root@omcr63 yum.repos.d]#vi /etc/yum.repos.d/local.repo#如果没有该文件则创建一个新的写入如下配置[local]name=localbaseurl=file:///mnt/isoenabled=1gpgcheck=05、升级ssh依次执行yum clean all,yumrepolist,yum install openssh命令,例如:[root@omcr63 yum.repos.d]# yum clean all已加载插件:langpacks, product-id, subscription-managerThis system is not registered to Red Hat Subscription Management. You can usesubscription-manager to register.正在清理软件源:localCleaning up everything[root@omcr63 yum.repos.d]# yumrepolist已加载插件:langpacks, product-id, subscription-managerThis system is not registered to Red Hat Subscription Management. You can usesubscription-manager to register.local| 4.1 kB 00:00:00(1/2): local/group_gz| 136 kB 00:00:00(2/2): local/primary_db| 3.9 MB 00:00:00源标识源名称状态locallocal 4,751 repolist: 4,751[root@omcr63 yum.repos.d]# yum install openssh已加载插件:langpacks, product-id, subscription-managerThis system is not registered to Red Hat Subscription Management. You can usesubscription-manager to register.正在解决依赖关系-->正在检查事务--->软件包openssh.x86_64.0.6.6.1p1-11.el7 将被升级-->正在处理依赖关系openssh = 6.6.1p1-11.el7,它被软件包openssh-clients-6.6.1p1-11.el7.x86_64 需要-->正在处理依赖关系openssh = 6.6.1p1-11.el7,它被软件包openssh-server-6.6.1p1-11.el7.x86_64 需要--->软件包openssh.x86_64.0.6.6.1p1-31.el7 将被更新6、升级后验证执行如下命令确认openssh已更新到openssh-6.6.1p1-31版本[root@omcr63 yum.repos.d]# rpm -qa |grepopensshopenssh-6.6.1p1-31.el7.x86_64openssh-server-6.6.1p1-31.el7.x86_64openssh-clients-6.6.1p1-31.el7.x86_647、重启SSH服务rhel7以后重启ssh命令变成了systemctl,r hel6以前是service[root@omcr63 yum.repos.d]# service ssh restart #rhel6以下用Redirecting to /bin/systemctlrestart ssh.serviceFailed to restart ssh.service: Unit not found[root@omcr63 yum.repos.d]# systemctl restart sshd #rhe l7以上注释1:ssh重启之前建议开启telnet防止ssh重启后服务器无法正常连接,RHEL7开启telnet 方法如下:1、首先查找telnet和xinetd守护进程软件是否有安装rpm -qa |grepxinetrpm -qa |grep telnet2、如果没安装,则安装 telnet-server、xinetd软件yum install telnet-server -yyum install xinetd -y3、启动以上两个服务:systemctl start telnet.socketsystemctl start xinetd4、将xinetd、telnet服务加入开机自启动:systemctl enable xinetd.servicesystemctl enable telnet.socket注释2:如果./configure检查编译环境的时候报如下错误[root@LTJNOMC-XJZ01-1 openssh-7.5p1]# ./configurechecking for gcc... nochecking for cc... nochecking for cl.exe... noconfigure: error: in `/tmp/openssh-7.5p1':configure: error: no acceptable C compiler found in $PATHSee `config.log' for more details[root@LTJNOMC-XJZ01-1 openssh-7.5p1]#处理方法:加载光盘镜像执行yum install gcc命令安装gcc编译环境即可。

linux系列1-centos5.8x64安装过程对于linux初学者来说,鸟哥的linux私房菜是很好的学习教材了。
我也是从linux初学者这条路⾛过来的,⽬前正在研究linux运维的技术。
对于⾃已学过的东西,总希望留点脚印(但愿不是坑),让⼤家少⾛点弯路。
于是想写下这⼀系列的教程。
建议在⽂本模式下安装linux,并通过命令⾏学习linux。
本⽂的系统安装只针对Centos5.x系统,Centos6.x的⽂本安装不能⾃定义分区及⼤⼩,不能⾃定义软件包。
⽬录1. 安装Centos5.8 x641.1. 下载Centos,新建虚拟机1.2. 输⼊linux text ,⽂本模式安装1.3. 安装盘检验,选择skip1.4. Welcome CentOS(默认OK)1.5. 选择语⾔为English1.6. 选择键盘布局类型为us1.7. 选择"⾃定义分区"1.8. 分区1.8.1. 设置/boot分区1.8.2. 设置swap分区1.8.3. 设置根分区1.8.4. 点OK确认分区1.9. 选择grub引导,默认OK1.10. boot加载参数, 默认OK1.11. 设置GRUB密码,根据需求情况设置,这⾥跳过,默认OK1.12. 确认安装位置, 默认 OK1.13. 确认MBR安装位置, 默认 OK1.14. 配置⽹络参数1.15. 配置GATEWAY、DNS(按需求设置),我这⾥默认⽤DHCP1.16. 设置主机名1.17. 设置时区 Asia/Shanghai1.18. 设置ROOT密码1.19. 选择⾃定义软件包1.20. ⾃定义软件包(重要)1.21. ⽣成安装⽇志/root/install.log1.22. 开始安装程序1.23. 安装完成, Reboot重启2. 配置Centos5.82.1. 关闭防⽕墙,SELinux2.2. 设置完成,退出setup agent3. ⽣产环境的分区建议4. 问题5. 更多资料1. 安装Centos5.8 x641.1. 下载Centos,新建虚拟机我使⽤的是VMware Workstation,注意选择的是64bit版本。

如何使用ssh命令在Linux终端中远程登录到其他计算机SSH(Secure Shell)是一种网络协议,用于通过加密的方式在网络上进行安全的远程登录连接。
在Linux系统中,通过使用ssh命令,我们可以方便地在终端中远程登录到其他计算机。
本文将介绍如何在Linux终端中使用ssh命令进行远程登录,并提供一些SSH命令的常见用法。
请根据需要自行调整命令格式。
1. 首先,确保你的Linux系统已经安装了OpenSSH软件包。
若未安装,可以使用以下命令进行安装:```sudo apt-get install openssh-server # Ubuntu/Debian系统sudo yum install openssh-server # CentOS/RHEL系统```安装完成后,系统会自动启动SSH服务,并将其设置为开机自启动。
2. 远程登录到另一台计算机,需要知道目标计算机的IP地址或域名。
假设目标计算机的IP地址为192.168.0.100。
在本地计算机的终端中,输入以下命令以连接到目标计算机: ```*******************.0.100```其中,`username`是目标计算机上的有效用户名。
如果连接成功,系统会提示输入密码。
输入密码时,终端中不会显示任何字符,这是正常的安全特性。
如果已经为目标计算机设置了SSH密钥对登录,则可以不输入密码直接登录。
3. 在终端中远程登录后,你可以在目标计算机上执行各种命令,就像在本地计算机上一样。
以下是一些常用的SSH命令用法: - 复制文件从本地计算机到远程计算机:```scp /path/to/local/file****************.0.100:/path/to/remote/directory```- 复制文件从远程计算机到本地计算机:```*******************.0.100:/path/to/remote/file/path/to/local/directory```- 在远程计算机上执行命令,并将结果输出到本地计算机:```*******************.0.100"command">/path/to/local/file```其中,`command`是你要在远程计算机上执行的命令。

Linux升级OpenSSH和OpenSSL,解决XMSSKey解析整数溢出漏洞、Open。
OpenSSH和OpenSSLOpenSSLOpenSSL其实是⼀个开源的C函数库,多⽤于加密依赖,很多程序的编译,需要OpenSSL作为依赖包。
OpenSSHOpenSSH 是 SSH (Secure SHell) 协议的免费开源实现,类似于OpenJDK和OracleJDK的区别。
需要⽤到OpenSSL的函数库,所以在更新OpenSSH前,最好先更新OpenSSL。
SSH协议族可以⽤来进⾏远程控制, 或在计算机之间传送⽂件。
相对于传统⽅式,OpenSSH提供了服务端后台程序和客户端⼯具,并且加密远程控制和⽂件传输过程中的数据。
简单地说,⽇常使⽤OpenSSH:远程控制服务器端,如:远程登录访问Linux的Terminal。
且过程中加密传输。
OpenSSL 拒绝服务漏洞拒绝服务漏洞,代号为:CVE-2021-3449:主要是⼀些操作,可能会让OpenSSL TLS 强⾏停⽌。
【我感觉这个漏洞不是很严重啦,但是⼤家都觉得很严重……那还是有必要修复⼀下╮( ̄▽ ̄"")╭】解决⽅法很简单:升级OpenSSL版本。
XMSS Key 解析整数溢出漏洞XMSS Key漏洞,代号为:CVE-2019-16905:主要是⾮法⽤户,可以通过此漏洞,跳过OpenSSH的认证,远程登录到你服务器【不过计算难度挺⾼的,⽽且条件苛刻……】。
但是,总归是重⼤漏洞,需要修复:解决⽅法很简单:升级OpenSSH版本。
升级的⽅法很简单:下载新版本OpenSSL源码备份旧版本OpenSSL编译安装新版本OpenSSL下载新版本OpenSSL源码这边推荐下载地址:⽐如,我这边下载openssl-1.1.1k.tar.gz。
到Linux控制台内,使⽤wget下载即可(你也可以使⽤宝塔等软件下载,但是记得权限问题):wget 'https:///source/openssl-1.1.1k.tar.gz'之后,我们解压这个tar.gz⽂件夹,并进⼊:# 使⽤tar⼯具包解压tar -xf openssl-1.1.1k.tar.gz# 进⼊⽂件夹cd openssl-1.1.1k备份旧版本OpenSSL为了避免编译过程中,出现意外(如:远程SSH突然断连,导致编译失败);我们提前备份旧版本OpenSSL,给回滚“留条路”(如果你之前都没有安装OpenSSL,这步可以跳过):# 备份OpenSSL到⽤户⽬录,并重命名为openBakmv openssl ~/openBak编译安装新版本OpenSSL刚刚我们已经在新的OpenSSL⽬录,所以我们可以直接开始编译。

基于源码编译安装openssh 最近的,openssl/openssh等相继漏洞的暴露,让暴露在公⽹的linux.沦陷为⾁鸡的正营。
没办法,还是升级版本。
00、openssh简介 OpenSSH 是⼀组安全远程的连接⼯具,主要包括了⼏个部份:ssh、sshd、scp、sftp、ssh-keygen、ssh-agent、ssh-add等ssh(SSH 客户端,⽤于登录建⽴连接,是 rlogin 与 Telnet的安全替代⽅案)sshd (SSH 服务端,典型的独⽴守护进程)scp、sftp (⽂件安全传输⼯具,rcp、ftp 安全的替代⽅案)ssh-keygen (⽤于产⽣ RSA 或 DSA 密钥)ssh-agent、ssh-add(帮助⽤户不需要每次都要输⼊⾦钥密码的⼯具)01、编译前的准备⼯作下载openssh:A: 已经安装了openssl(新版本的,编译安装的)B:或者基于本机的openssl(yum install -y openssl-devel)openssl version -a #查看当前版本的opensslssh -V #当前openssh编译的版本yum install -y zlib-devel #如果编译参数压缩的需要安装02、编译安装 OpenSSH./configure --prefix=/usr/local/openssh --sysconfdir=/etc/ssh2 --with-ssl-dir=/usr/local/openssl #如果openssl已经基于源码升级需要加此参数,但基于本机openssl的不需要添加make -j4 && make install解释:--prefix 安装⽬录--sysconfdir 配置⽂件⽬录 #当前的/etc/ssh ⽬的不覆盖,也可以基于本机直接覆盖安装--with-ssl-dir 指定 OpenSSL 的安装⽬录(基于源码安装的)03、备份OpenSSH 旧配置⽂件mv /etc/init.d/sshd /etc/init.d/sshd.bak04、修改ssh启动脚本openssh-7.4p1\contrib\redhat\sshd.init sshd就是根据sshd,init修改的针对redhat发⾏版本根据实际情况修正的sshd脚本 /etc/init.d/sshd#!/bin/bash## Init file for OpenSSH server daemon## chkconfig: 2345 55 25# description: OpenSSH server daemon## processname: sshd# config: /etc/ssh/ssh_host_key# config: /etc/ssh/ssh_host_key.pub# config: /etc/ssh/ssh_random_seed# config: /etc/ssh/sshd_config# pidfile: /var/run/sshd.pid# source function library. /etc/rc.d/init.d/functions# pull in sysconfig settings[ -f /etc/sysconfig/sshd ] && . /etc/sysconfig/sshd RETVAL=0prog="sshd"# Some functions to make the below more readable SSHD=/usr/local/openssh/sbin/sshd #按实际情况调整PID_FILE=/var/run/sshd.piddo_restart_sanity_check(){$SSHD -tRETVAL=$?if [ $RETVAL -ne 0 ]; thenfailure $"Configuration file or keys are invalid"echofi}start(){# Create keys if necessary/usr/local/openssh/bin/ssh-keygen -A #按实际情况调整 if [ -x /sbin/restorecon ]; then/sbin/restorecon /etc/ssh2/ssh_host_key.pub/sbin/restorecon /etc/ssh2/ssh_host_rsa_key.pub/sbin/restorecon /etc/ssh2/ssh_host_dsa_key.pub /sbin/restorecon /etc/ssh2/ssh_host_ecdsa_key.pub fiecho -n $"Starting $prog:"$SSHD $OPTIONS && success || failureRETVAL=$?[ $RETVAL -eq 0 ] && touch /var/lock/subsys/sshdecho}stop(){echo -n $"Stopping $prog:"killproc $SSHD -TERMRETVAL=$?[ $RETVAL -eq 0 ] && rm -f /var/lock/subsys/sshdecho}reload(){echo -n $"Reloading $prog:"killproc $SSHD -HUPRETVAL=$?echo}case "$1" instart)start;;stop)stop;;restart)stopstart;;reload)reload;;condrestart)if [ -f /var/lock/subsys/sshd ] ; thendo_restart_sanity_checkif [ $RETVAL -eq 0 ] ; thenstop# avoid racesleep 3startfifi;;status)status $SSHDRETVAL=$?;;*)echo $"Usage: $0 {start|stop|restart|reload|condrestart|status}"RETVAL=1esacexit $RETVALchmod +x /etc/init.d/sshd添加允许root远程登录/etc/ssh2/sshd_configPermitRootLogin yes05、设置环境变量vim /etc/profileexport PATH=/usr/local/openssh/bin:$PATHsource /etc/profile06、开机⾃启动 sshdservice sshd restartchkconfig sshd on07、openssh编译参数[root@rhel openssh-7.4p1]# ./configure --help`configure' configures OpenSSH Portable to adapt to many kinds of systems. Usage: ./configure [OPTION]... [VAR=VALUE]...To assign environment variables (e.g., CC, CFLAGS...), specify them as VAR=VALUE. See below for descriptions of some of the useful variables. Defaults for the options are specified in brackets.Configuration:-h, --help display this help and exit--help=short display options specific to this package--help=recursive display the short help of all the included packages-V, --version display version information and exit-q, --quiet, --silent do not print `checking ...' messages--cache-file=FILE cache test results in FILE [disabled]-C, --config-cache alias for `--cache-file=config.cache'-n, --no-create do not create output files--srcdir=DIR find the sources in DIR [configure dir or `..']Installation directories:--prefix=PREFIX install architecture-independent files in PREFIX[/usr/local]--exec-prefix=EPREFIX install architecture-dependent files in EPREFIX [PREFIX]By default, `make install' will install all the files in`/usr/local/bin', `/usr/local/lib' etc. You can specifyan installation prefix other than `/usr/local' using `--prefix',for instance `--prefix=$HOME'.For better control, use the options below.Fine tuning of the installation directories:--bindir=DIR user executables [EPREFIX/bin]--sbindir=DIR system admin executables [EPREFIX/sbin]--libexecdir=DIR program executables [EPREFIX/libexec]--sysconfdir=DIR read-only single-machine data [PREFIX/etc]--sharedstatedir=DIR modifiable architecture-independent data [PREFIX/com] --localstatedir=DIR modifiable single-machine data [PREFIX/var]--libdir=DIR object code libraries [EPREFIX/lib]--includedir=DIR C header files [PREFIX/include]--oldincludedir=DIR C header files for non-gcc [/usr/include]--datarootdir=DIR read-only arch.-independent data root [PREFIX/share]--datadir=DIR read-only architecture-independent data [DATAROOTDIR]--infodir=DIR info documentation [DATAROOTDIR/info]--localedir=DIR locale-dependent data [DATAROOTDIR/locale]--mandir=DIR man documentation [DATAROOTDIR/man]--docdir=DIR documentation root [DATAROOTDIR/doc/openssh]--htmldir=DIR html documentation [DOCDIR]--dvidir=DIR dvi documentation [DOCDIR]--pdfdir=DIR pdf documentation [DOCDIR]--psdir=DIR ps documentation [DOCDIR]System types:--build=BUILD configure for building on BUILD [guessed]--host=HOST cross-compile to build programs to run on HOST [BUILD]Optional Features:--disable-option-checking ignore unrecognized --enable/--with options--disable-FEATURE do not include FEATURE (same as --enable-FEATURE=no)--enable-FEATURE[=ARG] include FEATURE [ARG=yes]--disable-largefile omit support for large files--disable-pkcs11 disable PKCS#11 support code [no]--disable-strip Disable calling strip(1) on install--disable-etc-default-login Disable using PATH from /etc/default/login no--disable-lastlog disable use of lastlog even if detected no--disable-utmp disable use of utmp even if detected no--disable-utmpx disable use of utmpx even if detected no--disable-wtmp disable use of wtmp even if detected no--disable-wtmpx disable use of wtmpx even if detected no--disable-libutil disable use of libutil (login() etc.) no--disable-pututline disable use of pututline() etc. (uwtmp) no--disable-pututxline disable use of pututxline() etc. (uwtmpx) noOptional Packages:--with-PACKAGE[=ARG] use PACKAGE [ARG=yes]--without-PACKAGE do not use PACKAGE (same as --with-PACKAGE=no)--without-openssl Disable use of OpenSSL; use only limited internal crypto **EXPERIMENTAL**--with-ssh1 Enable support for SSH protocol 1--without-stackprotect Don't use compiler's stack protection--without-hardening Don't use toolchain hardening flags--without-rpath Disable auto-added -R linker paths--with-cflags Specify additional flags to pass to compiler--with-cppflags Specify additional flags to pass to preprocessor--with-ldflags Specify additional flags to pass to linker--with-libs Specify additional libraries to link with--with-Werror Build main code with -Werror--with-solaris-contracts Enable Solaris process contracts (experimental)--with-solaris-projects Enable Solaris projects (experimental)--with-solaris-privs Enable Solaris/Illumos privileges (experimental)--with-osfsia Enable Digital Unix SIA--with-zlib=PATH Use zlib in PATH--without-zlib-version-check Disable zlib version check--with-skey[=PATH] Enable S/Key support (optionally in PATH)--with-ldns[=PATH] Use ldns for DNSSEC support (optionally in PATH)--with-libedit[=PATH] Enable libedit support for sftp--with-audit=module Enable audit support (modules=debug,bsm,linux)--with-pie Build Position Independent Executables if possible--with-ssl-dir=PATH Specify path to OpenSSL installation #源码编译openssl需要指定--without-openssl-header-check Disable OpenSSL version consistency check--with-ssl-engine Enable OpenSSL (hardware) ENGINE support--with-prngd-port=PORT read entropy from PRNGD/EGD TCP localhost:PORT--with-prngd-socket=FILE read entropy from PRNGD/EGD socket FILE (default=/var/run/egd-pool)--with-pam Enable PAM support--with-pam-service=name Specify PAM service name--with-privsep-user=user Specify non-privileged user for privilege separation--with-sandbox=style Specify privilege separation sandbox (no, capsicum, darwin, rlimit, seccomp_filter, systrace, pledge) --with-selinux Enable SELinux support--with-kerberos5=PATH Enable Kerberos 5 support--with-privsep-path=xxx Path for privilege separation chroot (default=/var/empty)--with-xauth=PATH Specify path to xauth program--with-maildir=/path/to/mail Specify your system mail directory--with-mantype=man|cat|doc Set man page type--with-md5-passwords Enable use of MD5 passwords--without-shadow Disable shadow password support--with-ipaddr-display Use ip address instead of hostname in $DISPLAY--with-default-path= Specify default $PATH environment for server--with-superuser-path= Specify different path for super-user--with-4in6 Check for and convert IPv4 in IPv6 mapped addresses--with-bsd-auth Enable BSD auth support--with-pid-dir=PATH Specify location of ssh.pid file--with-lastlog=FILE|DIR specify lastlog location common locationsSome influential environment variables:CC C compiler commandCFLAGS C compiler flagsLDFLAGS linker flags, e.g. -L<lib dir> if you have libraries in anonstandard directory <lib dir>LIBS libraries to pass to the linker, e.g. -l<library>CPPFLAGS (Objective) C/C++ preprocessor flags, e.g. -I<include dir> ifyou have headers in a nonstandard directory <include dir>CPP C preprocessorUse these variables to override the choices made by `configure' or to helpit to find libraries and programs with nonstandard names/locations.OpenSSH has been configured with the following options:User binaries: /usr/local/openssh/binSystem binaries: /usr/local/openssh/sbinConfiguration files: /etc/ssh2Askpass program: /usr/local/openssh/libexec/ssh-askpassManual pages: /usr/local/openssh/share/man/manXPID file: /var/runPrivilege separation chroot path: /var/emptysshd default user PATH: /usr/bin:/bin:/usr/sbin:/sbin:/usr/local/openssh/binManpage format: docPAM support: noOSF SIA support: noKerberosV support: noSELinux support: noSmartcard support:S/KEY support: noMD5 password support: nolibedit support: noSolaris process contract support: noSolaris project support: noSolaris privilege support: noIP address in $DISPLAY hack: noTranslate v4 in v6 hack: yesBSD Auth support: noRandom number source: OpenSSL internal ONLYPrivsep sandbox style: rlimitHost: x86_64-pc-linux-gnuCompiler: gccCompiler flags: -g -O2 -Wall -Wpointer-arith -Wuninitialized -Wsign-compare -Wformat-security-Wno-pointer-sign -fno-strict-aliasing -D_FORTIFY_SOURCE=2 -ftrapv -fno-builtin-memset -fstack-protector-all -fPIE Preprocessor flags: -I/usr/local/openssl/includeLinker flags: -L/usr/local/openssl/lib -Wl,-z,relro -Wl,-z,now -Wl,-z,noexecstack -fstack-protector-all -pie Libraries: -lcrypto -lrt -ldl -lutil -lz -lcrypt -lresolv。
CentOS7OpenSSH升级到最新OpenSSH8.8p1教程⼀、环境介绍查看openssh、openssl版本[root@localhost ~]# openssl versionOpenSSL 1.0.2k-fips 26 Jan 2017[root@localhost ~]# ssh -VOpenSSH_7.4p1, OpenSSL 1.0.2k-fips 26 Jan 2017查看linux发⾏版和内核[root@localhost ~]# cat /etc/os-releaseNAME="CentOS Linux"VERSION="7 (Core)"ID="centos"ID_LIKE="rhel fedora"VERSION_ID="7"PRETTY_NAME="CentOS Linux 7 (Core)"ANSI_COLOR="0;31"CPE_NAME="cpe:/o:centos:centos:7"HOME_URL="https:///"BUG_REPORT_URL="https:///"CENTOS_MANTISBT_PROJECT="CentOS-7"CENTOS_MANTISBT_PROJECT_VERSION="7"REDHAT_SUPPORT_PRODUCT="centos"REDHAT_SUPPORT_PRODUCT_VERSION="7"[root@localhost ~]# uname -r3.10.0-957.el7.x86_64⼆、安装配置telnet2.1、安装telnet-server[root@localhost ~]# yum -y install xinetd telnet-server2.2、配置telnet`先看⼀下xinetd.d⽬录下是否有telnet⽂件`[root@localhost ~]# ll /etc/xinetd.d/telnetls: cannot access /etc/xinetd.d/telnet: No such file or directory`如果有,则将⽂件⾥⾯的disable = no改成disable = yes``如果没有,就进⾏下⾯的操作`[root@localhost ~]# cat > /etc/xinetd.d/telnet <<EOFservice telnet{disable = yesflags = REUSEsocket_type = streamwait = nouser = rootserver = /usr/sbin/in.telnetdlog_on_failure += USERID}EOF2.3、配置telnet登录的终端类型[root@localhost ~]# cat >> /etc/securetty <<EOFpts/0pts/1pts/2pts/3EOF2.4、启动telnet服务[root@localhost ~]# systemctl enable xinetd --now[root@localhost ~]# systemctl enable telnet.socket --now[root@localhost ~]# ss -nltp | grep23LISTEN 0128 :::23 :::* users:(("systemd",pid=1,fd=46))`23端⼝起来了,表⽰telnet服务正常运⾏`三、切换登录⽅式为telnet后⾯的操作都是在telnet链接的⽅式下进⾏,避免ssh中断导致升级失败以telnet⽅式登录的时候,注意选择协议和端⼝,协议为telnet,端⼝为23四、开始升级OpenSSH4.1、下载升级所需依赖包[root@localhost ~]# yum -y install gcc gcc-c++ glibc make autoconf openssl openssl-devel pcre-devel pam-devel[root@localhost ~]# wget https:///source/openssl-1.1.1i.tar.gz[root@localhost ~]# wget /pub/OpenBSD/OpenSSH/portable/openssh-8.6p1.tar.gz[root@localhost ~]# tar xf openssl-1.1.1i.tar.gz[root@localhost ~]# tar xf openssh-8.6p1.tar.gz4.3、编译安装OpenSSL`开始之前,先备份⼀下原有的OpenSSL⽂件`[root@localhost ~]# mv /usr/bin/openssl{,.bak}[root@localhost ~]# mv /usr/include/openssl{,.bak}[root@localhost ~]# cd openssl-1.1.1i/[root@localhost openssl-1.1.1i]# ./config shared && make && make install`编译完成后,可以在/usr/local⽬录下找到openssl的⼆进制⽂件和⽬录`[root@localhost ~]# ll /usr/local/bin/openssl-rwxr-xr-x 1 root root 749136 Jan 1414:25 /usr/local/bin/openssl[root@localhost ~]# ll -d /usr/local/include/openssl/drwxr-xr-x 2 root root 4096 Jan 1414:25 /usr/local/include/openssl/`建⽴软连接`[root@localhost ~]# ln -s /usr/local/bin/openssl /usr/bin/openssl[root@localhost ~]# ln -s /usr/local/include/openssl/ /usr/include/openssl[root@localhost ~]# ll /usr/bin/openssllrwxrwxrwx 1 root root 22 Jan 1414:32 /usr/bin/openssl -> /usr/local/bin/openssl[root@localhost ~]# ll -d /usr/include/openssllrwxrwxrwx 1 root root 27 Jan 1414:33 /usr/include/openssl -> /usr/local/include/openssl/`重新加载配置,验证openssl版本`[root@localhost ~]# echo"/usr/local/lib64" >> /etc/ld.so.conf[root@localhost ~]# /sbin/ldconfig[root@localhost ~]# openssl versionOpenSSL 1.1.1i 8 Dec 20204.3.1、可能会有的⼀些报错和解决⽅法[root@localhost ~]# openssl versionopenssl: error while loading shared libraries: libssl.so.1.1: cannot open shared object file: No such file or directory"这是因为libssl.so.1.1⽂件找不到,执⾏find / -name 'libssl.so.1.1',将/etc/ld.so.conf⾥⾯的lib64改成find出来的路径即可" [root@localhost ~]# find / -name "openssl""编译完,可以⽤上⾯的find命令看⼀下openssl所在的路径,以及include/openssl所在的路径"4.4、编译安装OpenSSH`备份原有的ssh⽬录`[root@localhost ~]# mv /etc/ssh{,.bak}[root@localhost ~]# mkdir /usr/local/openssh[root@localhost ~]# cd openssh-8.4p1/[root@localhost openssh-8.4p1]# ./configure --prefix=/usr/local/openssh \--sysconfdir=/etc/ssh \--with-openssl-includes=/usr/local/include \--with-ssl-dir=/usr/local/lib64 \--with-zlib \--with-md5-passwords \--with-pam && \make && \make install4.4.1、配置sshd_config⽂件[root@localhost ~]# echo"UseDNS no" >> /etc/ssh/sshd_config[root@localhost ~]# echo'PermitRootLogin yes' >> /etc/ssh/sshd_config[root@localhost ~]# echo'PubkeyAuthentication yes' >> /etc/ssh/sshd_config[root@localhost ~]# echo'PasswordAuthentication yes' >> /etc/ssh/sshd_config`如果是图形化界⾯,需要x11的话,需要配置如下`[root@localhost ~]# echo"X11Forwarding yes" >> /etc/ssh/sshd_config[root@localhost ~]# echo"X11UseLocalhost no" >> /etc/ssh/sshd_config [root@localhost ~]# echo"XAuthLocation /usr/bin/xauth" >> /etc/ssh/sshd_config4.4.2、创建新的sshd⼆进制⽂件[root@localhost ~]# mv /usr/sbin/sshd{,.bak}[root@localhost ~]# mv /usr/bin/ssh{,.bak}[root@localhost ~]# mv /usr/bin/ssh-keygen{,.bak}[root@localhost ~]# ln -s /usr/local/openssh/bin/ssh /usr/bin/ssh[root@localhost ~]# ln -s /usr/local/openssh/bin/ssh-keygen /usr/bin/ssh-keygen[root@localhost ~]# ln -s /usr/local/openssh/sbin/sshd /usr/sbin/sshd`查看openssh当前版本`[root@localhost ~]# ssh -VOpenSSH_8.4p1, OpenSSL 1.1.1i 8 Dec 20204.4.3、重新启动openssh服务[root@localhost ~]# systemctl disable sshd --now[root@localhost ~]# mv /usr/lib/systemd/system/sshd.service{,.bak}[root@localhost ~]# systemctl daemon-reload[root@localhost ~]# cp -a openssh-8.6p1/contrib/redhat/sshd.init /etc/init.d/sshd [root@localhost ~]# cp -a openssh-8.6p1/contrib/redhat/sshd.pam /etc/pam.d/sshd.pam [root@localhost ~]# chkconfig --add sshd[root@localhost ~]# systemctl enable sshd --now4.5、ssh链接成功后的处理[root@localhost ~]# ssh root@192.168.******`成功连接上之后,可以关闭telnet服务,当然,也可以不关闭`[root@localhost ~]# systemctl disable xinetd.service --now[root@localhost ~]# systemctl disable telnet.socket --now。
openssh编译参数【原创实用版】目录1.OpenSSH 编译参数概述2.OpenSSH 编译的基本参数3.OpenSSH 编译的选项参数4.OpenSSH 编译的调试参数5.OpenSSH 编译的错误处理6.编译 OpenSSH 的实例正文OpenSSH 编译参数OpenSSH 是一个用于在不安全网络上安全地进行远程连接的工具。
编译 OpenSSH 时,需要使用一些参数来指定编译选项,优化编译过程和结果。
下面我们来详细介绍一下 OpenSSH 编译参数的各个方面。
1.OpenSSH 编译参数概述OpenSSH 编译参数主要包括基本参数、选项参数、调试参数和错误处理参数。
这些参数可以通过命令行在编译过程中指定,用于控制编译器的行为。
2.OpenSSH 编译的基本参数OpenSSH 编译的基本参数主要包括以下几个:- -o:指定编译后的输出文件。
例如:“make -o sshd”表示将编译后的 sshd 文件输出到当前目录。
- -c:指定源文件。
例如:“make -c src”表示只编译 src 目录下的源文件。
- -j:指定并行编译的作业数量。
例如:“make -j4”表示允许 4 个作业并行编译。
3.OpenSSH 编译的选项参数OpenSSH 编译的选项参数主要包括以下几个:- -O:优化编译,生成优化后的可执行文件。
例如:“make -O sshd”表示编译优化后的 sshd 文件。
- -D:指定编译选项。
例如:“make -DDEBUG”表示开启调试选项进行编译。
- -I:指定头文件目录。
例如:“make -I/path/to/headers”表示指定头文件目录为/path/to/headers。
4.OpenSSH 编译的调试参数OpenSSH 编译的调试参数主要包括以下几个:- -g:在编译过程中添加调试信息。
例如:“make -g sshd”表示编译时添加调试信息。
- -p:在编译过程中进行预处理。
openssh由7.4编译升级到8.0之后出现⼀些问题问题⼀: /etc/ssh/ssh_config line 57: Unsupported option "gssapiauthentication"ssh升级之后登陆远程服务器的时候出现如下报错/etc/ssh/ssh_config line 57: Unsupported option "gssapiauthentication"客户端:找到/etc/ssh/ssh_config配置⽂件的第57⾏GSSAPIAuthentication yes把这⼀⾏注释掉就⾏了服务端:注释sshd_config的以下参数:#GSSAPIAuthentication yes#GSSAPICleanupCredentials yes#UsePAM yes服务端改配置需要重启sshd服务问题⼆: su命令不能⽤.使⽤su命令不成功,⽆在⽬标机器上通过⼀个普通⽤户su切换为root执⾏相关命令错误如下:ansible Timeout (12s) waiting for privilege escalation prompt我碰到的原因是因为ansible管理的客户端上⾯sshd配置⽂件设置有误,我直接从没问题的主机拷贝的sshd_config⽂件到问题主机上解决的,⽹上说的⼀种修改ansible.cfg的超时时间,不适合我当时碰到的情况问题三:⽂件句柄数设置不成功[root@cpoc-2ssh]# cat /etc/security/limits.conf |grep -v ^#|grep -v ^$* soft core 0* hard core 0* soft nproc 65535* hard nproc 65535* soft nofile 655350* hard nofile 655350* soft memlock 96* hard memlock 96[root@cpoc-2ssh]# cat /etc/security/limits.d/20-nproc.conf |grep -v ^#|grep -v ^$* soft nproc 4096root soft nproc unlimited然后普通⽤户ssh登陆之后查看 ulimit -a[xuweiyuan@cpoc-2 ~]$ ulimit -n1024[xuweiyuan@cpoc-2 ~]$ ulimit -u4096ssh不⽀持pam,查找原因是编译openssh的时候没有⽀持pam,也就是 --with-pam./configure --prefix=/usr --sysconfdir=/etc/ssh --with-md5-passwords --with-zlib --with-pammake -j4 && make instal重新编译安装,调整sshd_config⽂件,重启服务之后,登陆服务器的时候,输⼊正确的密码,然后出现如下报错密码错误,是因为UsePAM yes查看/etc/pam.d⽬录,没有发现sshd,所以重新写了⼀个⽂件vim /etc/pam.d/sshd#%PAM-1.0auth required pam_sepermit.soauth substack password-authauth include postlogin# Used with polkit to reauthorize users in remote sessions-auth optional pam_reauthorize.so prepareaccount required pam_nologin.soaccount include password-authpassword include password-auth# pam_selinux.so close should be the first session rulesession required pam_selinux.so closesession required pam_loginuid.so# pam_selinux.so open should only be followed by sessions to be executed in the user contextsession required pam_selinux.so open env_paramssession required pam_namespace.sosession optional pam_keyinit.so force revokesession include password-authsession include postlogin# Used with polkit to reauthorize users in remote sessions-session optional pam_reauthorize.so prepare重启sshd服务,再次登陆没有问题,⽽且查看 ulimit -a[xuweiyuan@cpoc-2 ~]$ ulimit -n655350[xuweiyuan@cpoc-2 ~]$ ulimit -u4096已经和/etc/security/limits.conf⽂件配置的⼀样了所以说卸载系统⾃带的openssh之前,最好是备份⼀下/etc/pam.d/sshdcp /etc/pam.d/sshd{,.old}编译完之后,查看/etc/pam.d如果没有sshd⽂件,就恢复备份问题四: [WARNING]: sftp transfer mechanism failed on [172.30.241.149]. Use ANSIBLE_DEBUG=1 to see detailed information 错误信息如下:[root@cpoc-1 xuweiyuan]# ansible all -b --become-method=su -m shell -a "whoami"[WARNING]: sftp transfer mechanism failed on [172.30.241.149]. Use ANSIBLE_DEBUG=1 to see detailed information172.30.241.150 | CHANGED | rc=0 >>root172.30.241.149 | CHANGED | rc=0 >>root查看sshd_config⽂件cat sshd_config|grep sftpSubsystem sftp /usr/libexec/openssh/sftp-serverll /usr/libexec/openssh/sftp-serverls: cannot access /usr/libexec/openssh/sftp-server: No such file or directory 查找 sftp-serverll /usr/libexec/sftp-server-rwxr-xr-x 1 root root 112800 Jul 26 15:47 /usr/libexec/sftp-server然后修改配置⽂件Subsystem sftp /usr/libexec/openssh/sftp-server改成Subsystem sftp /usr/libexec/sftp-server重启服务systemctl restart sshd ,重新执⾏命令,查看结果[root@cpoc-1 xuweiyuan]# ansible all -b --become-method=su -m shell -a "whoami"172.30.241.150 | CHANGED | rc=0 >>root172.30.241.149 | CHANGED | rc=0 >>root啦。
1、官网获取光盘镜像登录,找到相关的光盘镜像并下载:rhel-server-7.3-x86_64-dvd.iso(大约3.7GB)2、通过ftp工具以二进制方式传输光盘镜像到目标服务器例如:ftp传到/tmp/rhel-server-7.1-x86_64-dvd.iso3、挂载光盘镜像例如:[root@omcr63 ~]# mkdir /mnt/iso[root@omcr63 ~]# mount -o,loop /tmp/rhel-server-7.1-x86_64-dvd.iso /mnt/iso/mount: /dev/loop0 写保护,将以只读方式挂载4、更新yum源vi编辑/etc/yum.repos.d/local.repo文件加入如下内容;例如:[root@omcr63 yum.repos.d]#vi /etc/yum.repos.d/local.repo#如果没有该文件则创建一个新的写入如下配置[local]name=localbaseurl=file:///mnt/isoenabled=1gpgcheck=05、升级ssh依次执行yum clean all,yumrepolist,yum install openssh命令,例如:[root@omcr63 yum.repos.d]# yum clean all已加载插件:langpacks, product-id, subscription-managerThis system is not registered to Red Hat Subscription Management. You can usesubscription-manager to register.正在清理软件源:localCleaning up everything[root@omcr63 yum.repos.d]# yumrepolist已加载插件:langpacks, product-id, subscription-managerThis system is not registered to Red Hat Subscription Management. You can usesubscription-manager to register.local| 4.1 kB 00:00:00(1/2): local/group_gz| 136 kB 00:00:00(2/2): local/primary_db| 3.9 MB 00:00:00源标识源名称状态locallocal 4,751 repolist: 4,751[root@omcr63 yum.repos.d]# yum install openssh已加载插件:langpacks, product-id, subscription-managerThis system is not registered to Red Hat Subscription Management. You can usesubscription-manager to register.正在解决依赖关系-->正在检查事务--->软件包openssh.x86_64.0.6.6.1p1-11.el7 将被升级-->正在处理依赖关系openssh = 6.6.1p1-11.el7,它被软件包openssh-clients-6.6.1p1-11.el7.x86_64 需要-->正在处理依赖关系openssh = 6.6.1p1-11.el7,它被软件包openssh-server-6.6.1p1-11.el7.x86_64 需要--->软件包openssh.x86_64.0.6.6.1p1-31.el7 将被更新6、升级后验证执行如下命令确认openssh已更新到openssh-6.6.1p1-31版本[root@omcr63 yum.repos.d]# rpm -qa |grepopensshopenssh-6.6.1p1-31.el7.x86_64openssh-server-6.6.1p1-31.el7.x86_64openssh-clients-6.6.1p1-31.el7.x86_647、重启SSH服务rhel7以后重启ssh命令变成了systemctl,r hel6以前是service[root@omcr63 yum.repos.d]# service ssh restart #rhel6以下用Redirecting to /bin/systemctlrestart ssh.serviceFailed to restart ssh.service: Unit not found[root@omcr63 yum.repos.d]# systemctl restart sshd #rhe l7以上注释1:ssh重启之前建议开启telnet防止ssh重启后服务器无法正常连接,RHEL7开启telnet 方法如下:1、首先查找telnet和xinetd守护进程软件是否有安装rpm -qa |grepxinetrpm -qa |grep telnet2、如果没安装,则安装 telnet-server、xinetd软件yum install telnet-server -yyum install xinetd -y3、启动以上两个服务:systemctl start telnet.socketsystemctl start xinetd4、将xinetd、telnet服务加入开机自启动:systemctl enable xinetd.servicesystemctl enable telnet.socket注释2:如果./configure检查编译环境的时候报如下错误[root@LTJNOMC-XJZ01-1 openssh-7.5p1]# ./configurechecking for gcc... nochecking for cc... nochecking for cl.exe... noconfigure: error: in `/tmp/openssh-7.5p1':configure: error: no acceptable C compiler found in $PATHSee `config.log' for more details[root@LTJNOMC-XJZ01-1 openssh-7.5p1]#处理方法:加载光盘镜像执行yum install gcc命令安装gcc编译环境即可。
linux下编译安装openssh,同时介绍安装zlib及openssl,aix也适用
Linux下ssh升级安装配置
RedHat Linux下升级SSH 服务
当Telenet 已经渐渐退出历史舞台后,SSH ( Security SHell ) 就成为几乎所有Linux 操作系统的远程登录连接协议。
但是,目前很多Linux 发行版中集成的SSH 软件版本都比较老,存在着一些漏洞和安全隐患,因而升级SSH 服务软件修补漏洞提升系统安全成为Linux 系统安全中非常重要的一个环节。
下面就讲述一下如何升级SSH 服务。
SSH 有许多标准,通常Linux 中(Redhat, CentOS, SuSE 等)使用的是开源版本的OpenSSH,所以我们就是对OpenSSH 进行升级。
在升级OpenSSH 之前,需要升级系统中的OpenSSL (OpenSSL 可以为OpenSSH 提供加密传输支持,是OpenSSH 的一个中间件)版本和Zlib (提供压缩传输支持)版本,以达到最好的安全性。
注意:在开始升级之前一定要确认系统中已经安装了GCC 编译器!
一、升级Zlib
1、下载最新版本Zlib
Zlib 官方网站:/
目前最新版本的Zlib 是zlib-1.2.8.tar.gz
# cd /usr/local/src cd到安装目录下,可自己指定
# wget -c /zlib-1.2.8.tar.gz
2、编译安装Zlib
# tar xzvf zlib-1.2.3.tar.gz
# cd zlib-1.2.3
# ./configure --prefix=/usr/local/zlib
# make
# make install
这样,就把zlib 编译安装在/usr/local/zilib中了。
zlib-1.2.8.tar.gz openssl-0.9.8d.tar.gz openssh-6.0p1.tar.gz
pam-devel-0.99.6.2-6.el5_5.2.x86_64.rpm
二、升级 OpenSSL
1、下载最新版本 OpenSSL
OpenSSL 的官方网站:
目前最新版的 OpenSSL 是 openssl-0.9.8d
# cd /usr/local/src
# wget -c /source/openssl-0.9.8d.tar.gz
2、编译安装 OpenSSL
# tar xzvf openssl-0.9.8d.tar.gz
# cd openssl-0.9.8d
# ./Configure --prefix=/usr/local/ssl (此处直接 ./configure 就可以,)
# make
# make test (这一步很重要哦!是进行 SSL 加密协议的完整测试,如果出现错误就要一定先找出哪里的原因,否则一味继续可能导致最终 SSH 不能使用,后果很严重哦!) # make install
三、升级 OpenSSH
1、下载最新版本 OpenSSH
OpenSSH 的官方网站: (无法下载,可以自己百度下载openssh6.0,)
# cd /usr/local/src
# wget -c (此处省略)
2、编译安装 OpenSSH
# tar xzvf openssh-4.5p1.tar.gz
# cd openssh-4.5p1
# ./configure --prefix=/usr --sysconfdir=/etc/ssh --with-pam --with-zlib=/usr/local/zlib --with-ssl-dir=/usr/local/ssl --with-md5-passwords
(注意,如果 configure 时提示 PAM 有错误,那一般是因为系统中没有安装 pam-devel RPM 包,找到安装光盘,安装 pam-devel 就可以解决啦)
安装rpm包时遇到Header V3 DSA signature: NOKEY时解决办法
2011-03-22 15:52:08| 分类:默认分类|举报|字号订阅
最小化安装后,安装rpm包时经常会遇到
复制代码代码如下:
warning: rpmts_HdrFromFdno: Header V3 DSA signature: NOKEY, key ID*****这是由于yum安装了旧版本的GPG keys造成的,解决办法就是
复制代码代码如下:
rpm --import /etc/pki/rpm-gpg/RPM*
linux/centos Header V3 DSA signature: NOKEY, key ID 错误解决方法
后面加上--force --nodeps如
# rpm -ivh db4-devel-4.3.29-9.fc6.i386.rpm --force --nodeps
然后提示error: Failed dependencies:
xinetd is needed by tftp-server-0.42-3.1.i386
再安装rpm -ivh xinetd-2.3.14-10.el5.i386.rpm
#service xinetd restart就好了或者#service xinetd start
如果configure时出现configure: error: *** OpenSSL headers missing - please install first or check config.log ***
解决办法:安装openssl以及openssl-devel
# make
# make install
这样就完成了整个升级SSH 的工作,在升级完成后,我们还需要修改一下OpenSSH 的配置文件进一步提升安全性。
(跟实际系统有出入,感觉不该也可以)
通过以上步骤完成的升级工作,OpenSSH 的配置文件在/etc/ssh 下,其中SSH Server 的配置文件是sshd_config。
# vi /etc/ssh/sshd_config
找到:
CODE:
#Protocol 2,1修改为:
CODE:
Protocol 2这样就禁用了ssh v1 协议,只使用更安全的ssh v2 协议。
找到:
CODE:
X11Forwarding yes修改为:
CODE:
X11Forwarding no禁用X11 转发。
修改后保存退出。
● 生成ssh服务管理脚本(没有卸载老版本的SSH,服务管理不用添加,)
进入ssh解压目录
#cd /contrib/redhat
#cp sshd.init /etc/init.d/sshd
#chmod +x /etc/init.d/sshd
#chkconfig –add sshd
最后,启动SSH 服务使修改生效:
# /etc/init.d/sshd restart
重启后确认一下当前的OpenSSH 和OpenSSL 是否正确:
# ssh -v
如果看到了新的版本号就没问题啦!。