Maya 2013安装图文教程
- 格式:wps
- 大小:3.32 MB
- 文档页数:15
本人亲测可用!完美安装破解maya 2015 简体中文版和maya 2015 英文版。
1.解压maya 2015安装文件Autodesk_Maya_2015_dlm.sfx.exe,解压的文件夹路径不要出现中文字符,都用英文字符哦。
2. 打开解压目录,运行Setup.exe程序,开始安装maya 2015正式版。
(可自行选择简体中文版,或英文版),然后选择“在此计算机上安装”。
4. 点“我接受”,进行“下一步”5.输入序列号:066-66666666,产品密钥:657G1,点“下一步”。
6、选择安装路径,CG馒头的面粉注意:目录必须全部是英文字符!不然会出现各种安装错误哦!7.等待maya 2015自动安装,该过程较耗时,请耐心等待。
你们可以玩别的,也可以欣赏欧特克新品味~~为啥今年没有角色插图?安装完毕后,点“完成”。
接下来就是激活环节了哦!8.打开桌面上maya 2015快捷图标,在弹出的界面,点“同意”。
9.注意,之后会弹出“您提供的序~~列~~号无效”的界面,不用理会,点击“关闭”即可。
再次弹出界面,点“激~~活”,进入激~~活~~码界面。
9.特别注意,之后会弹出“您提供的序//列//号无效”的界面,不用理会,点击“关闭”即可。
再次弹出界面,点“激~活”,进入激~活~码界面。
10、破解Autodesk maya2015。
运行注册机(建议复制到硬盘后再运行),win64位的面粉以管理员权限运行xf-adsk2015_x64.exe。
先点击“Patch”,提示“Successfully patched”后,把上一步的maya申请号复制到注册机的第一栏,然后点击“Generate”,生产激活码。
11、把注册机第二栏生成的激活码,复制到maya 2015激活框里,点击“下一步”。
12、激活成功!点击“完成”,即可正常使用maya 2015简体中文正式版!。

Autodesk 3ds Max / 3ds Max Design 2013 Product Update 2 ReadmeThis readme contains recent information regarding the installation and use of Autodesk® 3ds Max® 2013 Product Update 2 and Autodesk® 3ds Max® Design 2013 Product Update 2 software. It is strongly recommended that you read this entire document before installing the software. For future reference, you should save this readme to your hard drive.Use the following table to locate various resources related to 3ds Max 2013 / 3ds Max Design 2013:Note: Autodesk is not responsible for errors or failures of Autodesk software arising from the installation of updates, extensions or new releases issued by third-party hardware or software vendors for the qualified software or hardware identified in this document (or for any other third party software or hardware that you may use in connection with Autodesk products).ContentsKnown Issues (2)Versions of the Product Update (2)Installation (2)Uninstall Instructions (2)Windows XP (2)Windows Vista / Windows 7 (2)Supported Operating Systems (3)Customer Involvement Program (CIP) (3)To enable CIP: (3)Customer Error Reports (CERs) (4)Fixes in this Product Update (4)Known IssuesVersions of the Product UpdateInstallation1.Download the appropriate file for your system. See Versions of this Product Update2.Double-Click the Product Update 2 executable3.Follow the installation prompts in the Product Update 2 installerUninstall InstructionsWindows XP1.Open Start > Settings > Control Panel > Add Or Remove Programs dialog.2.Turn on Show Updates at the top of the Add Or Remove Programs dialog.3.Select Autodesk 3ds Max 2013 Product Update 2 / Autodesk 3ds Max Design 2013 ProductUpdate 2.4.Click Remove.Windows Vista / Windows 71.Open Start > Control Panel > Programs and Features.2.Click View Installed Updates.3.Select Autodesk 3ds Max 2013 Product Update 2 / Autodesk 3ds Max Design 2013 ProductUpdate 2.4.Click Uninstall.If there are previously installed versions of any beta software (including Release Candidate (RC) versions) of Autodesk 3ds Max 2013 / Autodesk 3ds Max Design 2013, uninstall and delete these beta versions before installing the commercial version. Instructions on how to uninstall the beta versions are posted on the beta portal in the Beta and RC Readme files.Note: When uninstalling Product Update 2, if the Product Update 1 was also installed a disk source error might display. If this happens, the uninstall will fail. To correct this problem and successfully uninstall Product Update 2, the original Product Update 1 source files are needed. They can be extracted from the Product Update 1 available at /3dsmax-updates.Supported Operating SystemsUse the following supported operating systems for the 32-bit or 64-bit version of the Autodesk 3ds Max 2013 / Autodesk 3ds Max Design 2013 Product Update 2:∙Microsoft® Windows® XP Professional (SP2 or higher) operating system∙Microsoft® Windows® XP Professional x64 (SP2 or higher) operating system∙Microsoft® Windows Vista® Business (SP2 or higher) operating system∙Microsoft® Windows Vista® Business x64 (SP2 or higher) operating system∙Microsoft® Windows® 7 Professional operating system∙Microsoft® Windows® 7 Professional x64 operating system∙Mac® operating system: You can run 3ds Max 2013 / 3ds Max Design 2013 Product Update2 ona Mac® with either Boot Camp® or via Parallels Desktop for Mac, provided certain systemrequirements are met. Refer to the Autodesk 3ds Max 2013 and Autodesk 3ds Max Design 2013 Installation Guide for further details (found on the product media).Autodesk is not responsible for errors or failures of Autodesk software arising from the installation of updates, extensions or new releases issued by third-party hardware or software vendors for the qualified software or hardware identified in this document (or for any other third-party software or hardware that you may use in connection with Autodesk products).Customer Involvement Program (CIP)If you choose to participate in the Customer Involvement Program, 3ds Max or 3ds Max Design will automatically send Autodesk information about system configuration, which features are used most frequently problems encountered, and other information helpful to the future direction of the product. For further information, see /cip.To enable CIP:1.Install and start 3ds Max / 3ds Max Design.2.If the Customer Involvement Program dialog is not displayed automatically, then in the Helpmenu, click Customer Involvement Program.3.In the Customer Involvement Program dialog, select "Participate - with contact information."4.Click OK.Customer Error Reports (CERs)We can improve the stability of Autodesk 3ds Max / Autodesk 3ds Max Design largely because of the Customer Error Reports (CERs) that end-users submit. We thank you for taking the time to fill out these reports and ask you to include as much information as possible about what actions you were performing at the time the error occurred. These details raise the value of the report immensely and are very much appreciated by the Autodesk 3ds Max Quality Engineering team.For further information about CERs refer to /cer.Fixes in this Product UpdateFixes for Autodesk 3ds Max 2013 / Autodesk 3ds Max Design 2013 Product Update 2:Autodesk, Alias, and 3ds Max are registered trademarks or trademarks of Autodesk, Inc., and/or its subsidiaries and/or affiliates in the USA and/or other countries. mental ray, mental mill and iray are registered trademarks of NVIDIA® Corporation licensed for use by Autodesk, Inc. All other brand names, product names, or trademarks belong to their respective holders. Autodesk reserves the right to alter product and services offerings, and specifications and pricing at any time without notice, and is not responsible for typographical or graphical errorsthat may appear in this document.© 2012 Autodesk, Inc. All rights reserved.。


ADAMS 2013 32/64位安装教程注册机(win8 64位系统)一、准备工作1、下载Adams2013安装包(是iso镜像文件格式的);2、下载一个虚拟光驱软件(win8系统自带,虚拟光驱软件不用下载);二、证书安装1、复制虚拟光驱下的MAGNITUDE文件夹到安装软件的目录下。
2、进入安装目录下的MAGNITUDE文件,找到MSC_Calc_20130115.exe文件。
以管理员的身份运行MSC_Calc_20130115.exe文件(一定要管理员,不然会失败。
)然后输入Y。
图一生成证书的过程图二生成license.dat的文件(这就是你的证书)3、同样在安装目录下MAGNiTUDE文件中msc_licensing_11.9_windows3264.exe 文件,以管理员的身份运行。
图三直接点击Next图四选择Licensing 11.9的安装位置(我的安装位置为D:\MSC.Software\MSC.Licensing\11.9)4、如图十遇到Specify the license file path时,点击broswer浏览,选择刚刚生成的license.dat文件,点击Next。
图五选择第2步生成的证书5、此后一直单击Next会出现提示successfully时表明证书安装成功,单击确定出现如图十一,单击Finish完成安装;图六6、运行MSC.Licensing Utility,在MSC.Licensing Utility运行的情况下安装主程序。
图七运行MSC.Licensing Utility三、主程序安装教程1、用虚拟光驱加载iso镜像文件,单击ADAMAS2013安装包中的setup.exe开始安装,一直到图片十;图八单击Next图九选择Full并指定安装位置(我的安装位置为D:\MSC.Software\Adams_x64\2013)图十等待主程序安装直到2、如出现图五所示在License框内需要您输入27500@hostname;注意:这里不是安装证书的,不用点击browser浏览。

Maya2013~2015安装教程诸多安装失败问题解决之道!过程:除了装VC++ 2012 和 .net Framework 4.0 补关键:按字与图示maya安成,要启服务win【运行】输:services.msc 后找服务器64位系则选FLEXnet Licensing Service 64,32位系统就选FLEXnet Licensing Service 32 击属性设置“自动” 启动服务器FLEXnet Licensing Service 后才是注册激活maya上一张maya2015中文版安装成功后,初始启动画面,有视频教程ASR目录需要win7系统管理员解锁后,以管理员身份在ASR目录属性中设置可擦可写而非只读!因为maya安装过程就可以写入ASR尾缀格式的文件如果受到写入限制则安装会失败,解锁后才可以正常安装,否则安装失败报错提示,大部分人安装maya新版本出现的安装失败,归根是本身win系统初始化安全设置限制了安装,而不是maya软件问题。
举例:下图是写入ASR文件受到win7系统限制而报错!只要解锁就可以继续安装下去,否则就是放弃而安装不完整失败告终。
补充说明:Windows的ASR有什么用的?答:ASR 是Windows XP Professional 与Windows Server 2003 的一种恢复功能,它提供一个用来在灾难性系统或硬件故障的情况下保存与恢复Windows XP 或Windows Server 2003 操作状态的框架。
Tivoli Storage Manager 创建ASR 恢复所需的文件并将它们存储在Tivoli Storage Manager 服务器上。
要备份ASR 文件,您必须具有管理权限。
要使用Tivoli Storage Manager GUI 生成与备份ASR 文件,请执行以下操作:从GUI 主窗口单击备份。
出现“备份”窗口。
通过单击加号+ 展开目录树。
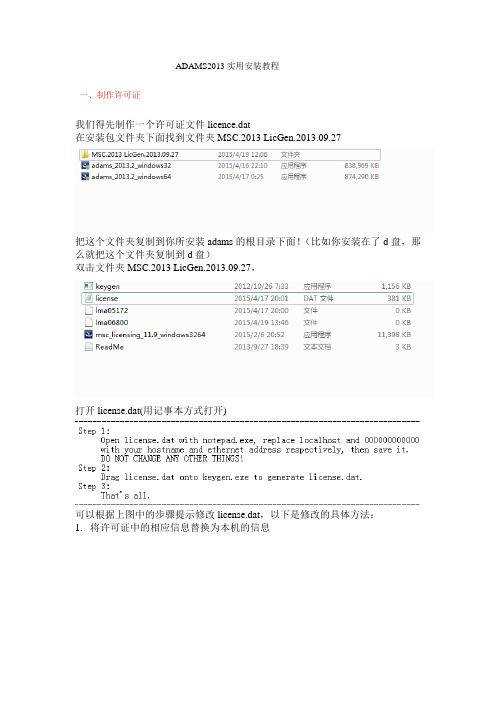
ADAMS2013实用安装教程一、制作许可证我们得先制作一个许可证文件licence.dat在安装包文件夹下面找到文件夹MSC.2013 LicGen.2013.09.27把这个文件夹复制到你所安装adams的根目录下面!(比如你安装在了d盘,那么就把这个文件夹复制到d盘)双击文件夹MSC.2013 LicGen.2013.09.27,打开license.dat(用记事本方式打开)可以根据上图中的步骤提示修改license.dat,以下是修改的具体方法:1.将许可证中的相应信息替换为本机的信息将上图中红色方框内的“localhost”替换为自己的计算机名(这个localhost必须替换成你自己的计算机名称(我们可以在自己的计算机右键属性中查看);将上图中蓝色方框内的“000000000000”替换为计算机的物理地址。
物理地址查看方法:在开始中运行“cmd.exe”进入DOS窗口在窗口中输入“ipconfig /all”,运行2.*将替换之后的“license.dat”保存,然后拖动“license.dat”到“keygen.exe”上,生成许可证文件。
(这一步一定不能落下,否则修改之后的许可证系统识别不了)3.许可证制作完毕。
二、开始安装主程序1、单击adams_2013.2_windows64.exe开始安装,出来直接点next3、出来这个界面User name 和 company name 都不用改,反正在这个界面啥也不需要改。
直接next4、在这个界面中,选择安装路径可以不要选择安装在系统盘,d盘、e盘、f盘都可以。
更改完安装路径之后,果断直接next。
不用理会,依然next。
接下来进入安装阶段,慢慢的等吧。
终于等了大约15分钟,5、接下来出现这个界面我们看到有License一栏,但是这里不是安装许可证的!而是要我们输入27500@hostname,这个hostname必须替换成你自己的计算机名称(我们可以在自己的计算机右键属性中查看)输入之后,就直接点next,出来这个界面单击是(Y).出来这个继续点next,出来这个界面由于前几个软件功能都用不到,我们只选最后一个即可。
Autodesk Maya 2014简体中文版完整安装方法一、所需工具1.Autodesk Maya 2014简体中文版安装文件;2.Autodesk Maya 2014简体中文版激活工具(32位:xf-adsk32.exe;64位:xf-adsk64.exe)二、完整安装过程1.一般我们在网上下载的AutodeskMaya 2014安装文件一般都为压缩包,所以我们需要先使用解压缩文件将其解压。
(注:Maya所有版本的安装源路径名中不允许有中文),解压完成后,文件夹内容如图所示。
2.双击文件夹中的“Setup.exe”文件(或右键单击它,在弹出的菜单中选择“以管理员身份运行”),待安装程序初始化完成后,屏幕显示如下图:3.单击“安装”按钮,屏幕显示如图下图:4.这一步是一个“Autodesk许可及服务协议”不用去管它,直接勾选“我接受”,单击“下一步”按钮,屏幕显示如下图:5.这一步是用来设置软件的许可类型和产品信息,我们一般选择许可类型为“单机使用工作站上的许可”,产品信息中选择“我有我的产品信息”并输入序列号“666-69696969”和产品密钥“657F1”(Maya软件安装序列号一般均为“666-69696969”产品密钥从2012-2014版本分别为“657D1”、“657E1”、“657F1”)填写完成后,单击“下一步”按钮,屏幕显示如下图:6.这一步是需要我们设置软件的安装路径,一般我们可以选择安装在默认路径“C:\Program Files\Autodesk\”,也可以单击“安装路径”输入框右侧的“浏览”按钮修改安装路径,设置完成后,单击“安装”按钮,开始安装屏幕显示如下图:7.安装过程完成后,单击“完成”按钮,完成安装过程。
8.接下来就是激活软件了,双击桌面上的“”图标运行软件,屏幕显示如下图:9.勾选“我同意按照“Autodesk隐私声明”(包括该声明中所述的跨境转移)中的描述使用我的个人信息。
MARC2013安装教程
1先装Marc的license,首先要修改license.dat这个文件
用记事本打开后找到下边位置红色圈出的
左边的改成自己的计算机名字,右边的数字是自己通过命令提示符(cmd)查找到的以太网的网址记住中间不要用空格,具体查找是在cmd中输入ipconfig /all(注意g后边有一个空格)
修改成功后一定记得保存然后给密钥中拖一下
License.dat上方的就是密钥,拖完之后把license.dat复制另一个文件夹
最好是建立一个安装文件,拖完之后把license.dat复制另一个文件夹根目录里边。
2安装license文件
最好右击以管理员身份打开,然后根据英文提示选择,记住开始第一项应该是选择安装目录的,后一项是选择上诉的license.dat的,要选上。
之后安装好了记得启动一下license看看是否能成功启动。
如上图license安装成功。
3 接下来安装主文件在安装主文件的时候也是一样第一步记得是选择安装目录,第二步是选择license.dat。
(我记得其中有三个选项都可以27500@。
还有一个。
我经常就选择license.dat)
之后安装就是一路YES了,不要在乎弹窗,他是在提示你是否安装PDF 阅览器,就一路YES就可以了。
安装前的准备:请先点击下载Maya2008【Autodesk Maya2008 玛雅】破解版32位英文版软件1第一步:安装maya2008 32位英文版-安装前说明Maya2008破解版安装图文教程(图一)在我写教程前,先给大家看看安装步骤,我写成了一个文档格式给大家看,如果在下面的安装过程中有不明的地,可以返回到这里查看,看看自己哪步没有做到,接下来的安装是有些复杂,大家好好看清楚,尽量一次到位,呵呵。
GO 如图一。
2第二步:安装maya2008 32位英文版(图二)下载maya2008 32位英文版安装包并解压,双击打开maya2008 32位英文版安装包。
如图二。
3第三步:1.先在C盘里创建名为FLEXLM的文件夹Maya2008破解版安装图文教程(图三)先在C盘里创建名为FLEXLM的文件夹如图三。
4第四步:复制粘贴破解文件(图四)在maya2008 32位英文版安装包里找到“Crack破解文件”文件夹并双击打开,把里面的两个文件(aw,dat和awkeygen,exe)复制粘贴到刚才我们在C盘里创建名为FLEXLM文件夹里。
如图四。
5第五步:粘贴破解文件(图五)把aw,dat和awkeygen,exe这两个破解文件粘贴到C盘的FLEXLM文件夹里。
如图五。
6第六步:先运行“isscript”(图六)返回到maya2008 32位英文版安装包里,先双击安装“isscript”。
如图六。
7第七步:点击nextMaya2008破解版安装图文教程(图七)点击next 如图七。
8第八步:许可证协议(图八)勾选“I accept the terms in the license agreement”点击next 如图八。
9第九步:点击install(图九)点击install 如图九。
10第十步:点击finishMaya2008破解版安装图文教程(图十)点击finish 如图十。
11第十一步:运行maya2008 32位英文版安装程序(图十一)双击“maya2008”运行maya2008 32位英文版安装程序。
maya骨骼绑定详细教程目录一、骨骼绑定概述 (2)1. 骨骼绑定简介 (3)2. 骨骼绑定在动画制作中的作用与重要性 (4)3. Maya软件在骨骼绑定中的应用 (5)二、骨骼系统基础 (7)1. 骨骼系统概述 (8)2. Maya中的骨骼系统 (9)3. 骨骼系统的基本组成 (11)三、Maya软件基础操作 (12)1. Maya软件界面介绍 (13)2. 基本操作工具介绍 (15)3. 快捷键设置与使用 (16)四、骨骼创建与编辑 (17)1. 创建骨骼 (18)(1)创建基本骨骼结构 (19)(2)创建细节骨骼结构 (19)(3)骨骼命名与整理 (20)2. 编辑骨骼属性 (22)(1)编辑骨骼参数设置 (23)(2)调整骨骼层级关系 (23)(3)骨骼旋转与位置调整 (25)五、骨骼绑定流程 (26)1. 模型准备与导入 (26)2. 创建骨骼系统并摆放骨骼位置 (27)3. 骨骼权重绘制 (28)一、骨骼绑定概述Maya骨骼绑定是三维动画和游戏开发中一个关键环节,它涉及到将角色模型与骨骼系统相连接,以便进行逼真的运动仿真。
骨骼绑定不仅确保角色的姿势和动作流畅自然,还能为角色添加重量感和真实感。
创建骨骼结构:首先,根据角色的外观和运动需求,使用Maya 的骨骼工具创建合适的骨骼结构。
这通常涉及创建根骨骼和多个子骨骼,以模拟角色的肌肉和关节。
设置控制器:控制器是用于操纵骨骼的关键元素,它们可以是简单的滑块或复杂的权重绘制工具。
通过控制器,动画师可以精确地控制角色的动作。
关节绑定:关节是骨骼之间的连接点,正确设置关节的旋转和位置关系对于保持角色动作的自然性至关重要。
Maya提供了多种工具来帮助用户精确调整关节的绑定。
权重绘制:权重绘制是将皮肤变形与骨骼绑定相结合的过程。
在这个过程中,动画师需要为每个骨骼分配权重,以确保皮肤变形能够准确地反映骨骼的动作。
运动学和动力学模拟:完成绑定后,可以使用Maya的运动学和动力学工具来测试角色的动画。
maya玛雅2013安装图文教程
Autodesk maya广泛的应用于动画制作及平面设计(二维设计)等领域,受到设计师、影视制片人、游戏开发者、视觉艺术设计专家、网站开发人员们的极力推崇,它强大的功能让它在影视广告等领域名声显赫。
部分用户对Maya 2013的安装方法一筹莫展,因此西西特为大家制作了Maya 2013的详细图文安装教程,希望能帮到有需要的朋友。
安装序列号:666-69696969或667-98989898、066-66666666;产品密钥:657E1
安装步骤:
1、下载Maya 2013安装版文件,点击解压到指定位置。
解压完毕后在解压的文件夹中找到“setup.exe”,双击开始安装Maya2013。
2、启动安装程序以后,会进行安装初始化,过几分钟就会弹出如下图所示的安装画面,我们就可以开始安装Maya2013
3、接受许可协议
4、选择许可证类型并输入产品信息,输入上面给大家提供的序列号及产品密匙
5、自定义安装路径并选择配置文件
注意:安装配置文件保持默认即可不要更改,安装路径则可自行选择
6、开始安装Maya2012,注意这一步的安装时间较长。
7、点击完成后桌面上会有个图标,点击“Autodesk Maya 2013 32-bit”打开程序。
8、产品激活步骤:
注意:若点击激活后出现序列号无效,则关闭等一会再点击激活即可。
下图的申请号,可以用CTRL+C来复制。
9、现在我们要用到上文中给出的Maya 2013注册机,将其下载下来,通过注册机将申请号转换成激活码。
注意打开的注册码要与您的操作系统的位数对应。
下图中,使用Ctrl+V 粘贴申请号;粘贴完成以后,先选择“Patch”选项,然后再选择“Generate”生成激活码
10、激活Maya 2013,粘贴激活码的时候,只需要选中第一个输入框,然后粘贴即可。
所有的激活码会自动填充。
激活Maya 2013完成。