
第四讲Windows2000系统及其使用
- 格式:ppt
- 大小:1.21 MB
- 文档页数:30

RealPortonWindows 2000Setup Guide92000310_ADigi International Inc. 2001. All Rights ReservedThe Digi logo is a trademark of Digi International Inc. All other brand and product names are the trademarks of their respective holders.Information in this document is subject to change without notice and does not represent a commitment on the part of Digi International.Digi provides this document “as is,” without warranty of any kind, either expressed or implied, including, but not limited to, the implied warranties of fitness or merchantability for a particular purpose. Digi may make improvements and/or changes in this manual or in the product(s) and/or the program(s) described in this manual at any time.This product could include technical inaccuracies or typographical errors. Changes are periodically made to the information herein; these changes may be incorporated in new editions of the publication.About This GuidePurposeUse this guide for the following:•An introduction to RealPort, how to install, configure and use RealPort and, how to troubleshoot should you encounter a problem•Configuration examples•Administration proceduresAudienceThis manual is intended for the person responsible for configuring and administering RealPort. Thisperson should have experience configuring network devices and be familiar with networkingconcepts.ConventionsFollowing are the conventions used in this document:Special FontsA special font is used for any input you need to enter. For example,set configSquare BracketsOptional parameters are displayed within square brackets. For example,set config [dhcp=on]Note:The square brackets themselves are not actually part of the command, and should notbe entered.ItalicsV ariables are displayed in italics. For example,set config ip=ip-addressNote:Substitute an appropriate IP address for ip-address in the above command.V ertical BarA vertical bar character (|) is used to denote a choice (logical "or"). For example,set flow=on|offNote:The above command would be entered as either:set flow=on or set flow=offiiiiv ConventionsContents Chapter 1Planning and PreparationAbout RealPort.....................................................................................................1-2 Requirements.......................................................................................................1-2 Limitations...........................................................................................................1-2 Key Concept: About Port Mapping Offsets.........................................................1-2 Related Documentation........................................................................................1-3 PortServer Documentation .............................................................................1-3 PortServer II Documentation .........................................................................1-3 PortServer TS 8/16 Documentation ...............................................................1-3 Digi One TS/PortServer TS 2/4 Documentation ............................................1-3 Etherlite Documentation ................................................................................1-3 Configuring Digi One TS and PortServer............................................................1-4 Configuring Etherlite...........................................................................................1-4 Chapter 2RealPort SetupMaster Setup Process...........................................................................................2-2 Installing the Driver.............................................................................................2-2 Upgrading the RealPort Driver............................................................................2-3 Accessing and Changing the RealPort Configuration..........................................2-3 Configuring a Printer...........................................................................................2-4 Configuring a Modem..........................................................................................2-4 Starting and Stopping the RealPort Service.........................................................2-5 Upgrading Etherlite Firmware.............................................................................2-5 Removing the Driver............................................................................................2-512chapter 1Planning and PreparationIn This Chapter• About RealPort. . . . . . . . . . . . . . . . . . . . . . . . . . . . . . . . . . . . . . . . . . . . . . . . . . 1-2• Requirements . . . . . . . . . . . . . . . . . . . . . . . . . . . . . . . . . . . . . . . . . . . . . . . . . . . 1-2• Limitations. . . . . . . . . . . . . . . . . . . . . . . . . . . . . . . . . . . . . . . . . . . . . . . . . . . . . 1-2• Key Concept: About Port Mapping Offsets. . . . . . . . . . . . . . . . . . . . . . . . . . . . 1-2• Related Documentation . . . . . . . . . . . . . . . . . . . . . . . . . . . . . . . . . . . . . . . . . . . 1-3• Configuring Digi One TS and PortServer . . . . . . . . . . . . . . . . . . . . . . . . . . . . . 1-4• Configuring Etherlite. . . . . . . . . . . . . . . . . . . . . . . . . . . . . . . . . . . . . . . . . . . . . 1-4 Planning and Preparation1-1About RealPortRealPort software can be installed on one or more host servers to provide local serial portfunctionality. RealPort can be used to provide standard system COM or TTY interfaces to controlbaud rate, parity, stop bits, and flow control of local serial ports. Any system utility or userapplication that works with a locally attached serial port should work with a Digi RealPort port.Digi's RealPort software works with all the Digi One RealPort, PortServer and EtherLite products. Requirements•The RealPort driver requires between one and two MB of memory on the Microsoft Windows 2000 system.•The Windows 2000 RealPort driver requires a 10-pin RJ-45 cable to connect devices to PortS-erver ports. This requirement does not apply to Etherlite units.LimitationsOnly TAPI-compliant applications or those written to COM 32 API (application programminginterface) standards can use intelligent ports, which means only these applications can use RealPortports.Key Concept: About Port Mapping OffsetsThe number of local ports on the Windows NT/2000 host offsets the port number on the Digi device.For example, if you have two local COM ports, Port 1 of the Digi device is seen by the RealPortservice as COM 3. Once the RealPort driver has been installed, you can modify the COM portnumbering scheme.1-2About RealPortRelated DocumentationPortServer Documentation•PortServer Configuration and Reference Guide•Digi One TS/PortServer Cable GuidePortServer II Documentation•PortServer II Hardware Installation Guide•PortServer II Command Reference•PortServer II Configuration and Administration Guide•Digi One TS/PortServer Cable Guide•Digi Port Authority--Remote Device Monitor Setup GuidePortServer TS 8/16 Documentation•PortServer TS 8/16 Hardware Installation Guide•PortServer TS 8/16 Command Reference•PortServer TS 8/16 Configuration and Administration Guide•Digi One TS/PortServer Cable Guide•Digi Port Authority--Remote Device Monitor Setup GuideDigi One TS/PortServer TS 2/4 Documentation•Digi One TS/PortServer TS 2/4 Quick Reference Card•Digi One TS/PortServer TS 2/4 Hardware Installation Guide•Digi One TS/PortServer TS 2/4 Command Reference•Digi One TS/PortServer TS 2/4 Configuration and Administration Guide•Digi One TS/PortServer Cable Guide•Digi Port Authority--Remote Device Monitor Setup GuideEtherlite Documentation•Etherlite Cable GuidePlanning and Preparation1-3Configuring Digi One TS and PortServerTo configure Digi One TS, PortServer TS 2/4, PortServer TS 8/16, PortServer II, and PortServer forRealPort, you must do the following:•Configure the device with an IP address.•Configure ports for RealPort.See "Related Documentation" on page 1-3 for device-specific configuration information.Configuring EtherliteTo configure Etherlite for RealPort, you must configure an IP address for the device. Therecommended way to do this is during Windows NT RealPort driver installation. This method isdescribed in "Installing the Driver" on page 2-2Other methods are also available. See "Related Documentation" on page 1-3 for information onadditional configuration methods.1-4Configuring Digi One TS and PortServerchapter 2RealPort SetupIn This Chapter• Master Setup Process. . . . . . . . . . . . . . . . . . . . . . . . . . . . . . . . . . . . . . . . . . . . . 2-2• Installing the Driver. . . . . . . . . . . . . . . . . . . . . . . . . . . . . . . . . . . . . . . . . . . . . . 2-2• Accessing and Changing the RealPort Configuration . . . . . . . . . . . . . . . . . . . . 2-3• Configuring a Printer . . . . . . . . . . . . . . . . . . . . . . . . . . . . . . . . . . . . . . . . . . . . . 2-4• Configuring a Modem . . . . . . . . . . . . . . . . . . . . . . . . . . . . . . . . . . . . . . . . . . . . 2-4• Starting and Stopping the RealPort Service. . . . . . . . . . . . . . . . . . . . . . . . . . . . 2-5• Upgrading Etherlite Firmware. . . . . . . . . . . . . . . . . . . . . . . . . . . . . . . . . . . . . . 2-5• Removing the Driver . . . . . . . . . . . . . . . . . . . . . . . . . . . . . . . . . . . . . . . . . . . . . 2-5• Removing the Driver . . . . . . . . . . . . . . . . . . . . . . . . . . . . . . . . . . . . . . . . . . . . . 2-5 RealPort Setup2-1Master Setup ProcessUse this topic to identify all the tasks required to complete RealPort setup.Procedure1.Configure the Digi One RealPort or PortServer for RealPort. See something somethingThis step is not required if you have an Etherlite module because configuration, which consistsof assigning an IP address to the unit can be accomplished during RealPort driver installation.See "Digi One TS/PortServer TS 2/4 Documentation" on page 1-3 and "Configuring Etherlite"on page 1-4.2.Install and configure the RealPort driver.•If this is a new driver, see "Installing the Driver" on page 2-2.•If this is a driver upgrade, see "Upgrading the RealPort Driver" on page 2-3.3.Configure peripherals on RealPort ports. See the following:•"Configuring a Printer" on page 2-4•"Configuring a Modem" on page 2-4Installing the DriverUse these procedures to install a RealPort driver on a Microsoft Windows 2000 system.1.From the Start menu, choose Settings > Control Panel > Add/Remove Hardware > Next.2.Choose Add/Troubleshoot a device > Next.The system searches for the device. When it determines that it cannot find the device, it displaysa list of devices.3.Choose Add a new device > Next.4.Choose No, I want to select the hardware from a list > Next.5.Choose Multi-port serial adapters > Next.6.Select Have Disk.7.Select Browse, point the system to the appropriate driver location and follow the installation andconfiguration procedure.8.Select the RealPort driver and Next > Next.9.If the Digital Signatures Not Found screen appears, choose Yes.10.If you are using an Etherlite unit that has not been assigned an IP address, do the following toassign an address:a.Press the DgIPServ button.e the wizard and the associated help text to assign an IP address to the Etherlite unit.c.When you finish, return to the Add Digi RealPort wizard.e the Add Digi RealPort wizard and the associated help text to configure the RealPort driverwith the IP address and TCP port number used by the Digi One RealPort, PortServer, or Ether-lite.12.Follow the prompts to complete configuration of the RealPort driver.2-2Master Setup ProcessUpgrading the RealPort DriverUse this procedure to upgrade a Digi RealPort device driver that is installed in your system. Digidrivers may be delivered on a CD-ROM or downloaded from the Digi Support Web().Note:Digi drivers for Microsoft Windows 2000 may be either signed or unsigned.Procedure1.From the Windows Desktop, right-click My Computer, then choose Properties > Hardware >Device Manager.2.Choose Multi-port serial adapters from the list of devices.3.Choose a Digi device from the list, then right-click and choose Properties.4.On the properties page, choose the Driver tab, then choose Update Driver. Do not uninstall theold driver. The Windows Upgrade Device Driver Wizard appears.5.Choose Next. On the Install Hardware Device Drivers page, choose Display a list of known driv-ers for this device... > Next.6.On the Select a Device Driver page, choose the correct Digi device and then Have Disk.7.Choose Browse to point to the appropriate driver location. The wizard should display the driver's.inf file at that location. Choose Open.8.To install the new driver, choose OK > Next > Next.9.If Windows displays a "Digital Signature Not Found" message, explaining that the driver is notsigned, choose Yes to continue through the message.10.Choose Finish to complete the wizard, then choose Close to close the Properties page.11.When prompted to restart your system, do so.Accessing and Changing the RealPort ConfigurationU se these procedures to access and/or change the RealPort configuration. Configuration changesmight include adding or subtracting Digi devices, adding or subtracting ports, or changing portattributes.Procedure1.Right click My Computer.2.Choose Properties > Hardware > Device Manager.3.Locate Multi-port Serial Adapters and expand the list if necessary.4.Choose a terminal server, right click and then choose Properties > Advanced.e the Digi device's Properties utility and the online help for aid in making configurationchanges.RealPort Setup2-3Configuring a PrinterUse this procedure to configure a printer on a Microsoft Windows 2000 system that is runningRealPort.Note:This procedure requires you to restart the computer. Therefore, you might want toprint this topic to avoid having to relocate it when the system restarts.Procedure1.From the Start menu, choose Settings > Printers > Add Printer.2.From the Add Printer Wizard, choose Next > select Local printer or Network printer.3.From the list of available ports, choose LPT1 (temporarily, until RealPort ports are added) andthen Next.e the Add Printer Wizard to install and configure a printer driver.Note:Do not print a test page.5.When the new printer is displayed in the Printers menu, choose the new printer and then right-click > select Properties.6.Choose the Ports tab and then Add Port... > Local Port > New Port.7.Type in a Digi port name followed by a colon (example: COM18:) and then choose OK.8.When the Ports list appears, choose the new Digi port and then Add.9.Choose the Digi port in the COM Port field and then OK.10.When you are prompted to reboot your system, choose Don't Restart Now.11.Choose the Digi port and then Settings.12.Set the Baud Rate, Data Bits, Parity, Stop Bits, and Flow Control to match your printer configu-ration.13.Choose OK and then exit the printer configuration.14.Reboot your system and then reaccess the Printer menu.15.Choose the printer and then File > Properties > Ports.16.Choose the Digi port from the list and then OK.Configuring a ModemUse this procedure to configure a modem on a Digi port.Procedure1.From the Start Menu, choose Settings > Control Panel > Phone and Modem Options > ModemsOptions.2.Choose the Modem tab and then Add.The system autodetects the modem.3.If the Windows 2000 system does not autodetect the proper modem, select the modem.4.Follow the Windows 2000 prompts to install and set up the modem on a Digi port.2-4Configuring a PrinterStarting and Stopping the RealPort ServiceUse this procedure to start or stop RealPort service on Microsoft Windows 2000.Procedure1.Right-click on My Computer, choose Properties > Hardware tab > Device Manager.Expand the Multi-port Serial Adapters list if necessary and select the terminal server.2.Right-click and choose Disable.Upgrading Etherlite FirmwareUse this procedure to upgrade the firmware on a Digi RealPort EtherLite module.Procedure1.Download the latest firmware upgrade from the Digi website at .2.Create and name a folder and extract the compressed firmware upgrade files to the folder.3.Locate and execute the DgIPserv utility.The utility was installed with the RealPort driver and can be found in the default directory loca-tion at c:\WINNT\system32.4.Choose Update Firmware > Next and browse to the location of the extracted firmware files.5.Change the Files of type from EtherLite Firmware *.prm to EtherLite Firmware *.bin andchoose the appropriate *.bin filewhere * represents the EtherLite firmware part number.6.Follow the prompts by entering the EtherLite's MAC address and it's current IP settings.7.Recycle the power and choose Finish. A message will appear confirming a successful upgrade tothe firmware.8.Reboot your system.Note:To verify the firmware update, use the Digi Verlog.exe utility found on the Digi web-site. It will list the EtherLite model, its firmware version, and related information.Removing the DriverUse this procedure to remove RealPort from your system.Procedure1.Highlight My Computer and right-click > choose Properties > select Hardware tab.2.Choose Device Manager > select Digi PortServer > highlight and right-click > select Uninstall. RealPort Setup2-52-6Removing the Driver。


中文windows+2000操作系统中文Windows 2000操作系统Windows 2000是由微软公司开发的一款操作系统。
它于1999年发布,是Windows NT家族的一员,也是微软公司推出的第一款商用版本。
Windows 2000在全球范围内得到了广泛应用,具备稳定性和高效性能,可以满足个人用户和企业用户的不同需求。
本文将围绕中文Windows 2000操作系统展开,介绍其特点、功能以及使用方法。
一、中文Windows 2000操作系统的特点中文Windows 2000操作系统作为一款商用版本,具有以下特点:1. 多语言支持:Windows 2000系统提供了多国语言的支持,其中包括中文,方便国内用户的使用。
2. 提升的稳定性:与Windows 98相比,Windows 2000具有更高的稳定性和可靠性。
系统具备自动修复功能,能够预测和避免潜在的错误,减少因软件故障而导致的系统崩溃。
3. 资源管理的优化:Windows 2000操作系统能够更好地管理和分配系统资源,从而提高系统性能。
它支持多线程处理,使得多个任务能够同时运行,提升了用户的工作效率。
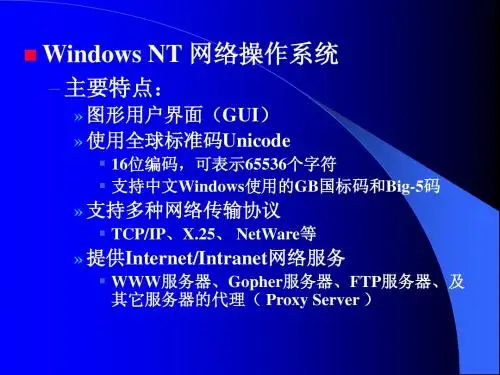
4. 网络功能强大:Windows 2000操作系统针对企业用户提供了更强大的网络支持。
它能够方便地与局域网和互联网进行连接,支持TCP/IP协议,提供了高效的网络传输速度和数据安全性。
二、中文Windows 2000操作系统的功能中文Windows 2000操作系统提供了丰富的功能,适用于个人用户和企业用户。
下面是其中的几个主要功能:1. 桌面管理:Windows 2000提供了直观的桌面界面,用户可以自由地在桌面上设置和安排各种快捷方式、文件夹和文件。
它还支持桌面主题和壁纸的更换,个性化地呈现用户的工作环境。
2. 文件管理:Windows 2000操作系统提供了强大的文件管理功能,用户可以方便地创建、复制、移动和删除文件和文件夹。
它还支持文件的搜索和排序,提高了用户对文件的管理效率。
