RedFlag Asianux Server虚拟化组件包指南
- 格式:pdf
- 大小:298.72 KB
- 文档页数:6


X3850x5 与Redflag Asianux Server 4.0 兼容性公告书经过兼容性测试,IBM x3850x5服务器在配有如下列表中的选件时通过了与RedFlag Asianux Server 4.0 x86-64bit版的兼容性测试,在中国区销售的IBM x3850x5服务器可以支持RedFlag Asianux Server 4.0 x86-64bit版本。
P/N Description46M0907IBM 6Gb SAS HBA Controller44E8689ServeRAID-BR10i SAS/SATA Controller44E8700IBM 3Gb SAS HBA v246M0829ServeRAID M5015 SAS/SATA Controller46M0830ServeRAID M5025 SAS/SATA Controller46M0831ServeRAID M1015 SAS/SATA Controller46M0832ServeRAID M1000 Series Advance Feature Key46M0916ServeRAID M5014 SAS/SATA Controller46M0917ServeRAID M5000 Series Battery Kit46M0930ServeRAID M5000 Series Advance Feature Key81Y4426ServeRAID M5000 Series Performance Accelerator Key46M0877IBM 160GB High IOPS SS Class SSD PCIe Adapter46M0878IBM 320GB High IOPS SD Class SSD PCIe Adapter46M0898IBM 320GB High IOPS MS Class SSD PCIe Adapter46M0969ServeRAID B5015 SSD controller81Y4519640GB High IOPS MLC Duo Adapter for IBM System x42C1790NetXtreme II 10 GigE Express Fiber SR Adapter42C1800QLogic 10Gb Dual Port CNA for IBM System x42C1820Brocade 10Gb Dual-port CNA for IBM System x49Y4216Brocade 10Gb SFP+ SR Optical Transceiver49Y4218QLogic 10Gb SFP+ SR Optical Transceiver49Y4250Emulex 10GbE Virtual Fabric Adapter for IBM System x39Y6066NetXtreme II 1000 Express Ethernet Adapter42C1750PRO/1000 PF Server Adapter by intel42C1780NetXtreme II 1000 Express Dual Port Ethernet Adapter49Y4220NetXtreme II 1000 Express Quad Port Ethernet Adpater49Y4230Intel Ethernet Dual Port Server Adapter I340-T2 for IBM System x49Y4240Intel Ethernet Quad Port Server Adapter I340-T4 for IBM System x39R6525QLogic 4Gb FC Single-Port PCIe HBA for IBM System x39R6527QLogic 4Gb FC Dual-Port PCIe HBA for IBM System x42C2069Emulex 4 Gbps FC Single-Port PCI-e HBA for IBM System x42C2071Emulex 4Gbps FC Dual-Port PCI-e HBA for IBM System x42D0485Emulex 8Gb FC Single-port HBA for IBM System x42D0494Emulex 8Gb FC Dual-port HBA for IBM System x42D0501QLogic 8Gb FC Single-port HBA for IBM System x42D0510QLogic 8Gb FC Dual-port HBA for IBM System x46M6049Brocade 8Gb FC Single-port HBA for IBM System x46M6050Brocade 8Gb FC Dual-port HBA for IBM System x59Y1987Brocade 4Gb FC Single-port HBA for IBM System x59Y1993Brocade 4Gb FC Dual-port HBA for IBM System x172621X IBM System Storage DS3200 (SAS Single Controller)172622X IBM System Storage DS3200 (SAS Dual Controller)172641X IBM System Storage DS3400 (FC Single Controller)172642X IBM System Storage DS3400 (FC Dual Controller)1746A2D IBM System Storage DS3512 Express Dual Controller Storage System 1746A2S IBM System Storage DS3512 Express Single Controller Storage System 1746A4D IBM System Storage DS3524 Express Dual Controller Storage System 1746A4S IBM System Storage DS3524 Express Single Controller Storage System 174712X IBM System Storage EXP2512 Express174724X IBM System Storage EXP2524 Express43W7734IBM 50GB SATA 1.8" NHS SSD。


CommandCenter SecureGateway V1 ModelsQuick Setup GuideThank you for your purchase of the CommandCenter Secure Gateway, Raritan's management software platform engineered to consolidate secure access and control of IT devices. This Quick Setup Guide explains how to install and configure the CommandCenter Secure Gateway.For additional information on any aspect of the CommandCenter Secure Gateway, see the accompanying online help accessed from the CommandCenter Secure Gateway or from the CommandCenter Secure Gateway User Guide, which can be downloaded from the Firmware and Documentation section of Raritan's website(/support/firmware-and-documentation/).I. Unpack CC-SGWith your shipment, you should receive:(1) CommandCenter Secure Gateway V1 unit(1) CommandCenter Secure Gateway V1 front bezel (1) Rack mount kit(1) Power supply cord(1) CAT 5 network cable(1) Printed Quick Setup Guide (1) Registration and Warranty papersDetermine Rack LocationDecide on a location in the rack for CC-SG, in a clean,dust-free, well-ventilated area. Avoid areas where heat, electrical noise, and electromagnetic fields are generated and place it near a grounded power outlet.II. Rack-mount CC-SGIdentify Rail SectionsYour rack mount kit contains two rack rail assemblies. Each assembly consists of two sections: an inner fixed chassis rail (A) that secures to the unit and an outer fixed rack rail (B) that secures to the rail brackets. A sliding rail guide sandwiched between the two should remain attached to the outer fixed rack rail. The A and B rails must be detached from each other for installation.To remove the inner fixed chassis rail (A), pull it out as far as possible until you hear a clicking sound when a locking tab emerges from inside the rail assembly and locks the inner rail. Depress the locking tab to pull the inner rail completely out.Do this for both rack rail assemblies. Install the Chassis Rails1. Position the inner fixed chassis rail sections you justremoved along one side of the chassis; ensure the five screw holes line up.2. Screw the rail securely to the side of the chassis.3. Repeat steps 1 and 2 for the other rail on the other side ofthe chassis. Attach rail brackets if installing into a Telcorack. Install Rack Rails1. Determine where you want the CC-SG belongs in therack.2. Position the outer fixed rack rail/sliding rail guideassemblies at the desired location in the rack, keeping the sliding rail guide facing the inside of the rack.3. Screw the assembly securely to the rack using thebrackets provided.4. Attach the other assembly to the other side of the rack,making sure that both are at the exact same height and with the rail guides facing inward. Ideally, two peopleshould work on this together. Install CC-SG into the RackOnce the rails are attached to both the chassis and the rack, install CC-SG into the rack.1. Line up the rear of the chassis rails with the front of therack rails.2. Slide the chassis rails into the rack rails, keeping thepressure even on both sides (you may have to depress the locking tabs when inserting). When CC-SG has been pushed completely into the rack, you should hear the locking tabs click.Locking TabsBoth chassis rails have a locking tab that serves two functions:∙ To lock CC-SG into place when installed and pushed fullyinto the rack (normal operating position).∙ To lock CC-SG in place when extended from the rack,preventing the unit from falling out of the rack when pulled out for servicing.III. Connect CablesOnce the CC-SG unit is installed into the rack, you can connect cables. See the diagrams on page 1.1. Connect the CAT 5 network LAN cable to the LAN 1 porton the rear panel of the CC-SG unit. It is stronglyrecommended to connect a second CAT 5 network LAN cable to the LAN 2 port. Connect the other end of each CAT 5 cable to the network.2. Attach the included AC power cord to the power port onthe rear panel of the CC-SG unit. Plug the other end of the AC power cord into an AC power outlet.3. Connect KVM cables to the corresponding ports on therear panel of the CC-SG unit.IV. Log in to Local Console to Set CC-SG IP Address1. Power ON CC-SG by pressing the POWER button on thefront of the CC-SG unit.2. Attach the front bezel by snapping it onto the front of theCC-SG unit.3. Log in as admin/raritan . Usernames and passwords arecase-sensitive.4. You will be prompted to change the local consolepassword.a. Type the default password (raritan ) again.b. Type and then confirm the new password. The newpassword must be a strong password consisting of at least eight characters that are a combination of letters and numbers.5. Press CTRL+X when you see the Welcome screen.6. Choose Operation > Network Interfaces > NetworkInterface Config. The Administrator Console appears. 7. In the Configuration field, select DHCP or Static. If youselect Static, type a static IP address. If needed, specify DNS servers, netmask, and gateway address.8. Select Save. Wait a few minutes as CC-SG restarts.Default CC-SG SettingsIP Address: 192.168.0.192 Subnet Mask: 255.255.255.0 Username/Password: admin/raritanV. Get Your License1. The license administrator designated at time of purchasewill receive an email from Raritan Licensing Portal from ************************************,withthesubject line Thank You for Registering.2. Click the link in the email to go to the Software LicenseKey Login page on Raritan's website. Create a useraccount and login. The username is your email address. The licensing account information page opens. Your license files will be available shortly.3. Check your email for another message from RaritanLicensing Portal from the email address*********************,withthesubjectlineYourRaritanCommandcenter SG Software License Key is Available.4. Click the link in the email to go to the Software LicenseKey Login page on Raritan's website and login with the user account just created.5. Click the Product License tab. The licenses you purchaseddisplay in a list. You may have only 1 license, or multiple licenses.6. To get each license, click Create next to the item in thelist, then enter the CommandCenter Secure Gateway Host ID. You can copy and paste the Host ID from the License Management page. See Find Your Host ID (on page 3). 7. Click Create License. The details you entered display in apop-up. Verify that your Host ID is correct.Warning: Make sure the Host ID is correct! A licensecreated with an incorrect Host ID is not valid and requires Raritan Technical Support's help to fix. 8. Click OK. The license file is created.9. Click Download Now and save the license file.VI. Log in to CC-SGOnce CC-SG has restarted, you can log in to CC-SG from a remote client.1. Launch a supported browser and type the URL of theCC-SG: https://<IP address>/admin.For example, https://192.168.0.192/admin.Note: The default setting for browser connections is HTTPS/SSL encrypted.2. When the security alert window appears, accept theconnection.3. You will be warned if you are using an unsupported JavaRuntime Environment version. Follow the prompts to either download the correct version, or continue. The Login window appears.4. Type the default username (admin ) and password (raritan )and click Login.The CC-SG Admin Client opens.Find Your Host ID1. Choose Administration > License Management.2. The Host ID of the CommandCenter Secure Gateway unityou are logged into displays in the License Management page. You can copy and paste the Host ID.VII. Install and Check Out Your License1. Choose Administration > License Management.2. Click Add License.3. Read the license agreement and scroll down the wholetext area, then select the I Agree checkbox.4. If you have multiple licenses, such as a "base"appliancelicense plus Add-On license for additional nodes orWS-API, you must upload the physical appliance license first. Click Browse, then select the license file to upload.5. Click Open. The license appears in the list. Repeat forAdd-On licenses.You must check out licenses to activate the features.6. Select a license from the list then click Check Out. Checkout all the licenses you want to activate.See the CC-SG Administrators Guide for more details about licenses.VIII. Next StepsSee the CommandCenter Secure Gateway Deployment Guide for information on deploying other Raritan devices for CC-SG management.See the CommandCenter Secure Gateway Administrator Guide for information on configuring CC-SG.Additional InformationFor more information about the CommandCenter Secure Gateway and the entire Raritan product line, see Raritan's website (). For technical issues, contact Raritan Technical Support. See the Contact Support page in the Support section on Raritan's website for technical support contact information worldwide.Raritan's products use code licensed under the GPL and LGPL. You can request a copy of the source code. For details, see the Open Source Software Statement at(/about/legal-statements/open-source-software-statement /) on Raritan's website.。

纪检监察管理信息系统软件使用说明书南京苏德软件开发有限公司二〇一一年十一月目录1概述 (8)1.1系统简介 (8)1.2运行环境 (9)2系统登录 (9)2.1首页 (10)3系统基本操作 (11)3.1系统主界面 (11)菜单栏 (11)标签页 (12)工具栏 (12)浮动窗口 (13)机构/人员树 (14)列表区 (15)翻页操作 (15)日期选择器 (15)4系统设置 (16)4.1角色设置 (16)添加角色 (17)删除角色 (18)修改角色 (18)查询角色 (19)4.2管理员设置 (19)添加管理员 (20)删除管理员 (22)修改管理员 (22)查询管理员 (22)禁用管理员 (23)启用管理员 (23)4.3数据字典 (23)添加字典 (24)删除字典 (24)修改字典 (25)查询字典 (25)4.4系统日志 (26)删除日志 (26)查询日志 (26)全部删除 (27)5个人设置 (27)5.1代理授权 (27)5.2修改密码 (28)5.3已办事项 (30)查询已办事项 (31)收回已办事项 (31)6机构人员 (32)6.1机构管理 (32)添加机构 (33)删除机构 (34)修改机构 (35)查询机构 (35)机构调动 (35)6.2人员管理 (36)添加人员 (36)删除人员 (37)修改人员 (37)查询人员 (38)人员调动 (38)详细信息 (39)7廉政档案 (39)7.1报表定制 (39)添加报表 (40)删除报表 (40)修改报表 (41)查询报表 (41)锁定报表 (42)解锁报表 (42)定制报表 (42)预览报表 (45)7.2录入档案 (46)7.3管理档案 (47)添加档案 (48)删除档案 (48)修改档案 (49)查询档案 (49)锁定档案 (49)解锁档案 (49)查看档案 (49)7.4下载离线填报客户端 (50)填表说明 (54)新建 (54)保存 (58)另存为 (60)打印预览 (61)7.5导入离线档案 (62)8信访 (64)8.1信访件录入 (64)信访流程 (66)处理信访件 (67)相关表单 (68)相关附件 (68)涉案人员 (69)暂存 (69)退回 (69)流程跟踪 (70)8.2信访件管理 (70)添加信访件 (71)删除信访件 (71)修改信访件 (71)查询信访件 (71)暂存恢复 (72)办结恢复 (72)显示重复件 (72)8.3信访核查结果 (72)添加信访件 (73)修改信访件 (73)查询信访件 (73)暂存恢复 (74)办结恢复 (74)显示重复件 (74)9案件 (74)9.1初核登记 (74)初核流程 (75)填写初核线索登记表 (76)9.2立案登记 (78)立案流程 (79)填写立案登记表 (79)9.3申诉登记 (81)申诉流程 (82)9.4案件管理 (82)删除案件 (82)查询案件 (83)暂存恢复 (83)显示全部 (83)10查询统计 (84)10.1机构情况列表 (84)10.2人员情况列表 (87)10.3廉政档案填报情况列表 (90)10.4信访案件统计 (92)开始统计 (93)查询统计表 (93)查看统计表 (94)审核统计表 (94)10.5廉政信访案件综合 (94)10.6自定义查询统计 (95)廉政信息查询 (95)廉政信息统计 (98)11轮岗管理 (102)11.1轮岗设置 (102)11.2轮岗查询 (104)12宣传教育 (106)12.1政策法规 (106)添加法规 (107)删除 (107)修改 (108)查询 (108)类别设置 (109)阅读法规内容 (109)查看更多法规 (110)查看其他机构的法规 (111)12.2学习园地 (111)看帖 (111)发帖 (112)回帖 (113)删帖 (114)12.3廉政短信库 (115)添加短信 (115)删除短信 (116)修改短信 (116)查询短信 (117)12.4发送廉政短信 (117)短信审核流程 (120)12.5廉政短信管理 (120)查询廉政短信 (121)13公共信息 (122)13.1内部消息 (122)已收消息 (122)发消息 (123)删除消息 (125)回复消息 (125)查询消息 (126)查看消息 (126)已发消息 (127)发消息 (128)删除消息 (128)修改消息 (128)查询消息 (129)查看消息 (129)13.2网络存储 (129)添加存储 (130)删除存储 (130)修改存储 (131)查询存储 (131)下载存储 (132)查看共享信息 (133)13.3通讯助理 (133)添加通讯录 (133)删除 (134)修改 (135)查询 (135)导出Excel (136)13.4简报刊物 (137)添加简报 (139)删除 (139)修改 (140)查询 (140)类别设置 (141)阅读简报内容 (141)查看更多简报 (142)查看其他机构的简报 (143)14帮助 (143)14.1使用说明书 (143)14.2视频教程 (143)14.3关于 (143)15退出 (143)15.2退出登录 (144)1概述1.1 系统简介纪检监察管理信息系统是根据中央纪委监察部制定的纪检工作规范,采用科学的信息化手段,为各级纪检机构建立领导干部廉政档案信息库、信访资料库、案件审理库,自定义信访和案件审理的流程,彻底解决目前纪检监察工作中存在的重复录入,重复统计,流转缓慢和无法跟踪等问题。
红旗RedFlag Asianux及ORACLE数据库安装指南1. 准备工作1.1 硬件要求确保服务器满足以下硬件要求:•至少2颗CPU•至少4GB内存•至少100GB硬盘空间•至少1块SCSI或IDE硬盘1.2 软件要求•红旗RedFlag Asianux操作系统•ORACLE数据库软件1.3 下载软件从红旗RedFlag Asianux官方网站下载最新版本的操作系统和ORACLE数据库软件。
1.4 创建磁盘分区在安装前,为服务器创建至少100GB的硬盘分区。
2. 安装红旗RedFlag Asianux操作系统2.1 启动安装程序将红旗RedFlag Asianux安装光盘放入服务器的光驱,重启服务器,进入BIOS 设置,修改启动顺序,使光驱优先启动。
按下Enter键进入安装程序。
2.2 选择安装选项•单用户安装:适用于开发和测试环境。
•多用户安装:适用于生产环境。
选择合适的安装选项,按Enter键继续。
2.3 选择磁盘分区选择要安装操作系统的磁盘分区,按Enter键确认。
2.4 安装过程中等待等待系统自动完成安装,期间可能会要求设置root用户密码。
2.5 完成安装安装完成后,重新启动服务器。
3. 安装ORACLE数据库软件3.1 创建用户和组在命令行中输入以下命令,创建oracle用户和组:```bashgroupadd oinstallgroupadd dbauseradd -g oinstall -G dba oracle3.2 配置环境变量为oracle用户配置环境变量,编辑.bash_profile文件:```bashvim ~/.bash_profile在文件中添加以下内容:```bashexport ORACLE_HOME=/opt/oracle/product/12.1.0/db_1export PATH=PATH:ORACLE_HOME/binexport LD_LIBRARY_PATH=ORACLE H OME/lib:LD_LIBRARY_PATH export TNS_ADMIN=$ORACLE_HOME/network/admin保存并退出编辑器,为oracle用户使环境变量生效:```bashsource ~/.bash_profile3.3 解压ORACLE安装文件将下载的ORACLE安装文件解压到指定目录:```bashtar -zxvf oracle-xe-12.1.0-1.0.x86_64.rpm.tar.gz -C /opt/3.4 安装ORACLE数据库软件在命令行中输入以下命令,开始安装:```bashsudo su - oracle/opt/oracle/runInstaller3.5 安装过程中选择选项•单实例数据库安装:选择此选项进行安装。
R O S E共享存储双机热备解决方案解决方案优点:●对服务器硬件配置要求不高,可以根据应用情况采用不同型号或配置●可利用原有生产系统快速构建双机系统,性价比高●系统切换时间短,最大程度减少业务中断的影响●切换过程对应用程序无影响,无需重新启动或登录,做到无人值守●系统效率高,系统中数据读写、管理及容错由磁盘阵列来完成;而系统服务器故障监控切换处理由HA软件来完成;双机监控依靠RS232串口线路或专用TCP/IP网路线路,既不占用主机CPU资源也不占用基础业务网络带宽,在实际应用中得到用户的一致好评●支持丰富的应用配置,如:Oracle、MSSQL、Sybase、MySQL、文件服务、Web服务等,无需额外插件支持用户自定义应用●硬件可采用机架式结构,便于维护管理RoseHA产品介绍RoseHA高可用系统解决方案,由两台服务器和一台共享存储设备组成主要硬件环境,通过RoseHA持续、稳定、高效的软件系统,实现两个节点的高可用功能;采用Rose基于共享存储的高可用解决方案,实现企业关键业务7×24小时不间断运营,是企业最佳之选;RoseHA的工作原理RoseHA双机系统的两台服务器主机都与磁盘阵列共享存储系统连接,用户的操作系统、应用软件和RoseHA高可用软件分别安装在两台主机上,数据库等共享数据存放在存储系统上,两台主机之间通过私用心跳网络连接;配置好的系统主机开始工作后,RoseHA软件开始监控系统,通过私用网络传递的心跳信息,每台主机上的RoseHA软件都可监控另一台主机的状态;当工作主机发生故障时,心跳信息就会产生变化,这种变化可以通过私用网络被RoseHA软件捕捉;当捕捉到这种变化后RoseHA就会控制系统进行主机切换,即备份机启动和工作主机一样的应用程序接管工作主机的工作包括提供TCP/IP网络服务、存储系统的存取等服务并进行报警,提示管理人员对故障主机进行维修;当维修完毕后,可以根据RoseHA的设定自动或手动再切换回来,也可以不切换,此时维修好的主机就作为备份机,双机系统继续工作; RoseHA实现容错功能的关键在于,对客户端来说主机是透明的,当系统发生错误而进行切换时,即主机的切换在客户端看来没有变化,所有基于主机的应用都仍然正常运行;RoseHA采用了虚拟IP地址映射技术来实现此功能;客户端通过虚拟地址和工作主机通讯,无论系统是否发生切换,虚拟地址始终指向工作主机;在进行网络服务时,RoseHA提供一个逻辑的虚拟地址,任何一个客户端需要请求服务时只需要使用这个虚拟地址;正常运行时,虚拟地址及网络服务由主服务器提供;当主服务器出现故障时,RoseHA会将虚拟地址转移到另外一台服务器的网卡上,继续提供网络服务;切换完成后,在客户端看来系统并没有出现故障,网络服务仍然可以使用;除IP地址外,HA还可以提供虚拟的计算机别名供客户端访问;对于数据库服务,当有主服务器出现故障时,另外一台服务器就会自动接管,同时启动数据库和应用程序,使用户数据库可以正常操作;RoseHA主要功能特点●简洁直观的管理方式RoseHA提供了友好直观的图形安装界面和监控管理界面;通过直观而又方便的JavaApplet管理界面,用户可以交互式地对集群系统进行配置、监控和管理,并可以利用Applet的网络特性,通过网络对系统进行远程管理,实时地显示出主机系统及服务的状态;●灵活的高可用应用模式RoseHA支持Active-Active模式和Active-Standby模式;用户可指定每台服务器的作用activeorstandby,指定要监控的服务和硬件部分,定义指定的服务发生故障后要采取的进一步行动如是否重新启动该服务、允许的最大启动时间等;●适应复杂网络环境1.在网络环境中,每个IP与唯一的MAC绑定在一起;而传统的集群结构下,将致使集群的活动IP在不同时刻绑定不同的MAC地址,导致跨网段通信出现问题;为了使集群软件更好的支持这种网络安全级别较高的网络环境,RoseHA提供了支持虚拟MAC地址的功能,使集群环境IP地址实现与唯一MAC地址绑定;2.RoseHA支持IPV4网络通信协议以及未来适用的IPV6网络通信协议;●支持动态卷切换机制1.支持Windows2008R2以后的平台上的动态卷,增强卷切换的效率;2.支持Linux平台LVM卷设备切换;●集群的容错可靠性1.RoseHA集群具有容错可靠性,RoseHA集群的拓扑包括两台服务器和一台磁盘阵列,硬件实现了容错可靠;2.RoseHA具有两个核心进程,它们互相监控,如果其中一个进程失败,另一个进程会立即进行恢复,避免了RoseHA自身服务的单点故障;3.RoseHA支持Socket和RS232两种类型的心跳,配置多条心跳路径可以避免心跳的单点故障;4.支持仲裁盘RoseHA提供磁盘仲裁资源;即使集群节点间通信全部断开,也能通过仲裁资源来确定集群的运行状态,避免集群节点间的资源竞争;●丰富的附加功能提供不同的针对特定应用的Agent程序,使服务监控更切实际,更加有效;●系统资源监控深度和持续监测系统运行状态,智能分析系统资源使用情况,保障系统资源环境的健康稳定包含CPU,内存;●集群环境监控主备节点上的RoseHA集群服务通过IP网络链路互相通信,传递应用程序及主服务器运行状态信息;当集群服务因诸如网络阻塞、网卡故障、网络运营服务中断等网络故障,或者服务器电源故障、服务器宕机、系统维护等服务器故障等原因,无法在预设的时间范围内应答对方节点发送的心跳信息,都有可能造成RoseHA心跳超时,所以建议管理员配置2条或3条IP网络作为私网心跳,避免因网络拥塞、服务器繁忙等非常规性网络或服务器故障,造成集群间通信不畅的情况发生;●多样化的报警方式RoseHA针对各种意外提供了多种报警方式,如:在线日志,邮件通知,短信通知,SNMP协议通知等,以便管理员及时监控管理集群;Rose双机热备软件安装指南:一;安装前的准备工作1.安装服务器windowsserver操作系统,操作系统必须一致2.设置服务器的机器名,机器名不能相同3.服务器必须在同一个工作组或者域内4.设置相同的系统管理员密码,5.私用网的IP地址必须与公用网的IP地址不在同一个网段上6.私用网的连接:用交叉网线直连7.公用网的连接:通过LAN连接公网、私网各网段可以相互Ping通8.磁盘阵列在两台服务器上认作的磁盘为基本卷,不能为动态卷,盘符一致二;安装双击安装程序setup.Exe,开始安装;点击next,输入用户信息:点击next,输入两台服务器的机器名,local为本地机器名,remote为对方机器名:点击next,点击netx,点击next,点击finish,完成安装;三;配置开始--程序--RoseHAAdministration打开管理界面点击Tools-License,弹出以下界面,请记录界面中的相关信息:HostID,SerialNo,发给供货商,以提取license;收到license之后,输入新的SerialNo,Date,和License信息,点击OK;返回到管理界面,点击界面中的绿色按钮,以开启Rose的服务;创建心跳线:点击PrivateNet-TCP/IPSocket弹出以下界面,选择要用作心跳线的网卡地址,一般为内网地址注:以上所有操作,在两台服务器上都要进行;创建资源:创建虚拟IP资源:首先点击,资源切换按钮,然后点击Resource-Create-IPAddress创建虚拟IP弹出以下界面,ObjectName可选择默认IP,ActiveIPAddress输入要创建的虚拟ip地址,并选中每台机器要绑定的实际ip地址;点击Create,显示成功之后,点击close,关闭界面;、创建共享卷资源:Resoure-Create-Volume,LocalServerVolume选择磁盘阵列在本机上认作的磁盘号,如disk1或者disk2;RemoteServerVolume选择磁盘阵列在远程对方机器上认作的磁盘号,DriverLetter会显示出共享磁盘的盘符;选择完成,点击create,创建完成;创建数据库服务:Resoure-Create-NTService,在服务栏中选择MSSQLSERVER,点击select按钮;在ObjectName输入MSSQLSERVER;将AvailableObject中的IP和Volume通过Add按钮选择到Pre-requisiteObject中,点击Create,创建完成;同样以此法创建数据库的agent服务即,SQLSERVERAGENT;带入服务:依次右键点击IP,Volume,NTService,选择BringInCluster,将资源激活;四;切换手动切换,在主机上右键点击--ServerFailover,或者在备机上右键点击--ServerTakeover,即将主备机资源切换;自动切换,将主机关机,资源自动切换到备机;五;开关机顺序关机顺序:先关备机,再关主机,最后关闭磁盘阵列开机顺序:先开磁盘阵列,磁盘阵列初始化完毕之后,再开启主机,最后开启备机。
RedFlag网络安全安全性是网络服务器可靠运行的基础。
随着通信技术和Internet的广泛应用,服务器被攻击的情况可能经常发生,来自网络上的安全威胁是Linux服务器安全问题的主要来源。
本章介绍如何在Red Flag Asianux Server 3构建的服务器平台上,利用系统提供的安全工具,达到有效保护系统安全、减少成功入侵数量、检测和追踪入侵日志、降低危害程度并快速从攻击中恢复的策略。
有关物理和文件系统安全的知识请参考第6章系统安全。
1.1X inetd1.1.1简介xinetd提供了访问控制,改进的日志功能和资源管理,是Red Flag Asianux Server 3系统中的Internet 标准超级守护进程。
Inetd被称作超级服务器,用来实现对主机网络连接的控制。
当一个请求到达由Inetd管理的服务端口,Inetd将该请求转发给名为tcpd的程序。
tcpd根据配置文件/etc/hosts.allow和/etc/hosts.deny来判断是否允许服务响应该请求。
如果请求被允许则相应的服务器程序(如:telnetd)将被启动。
这个机制也被称作tcp_wrapper。
xinetd(eXtended InterNET services daemon)提供类似于inetd + tcp_wrapper的功能,但是更加强大和安全。
它具有以下特色:支持对tcp、udp、RPC服务(但是当前对RPC的支持不够稳定,可以启动protmap与xinetd共存来解决这个问题)。
基于时间段的访问控制。
功能完备的log功能,即可以记录连接成功也可以记录连接失败的行为。
能有效的防止DoS攻击(Denial of Services)。
能限制同时运行的同一类型的服务器数目。
能限制启动的所有服务器数目。
能限制log文件大小。
将某个服务绑定在特定的系统接口上,从而能实现只允许私有网络访问某项服务。
能实现作为其他系统的代理。
RedFlag Asianux Server 3虚拟化组件包指南
为使本届杯赛选手可以近距离感受企业级虚拟化技术的构建方案,组委会特将类似红旗企业级别产品“RFVM(红旗虚拟化服务器) v1.0”的开源基础模型整合编译后提供选手借鉴体验,对应的企业产品仅为需要构建商业技术服务的企业项目提供。
院校教师,可通过本届杯赛的教师培训课程,更加详细具体的学习掌握相关企业技术的应用,并指导学员完善竞赛技术的实现。
一、预备
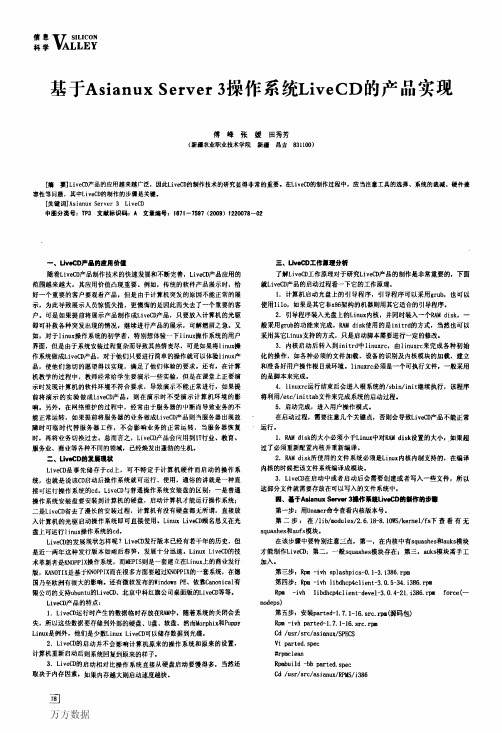
1、KVM
Linux将KVM合并到Linux内核中(2.6.20)。
KVM是一种完全虚拟化解决方案,它有一个方面非常独特:它将Linux内核转换为一个使用内核模块的hypervisor。
这个模块允许使用其他客户操作系统,然后在宿主Linux内核的用户空间中运行(参见下图)。
内核中的KVM通过/dev/kvm字符设备来公开虚拟化后的硬件。
客户操作系统使用为PC硬件仿真修改过的QEMU进程与KVM模块接口。
OpenVZ软件同时为用户提供工具,协助自动化管理虚拟服务器。
基于模板的应用程序部署可以在几分钟内用简单的方法创建新的虚拟服务器并投入使用,而且与其他的虚拟化技术相比,OpenVZ可以在每CPU上运行几倍于其他虚拟化服务器技术的虚拟化服务器。
二、安装
1、先安装RedFlag Asianux Server 3 SP2 x86 32版操作系统,安装过程中建议分区如下:
挂载点大小备注
/ 30GB 安装系统,KVM虚拟机的操作系统镜像文件默认在/var下
/vz 30GB 用于openvz的模板文件和虚拟环境用户数据的存放
/data 20GB 用于iSCSI-target的共享盘数据存放
SWAP 按需一般为内存2倍,若内存大于4GB,就固定4GB
2、请注意安装操作系统时选择虚拟化组件支持,安装操作系统后,将Tool工具盘也完
全安装到服务器中。
3、配置sshd服务和vncserver,此步骤为可选,不影响虚拟化组件包运行。
4、将package_for_32.tar.gz放置到服务器的/root目录下(如为64位OS系统,选择
package_for_64.tar.gz),执行如下命令:
tar -zxvf package_for_32.tar.gz
cd package
./install.sh
5、重新启动计算机,安装即完成。
三、使用
1、KVM使用
a)登录桌面,点击“开始”→“应用程序”→“虚拟系统管理器”,打开虚拟系
统管理界面
b)在“localhost(QEMU)”上单击鼠标右键,选择新建。
c)新弹出窗口即为虚拟机创建窗口,输入虚拟机名称即可开始,具体方法略
2、OpenVZ使用
a)点击:“开始”→“应用程序”→“终端程序”,打开终端,执行如下命令:
cd Desktop/
./easyVZ.sh
b)弹出如下窗口,点击“连接”:
c)点击“连接”后弹出如下界面,点击左上角“新建”按键:
d)在新弹出的创建窗口中输入对应参数:
各参数含义如下:
参数项目含义
OS Template 操作系统模板,默认包含Asianux Server 3的最小系统和默认系
统,最小系统为最小安装,默认系统则包含gcc和kde等组件Profile Name 资源配置类型模板,不同选项对应不同大小的资源限制数值VPS ID 在系统中每个虚拟环境的唯一ID标识,不能够重复,建议起始
于大于100的整数
e)参数都配置好以后,点击“Create”即可完成创建,稍等几分钟后,创建完毕,
关闭此窗口。
f)此时出现了以101为ID的虚拟环境(VPS),选中此行,并点击属性按键,如
下图所示:
g)在弹出的属性对话框中,切换到“User Management”选项卡,填入Password
和Confirm Password,此处的密码为该虚拟环境(VPS)的密码:
h)点击“应用”完毕后返回到主界面,再次选择该101虚拟环境,点选Start按
键,即可启动该虚拟环境:
i)输入完毕后,点击“应用”,提示更新成功后,关闭这两层窗口,此时该虚拟
环境已经可用,可以远程登录使用。
j)至此配置完毕。
k)由于该GUI有bug,删除虚拟环境操作顺序如下:首先停止(halt),然后删除(Destroy)
l)命令行列表:
命令行参数
vzctl mount / unmount start / stop / restart / destroy / set VPS_ID参数
vzlist -a / VPS_ID
vzpkg* vzpkgcache / vzpkgls
四、补充
1、本包还集成了iSCSI Target功能,可以配置并启动服务后成为iSCSI服务器,具体配
置由于与虚拟化关系不大,此处不赘述
2、OpenVZ需要使用ezTemplate模板技术,此处编译了RedFlag Asianux Server 3 sp2的
OS ezTemplate,大家可以下载官方的其他操作系统模板或自己架设源服务器,详情
参见openVZ官方网站。