ASM 11gR1 Installation & Configuration
- 格式:pdf
- 大小:2.12 MB
- 文档页数:15

Linux下Weblogic 11g R1安装和配置2013-12-07 19:36:05| 分类:server|举报|字号订阅转自:/juluce133/article/details/97743271. 安装前1 确定weblogic版本被认证首先请确认您要安装的Weblogic版本所在的平台已通过了BEA的认证,完整的认证平台列表请参考/wls/certifications/certs_810/index.html1.2 确定一个安装目录,建议该目录下至少有1个G的空间,可以使用du来察看磁盘空间的使用情况(实际情况是我们大多数人都没有这么大的内存,如果你有256,我想也是可以的,因为你是用来自己开发,不是用来对外发布的)1.3 创建一个BEA用户组帐号groupadd –g GID groupname说明:GID代表创建组的ID,一般大于500比如:groupadd –g 600 bea(你可以自己建一个Weblogic组&Weblogic帐户,官方也是这样建议的,但是你也可以不这么做。
用你的常用帐户作为工作目录也可以)1.4 创建一个Weblogic用户帐号useradd –d userhome –g GID username说明:userhome 代表用户的主目录,GID 为前一步创建的组ID比如useradd –d /home/Weblogic–g 600Weblogic添加Weblogic用户和Weblogic组# groupadd weblogic# useradd –g weblogic–m weblogic# passwd weblogic2. 安装时Weblogic在Linux平台下的安装方法一般有三种:图形窗口模式,控制台模式,无人守护安装模式。
由于控制台模式的使用最为广泛且不受任何其它硬件条件的限制。
(所以我这里只介绍控制台安装模式,图形模式和win里面的完全一样,各位就不要问我怎么安装呢吧!)2.1 安装JRE环境Weblogic安装程序需要JRE的支持,根据安装平台的不同,Weblogic的安装介质也分为两类,一种自带了JRE(后缀名为.bin),一种需要下载平台厂商所提供的JRE环境(后缀名为.jar),以wls1034_linux32.bin(本系统安装的就是这个版本,自带jre)为例,目前所支持的UNIX/Linux平台你可以到官方查询。
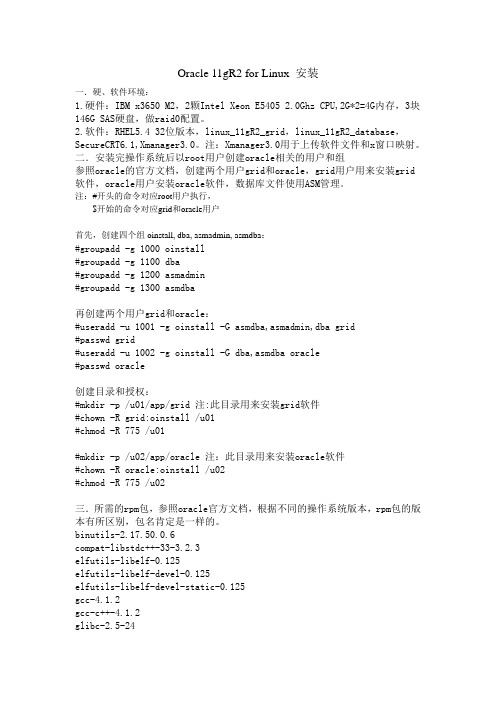
Oracle 11gR2 for Linux 安装一.硬、软件环境:1.硬件:IBM x3650 M2,2颗Intel Xeon E54052.0Ghz CPU,2G*2=4G内存,3块146G SAS硬盘,做raid0配置。
2.软件:RHEL5.4 32位版本,linux_11gR2_grid,linux_11gR2_database,SecureCRT6.1,Xmanager3.0。
注:Xmanager3.0用于上传软件文件和x窗口映射。
二.安装完操作系统后以root用户创建oracle相关的用户和组参照oracle的官方文档,创建两个用户grid和oracle,grid用户用来安装grid 软件,oracle用户安装oracle软件,数据库文件使用ASM管理。
注:#开头的命令对应root用户执行,$开始的命令对应grid和oracle用户首先,创建四个组oinstall, dba, asmadmin, asmdba:#groupadd -g 1000 oinstall#groupadd -g 1100 dba#groupadd -g 1200 asmadmin#groupadd -g 1300 asmdba再创建两个用户grid和oracle:#useradd -u 1001 -g oinstall -G asmdba,asmadmin,dba grid#passwd grid#useradd -u 1002 -g oinstall -G dba,asmdba oracle#passwd oracle创建目录和授权:#mkdir -p /u01/app/grid 注:此目录用来安装grid软件#chown -R grid:oinstall /u01#chmod -R 775 /u01#mkdir -p /u02/app/oracle 注:此目录用来安装oracle软件#chown -R oracle:oinstall /u02#chmod -R 775 /u02三.所需的rpm包,参照oracle官方文档,根据不同的操作系统版本,rpm包的版本有所区别,包名肯定是一样的。

Oracle HTTP Server 11g R1 Configuration for FLEXCUBEOracle FLEXCUBE Universal BankingRelease 12.4.0.0.0[May] [2017]Table of Contents1.PURPOSE (3)2.INTRODUCTION TO ORACLE HTTP SERVER (OHS) (3)2.1HTTP L ISTENER (3)2.2M ODULES (MODS) (3)3.INSTALLATION OF OHS 11G (4)4.CONFIGURE ORACLE HTTP SERVER INFRONT OF WEBLOGIC SERVER (11)4.1F OR W EB L OGIC IN SINGLE INSTANCE (11)4.2F OR W EBLOGIC INSTANCES IN CLUSTER (12)5.ENABLE “WEBLOGIC PLU G-IN ENABLED” FLAG I N WEBLOGIC (13)PRESSION RULE SETTING (13)6.1L OADING MOD_DEFLATE (13)6.2C ONFIGURING FILE TYPES (14)6.3HTTPD.CONF FILE CHANGES (14)7.CONFIGURING SSL FOR ORACLE HTTP SERVER (16)7.1SSL CONFIGURATION FOR I NBOUND R EQUEST TO O RACLE HTTP S ERVER (16)7.1.1Create a new Wallet and import Certificate (16)7.1.2Configuring Wallet in ssl.conf file (20)7.2C ONFIGURING SSL BETWEEN O RACLE HTTP S ERVER AND O RACLE W EBLOGIC S ERVER (21)7.2.1Turn off KeepAliveEnabled (21)7.2.2To enable one-way SSL (21)7.2.3To enable two-way SSL (22)8.SAMPLE CONFIGURATION FILES (23)9.STARTING, STOPPING, AND RESTARTING ORACLE HTTP SERVER (23)9.1S TART (23)9.2S TOP (23)9.3R ESTART (23)10.TEST THE APPLICATION (24)11.SERVER LOGS LOCATION (24)12.REFERENCES (24)1. PurposeThe objective of this document is to explain the installation and configuration of Oracle HTTP Server 11g R1(11.1.1.6.0). This includes setting up of server details, configuration of compression rules and enabling SSL.2. Introduction to Oracle HTTP Server (OHS)Oracle HTTP Server is the Web server component for Oracle Fusion Middleware. It is based on Apache web server, and includes all base Apache modules and modules developed specifically by Oracle. It provides a HTTP listener for Oracle WebLogic Server and the framework for hosting static pages, dynamic pages, and applications over the Web. Key aspects of Oracle HTTP Server are its technology, its serving of both static and dynamic content and its integration with both Oracle and non-Oracle products.Oracle HTTP Server consists of several components that run within the same process. These components provide the extensive list of features that Oracle HTTP Server offers when handling client requests.Following are the major components:2.1 HTTP ListenerOracle HTTP Server is based on an Apache HTTP listener to serve client requests. An HTTP server listener handles incoming requests and routes them to the appropriate processing utility.2.2 Modules (mods)Modules extend the basic functionality of Oracle HTTP Server, and support integration between Oracle HTTP Server and other Oracle Fusion Middleware components. There are modules developed specifically by Oracle for Oracle HTTP Server. Ex: mod_wl_ohs, mod_plsqlOracle HTTP Server also includes the base Apache and third-party modules out-of-the-box.These modules are not developed by Oracle. Ex: mod_proxy, mod_perl3. Installation of OHS 11gInvoke the setup exe to start the installationSelect Skip Software UpdatesSelect Install and ConfigureSelect only Oracle HTTP ServerEnter the required OHS instance and component namesThis completes the installation of Oracle HTTP Server with <Instance> and <component>. Example: Instance is instance1 and component is ohs1.If you would like to change the port after the installation(OHS Listen Port) edit$ORACLE_INSTANCE/config/OHS/<component_name>/httpd.conf and change the listen port.NOTE: This port is for http protocol and not for https.4. Configure Oracle HTTP Server infront of Weblogic ServerIn Oracle HTTP Server requests from Oracle HTTP Server to Weblogic server are proxied usingmod_wl_ohs module. This configuration file needs to be modified to include the Weblogic server and port details.mod_wl_ohs.conf file is located at${ORACLE_INSTANCE}/config/OHS/{COMPONENT_NAME}/mod_wl_ohs.confAdd the below directives to mod_wl_ohs.conf file.4.1 For WebLogic in single instance<Location /<<context/url>> >SetHandler weblogic-handlerWebLogicHost <<server name>>WeblogicPort <<port>></Location>Example:<Location /FCJNeoWeb>SetHandler weblogic-handlerWebLogicHost wlserver1WeblogicPort 7707</Location>This will forward /FCJNeoWeb from HTTP server to /FCJNeoWeb on WebLogic Server wlserver1: 77074.2 For Weblogic instances in cluster<Location /<<context/url>> >SetHandler weblogic-handlerWebLogicCluster <server1>:<port1>,<server2>:<port2></Location>Example<Location / FCJNeoWeb >SetHandler weblogic-handlerWebLogicCluster wlserver1:7010, wlserver2:7010</Location>This will forward /FCJNeoWeb from HTTP server to /FCJNeoWeb on WebLogic Cluster wlserver1:7010 and wlserver2:70105.Enable “WebLogic Plug-In Enabled” flag in weblogicThis flag needs to be enabled in weblogic if it is accessed through proxy plugins. When the WebLogic plugin is enabled, a call to getRemoteAddr will return the address of the browser client from the proprietary WL-Proxy-Client-IP header instead of the web server.a. Plugin flag at managed server leveli. Click on ‘Environment’- > 'Servers' -> '<ManagedServer>' -> 'General' -> 'Advanced'ii. Check the 'WebLogic Plug-In Enabled' box.iii. Click 'Save'iv. Restart the Server.b. Plugin flag at domain levelv. Click on <Domain> -> 'Web Applications'vi. Check the 'WebLogic Plug-In Enabled' box.vii. Click 'Save'viii. Restart the server.6. Compression rule settingContent compression in Oracle HTTP Server is done using mod_deflate. This can compress HTML, text or XML files to approx. 20 - 30% of their original sizes, thus saving on server traffic. However, compressing files causes a slightly higher load on the server, but clients' connection times to server is reduced.6.1 Loading mod_deflatemod_deflate is used for compression in OHS and this is installed in Oracle HTTP Server under location "${ORACLE_HOME}/OHS/modules/mod_deflate.so"But it might not be loaded.To load the file add the below directive in mod_wl_ohs.conf fileLoadModule deflate_module "${ORACLE_HOME}/OHS/modules/mod_deflate.so"6.2 Configuring file typesmod_deflate also requires to specify which type files are going to be compressed.In the LOCATION section of mod_wl_ohs.conf file add the below entries.AddOutputFilterByType DEFLATE text/plainAddOutputFilterByType DEFLATE text/xmlAddOutputFilterByType DEFLATE application/xhtml+xmlAddOutputFilterByType DEFLATE text/cssAddOutputFilterByType DEFLATE application/xmlAddOutputFilterByType DEFLATE application/x-javascriptAddOutputFilterByType DEFLATE text/htmlSetOutputFilter DEFLATEImages are supposed to be in a compressed format, and therefore are bypassed by mod_deflate.6.3 httpd.conf file changesThis is a server configuration file which typically contains directives that affect how the server runs, such as user and group IDs it should use, and location of other files. Cross check the existence of mod_wl_ohs.conf include in httpd.conf file.httpd.conf file is present under location“${ORACLE_INSTANCE}/config/OHS/{COMPONENT_NAME}/httpd.conf”In this file cross check for the below entryinclude "${ORACLE_INSTANCE}/config/OHS/${COMPONENT_NAME}/mod_wl_ohs.conf"If above include entry is not present, then add the above include section.7. Configuring SSL for Oracle HTTP ServerSecure Sockets Layer (SSL) is required to run any Web site securely. Secure Sockets Layer (SSL) is an encrypted communication protocol that is designed to securely send messages across the Internet.Reading of “SSL_Configuration on Weblogic” document provide d as part of FCUBS installation isrecommended before proceeding with further setup.In Oracle HTTP server, SSL configuration can be done between1. Browser to Oracle HTTP Server(Mandatory)2. Oracle HTTP Server to Oracle Weblogic Server(If required)7.1 SSL configuration for Inbound Request to Oracle HTTP ServerPerform these tasks to enable and configure SSL between browser and Oracle HTTP Server.1. Obtain a certificate from CA or create a self signed certificate.2. Create an Oracle Wallet which contains the above SSL Certificate. The default wallet that isautomatically installed with Oracle HTTP Server is for testing purposes only. The default wallet is located in "${ORACLE_INSTANCE}/config/OHS/${COMPONENT_NAME}/keystores/default"3. Configuring Wallet in ssl.conf file7.1.1 Create a new Wallet and import Certificate1. Go to the \Oracle_WT1\bin\launch.exe, this will launch your wallet manager2. Click on Create new and then click no option.3. Enter the wallet password and click on OK, this will create a new wallet.4. Not it will ask for certificate request creation, Click on NO to proceed5. Right click on trusted certificates and then import trusted certificate.6. Browse to the folder where certificate is stored and click on Open7. Click on Save Wallet button on the left side navigation and save the wallet either to defaultlocation("${ORACLE_INSTANCE}/config/OHS/${COMPONENT_NAME}/keystores/default") or folder of your choice.8. Click on Wallet tab and enable Auto Login7.1.2 Configuring Wallet in ssl.conf fileIn ssl.conf file the newly created wallet need to updated. This file is located under folder"${ORACLE_INSTANCE}/config/OHS/${COMPONENT_NAME}/1. Change the SSLWallet directive to point to the location of new wallet created.SSLWallet "${ORACLE_INSTANCE}/config/${COMPONENT_TYPE}/${COMPONENT_NAME}/keystores/"2. Change the Listen port number in ssl.conf file to the SSL enabled port, by default the value is 44437.2 Configuring SSL between Oracle HTTP Server and Oracle Weblogic ServerSSL for outbound requests from Oracle HTTP Server are configured in mod_wl_ohs.Refer to “SSL_Configura tion on Weblogic” document for weblogic server setting mentioned in below section.7.2.1 Turn off KeepAliveEnabledThe below parameter in mod_wl_ohs should be turned off, by default it is on. Add the below directive under LOCATION section of mod_wl_ohs fileKeepAliveEnabled OFF7.2.2 To enable one-way SSL1. Generate a custom keystore identity.jks for Weblogic Server containing a certificate.2. At Identity section in Keystores tab in weblogic Admin Console for server seta. The custom trust store with the identity.jks file locationb. The keystore type as JKSc. The passphrase used to created the keystore3. Copy the certificate to Oracle HTTP Server and import the new certificate into OHS wallet as a trustedcertificate.4. Add following new directive in mod_wl_ohs.conf to point to the wallet locationWlSSLWallet "${ORACLE_INSTANCE}/config/OHS/{COMPONENT_NAME}/keystores/default"5. Change the port in mod_wl_ohs file to point to SSL port of Weblogic server.6. Restart both Weblogic Server and Oracle HTTP Server7.2.3 To enable two-way SSL1. Perform one-way SSL configuration steps2. Generate a new trust store, trust.jks for Weblogic server3. Keystore created for one-way SSL could be used, but it is recommended to create a separate truststore4. Export the user certificate from Oracle HTTP Server wallet, and import it into truststore created above5. At Trust section in Keystores tab in Weblogic Admin Console for the server seta. The custom trust store with the trust.jks file locationb. The keystore type as JKSc. The passphrase used to created the keystore6. Under the SSL tabEnsure trusted CA is set as from Custom Trust Keystore.7. Restart Weblogic Server8. Sample Configuration Fileshttpd.conf mod_wl_ohs.conf ssl.conf9. Starting, Stopping, and Restarting Oracle HTTP ServerNavigate to the below location in command prompt ${ORACLE_INSTANCE}/bin/ and run below commands 9.1 Startopmnctl startproc ias-component={COMPONENT_NAME}Example: opmnctl startproc ias-component=ohs19.2 Stopopmnctl stopproc ias-component={COMPONENT_NAME}Example: opmnctl stopproc ias-component=ohs19.3 Restartopmnctl restartproc ias-component={COMPONENT_NAME}Example: opmnctl restartproc ias-component=ohs110. Test the applicationTest the application deployed on Weblogic using Oracle HTTP Server after restarting both the oracle http server and weblogic serverhttps://ohs_servername:ohs_https_port/<<context/url>>http://ohs_servername:ohs_http_port/<<context/url>>ohs_servername: server on which OHS is deployedohs_https_port: port number mentioned against LISTEN directive in SSL.conf fileohs_http_port: port number mentioned against LISTEN directive in httpd.conf fileExample:https://localhost:4443/FCJNeoWeb/welcome.jspOrhttp://localhost:7777/FCJNeoWeb/welcome.jsp11. Server Logs LocationOracle HTTP Server Logs are generated under folder${ORACLE_INSTANCE}/diagnostics/logs/OHS/{COMPONENT_NAME}/12. ReferencesSSL_Configuration.doc for Weblogic provided as part of FCUBS installation./cd/E16764_01/web.1111/e10144/under_mods.htm/cd/E25054_01/core.1111/e10105/sslconfig.htmOracle_HTTP_Server_Configuration[May] [2017]Version 12.4.0.0.0Oracle Financial Services Software LimitedOracle ParkOff Western Express HighwayGoregaon (East)Mumbai, Maharashtra 400 063IndiaWorldwide Inquiries:Phone: +91 22 6718 3000Fax:+91 22 6718 3001/financialservices/Copyright © 2007, 2017, Oracle and/or its affiliates. All rights reserved.Oracle and Java are registered trademarks of Oracle and/or its affiliates. Other names may be trademarks of their respective owners. U.S. GOVERNMENT END USERS: Oracle programs, including any operating system, integrated software, any programs installed on the hardware, and/or documentation, delivered to U.S. Government end users are "commercial computer software" pursuant to the applicable Federal Acquisition Regulation and agency-specific supplemental regulations. As such, use, duplication, disclosure, modification, and adaptation of the programs, including any operating system, integrated software, any programs installed on the hardware, and/or documentation, shall be subject to license terms and license restrictions applicable to the programs. No other rights are granted to the U.S. Government.This software or hardware is developed for general use in a variety of information management applications. It is not developed or intended for use in any inherently dangerous applications, including applications that may create a risk of personal injury. If you use this software or hardware in dangerous applications, then you shall be responsible to take all appropriate failsafe, backup, redundancy, and other measures to ensure its safe use. Oracle Corporation and its affiliates disclaim any liability for any damages caused by use of this software or hardware in dangerous applications.This software and related documentation are provided under a license agreement containing restrictions on use and disclosure and are protected by intellectual property laws. Except as expressly permitted in your license agreement or allowed by law, you may not use, copy, reproduce, translate, broadcast, modify, license, transmit, distribute, exhibit, perform, publish or display any part, in any form, or by any means. Reverse engineering, disassembly, or decompilation of this software, unless required by law for interoperability, is prohibited.The information contained herein is subject to change without notice and is not warranted to be error-free. If you find any errors, please report them to us in writing.This software or hardware and documentation may provide access to or information on content, products and services from third parties. Oracle Corporation and its affiliates are not responsible for and expressly disclaim all warranties of any kind with respect to third-party content, products, and services. Oracle Corporation and its affiliates will not be responsible for any loss, costs, or damages incurred due to your access to or use of third-party content, products, or services.。

实验:Redhat4.3上11gr2安装asm数据库Tom Tongasktom@1 实验目的通过本次实验,了解 Oracle Grid Infrastructure 11g R2 的安装熟悉 ASM 的管理及操作熟悉 CRS 的管理熟悉 Enterprise Manager 管理及监控2 实验环境Grid Infrastructure 安装及管理参考:/docs/cd/E11882_01/install.112/e10812/toc.htm /docs/cd/E11882_01/rac.112/e10717/toc.htm ASM管理参考:( Storage Administrator's Guide)/docs/cd/E11882_01/server.112/e10500/toc.htm 3 实验安装前准备工作3.0 用户与组1. 创建OS组#/usr/sbin/groupadd -g 106 oinstall#/usr/sbin/groupadd -g 107 dba#/usr/sbin/groupadd -g 108 asmadmin#/usr/sbin/groupadd -g 109 asmdba#/usr/sbin/groupadd -g 110 asmoper2. 创建OS用户#/usr/sbin/useradd -u 501 -g oinstall -Gdba,asmadmin,asmdba,asmoper oracle3. 设置OS用户密码#passwd oracle3.1 系统检查1. 服务器内存:(最少1.5 GB for grid infrastructure for a cluster), 我们这里把其设置为1G#grep MemTotal /proc/meminfo2. 服务器交换分区: (最少1.5 GB,建议1.5倍内存大小), 我们这里把其设置为1G#grep SwapTotal /proc/meminfo3. 磁盘空间需求:∙/tmp目录: 1.5GB∙数据库软件: 1 5-10GB,依赖于安装类型∙Grid Infrastructure: 5GB∙文件系统: 5GB用来放置安装软件在这里我们添加了两块盘, 8G和20G请按上面的要求使用fdisk命令划分磁盘分区,并挂载相应的文件系统,下面是我的划分,如有需要请参考。

1、用unzip解压Oracle 11g文件unzip linux_x86_11gR1_database.zip 解压后在datebase 目录中启动监听:切换到oracle 输入:lsnrctl start启动SQLplus 输入:sqlplus /nolog SQL>conn / as sysdba防止出现乱码:export LANG=en_US安装oracle指向目录:rpm -i --prefix=/路径/(在不经过图形界面的情况下)把rpm安装包拷贝到linux上进行挂载:mount -t iso9660 -o loop XXX.iso /media/cdrom2、安装包安装首先把安装系统的光盘mount到/mnt下,具体命令是mount /dev/cdrom /mnt然后配置yum源:vim /etc/yum.repos.d/server.repo以下为此文件内容:[base]name=basebaseurl=file:///mnt/Serverenabled=1gpgcheck=0配置完后执行yum clean all,然后执行安装以下包:yum install compat-db-4* compat-gcc-34-3* compat-gcc-34-c++-* compat-libstdc++-* elfutils-libelf-devel-* glibc-* glibc-devel-* gcc-* gcc-c++-* libaio-* libaio-devel-* libstdc++-devel-* libXp-* make-3* openmotif-* setarch-* sysstat-* unixODBC-* -y3、系统参数和用户及目录设置//系统参数设置vi /etc/sysctl.conf以下为此文件更改后的内容:# Kernel sysctl configuration file for Red Hat Linux## For binary values, 0 is disabled, 1 is enabled.See sysctl(8) and# sysctl.conf(5) for more details.# Controls IP packet forwardingnet.ipv4.ip_forward = 0# Controls source route verificationnet.ipv4.conf.default.rp_filter = 1# Do not accept source routingnet.ipv4.conf.default.accept_source_route = 0# Controls the System Request debugging functionality of the kernelkernel.sysrq = 0# Controls whether core dumps will append the PID to the core filename# Useful for debugging multi-threaded applicationskernel.core_uses_pid = 1# Controls the use of TCP syncookiesnet.ipv4.tcp_syncookies = 1# Controls the maximum size of a message, in bytes#kernel.msgmnb = 65536# Controls the default maxmimum size of a mesage queue#kernel.msgmax = 65536# Controls the maximum shared segment size, in bytes#kernel.shmmax = 4294967295# Controls the maximum number of shared memory segments, in pages#kernel.shmall = 268435456#Below for oracle11gkernel.core_uses_pid = 1kernel.shmmax = 536870912kernel.shmmni = 4096kernel.shmall = 2097152kernel.sem = 250 32000 100 128net.core.rmem_default = 4194304net.core.rmem_max = 4194304net.core.wmem_default = 262144net.core.wmem_max = 262144fs.file-max = 6553600net.ipv4.ip_local_port_range = 1024 65000//添加用户组及用户执行如下命令:#groupadd dba#groupadd oinstall#useradd oracle -g oinstall -G dba#passwd oracle//新建目录权限执行如下命令:#mkdir -p /u01#chown -R oracle:dba /u01#chmod -R 755 /u01//用户环境变量先切换用户到oracle:su – oracle修改.bash_profile文件:vi .bash_profile以下是此文件的内容:SID 要跟下面的对应# .bash_profile# Get the aliases and functionsif [ -f ~/.bashrc ]; then. ~/.bashrcfi# User specific environment and startup programsexport PATHexport TMP=/tmpexport TMPDIR=/tmpunset USERNAMEexport ORACLE_BASE=/u01/oracleexport ORACLE_HOME=/u01/oracle/product/11.1.0/db_1export ORACLE_SID=studyexport ORACLE_TERM=xtermexport LD_LIBRARY_PATH=$ORACLE_HOME/lib:$ORACLE_HOME/jdbc/lib:/lib:/usr/libexport PATH=$PATH:.:/bin:/usr/bin:/usr/bin/X11/:/usr/local/binexport PATH=$ORACLE_HOME/bin:$PATHexport CLASSPATH=$ORACLE_HOME/JRE:$ORACLE_HOME/jlib:$ORACLE_HOME/rdbms/jlib export NLS_LANG=AMERICAN_AMERICA.AL32UTF8umask 0224、安装oracle注销root ;用oracle帐号进入,进入Oracle所在的目录我的是/disk/Oracle11g-linux_x86 [oracle@root-bs Oracle11g-linux_x86]$ lsdoc install response runInstaller stage welcome.html执行./runInsaller进行安装:[or acle@root-bs Oracle11g-linux_x86]$ ./runInstaller当进度条走到头时弹出“密码管理窗口”不想更改,点“确定”。

AIX 7.1 Oracle 11g RAC ASM如何查看rootvg镜像组成# bootlist -o -m normalhdisk0 blv=hd5 pathid=0hdisk0 blv=hd5 pathid=1hdisk1 blv=hd5 pathid=0hdisk1 blv=hd5 pathid=1cd0如何查看cpu核数?# lsdev -Cc processorproc0 Available 00-00 Processorproc4 Available 00-04 Processorproc8 Available 00-08 Processorproc12 Available 00-12 Processorproc16 Available 00-16 Processorproc20 Available 00-20 Processorproc24 Available 00-24 Processorproc28 Available 00-28 Processorproc32 Available 00-32 Processorproc36 Available 00-36 Processorproc40 Available 00-40 Processorproc44 Available 00-44 Processorproc48 Available 00-48 Processorproc52 Available 00-52 Processorproc56 Available 00-56 Processorproc60 Available 00-60 Processor# bindprocessor -qThe available processors are: 0 1 2 3 4 5 6 7 8 9 10 11 12 13 14 15 16 17 18 19 20 21 22 23 24 25 26 27 28 29 30 31 32 33 34 35 36 37 38 39 40 41 42 43 44 45 46 47 48 49 50 51 52 53 54 55 56 57 58 59 60 61 62 63## prtconf|grep ProcessorsNumber Of Processors: 16#如何查看WWN号?# lsdev -Cc adapter -S a | grep fcsfcs0 Available 04-00 8Gb PCI Express Dual Port FC Adapter (df1000f114108a03)fcs1 Available 04-01 8Gb PCI Express Dual Port FC Adapter (df1000f114108a03)fcs2 Available 05-00 8Gb PCI Express Dual Port FC Adapter (df1000f114108a03)fcs3 Available 05-01 8Gb PCI Express Dual Port FC Adapter (df1000f114108a03)# lscfg -vpl fcs0fcs0 U78AA.001.WZSKJYT-P1-C2-T1 8Gb PCI Express Dual Port FC Adapter (df1000f114108a03)Part Number.................00E0806Serial Number...............1A4080061CManufacturer................001AEC Level.................... D77161Customer Card ID Number.....577DFRU Number..................00E0806Device Specific.(ZM) (3)Network Address.............10000090FA67C1CAROS Level and ID............027820B7Device Specific.(Z0) (31004549)Device Specific.(Z1) (00000000)Device Specific.(Z2) (00000000)Device Specific.(Z3) (09030909)Device Specific.(Z4)........FF781150Device Specific.(Z5)........027820B7Device Specific.(Z6)........077320B7Device Specific.(Z7)........0B7C20B7Device Specific.(Z8)........20000120FA67C1CADevice Specific.(Z9)2.02X7Device Specific.(ZA)........U2D2.02X7Device Specific.(ZB)........U3K2.02X7Device Specific.(ZC) (00000000)PLATFORM SPECIFICName: fibre-channelModel: 00E0806Node: fibre-channel@0Device Type: fcp# lscfg -vpl fcs1fcs1 U78AA.001.WZSKJYT-P1-C2-T2 8Gb PCI Express Dual Port FC Adapter (df1000f114108a03)Part Number.................00E0806Serial Number...............1A4080061CManufacturer................001AEC Level.................... D77161Customer Card ID Number.....577DFRU Number..................00E0806Device Specific.(ZM) (3)Network Address.............10000090FA67C1CBROS Level and ID............027820B7Device Specific.(Z0) (31004549)Device Specific.(Z1) (00000000)Device Specific.(Z2) (00000000)Device Specific.(Z3) (09030909)Device Specific.(Z4)........FF781150Device Specific.(Z5)........027820B7Device Specific.(Z6)........077320B7Device Specific.(Z7)........0B7C20B7Device Specific.(Z8)........20000120FA67C1CBDevice Specific.(Z9)2.02X7Device Specific.(ZA)........U2D2.02X7Device Specific.(ZB)........U3K2.02X7Device Specific.(ZC) (00000000)PLATFORM SPECIFICName: fibre-channelModel: 00E0806Node: fibre-channel@0,1Device Type: fcp#查看内存大小:# lsattr -El mem0ent_mem_cap I/O memory entitlement in Kbytes Falsegoodsize 63232 Amount of usable physical memory in Mbytes Falsemem_exp_factor Memory expansion factor Falsesize 63232 Total amount of physical memory in Mbytes Falsevar_mem_weight Variable memory capacity weight False#lsdev -Cc memoryselect GROUP_NUMBER,DISK_NUMBER,TOTAL_MB,FREE_MB,path from V$ASM_DISK;GROUP_NUMBER DISK_NUMBER TOTAL_MB FREE_MB PATH------------ ----------- ---------- ---------- ----------------------------------------------------------------------------------------------------------------------------------------------------------------------------------------------------------------------------------------------------------------1 0 112640 108634 /dev/rhdiskpower11 1 153600 148149 /dev/rhdiskpower101 2 163840 158019 /dev/rhdiskpower111 3 174080 167900 /dev/rhdiskpower121 4 184320 177772 /dev/rhdiskpower131 5 194560 187652 /dev/rhdiskpower141 6 204800 197531 /dev/rhdiskpower151 7 225280 217274 /dev/rhdiskpower161 8 235520 227154 /dev/rhdiskpower171 9 143360 138261 /dev/rhdiskpower21 10 215040 207395 /dev/rhdiskpower32 0 5120 4724 /dev/rhdiskpower51 11 102400 98761 /dev/rhdiskpower71 12 122880 118515 /dev/rhdiskpower81 13 133120 128382 /dev/rhdiskpower9选定了17 行powermt display dev=all# powermt display dev=all# powermt display dev=allPseudo name=hdiskpower0VNX ID=FCN00141200036 [IBM POWER740]Logical device ID=600601607BF038007138E28678FEE311 [CRS2]state=alive; policy=CLAROpt; queued-IOs=0Owner: default=SP A, current=SP A Array failover mode: 4============================================================================== --------------- Host --------------- - Stor - -- I/O Path -- -- Stats ---### HW Path I/O Paths Interf. Mode State Q-IOs Errors==============================================================================0 fscsi0 hdisk4 SP A1 active alive 0 01 fscsi2 hdisk28 SP B1 active alive 0 0Pseudo name=hdiskpower1VNX ID=FCN00141200036 [IBM POWER740]Logical device ID=600601607BF03800EA9BE11779FEE311 [DATA2]state=alive; policy=CLAROpt; queued-IOs=0Owner: default=SP A, current=SP A Array failover mode: 4==============================================================================--------------- Host --------------- - Stor - -- I/O Path -- -- Stats ---### HW Path I/O Paths Interf. Mode State Q-IOs Errors==============================================================================0 fscsi0 hdisk5 SP A1 active alive 0 01 fscsi2 hdisk29 SP B1 active alive 0 0Pseudo name=hdiskpower2VNX ID=FCN00141200036 [IBM POWER740]Logical device ID=600601607BF0380008A51F3079FEE311 [DATA5]state=alive; policy=CLAROpt; queued-IOs=0Owner: default=SP A, current=SP A Array failover mode: 4============================================================================== --------------- Host --------------- - Stor - -- I/O Path -- -- Stats ---### HW Path I/O Paths Interf. Mode State Q-IOs Errors==============================================================================0 fscsi0 hdisk6 SP A1 active alive 0 01 fscsi2 hdisk30 SP B1 active alive 0 0Pseudo name=hdiskpower3VNX ID=FCN00141200036 [IBM POWER740]Logical device ID=600601607BF0380080A25E6779FEE311 [DATA12]state=alive; policy=CLAROpt; queued-IOs=0Owner: default=SP A, current=SP A Array failover mode: 4============================================================================== --------------- Host --------------- - Stor - -- I/O Path -- -- Stats ---### HW Path I/O Paths Interf. Mode State Q-IOs Errors==============================================================================0 fscsi0 hdisk7 SP A1 active alive 0 01 fscsi2 hdisk31 SP B1 active alive 0 0Pseudo name=hdiskpower4VNX ID=FCN00141200036 [IBM POWER740]Logical device ID=600601607BF03800FA516CC278FEE311 [ARCH2]state=alive; policy=CLAROpt; queued-IOs=0Owner: default=SP A, current=SP A Array failover mode: 4============================================================================== --------------- Host --------------- - Stor - -- I/O Path -- -- Stats ---### HW Path I/O Paths Interf. Mode State Q-IOs Errors==============================================================================0 fscsi0 hdisk8 SP A1 active alive 0 01 fscsi2 hdisk32 SP B1 active alive 0 0Pseudo name=hdiskpower5VNX ID=FCN00141200036 [IBM POWER740]Logical device ID=600601607BF038007038E28678FEE311 [CRS1]state=alive; policy=CLAROpt; queued-IOs=0Owner: default=SP A, current=SP A Array failover mode: 4============================================================================== --------------- Host --------------- - Stor - -- I/O Path -- -- Stats ---### HW Path I/O Paths Interf. Mode State Q-IOs Errors==============================================================================0 fscsi0 hdisk9 SP A1 active alive 0 01 fscsi2 hdisk33 SP B1 active alive 0 0Pseudo name=hdiskpower6VNX ID=FCN00141200036 [IBM POWER740]Logical device ID=600601607BF038007238E28678FEE311 [CRS3]state=alive; policy=CLAROpt; queued-IOs=0Owner: default=SP A, current=SP A Array failover mode: 4============================================================================== --------------- Host --------------- - Stor - -- I/O Path -- -- Stats ---### HW Path I/O Paths Interf. Mode State Q-IOs Errors==============================================================================0 fscsi0 hdisk10 SP A1 active alive 0 01 fscsi2 hdisk34 SP B1 active alive 0 0Pseudo name=hdiskpower7VNX ID=FCN00141200036 [IBM POWER740]Logical device ID=600601607BF038004A0E320E79FEE311 [DATA1]state=alive; policy=CLAROpt; queued-IOs=0Owner: default=SP A, current=SP A Array failover mode: 4============================================================================== --------------- Host --------------- - Stor - -- I/O Path -- -- Stats ---### HW Path I/O Paths Interf. Mode State Q-IOs Errors==============================================================================0 fscsi0 hdisk11 SP A1 active alive 0 01 fscsi2 hdisk35 SP B1 active alive 0 0Pseudo name=hdiskpower8VNX ID=FCN00141200036 [IBM POWER740]Logical device ID=600601607BF03800A64A6E2079FEE311 [DATA3]state=alive; policy=CLAROpt; queued-IOs=0Owner: default=SP A, current=SP A Array failover mode: 4============================================================================== --------------- Host --------------- - Stor - -- I/O Path -- -- Stats ---### HW Path I/O Paths Interf. Mode State Q-IOs Errors==============================================================================0 fscsi0 hdisk12 SP A1 active alive 0 01 fscsi2 hdisk36 SP B1 active alive 0 0Pseudo name=hdiskpower9VNX ID=FCN00141200036 [IBM POWER740]Logical device ID=600601607BF03800F601412879FEE311 [DA TA4]state=alive; policy=CLAROpt; queued-IOs=0Owner: default=SP A, current=SP A Array failover mode: 4============================================================================== --------------- Host --------------- - Stor - -- I/O Path -- -- Stats ---### HW Path I/O Paths Interf. Mode State Q-IOs Errors==============================================================================0 fscsi0 hdisk13 SP A1 active alive 0 01 fscsi2 hdisk37 SP B1 active alive 0 0Pseudo name=hdiskpower10VNX ID=FCN00141200036 [IBM POWER740]Logical device ID=600601607BF038004C99743979FEE311 [DATA6]state=alive; policy=CLAROpt; queued-IOs=0Owner: default=SP A, current=SP A Array failover mode: 4============================================================================== --------------- Host --------------- - Stor - -- I/O Path -- -- Stats ---### HW Path I/O Paths Interf. Mode State Q-IOs Errors==============================================================================0 fscsi0 hdisk14 SP A1 active alive 0 01 fscsi2 hdisk38 SP B1 active alive 0 0Pseudo name=hdiskpower11VNX ID=FCN00141200036 [IBM POWER740]Logical device ID=600601607BF03800228CE84279FEE311 [DATA7]state=alive; policy=CLAROpt; queued-IOs=0Owner: default=SP A, current=SP A Array failover mode: 4============================================================================== --------------- Host --------------- - Stor - -- I/O Path -- -- Stats ---### HW Path I/O Paths Interf. Mode State Q-IOs Errors==============================================================================0 fscsi0 hdisk15 SP A1 active alive 0 01 fscsi2 hdisk39 SP B1 active alive 0 0Pseudo name=hdiskpower12VNX ID=FCN00141200036 [IBM POWER740]Logical device ID=600601607BF0380024FE984B79FEE311 [DATA8]state=alive; policy=CLAROpt; queued-IOs=0Owner: default=SP A, current=SP A Array failover mode: 4============================================================================== --------------- Host --------------- - Stor - -- I/O Path -- -- Stats ---### HW Path I/O Paths Interf. Mode State Q-IOs Errors==============================================================================0 fscsi0 hdisk16 SP A1 active alive 0 01 fscsi2 hdisk40 SP B1 active alive 0 0Pseudo name=hdiskpower13VNX ID=FCN00141200036 [IBM POWER740]Logical device ID=600601607BF038001A53695379FEE311 [DATA9]state=alive; policy=CLAROpt; queued-IOs=0Owner: default=SP A, current=SP A Array failover mode: 4============================================================================== --------------- Host --------------- - Stor - -- I/O Path -- -- Stats ---### HW Path I/O Paths Interf. Mode State Q-IOs Errors==============================================================================0 fscsi0 hdisk17 SP A1 active alive 0 01 fscsi2 hdisk41 SP B1 active alive 0 0Pseudo name=hdiskpower14VNX ID=FCN00141200036 [IBM POWER740]Logical device ID=600601607BF038003C27765A79FEE311 [DATA10]state=alive; policy=CLAROpt; queued-IOs=0Owner: default=SP A, current=SP A Array failover mode: 4============================================================================== --------------- Host --------------- - Stor - -- I/O Path -- -- Stats ---### HW Path I/O Paths Interf. Mode State Q-IOs Errors==============================================================================0 fscsi0 hdisk18 SP A1 active alive 0 01 fscsi2 hdisk42 SP B1 active alive 0 0Pseudo name=hdiskpower15VNX ID=FCN00141200036 [IBM POWER740]Logical device ID=600601607BF03800F203C96079FEE311 [DATA11]state=alive; policy=CLAROpt; queued-IOs=0Owner: default=SP A, current=SP A Array failover mode: 4============================================================================== --------------- Host --------------- - Stor - -- I/O Path -- -- Stats ---### HW Path I/O Paths Interf. Mode State Q-IOs Errors==============================================================================0 fscsi0 hdisk19 SP A1 active alive 0 01 fscsi2 hdisk43 SP B1 active alive 0 0Pseudo name=hdiskpower16VNX ID=FCN00141200036 [IBM POWER740]Logical device ID=600601607BF0380010784C6E79FEE311 [DATA13]state=alive; policy=CLAROpt; queued-IOs=0Owner: default=SP A, current=SP A Array failover mode: 4============================================================================== --------------- Host --------------- - Stor - -- I/O Path -- -- Stats ---### HW Path I/O Paths Interf. Mode State Q-IOs Errors==============================================================================0 fscsi0 hdisk20 SP A1 active alive 0 01 fscsi2 hdisk44 SP B1 active alive 0 0Pseudo name=hdiskpower17VNX ID=FCN00141200036 [IBM POWER740]Logical device ID=600601607BF038006A15A77679FEE311 [DATA14]state=alive; policy=CLAROpt; queued-IOs=0Owner: default=SP A, current=SP A Array failover mode: 4============================================================================== --------------- Host --------------- - Stor - -- I/O Path -- -- Stats ---### HW Path I/O Paths Interf. Mode State Q-IOs Errors==============================================================================0 fscsi0 hdisk21 SP A1 active alive 0 01 fscsi2 hdisk45 SP B1 active alive 0 0Pseudo name=hdiskpower19VNX ID=FCN00141200036 [IBM POWER740]Logical device ID=6006016090B03800484C45D6C5FEE311 [ARCH1]state=alive; policy=CLAROpt; queued-IOs=0Owner: default=SP A, current=SP A Array failover mode: 4============================================================================== --------------- Host --------------- - Stor - -- I/O Path -- -- Stats ---### HW Path I/O Paths Interf. Mode State Q-IOs Errors==============================================================================0 fscsi0 hdisk3 SP A1 active alive 0 01 fscsi2 hdisk27 SP B1 active alive 0 0Pseudo name=hdiskpower20VNX ID=FCN00141200036 [IBM POWER740]Logical device ID=6006016090B0380076D3B562F300E411 [Backup1]state=alive; policy=CLAROpt; queued-IOs=0Owner: default=SP A, current=SP A Array failover mode: 4============================================================================== --------------- Host --------------- - Stor - -- I/O Path -- -- Stats ---### HW Path I/O Paths Interf. Mode State Q-IOs Errors==============================================================================0 fscsi0 hdisk46 SP A1 active alive 0 01 fscsi2 hdisk48 SP B1 active alive 0 0Pseudo name=hdiskpower21VNX ID=FCN00141200036 [IBM POWER740]Logical device ID=6006016090B038002EC8566FF300E411 [Backup2]state=alive; policy=CLAROpt; queued-IOs=0Owner: default=SP A, current=SP A Array failover mode: 4============================================================================== --------------- Host --------------- - Stor - -- I/O Path -- -- Stats ---### HW Path I/O Paths Interf. Mode State Q-IOs Errors==============================================================================0 fscsi0 hdisk47 SP A1 active alive 0 01 fscsi2 hdisk49 SP B1 active alive 0 0#crs1 hdiskpower5crs2 hdiskpower0crs3 hdiskpower6data1 hdiskpower7data2 hdiskpower1data3 hdiskpower8data4 hdiskpower9data5 hdiskpower2data6 hdiskpower10data7 hdiskpower11data8 hdiskpower12data9 hdiskpower13data10 hdiskpower14data11 hdiskpower15data12 hdiskpower3data13 hdiskpower16data14 hdiskpower17arch1 hdiskpower19arch2 hdiskpower4backup1 hdiskpower20backup2 hdiskpower21lsattr -E -l hdiskpower0rmdev -dl hdiskpower19chdev -l hdiskpower0 -a pv=yes chdev -l hdiskpower1 -a pv=yes chdev -l hdiskpower2 -a pv=yes chdev -l hdiskpower3 -a pv=yes chdev -l hdiskpower4 -a pv=yes chdev -l hdiskpower5 -a pv=yes chdev -l hdiskpower6 -a pv=yes chdev -l hdiskpower7 -a pv=yes chdev -l hdiskpower8 -a pv=yes chdev -l hdiskpower9 -a pv=yes chdev -l hdiskpower10 -a pv=yeschdev -l hdiskpower11 -a pv=yeschdev -l hdiskpower12 -a pv=yeschdev -l hdiskpower13 -a pv=yeschdev -l hdiskpower14 -a pv=yeschdev -l hdiskpower15 -a pv=yeschdev -l hdiskpower16 -a pv=yeschdev -l hdiskpower17 -a pv=yeschdev -l hdiskpower19 -a pv=yeschdev -l hdiskpower20 -a pv=yeschdev -l hdiskpower21 -a pv=yeschdev -l hdiskpower19 -a pv=yeschdev -l hdiskpower19 -a pv=clearchdev -l hdiskpower0 -a reserve_policy=no_reserve chdev -l hdiskpower1 -a reserve_policy=no_reserve chdev -l hdiskpower2 -a reserve_policy=no_reserve chdev -l hdiskpower3 -a reserve_policy=no_reserve chdev -l hdiskpower4 -a reserve_policy=no_reserve chdev -l hdiskpower5 -a reserve_policy=no_reserve chdev -l hdiskpower6 -a reserve_policy=no_reserve chdev -l hdiskpower7 -a reserve_policy=no_reserve chdev -l hdiskpower8 -a reserve_policy=no_reserve chdev -l hdiskpower9 -a reserve_policy=no_reserve chdev -l hdiskpower10 -a reserve_policy=no_reserve chdev -l hdiskpower11 -a reserve_policy=no_reserve chdev -l hdiskpower12 -a reserve_policy=no_reserve chdev -l hdiskpower13 -a reserve_policy=no_reserve chdev -l hdiskpower14 -a reserve_policy=no_reserve chdev -l hdiskpower15 -a reserve_policy=no_reserve chdev -l hdiskpower16 -a reserve_policy=no_reserve chdev -l hdiskpower17 -a reserve_policy=no_reserve chdev -l hdiskpower19 -a reserve_policy=no_reserve chdev -l hdiskpower20 -a reserve_policy=no_reserve chdev -l hdiskpower21 -a reserve_policy=no_reservechown grid:asmadmin /dev/rhdiskpower0chown grid:asmadmin /dev/rhdiskpower1chown grid:asmadmin /dev/rhdiskpower2chown grid:asmadmin /dev/rhdiskpower3chown grid:asmadmin /dev/rhdiskpower5chown grid:asmadmin /dev/rhdiskpower6chown grid:asmadmin /dev/rhdiskpower7chown grid:asmadmin /dev/rhdiskpower8chown grid:asmadmin /dev/rhdiskpower9chown grid:asmadmin /dev/rhdiskpower10chown grid:asmadmin /dev/rhdiskpower11chown grid:asmadmin /dev/rhdiskpower12chown grid:asmadmin /dev/rhdiskpower13chown grid:asmadmin /dev/rhdiskpower14chown grid:asmadmin /dev/rhdiskpower15chown grid:asmadmin /dev/rhdiskpower16chown grid:asmadmin /dev/rhdiskpower17chmod 660 /dev/rhdiskpower0chmod 660 /dev/rhdiskpower1chmod 660 /dev/rhdiskpower2chmod 660 /dev/rhdiskpower3chmod 660 /dev/rhdiskpower5chmod 660 /dev/rhdiskpower6chmod 660 /dev/rhdiskpower7chmod 660 /dev/rhdiskpower8chmod 660 /dev/rhdiskpower9chmod 660 /dev/rhdiskpower10chmod 660 /dev/rhdiskpower11chmod 660 /dev/rhdiskpower12chmod 660 /dev/rhdiskpower13chmod 660 /dev/rhdiskpower14chmod 660 /dev/rhdiskpower15chmod 660 /dev/rhdiskpower16chmod 660 /dev/rhdiskpower17chdev -l hdiskpower5 -a reserve_policy=no_reserve/usr/sbin/lsattr -E -l hdiskpower5# /usr/sbin/lsattr -E -l hdiskpower5PR_key_value none Reserve Key. Trueclr_q no Clear Queue (RS/6000) Truelocation Location Truelun_id 0x6000000000000 LUN ID Falselun_reset_spt yes FC Forced Open LUN Truemax_coalesce 0x100000 Maximum coalesce size Truemax_retries 5 Maximum Retries Truemax_transfer 0x100000 Maximum transfer size Truepvid 00f933f9c497fa560000000000000000 Physical volume identifier False pvid_takeover yes Takeover PVIDs from hdisks Trueq_err yes Use QERR bit Trueq_type simple Queue TYPE Falsequeue_depth 32 Queue DEPTH Truereassign_to 120 REASSIGN time out value Truereserve_policy no_reserve Reserve Policy used to reserve device on open. True reset_delay 2 Reset Delay Truerw_timeout 30 READ/WRITE time out Truescsi_id 0x10600 SCSI ID Falsestart_timeout 60 START unit time out Trueww_name 0x500601693ee0648b World Wide Name Falsereserve_policy no_reservelsattr -E -l /dev/rhdiskpower0lsattr -E -l /dev/rhdisk3查看:lsattr -E -l rhdiskpower0|grep reservelsattr -El sys0 -a realmem# lsattr -El sys0 -a realmemrealmem 64749568 Amount of usable physical memory in Kbytes False# lsps -aPage Space Physical V olume V olume Group Size %Used Active Auto Type Chksumhd6 hdisk0 rootvg 65536MB 0 yes yes lv 0### lsvg rootvgVOLUME GROUP: rootvg VG IDENTIFIER: 00f933f900004c0000000146e2225531 VG STA TE: active PP SIZE: 512 megabyte(s)VG PERMISSION: read/write TOTAL PPs: 1116 (571392 megabytes)MAX LVs: 256 FREE PPs: 808 (413696 megabytes)LVs: 13 USED PPs: 308 (157696 megabytes)OPEN LVs: 12 QUORUM: 1 (Disabled)TOTAL PVs: 2 VG DESCRIPTORS: 3STALE PVs: 0 STALE PPs: 0ACTIVE PVs: 2 AUTO ON: yesMAX PPs per VG: 32512MAX PPs per PV: 1016 MAX PVs: 32LTG size (Dynamic): 1024 kilobyte(s) AUTO SYNC: noHOT SPARE: no BB POLICY: relocatablePV RESTRICTION: none INFINITE RETRY: noDISK BLOCK SIZE: 512# lsvg -l rootvgrootvg:LV NAME TYPE LPs PPs PVs LV STA TE MOUNT POINThd5 boot 1 2 2 closed/syncd N/Ahd6 paging 128 256 2 open/syncd N/Ahd8 jfs2log 1 2 2 open/syncd N/Ahd4 jfs2 2 4 2 open/syncd /hd2 jfs2 6 12 2 open/syncd /usrhd9var jfs2 1 2 2 open/syncd /varhd3 jfs2 4 8 2 open/syncd /tmphd1 jfs2 1 2 2 open/syncd /homehd10opt jfs2 1 2 2 open/syncd /opthd11admin jfs2 1 2 2 open/syncd /adminfwdump jfs2 3 6 2 open/syncd /var/adm/ras/platform lg_dumplv sysdump 8 8 1 open/syncd N/Alivedump jfs2 1 2 2 open/syncd /var/adm/ras/livedump #chps -s 32 hdisk0chfs -a size=30G /tmpchfs -a size=10G /homechfs -a size=5G /chfs -a size=+10G /u01mklv -t jfs2 -y u01lv rootvg 200crfs -v jfs2 -d /dev/u01lv -m /u01mount /u01lsattr -El /dev/hdiskpower0lsattr -El /dev/rhdiskpower0ioo -o aio_maxreqsvmo -p -o minperm%=3vmo -p -o maxperm%=90vmo -p -o maxclient%=90vmo -p -o lru_file_repage=0vmo -p -o strict_maxclient=1vmo -p -o strict_maxperm=0lru_file_repagevmo -p -o lru_file_repage=0vi + /etc/security/limitsfsize = -1core = 2097151cpu = -1data = -1rss = -1stack = -1nofiles = -1no -r -o ipqmaxlen=521no -p -o rfc1323=1no -p -o sb_max=1500000no -p -o tcp_recvspace=65536no -p -o tcp_sendspace=65536no -p -o udp_recvspace=1351680no -p -o udp_sendspace=13516/usr/sbin/no -r -o ipqmaxlen=512/usr/sbin/no -po rfc1323=1/usr/sbin/no -po sb_max=131072/usr/sbin/no -po tcp_recvspace=65536/usr/sbin/no -po tcp_sendspace=65536/usr/sbin/no -po udp_recvspace=65530/usr/sbin/no -po udp_sendspace=65536#public ip192.168.100.103 sqwsjdb01192.168.100.104 sqwsjdb02#Private ip10.10.10.1 sqwsjdb01-priv10.10.10.2 sqwsjdb02-priv#Virtual ip192.168.100.101 sqwsjdb01-vip192.168.100.102 sqwsjdb02-vip#Scan ip192.168.100.100 rac-scanlsdev -Cc adapter查看ssh服务状态# lssrc -s sshdSubsystem Group PID Statussshd ssh 3866742 active停止和启动ssh 服务# stopsrc -s sshd# startsrc -s sshd建议通过console连接,不然停止ssh后网络连接就断开连不上了。
CentOS 6.6 ASM 11G RAC 安装OS: CentOS release 6.6 (final)DB: Oracle 11.2.0.4************************************************************************** 1.配置ip**************************************************************************注释:①每个节点都需要2个网卡第一个网卡为public ip 第二个为private ip②修改IP后使生效命令:network restart③修改IP方法:服务端setup进入图形界面配置,也可修改ifcfg-eth0文件修改主机名:vi /etc/sysconfig/network修改rac01test主机名[root rac01test ~]# cat /etc/sysconfig/networkNETWORKING=yesNETWORKING_IPV6=noHOSTNAME=rac01test修改rac02test主机名[root rac02test ~]# cat /etc/sysconfig/networkNETWORKING=yesNETWORKING_IPV6=noHOSTNAME= rac02test使主机名生效[root rac01test ~] hostname rac01test[root rac02test ~] hostname rac02test配置NTP时间同步:rac01test:[root rac01test /] cd etc[root rac01test etc/] mv npt.conf npt.conf.bakrac02test:[root rac02test /]# cd /etc[root rac02test etc]# mv ntp.conf ntp.conf.bak************************************************************************** 2.关闭防火墙**************************************************************************[root rac01test /] vi /etc/selinux/configSELINUX=disabled ---修改成disabledSELINUXTYPE=targeted#setenforce 0注意:两个节点都要修改两节点关闭防火墙另一种方式:chkconfig --list|grep ipchkconfig ip6tables offchkconfig iptables offservice ip6tables stopservice iptables stop************************************************************************** 3.修改hosts文件**************************************************************************rac01test[rootrac01test/]# vi /etc/hosts192.168.26.180 rac01test192.168.26.181 rac02test192.168.26.182 rac01testvip192.168.26.183 rac02testvip192.168.26.184 scanip172.16.1.180 rac01testpriv172.16.1.181 rac02testprivrac02test[rootrac02test /]# vi /etc/hosts192.168.26.180 rac01test192.168.26.181 rac02test192.168.26.182 rac01testvip192.168.26.183 rac02testvip192.168.26.184 scanip172.16.1.180 rac01testpriv172.16.1.181 rac02testpriv************************************************************************** 4.配置yum**************************************************************************以下配置操作两个节点都要配置[rootrac01test etc]# cd /etc/yum.repos.d[root rac01test yum.repos.d]# vi rhel-debuginfo.repo修改成以下配置[rhel-debuginfo]name=Red Hat Enterprise Linux $releasever - $basearch - Debugbaseurl=file:///mnt/Serverenabled=1gpgcheck=0[root rac01test yum.repos.d]# yum clean allLoaded plugins: rhnplugin, securityCleaning up Everything注意:以上挂载方式是,未联网用光盘里面的包;如果系统联网可以直接在外网yum挂载磁盘, 如果连接外网YUM就不需要挂载磁盘[root rac01test yum.repos.d]# mount /dev/hdc /mntmount: block device /dev/hdc is write-protected, mounting read-onlyCentOS 6.6 版本需要安装以下的系统包glibc-2.12-1.7.el6 (i686)glibc-2.12-1.7.el6 (x86_64)glibc-devel-2.12-1.7.el6 (x86_64)glibc-devel-2.12-1.7.el6.i686kshlibgcc-4.4.4-13.el6 (i686)libgcc-4.4.4-13.el6 (x86_64)libstdc++-4.4.4-13.el6 (x86_64)libstdc++-4.4.4-13.el6.i686libstdc++-devel-4.4.4-13.el6 (x86_64)libstdc++-devel-4.4.4-13.el6.i686libaio-0.3.107-10.el6 (x86_64)libaio-0.3.107-10.el6.i686libaio-devel-0.3.107-10.el6 (x86_64)libaio-devel-0.3.107-10.el6.i686make-3.81-19.el6sysstat-9.0.4-11.el6 (x86_64)unixODBC-2.2.14-11.el6 (x86_64) or laterunixODBC-2.2.14-11.el6.i686 or laterunixODBC-devel-2.2.14-11.el6 (x86_64) or laterunixODBC-devel-2.2.14-11.el6.i686 or later执行以下命令就可把需要的包装上:yum install -y binutils-* libXp* compat-libstdc++-33-* elfutils-libelf-* elfutils-libelf-devel-* gcc-* gcc-c++-* glibc-* glibc-common-* glibc-devel-* glibc-headers-* ksh-* libaio-* libgcc-* libstdc++-* make-* sysstat-* unixODBC-* unixODBC-devel-*s******************************************************************************* 5.创建oracle用户组*******************************************************************************rac01test:[rootrac01test /]# groupadd -g 501 oinstall[root rac01test /]# groupadd -g 502 dba[root rac01test /]# groupadd -g 503 asmadmin[root rac01test /]# groupadd -g 504 asmdba[root rac01test /]# groupadd -g 505 asmoper[root rac01test /]# useradd -u 501 -g oinstall -G asmadmin,asmdba,asmoper grid[root rac01test /]# useradd -u 502 -g oinstall -G dba,asmdba oracle[root rac01test /]# passwd oracle[root rac01test /]# passwd gridrac02test:[root rac02test yum.repos.d]# cd /[root rac02test /]# groupadd -g 501 oinstall[root rac02test /]# groupadd -g 502 dba[root rac02test /]# groupadd -g 503 asmadmin[root rac02test /]# groupadd -g 504 asmdba[root rac02test /]# groupadd -g 505 asmoper[root rac02test /]# useradd -u 501 -g oinstall -G asmadmin,asmdba,asmoper grid[root rac02test /]# useradd -u 502 -g oinstall -G dba,asmdba oracle[root rac02test /]# passwd oracle[root rac02test /]# passwd grid******************************************************************************* 6.修改核参数*******************************************************************************rac01test:[root rac01test /]# vi /etc/sysctl.conffs.aio-max-nr = 1048576fs.file-max = 6815744kernel.shmall = 2097152kernel.shmmax = 536870912kernel.shmmni = 4096kernel.sem = 250 32000 100 128net.ipv4.ip_local_port_range = 9000 65500net.core.rmem_default = 262144net.core.rmem_max = 4194304net.core.wmem_default = 262144net.core.wmem_max = 1048576rac02test:[root rac01test /]# vi /etc/sysctl.conffs.aio-max-nr = 1048576fs.file-max = 6815744kernel.shmall = 2097152kernel.shmmax = 536870912kernel.shmmni = 4096kernel.sem = 250 32000 100 128net.ipv4.ip_local_port_range = 9000 65500net.core.rmem_default = 262144net.core.rmem_max = 4194304net.core.wmem_default = 262144net.core.wmem_max = 1048576sysctl -p 查看核参数,以下是修改后的核参数[root rac01test /]# sysctl -pnet.ipv4.ip_forward = 0net.ipv4.conf.default.rp_filter = 1net.ipv4.conf.default.accept_source_route = 0kernel.sysrq = 0kernel.core_uses_pid = 1net.ipv4.tcp_syncookies = 1kernel.msgmnb = 65536kernel.msgmax = 65536kernel.shmmax = 68719476736kernel.shmall = 4294967296fs.aio-max-nr = 1048576fs.file-max = 6815744kernel.shmall = 2097152kernel.shmmax = 536870912kernel.shmmni = 4096kernel.sem = 250 32000 100 128net.ipv4.ip_local_port_range = 9000 65500net.core.rmem_default = 262144net.core.rmem_max = 4194304net.core.wmem_default = 262144net.core.wmem_max = 1048576*******************************************************************************7.修改oracle 用户能用的进程最大数量******************************************************************************* 注意:记得rac01test和rac01test都要修改rac01test[root rac01test /]# vi /etc/security/limits.conforacle soft nproc 2047oracle hard nproc 16384oracle soft nofile 1024oracle hard nofile 65536rac02test[root rac02test /]# vi /etc/security/limits.conforacle soft nproc 2047oracle hard nproc 16384oracle soft nofile 1024oracle hard nofile 655368.新建oracle的安装目录注意:两个节点都要创建mkdir -p /u01/app/oraInventorychown -R grid:oinstall /u01/app/oraInventorychmod -R 775 /u01/app/oraInventorymkdir -p /u01/11.2.0/gridmkdir -p /u01/app/gridchown -R grid:oinstall /u01/app/gridchown -R grid:oinstall /u01/11.2.0/gridchmod -R 775 /u01/11.2.0/gridmkdir -p /u01/app/oraclemkdir /u01/app/oracle/cfgtoollogschown -R oracle:oinstall /u01/app/oraclechmod -R 775 /u01/app/oraclemkdir -p /u01/app/oracle/product/11.2.0/db_1chown -R oracle:oinstall /u01/app/oracle/product/11.2.0/db_1chmod -R 775 /u01/app/oracle/product/11.2.0/db_1***************************************************************************** 9.创建分区***************************************************************************** 单节点执行即可[rootrac01test ~]# fdisk -lDisk /dev/sdb doesn't contain a valid partition table给/dev/sdb 磁盘分区[rootnode1 ~]# fdisk /dev/sdbm 帮助菜单p 打印分区表n 创建分区p 创建主分区d 删除一个主分区e 创建扩展分区扩展分区不能直接使用不能建文件系统和映射裸设备通过逻辑分区使用w 保存退出q 不保存退出创建完成后刷新一下[root rac01test ~]partprobe[root rac02test ~]partprobe查看刚分区的磁盘,下面sdb1到sdb5是刚分区的[root rac01test ~]# fdisk -lDisk /dev/sda: 21.4 GB, 21474836480 bytes255 heads, 63 sectors/track, 2610 cylindersUnits = cylinders of 16065 * 512 = 8225280 bytesDevice Boot Start End Blocks Id System/dev/sda1 * 1 131 1052226 83 Linux/dev/sda2 132 653 4192965 82 Linux swap / Solaris/dev/sda3 654 2610 15719602+ 83 LinuxDisk /dev/sdb: 21.4 GB, 21474836480 bytes255 heads, 63 sectors/track, 2610 cylindersUnits = cylinders of 16065 * 512 = 8225280 bytesDevice Boot Start End Blocks Id System/dev/sdb1 1 244 1959898+ 83 Linux/dev/sdb2 245 488 1959930 83 Linux/dev/sdb3 489 732 1959930 83 Linux/dev/sdb4 733 976 1959930 5 Extended /dev/sdb5 733 976 1959898+ 83 Linux磁盘映射,注意sdb4是扩展分区,不能使用节点1[root rac01test rules.d]# vi /etc/udev/rules.d/60-raw.rulesACTION=="add", KERNEL=="sdb1", RUN+="/bin/raw /dev/raw/raw1 %N" ACTION=="add", KERNEL=="sdb2", RUN+="/bin/raw /dev/raw/raw2 %N" ACTION=="add", KERNEL=="sdb3", RUN+="/bin/raw /dev/raw/raw3 %N" ACTION=="add", KERNEL=="sdb5", RUN+="/bin/raw /dev/raw/raw5 %N" KERNEL=="raw*", OWNER="grid" GROUP="asmadmin", MODE="660"节点2[root rac02test rules.d]# vi /etc/udev/rules.d/60-raw.rulesACTION=="add", KERNEL=="sdb1", RUN+="/bin/raw /dev/raw/raw1 %N" ACTION=="add", KERNEL=="sdb2", RUN+="/bin/raw /dev/raw/raw2 %N" ACTION=="add", KERNEL=="sdb3", RUN+="/bin/raw /dev/raw/raw3 %N" ACTION=="add", KERNEL=="sdb5", RUN+="/bin/raw /dev/raw/raw5 %N" KERNEL=="raw*", OWNER="grid" GROUP="asmadmin", MODE="660"[root rac01test rules.d]# start_udevStarting udev: [ OK ][root rac02test ~]# start_udevStarting udev: [ OK ] 分别查看,可以看到5块盘[rootrac01test rules.d]# raw -qa/dev/raw/raw1: bound to major 8, minor 17/dev/raw/raw2: bound to major 8, minor 18/dev/raw/raw3: bound to major 8, minor 19/dev/raw/raw4: bound to major 8, minor 20/dev/raw/raw5: bound to major 8, minor 21[root rac02test ~]# raw -qa/dev/raw/raw1: bound to major 8, minor 17/dev/raw/raw2: bound to major 8, minor 18/dev/raw/raw3: bound to major 8, minor 19/dev/raw/raw4: bound to major 8, minor 20/dev/raw/raw5: bound to major 8, minor 21***************************************************************************** 10.配置互信******************************************************************************* 互信oracle 用户和grid用户都要执行(只在一个节点执行即可)脚本在/soft/grid/sshsetup目录下,第一个脚本用grid用户执行,第二个脚本用oracle用户执行./sshUserSetup.sh -user grid -hosts " rac01test rac01test " -advanced -noPromptPassphrase./sshUserSetup.sh -user oracle -hosts "node3 node4" -advanced -noPromptPassphrase******************************************************************************* 11.检测互信*******************************************************************************请注意,当您使用ssh 第一次访问远程主机时,其RSA 密钥将是未知的,从而将提示您确认是否希望连接该主机。
Oracle11gR2RAC+ASM+Grid安装(⼀)环境准备主机操作系统windows10虚拟机平台vmware workstation 12虚拟机操作系统redhat 5.5 x86(32位) :Linux.5.5.for.x86.rhel-server-5.5-i386-dvd.isogrid版本linux_11gR2_grid.zip (32位)oracle版本linux_11gR2_database_1of2 和 linux_11gR2_database_2of2(32位)共享存储ASM(⼆)操作系统安装(2.1)操作系统安装操作系统安装相对⽽⾔较简单,不做详述。
系统的配置信息⼤致如下,后⾯还会根据需要添加和删除设备(2.2)安装VM Tools为了⽅便在主机与虚拟机之间进⾏⽂件拖拽、复制粘贴、使⽤共享⽂件夹等功能,我们需要安装VM Tools,VM Tools的安装包已经集合在了vmware workstation⾥⾯了。
下⾯⼀步⼀步安装VM Tools。
step 1:虚拟机-> 安装Vmware Toolsstep 2: mount查看是否装载 VMware Tools 虚拟 CD-ROM 映像,如果有红⾊部分,说明已经将VM tools安装包mount在了/media⽬录下step 3:转到安装⽬录/tmp,解压VM tools安装包step 4:开始安装VM Tools[root@Redhat tmp]# cd vmware-tools-distrib[root@Redhat vmware-tools-distrib]#./vmware-install.pl遇到选项,直接回车即可。
step 5:安装结束,重启虚拟机[root@rac1 ~]# rebootstep6:测试VM Tools安装是否成功从主机拖到⼀个⽂档到虚拟机,如果拖动成功,说明VM Tools已经安装成功(三)操作系统配置(3.1)⽹络配置(3.1.1)主机名配置①节点1:[root@rac1 ~]# vim /etc/sysconfig/networkNETWORKING=yesNETWORKING_IPV6=noHOSTNAME=rac1②节点2:[root@rac2 ~]# vim /etc/sysconfig/networkNETWORKING=yesNETWORKING_IPV6=noHOSTNAME=rac2(3.1.2)IP配置为了使⽤静态IP配置数据库,我⼜为每台虚拟机新增加了⼀块⽹卡,将其配置成only-host模式,新增⽹卡⽅式如下:step1:添加⽹络点击vmware的“编辑”-> “虚拟⽹络编辑器”-> “更改设置”-> “添加⽹络”,按下图选择,保存step2:在两台虚拟机上添加⽹卡选择虚拟机,“设置”->“添加”->“⽹络适配器”,选择“⾃定义”,这个⾃定义是我们上⼀步定义的⽹络,结果如下:step3:根据⽹络设置,我们规划IP地址如下:接下来就是配置IP地址了,对于节点1(主机名:rac1),我们:①配置eth1--或删除BOOTPROTO--不要修改硬件地址--设置⽹卡为开机启动--增加IP和MASK[root@rac1 ~]# vim /etc/sysconfig/network-scripts/ifcfg-eth1#修改下⾯红⾊部分# Advanced Micro Devices [AMD] 79c970 [PCnet32 LANCE]DEVICE=eth1# BOOTPROTO=dhcpHWADDR=00:0C:29:9C:DF:6AONBOOT=yes IPADDR=192.168.19.10NETMASK=255.255.255.0②配置eth2[root@rac1 ~]# vim /etc/sysconfig/network-scripts/ifcfg-eth2# 修改红⾊部分# Advanced Micro Devices [AMD] 79c970 [PCnet32 LANCE]DEVICE=eth2# BOOTPROTO=dhcpONBOOT=yesHWADDR=00:0C:29:6G:8C:5F=192.168.15.10NETMASK=255.255.255.0对于节点2(主机名:rac2),我们参照节点1即可:①配置eth1[root@rac2 ~]# vim /etc/sysconfig/network-scripts/ifcfg-eth1 # Advanced Micro Devices [AMD] 79c970 [PCnet32 LANCE] DEVICE=eth1# BOOTPROTO=dhcp ONBOOT=yesHWADDR=00:0c:29:b0:4e:b6IPADDR=192.168.19.11NETMASK=255.255.255.0②配置eth2[root@rac2 ~]# vim /etc/sysconfig/network-scripts/ifcfg-eth2 # Advanced Micro Devices [AMD] 79c970 [PCnet32 LANCE] DEVICE=eth2# BOOTPROTO=dhcpONBOOT=yesHWADDR=00:0c:29:b0:4e:c0IPADDR=192.168.15.11NETMASK=255.255.255.0(3.1.3)hosts⽂件配置在2个节点上配置hosts⽂件,以节点1为例[root@rac1 ~]# vim /etc/hosts# 在⽂件的最后⾯加上#eth1 public192.168.19.10 rac1192.168.19.11 rac2#virtual192.168.19.12 rac1-vip192.168.19.13 rac2-vip192.168.15.10 rac1-priv192.168.15.11 rac2-priv#scan192.168.19.14 rac-scan配置完成后,重启⽹卡[root@rac1 ~]# service network restart重启⽹卡时,遇到了⼀个⼩错误,提⽰:Device eth2 has different MAC address than expected, ignoring.[FAILED]看了其他⼈的⽂章,发现是⽹卡配置⽂件⾥⾯的MAC地址与实际虚拟机的MAC地址不⼀样,解决办法如下:step1:查看本机实际MAC地址(红⾊部分)[root@rac1 ~]# ifconfig eth2eth2 Link encap:Ethernet HWaddr 00:0C:29:9C:DF:7Einet addr:192.168.15.10 Bcast:192.168.15.255 Mask:255.255.255.0inet6 addr: fe80::20c:29ff:fe9c:df7e/64 Scope:LinkUP BROADCAST RUNNING MULTICAST MTU:1500 Metric:1RX packets:30677 errors:0 dropped:0 overruns:0 frame:0TX packets:26377 errors:0 dropped:0 overruns:0 carrier:0collisions:0 txqueuelen:1000RX bytes:15839769 (15.1 MiB) TX bytes:10819637 (10.3 MiB)Interrupt:83 Base address:0x2824step2:查看我们配置的MAC地址[root@rac1 ~]# vim /etc/sysconfig/network-scripts/ifcfg-eth2# 修改红⾊部分# Advanced Micro Devices [AMD] 79c970 [PCnet32 LANCE]DEVICE=eth2# BOOTPROTO=dhcpONBOOT=yesHWADDR=00:0C:29:6G:8C:5FIPADDR=192.168.15.10NETMASK=255.255.255.0发现我们配置的MAC地址与实际的MAC地址不⼀样,修改⽹卡step2⾥⾯的MAC地址,重启⽹卡。
ASM中的offline和drop操作当一个ASM磁盘不可用时,ASM会把它从磁盘组里移除,对吗?要看情况,通常取决于ASM版本和磁盘组的冗余级别。
因为一个external冗余的磁盘组会直接被dismount,所以主要关注normal和high冗余磁盘组的情况。
ASM 10g版本,磁盘会被直接drop。
从11gR1,一个磁盘不可用时会先被offline,此时disk repair计时器开始介入,如果计时器达到磁盘组DISK_REPAIR_TIME 属性值时,这个磁盘会从所属的磁盘组中drop 掉。
如果这个磁盘在计时器过期前恢复可用,那么它的状态会变回online,不会被drop。
但是ASM是如何发现磁盘恢复可用又有什么机制将它恢复online呢?当一个磁盘不能被ASM或者ASM客户端读或写时,会被认为不可用。
数据库是一种典型的ASM客户端,但ASM客户端并不只限于是数据库。
磁盘会因为各种原因变成不可用,本地硬盘的SCSI线缆受损,存储的SAN交换机或者网络故障,NFS空间的服务器故障,双活场景的站点故障,又或是磁盘本身故障等各种场景。
无论是哪种情况,ASM或者是ASM客户端会报IO错误,然后ASM会进行相应的处理。
在ASM 10G时,ASM会立即Drop变成不可用的磁盘。
这会触发一个尝试恢复数据冗余的重平衡操作。
一旦重平衡过程完成,数据冗余度会恢复,同时磁盘会被移除出磁盘组。
一旦磁盘不可用的故障被解决,可以通过alter diskgroup命令将磁盘重新添加回磁盘组。
例如:alter diskgroup DATA add disk 'ORCL: DISK077'; 这又会再次触发一个重平衡操作,一旦重平衡过程完成,磁盘会恢复成为磁盘组成员。
但是如果多个磁盘同时发生故障,又或者一个磁盘故障在重平衡过程中又有磁盘故障会导致什么结果?这取决于多个因素,磁盘组的冗余度、磁盘是否来自于相同或不同的failgroup和故障磁盘是否是partner关系。
11gr2 ASM安装准备工作(linux)1.检查a.At least 1 GB of RAMb.Swap Area needs to be set as follow:If RAM = 1024MB to 2048Mbthen 1.5 times RAMelseif RAM > 2048MB and < 8192MBthen match RAMelse RAM > 8192MBthen .75 times RAMc.Between 150 and 200 MB of disk space in the /tmp directory[root@localhost database]# grep MemTotal /proc/meminfoMemTotal: 2058496 kB[root@localhost database]# free -mtotal used free shared buffers cached Mem: 2010 586 1423 0 43 363 -/+ buffers/cache: 179 1830Swap: 2047 0 2047[root@localhost database]# df -k /tmpFilesystem 1K-blocks Used Available Use% Mounted on/dev/sda1 48755468 22921876 23317012 50% /d.checking packagebinutils-2.17.50.0.6-2.el5compat-libstdc++-33-3.2.3-61elfutils-libelf-0.125-3.el5elfutils-libelf-devel-0.125gcc-4.1.1-52gcc-c++-4.1.1-52glibc-2.5-12glibc-common-2.5-12glibc-devel-2.5-12glibc-headers-2.5-12libaio-0.3.106libaio-devel-0.3.106libgcc-4.1.1-52libstdc++-4.1.1libstdc++-devel-4.1.1-52.e15make-3.81-1.1numactl-devel-0.9.8.i386sysstat-7.0.02.Oracle Installation Owner Shell Limits:Add the following lines to /etc/profile to set shell limits for the user oracle:umask 022if [ \$USER = "oracle" ]; thenif [ \$SHELL = "/bin/ksh" ]; thenulimit -p 16384ulimit -n 65536elseulimit -u 16384 -n 655363.内核参数:a.Edit the /etc/sysctl.conf and add the next kernel parameters:fs.file-max = 512 * PROCESSESkernel.shmall = 2097152kernel.shmmax = 2147483648kernel.shmmni = 4096kernel.sem = 250 32000 100 128net.ipv4.ip_local_port_range = 1024 65000net.core.rmem_default = 4194304net.core.rmem_max = 4194304net.core.wmem_default = 262144net.core.wmem_max = 262144net.ipv4.tcp_wmem = 262144 262144 262144net.ipv4.tcp_rmem = 4194304 4194304 41943044. Shell Limits for the oracle User:a. Add the following lines to the /etc/security/limits.conf file:oracle soft nproc 2047oracle hard nproc 16384oracle soft nofile 1024oracle hard nofile 65536b.Add or edit the following line in the /etc/pam.d/login file:session required pam_limits.so5. Creating Operating System Groups and Users:The following operating system groups and user are required if you are installingOracle Database:The OSDBA group (dba): 他确定了操作系统具有数据库管理权限(sysdba权限)The OSOPER group (oper): 这是一个可选的组。
ASM 11gR1 Installation & Configuration A) This document explains, in detail, the steps required to install the Oracle Server 11gR1 (11.1.0.6.0), create an ASM instance and diskgroups through the OUI (Oracle Universal Installer).B) Note: Before start with the installation, please check the required hardware & OS requirements in the next manual:/pls/db111/portal.portal_db?selected=11&frame=#linux_installatio n_guidesOracle® Database Installation Guide11g Release 1 (11.1) for <your specific platform>Installation steps:1) Download the “Oracle Database 11g Release 1 (11.1.0.6.0)” for Linux x86 (1.7 GB) to your desktop:/technology/software/products/database/index.html=)> Oracle Database 11g Release 1 (11.1.0.6.0) for Linux x86==)> linux_11gR1_database_1013.zip (1,844,527,800 bytes) (cksum - 1044354138) 2) Connect as root OS user & create a new subdirectory on the “/u01/stage” directory:3) Transfer the “linux_11gR1_database_1013.zip” file (as root user) to your host, (for this example, you will need to place it on the “/u01/stage/11.1” directory).4) Uncompress the “linux_11gR1_database_1013.zip” file (as root user):5) Connect as “oracle” OS user thru a graphical session and set the environment variables for the ASM Oracle Home release 11.1 (11gR1) :[oracle@asmteam ~]$ export ORACLE_HOME=/u01/app/11.1/asm[oracle@asmteam ~]$ export ORACLE_SID=+ASM[oracle@asmteam ~]$ export PATH=$ORACLE_HOME/bin:$PATH6) Verify the environment variables were set:7) Change to the staging area directory (/u01/stage/11.1/database) and run the OUI associated with the Oracle Server release 11gR1:8) At the “Select a Product to Install” screen you will need to chose “Advanced Installation” & then press the [Next] button:9) At the “Specify Inventory directory and credentials” screen you will need to provide the Oracle Inventory location, for this example specify “/u01/app/oraInventory“ in the “Enter the full path of the inventory directory” text box, then at the “Specify Operating System group name” make sure “oinstall” is selected & then press the [Next] button:10) At the “Select Installation Type” screen you will need to chose “Enterprise Edition (3.18GB)” & then press the [Next] button:11) At the “Specify Home Details” screen you will need to provide “/u01/app/oracle” in the “Oracle Base” text box, then populate the “Name” text box with the “OraDb11g_home1ASM” name, in the “Path” text box introduce “/u01/app/11.1/asm” for the ASM Oracle Home location & then press the [Next] button:12) At the “Product - Specific Pre Requisite Checks” screen you will receive the “Checking for ip_local_port_range=1024 - 65000; ip_local_port_range=9000 - 65500.Failed <<<<” warning, but the “Oracle® Database Installation Guide 11g Release 1 (11.1)” manual states:/docs/cd/B28359_01/install.111/b32281/toc.htm#LADQI123ip_local_port_range Minimum: 9000 Maximum: 65500Note: Ignore any Oracle Universal Installer warnings related to this parameter.So please check the [X] check box associated with the “Checking kernel parameters” option to ignore the warning and accept the current kernel OS setting & then press the [Next] button:13) At the “Select Configuration Option” screen you will need to chose “Configure Automatic Storage Management (ASM)”, provide the ASM password (“oracle”) & thenpress the [Next] button:14) At the “Configure Automatic Storage Management” screen, specify “DATA” as diskgroup in the “Disk Group Name” text box, chose “Normal” at the “Redundancy” section, at the “Add Disks” section select the “ORCL:ASMDISK1” & “ORCL:ASMDISK2” ASMLIB disks only & then press the [Next] button:Note: If Candidate disks are not displayed, then press on the [Change Disk Discovery Path] button and set the discovery string (ORCL:*) & press the [Ok ] button:15) At the “Privileged Operating System Groups” screen, select “dba” for the “OSDBA” group, “oinstall” for the “OSOPER” group & “oinstall” for the “OSASM” group. Then press the [Next] button:16) At the “Oracle Configuration Manager Registration” screen press the [Next] button:17) At the “Summary” press the [Next] button to start with the installation:18) Monitor the progress of the installation through the following screen:19) At the end of the installation, the OUI will ask to execute the “orainstRoot.sh” & “root.sh” scripts as root user:10) Through another session, connect as root user, and execute the “orainstRoot.sh” & “root.sh” scripts:11) Return to the previous OUI screen and press the [OK] button:12) The “Configuration Assistance” screen will start executing the NETCA & DBCA to setup the Listener & ASM respectively, at the end press the [Next] button:13) Press the [Exit] button at the “End of Installation” screen:14) Verify the CSS (Cluster Synchronization Service) is up and running (connected as “oracle” OS user) as follow:15) Verify the ASM instance is up & the diskgroup(s) is/are mounted (connected as “oracle” OS user first & then through SQL*Plus as “sysasm”) as follow:16) The Oracle Server 11gR1 (11.1.0.6.0) was installed and the ASM instance successfully created along with the DATA diskgroup.17) Finally remove the “/u01/stage/11.1/database” directory to release space (as “root” user):# rm -rf /u01/stage/11.1/database。