QSmartSPC部署安装手册
- 格式:pdf
- 大小:2.76 MB
- 文档页数:46

“事件驱动的车间管理模式”安灯系统的应用及解决方案来源:太友科技—一、安灯系统(QSmart Andon系统)“生产现场顺畅运行,支持部门可轻松待命,现场异常出现,立即启动事件驱动流程,各支持部门进行紧急处理”。
在当前企业的管理中,生产现场的异常情况是影响生产顺畅运行的主要原因,如设备状况、品质问题、物料短缺等各种情况,生产现场与支持部门常常是采用电话进行信息的沟通,常常会出现沟通不顺畅等问题,而对于异常事件,支持部门的响应速度等也常常使问题不能及时有效地得到解决,这些因素常常影响生产现场的效率,同时对于产品品质的提升也是一个阻碍。
Andon系统(又称为安灯系统或暗灯系统),其常应用在重工行业的装配生产线上,由于科技的发展及计算机技术的推动,传统的Andon系统已经越来越多应用在其它行业的生产线中,并取得良好的效益,使生产现场的管理更加有序,对于生产现场的异常状况能够及时得到支持部门的响应,使得现场的异常状况能够得到及时有效的处理。
二、安灯系统的作用Andon系统虽然起源于汽车行业,但当前其应用已不仅只限于汽车行业的现场管理,已在各类制造行业的生产线上得以推广及应用,并取得良好的效果,对于现场品质、设备、物料的管理发挥出其重要的作用。
1、当工位或生产线上有异常状况(如品质、设备、物料等问题)产生时,即时发出信息,寻求相关支持部门帮助;2、推动管理层和支持部门“巡视发现”生产线上的问题并采取行动;3、系统跟踪异常状况到问题解决的整个流程,促使解决问题流程的实施;4、系统搜集数据,识别问题发生最多的地方,并进行改善5、传递各工位或生产线的实时状态信息,建立透明化的生产现场;三、Andon系统物理结构示意图结构说明:1、现场信息采集装置:现场可根据客户需要采用两种模式的信息发送装置,按钮模式或数据采集仪模式。
当生产现场出现如设备故障等异常状况时,现场人员可通过按钮点亮相应的警示灯或者直接通过触摸屏进行操作。


INSTALLATION AND MOUNTING MANUALHyperSpike® TCPA-10This manual contains information that is proprietary to Ultra Electronics – USSI. It is intended solely for the education and use of parties operating and maintaining the equipment described herein.ISSUE DATE: 10/16/2017ORIGINAL ISSUE DATE RELATED TO MOUNTING AND WIRING DIAGRAM ONLY.CHANGE TO ISSUE DATE WILL AFFECT RELATED LABELS.- - - - - - - - - - - - - - - - - - - - - - - - - - - - - - - - - - - - - - - - WARNING - - - - - - - - - - - - - - - - - - - - - - - - - - - - - - - - - - - - - - - - EXPORT, RE-EXPORT, AND TRANSFER OF THIS TECHNICAL DATA IS REGULATED BY US EXPORT ADMINISTRATION REGULATIONS AND MAY BE SUBJECT TO LICENSING REQUIREMENTS FROM THE BUREAU OF INDUSTRY AND SECURITY.- - - - - - - - - - - - - - - - - - - - - - - - - - - - - - - - - - - - - - - - - - - - - - - - - - - - - - - - - - - - - - - - - - - - - - - - - - - - - - - - - - - - - - - - -Page 11.0 INTRODUCTIONThe TCPA-10 family consists of the TCPA-10 4 Ohm, TCPA-10 8 Ohm, and the TCPA-10Distributed Audio. The TCPA-10 4 Ohm and TCPA-10 8 Ohm are Direct Drive systems, useful for public address applications. The TCPA-10 Distributed Audio system is meant for use with fire alarm systems.All TCPA-10 series speaker systems are designed for indoor or outdoor wet applications. TheTCPA-10 produces 90 degrees of acoustic energy and excels in high ambient noise environments. It has an operating temperature range of -40°C to 60°C.1.1. TCPA-10 Direct Drive SpeakerThe TCPA-10 can be configured as an 8 ohm or 4 ohm nominal speaker.Models: 90219A-800-00-LCertification:N/A – Uncertified versionsL – UL 1480 and Class I Division 2, Group A, B, C and D certifiedColor Code: 01 – Black 04 – Gray 05 – Red 06 – WhiteImpedance: 801 – 8 Ohm 802 – 4 OhmTCPA Direct Drive Specifications:* UL Standard SPL MeasurementFrequency Response: 400 Hz – 4000 Hz Directionality: See Figure 1 Weight: 9 lbDimensions: 10.1” H X 10.1” W X 11.3” LSuitable for Outdoor Use (Adapté à l'utilisation externe)Input VoltageImpedance dB SPL (Peak @ 1m)dB SPL (Max @ 1m)* dB SPL (Reverb @ 10ft)Usable Range (Feet @ 80dB)22 8 Ohm 139 134 112 1,640 224 Ohm1421371142,320Page 21.2. TCPA-10 Distributed Audio SpeakerThe TCPA-10 Distributed Audio speaker has five field-selectable power taps that run off of 25 V, 70 V, and 100 VRMS audio systems. The taps can easily be set by turning a slotted selector switch. The speaker has an integrated DC blocking capacitor that allows the fire alarm control panel to conduct circuit supervision. Models:90215A-801-00-LCertification:N/A – Uncertified versionsL – UL 1480 and Class I Division 2, Group A, B, C and D certifiedColor Code: 01 – Black 04 – Gray 05 – Red 06 – WhiteTCPA-10 Distributed Audio Specifications:* UL Standard SPL MeasurementFrequency Response: 400 Hz – 4000 Hz Directionality: See Figure 1Max Supervisory Voltage: 50 VDC Weight: 9 lbDimensions: 10.1” H X 10.1” W X 11.3” LSuitable for Outdoor Use (Adapté à l'utilisation externe)Input VoltageWatts dB SPL (Peak @ 1 m)dB SPL (Max @ 1 m)* dB SPL (Reverb @ 10 ft)Usable Range (Feet @ 80 dB)25 0.5 119 114 90 160 25 1 122 117 96 230 25 1.5 124 119 98 290 25 2 126 121 99 360 25 3 128 123 100 460 70 4 129 124 102 520 70/100 8 131 126 104 650 70 12 133 128 107 820 70/100 16 134 129 107 920 70/100 24 136 131 109 1,160 100 32 137 132 110 1,300 100451391341121,640CAUTION: EXCEEDING THE MAXIMUM RATINGS OF THE SPEAKER WILL CAUSE EXCESSIVE DISTORTION AND MAY CAUSE PERMANENT DAMAGE TO THE SPEAKER AND ITS INTERNAL COMPONENTS.MISE EN GARDE: TOUT DÉPASSEMENT DES VALEURS NOMINALES MAXIMALES DU HAUT-PARLEUR ENTRAÎNERA UNE DISTORSION EXCESSIVE ET PEUT PROVOQUER DES DOMMAGES IRRÉVERSIBLES SUR LE HAUT-PARLEUR ET SES COMPOSANTS INTERNES.Figure 1: Dispersion Characteristics at 3 meters as measured by UL LabsPage 2Page 31.3. Optional AccessoriesFigure 2: Optional Accessory KitsOPTIONAL ACCESSORY LIST ITEM PART NUMBER DESCRIPTION 1 72377B-801 WALL MOUNT BRACKET2 72378B-801DUAL UNIT MOUNTINGADAPTER3 72379B-801POLE MOUNT ADAPTER 490172A-807AMPLIFIER KIT(Direct Drive)43212.0 TCPA-10 MOUNTINGWARNING: WHEN MOUNTING OUTSIDE MAKE SURE THAT THE SUPPORT SYSTEM USED HAS THE PROPER WIND LOAD RATING AND COMPLIES WITH LOCAL STANDARDS AND CODES.AVERTISSEMENT : EN CAS DE MONTAGE EXTERNE, ASSUREZ-VOUS QUE LE SYSTÈME DE SUPPORT UTILISÉ A UNE CHARGE DE VENT NOMINALE APPROPRIÉE ET QU'IL EST CONFORME AUX NORMES ET CODES LOCAUX.This equipment is suitable for indoor or outdoor wet location use in Class I Division 2, Groups A, B, C, D; or Non-Hazardous locations only.Temperature Code: T5The TCPA-10 comes standard with a mounting bracket from which to mount the unit. TheTCPA-10 is provided with three feet of electrical leads in a ¼ Trade Size flexible conduit exiting the back of the unit (¼ Trade Size Conduit has a nominal Ø.39” ID / Ø.57” OD).Mounting Bracket¼ Trade SizeConduitFigure 3: Mounting BracketPage 42.1. Single MountThe TCPA-10 is intended to be hung from the mounting bracket. A typical mount will usea wall bracket. A double mounting bracket is available for hanging two speakers togetherfor 180° of broadcast coverage (see section 2.2).1) To mount a single TCPA-10, attach the mounting bracket to the wall bracket (optionalaccessory or customer supplied) with three ¼-20 bolts (Figure 4).Figure 4: Attaching Wall Mounting Bracket2) Attach the mounting bracket to the wall or pole with appropriate hardware according tolocal codes and safety practices.Page 52.2. Dual Mount1) To mount two TCPA-10 systems to the same wall mounting bracket, use an optional DualUnit Mounting Adapter. Attach the dual mount plate to the TCPA-10 mounting brackets with the hardware provided in the kit (Figure 5).Figure 5: Attaching a Dual Mount Plate2) Attach the wall mount bracket to the middle holes of the dual mount plate with three ¼-20bolts (Figure 6).Figure 6: Attaching Dual Speaker System to a Wall Mounting BracketPage 63) Attach the mounting bracket to the wall or pole with appropriate hardware according tolocal codes and safety practices.2.3. Tether Attachment1) A tether cable may be attached to all speakers by looping the cable through the large holein the TCPA-10 mounting bracket (Figure 7).Figure 7: Tether Attachment PointPage 73.0 SETTING THE POWER LEVEL – Distributed Audio version only1) To set the power level, use a slotted screwdriver.2) Turn the selector switch clockwise to the stop. This is the .5/4/8 Watt setting.3) To change to a higher setting, count clicks as you turn the switch counter-clockwise to1/8/16 W, 1.5/12/24 W, 2/16/32 W or 3/24/45 W (Figure 8).4) Note that the slot direction does not indicate the setting.Figure 8: Power Selection SwitchWARNING: AFTER INSTALLATION, VERIFY THAT THE SPL AT THE MINIMUM HEARING DISTANCE OF 10 FEET IS LESS THAN 120 DECIBELS (A).AVERTISSEMENT : APRÈS L'INSTALLATION, VÉRIFIEZ QUE LE SPL À LA DISTANCE D'ÉCOUTE MINIMALE DE 3,3 MÈTRES (10 PIEDS) EST INFÉRIEUR À 120 DÉCIBELS (A).Page 84.0 FIELD WIRINGWARNING: EXPLOSION HAZARD. DO NOT DISCONNECT THE EQUIPMENT UNLESS POWER HAS BEEN SWITCHED OFF OR UNLESS THE AREA IS KNOWN TO BE NON-HAZARDOUS.AVERTISSEMENT : RISQUE D'EXPLOSION. NE DÉBRANCHEZ PAS L'ÉQUIPEMENT AVANT DE L'AVOIR MIS HORS TENSION OU SAUF SI LA ZONE EST CONNUE POUR ÊTRE NON DANGEREUSE.4.1. Cable RoutingAll TCPA-10 systems come with a three-foot long weather-proof ¼ Trade Size flexible conduit and 42” leads.Route the conduit to a junction box approved by local electrical codes and standards.Follow your integrator’s instructions for installing into an appropriate junction system.4.2. Wiring DiagramsThe 4 ohm (Direct Drive) and Distributed Audio systems have four lead wires. The 4 and 8 ohm should be wired as shown below. The duplicate wires on the Distributed Audio is for placing multiple units in series (i.e. multiple TCPA-10s on the same Distributed Audio line).DirectDriveDistributedAudioDirectDriveFigure 9: TCPA-10 Wiring DiagramsPage 95.0 WARRANTYUltra Electronics – USSI warrants its products to be free from defects in material and workmanship for a period of one (1) year from the date of shipment from USSI’s facility. This warranty is extended to the original purchaser and all subsequent owners, provided a copy of the original dated bill of sale is presented when service is requested under warranty.If your product should require service, write, phone, fax or e-mail Ultra Electronics – USSI at:Ultra Electronics – USSI4868 East Park 30 DriveColumbia City, IN 46725Phone: 260-248-3665Fax: 260-248-3510E-mail: ********************************URL: We will either direct you to a local service agency or provide you with a Return Material Authorization (RMA) number so that you can ship the product to our factory. Do not ship the product to us without first obtaining an RMA number. Place the RMA number on all boxes returned to the factory to prevent equipment from being lost or mishandled. Merchandise returned to us for service under warranty must be accompanied by a copy of the original bill of sale, and shipped prepaid. You are responsible for transporting your product to our factory. We will pay the return shipping charges on all products repaired under warranty.5.1. Failures Not Covered by This WarrantyThis warranty covers manufacturing defects. The warranty DOES NOT cover:1) Damage caused by accident, misuse, abuse, product modification or neglect.2) Damage incurred during shipment (you must claim these damages from the carrier).3) Damage resulting from failure to operate the product in accordance with the instruction manual.4) Damage resulting from attempted repairs by unauthorized personnel.5) Claims based on any perceived agreement not explicitly stated in this warranty such asconversations with service personnel or sales representatives.5.2. Limitation of Implied WarrantiesAll implied warranties, including warranties of merchantability, are limited in duration to a period of one (1) year from the date of shipment from Ultra Electronics – USSI.5.3. Exclusion of Certain DamagesUltra’s liability is limited to the repair or replac ement, at our option, of any defective product, and shall in no event include incidental or consequential commercial damages of any kind. Some states do not allow the exclusion or limitation of incidental or consequential damages, so the preceding limitation or exclusion may not apply to you.For further information regarding this warranty, parts, or service, please contact Ultra Electronics – USSI through one of the methods listed at the beginning of this warranty section.Page 10Ultra Electronics – USSI4868 East Park 30 Drive Columbia City, IN 46725 USA +1-260-248-3666。
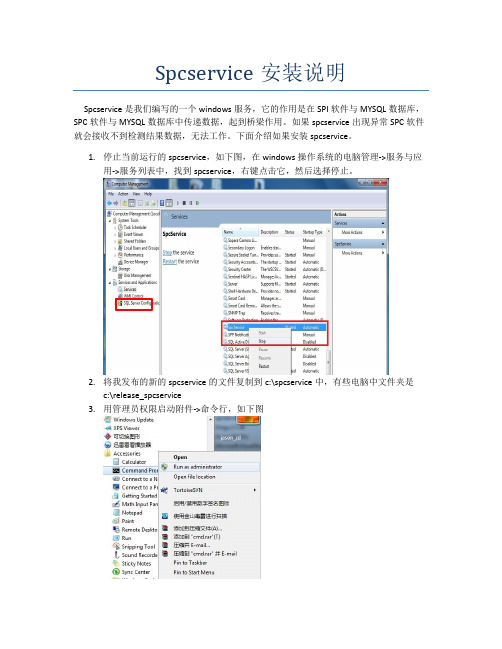
Spcservice安装说明
Spcservice是我们编写的一个windows服务,它的作用是在SPI软件与MYSQL数据库,SPC 软件与MYSQL数据库中传递数据,起到桥梁作用。
如果spcservice出现异常SPC软件就会接收不到检测结果数据,无法工作。
下面介绍如果安装spcservice。
1.停止当前运行的spcservice,如下图,在windows操作系统的电脑管理->服务与应
用->服务列表中,找到spcservice,右键点击它,然后选择停止。
2.将我发布的新的spcservice的文件复制到c:\spcservice中,有些电脑中文件夹是
c:\release_spcservice
3.用管理员权限启动附件->命令行,如下图
4.输入命令cd c:\spcservice 或者cd c:\release_spcservice,换行后再输入install.bat,
回车
5.电脑就会自动安装spcservice服务了,如果成功会显示如下图,我的截图是英文版,
客户处的电脑是中文版,语言不同,意思是一样的。
这样spcservice就安装成功并且自动启动了。
SmartQV7请访问智器官方网站 获取产品信息、技术支持和软件升级服务。
注意事项............................................01随配附件............................................02功能特性............................................03硬件规格............................................05认识产品............................................07升级固件............................................08● 开机................................................09● 开机界面.........................................09● 校准触摸屏.....................................09● 弹出右键菜单..................................09● 移动超过屏幕高度的窗口................10● 充电................................................10● 开始菜单.........................................10● 关机和挂起.....................................10● 快速启动栏.....................................10● 软键盘............................................11● 输入中文.........................................11● 音量调节.........................................12● 背光亮度及电源管理.......................12● 时间设置.........................................13● 连接电脑读写SD卡中的文件............14● HDMI 输出和TV-out 输出...............16● BT 下载...........................................17● RSS 订阅.........................................17● 即时通讯.........................................17● 浏览器.. (18)Ubuntu Linux 操作系统部分基本操作............................................08功能说明............................................15● 影音................................................15● 互联网............................................17................● PPS 在线视频播放...........................18● 电子邮件.........................................19● 个人信息管理..................................20● 文字处理.........................................20● 电子书阅读.....................................20● 电子表格.........................................21● 宝石方块.........................................22● 连连看............................................22● PDF 文档浏览..................................23● 图片查看.........................................23● 画图................................................23● 文件管理器.....................................24● 软件包安装.....................................24● 压缩文件管理.................................25● 查找文件及目录..............................25● 电子辞典.........................................26● 终端................................................27● 计算器............................................27● 记事本............................................27● 3G 连接...........................................28● Language ......................................28● 外观设定.........................................28● 无线网络.........................................29● 窗口主题.........................................32● 系统设置.........................................32● 蓝牙................................................33● 办公................................................20● 游戏................................................22● 图像................................................23● 系统工具........................................24● 附件................................................25● 首选项............................................28● 运行................................................38使用技巧及疑难问题解答...................39● 系统设置.........................................45● 安装和运行应用程序.......................46● 触摸屏校验.....................................4647Android 操作系统部分开机与关机........................................42桌面...................................................43按键...................................................44主菜单操作........................................45时间日期设置.....................................WIFI 无线连接操作.............................47网页浏览............................................48音乐播放............................................48............................................Windows CE 操作系统部分开机与关机........................................49按键...................................................50系统设置............................................51● 触摸屏校验.....................................51● 日期与时间设置..............................51● 背光、USB 、WIFI 和蓝牙................52● WIFI 网络连接.................................52● 蓝牙连接.........................................53● 输入面板.........................................53● 软键盘和输入法..............................53● 音量和声音设置..............................54● 电源属性.........................................54● 系统显示设置..................................54● 通过USB 连接PC 机..........................55● 文件浏览程序..................................56● 网络浏览器.....................................56● 音乐播放器.....................................57● 视频播放器.....................................57● QQ 客户端程序................................58应用程序............................................56应用程序安装. (58)注意事项●●●●●●●●●●本产品是高精密电子产品 , 请勿自行拆卸。

太友QSmart SPC品质数据分析端软件
QSmart SPC软件为太友科技自主研发的一套成熟软件,目前已经在各行业中有超过十年的应用历史,我们可根据用户的需求进行量身定制,建立最适合用户企业特点的品质过程控制系统。
其运行流程及管理环节关系图如下所示:
QSmart SPC提供两类独立的分析端供用户进行品质数据分析以及品质的过程控制,一类侧重于严格的SPC控制,另一类侧重于实时监控以及灵活的数据分析,一般情况下用户可同时选用两类配合使用以达到全面的控制效果。
∙第一类为侧重于标准化的SPC流程控制 - QSmart SPC Monitor;
∙第二类为侧重于检测数据的实时监控 - QSmart SPC Real-Time;
QSmart SPC Monitor分析端应用场合特点
QSmart SPC Monitor 具有普遍的通用性,尤其是适合需要严格标准化的SPC控制流程的场合,例如需要满足国内外大客户对于SPC控制的审核要求,其操作模式的特点是:
QSmart SPC Real-Time分析端应用场合特点
QSmart Real-Time应用在需要进行实时监控,以及需要灵活组合数据进行分析的需求场合,其操作模式的特点为:。
SMART-PTT集群系统手册产品产品手册深圳卓智达科技有限公司2目录第1章开发目的 (3)第2章产品特点 (3)第3章产品功能 (4)3.1基本功能 (4)3.2用户呼叫优先级 (5)3.3历史记录回放 (5)3.4监听 (5)3.5认证与加密 (6)3.6用户功能设置 (6)3.7短信或电话激活 (6)3.8两级管理平台 (7)3.9客户端软件自动更新下载 (7)3.10数据备份恢复 (7)3.11可视化调度软件 (8)第4章技术实现 (9)4.1体系结构 (9)4.2交换服务器 (9)4.3系统管理平台 (10)4.4客户端软件 (10)第5章组网方案 (11)5.1公网连网方案 (11)5.2专网连网方案 (11)5.3WiFi 局域网方案 (12)3第1章开发目的传统对讲业务是集群通信中最广泛使用的一种通信调度工具,一般需要通过专门规划的无线通讯频率和专用的对讲承载工具、在一定的覆盖范围内实现,具有专用性、地域性的特点。
本公司利用各种无线接入技术(GPRS/CDMA 1x/EVDO/WCDMA/WiFi)实现的SMART-PTT 集群系统,则体现出与上述传统对讲机的差异性,可实现在移动通信网络覆盖的更大范围内实现灵活对讲,是对传统集群通信产品的功能的延伸和补充。
第2章产品特点�一按即通手机变成对讲机,呼叫接续快,支持单呼和组呼。
�一呼百应群组内用户容量大,群组呼叫,适用于现场指挥、现场协调的工作场景。
�跨域联动不受地域、距离限制,可实现远程的实时调度。
�发言管理实现分权限强行插入发言,优先下达紧急指令。
�组网简单依托中国移动通信网络,只需增加PTT 服务器可实现PTT 系统。
�与其它集群系统互通通过安装中间转换器,可以与TETRA、模拟对讲系统等其它集群系统互通。
4第3章产品功能3.1基本功能通讯功能是SMART-PTT 集群系统最基本的功能,包括如下基本功能:�固定群组呼叫用户进入固定群组后可以对所有在这个群组中的在线用户进行呼叫,同时也可以接听群组中其他用户的呼叫。
QMS质量手册:生产安装控制工作程序QMS质量手册:生产安装控制程序1.目的策划并在受控条件下进行生产安装,以确保满足顾客的要求和期望,对本公司的所有生产安装活动过程中产生的质量因素进行有效控制,确保质量管理体系正常运行并不断改进,实现质量方针、目标和指标。
2.适用范围适用于对生产安装提供的控制、生产安装过程的确认、标识和可追溯性、顾客财产、产品防护等因素的控制。
3.职责3.1技术生产部A.负责负责编制相应的规程及关键、特殊工序作业指导书;B.负责按要求执行生产安装任务;C.负责检测、标识及可追溯性控制,制定生产安装质量目标并执行检验及组织售后服务工作。
3.2市场部负责产品的交付4.程序4.1获得表述生产安装要求的信息4.1.1安装计划4.1.2技术生产部负责策划并确定生产和安装过程(见流程图)。
4.1.3技术生产部应依据获得的产品特性信息,考虑安装状况,结合实际安装能力,编制《生产计划表》,明确产品规格、数量、交货期及生产进度要求,并按工艺图进行生产安装。
4.2过程确认本公司的生产安装过程没有特殊过程4.3生产安装准备a)技术生产部依据顾客提供的图纸和技术文件,做好安装准备;b)依据《生产计划表》做好产品的元器件和辅料的准备,各种仪表设备工具保持良好状态。
4.4电器安装生产人员依据技术文件和图纸及工艺要求进行元器件安装,完成后向检验员报检。
4.4.1一次线安装生产人员依据技术文件和图纸及工艺要求继元器件安装合格后,进行一次线安装并报检。
4.4.2二次线安装生产人员依据技术文件和图纸及工艺要求继一次线安装合格后,进行二次线安装并报最终检验。
4.4.3现场安装合格出厂的产品依据合同要求,如需到使用现场安装的要按照《设备安装计划表》的要求进行现场安装和调试,运行正常后交付。
4.4.4技术生产部负责产品工艺过程的控制,每个工序完成后,提请检验员检验,使过程质量符合规定要求。
4.4.5检验员负责依据《检验规程》,对过程产品、最终产品进行检验,对需要粘贴3C 认证标识的产品,应对其一致性进行检验。