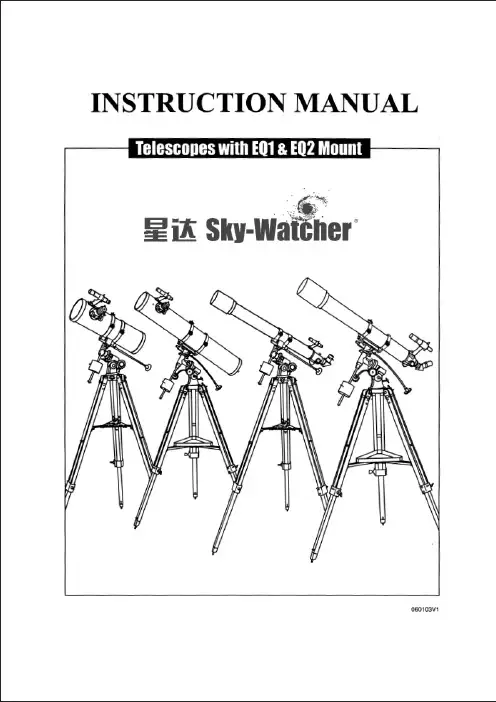
信达牛反天文望远镜SkyWatcher DOB8,10,12,14&16官方操作手册
- 格式:pdf
- 大小:5.77 MB
- 文档页数:17

自动寻星Sky-Watcher 信达ATP130反射式天文望远镜AZ GOTO自动寻星操作说明书小曾QQ1569638698;首先插入电源接好GOTO手柄,会出现如下如所示的初始界面,按右侧的ENTER(进入)得到图二(图一)图二所示是一个使用提示界面可以继续按ENTER进入下一个界面图三(图二)图三是经纬度输入界面,实现找好自己观测地的经纬度,通过数字直接输入,东西经度和南北维度可以通过方向键选择,输入之后点击ENTER进入下一个界面图四(图三)图四是所在地的时区设置,我们所处一般都为东八区,所以这项可以直接按ENTER进入图五(图四)图五是观测时的日期设置,通过数字键直接输入,完成之后按ENTER进入图六进行观测时的时间设置图七也可以直接按ENTER跳过进入图八图八也同样按ENTER进入图九进行经纬仪的校准(图八)如图九,是否进行亮星校准程序,按数字键1进行校准,按2放弃校准,如需校准则按1进入校准页面图十(图九)直接按ENTER进入图十一(图十)观察观测时各个天区有何亮星变选择那个天区进行校准,通过下方的上下键选择天区之后按ENTER进入图十二(图十一)选择某一亮星进行首星校准,按ENTER进入,此时的望远镜不会主动找寻首星,需要自己通过GOTO手柄的上下左右方向键调整方向,将首颗校准星准确地放入目镜视野的正中央,之后按ENTER进入第二颗星校准如图十三(图十二)选择好第二颗亮星之后按ENTER进行第二颗星校准,此时望远镜会自动指向第二课星,当然指向并不精确,所以还是需要用上下左右方向键将第二课星放入目镜视野正中央,之后点击ENTER会提示校准成功,如图十四(图十三)(图十四)校准成功提示(图十五)最后就可以选择自己想看的目标了,有M梅西耶天体、NGC天体、PLANET行星等天体,选择了目标之后按ENTER确定,按上下左右键盘可微调(图十六)校准准确度影响注意点(重要):第一:必须将三脚架调制完全水平第二:输入的观测地的经纬度时间越准确越好;第三在二星校准时,必须将亮星都移入目镜正中央,越中央,则校准越准确。
SKY WATCHER道布森望远镜254/1200其主镜是消球差的抛物面反射镜,副镜使用四臂支撑(臂厚0.5毫米),减少衍射影响和光能损失。
另外,这个规格包含一个2寸调焦座和一个1.25寸转接头,可以使用任何一个目镜。
这个规格还包含一个新的缩紧手柄。
10”道布森用的是PYREX玻璃SKY WATHCER 10寸道布森望远镜用的是Pyrex玻璃制造的主镜。
由于它非常低的膨胀率,温度变化对Pyrex玻璃的影响很小。
这样在不使用附加风扇的情况下,大大缩短了8寸以上望远镜的冷却时间。
低膨胀玻璃的良好稳定性保证了高质量的图象。
而且本身比普通平板玻璃更耐刮伤。
只在254mm/1200mm(10”)镜子上使用。
什么是道布森望远镜?为什么要用拉力控制手柄?20世纪70年代,John Dobson为流行的牛顿式反射制造了一个简洁漂亮的地平支架。
由于其简洁的构造,道布森支架在天文爱好者和望远镜制造商中很流行。
在其简洁的外型里,道布森支架包含一个盒子,这个盒子把镜筒装在高度轴里,盒子本身可以在地平方位旋转。
道布森支架一般是依靠望远镜镜筒侧面的轴承和安放镜筒的V形槽上的摩擦材料之间的摩擦力。
如果那里的摩擦力太大,望远镜很难将目标移动到视场中间。
如果摩擦力太小,望远镜就不能停留在需要的位置。
这样使得道布森支架在使用的时候,望远镜很难稳定,尤其是在使用寻星镜或目镜的时候。
当系统的摩擦力在一个适当的水平,镜筒就可以稳定,望远镜可以停在观察目标希望的位置,即使支架旋转了也可以保持这个位置。
道布森支架的稳定装置包含:一个盘状平衡配重,一个可以约束望远镜移动的摩擦力可调的锁紧装置,一个连接望远镜镜筒和支架的弹簧。
这些装置用起来比较麻烦,因为它们不能提供一个简单的,易于使用的方式调节摩擦力。
SKY WATCHER拉力控制手柄(美国专利No.6940642)可以给使用者提供一个简单的旋转增加或减少拉力来增加或减少镜筒和支架侧板之间的摩擦力。

polaris vega使用指导嘿,各位星空迷和摄影大咖们,你们期待已久的Polaris Vega终于来啦!这款集高科技与美学于一身的天文望远镜,是否已经让你蠢蠢欲动,想要一探宇宙的奥秘呢?别急,让我带你走进Polaris Vega的使用世界,一起开启这场璀璨星空下的探索之旅!首先,咱们得明确一点:Polaris Vega不仅仅是一款望远镜,它是你通往浩瀚宇宙的钥匙! 你是否曾经仰望星空,对那些闪烁的星辰充满好奇?现在,就让Polaris Vega帮你揭开它们的神秘面纱吧!一、初见惊艳,组装有道打开包装,Polaris Vega的精致设计一定会让你眼前一亮!但别急,组装可是个技术活。
别担心,说明书就是你的好帮手,一步步按照指示来,保证你能轻松搞定。
记得,组装过程中要细心哦,毕竟,每一个细节都关乎你的观测体验呢!二、智能连接,操作便捷Polaris Vega的最大亮点之一,就是它的智能连接功能。
通过手机APP,你可以轻松设置观测目标,甚至还能远程控制望远镜的移动!是不是超酷的?想象一下,躺在床上就能遥控望远镜,探索遥远的星系,是不是感觉自己在拍科幻大片呢?三、高清成像,细节尽显当然,作为一款顶级天文望远镜,成像质量可是重中之重。
Polaris Vega 采用了先进的光学系统,确保每一次观测都能捕捉到最清晰、最细腻的画面。
无论是月球表面的坑洞,还是遥远星系的轮廓,都能尽收眼底。
记得,观测时选择合适的放大倍数,你会发现更多惊喜哦!四、探索未知,乐趣无穷使用Polaris Vega,你不仅仅是在观测星空,更是在探索未知。
每一次对准新的目标,都是一次全新的冒险。
你可能会发现未知的行星、彗星,甚至还能捕捉到流星划过的瞬间。
那种激动和喜悦,简直无法用言语来形容!不过,别忘了,观测星空也是个技术活。
你得学会识别星座、了解天文现象,才能更好地享受Polaris Vega带来的乐趣。
所以,不妨多学习一些天文知识,让自己成为真正的星空大师吧!说到这里,你是不是已经迫不及待想要试试Polaris Vega了呢?别急,我还有个小建议给你:不妨邀请你的朋友们一起加入这场星空探索之旅。

教您天文望远镜基础知识入门目录一、天文望远镜概述 (2)1.1 望远镜的定义与分类 (3)1.2 望远镜的工作原理 (4)1.3 天文望远镜的发展历程 (5)二、望远镜的基本构造 (6)2.1 主要部件介绍 (7)2.2 望远镜的类型 (9)三、天文望远镜的选择与使用 (10)3.1 如何根据需求选择望远镜 (11)3.2 望远镜的使用与保养 (12)3.3 常见问题及解决方法 (14)四、观测技巧与实践 (14)4.1 观测前的准备 (16)4.2 实际观测案例分享 (17)4.3 提升观测效果的技巧 (19)五、天文望远镜的辅助工具 (20)5.1 星图与星表 (21)5.2 天气预报与观测计划 (22)5.3 其他辅助设备 (23)六、天文望远镜的科学研究价值 (24)6.1 对恒星与行星的研究 (25)6.2 对星系与宇宙学的研究 (27)6.3 天文望远镜在教育中的应用 (29)七、望远镜技术的未来展望 (30)7.1 新型望远镜技术介绍 (32)7.2 天文望远镜在太空探索中的作用 (34)7.3 科技发展对望远镜的影响 (35)一、天文望远镜概述天文望远镜是一种用于观察和观测天体的特殊仪器,其历史源远流长,追溯到古埃及和古希腊时期。
现代天文望远镜的设计和用途多种多样,但它们的共同目标是提供更清晰和放大的天体图像,以便科学家和爱好者可以更好地了解宇宙。
折射望远镜:这类望远镜利用透镜来聚焦光线。
镜子在折射望远镜中并不直接用于成像,而是用于引导光线进入望远镜并反射回透镜中。
这种望远镜在观测弥散和星云时非常有效。
反射望远镜:反射望远镜主要使用表面非常平整的金属或玻璃制成的镜子来反射进入望远镜的光线。
大型反射望远镜通常放置在海拔较高或干燥地区,以减小大气扰动,提高观测质量。
折反射望远镜:这种望远镜结合了折射和反射望远镜的特点,通常使用一个透镜在前端聚集光线,然后用一个大型镜子在望远镜的后端将光线反射到目镜中,这样可以在保持清晰度的同时提供更大的视场。
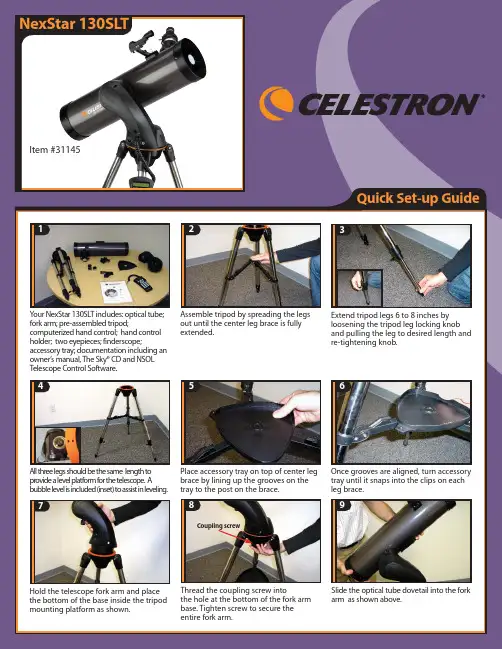
Extend tripod legs 6 to 8 inches by loosening the tripod leg locking knob and pulling the leg to desired length and re-tightening knob.Assemble tripod by spreading the legs out until the center leg brace is fully extended.Item #31132Quick Set-up Guide123All three legs should be the same length to provide a level platform for the telescope. A bubble level is included (inset) to assist in leveling.47Hold the telescope fork arm and place the bottom of the base inside the tripod mounting platform as shown.Place accessory tray on top of center leg brace by lining up the grooves on the tray to the post on the brace.5Once grooves are aligned, turn accessory tray until it snaps into the clips on each leg brace.6Thread the coupling screw intothe hole at the bottom of the fork arm base. Tighten screw to secure the entire fork arm.8Slide the optical tube dovetail into the fork arm as shown above.9NexStar 130SLTYour NexStar 130SL T includes: optical tube;fork arm; pre-assembled tripod;computerized hand control; hand control holder; two eyepieces; finderscope;accessory tray; documentation including an owner’s manual, The Sky® CD and NSOL Telescope Control Software.Item #31145Coupling screwQuick Set-up Guide [cont]Secure optical tube to fork arm by tightening the screw located on the inside of the fork arm assembly.11T o attach the finderscope, loosen the silver screw and slide finderscope into mounting platform .12Secure finderscope to mounting platform by tightening the silver screw. The glass window of the finderscope should be facing towards the front of the telescope.13Select the low power (25mm) eyepiece and insert it as shown above.14Tighten silver screw to secure.15Attach plastic hand control holder to the tripod leg.16Slide Computerized Hand Control into the hand control holder as shown above.1718Before you begin viewing, please remember to remove tube lens cap.19While observing, tube should be positioned as shown above.10Plug Computerized Hand Control into the “Hand Control”port on the fork arm.Before you can begin observing,you must setup your hand control,align your finderscope and align your telescope.Step by step instructions are included in the following Hand Control Setup section.20Before you can use your telescope, you must insert 8 AA batteries.21Place AA batteries inside the battery compartment located at the base of the fork arm.Hand Control Guide1Turn power switch located on the side of the fork arm to “on”position. The light will come on and the hand control will display “NexStar SLT”.2You will notice that there are directional arrows in the center of the hand control.These only move the telescope. They cannot be used to scroll through menu features.3Now you will need to align the finderscope.Turn on the red LED light by turning the knob shown above. When used for the first time, remove the clear plastic disk that is located between the battery clip and the battery. See inset.4Use the hand control direction arrow buttons to point telescope at a distant land object, like a telephone pole or at night you can use the moon. Center and focus the object in the 25mm eyepiece of the telescope.5In order to accurately center an object in the eyepiece it may be necessary to change the slew speed of the motors. To change the slew speed, press the RATE button then select a number from 1 (slowest) to 9 (fastest).Before you can begin using your NexStar 130SLT, you must setup your computerized hand control and go through the SkyAlign alignment procedure. In order for the NexStar to accurately point to the objects in the sky, it must first be aligned with known positions (stars) in the sky. With this information, the telescope can create a model of the sky, which it uses to locate any object in its database Once you have aligned your finderscope,make sure to turn off the LED light to conserve the battery. Now you are ready to align the telescope. This will have to be done at night.79Use the UP and DOWN scroll buttons (located on #6 and #9) to select“SkyAlign”then press ENTER. Now you will need to enter your site/time information.With the object centered in the eyepiece,use the azimuth (right/left) and altitude (up/down) adjustment knobs on the finderscope to place the red alignment dot directly over the centered object.10The hand control will display the last entered time and site information. Since this is your first time using the NexStar,press UNDO to enter your site and time information.1112Using the numeric key pad enter your time information. Press ENTER to continue. Press UNDO to backspace.Press ENTER to select City Database. Use the Up and Down scroll buttons (located on #6 and #9)and choose the closest city to your present location. Press ENTER after selecting the country, state and city.8When the display reads NexStar SLT,press ENTER to begin the alignment procedure.6Hand Control Guide [cont]If you have questions or problems with set-up,please contactCelestron Technical Support:310.803.59551518For the second alignment object, choose a bright star or planet as far from the first alignment object as possible. Once again use the directional arrow buttons to center the object in the finderscope and press ENTER. Once object is centered in the eyepiece, press ALIGN.19Repeat the process for the thirdalignment star. When the telescope has been aligned to the final star, the display will read “Match Confirmed”. Press UNDO to display the names of the three bright objects you aligned to, or press ENTER to accept these three objects for alignment.2021Press INFO to read information about the object displayed. Press the DOWN scroll key to display the next object. Press ENTER to slew (move) to the displayed object.TOURUse the directional arrow keys on the hand control to slew (move) the telescope towards any bright celestial object in the sky. Center the object in the finderscope and press ENTER.Now that your telescope is properly aligned, you are ready to find your first object. Press the TOUR button on the hand control. The hand control willdisplay a list of objects that are visible for the date and location entered.16If the finderscope has been properly aligned, the alignment star should now be visible in the field of view of the eyepiece.17The hand control will prompt you to center the bright alignment star in the center of the eyepiece. Once centered,press ALIGN. This will accept the star as your first alignment position.13Now, using the Up and Down scrollbuttons (located on #6 and #9), verify the time zone you are in and press ENTER.14Using the numeric key pad enter the date. Press ENTER to continue. Press UNDO to backspace.INFOFor general usage information,please consult your user’s manual.。
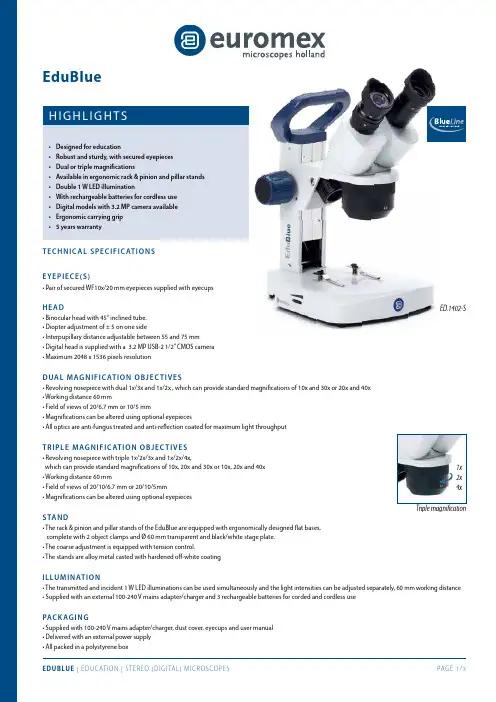
H I GH LI GH TS• Designed for education• Robust and sturdy, with secured eyepieces • Dual or triple magnifications• Available in ergonomic rack & pinion and pillar stands • Double 1 W LED illumination• With rechargeable batteries for cordless use • Digital models with 3.2 MP camera available • Ergonomic carrying grip • 5 years warrantyTEC HNI C A L S P E C IF IC AT I ON S EYEP I E C E (S )• Pair of secured WF10x/20 mm eyepieces supplied with eyecupsHE A D• Binocular head with 45° inclined tube. • Diopter adjustment of ± 5 on one side• Interpupillary distance adjustable between 55 and 75 mm • D igital head is supplied with a 3.2 MP USB-2 1/2” CMOS camera • Maximum 2048 x 1536 pixels resolutionDUA L MAG NI F I C AT I ON O B J E C T IV E S• Revolving nosepiece with dual 1x/3x and 1x/2x , which can provide standard magnifications of 10x and 30x or 20x and 40x • Working distance 60 mm• Field of views of 20/6.7 mm or 10/5 mm• M agnifications can be altered using optional eyepieces• All optics are anti-fungus treated and anti-reflection coated for maximum light throughputTRI P LE MAG NI F I C AT I ON OB J E C T IV E S• Revolving nosepiece with triple 1x/2x/3x and 1x/2x/4x,which can provide standard magnifications of 10x, 20x and 30x or 10x, 20x and 40x • Working distance 60 mm• F ield of views of 20/10/6.7 mm or 20/10/5mm • Magnifications can be altered using optional eyepiecesSTAN D• The rack & pinion and pillar stands of the EduBlue are equipped with ergonomically designed flat bases, complete with 2 object clamps and Ø 60 mm transparent and black/white stage plate. • The coarse adjustment is equipped with tension control. • The stands are alloy metal casted with hardened off-white coatingI LLU MI N AT I O N• The transmitted and incident 1 W LED illuminations can be used simultaneously and the light intensities can be adjusted separately, 60 mm working distance • Supplied with an external 100-240 V mains adapter/charger and 3 rechargeable batteries for corded and cordless usePAC K AG I N G• Supplied with 100-240 V mains adapter/charger, dust cover, eyecups and user manual • Delivered with an external power supply • All packed in a polystyrene boxEduBlueED.1402-S1x 2x 4xTriple magnificationDigital head1x/3x objectives 2x/4x objectives 1x/2x/3x objectives 1x/2x/4x objectivesPillar standRack & pinionstandED.1302-P ••ED.1302-S ••ED.1305-S •••ED.1402-P ••ED.1402-S ••ED.1405-S •••ED.1502-S ••ED.1505-S •••ED.1802-S ••ED.1805-S•••M O D E L SDI GI TAL MO DE LS C AME R A• Digital models are equipped with a 3.2 MP USB 2 1/2 inch sensor CMOS USB-2 camera• Maximum resolution is 2048 x 1536 pixels, 24 bits color depth, up to 10 frames per second. Smaller resolutions are selectable • Delivered with the ImageFocus 4 software, for capturing of images and videos, USB-2 cable and a micrometer 1mm/100 slide • Warranty for the camera is 2 yearsSOF T WA RE• Delivered with ImageFocus 4 for capturing of images and videos• This software also allows a full range of analysis like measurements on still and live images and annotations on captured images • Save images in .jpg, .tif or .bmp formats, save videos in .avi format• Images can be annotated and measurements can be performed on live or captured images • Compatible with Windows XP , Vista, 7, 8 and 10, all 32 and 64 bits configurations • For Mac OS more basic software is available• Updates can be downloaded on our website ED.1505-SED.1302-PACC E S S O RI E S A ND S PA RE PA R TSED.6005 Pair of HWF 5x/22 mm eyepieces ED.6010 Pairof HWF 10x/20 mm eyepieces ED.6015 Pair of HWF 15x/12 mm eyepieces ED.6020 Pair of HWF 20x/10 mm eyepiecesED.6110 HWF 10x/20 mm eyepiece with 10 mm/100 micrometer ED.6099 Pair of eyecupsED.9570 Pair of object clamps for stageED.9950 Stage plate frosted glass, opaque, Ø 60 mm ED.9956 Stage plate black/white, Ø 60 mm ED.9975 External 100-240 V mains adapter/ charger ED.4300 Aluminium transport case for EduBlue microscopesSL.5504 LED replacement unit for EduBlue, incident illumination SL.5505 LED replacement unit for EduBlue, transmitted illuminationAE.1112 Micrometer 76 x 26 mm slide, 50 mm/50 divisions PB.5245 Lens cleaning paper, 100 sheets per pack PB.5274 Isopropyl alcohol 99% (200 ml)PB.5275 Cleaning kit: lens cleaning fluid, lint free lens tissue, brush, air blower, cotton swabsD I ME N S I O N S258260463822017513548EuromexMicroscopenbv•Papenkamp20•6836BDArnhem•TheNetherlands•T+31(0)263232211•F+31(0)263232833•****************•。
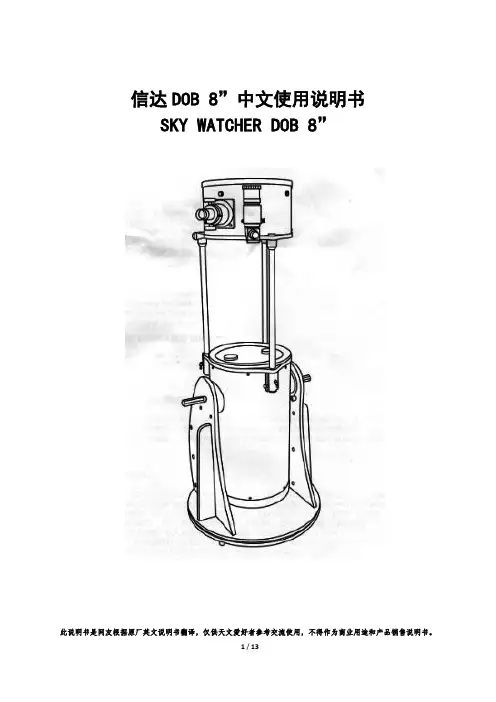
信达DOB 8”中文使用说明书SKY WATCHER DOB 8”此说明书是网友根据原厂英文说明书翻译,仅供天文爱好者参考交流使用,不得作为商业用途和产品销售说明书。
目录组装望远镜 (2)基座组装 (2)主镜筒安装 (5)操作你的望远镜 (8)校准寻星镜 (8)对焦 (8)使用巴洛镜 (9)使用张力控制把手 (9)DOB指向 (10)观测天空 (10)天空条件 (10)选择观测地点 (10)选择最佳观测时间 (11)冷却望远镜 (11)眼睛的适应 (11)保养望远镜 (13)准直 (16)清洁望远镜 (17)开始前本使用说明书适用于封面上列出的所有型号。
在开始之前认真完整地阅读说明书。
你的望远镜应该在白天组装。
选择一个大型、开放的区域,有足够的空间将所有的零部件从包装中取出。
小心!不要使用你的望远镜直接看太阳。
眼睛会导致永久性损伤。
使用适当的太阳滤镜观测太阳。
当观测太阳的防尘盖置于你寻星镜,以保护它免受暴露。
永远不要使用目镜式太阳滤镜和永远不要用望远镜将阳光投影到另一个表面上,这样内部的热积累会损伤望远镜光学元件。
基座安装(DOB 8”)1.B板连接的A1和A2板。
确保标识在Al和A2板的外侧。
B板有三个小孔的边应朝前面。
2.连接组装到圆板C上。
3.把3个脚装在D板上。
4.将特氟隆垫放置在第 2 步的组装件和D板之间。
从第2包中取出黑色的管子插入他们的中心。
5. 从第2包中取出带垫圈的螺栓,并插入黑色的管中。
使用配套的两个扳手将螺母和垫圈装上。
不要将螺栓拧得过度紧。
确保基座自由旋转。
定。
7.从包裹4中取出手柄,用包裹5中的六角扳手和螺丝钉安装到B板上。
8.从包裹5取出圆柱鞍和螺丝,拆开。
如图,将圆柱鞍和螺丝分两侧安装在 A1和A2板上。
主镜筒安装(DOB 8”)1.在A1和A2板之间放置主镜筒。
请确保主镜筒侧边的轴支撑在4个侧板的圆柱上。
2.将手柄安装到A1和A2板上的孔。
不要将手柄拧得过紧。
为了方便,请确保张力控制手柄安装在调焦座的同一侧。

1. 口径这是选择天文望远镜时最重要的因素,望远镜的口径是指望远镜物镜的玻璃直径或者是主要的镜片大小,用毫米或者是英寸来表示。
口径越大对于光线的收集的能力就越强,成像就越好。
口径越大呈现出的画面细节也就越清晰,比如:在观测一个M13的球状星云的时候,用4英寸的口径的望远镜需要用150的电源,但是用8英寸的口径的望远镜也用同样的电源,但是星云图像比用4英寸的清晰16倍。
即使是微弱光线下的星星也能看得清楚。
考虑到使用者需要的是一个物美价廉并且便于携带的望远镜,尽可能选择大口径的望远镜。
大口径的望远镜拍下的照片,对比度更高,分辨率更好,并且更加清晰。
塞莱斯特望远镜有“5英寸口径”“8英寸口径”“14英寸口径”。
2.焦距焦距是指在光学系统中从透镜(或者主平面镜)到望远镜焦点的距离(用毫米来表示)。
总的来说,望远镜的焦距越长那么它的吸收光线的能里也就越大,图像成像也越大,视野范围也越小。
例如,一个望远镜的焦距是2000mm,放大倍率是焦距1000mm的两倍,视野范围是它的一半,大多数的望远镜的焦距都是指定的,如果你不知道这个焦距但是你知道焦比,你也可以通过一下公式计算出来:焦距=口径(mm)x焦比,例如:一个8英寸(203.2mm)口径的望远镜,焦比是f/10,则它的焦距就是203.2x10=2032mm。
3.分辨率这是望远镜呈现图像细节的能力,分辨率越高细节呈现就越好,口径越大,的望远镜,如果光学质量好那么分辨率就越高。
4.分辨能力这个涉及到“道斯限制”。
区分出两颗挨得很紧的双子星,理论上望远镜的分辨能力是由4.56除以望远镜的口径决定的。
例如:一个口径为8英寸的分辨能力就是0.6(4.56/8=0.6)直接影响望远镜的分辨能力的因素就是望远镜的口径,因此口径越大的望远镜,分辨能力越好。
然而分辨能力也取决于大气流的影响和人们观察物体的敏锐程度。
5. 对比度理想的图像最大对比度需要被观测的物体的对比度较低,比如:月球和行星。

牛顿反射式望远镜的结构原理1. 初识牛顿反射式望远镜嘿,小伙伴们!今天咱们聊聊一个超级有趣的天文工具——牛顿反射式望远镜。
你们有没有想过,咋样才能看到那些遥远星星的细节呢?就像在远处窥视一场星星的派对一样!牛顿反射式望远镜就是这么神奇的家伙,它把牛顿的科学智慧打包成了一个能让你大开眼界的设备。
说实话,它的工作原理还挺简单的,但却充满了智慧。
1.1 牛顿的奇思妙想说到牛顿,大家脑子里是不是会浮现出那个坐在苹果树下的人?对,没错,就是他!他那颗天才的脑袋不仅发明了微积分,还在光学上大显神威。
牛顿观察到白光其实是由不同颜色的光混合而成的,这给了他灵感,发明了反射式望远镜。
简直是“千里眼”加“顺风耳”,把宇宙的秘密暴露在我们面前。
1.2 结构小揭秘好啦,回到正题,这个牛顿反射式望远镜到底是咋运作的呢?它主要由几个部分构成:主镜、次镜和一个用来观察的目镜。
主镜是望远镜的“心脏”,它是一个大圆盘,表面像是抹了一层镜子。
这个主镜负责接收光线,像个超级大“接收器”一样,把光线集中到一个点上。
然后,光线还会通过一个小小的次镜反射到望远镜的一边,最后通过目镜展示给你,哇哦,这简直像是在夜空中开了一扇窗。
2. 细节探秘2.1 主镜的秘密主镜,顾名思义,是反射式望远镜的主角。
它不仅大,还得有超高的质量。
你要知道,这个镜子可不是随随便便的玩意儿,它得经过精密打磨,表面得像镜子一样平滑。
否则,就会影响光线的聚焦,搞得整个观星体验都大打折扣。
大家可以想象一下,如果主镜上有颗小灰尘,那就像给眼睛上了个“污点”,什么都看不清楚啦!2.2 次镜的妙用接下来,咱们聊聊次镜。
虽然它的体积小,但作用可大了!次镜就是那个调皮的小家伙,它把从主镜来的光线“分流”到旁边的目镜。
你可以把它想象成一个转弯的路标,让光线不会直接撞到望远镜的管子里。
这样一来,光线就能顺利地传到目镜,呈现出清晰的图像。
简单来说,次镜就是光线的“搬运工”,它不但要稳,还要准,才能确保你看到的图像清晰又亮丽。
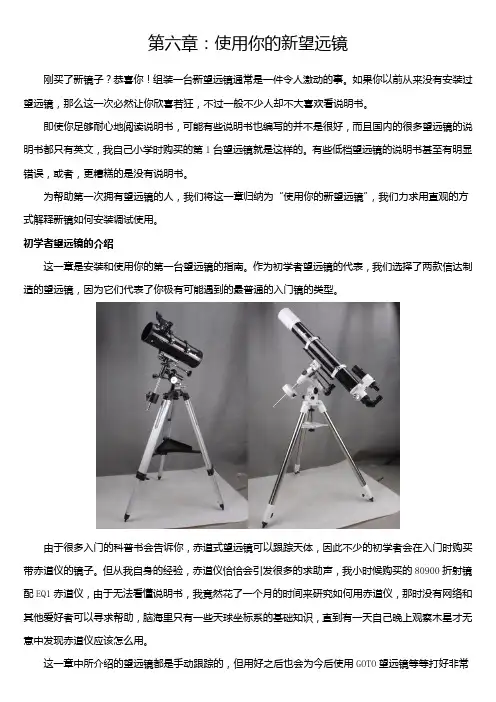
第六章:使用你的新望远镜刚买了新镜子?恭喜你!组装一台新望远镜通常是一件令人激动的事。
如果你以前从来没有安装过望远镜,那么这一次必然让你欣喜若狂,不过一般不少人却不大喜欢看说明书。
即使你足够耐心地阅读说明书,可能有些说明书也编写的并不是很好,而且国内的很多望远镜的说明书都只有英文,我自己小学时购买的第1台望远镜就是这样的。
有些低档望远镜的说明书甚至有明显错误,或者,更糟糕的是没有说明书。
为帮助第一次拥有望远镜的人,我们将这一章归纳为“使用你的新望远镜”,我们力求用直观的方式解释新镜如何安装调试使用。
初学者望远镜的介绍这一章是安装和使用你的第一台望远镜的指南。
作为初学者望远镜的代表,我们选择了两款信达制造的望远镜,因为它们代表了你极有可能遇到的最普通的入门镜的类型。
由于很多入门的科普书会告诉你,赤道式望远镜可以跟踪天体,因此不少的初学者会在入门时购买带赤道仪的镜子。
但从我自身的经验,赤道仪恰恰会引发很多的求助声,我小时候购买的80900折射镜配EQ1赤道仪,由于无法看懂说明书,我竟然花了一个月的时间来研究如何用赤道仪,那时没有网络和其他爱好者可以寻求帮助,脑海里只有一些天球坐标系的基础知识,直到有一天自己晚上观察木星才无意中发现赤道仪应该怎么用。
这一章中所介绍的望远镜都是手动跟踪的,但用好之后也会为今后使用GOTO望远镜等等打好非常良好的基础,当然了,也会为你训练目视观测的技术打好很好的基础。
几个年轻的爱好者在尝试摆弄新组装的望远镜,初学者都需要经历这第一课。
巡视一下你的望远镜虽然有些望远镜,如Celestron的NexStar系列,是作为一个整体从盒子里拿出来的,但是大多数都是需要进行组装的。
脚架必须锁在一起,赤道仪需要调整和拧紧,附件必须安装到主镜筒上。
在钻研安装使用指南之前,我们将巡视一下列出的这2种有代表性的望远镜来了解他们上面的部件以及作用。
我们甚至将指出那些只会让初学者迷惑却没有任何用途的部件。
NT114PHCARBON FIBER NEWTONIAN 114 MMW/ PAN HANDLE MOUNT INSTRUCTION MANUAL10+SUN HAZARD — Never look directly at the sun with this device.WARNING:CHOKING HAZARD — Small parts. WARNING:Contains button or coin cell battery. Hazardous if swallowed — see instructions.INCLUDEDX 1The lens contains lead that may be harmful. WARNING:Customer Service: Call 1-866-252-3811Instruction Manual and Downloadable Planisphere Visit:/pages/product-manualsHow To Set UpNote: We recommend assembling your telescope for the first time in the daylight or in a lit room so that you can familiarize yourself with assembly steps and all components.Telescope Terms To Know:Diagonal: A mirror that deflects the ray of light 90 degrees.With a horizontal telescope tube, this device deflects the light upwards so that you can comfortably observe by looking downwards into the eyepiece. The image in a diagonal mirror appears upright, but rotated around its vertical axis (mirror image).Focal length: Everything that magnifies an object via an optic lens has a certain focal length. The focal length is the length of the path the light travels from the surface of the lens to its focal point. The focal point is also referred to as the focus. In focus, the image is clear . In the case of a telescope, the focal length of the telescope tube and the eyepieces are used to determine magnification.Lens: The lens turns the light that falls on it around in such a way so that the light gives a clear image in the focal point after it has traveled a certain distance (focal length).568321724Parts Overview1. 114mm Objective Lens2. Pan-Tilt Alt-Azimuth Mount3. Tripod with Accessory Tray4. Focus Wheel5. 1.25” Eyepieces (9.7mm and 26mm)6. 2x Barlow Lens7. Red Dot Viewfinder8. Smartphone AdapterUsing your telescope:After you have aligned your viewfinder , you are ready to start observing! Put the 26 mm eyepiecewider field of view will make it easier to locate and track objects. Use the panhandle to move the scope up, down and side to side until your target comes into view in the eyepiece. It is important to remember that the rotation of the Earth means objects will move out of your eyepiece fairly quickly. Once you have found and focused on your desired target, you can track it as it journeys across the night sky using the panhandle.For a closer look at an object, you can insert the 9.7 mm eyepiece. The magnification will increase from 23x to 62x.For a more closer look at an object, you can insert the 2x Barlow lens. The magnification will increase to 46x for the 26 mm eyepiece and 124x for the 9.7 mm eyepiece.Cleaning:Your telescope is a precision optical device and keeping the optics free of dust and dirt is crucial for optimalperformance. To clean the lenses (objective and eyepiece) use only a photo-grade soft brush or a lint-free cloth, like a microfiber cloth. Do not press down too hard while cleaning, as this might scratch the lens. Ask your parents to help if your telescope is really dirty. f necessary, the cleaning cloth can be moistened with an optical glass cleaning fluid and the lens wiped clean using very little pressure. Do not use harsh detergents!Make sure your telescope is always protected against dust and dirt. After use, leave it in a warm room to dry off before storing.Eyepiece: An eyepiece is a system made for your eye and comprised of one or more lenses. In an eyepiece, the clear image that is generated in the focal point of a lens is captured and magnified still more.Magnification: The magnification corresponds to the difference between observation with the naked eye andobservation through a magnifying device like a telescope. If a telescope configuration has a magnification of 30x, then an object viewed through the telescope will appear 30 times larger than it would with the naked eye. To calculate the magnification of your telescope setup, divide the focal length of the telescope tube by the focal length of the eyepiece.Using/Aligning the Red Dot Viewfinder:The viewfinder is powered by a CR-1620 battery that is included. Before using the viewfinder for the first time, remember to remove the plastic insulator that is blocking the battery from connecting. Note: Please recycle batteries responsibly.For The Viewfinder To Be Effective, It Must Be Aligned.• Insert the 26 mm eyepiece into the diagonal and power on the viewfinder by sliding the switch on its right side to an “On” position.• Point the eyepiece at an easy to identify target like a telephone pole that is approximately 200 yards away. Center the object in the eyepiece. Lock the telescope into place by tightening the panhandle.• Without moving the telescope, position the red dot using the two adjustment screws so that it shares the same view as the one in your eyepiece. The front screw will move the viewfinder up and down, and the other will move it side to side. Your viewfinder is now aligned. Note: To preserve battery life, don’t forget to turn off the viewfinder after use.f=26 mmf=9.7 mmThe Moon f=26 mmf=9.7 mmTerrestrial Images Possible Objects for Observation:Terrestrial objectsTake note of the examples below, including Mount Rushmore and the golf course. Start with the 26 mm eyepiece and focus until the image is clear . After mastering the 26 mm eyepiece, switch to the 9.7 mm eyepiece and practice scanning and focusing until the image is clear . Choose several terrestrial objects to practicefocusing on, but never point your telescope at or near the sun, or you risk blindness.The MoonDiameter: 3,476 kmDistance: Approximately 384,401 kmThe Moon is the Earth’s only natural satellite, and it is the second brightest object in the sky (after the Sun). Although it is our closest neighbor , a lot of people have never really taken a good long like at the Moon. With your telescope, you should be able to see several interesting lunar features. These include lunar maria, which appear as vast plains, and some of the larger craters. The best views will be found along theterminator , which is the edge where the visible and cloaked portions of the Moon meet.Orion Nebula (M 42)M 42 in the Orion constellationRight ascension: 05:35 (Hours: Minutes) Declination: -5:22 (Degrees: Minutes)Distance from Earth: 1,500 light yearsLocated about 1,500 light years from Earth, the Orion Nebula (Messier 42,abbreviation: M 42) is the brightest diffuse nebula in the sky – visible with the naked eye, and a worthwhile object for telescopes of all types and sizes, from the smallest field glass to the largest earthbound observatories and the Hubble Space Telescope. When talking about Orion, we‘re actually referring to the main part of a much larger cloud of hydrogen gas and dust, which spreads out over half of the Orion constellation. The expanse of this enormous cloud stretches several hundred light years.Ring Nebula (M 57)M 57 in the Lyra constellationR ight ascension: 18:53 (Hours: Minutes) Declination: -33:02 (Degrees: Minutes)Distance from Earth: 2,400 light yearsThe famous Ring Nebula M 57 in the constellation of Lyra is often viewed as theprototype of a planetary nebula; it is one of the magnificent features of the Northern Hemisphere’s summer sky. Recent studies have shown that it is probably comprised of a ring (torus) of brightly shining material that surrounds the central star (only visible with larger telescopes), and not of a gas structure in the form of a sphere or an ellipsis. If you were to look at the Ring Nebula from the side, it would look like the Dumbbell Nebula (M27). When viewed from Earth, we are looking directly at the pole of the nebula.Dumbbell Nebula (M 27)M 27 in the Fox constellationRight ascension: 19:59.6 (Hours: Minutes) Declination: -+22:43 (Degrees: Minutes)Distance from Earth: 1,360 light yearsThe Dumbbell Nebula (M 27) in Fox was the first planetary nebula ever discovered. On July 12, 1764, Charles Messier discovered this new and fascinating class of objects. We see this nebula almost directly from its equatorial plane. If we could see the Dumbbell Nebula from one of its poles, we would see the shape of a ring, and we would seesomething very similar to what we know as the Ring Nebula (M 57). In reasonably good weather , we can see this object well even with low magnifications.f=26 mmf=9.7 mmOrion Nebula M 42f=26 mmf=9.7 mmRing Nebula in Lyra Constellation M 57f=26 mmf=9.7 mmDumbbell Nebula in Fox Constellation M 27Troubleshooting Guide:Using the Smartphone Adapter:SUPERVISION BY ADULTSRead and follow the instructions, safety rules and first aid informationThe Smartphone Adapter will allow you to connect almost any “smart” device to a 1.25” eyepiece.To use the adapter, place it directly onto the selected eyepiece and secure it by tightening the setscrew until snug.Be careful not to overtighten because this could damage the adapter and/or the eyepiece.The camera lens on your smart device will need to be centered over the eyepiece. This alignment is best done by opening the camera function and viewing the image while you center the device. Once you have positioned the device correctly, carefully press it onto the suction cup/non-skid surface of the adapter pad. Never allow the adapter pad to hold your device without you supporting the item as well.The point at which you secure the eyepiece/adapter combination into the diagonal depends largely on the dimensions of your device. For smaller devices like smart phones, it may be easier to secure it to the eyepiece/adapter combination before inserting the entire unit into the diagonal on the telescope. For larger devices, such as tablets, it may be easier to secure the eyepiece/adapter combination into the diagonal, and then align and attach your device.After positioning your device and capturing images, you can enhance and edit the photos using the imaging software of your choice. One option can be found at https:///.WARNING: Do not leave your device unsupported or unattended on the adapter pad.Though the surface of the adapter pad is designed with suction cups and is non-skid, the manufacturer cannot assure that the pad will support the weight of various devices or guarantee that it will adhere to all surfaces on various smart devices. The pad is not intended to secure, balance or support the device on its own, and the operator should not let the device rest solely on the adapter pad. Leaving the device unattended or allowing it to balance on its own without operator support may result in the device falling, unbalancing the entire instrument and possibly damaging the telescope or your smart device.CHEMICALSAny chemicals and liquids used in preparing, using, or cleaning should be kept out of reach of children. Do not drink any chemicals. Hands should be washed thoroughly under running water after use. In case of accidental contactwith the eyes or mouth rinse with water. Seek medical treatment for ailments arising from contact with the chemical substances and take the chemicals with you to the doctor.Keep packaging materials (plastic bags, rubber bands, etc.) away from children. There is a risk of SUFFOCATION. Dispose of packaging materials as legally required. Consult the local authority on the matter if necessary. DISPOSALDispose of the packaging materials properly, according to their type, such as paper or cardboard. Contact your local waste-disposal service or environmental authority for information on the proper disposal. Please take the current legal regulations into account when disposing of your device. You can get more information on the proper disposal from your local waste-disposal service or environmental authority.NotesNotesNotes©2018 National Geographic Partners LLC. All rights reserved. NATIONAL GEOGRAPHIC and Yellow Border Design are trademarks of the National Geographic Society, used under license.©2018 Explore Scientific, LLC.1010 S. 48th Street, Springdale AR 72762All rights reserved. | | 866.252.3811Made in ChinaCONFORMS TO THE SAFETY REQUIREMENTS OF ASTM F963。
不建议初学者购买牛反,理由不外乎两个:1.镜片要隔时镀膜2.牛反不行校准镀膜的问题其实此刻已经水平超级高,好的镀膜保留个5到10年完全没有问题第二个问题就需要:耐心体会和一个好的工具而本品确实是如此一个工具产自江西智通,全金属结构,经久耐用,不易变形,能够用到老结构其实很简单,细孔加十字丝最后看到的像差不多就那个样子,那个像和十字丝对齐就光轴正了下面详细讲述一下如何用校准目镜校准光轴:下面是一个从调焦座看过去的像,超级有体会的老鸟就通过这种目视法来校准焦距保证这些像超级匀称的一圈包一圈,最后眼睛(相机的镜头)在正中就说明光轴差不多校准了,但精度怎么样就因人而异了呵呵下面是一个差不多校准了的图再来看看我的114从调焦座看过去的像,已经被我折腾得……调光轴需要动的就两个地址,一个副镜,一个主镜,听起来很简单但调副镜的是4个螺丝,调主镜的是6个螺丝,这下排列组合多了吧副镜一个主螺丝操纵其前进后退,三个副螺丝辅助微调主镜六个螺丝,两个一组,一个固定螺丝,一个校正螺丝,这两个螺丝到底干吗用?看以下图你马上就明白了介绍了原理,下面讲如何校准光轴了,本人的方式:先校准副镜,再主镜方式比较简单,先把主镜去掉,然后用连线的方式去找圆心(不是那么好找的)若是光轴误差专门大,能够先用眼睛从调焦座往里看调个可能,然后再把校准目镜插上此刻的目的确实是要通过校准目镜看到的十字丝交点对上主镜那里的圆心通过调剂副镜上4个螺丝,达到以下成效就差不多了,照相机的焦距有限不行照十字丝,最前面模糊的那个确实是十字丝副镜差不多了,此刻加上主镜,先把那个固定螺丝拧到底,固定好期待装上就成功么?那是不可能滴呵呵看以下图,误差不是一样的大没有别的方法,再慢慢调主镜的6个螺丝呗直抵达到下面的成效为止到此刻为止,光轴就差不多校准完了,来试试风光,测试环境如下不看不明白,一看吓一跳,上到PL6.5仍是超级清楚,图像犀利以下图刚买镜子的时候拍的,那光阴轴确信没有那么歪,注意海尔下面的小字这是PL6.5拍的,清楚很多吧上到PL10+3倍巴罗奥运印和五环都超级清楚了。
牛顿反射式天文望远镜结构设计及原理介绍下载提示:该文档是本店铺精心编制而成的,希望大家下载后,能够帮助大家解决实际问题。
文档下载后可定制修改,请根据实际需要进行调整和使用,谢谢!本店铺为大家提供各种类型的实用资料,如教育随笔、日记赏析、句子摘抄、古诗大全、经典美文、话题作文、工作总结、词语解析、文案摘录、其他资料等等,想了解不同资料格式和写法,敬请关注!Download tips: This document is carefully compiled by this editor. I hope that after you download it, it can help you solve practical problems. The document can be customized and modified after downloading, please adjust and use it according to actual needs, thank you! In addition, this shop provides you with various types of practical materials, such as educational essays, diary appreciation, sentence excerpts, ancient poems, classic articles, topic composition, work summary, word parsing, copy excerpts, other materials and so on, want to know different data formats and writing methods, please pay attention!牛顿反射式天文望远镜结构设计及原理介绍天文望远镜是观测天体的重要工具,其中反射式天文望远镜因其优异的光学性能和便于制造而备受青睐。
Germany, April 20th 2003 Controlling the NexStar 4/60/80/114 Series Telescopes Fully Remotely Introduction:Remote controlling the little NexStar telescopes has been discussed in the NexStar Yahoo Group since their introduction approx. 3 years ago. The latest GT hand-controllers do actually allow to control the telescope via the RS232 port of a PC or a PDA. After an alignment of the telescope using the menus of the GT hand-controller you can activate the RS232 port and subsequently control the telescope using Goto commands. However you cannot fine tune the telescope remotely – you need to use the direction buttons of the hand-controller.Some testing and trials:Thus I started to debug the protocol between the hand-controller and the base of the telescope. However I did not fully decode it and only when Michael Ganslmeier stepped in we finally managed to fully understand the protocol and the functions. Meanwhile Michael Swanson gave valuable hints on how to mimic the direction buttons by changing the tracking rate of the telescopes. These hints were given for the new GPS series telescopes and can be found at/PCControl/NewGPSCommands.htm. We could finally adapt them also to the smaller NexStar telescopes.The solution:When bypassing the alignment of the GT hand-controller and fully remote control the telescope from a remote site we were facing the challenge of implementing the 2 star alignment or auto alignment on the PC. Being too lazy to work all this out Michael Ganslmeier and I finally managed to use the Celestron …GuideStar“ software and create a software plug-in to add the …direction button“ functionality. This means we use the …GuideStar“ software to align the telescope and also initiate Goto commands and have a small additional window with the directional buttons on the PC screen to fine tune the telescope (left-right-down-up). Thanks to Michael’s program “ArrowKeys4GS” it actually looks like it is all one piece of software. It runs under Windows 2000/XP, it is not working under Windows 98/ME.Unfortunately the original GT hand-controller cannot be used to apply our approach. Yet we can offer 3 solutions how to get there:1)If you have a HC hand-controller you are already there. Just use it and connect it to the PC by a RS232 cable.2)You can slightly modify your GT hand-controller. The modification does not affect the functionality using the hand-controller …stand alone“. Please note that after the modification the …normal“ remote control of the telescope by the RS232 port does no longer work because the protocol to be used is changed.3)You can build a small interface circuit and substitute the hand-controller completely. This circuit is connected to thebase unit instead of the hand-controller and connects the base unit directly to the PC.Subsequently you find explanations to the different hardware solutions including information to the RS232 cable as well as a description of how to install and operate the software.HC hand-controller:For some time Celestron sold the little NexStars as a low budget version with a …HC“ hand-controller instead as the …GT“ hand-controller. As far as I know only very few of them were sold in Europe but quite some of them in the US. Even more were sold under the TASCO brand name (models Starguide 60/80/114/4) and maybe you can get hold of a used one. As mentioned above, if you can get such a HC hand-controller you are set – no need for any modifications of the telescope. Below you find a picture with the HC hand-controller on the left and the GT hand-controller on the right side.Modification of a GT hand-controller:If you know how to use a soldering iron you should not have a problem to make the necessary changes inside your GT hand-controller. However be aware that you will definitely loose you warranty of the telescope! Essentially you only have to cut some traces on the PCB of the hand-controller and insert a switch with some wires (see the diagram below).After the modification you can switch between …stand alone mode“ of the telescope (i.e. you align and control it with the hand-controller) and …remote control mode“ (i.e. you can fully remote control the telescope with your PC). Below please find a picture with instructions for the modification. Please note the colours are:1=white(ws), 2=black(sw), 3=red(rt), 4=green (gn), 5=yellow(ge), 6=blue(bl)Finally please see 2 pictures of the hand-controller after the modification.By using a multi pole/through switch you should be able to modify the hand-controller also in a way, that you can switch between “original mode” and “new remote control mode”. However we have not yet verified this in hardware.Simple Interface Circuit:The third solution is a small electronic circuit you need to build. Below you find the schematic of a simple interface.No external power supply is needed, the circuit is powered by the base unit of the telescope. Because this interface does not provide true RS232 levels it may not work with some PCs. However from our experience it should work with most of them. We recommend putting the PCB in a small plastic casing to insulate and protect it.Cable between telescope and PC:The RS232 cable for connecting the telescope to the PC is the same for the NexStars 4/5/8/60/80/114. You can buy it at Celestron and their dealers. If you are fond of home-brewing you may build your own cable. The signals at the plug going into the NexStar hand-controller are shown below..A very comprehensive description can be downloaded from Mike Swanson’s NexStar resource site at/PCControl/RS232Cable.htm. He also offers a list of hints if you experience problems with the communication between the telescope and the PC at /PCControl/PCControlProblems.htm . How to install the software:The …GuideStar“ software was shipped for a while with the NexStar telescope but Celestron meanwhile ceased to distribute it. I got permission from Celestron to freely distribute the software and you can download it from my homepage http://www.dd1us.de. Please note, that you can download the software free of charge but Celestron Inc. continues to hold all rights of the software.The full software package is called “GuideStar_Setup.zip” and is 5.1MByte large. After downloading this .zip-file please unpack the installation program “GuideStar_Setup.exe” into an empty folder (e.g. c:\copybox). Next you start this instal-lation program to install the programs “GuideStar” and “ArrowKeys4GS” and the necessary auxiliary files. The default directory “c:\program files\GuideStar” must not be changed. If you have “GuideStar” already installed you need to down-load only the small file “ArrowKeys4GS_only.zip” from my homepage and unzip it to “c:\program files\GuideStar”.After the installation you can delete the file “GuideStar_setup.exe” in your temporary folder (e.g. c:\copybox\).Please do never move the files but leave them in the directory “c:\program files\GuideStar” even when installing the software “GuideStar 2.1” on a PC running a German version of Windows (probably every non-US revision). Furthermore you must not set the Windows PC's country settings to German (again non-US). When changing to English (USA) it seems to work fine. If the country settings are set to German the RA/DEC values from the window "change information" are wrong converted to the used RA/DEC values in the window "information". Another small “bug” we noticed testing“GuideStar” was the fact, that it is not completely removed out of memory when exiting the program. You can see this in the Windows task manager. However we have not noticed any problems associated with this behaviour.How to use the software:Now you can either start “GuideStar” and “ArrowKeys4GS” manually or just start the Batch file “GuideStar remote.bat” which you can find in the same directory and automates the launch of both programs together.Of course you have to configure the …GuideStar“ software when you use it first time. Simply go through the setup menu and enter your location, time zone incl. daylight savings status, comm port number of the PC and your telescope model.Once you saved these parameters they will be used as default for future alignments of the telescope. With the software using the time of the PC the alignments become thus very simple and fast. Next you need to align the telescope. The …GuideStar“ software offers the same auto-alignment procedure as the GT hand-controller but with an improved menu.After alignment you can use …GuideStar“ alone or the auxiliary program along with it. Below please find a screen shot of the …GuideStar“ program (right) and the small auxiliary program “ArrowKeys4GS” with the direction buttons (left).You can actually either use your mouse to click on the direction buttons or use the direction buttons on your keypad. Make sure numlock is deactivated. You can press two direction buttons simultaneously (e.g. right and up). With the slider “speed” in the “ArrowKeys4GS” window you can control the speed of the telescope. Once initiated a command from the program “ArrowKeys4GS” the program “GuideStar” is in a kind of hibernation mode (without loosing the alignment). However the tracking mode as defined in “GuideStar” is still active thus you can Goto an object, track it and center it with the direction buttons of the PC. If you want to send new commands from “GuideStar” (e.g. send a new Goto command or change the tracking mode) please first click on the button “GuideStar” in the window “ArrowKeys4GS” and then use the program …GuideStar“. The program …GuideStar“ offers quite some nice features – you should really give it a try. The next screenshots give you examples of the Goto menu as well as an information window for some of the objects.You can jump between both programs as often as you want. Please note that the two programs do communicate properly using Windows 2000 and XP, they are not working together using Windows 98 and ME. It looks like the used hibernation mode in …GuideStar“ cannot be used in some Windows versions, sorry! If you test it with other Windows versions we kindly ask you to share your experience with us and the other NexStar users.What’s missing?Now that you can control your telescope remotely you also want to watch the sky remotely. You can attach a web- or video-camera to your eyepiece/instead of your eyepiece. The live pictures can be transferred to a TV/video screen to watch it or to a frame grabber card in your PC for further processing. There are many nice programs available to process such signals like integrating, noise reduction, enhancements.What comes next?Well, of course we want to get rid of all the wires between the telescope and the PC. You can find an article on my webpage (http://www.dd1us.de) showing a 2.4 GHz radio link to transmit the video signal from the telescope to you. An RF link for the RS232 control signals is under investigation and will be published once we succeed ;-)Acknowledgement and Disclaimer:We cannot take any guarantee that the instructions and the software is error free. All modifications as well as the operation of the software are at your own risk.We want to thank Celestron for allowing us to offer the …GuideStar“ software download free of charge. Please note, that Celestron Inc. maintains all rights at the …GuideStar“ software. We think that this is a great gift from Celestron Inc. to the NexStar community.The auxiliary program is provided as …beerware“. You do not have to pay any money to us but should once pay a cold drink to one of the key contributors of the NexStar Yahoo Group (too many to name). If you are interested in the source code of the program “ArrowKeys4GS” you may send a request to the authors.For further information please first have a look at http://www.dd1us.de. The most recent versions and additional information are available there. We publish this information hoping it will help other users having even more fun with their NexStar telescopes. If you can give us additional information or have any questions please feel free to send an Email to Michael Ganslmeier (******************************) and/or Matthias Bopp (***************).Kind regardsMichael & Matthias。
天文望远镜的使用方法天文望远镜是一种用来观测天体的光学仪器,其主要原理是通过聚集和放大天体光线来观察远处的天体。
下面我将详细介绍天文望远镜的使用方法。
首先,使用天文望远镜之前,我们需要选择一个合适的观测位置。
这个位置最好远离强烈光源和遮挡物,以确保观测到的天体清晰可见。
接下来,我们需要根据观测的目标天体选择合适的望远镜。
通常,望远镜的主要参数包括口径和焦距。
口径越大,望远镜的光收集能力越强,细节观测得更清晰。
焦距则决定了望远镜的放大倍数。
一般来说,对于初学者,一个口径为70毫米左右的折射望远镜或者口径为4-8英寸的反射望远镜是较为合适的选择。
在选择好望远镜之后,我们需要进行天文望远镜的组装和校准。
首先,安装望远镜的三脚架,并确保它稳固地支撑着望远镜。
接下来,将望远镜的光学管体固定在三脚架上,并确保望远镜的视轴与地平线垂直。
接下来,使用调焦机构将目视准线调整到合适的位置。
这样,我们就完成了天文望远镜的组装和校准。
当我们完成了天文望远镜的组装和校准后,就可以开始观测了。
在观测之前,我们需要调整望远镜的焦点和放大倍数。
通常,望远镜的焦点调整是通过旋转目镜或调焦机构来实现的。
放大倍数可以通过更换不同的目镜或者使用望远镜配套的放大倍数镜头来调节。
接下来,我们可以选择一个具体的天体进行观测。
在选择天体之前,我们可以使用星图或天文软件来了解天体的位置和亮度等信息。
一般来说,初学者可以首先选择一些亮度较高的天体进行观测,比如彗星、星云、行星和月亮等。
当我们选择好天体之后,可以通过调整望远镜的俯仰和方位来将天体置于望远镜的视场内。
俯仰调节是通过调整望远镜的高度来实现的,方位调节则是通过旋转望远镜的水平轴来实现的。
注意,在调节过程中要小心操作,以免碰撞到望远镜或者破坏其结构。
当我们将天体置于视场内后,可以使用辅助仪器如星表或导星镜来帮助我们更准确地观察天体。
同时,我们可以适度调整望远镜的焦距和放大倍数,以获得更清晰、更详细的观测效果。