联想网络培训-基础知识
- 格式:ppt
- 大小:11.49 MB
- 文档页数:81


联想入职培训资料前言 (2)第一课LTL网络培训手册(V3.0) (3)第二课关于计算机运用的其他问题 (10)第三课商务流程.......................................................一三第四课LTL 财务知识..................................................一八第五课时间管理概览.. (19)附:《联想之歌》前言为了完善集团公司的新员工“入模子”培训工作,巩固培训成果;也为了迅速使新员工转变观念、统一意志,认同LTL的经营理念与价值观与掌握LTL的基本知识、方法与技能等内容,提升自己的角色转变意识与实际岗位工作能力,为今后的进一步提高制造条件,我们开展了这项新员工培训工作。
为便于培训工作的开展,通过我们的努力,编写了这套教材,以利于我们共同学习与提高。
在此,我们对给予我们工作大力支持的调研部、秘书室、经营计划部、综合部与部分事业部的同仁表示感谢,并对集团人力资源部与联想电脑公司人力资源部同仁的大力支持,致以诚挚的谢意。
由于我们水平有限与时间仓促,教材中的不妥之处在所难免,还望各位同仁不吝赐教,以便于把我们的工作做得更好。
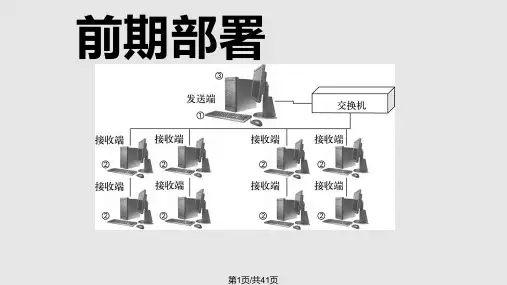
他山之石……第一课 LTL网络培训手册(V3.0)适用于LTL网络用户经营计划部主编一.前言1.此次培训的内容●讲解网络的基本知识。
●讲解内部主页的内容。
●收发Email的方法与使用技巧。
●掌握浏览Internet的方法。
●出差时如何上网。
2.联想集团网络与LTL网络的概况二.登录NT域目前我们LTL的网络供大家登录的有三个域。
分别为LTL域、LTL_SW域与RAS域。
域,用通俗的话来说,就是由一台服务器(域操纵器)管理的用户群的集合。
假如想登录到某一个域中,您务必:1)在此域中注册2)输入正确的用户名与密码,并选择相应的域当出现“输入网络密码”的窗口时,请输入您登录NT域的用户名与密码,请注意字母的大小写。

风格与沟通沟通是什么C O M M U N I C A T I O N的字源是源于拉丁字[C O M M U N I S],原意是[彼此分享]、[建立共同看法]、所以,沟通的主体在于互动双方建立彼此相互了解,相互回应,并且期待能经由沟通的行为与历程建立接纳及共识。
2心理学家佛洛姆(F R O M M )—人类与生俱来具有[关系需求],强调每个人都会期待与他人产生情感上的关联,并藉此确定自己的角色、地位、与存在的价值。
何谓理想的沟通愉快的感觉问题的解决关系忠诚度人际沟通的特性1.沟通是有目的的2.沟通是有差异的3.人际沟通是连续的4.人际沟通是有关系性的5.沟通是可以互相学习的沟通的层次1.自我沟通2.人际沟通3.大众沟通内在情绪管理的自问法则1.我的问题究章是什么2.我是否已尽了全力3.我应不应该在意他人的看法4.应该用什么态度去面对问题5.有没有更好的处理方式6.在这件事中我学习到些什么人际沟通的功能心理功能关怀接纳尊重8人际沟通的功能社会功能建立维持改变关系社会支持社会地位人际沟通的功能决策功能1.获得资讯收集意见2.交换意见观念互动3.影响他人的行为10确认检核整合意见判断资讯收集资讯正确领导决定对策专业经验分析问题确认目标11沟通能力是决定管理者;是否有潜力更上层楼的关键因素之一;这是一种以语言和文字;简明有效的提出构想与传递资讯的能力; __________美孚石油公司董事长华纳12人际沟通的重要商场上的成功85%取决于沟通;美国企业经理94%的时间在沟通;美国联邦品保机构已将沟通能力列入质量保证成功的先决条件;全球7500位经理人最欣赏的老板※激励人心的能力沟通※理解他人的观点※热情畅谈的能力13沟通的技巧三()积极倾听-------专心聆听对方的陈述理解传达的讯息------14沟通的技巧四()同理心--------说出对方当下的情绪以及背后的期待---------15沟通的技巧五()谨慎探询真象-----询问有利的问题以协助对方及自己思考--------16沟通取向=想法+角色=行为+价值观优点与缺点其实是同一种行为缺点只是优点的过当或不足优缺点的认定是主观的优缺点的描述因人而异了解每个人皆有正向意图欣赏并学习了解彼此价值差异人际风格的学习要点不将人贴标签,而是了解行为与价值观不须改变风格,着重在管理与发展长处不同风格经由不同方式达到个人成就与满足感强调可以调整的行为习惯行为风格分析以事为主分析型实践型内敛B AC D果断表现型理想型20与理想型相处强调信任与忠诚特别重视您的存在价值给与真诚及强烈的肯定讲求团队合作协助他将理想变为现实专注倾听并给予认同与理性型相处系统完整的资讯不必牵扯太多情绪提供成功案例的作法给他足够的时间思考对数据资料谨慎清楚按部就班的执行与实践型相处了解对事不对人绝对肯定他的能力支持他的看法把握事情完成的时效与正确性掌握要点当由他做选择直截了当由他做选择不重复提问不出错与表现型相处先关心个人并营建快乐气氛协助他对资讯再三求证让他觉得受重视多运用人际网络喜欢非正式的聚会谈谈流行事物沟通上的“黄金律”“你们希望别人怎样对待你们,你们也要怎样对待别人”“用别人喜欢被对待的方式来对待他们”25少说抱怨的话,多说宽容的话;少说讽刺的话,多说尊重的话;少说拒绝的话,多说关怀的话;少说命令的话,多说商量的话;少说批评的话,多说鼓励的话.度量大一点做事多一点行动快一点效率高一点脑筋活一点理由少一点嘴巴甜一点脾气小一点说话轻一点微笑露一点感谢伤害你的人,因为它磨练了你的心志;感激欺骗你的人,因为它增进了你的智慧;感激中伤你的人,因为它砥励了你的人格;感激鞭打你的人,因为它激发了你的斗志;感激遗弃你的人,因为它教导了你的独立;感激绊倒你的人,因为它强化了你的双腿;感激斥责你的人,因为它提醒了你的缺点.沟通学习五项修炼一种精神两种意识三个三四个四五转变一种精神正向且周延的思考两种意识服务意识双赢意识三个三倾听沟通三步骤同理心回馈此时此刻沟通三原则绝对尊重绝对保密V I S U A L沟通三要素V O C A L32四个四沟通四字诀人际沟通四风格LI S T ENI N G理想S H A R E I N G实践S M A R T理性S Y M P A T H Y表现态度四注意问题处理四步骤态度影响态度肯定对方大态度由你选择异中求同态度可以改变创造双赢33五转变建议转为鼓励分析转为同理差共转为欣赏抱怨转为回馈争执转为学习沟通之门的钥匙第一把钥匙——欲望第二把钥匙——详探究竟第三把钥匙——掌握基本技巧第四把钥匙——勤奋练习第五把钥匙——耐心※※35影响团队绩效的关键要素共同愿景凝聚力信任领导团队绩效团队规范专长特色沟通互动二十一世纪中沟通的差异*宏观面---纳百江成大海*微观面----从高高在上到一视同仁书面沟通内部通讯内部刊物员工手册年度报告信件告示板※※文件通知问题的类型封闭式----用来确认资讯的正确性开放式----鼓励应征者详细回答,表达情绪探询式-----用来澄清之前谈过的主题与资讯假设性-----用来了解解决问题的方式报告与建议策略建构4 P S演练Pos i t i on 立场Pr obl em 问题Possi b i l i t i es 可能性Pr opos a l 建议※※马斯洛需求原理自我实现的需求受尊重的需求社会性的需求安全感的需求生理层面的需求部署风格领导方式给予再三肯定让部属可依赖理想型互相设定目标请求团队合作行事公平公正让部属展现价值分享学习成长有远见有抱负给予自主机会让部属有机会发辉实践型指出工作范围极限请求合理赏罚制度行事创新有挑战性让部属展现自信开放讨论发言空间有决断力有搭当条理分明前后一致理性型目的清楚具有系统重视细节让部属安全客观合理有定力很稳定友善亲切肯定弹性表现型人际关系请求团队精神工作气氛好常鼓励部属展现幽默感开心生活42。
联想ERP系统概念专题培训1. 简介本文档提供了联想ERP(Enterprise Resource Planning)系统的概念专题培训。
在本次培训中,我们将介绍ERP系统的定义、功能、优势以及如何应用于实际业务场景。
通过本次培训,您将对联想ERP系统有一个整体的了解,并了解如何在您的组织中使用该系统。
2. ERP系统概述2.1 定义ERP系统是一种集成管理系统,它通过集成各个业务部门的功能,实现企业资源的统一管理和优化。
通过 ERP系统,企业可以实现业务流程的整合、信息的共享、决策的协同,从而提高企业的综合竞争力。
2.2 功能•供应链管理:包括采购、供应商管理、物流管理等功能,帮助企业优化供应链运作,实现供应链的协同管理。
•生产管理:包括生产计划、物料需求计划、生产调度等功能,帮助企业提高生产效率和产品质量。
•销售管理:包括订单管理、客户关系管理、销售预测等功能,帮助企业提升销售业绩和客户满意度。
•财务管理:包括会计核算、预算管理、资金管理等功能,帮助企业实现财务数据的统一管理和财务决策的支持。
•人力资源管理:包括人事管理、薪酬管理、绩效管理等功能,帮助企业优化人力资源管理流程。
2.3 优势•效率提升:通过自动化、标准化的业务流程,减少人工操作和人为错误,提高工作效率。
•信息集成:通过集成不同部门的信息和业务流程,实现信息共享和业务协同,避免信息孤岛和信息重复录入。
•数据分析:通过采集和分析大量数据,帮助企业进行决策分析、销售预测等,提高决策的准确性和效果。
•客户满意度:通过客户关系管理模块,帮助企业更好地了解客户需求,提供个性化的服务,提升客户满意度。
3. 联想ERP系统应用案例3.1 案例一:供应链管理公司A是一家制造型企业,通过联想ERP系统的供应链管理模块,实现了以订单为导向的生产调度,及时采购原材料,并优化了物流管理流程,减少了库存和运输成本,提高了交付效率。
3.2 案例二:财务管理公司B是一家中小型企业,通过联想ERP系统的财务管理模块,实现了财务数据的自动采集和报表生成,大大提高了财务数据的准确性和报表的及时性,帮助企业实现了财务决策的支持。


联想公司入职培训课程联想公司入职培训课程随着全球范围的商业和信息技术的迅速发展,联想公司成为了一家全球知名的科技公司。
在这样的背景下,全球各地不断涌入着新入职员工,如何让他们尽快适应公司的氛围和完成各项工作任务是联想公司需要考虑并解决的问题之一,而入职培训课程的开展则是解决这一问题的一个重要举措。
一、基础课程入职培训的第一部分是基础课程,旨在帮助新员工快速了解联想公司的背景和文化,并消除他们的初入门会带来的不适感和紧张感。
这一课程包括以下几个方面:1、公司概况。
这个环节主要向新员工介绍联想公司的概括,包括公司的发展历程、绩效、经营范围、公司文化,让新员工更好地理解公司的整体规模和方向。
2、部门介绍。
可以选取一些重点部门,让新员工了解公司中各部门的职能以及互相之间的关系。
3、人员介绍。
新员工与同事沟通的过程、对公司的了解程度以及未来的发展方向都会牵扯到人员介绍。
这里,可以组织入职人员参观公司的各个部门,让他们与同事更好地互动、讨论和交流。
4、企业文化。
联想公司非常重视企业文化,因此该课程也要加以重视。
通过展示公司的企业文化,新员工可以更好地了解公司的理念,进而更好地融入公司的文化氛围和发展环境。
二、技能课程基础课程结束后,就要进行技能课程的学习。
技能课程是入职培训的重中之重,它能够帮助新员工更好地掌握公司的职业技能,逐渐成为一名优秀的联想员工。
技能课程应结合新员工的各个方面,从实践出发,帮助大家掌握更加全面和实用的职业技能。
1、业务课程。
在经营和管理业务方面,入职员工需要学会尽早掌握一些业务技能,了解公司的产品,并且熟练掌握公司的业务流程。
业务课程是一个提供这些知识和技能的好机会。
2、组织管理课程。
这个环节主要是向新员工详细介绍联想公司的管理制度、规章制度和相关流程。
新员工需要了解公司的工作流程和相应要求,包括日常工作协作、人际沟通和工作任务的分配等。
3、战略规划课程。
这个环节可以帮助新员工了解公司的发展规划、营销战略、客户服务等方面的要求和流程。

Lenovo NetworkONIE Quick Start GuideNote: Before using this information and the product it supports, read the general information in the Safety information and Environmental Notices and User Guide documents on the Lenovo Documentation CD, and the Warranty Information document that comes with the product.First Edition (June 2016)© Copyright Lenovo 2016LIMITED AND RESTRICTED RIGHTS NOTICE: If data or software is delivered pursuant a General Services Administration “GSA” contract, use, reproduction, or disclosure is subject to restrictions set forth in Contract No. GS-35F-05925.Lenovo and the Lenovo logo are trademarks of Lenovo in the United States, other countries, or both.ContentsOverview . . . . . . . . . . . . . . . . . . . . . . . . . . . .5Connecting to the G8272 . . . . . . . . . . . . . . . . . . . . .7Switch Unit . . . . . . . . . . . . . . . . . . . . . . . . . . . . 7Mini-USB Serial Console Port . . . . . . . . . . . . . . . . . . . . 8Geographic Layout of the Temperature Sensors . . . . . . . . . . . . . 9 ONIE on the G8272 . . . . . . . . . . . . . . . . . . . . . . . 11Installing the ONIE FoD License Key . . . . . . . . . . . . . . . . . . .12Obtaining the ONIE License Key . . . . . . . . . . . . . . . . . . .12Installing the ONIE License Key on CNOS . . . . . . . . . . . . . . .13Uninstalling the ONIE License Key on CNOS . . . . . . . . . . . .13 Installing ONIE . . . . . . . . . . . . . . . . . . . . . . . . . . . .14Installing ONIE on CNOS . . . . . . . . . . . . . . . . . . . . . .14 Booting in ONIE Mode . . . . . . . . . . . . . . . . . . . . . . . . .16Booting in ONIE Install Mode . . . . . . . . . . . . . . . . . . . .17Booting in ONIE Rescue Mode . . . . . . . . . . . . . . . . . . . .17Booting in ONIE Uninstall Mode . . . . . . . . . . . . . . . . . . .18Booting in ONIE Update Mode . . . . . . . . . . . . . . . . . . . .18 The Boot Management Menu . . . . . . . . . . . . . . . . . . . . . .19Uninstalling the Lenovo Network OS . . . . . . . . . . . . . . . . . . .20Using ONIE without Lenovo Network OS . . . . . . . . . . . . . . . . .21© Copyright Lenovo 2016 Contents 34 Lenovo ONIE Quick Start GuideOverviewThe Open Network Install Environment (ONIE) is a small Linux-based operatingsystem that provides an open install environment for network switches withoutoperating systems.ONIE enables a network switch ecosystem where end-users can choose amongdifferent Network Operating Systems (NOS). Practically, ONIE boots on a switch,discovers NOS installer images available on the local network or USB drive, copiesthe chosen image to the switch, and provides an environment where the installercan load the NOS onto the switch.For more details about ONIE, go to .To download the Lenovo ONIE image, G8272-ONIE-CNOS-10.1.1.0.imgs,which is compatible with the Lenovo Cloud Network OS, visit the following link:https:///support/fixcentral/To download an open-source ONIE image, go to the following link:https:///lenovo-network/onieThe image is called onie-lenovo_g8272-r0.bin.© Copyright Lenovo 201656 Lenovo ONIE Quick Start GuideConnecting to the G8272This section describes how to connect to the Lenovo RackSwitch G8272. For moredetails about the G8272 and on how to install the switch hardware, consult theLenovo RackSwitch G8272 Installation Guide.Switch UnitThe G8272 is a 1U GbE switch and it can be rack-mounted in a horizontal position.The following illustrations show the features on the front and rear panels of theswitch:Figure1.RackSwitch G8272 front panelFigure2.RackSwitch G8272 management panel detailFigure3.RackSwitch G8272 rear panel© Copyright Lenovo 201678 Lenovo ONIE Quick Start GuideMini-USB Serial Console PortThe mini-USB port on the front management panel is available for switch console management. The port operates using RS-232 serial communications. A compatible console cable kit is included with the switch.To connect a computer or terminal to the switch using the included kit, first connect the console cable to the mini-USB port on the front panel. Connect one end of the Category 5 patch cable to the RJ-45 port on the console cable and the other end of the patch cable to the RJ-45-to-DB9 adapter (see the following illustration).Figure 4.Console cable connectionsThe computer or terminal must run a terminal emulator (for example, SecureCRT, HyperTerminal, or PuTTY). The console port terminal emulation requirements are as follows:• Default baud rate: 9,600 bps • Character size: 8 characters • Parity: none • Stop bits: 1• Data bits: 8• Flow control: noneTo PC TerminalTo SwitchRJ-45 AdapterCategory 5Patch CableSwitch Console CableGeographic Layout of the Temperature SensorsThe following illustrations show the location of the temperature sensors (pointedout with red arrows) on the main and CPU boards.Figure5.RackSwitch G8272 CPU Board Temperature Sensors© Copyright Lenovo 2016 Connecting to the G8272 9Figure6.RackSwitch G8272 Main Board Temperature Sensors10 Lenovo ONIE Quick Start GuideONIE on the G8272The Lenovo RackSwitch G8272 comes out of the box with Lenovo EnterpriseNetwork OS (ENOS) already installed on the switch.To ensure maximum security, ONIE is not available on the switch by default. Toenable the running of ONIE on the switch, you must follow these steps:1.Download and install the Lenovo Cloud Network OS.You can download the latest CNOS image from the following link:https:///support/fixcentral/The CNOS image is called G8272-CNOS-10.1.1.0.imgs.For details on how to upgrade the switch operating system from ENOS to CNOS,see the Lenovo Network Release Notes for Lenovo Cloud Network Operating System.2.Obtain and install an ONIE FoD license key.For details on how to acquire and install the ONIE license key on the switch, see“Installing the ONIE FoD License Key” on page12.3.Download and install an ONIE image.For details on how to install ONIE on a switch, see “Installing ONIE” on page14.© Copyright Lenovo 201611Installing the ONIE FoD License KeyONIE is currently disabled by default and it can be activated only using a Featureon Demand (FoD) license key. The process of obtaining and installing a license keyis described in the following pages.Obtaining the ONIE License KeyThe ONIE license key or activation key can be acquired using the IBM System xFeatures on Demand (FoD) website:/systems/x/fod/You can also use the website to review and manage the license, and to obtainadditional help if required.Note: An IBM ID and password are required to log into the FoD website. If you donot have an IBM ID, you can register at the website.The ONIE FoD license key is provided as a file that must be downloaded to theG8272. To obtain an activation key, use the FoD website to acquire anAuthorization Code.To obtain the Authorization Code, you will need to provide the unique ID (UID) ofthe specific G8272 where the ONIE license key will be installed. The UID is the last12 characters of the G8272 serial number. This serial number is located on the PartNumber (PN) label and is also displayed during successful login to the device.You can also view the UID of a switch using the following command:G8272> display license host-idSystem serial number: Y052MV4CR026Once the FoD license key file have been acquired from the FoD website, it must beinstalled on the G8272.12 Lenovo ONIE Quick Start GuideInstalling the ONIE License Key on CNOSThe following example depicts use of the G8272 Command Line Interface (CLI)running Lenovo Cloud Network OS (CNOS) to install the ONIE license key.1.Log into the G8272 and enter Global Configuration command mode:G8272> enableG8272# configure deviceG8272(config)#2.You can install the license key by copying it from a remote server or a USB device:●remote FTP, SCP, SFTP, or TFTP server:G8272(config)# license install {ftp|scp|sftp|tftp} <server IP address and filepath> vrf managementFor example, using a TFTP server:G8272(config)# license install tftp tftp://10.120.33.12/fod-keys/fodEE3vrf management●USB device:G8272(config)# license install usb1 <file path>For example:G8272(config)# license install usb1 fod-keys/fodEE3The license key has now been successfully installed on the switch.3.To view installed license keys, use the following command:G8272> display license briefUninstalling the ONIE License Key on CNOSTo remove the ONIE license key from the switch, use the following command:G8272(config)# no license install <license file>For example:G8272(config)# no license install fodEE3Note:When removing the ONIE license key from the switch, the ONIE softwareimage is also removed.© Copyright Lenovo 2016 ONIE on the G8272 13Installing ONIEOnly after you have successfully installed the appropriate FoD license key, you willbe able to install ONIE on the switch. For more details, see “Installing the ONIEFoD License Key” on page12.Installing ONIE on CNOSTo install ONIE on the G8272 running CNOS, use the following steps:Note:The commands used to install ONIE on the switch will display an error if theONIE license key is not installed.1.Download an ONIE image for the G8272 from the following link:https:///support/fixcentral/The ONIE image is called G8272-ONIE-CNOS-10.1.1.0.imgs.2.Upload the ONIE image to a local server or a USB device.3.Connect to the G8272 using the mini-USB serial console port. For more details, see“Connecting to the G8272” on page7.4.After connecting to the switch, enter Privileged EXEC configuration mode:G8272> enableG8272#e one of the following commands to copy the ONIE image:●using FTP, SCP, SFTP, or TFTP:cp ftp<FTP URL>system-image onie [vrf management]cp scp <SCP URL> system-image onie [vrf management]cp sftp <SFTP URL> system-image onie [vrf management]cp tftp <TFTP URL> system-image onie [vrf management]●using a USB device:cp usb1 <file path> system-image onie [vrf management]14 Lenovo ONIE Quick Start GuideFollowing is an example using the cp tftp command:G8272# cp tftp tftp://10.72.97.98/onie-img/G8272-ONIE-CNOS-10.1.1.0.imgssystem-image onie vrf managementCConfirm download operation? (y/n) [n] yDownload in progress...Copy SuccessInstall image...This takes about 90 seconds. Please waitValid image detected.Check image signature succeededExtracting image: 100%Installing ONIE:Updating flash: 100%Updating ONIE eeprom with manufacturing fields...ONIE image installation succeeded.ONIE image now contains Software Version 10.1.1.06.To check if the ONIE image was successfully installed on the switch, use thefollowing command:G8272# display bootCurrent FLASH software:active image: version 10.1.1.0standby image: emptyUboot: version 10.1.1.0ONIE: version 10.1.1.0Currently set to boot software active imageCurrently scheduled reboot time: noneCurrent port mode: default modeIn the command output, the current ONIE image installed on the switch isdisplayed under the Current FLASH software section.© Copyright Lenovo 2016 ONIE on the G8272 15Booting in ONIE ModeAfter you have activated and installed an ONIE image, you can boot the switch inONIE mode. ONIE offers four modes for booting, each providing a differentoperation:●ONIE install mode (“Booting in ONIE Install Mode” on page17)●ONIE rescue mode (“Booting in ONIE Rescue Mode” on page17)●ONIE uninstall mode (“Booting in ONIE Uninstall Mode” on page18)●ONIE update mode (“Booting in ONIE Update Mode” on page18)There are two ways to boot the switch in an ONIE mode:●using the Command Line Interface (CLI):startup image onie-image installstartup image onie-image rescuestartup image onie-image uninstallstartup image onie-image update●using the Boot Management Menu (for more details, see “The Boot ManagementMenu” on page19)Note:For CNOS, the commands for booting in the different ONIE modes willdisplay an error if the ONIE license key is not installed on the switch. For details,see “Installing the ONIE FoD License Key” on page12.16 Lenovo ONIE Quick Start GuideBooting in ONIE Install ModeThis mode is used to install a NOS using ONIE. The ONIE install mode boots theONIE kernel and file-system and executes the ONIE discovery process. Thediscovery process uses a number of different mechanisms to find a NOS installerprogram.Once a NOS installer is found, it is downloaded and executed. The installer loadsthe Network OS on the switch, updates required ONIE environment variables andreboots the switch.The switch will now run its newly installed Network OS and behave like a regularswitch. The user can, at any point, reboot and run the ONIE installer again toinstall another Network OS.The Lenovo ONIE installer image, which installs the Lenovo Cloud Network OS viaONIE, is called onie-installer-powerpc-lenovo_g8272-r0, and it isavailable at the following link:https:///support/fixcentral/To boot the switch in ONIE install mode on the next reload, use the followingcommand from the switch CLI:G8272(config)# startup image onie-image installTo check in which ONIE mode the switch is configured to boot, use the followingcommand from the switch CLI:G8272(config)# display bootCurrent FLASH software:active image: version 10.1.1.0standby image: version 10.1.1.0Uboot: version 10.1.1.0ONIE: version 10.1.1.0Currently set to boot ONIE install modeCurrently scheduled reboot time: noneCurrent port mode: default modeBooting in ONIE Rescue ModeONIE rescue and recovery mode is useful when trying to recover from a brokenNOS image. It works similarly to the ONIE install mode, except the ONIEdiscovery process is disabled. ONIE will not try to find and install a NOS image.This allows for the troubleshooting of the system.To boot the switch in ONIE rescue mode on the next reload, use the followingcommand from the switch CLI:G8272(config)# startup image onie-image rescue© Copyright Lenovo 2016 ONIE on the G8272 1718 Lenovo ONIE Quick Start GuideBooting in ONIE Uninstall ModeThis mode is used to uninstall a NOS using ONIE. The ONIE uninstall mode boots the ONIE kernel and deletes the NOS image running on the switch. After the uninstall is complete, the ONIE discovery process is executed.To boot the switch in ONIE uninstall mode on the next reload, use the following command from the switch CLI:Note:The following warning will be displayed after choosing ONIE uninstall mode and you will be prompted for confirmation:Once you confirm, the switch will boot in ONIE uninstall mode on the next reload. For more details, see “Uninstalling the Lenovo Network OS” on page 20.Booting in ONIE Update ModeONIE update mode will install a new version of ONIE on the switch, including the boot loader and the Linux kernel. It works similarly to the ONIE install mode, except the discovery process will search for an ONIE image instead, and not a NOS image.Notes:●This will only upgrade the ONIE partition on the switch and will not affect the NOS image. ONIE installer images that can be used with ONIE Update mode are available at the following link:https:///lenovo-network/onieThe installer image is called onie-updater-powerpc-lenovo_g8272-r0.●This will also install a different version of the ONIE boot loader, which does not support running Lenovo Network OS. If you wish to boot Lenovo NOS, you will have to re-install it by using ONIE Install mode (for more details, see “Booting in ONIE Install Mode” on page 17).To boot the switch in ONIE update mode on the next reload, use the following command from the switch CLI:Note:Upon reloading after the update process is completed, the switch will not be able to load the Lenovo Network OS, booting into ONIE Install mode instead.G8272(config)# startup image onie-image uninstall WARNING: Booting ONIE in uninstall mode will completely uninstall the operating system!Only the ONIE image will be preserved.Are you sure you want the next boot to uninstall the OS? (y/n)G8272(config)# startup image onie-image update© Copyright Lenovo 2016ONIE on the G8272 19The Boot Management MenuThe Boot Management menu is another way to access ONIE and configure the switch to boot in different ONIE modes.You can interrupt the startup process of the switch and enter the Boot Management menu from the serial console port. When the system displays the following message, press Shift + B . The Boot Management menu will appear.Note:For CNOS, the options present in the ONIE submenu will return an error message, unless the ONIE license key is installed on the switch. For more details, see “Installing the ONIE FoD License Key” on page 12.To enter the ONIE submenu, press O .The ONIE submenu allows you to perform the following actions:●To boot the switch in ONIE Install mode, press I . For more details, see “Booting in ONIE Install Mode” on page 17.●To boot the switch in ONIE Rescue mode, press R . For more details, see “Booting in ONIE Rescue Mode” on page 17.●To boot the switch in ONIE Update mode, press U . For more details, see “Booting in ONIE Update Mode” on page 18.●To boot the switch in ONIE Uninstall mode, press D . For more details, see “Booting in ONIE Uninstall Mode” on page 18.●To boot the switch using the installed NOS image, press N .●To exit the ONIE submenu and return to the Boot Management Menu, press E .The system is going down for reboot NOW!INIT: reboot: Restarting system...Press shift-B for startup menu or shift-R for recovery mode: ..Running Startup Menu...Boot Management MenuM - Change boot mode (Legacy vs NextGen)I - Change booting imageR - Boot in recovery mode (tftp and xmodem download of images to recover switch)P - Password resetO - ONIE submenuQ - RebootE - ExitPlease choose your menu option:ONIE MenuI - Startup ONIE OS installerN - Startup NOS mode (system default)R - Startup ONIE rescue modeU - Startup ONIE self update modeD - Startup ONIE OS uninstallerE - Exit ONIE menuOption? :20 Lenovo ONIE Quick Start Guide Uninstalling the Lenovo Network OSIf you wish to run another network operating system (NOS), you can uninstall the Lenovo Network OS by using the ONIE Uninstall mode. For more details, see “Booting in ONIE Uninstall Mode” on page 18.Notes:●If the switch does not have ONIE installed, you must first install a ONIE FoD license key and then set up the software on the networking device. For more details, see “Installing the ONIE FoD License Key” on page 12 and “Installing ONIE” on page 14.●If you are connected to the G8272 through the mini-USB serial console port, once you have uninstalled the Lenovo Network OS you must configure the default baud rate from 9,600 bps to 115,200 bps.●Once you have uninstalled the Lenovo Network OS from the network device, see “Using ONIE without Lenovo Network OS” on page 21.After booting in ONIE Uninstall mode, the following should be displayed: Once the NOS uninstall process is complete, the switch is reloaded and configured to boot in ONIE Install mode.Loading Open Network Install Environment ...Platform: -lenovo_g8272-r0Version : lenovo-internal...discover: Uninstall mode detected. Running uninstaller.Erasing u-boot environment NOR flash regionErasing 128 Kibyte @ 20000 - 100% complete.Erasing internal mass storage device: /dev/mmcblk0 (7631MB)Percent complete: 100%Erase complete.Uninstall complete. Rebooting...discover: Uninstall mode detected. No discover stopped.Stopping: dropbear ssh daemon... done.Stopping: telnetd... done.Stopping: syslogd... done.Info: Unmounting kernel filesystemsThe system is going down NOW!Sent SIGTERM to all processesSent SIGKILL to all processesRequesting system rebootRestarting system....discover: installer mode detected. Running installer.Starting: discover... done.Please press Enter to activate this console. Info: eth0: Checking link... up.Info: Trying DHCPv4 on interface: eth0Warning: Unable to configure interface using DHCPv4: eth0ONIE: Using default IPv4 addr: eth0: 192.168.3.10/24ONIE: Using link-local IPv4 addr: eth0: 169.254.166.99/16ONIE: Starting ONIE Service DiscoveryUsing ONIE without Lenovo Network OSIf you have removed the Lenovo Network OS from the switch by using ONIEUninstall mode, we recommend that you consult the official documentation fromthe ONIE website:https:///opencomputeproject/onie/wiki/Quick-Start-GuideIf you are having trouble with an ONIE-based installation, follow the suggestionsfrom the ONIE website:https:///opencomputeproject/onie/wiki/Quick-Start-Guide#debugging-an-installation© Copyright Lenovo 2016 ONIE on the G8272 2122 Lenovo ONIE Quick Start Guide。
联想入职培训资料导言:联想集团是一家全球知名的科技企业,致力于通过创新技术来改善人们的生活品质。
作为新员工,你将接受一系列的入职培训,帮助你更好地了解联想的企业文化、业务及职业发展机会。
本资料将介绍联想入职培训的内容和相关注意事项。
第一章:公司简介1.1 联想简介- 公司历史和发展- 公司使命和愿景- 全球布局与领域涉及1.2 企业文化- 联想价值观- 团队合作与创新精神- 企业社会责任第二章:产品与业务2.1 产品及解决方案- 个人电脑与移动设备- 数据中心与云计算- 智能设备与物联网2.2 市场与竞争分析- 全球市场格局- 竞争对手分析- 市场趋势与机会2.3 销售与营销策略- 渠道管理与销售模式- 客户关系管理- 市场推广与品牌建设第三章:职场技能与素养3.1 沟通与协作- 高效沟通技巧- 团队合作与协调能力- 跨部门合作与解决问题3.2 领导力与管理- 领导风格与激励- 目标设定与执行- 团队管理与人才培养3.3 职业素养- 商业礼仪与形象管理- 个人效率与时间管理- 跨文化意识与全球化视野第四章:职业发展与机会4.1 职业规划- 职业路径与发展方向- 职业发展规划工具- 晋升机制与职业发展支持4.2 培训与发展- 内训与外部培训资源- 职业技能培训与认证- 培训计划与自学能力4.3 跨部门与跨国交流- 内部岗位轮岗与交流计划- 跨国公司文化与业务交流- 跨部门合作与项目参与机会结论:联想入职培训将为你提供必要的知识与技能,帮助你更好地适应公司的文化和工作环境。
同时,通过职业发展与机会的介绍,你将了解到在联想集团内不断成长和进步的机会。
祝你在联想的职业道路上取得成功!附录:- 公司组织结构图- 入职培训时间表- 培训资源与参考书目。