【免费下载】Delphi汇出Excel时Excel单元格格式设置附Delphi操作Excel方法
- 格式:pdf
- 大小:234.34 KB
- 文档页数:10
delphi dbgrid 导出Excel表///////// 利用剪贴板,速度很快!适合装有Excel的机器///////////////////// USES Clipbrd,ComObj;procedure TForm1.Button1Click(Sender: TObject);varstr:string;i:Integer;excelapp,sheet:Variant;begin// lbl2.Caption:=DateTimeToStr(Now);str:='';dbgrd1.DataSource.DataSet.DisableControls;for i:=0 to dbgrd1.DataSource.DataSet.FieldCount-1 dostr:=str+dbgrd1.DataSource.DataSet.fields[i].DisplayLabel+char(9);str:=str+#13;dbgrd1.DataSource.DataSet.First;while not(dbgrd1.DataSource.DataSet.eof) do beginfor i:=0 to dbgrd1.DataSource.DataSet.FieldCount-1 dostr:=str+dbgrd1.DataSource.DataSet.Fields[i].AsString+char(9);str:=str+#13;dbgrd1.DataSource.DataSet.next;lbl1.Caption:=IntToStr(dbgrd1.DataSource.DataSet.RecNo);Application.ProcessMessages;end;//end whiledbgrd1.DataSource.DataSet.EnableControls;clipboard.Clear;Clipboard.Open;Clipboard.AsText:=str;Clipboard.Close;excelapp:=createoleobject('excel.application');excelapp.workbooks.add(1); // excelapp.workbooks.add(-4167);sheet:=excelapp.workbooks[1].worksheets[1];:='sheet1';sheet.paste;Clipboard.Clear;// :='宋体';// sheet.columns.font.size:=9;// sheet.Columns.AutoFit;excelapp.visible:=true;// lbl3.Caption:=DateTimeToStr(Now);end;/////////////////////////////////////////////////////////利用TStringList,速度很快!适合没有装Excel的机器////////////////////////procedure TForm1.Button1Click(Sender: TObject);vars:TStringList;str:string;i:Integer;begin// lbl1.Caption:=DateTimeToStr(Now);str:='';dbgrd1.DataSource.DataSet.DisableControls;for i:=0 to dbgrd1.DataSource.DataSet.FieldCount-1 dostr:=str+dbgrd1.DataSource.DataSet.fields[i].DisplayLabel+char(9);str:=str+#13;dbgrd1.DataSource.DataSet.First;while not(dbgrd1.DataSource.DataSet.eof) do beginfor i:=0 to dbgrd1.DataSource.DataSet.FieldCount-1 dostr:=str+dbgrd1.DataSource.DataSet.Fields[i].AsString+char(9);str:=str+#13;dbgrd1.DataSource.DataSet.next;// lbl3.Caption:=IntToStr(dbgrd1.DataSource.DataSet.RecNo);// Application.ProcessMessages;end;//end whiledbgrd1.DataSource.DataSet.EnableControls;s:=TStringList.Create;s.Add(str);s.SaveToFile('c:\temp.xls');//保存到c:\temp.xlss.Free;// lbl2.Caption:=DateTimeToStr(Now);end;////////////////////////////////////////////////***********************************************************(Delphi)Excel的快速导入***********************************************************(Delphi)Excel的快速导入//怎样可以提高EXCEL的导出速度?uses ADODB,excel97,adoint;function TForm1.ExportToExcel: Boolean;varxlApp,xlBook,xlSheet,xlQuery: Variant;adoConnection,adoRecordset: Variant;beginadoConnection := CreateOleObject('ADODB.Connection');adoRecordset := CreateOleObject('ADODB.Recordset');adoConnection.Open('Provider=Microsoft.Jet.OLEDB.4.0;Data Source=E:\Tree.mdb;Persist Security Info=False');adoRecordset.CursorLocation := adUseClient;adoRecordset.Open('SELECT * FROM tree',adoConnection,1,3);tryxlApp := CreateOleObject('Excel.Application');xlBook := xlApp.Workbooks.Add;xlSheet := xlBook.Worksheets['sheet1'];//设置这一列为文本列,让"00123" 正确显示,而不是自动转换为"123"xlSheet.Columns['C:C'].NumberFormatLocal := '@';xlApp.Visible := True;//把查询结果导入EXCEL数据xlQuery := xlSheet.QueryTables.Add(adoRecordset,xlSheet.Range['A1']); //关键是这一句xlQuery.FieldNames := True;xlQuery.RowNumbers := False;xlQuery.FillAdjacentFormulas := False;xlQuery.PreserveFormatting := True;xlQuery.RefreshOnFileOpen := False;xlQuery.BackgroundQuery := True;//xlQuery.RefreshStyle := xlInsertDeleteCells;xlQuery.SavePassword := True;xlQuery.SaveData := True;xlQuery.AdjustColumnWidth := True;xlQuery.RefreshPeriod := 0;xlQuery.PreserveColumnInfo := True;xlQuery.FieldNames := True;xlQuery.Refresh;xlBook.SaveAs('d:\fromD.xls',xlNormal,'','',False,False);finallyif not VarIsEmpty(XLApp) then beginXLApp.displayAlerts:=false;XLApp.ScreenUpdating:=true;XLApp.quit;end;end;end;///////////////////////////////////////////////////procedure saveToExcel();varEclapp,workbook:variant;i,n:integer;beginif not adoquery1.Active then exit;if adoquery1.RecordCount<=0 then exit;if application.MessageBox('确认导出excel表吗?','提示',mb_okcancel+mb_iconinformation)=idcancel then exit;Eclapp := createoleobject('Excel.Application');Eclapp.workbooks.add;for i:=0 to dbgrid2.FieldCount-1 dobeginEclapp.cells[1,i+1]:=dbgrid2.Columns[i].Title.Caption;end;Eclapp.cells[1,5]:='签字';adoquery1.First;n:=2;while not adoquery1.Eof doeclapp.cells[n,1] := adoquery1.Fields[0].AsString;eclapp.cells[n,2] := adoquery1.Fields[1].AsString;eclapp.cells[n,3] := adoquery1.Fields[2].AsString;eclapp.cells[n,4] := adoquery1.Fields[4].AsString;eclapp.cells[n,6] :=' ';inc(n);adoquery1.Next;end;eclapp.cells[n,1] := '满足条件记录的总数为:'+inttostr(adoquery1.RecordCount)+'条';application.MessageBox('数据导出完成!','提示',mb_ok+mb_iconinformation);eclapp.visible := true;end;方法二procedure CopyDbDataToExcel(Args: array of const);variCount, jCount: Integer;XLApp: Variant;Sheet,range: Variant;I: Integer;beginScreen.Cursor := crHourGlass;if not VarIsEmpty(XLApp) thenbeginXLApp.DisplayAlerts := False;XLApp.Quit;VarClear(XLApp);end;tryXLApp:=CreateOleObject(Excel.Application);exceptScreen.Cursor := crDefault;Exit;end;XLApp.WorkBooks.Add;XLApp.SheetsInNewWorkbook := High(Args) + 1;for I := Low(Args) to High(Args) doXLApp.WorkBooks[1].WorkSheets[I+1].Name := TDBGrid(Args[I].VObject).Name;Sheet := XLApp.Workbooks[1].WorkSheets[TDBGrid(Args[I].VObject).Name];if not TDBGrid(Args[I].VObject).DataSource.DataSet.Active thenbeginScreen.Cursor := crDefault;Exit;end;TDBGrid(Args[I].VObject).DataSource.DataSet.first;for iCount := 0 to TDBGrid(Args[I].VObject).Columns.Count - 1 dorange:=sheet.range[sheet.cells[1,1],sheet.cells[1,iCount + 1]];range.select;range.merge;sheet.cells[1,1]:=[+fqueryhuman.dbedit2.text+]+个人报销记录(普通报销、特殊报销)查询;jCount :=2;for iCount := 0 to TDBGrid(Args[I].VObject).Columns.Count - 1 doSheet.Cells[2, iCount + 1]:=TDBGrid(Args[I].VObject).Columns.Items[iCount].Title.Caption; while not TDBGrid(Args[I].VObject).DataSource.DataSet.Eof dobeginfor iCount := 0 to TDBGrid(Args[I].VObject).Columns.Count - 1 doSheet.Cells[jCount + 1, iCount + 1] :=TDBGrid(Args[I].VObject).Columns.Items[iCount].Field.AsString;Inc(jCount);TDBGrid(Args[I].VObject).DataSource.DataSet.Next;end;XlApp.Visible := True;end;Screen.Cursor := crDefault;end;方法三delphi导入/导出excel2008年03月02日星期日16:39从Excel文件中,导入数据到SQL数据库中,很简单,直接用下面的语句:/*===================================================================*/--如果接受数据导入的表已经存在insert into 表select * fromOPENROWSET('MICROSOFT.JET.OLEDB.4.0','Excel 5.0;HDR=YES;DATABASE=c:\test.xls',sheet1$)--如果导入数据并生成表select * into 表fromOPENROWSET('MICROSOFT.JET.OLEDB.4.0','Excel 5.0;HDR=YES;DATABASE=c:\test.xls',sheet1$)/*===================================================================*/--如果从SQL数据库中,导出数据到Excel,如果Excel文件已经存在,而且已经按照要接收的数据创建好表头,就可以简单的用:insert into OPENROWSET('MICROSOFT.JET.OLEDB.4.0','Excel 5.0;HDR=YES;DATABASE=c:\test.xls',sheet1$)select * from 表--如果Excel文件不存在,也可以用BCP来导成类Excel的文件,注意大小写:--导出表的情况EXEC master..xp_cmdshell 'bcp 数据库名.dbo.表名out "c:\test.xls" /c -/S"服务器名" /U"用户名" -P"密码"'--导出查询的情况EXEC master..xp_cmdshell 'bcp "SELECT au_fname, au_lname FROM pubs..authors ORDER BY au_lname" queryout "c:\test.xls" /c -/S"服务器名" /U"用户名" -P"密码"'/*--说明:c:\test.xls 为导入/导出的Excel文件名.sheet1$ 为Excel文件的工作表名,一般要加上$才能正常使用.--*/--下面是导出真正Excel文件的方法:if exists (select * from dbo.sysobjects where id = object_id(N'[dbo].[p_exporttb]') and OBJECTPROPERTY(id, N'IsProcedure') = 1)drop procedure [dbo].[p_exporttb]GO/*--数据导出EXCEL导出表中的数据到Excel,包含字段名,文件为真正的Excel文件,如果文件不存在,将自动创建文件,如果表不存在,将自动创建表基于通用性考虑,仅支持导出标准数据类型--邹建2003.10(引用请保留此信息)--*//*--调用示例p_exporttb @tbname='地区资料',@path='c:\',@fname='aa.xls'--*/create proc p_exporttb@tbname sysname, --要导出的表名@path nvarchar(1000), --文件存放目录@fname nvarchar(250)='' --文件名,默认为表名asdeclare @err int,@src nvarchar(255),@desc nvarchar(255),@out intdeclare @obj int,@constr nvarchar(1000),@sql varchar(8000),@fdlist varchar(8000)--参数检测if isnull(@fname,'')='' set @fname=@tbname+'.xls'--检查文件是否已经存在if right(@path,1)<>'\' set @path=@path+'\'create table #tb(a bit,b bit,c bit)set @sql=@path+@fnameinsert into #tb exec master..xp_fileexist @sql--数据库创建语句set @sql=@path+@fnameif exists(select 1 from #tb where a=1)set @constr='DRIVER={Microsoft Excel Driver (*.xls)};DSN='''';READONLY=FALSE' +';CREATE_DB="'+@sql+'";DBQ='+@sqlelseset @constr='Provider=Microsoft.Jet.OLEDB.4.0;Extended Properties="Excel 8.0;HDR=YES' +';DATABASE='+@sql+'"'--连接数据库exec @err=sp_oacreate 'adodb.connection',@obj outif @err<>0 goto lberrexec @err=sp_oamethod @obj,'open',null,@constrif @err<>0 goto lberr/*--如果覆盖已经存在的表,就加上下面的语句--创建之前先删除表/如果存在的话select @sql='drop table ['+@tbname+']'exec @err=sp_oamethod @obj,'execute',@out out,@sql--*/--创建表的SQLselect @sql='',@fdlist=''select @fdlist=@fdlist+',['++']',@sql=@sql+',['++'] '+casewhen like '%char'then case when a.length>255 then 'memo'else 'text('+cast(a.length as varchar)+')' endwhen like '%int' or ='bit' then 'int'when like '%datetime' then 'datetime'when like '%money' then 'money'when like '%text' then 'memo'else endFROM syscolumns a left join systypes b on a.xtype=b.xusertypewhere not in('image','uniqueidentifier','sql_variant','varbinary','binary','timestamp') and object_id(@tbname)=idselect @sql='create table ['+@tbname+']('+substring(@sql,2,8000)+')',@fdlist=substring(@fdlist,2,8000)exec @err=sp_oamethod @obj,'execute',@out out,@sqlif @err<>0 goto lberrexec @err=sp_oadestroy @obj--导入数据set @sql='openrowset(''MICROSOFT.JET.OLEDB.4.0'',''Excel 8.0;HDR=YES;IMEX=1 ;DATABASE='+@path+@fname+''',['+@tbname+'$])'exec('insert into '+@sql+'('+@fdlist+') select '+@fdlist+' from '+@tbname)returnlberr:exec sp_oageterrorinfo 0,@src out,@desc outlbexit:select cast(@err as varbinary(4)) as 错误号,@src as 错误源,@desc as 错误描述select @sql,@constr,@fdlistgoif exists (select * from dbo.sysobjects where id = object_id(N'[dbo].[p_exporttb]') and OBJECTPROPERTY(id, N'IsProcedure') = 1)drop procedure [dbo].[p_exporttb]GO/*--数据导出EXCEL导出查询中的数据到Excel,包含字段名,文件为真正的Excel文件如果文件不存在,将自动创建文件如果表不存在,将自动创建表基于通用性考虑,仅支持导出标准数据类型--邹建2003.10(引用请保留此信息)--*//*--调用示例p_exporttb @sqlstr='select * from 地区资料',@path='c:\',@fname='aa.xls',@sheetname='地区资料'--*/create proc p_exporttb@sqlstr varchar(8000), --查询语句,如果查询语句中使用了order by ,请加上top 100 percent@path nvarchar(1000), --文件存放目录@fname nvarchar(250), --文件名@sheetname varchar(250)='' --要创建的工作表名,默认为文件名asdeclare @err int,@src nvarchar(255),@desc nvarchar(255),@out intdeclare @obj int,@constr nvarchar(1000),@sql varchar(8000),@fdlist varchar(8000)--参数检测if isnull(@fname,'')='' set @fname='temp.xls'if isnull(@sheetname,'')='' set @sheetname=replace(@fname,'.','#')--检查文件是否已经存在if right(@path,1)<>'\' set @path=@path+'\'create table #tb(a bit,b bit,c bit)set @sql=@path+@fnameinsert into #tb exec master..xp_fileexist @sql--数据库创建语句set @sql=@path+@fnameif exists(select 1 from #tb where a=1)set @constr='DRIVER={Microsoft Excel Driver (*.xls)};DSN='''';READONLY=FALSE'+';CREATE_DB="'+@sql+'";DBQ='+@sqlelseset @constr='Provider=Microsoft.Jet.OLEDB.4.0;Extended Properties="Excel 8.0;HDR=YES' +';DATABASE='+@sql+'"'--连接数据库exec @err=sp_oacreate 'adodb.connection',@obj outif @err<>0 goto lberrexec @err=sp_oamethod @obj,'open',null,@constrif @err<>0 goto lberr--创建表的SQLdeclare @tbname sysnameset @tbname='##tmp_'+convert(varchar(38),newid())set @sql='select * into ['+@tbname+'] from('+@sqlstr+') a'exec(@sql)select @sql='',@fdlist=''select @fdlist=@fdlist+',['++']',@sql=@sql+',['++'] '+casewhen like '%char'then case when a.length>255 then 'memo'else 'text('+cast(a.length as varchar)+')' endwhen like '%int' or ='bit' then 'int'when like '%datetime' then 'datetime'when like '%money' then 'money'when like '%text' then 'memo'else endFROM tempdb..syscolumns a left join tempdb..systypes b on a.xtype=b.xusertypewhere not in('image','uniqueidentifier','sql_variant','varbinary','binary','timestamp') and a.id=(select id from tempdb..sysobjects where name=@tbname)if @@rowcount=0 returnselect @sql='create table ['+@sheetname+']('+substring(@sql,2,8000)+')',@fdlist=substring(@fdlist,2,8000)exec @err=sp_oamethod @obj,'execute',@out out,@sqlif @err<>0 goto lberrexec @err=sp_oadestroy @obj--导入数据set @sql='openrowset(''MICROSOFT.JET.OLEDB.4.0'',''Excel 8.0;HDR=YES ;DATABASE='+@path+@fname+''',['+@sheetname+'$])'exec('insert into '+@sql+'('+@fdlist+') select '+@fdlist+' from ['+@tbname+']')set @sql='drop table ['+@tbname+']'exec(@sql)returnlberr:exec sp_oageterrorinfo 0,@src out,@desc outlbexit:select cast(@err as varbinary(4)) as 错误号,@src as 错误源,@desc as 错误描述select @sql,@constr,@fdlistgo。
关于VFP输出EXCEL的格式以下是我在处理 VFP 输出 EXCEL 报表时用的一段程序片段,以供参考。
如有更好的建议,亦请拿出来讨论讨论。
tmpsheet = GETOBJECT('','excel.sheet')if .not. ( type('tmpsheet')='O' ) && U 未能产生EXCEL对象=messagebox( '创建报表失败!' + CHR(13) + CHR(13) + ;'请检查你的系统是否正确安装 EXCEL 软件!' + CHR(13) + CHR(13) + ;'请联络系统管理员' + CHR(13) + ;'', 48, '')returnendifxlapp = tmpsheet.APPLICATIONxlapp.VISIBLE = .f.=messagebox( '准备生成月帐单' + CHR(13) + CHR(13) + ;'日期:' + dtoc(tt_this_day) + CHR(13) + CHR(13) + ;'如有在使用 EXCEL ,请暂时不要使用打印预览功能!!!' + CHR(13) + CHR(13) + ;'报表生成的过程中,请暂时不要使用计算机', 48, '')* wait wind '正在生成'+ form_title +'报表,请稍侯......' nowait***! 创建excel打印对象 *****xlapp.workbooks.ADD()xlapp.ActiveWindow.WindowState = 2 && 最大化打开的工作本xlsheet = xlapp.activesheetlc_name = allt(file_name_check( &temp_dls2_a..kh_mc )) = lc_name***! 创建excel打印对象 *****xlsheet.Columns("A:G").Font.Size = 9 && 选择列xlsheet.Columns("A:A").ColumnWidth = 10 && 设置列宽度xlsheet.Columns("B:B").ColumnWidth = 15 && 设置列宽度xlsheet.Columns("C:C").ColumnWidth = 16 && 设置列宽度xlsheet.Columns("D:D").ColumnWidth = 16 && 设置列宽度xlsheet.Columns("E:E").ColumnWidth = 8 && 设置列宽度xlsheet.Columns("F:F").ColumnWidth = 10 && 设置列宽度xlsheet.Columns("G:G").ColumnWidth = 8 && 设置列宽度xlsheet.Columns("A:A").NumberFormatLocal = "@ "xlsheet.Columns("B:B").NumberFormatLocal = "@ "xlsheet.Columns("C:C").NumberFormatLocal = "@ "xlsheet.Columns("D:D").NumberFormatLocal = "@ "xlsheet.Columns("E:E").NumberFormatLocal = "0 "xlsheet.Columns("F:F").NumberFormatLocal = "0.00_ "xlsheet.Columns("G:G").NumberFormatLocal = "@ "xlsheet.Rows("5:5").ShrinkT oFit = .t. && 自动收缩为适当尺寸以适应有效列宽xlsheet.Rows("5:5").HorizontalAlignment = 3 && 水平 1左对齐,3居中,4右对齐xlsheet.Rows("1:2").HorizontalAlignment = 3 && 水平 1左对齐,3居中,4右对齐* xlsheet.Columns("G:G").ShrinkToFit = .t. && 自动收缩为适当尺寸以适应有效列宽***! 设置页面信息 *****In_Po = 0.0393700787401575 && 将度量单位从英寸转换为磅基础单位: 0.0393700787401575英寸 -> 0.1磅xlsheet.PageSetup.LeftMargin = xlapp.Application.InchesT oPoints( In_Po * 10 )xlsheet.PageSetup.RightMargin = xlapp.Application.InchesT oPoints( In_Po * 10 )xlsheet.PageSetup.TopMargin = xlapp.Application.InchesT oPoints( In_Po * 10 )xlsheet.PageSetup.BottomMargin = xlapp.Application.Inche sToPoints( In_Po * 20 )xlsheet.PageSetup.HeaderMargin = xlapp.Application.Inche sToPoints( In_Po * 10 )xlsheet.PageSetup.FooterMargin = xlapp.Application.Inches ToPoints( In_Po * 10 )xlsheet.PageSetup.Orientation = 1 && 设置打印方向: 1 纵向 2横向xlsheet.PageSetup.PrintTitleRows = "$1:$7" & & 设置每页的页头xlsheet.PageSetup.RightFooter = "第 &P 页,共 &N 页"xlsheet.PageSetup.CenterHorizontally = .t. && 页面水平居中***! 设置页面信息 ********! 生成打印内容 *****xlsheet.Cells( 2,1).VALUE = "帐单时间:" + t_this_yy + '年 '+t_this_mm + '月'xlsheet.Cells( 3,1).VALUE = "客户名称:"+ allt(&temp_dls2_a..khmc)xlsheet.Cells( 4,1).VALUE = "客户帐号:"+ allt(&temp_dls2_a..zh)prn_line = 5xlsheet.Cells( prn_line, 1).VALUE = "主叫号码"xlsheet.Cells( prn_line, 2).VALUE = "被叫号码"xlsheet.Cells( prn_line, 3).VALUE = "开始时间"xlsheet.Cells( prn_line, 4).VALUE = "结束时间"xlsheet.Cells( prn_line, 5).VALUE = "时长"xlsheet.Cells( prn_line, 6).VALUE = "话费(元)"xlsheet.Cells( prn_line, 7).VALUE = "计费标识"lc_min_col = 1lc_max_col = 7for lo_Col = lc_min_col to lc_max_colxlsheet.Cells( prn_line,lo_Col).Borders(4).Weight = 2 &&框线宽度: 2细线 3粗线endforprn_line = prn_line + 1lc_sum_brhj = 0lc_sum_bybrlj = 0sele &dbf_j_yjd_acount to max_slsum &dbf_j_yjd_a..dj to sum_djgo topscanwait wind '处理'+ lc_name + ' 第'+ str(recno()) + ' 总数:'+str(max_sl) nowaitxlsheet.Cells( prn_line, 1).VALUE = allt(&dbf_j_yjd_a..zjhm) xlsheet.Cells( prn_line, 2).VALUE = allt(&dbf_j_yjd_a..bdhm) xlsheet.Cells( prn_line, 3).VALUE = allt(&dbf_j_yjd_a..riqi)xlsheet.Cells( prn_line, 4).VALUE = allt(&dbf_j_yjd_a..riqi2)xlsheet.Cells( prn_line, 5).VALUE = &dbf_j_yjd_a..fzxlsheet.Cells( prn_line, 6).VALUE = &dbf_j_yjd_a..djxlsheet.Cells( prn_line, 7).VALUE = allt(&dbf_j_yjd_a..jfbs)prn_line = prn_line + 1endscanfor lo_Col = lc_min_col to lc_max_colxlsheet.Cells( prn_line,lo_Col).Borders(3).Weight = 2 &&框线宽度: 2细线 3粗线endforxlsheet.Range("A1:G1").MergeCells = .t. && 合并单元格xlsheet.Range("A2:G2").MergeCells = .t. && 合并单元格xlsheet.Range("A3:G3").MergeCells = .t. && 合并单元格xlsheet.Range("A4:G4").MergeCells = .t. && 合并单元格xlsheet.Range("A5:G5").MergeCells = .t. && 合并单元格xlsheet.Rows("1:1").Font.Size = 11 && 选择行xlsheet.Rows("1:1").Font.Bold = .t.xlsheet.Rows("1:2").RowHeight = 18.00 && 设置行宽度xlsheet.Rows("4:4").HorizontalAlignment = 4 && 水平 1左对齐,3居中,4右对齐xlsheet.Rows("5:5").HorizontalAlignment = 1 && 水平 1左对齐,3居中,4右对齐*! 完成删除提示按扭 *****file_name = all_path + lc_name + '.xls'if file( file_name) = .t.chr(7)result=messagebox( file_name +'已存在,要替换该文件吗? ', 4+48+256, '' )if result=6ERASE &file_namexlapp.activeWorkbook.SaveAs( file_name )endifelsexlapp.activeWorkbook.SaveAs( file_name )endifxlapp.activeWorkbook.close(.f.)endifendscanxlapp = tmpsheet.APPLICATIONxlapp.activeWorkbook.close(.f.)xlapp.quit=messagebox( '已完成报表输出!', 48, '')return。
delphi导出数据至E xcel的几种方法及比较一、delphi快速导出ex celuses ComObj,clipbr d;functi on ToExce l(sfilen ame:string; ADOQue ry:TADOQu ery):boolea n;constxlNorm al=-4143;vary : intege r;tsList : TStrin gList;s,filena me :string;aSheet :Varian t;excel:OleVar iant;savedi alog :tsaved ialog;beginResult := true;trye xcel:=Create OleOb ject('Excel.Applic ation');e xcel.workbo oks.add;except//screen.cursor:=crDefa ult;showme ssage('无法调用Ex cel!');exit;end;savedi alog:=tsaved ialog.Create(nil);savedi alog.FileName:=sfilen ame; //存入文件savedi alog.Filter:='Excel文件(*.xls)|*.xls';if savedi alog.Execut e thenbegini f FileEx ists(savedi alog.FileNa me) thentryif application.messag ebox('该文件已经存在,要覆盖吗?','询问',mb_yesno+mb_iconquestion)=idyesthenDelete File(PChar(savedi alog.FileNa me))elsebeginExcel.Quit;savedi alog.free;//screen.cursor:=crDefa ult;Exit;end;exceptExcel.Quit;screen.cursor:=crDefa ult;Exit;end;f ilena me:=savedi alog.FileNa me;end;savedi alog.free;if filena me='' thenbeginresult:=true;Excel.Quit;//screen.cursor:=crDefa ult;exit;end;aSheet:=excel.Worksh eets.Item[1];tsList:=TStrin gList.Create;//tsList.Add('查询结果'); //加入标题s:=''; //加入字段名for y := 0 to adoque ry.fieldC ount- 1 dobegins:=s+adoQue ry.Fields.Fields[y].FieldN ame+#9 ; Applic ation.Proces sMess ages;end;tsList.Add(s);trytryA DOQue ry.First;WhileNot ADOQue ry.Eof dob egins:='';for y:=0 to ADOQue ry.FieldC ount-1 dobegins:=s+ADOQue ry.Fields[y].AsStri ng+#9;Applic ation.Proces sMess ages;end;tsList.Add(s);ADOQue ry.next;end;C lipbo ard.AsText:=tsList.Text;e xceptr esult:=false;end;finall yt sList.Free;aSheet.Paste;Messag eBox(A pplica tion.Handle,'数据导出完毕!','系统提示',MB_ICO NINFO RMA TION or MB_OK);tryi f copy(FileNa me,length(FileNa me)-3,4)<>'.xls' thenFileNa me:=FileNa me+'.xls';E xcel.Active Workb ook.SaveAs(FileNa me, xlNorm al, '', '', False, False);exceptExcel.Quit;s creen.cursor:=crDefa ult;exit;end;Excel.V isibl e := false; //true会自动打开已经保存的ex celExcel.Quit;Excel:= UnAssi gned;end;调用:ToExcel('D:\a.xsl',QueryT oExcel);//路径可以自定义-------------------------------------------------------------------------------------------------******************************************************************************************* ******二、delphi如何导出E XCEL,代码。

将DELPHI中把数据库中数据导出到EXCEL中使用Delphi 控件方法在Form中分别放入ExcelApplication, ExcelWorkbook和ExcelWorksheet。
1)打开ExcelExcelApplication1.Connect;2) 显示当前窗口:ExcelApplication1.Visible[0]:=True;3) 更改Excel 标题栏:ExcelApplication1.Caption := '应用程序调用Microsoft Excel';4) 添加新工作簿:ExcelWorkbook1.ConnectTo(ExcelApplication1.Workbooks.Add(EmptyParam,0));5) 添加新工作表:var Temp_Worksheet: _WorkSheet;beginTemp_Worksheet:=ExcelWorkbook1.WorkSheets.Add(EmptyParam,EmptyParam,EmptyParam,EmptyParam,0) as _WorkSheet;ExcelWorkSheet1.ConnectTo(Temp_WorkSheet);End;6) 打开已存在的工作簿:ExcelApplication1.Workbooks.Open (c:\a.xlsEmptyParam,EmptyParam,EmptyParam,EmptyParam,EmptyParam,EmptyParam,EmptyParam,EmptyParam,EmptyParam,EmptyParam,EmptyParam,EmptyParam,0)7) 设置第2个工作表为活动工作表:ExcelApplication1.WorkSheets[2].Activate; 或ExcelApplication1.WorksSheets[ 'Sheet2' ].Activate;8) 给单元格赋值:ExcelApplication1.Cells[1,4].V alue := '第一行第四列';9) 设置指定列的宽度(单位:字符个数),以第一列为例:ExcelApplication1.ActiveSheet.Columns[1].ColumnsWidth := 5;10) 设置指定行的高度(单位:磅)(1磅=0.035厘米),以第二行为例:ExcelApplication1.ActiveSheet.Rows[2].RowHeight := 1/0.035; // 1厘米11) 在第8行之前插入分页符:ExcelApplication1.WorkSheets[1].Rows[8].PageBreak := 1;12) 在第8列之前删除分页符:ExcelApplication1.ActiveSheet.Columns[4].PageBreak := 0;13) 指定边框线宽度:ExcelApplication1.ActiveSheet.Range[ 'B3:D4' ].Borders[2].Weight := 3;1-左2-右3-顶4-底5-斜( \ ) 6-斜( / )14) 清除第一行第四列单元格公式:ExcelApplication1.ActiveSheet.Cells[1,4].ClearContents;15) 设置第一行字体属性:ExcelApplication1.ActiveSheet.Rows[1] := '隶书';ExcelApplication1.ActiveSheet.Rows[1].Font.Color := clBlue;ExcelApplication1.ActiveSheet.Rows[1].Font.Bold := True;ExcelApplication1.ActiveSheet.Rows[1].Font.UnderLine := True;16) 进行页面设置:a.页眉:ExcelApplication1.ActiveSheet.PageSetup.CenterHeader := '报表演示';b.页脚:ExcelApplication1.ActiveSheet.PageSetup.CenterFooter := '第&P页';c.页眉到顶端边距2cm:ExcelApplication1.ActiveSheet.PageSetup.HeaderMargin := 2/0.035;d.页脚到底端边距3cm:ExcelApplication1.ActiveSheet.PageSetup.HeaderMargin := 3/0.035;e.顶边距2cm:ExcelApplication1.ActiveSheet.PageSetup.TopMargin := 2/0.035;f.底边距2cm:ExcelApplication1.ActiveSheet.PageSetup.BottomMargin := 2/0.035;g.左边距2cm:ExcelApplication1.ActiveSheet.PageSetup.LeftMargin := 2/0.035;h.右边距2cm:ExcelApplication1.ActiveSheet.PageSetup.RightMargin := 2/0.035;i.页面水平居中:ExcelApplication1.ActiveSheet.PageSetup.CenterHorizontally := 2/0.035;j.页面垂直居中:ExcelApplication1.ActiveSheet.PageSetup.CenterV ertically := 2/0.035;k.打印单元格网线:ExcelApplication1.ActiveSheet.PageSetup.PrintGridLines := True;17) 拷贝操作:a.拷贝整个工作表:ed.Range.Copy;b.拷贝指定区域:ExcelApplication1.ActiveSheet.Range[ 'A1:E2' ].Copy;c.从A1位置开始粘贴:ExcelApplication1.ActiveSheet.Range.[ 'A1' ].PasteSpecial;d.从文件尾部开始粘贴:ExcelApplication1.ActiveSheet.Range.PasteSpecial;18) 插入一行或一列:a. ExcelApplication1.ActiveSheet.Rows[2].Insert;b. ExcelApplication1.ActiveSheet.Columns[1].Insert;19) 删除一行或一列:a. ExcelApplication1.ActiveSheet.Rows[2].Delete;b. ExcelApplication1.ActiveSheet.Columns[1].Delete;20) 打印预览工作表:ExcelApplication1.ActiveSheet.PrintPreview;21) 打印输出工作表:ExcelApplication1.ActiveSheet.PrintOut;22) 工作表保存:if not ExcelApplication1.ActiveWorkBook.Saved thenExcelApplication1.ActiveSheet.PrintPreview;23) 工作表另存为:ExcelApplication1.SaveAs( 'C:\Excel\Demo1.xls' );24) 放弃存盘:ExcelApplication1.ActiveWorkBook.Saved := True;25) 关闭工作簿:ExcelApplication1.WorkBooks.Close;26) 退出Excel:ExcelApplication1.Quit;ExcelApplication1.Disconnect;Top2 楼songlian(雨)回复于2005-04-29 16:37:15 得分0把数据集导如导excel,adsdata可以换成任意你用导的数据集WriteExcel(AdsData:Tclientdataset; sName, Title: string);varExcelApplication1: TExcelApplication;ExcelWorksheet1: TExcelWorksheet;ExcelWorkbook1: TExcelWorkbook;i, j: integer;filename: string;beginfilename := concat(sName, '.xls');tryExcelApplication1 := TExcelApplication.Create(Application);ExcelWorksheet1 := TExcelWorksheet.Create(Application);ExcelWorkbook1 := TExcelWorkbook.Create(Application);ExcelApplication1.Connect;exceptApplication.Messagebox('Excel没有安装!','Hello',MB_ICONERROR + mb_Ok);Abort;end;tryExcelApplication1.Workbooks.Add(EmptyParam, 0);ExcelWorkbook1.ConnectTo(ExcelApplication1.Workbooks[1]);ExcelWorksheet1.ConnectTo(ExcelWorkbook1.Worksheets[1] as _worksheet);AdsData.First;for j := 0 to AdsData.Fields.Count - 1 dobeginExcelWorksheet1.Cells.item[3, j + 1] := AdsData.Fields[j].DisplayLabel;ExcelWorksheet1.Cells.item[3, j + 1].font.size :='10';end;for i := 4 to AdsData.RecordCount + 3 dobeginfor j := 0 to AdsData.Fields.Count - 1 dobeginExcelWorksheet1.Cells.item[i, j + 1] :=AdsData.Fields[j].Asstring;ExcelWorksheet1.Cells.item[i, j + 1].font.size := '10';end;AdsData.Next;end;ExcelWorksheet1.Columns.AutoFit;ExcelWorksheet1.Cells.item[1, 2] := Title;ExcelWorksheet1.Cells.Item[1, 2].font.size :='14';ExcelWorksheet1.SaveAs(filename);Application.Messagebox(pchar('数据成功导出'+ filename),'信息化建设部',mb_Ok);finallyExcelApplication1.Disconnect;ExcelApplication1.Quit;ExcelApplication1.Free;ExcelWorksheet1.Free;ExcelWorkbook1.Free;end;end;。

delphi dbgrid 保存为excel 简单方法你可以使用以下简单方法将Delphi的DBGrid保存为Excel:1. 首先,添加Excel的引用。
在Delphi的“工具”菜单下选择“导入类型库”,然后选择Microsoft Excel并点击“创建单元”。
这将在您的Delphi项目中添加对Excel的引用。
2. 在所需的单元(例如表单或数据模块)中,添加以下单元引用:- ComObj:用于与COM对象(例如Excel)进行交互的单元。
- DBGrids:用于访问和操作DBGrid的单元。
3. 创建一个导出数据的按钮(或其他事件),然后在事件处理程序中添加以下代码:```delphiusesComObj, DBGrids;procedure TForm1.Button1Click(Sender: TObject);varExcel, Workbook, Worksheet: Variant;i, j: Integer;begin// 创建Excel对象Excel := CreateOleObject('Excel.Application');Excel.Visible := True;// 创建Workbook和WorksheetWorkbook := Excel.Workbooks.Add;Worksheet := Workbook.Worksheets[1];// 输出DBGrid的标题行for i := 0 to DBGrid1.Columns.Count - 1 doWorksheet.Cells[1, i+1].Value :=DBGrid1.Columns[i].Title.Caption;// 输出DBGrid的数据行for i := 0 to DBGrid1.DataSource.DataSet.RecordCount - 1 dobeginfor j := 0 to DBGrid1.Columns.Count - 1 doWorksheet.Cells[i+2, j+1].Value :=DBGrid1.DataSource.DataSet.FieldByName(DBGrid1.Columns[j].FieldName).AsString;DBGrid1.DataSource.DataSet.Next;end;// 保存Workbook并关闭ExcelWorkbook.SaveAs('path\to\save\file.xlsx');Workbook.Close;Excel.Quit;end;```在上述代码中,使用`CreateOleObject`函数创建了Excel对象,并将其设置为可见。

用DELPHI操作EXCEL在DELPHI中显示EXCEL文件,可用以下简单代码做到。
但要实用,则需进一步完善。
varForm1: TForm1;EApp:variant;implementationuses ComObj, OleServer,Excel2000;{$R *.dfm}procedure TForm1.Button1Click(Sender: TObject);beginEApp:=CreateOleObject('Excel.Application');Windows.SetParent(EApp.HWND,Panel1.Handle);EApp.Workbooks.Open('C:\a.xls');EApp.Visible:=true;end;以下内容的原贴地址:/fatice/blog/item/2197d451558bfd2342a75b 3a.htmlDELPHI中EXCEL组件的使用方法:一) 使用动态创建的方法首先创建 Excel 对象,使用ComObj:var ExcelApp: Variant;ExcelApp := CreateOleObject( 'Excel.Application' );1) 显示当前窗口:ExcelApp.Visible := True;2) 更改 Excel 标题栏:ExcelApp.Caption := '应用程序调用 Microsoft Excel';3) 添加新工作簿:ExcelApp.WorkBooks.Add;4) 打开已存在的工作簿:ExcelApp.WorkBooks.Open( 'C:\Excel\Demo.xls' );5) 设置第2个工作表为活动工作表:ExcelApp.WorkSheets[2].Activate;或ExcelApp.WorksSheets[ 'Sheet2' ].Activate;6) 给单元格赋值:ExcelApp.Cells[1,4].Value := '第一行第四列';7) 设置指定列的宽度(单位:字符个数),以第一列为例:ExcelApp.ActiveSheet.Columns[1].ColumnsWidth := 5;8) 设置指定行的高度(单位:磅)(1磅=0.035厘米),以第二行为例:ExcelApp.ActiveSheet.Rows[2].RowHeight := 1/0.035; // 1厘米9) 在第8行之前插入分页符:ExcelApp.WorkSheets[1].Rows.PageBreak := 1;10) 在第8列之前删除分页符:ExcelApp.ActiveSheet.Columns[4].PageBreak := 0;11) 指定边框线宽度:ExcelApp.ActiveSheet.Range[ 'B3:D4' ].Borders[2].Weight := 3;1-左 2-右 3-顶 4-底 5-斜( \ ) 6-斜( / )12) 清除第一行第四列单元格公式:ExcelApp.ActiveSheet.Cells[1,4].ClearContents;13) 设置第一行字体属性:ExcelApp.ActiveSheet.Rows[1] := '隶书';ExcelApp.ActiveSheet.Rows[1].Font.Color := clBlue;ExcelApp.ActiveSheet.Rows[1].Font.Bold := True;ExcelApp.ActiveSheet.Rows[1].Font.UnderLine := True;14) 进行页面设置:a.页眉:ExcelApp.ActiveSheet.PageSetup.CenterHeader := '报表演示';b.页脚:ExcelApp.ActiveSheet.PageSetup.CenterFooter := '第&P页';c.页眉到顶端边距2cm:ExcelApp.ActiveSheet.PageSetup.HeaderMargin := 2/0.035;d.页脚到底端边距3cm:ExcelApp.ActiveSheet.PageSetup.HeaderMargin := 3/0.035;e.顶边距2cm:ExcelApp.ActiveSheet.PageSetup.TopMargin := 2/0.035;f.底边距2cm:ExcelApp.ActiveSheet.PageSetup.BottomMargin := 2/0.035;g.左边距2cm:ExcelApp.ActiveSheet.PageSetup.LeftMargin := 2/0.035; h.右边距2cm:ExcelApp.ActiveSheet.PageSetup.RightMargin := 2/0.035; i.页面水平居中:ExcelApp.ActiveSheet.PageSetup.CenterHorizontally :=2/0.035;j.页面垂直居中:ExcelApp.ActiveSheet.PageSetup.CenterVertically := 2/0.035; k.打印单元格网线:ExcelApp.ActiveSheet.PageSetup.PrintGridLines := True;15) 拷贝操作:a.拷贝整个工作表:ed.Range.Copy;b.拷贝指定区域:ExcelApp.ActiveSheet.Range[ 'A1:E2' ].Copy;c.从A1位置开始粘贴:ExcelApp.ActiveSheet.Range.[ 'A1' ].PasteSpecial;d.从文件尾部开始粘贴:ExcelApp.ActiveSheet.Range.PasteSpecial;16) 插入一行或一列:a. ExcelApp.ActiveSheet.Rows[2].Insert;b. ExcelApp.ActiveSheet.Columns[1].Insert;17) 删除一行或一列:a. ExcelApp.ActiveSheet.Rows[2].Delete;b. ExcelApp.ActiveSheet.Columns[1].Delete;18) 打印预览工作表:ExcelApp.ActiveSheet.PrintPreview;19) 打印输出工作表:ExcelApp.ActiveSheet.PrintOut;20) 工作表保存:if not ExcelApp.ActiveWorkBook.Saved thenExcelApp.ActiveSheet.PrintPreview;21) 工作表另存为:ExcelApp.SaveAs( 'C:\Excel\Demo1.xls' );22) 放弃存盘:ExcelApp.ActiveWorkBook.Saved := True;23) 关闭工作簿:ExcelApp.WorkBooks.Close;24) 退出 Excel:ExcelApp.Quit;(二) 使用Delphi 控件方法在Form中分别放入ExcelApplication, ExcelWorkbook和ExcelWorksheet。
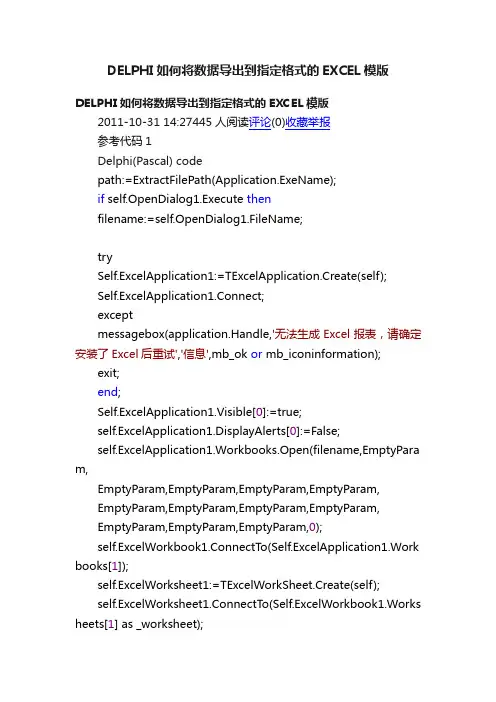
DELPHI如何将数据导出到指定格式的EXCEL模版DELPHI如何将数据导出到指定格式的EXCEL模版2011-10-31 14:27445人阅读评论(0)收藏举报参考代码1Delphi(Pascal) codepath:=ExtractFilePath(Application.ExeName);if self.OpenDialog1.Execute thenfilename:=self.OpenDialog1.FileName;trySelf.ExcelApplication1:=TExcelApplication.Create(self);Self.ExcelApplication1.Connect;exceptmessagebox(application.Handle,'无法生成Excel报表,请确定安装了Excel后重试','信息',mb_ok or mb_iconinformation);exit;end;Self.ExcelApplication1.Visible[0]:=true;self.ExcelApplication1.DisplayAlerts[0]:=False;self.ExcelApplication1.Workbooks.Open(filename,EmptyPara m,EmptyParam,EmptyParam,EmptyParam,EmptyParam,EmptyParam,EmptyParam,EmptyParam,EmptyParam,EmptyParam,EmptyParam,EmptyParam,0);self.ExcelWorkbook1.ConnectT o(Self.ExcelApplication1.Work books[1]);self.ExcelWorksheet1:=TExcelWorkSheet.Create(self);self.ExcelWorksheet1.ConnectT o(Self.ExcelWorkbook1.Works heets[1] as _worksheet);i:=self.StringGrid2.RowCount;for j:=1to i-1dobeginxh:=Self.StringGrid2.Cells[0,j];pscj:=self.StringGrid2.Cells[2,j];kscj:=Self.StringGrid2.Cells[4,j];zpcj:=Self.StringGrid2.Cells[5,j];self.ExcelWorksheet1.cells.Item[l+j,m]:=pscj;self.ExcelWorksheet1.cells.Item[l+j,n]:=kscj;self.ExcelWorksheet1.cells.Item[l+j,k]:=zpcj;end;Self.ExcelWorksheet1.SaveAs(filename);Self.ExcelApplication1.Disconnect;Self.ExcelWorkbook1.Disconnect;Self.ExcelWorksheet1.Disconnect;Delphi(Pascal) codepath:=ExtractFilePath(Application.ExeName);if self.OpenDialog1.Execute thenfilename:=self.OpenDialog1.FileName;trySelf.ExcelApplication1:=TExcelApplication.Create(self);Self.ExcelApplication1.Connect;exceptmessagebox(application.Handle,'无法生成Excel报表,请确定安装了Excel后重试','信息',mb_ok or mb_iconinformation);e…tryexcel := CreateOleObject('Excel.Application'); WorkBook := excel.Workbooks.Add('模板的路径.xls'); Sheet := WorkBook.Worksheets[1];exceptexcel := NULL;DJShow('请先安装Excel97/2000。

在Delphi中操作Excel的方法
丁树江;高永青
【期刊名称】《山东电子》
【年(卷),期】2000(000)003
【摘要】本文介绍了如何使用Delph5.0实现将数据库文件转换为Excel文件的方法。
本文共涉及到四个问题,CreateOleObject函数的使用、Ole自动化、Variant变量类型以及Excel对象。
本文的程序在Win-dowsNT、Wondiws98中使用Delphi5.0编译通过。
【总页数】2页(P30-31)
【作者】丁树江;高永青
【作者单位】不详;不详
【正文语种】中文
【中图分类】TP311
【相关文献】
1.在Delphi5中连接导入Excel数据表的几种方法 [J], 朱正月
2.用Delphi结合ADO开发Excel数据服务器应用技术(二)——Delphi操作Excel 数据文件的ADO方法 [J], 闫海忠
3.Delphi中调用Excel制作报表的方法 [J], 蒋丽华;雷佳兵
4.在Delphi中通过OLE Automation操作Excel [J], 刘卫
5.Delphi中操作Excel的方法 [J], 葛涛;郝跃伟
因版权原因,仅展示原文概要,查看原文内容请购买。

delphi excelwriter引用单元-回复【Delphi ExcelWriter引用单元】是一个用于在Delphi编程环境中生成和操作Excel文件的单元。
它提供了一系列的功能和方法,使得开发者可以方便地创建、修改和保存Excel文档,同时还可以对表格、单元格和格式进行控制。
下面将一步一步回答关于【Delphi ExcelWriter引用单元】的问题。
第一步:引用【Delphi ExcelWriter引用单元】在开始之前,我们首先需要将【Delphi ExcelWriter引用单元】引入我们的项目中。
这可以通过在项目中包含ExcelWriter单元来实现。
在Delphi中,可以通过使用uses关键字将ExcelWriter引用单元包含到项目中,如下所示:usesExcelWriter;第二步:创建Excel文档对象一旦我们引入了【Delphi ExcelWriter引用单元】,我们就可以开始创建一个Excel文档对象。
在Delphi中,可以通过ExcelApplication类来创建一个Excel文档对象。
首先,我们需要声明一个Excel应用程序变量并为其分配一个实例,如下所示:varExcelApp: ExcelApplication;beginExcelApp := TExcelApplication.Create(nil);第三步:打开Excel文档在创建Excel文档对象之后,我们可以使用Open方法打开一个现有的Excel文档或者使用CreateNew方法创建一个新的Excel文档。
我们可以使用FileName属性来指定Excel文档的路径和名称,如下所示:ExcelApp.Workbooks.Open('C:\path\to\existing\workbook.xlsx' );或者创建一个新的Excel文档ExcelApp.Workbooks.CreateNew;第四步:操作Excel文档一旦我们打开或创建了Excel文档,我们可以使用ExcelDocument 属性来访问文档的各种属性和方法。

DelphiDBGridEh导出Excel unit Unit_DBGridEhToExcel;interfaceusesSysUtils, Variants, Classes, Graphics, Controls, Forms, Excel2000, ComObj,Dialogs, DB, DBGridEh, windows,ComCtrls,ExtCtrls;typeTDBGridEhToExcel = class(TComponent)privateFProgressForm: TForm; {进度窗体}FtempGauge: TProgressBar; {进度条}FShowProgress: Boolean; {是否显⽰进度窗体}FShowOpenExcel:Boolean; {是否导出后打开Excel⽂件}FDBGridEh: TDBGridEh;FTitleName: TCaption; {Excel⽂件标题}FUserName: TCaption; {制表⼈}procedure SetShowProgress(const Value: Boolean); {是否显⽰进度条}procedure SetShowOpenExcel(const Value: Boolean); {是否打开⽣成的Excel⽂件}procedure SetDBGridEh(const Value: TDBGridEh);procedure SetTitleName(const Value: TCaption); {标题名称}procedure SetUserName(const Value: TCaption); {使⽤⼈名称}procedure CreateProcessForm(AOwner: TComponent); {⽣成进度窗体}publicconstructor Create(AOwner: TComponent); override;destructor Destroy; override;procedure ExportToExcel; {输出Excel⽂件}publishedproperty DBGridEh: TDBGridEh read FDBGridEh write SetDBGridEh;property ShowProgress: Boolean read FShowProgress write SetShowProgress; //是否显⽰进度条property ShowOpenExcel: Boolean read FShowOpenExcel write SetShowOpenExcel; //是否打开Excelproperty TitleName: TCaption read FTitleName write SetTitleName;property UserName: TCaption read FUserName write SetUserName;end;implementationconstructor TDBGridEhToExcel.Create(AOwner: TComponent);begininherited Create(AOwner);FShowProgress := True;FShowOpenExcel:= True;end;procedure TDBGridEhToExcel.SetShowProgress(const Value: Boolean);beginFShowProgress := Value;end;procedure TDBGridEhToExcel.SetDBGridEh(const Value: TDBGridEh);beginFDBGridEh := Value;end;procedure TDBGridEhToExcel.SetTitleName(const Value: TCaption);beginFTitleName := Value;end;procedure TDBGridEhToExcel.SetUserName(const Value: TCaption);beginFUserName := Value;end;function IsFileInUse(fName: string ): boolean;varHFileRes: HFILE;beginResult :=false;if not FileExists(fName) then exit;HFileRes :=CreateFile(pchar(fName), GENERIC_READor GENERIC_WRITE,0, nil,OPEN_EXISTING,FILE_ATTRIBUTE_NORMAL, 0);Result :=(HFileRes=INVALID_HANDLE_VALUE);if not Result thenCloseHandle(HFileRes);end;procedure TDBGridEhToExcel.ExportToExcel;varXLApp: Variant;Sheet: Variant;s1, s2: string;Caption,Msg: String;Row, Col: integer;iCount, jCount: Integer;FBookMark: TBookmark;FileName: String;SaveDialog1: TSaveDialog;begin//如果数据集为空或没有打开则退出if not DBGridEh.DataSource.DataSet.Active then Exit;SaveDialog1 := TSaveDialog.Create(Nil);SaveDialog1.FileName := TitleName + '_' + FormatDateTime('YYMMDDHHmmSS', now);SaveDialog1.Filter := 'Excel⽂件|*.xls';if SaveDialog1.Execute thenFileName := SaveDialog1.FileName;SaveDialog1.Free;if FileName = ''then Exit;while IsFileInUse(FileName) dobeginif Application.MessageBox('⽬标⽂件使⽤中,请退出⽬标⽂件后点击确定继续!','注意', MB_OKCANCEL + MB_ICONWARNING) = IDOK thenbeginendelsebeginExit;end;end;if FileExists(FileName) thenbeginMsg := '已存在⽂件(' + FileName + '),是否覆盖?';if Application.MessageBox(PChar(Msg), '提⽰', MB_YESNO + MB_ICONQUESTION + MB_DEFBUTTON2) = IDYES then begin//删除⽂件DeleteFile(PChar(FileName))endelseexit;end;Application.ProcessMessages;Screen.Cursor := crHourGlass;//显⽰进度窗体if ShowProgress thenCreateProcessForm(nil);if not VarIsEmpty(XLApp) thenbeginXLApp.DisplayAlerts := False;XLApp.Quit;VarClear(XLApp);end;//通过ole创建Excel对象tryXLApp := CreateOleObject('Excel.Application');exceptMessageDlg('创建Excel对象失败,请检查你的系统是否正确安装了Excel软件!', mtError, [mbOk], 0);Screen.Cursor := crDefault;Exit;end;//⽣成⼯作页XLApp.WorkBooks.Add[XLWBatWorksheet];XLApp.WorkBooks[1].WorkSheets[1].Name := TitleName;Sheet := XLApp.Workbooks[1].WorkSheets[TitleName];//写标题sheet.cells[1, 1] := TitleName;sheet.range[sheet.cells[1, 1], sheet.cells[1, DBGridEh.Columns.Count]].Select; //选择该列XLApp.selection.HorizontalAlignment := $FFFFEFF4; //居中XLApp.selection.MergeCells := True; //合并//写表头Row := 1;jCount := 3;for iCount := 0to DBGridEh.Columns.Count - 1dobeginCol := 2;Row := iCount+1;Caption := DBGridEh.Columns[iCount].Title.Caption;while POS('|', Caption) > 0dobeginjCount := 4;s1 := Copy(Caption, 1, Pos('|',Caption)-1);if s2 = s1 thenbeginsheet.range[sheet.cells[Col, Row-1],sheet.cells[Col, Row]].Select;XLApp.selection.HorizontalAlignment := $FFFFEFF4;XLApp.selection.MergeCells := True;endelseSheet.cells[Col,Row] := Copy(Caption, 1, Pos('|',Caption)-1);Caption := Copy(Caption,Pos('|', Caption)+1, Length(Caption));Inc(Col);s2 := s1;end;Sheet.cells[Col, Row] := Caption;Inc(Row);end;//合并表头并居中if jCount = 4thenfor iCount := 1to DBGridEh.Columns.Count doif Sheet.cells[3, iCount].Value = ''thenbeginsheet.range[sheet.cells[2, iCount],sheet.cells[3, iCount]].Select;XLApp.selection.HorizontalAlignment := $FFFFEFF4;XLApp.selection.MergeCells := True;endelse beginsheet.cells[3, iCount].Select;XLApp.selection.HorizontalAlignment := $FFFFEFF4;end;//读取数据DBGridEh.DataSource.DataSet.DisableControls;FBookMark := DBGridEh.DataSource.DataSet.GetBookmark;DBGridEh.DataSource.DataSet.First;while not DBGridEh.DataSource.DataSet.Eof dobeginfor iCount := 1to DBGridEh.Columns.Count dobegin//Sheet.cells[jCount, iCount] :=DBGridEh.Columns.Items[iCount-1].Field.AsString;case DBGridEh.DataSource.DataSet.FieldByName(DBGridEh.Columns.Items[iCount-1].FieldName).DataType offtSmallint, ftInteger, ftWord, ftAutoInc, ftBytes:Sheet.cells[jCount, iCount] :=DBGridEh.Columns.Items[iCount-1].Field.asinteger;ftFloat, ftCurrency, ftBCD:Sheet.cells[jCount, iCount] :=DBGridEh.Columns.Items[iCount-1].Field.AsFloat;elseif DBGridEh.DataSource.DataSet.FieldByName(DBGridEh.Columns.Items[iCount-1].FieldName) is TBlobfield then// 此类型的字段(图像等)暂⽆法读取显⽰ Sheet.cells[jCount, iCount] :=DBGridEh.Columns.Items[iCount-1].Field.AsStringelseSheet.cells[jCount, iCount] :=''''+DBGridEh.Columns.Items[iCount-1].Field.AsString;end;end;Inc(jCount);//显⽰进度条进度过程if ShowProgress thenbeginFtempGauge.Position := DBGridEh.DataSource.DataSet.RecNo;FtempGauge.Refresh;end;DBGridEh.DataSource.DataSet.Next;end;if DBGridEh.DataSource.DataSet.BookmarkValid(FBookMark) thenDBGridEh.DataSource.DataSet.GotoBookmark(FBookMark);DBGridEh.DataSource.DataSet.EnableControls;//读取表脚if DBGridEh.FooterRowCount > 0thenbeginfor Row := 0to DBGridEh.FooterRowCount-1dobeginfor Col := 0to DBGridEh.Columns.Count-1doSheet.cells[jCount, Col+1] := DBGridEh.GetFooterValue(Row,DBGridEh.Columns[Col]);Inc(jCount);end;end;//调整列宽// for iCount := 1 to DBGridEh.Columns.Count do// Sheet.Columns[iCount].EntireColumn.AutoFit;sheet.cells[1, 1].Select;XlApp.Workbooks[1].SaveAs(FileName);XlApp.Visible := True;XlApp := Unassigned;if ShowProgress thenFreeAndNil(FProgressForm);Screen.Cursor := crDefault;end;destructor TDBGridEhToExcel.Destroy;begininherited Destroy;end;procedure TDBGridEhToExcel.CreateProcessForm(AOwner: TComponent);varPanel: TPanel;beginif Assigned(FProgressForm) thenexit;FProgressForm := TForm.Create(AOwner);with FProgressForm dobegintry := '宋体'; {设置字体}Font.Size := 10;BorderStyle := bsNone;Width := 300;Height := 30;BorderWidth := 1;Color := clBlack;Position := poScreenCenter;Panel := TPanel.Create(FProgressForm);with Panel dobeginParent := FProgressForm;Align := alClient;Caption := '正在导出Excel,请稍候......';Color:=$00E9E5E0;end;FtempGauge:=TProgressBar.Create(Panel);with FtempGauge dobeginParent := Panel;Align:=alClient;Min := 0;Max:= DBGridEh.DataSource.DataSet.RecordCount;Position := 0;end;exceptend;end;FProgressForm.Show;FProgressForm.Update;end;procedure TDBGridEhToExcel.SetShowOpenExcel(const Value: Boolean); beginFShowOpenExcel:=Value;end;end.调⽤:varDbOut : TDBGridEhToExcel;beginDbOut := TDBGridEhToExcel.Create(Self);DbOut.TitleName := Caption;DbOut.ShowProgress := True;DbOut.ShowOpenExcel := True;DbOut.DBGridEh := DBGridEh1;DbOut.ExportToExcel;FreeAndNil(DbOut);。
【Delphi】汇出Excel时,Excel单元格格式设置(附Delphi操作Excel方法)一个例子:excelworksheet1.Cells.Item[row,3]. numberformatlocal:='$#,##0.00;[红色]-$#,##0.00';excelworksheet1.Cells.Item[row,3].Formula:='=SUM(R[-'+inttostr(row-rowflag+1)+']C:R[-1]C)';excelworksheet1.Cells.Item[row,3].Borders[3].LineStyle :=xlContinuous; excelworksheet1.Cells.Item[row,3].Borders[4].LineStyle :=xlDouble; excelworksheet1.Cells.Item[row,4].Borders[3].LineStyle :=xlContinuous; excelworksheet1.Cells.Item[row,4].Borders[4].LineStyle :=xlDouble; excelworksheet1.Cells.Item[row,4].Formula:='=R[-1]C';注:不知道公式及格式,均可通过录制宏找出对应公式及格式。
效果如下图:资料来自网络单元格设置1.设置单元格线框Excel.ActiveSheet.Range[B10:C13].Borders[N].LineStyle := xlNoneExcel.ActiveSheet.Range[B10:C13].Borders[N].Weight := xlThin边框的类型 Borders[N]xlEdgeLeft 左=1xlEdgeRight 右=2xlEdgeTop 顶=3xlEdgeBottom 底=4xlDiagonalUp 左上右下=5xlDiagonalDown 左下右上=6xlEdgeLeft 外部左边框=7xlEdgeTop 外部上边框=8xlEdgeBottom 外部下边框=9xlEdgeRight 外部右边框=10xlInsideVertical 内部竖线=11xlInsideHorizontal 内部横线=12(其中1:为左 2:右 3:顶 4:底 5:斜\ 6:斜/)线条类型LineStyle,宽度Weight单条线的LineStyle := xlContinuous双条线的LineStyle := xlDouble虚线 xlHairline 1实线 xlThin中实线 xlMedium粗实线 xlThick2.给单元格赋值:Excel.Cells[1,4].Value := 第一行第四列;3.设置第一行字体属性(隶书,蓝色,加粗,下划线):Excel.ActiveSheet.Rows[1] := 隶书; Excel.ActiveSheet.Rows[1].Font.Color := clBlue; Excel.ActiveSheet.Rows[1].Font.Bold := True; Excel.ActiveSheet.Rows[1].Font.UnderLine := True;4.设置整个表字体为9Excel.Cells.Font.Size:=9;5.在第8行之前插入/删除分页符:Excel.WorkSheets[1].Rows[8].PageBreak := 1; (0为删除)6.清除第一行第四列单元格公式:Excel.ActiveSheet.Cells[1,4].ClearContents;7.从数字类型转换成文本类型(不知道格式化字符串,请录制宏,抽出宏中格式化字符串。
delphi如何获得EXCEL文件内指定单元格内容pr ocedu re TE_Yhts F.Bit Btn2C lick(Sende r: TO bject);va r s3, s4,s5, s6: st ring;i: inte ger;beginif dbgr ideh1.Data Sourc e.Dat aSet.Recor dCoun t=0 t hen begi n App licat ion.M essag eBox('请先载入相应年月的用水记录再进行导入', '系统提示',mb_ok+mb_i conin forma tion); abo rt; end;to olbut ton7.Enabl ed := fals e;Tag := tru e;ado_t mp := tado query.Crea te(ni l); ado_tmp.C onnec tion:= da tamod ule1.ADOCo nnect ion1;if RzOp enDia log1.Execu te th enbegintryExcel Appli catio n1.Co nnect; //连接到EXC EL exc eptAppli catio n.Mes sageB ox('E xcel可能没有安装! ', '提示', MB_OK +MB_IC ONSTO P);Exit;end;E xcelA pplic ation1.Vis ible[0] := fals e; //不显示Ex cel窗口tryExcel Appli catio n1.Wo rkboo ks.Op en(Rz OpenD ialog1.Fil eName,null, null, nul l, nu ll, n ull,null, null, nul l, nu ll, n ull,null, null, 0); //打开指定的EX CEL 文件 exce ptb egin Ex celAp plica tion1.Disc onnec t; //关闭连接 Ex celAp plica tion1.Quit;exit; end; end;Excel WorkB ook1.Conne ctTo(Excel Appli catio n1.Wo rkboo ks[1]); //Excel Workb ook1与Eexce lappl icati on1建立连接 Exc elWor kShee t1.Co nnect To(Ex celWo rkBoo k1.Wo rkshe ets[1] as_Work sheet);//Excel works heet1与Exce lwork book1建立连接E_JdF:= tE_JDF.Creat e(sel f); E_Jdf.L abel1.Capt ion := '正在读取数据,请稍候......... ';E_Jdbe l1.Fo nt.Co lor:=clred; E_Jd F.Pro gress Bar1.Posit ion := 0;E_JdF.Progr essBa r1.ma x := Exce lAppl icati on1.A ctive Cell.Row;//开始从EXCEL中取数,取完数后关闭EXCELE_JdF.Show; fori :=1 toExcel Appli catio n1.Ac tiveC ell.R ow do //最大数 begi n Ap plica tion.Proce ssMes sages; E_JdF.P rogre ssBar1.Pos ition := E_JdF.Progr essBa r1.Po sitio n + 1; if trim(exce lwork sheet1.cel ls.it em[i+ 1,1]) < > ' ' th enb egin if trim(exce lwork sheet1.cel ls.it em[i+ 1,17])= ' ' thenb eginAppli catio n.Mes sageB ox('E xcel表中缴费日期为空,导入数据失败! ', '警告',MB_O K + M B_ICO NSTOP); E_JdF.C lose; Tool butto n7.En abled := t rue;aborte nd elseb egins0 := exce lwork sheet1.cel ls.it em[i+ 1,16];//用户实缴 s1:= st rtoda te(ex celwo rkshe et1.c ells.item[i + 1, 17]); //缴费日期s3 := trim(exce lwork sheet1.cel ls.it em[i+ 1,3]);//用户编号 s4:= ex celwo rkshe et1.c ells.item[i + 1, 5]; //年度 s5 := exc elwor kshee t1.ce lls.i tem[i + 1, 6];//月份s6 := exce lwork sheet1.cel ls.it em[i+ 1,4]; //水表编号e nd; wit h ado_tmpdo //更新JFJ L表 begi n clo se;s ql.Cl ear;sql.A dd('u pdate jfjl setyhsjj e=' '' + f loatt ostr(s0) + ' '',jfr q= ''' +datet ostr(s1) + ' '' '+'wher e yhb h= ''' +s3 +' ' ' andsbbh= ' '' + s6 + '' ' a nd n d= ''' + s4 + ' ' 'and y f= ''' +s5 +' ' ' andsfts=1 '); Exec SQL; en d;e nd; en d; E_J dF.Pr ogres sBar1.Posi tion:= Ex celAp plica tion1.Acti veCel l.Row; Appl icati on.Me ssage Box('数据读取完毕 ', '提示', mb_ok);E_JdF.Close; Exce lAppl icati on1.D iscon nect;Excel Appli catio n1.Qu it; wi th ad o_add do //从表中获取数据 be ginsql_s tr := SQL.Text; sql.Clea r;s ql.Te xt := 'sel ect * from jfjl wher e nd=' ''+ s4+ ' ' ' an d yf= ' '' + s5 + ''' an d sft s=1 a nd sf ysf=0 orde r byyhbh'; op en; en d;end;Too lbutt on7.E nable d :=true;Bi tBtn4.Enab led := tru e;en d;。
Winform导出Excel的列格式设置最近,在做winform项目中遇到了将数据添加到excle中,其中也涉及到数据的格式问题,在网上搜索了一番,找到一编解决的文章,特保存下来,以备不时之需。
Winform导出Excel的列格式设置在项目中一般都需要将报表数据导出到EXCEL中,但经常出现导出长串数据(如身份证)到EXCEL中后显示为科学计数法的格式,或者报表中显示为001的数据导出到Excel后成了1的格式。
下面简单介绍一下以上问题的解决方法:protected void GridView2_RowDataBound(object sender, GridViewRowEventArgs e){if (e.Row.RowType == DataControlRowType.DataRow)e.Row.Cells[1].Attributes.Add("style", "vnd.ms-excel.numberformat:@");}1、首先,了解一下excel从web页面上导出的原理。
当我们把这些数据发送到客户端时,我们想让客户端程序(浏览器)以excel的格式读取它,所以把mime类型设为:application/vnd.ms-excel,当excel读取文件时会以每个cell的格式呈现数据,如果cell没有规定的格式,则excel会以默认的格式去呈现该cell的数据。
这样就给我们提供了自定义数据格式的空间,当然我们必须使用excel支持的格式。
下面就列出常用的一些格式:1)文本:vnd.ms-excel.numberformat:@2)日期:vnd.ms-excel.numberformat:yyyy/mm/dd3)数字:vnd.ms-excel.numberformat:#,##0.004)货币:vnd.ms-excel.numberformat:¥#,##0.005)百分比:vnd.ms-excel.numberformat: #0.00%方法2:m_objSheet.get_Range("A2",m_objExcel.Cells[nCountRow+1,1]).NumberFormat = "@";m_objSheet.get_Range("A2",m_objExcel.Cells[nCountRow+1,1]).NumberFormat = "00000";这种方法看似可以,但是点击单元格,还是int型。
用DELPHI操作EXCEL2007年07月03日星期二 11:45DELPHI中EXCEL组件的使用方法:一) 使用动态创建的方法首先创建 Excel 对象,使用ComObj:var ExcelApp: Variant;ExcelApp := CreateOleObject( 'Excel.Application' );1) 显示当前窗口:ExcelApp.Visible := True;2) 更改 Excel 标题栏:ExcelApp.Caption := '应用程序调用 Microsoft Excel';3) 添加新工作簿:ExcelApp.WorkBooks.Add;4) 打开已存在的工作簿:ExcelApp.WorkBooks.Open( 'C:\Excel\Demo.xls' );5) 设置第2个工作表为活动工作表:ExcelApp.WorkSheets[2].Activate;或ExcelApp.WorksSheets[ 'Sheet2' ].Activate;6) 给单元格赋值:ExcelApp.Cells[1,4].Value := '第一行第四列';7) 设置指定列的宽度(单位:字符个数),以第一列为例:ExcelApp.ActiveSheet.Columns[1].ColumnsWidth := 5;8) 设置指定行的高度(单位:磅)(1磅=0.035厘米),以第二行为例:ExcelApp.ActiveSheet.Rows[2].RowHeight := 1/0.035; // 1厘米9) 在第8行之前插入分页符:ExcelApp.WorkSheets[1].Rows.PageBreak := 1;10) 在第8列之前删除分页符:ExcelApp.ActiveSheet.Columns[4].PageBreak := 0;11) 指定边框线宽度:ExcelApp.ActiveSheet.Range[ 'B3:D4' ].Borders[2].Weight := 3;1-左 2-右 3-顶 4-底 5-斜( \ ) 6-斜( / )12) 清除第一行第四列单元格公式:ExcelApp.ActiveSheet.Cells[1,4].ClearContents;13) 设置第一行字体属性:ExcelApp.ActiveSheet.Rows[1] := '隶书';ExcelApp.ActiveSheet.Rows[1].Font.Color := clBlue;ExcelApp.ActiveSheet.Rows[1].Font.Bold := True;ExcelApp.ActiveSheet.Rows[1].Font.UnderLine := True;14) 进行页面设置:a.页眉:ExcelApp.ActiveSheet.PageSetup.CenterHeader := '报表演示';b.页脚:ExcelApp.ActiveSheet.PageSetup.CenterFooter := '第&P页';c.页眉到顶端边距2cm:ExcelApp.ActiveSheet.PageSetup.HeaderMargin := 2/0.035;d.页脚到底端边距3cm:ExcelApp.ActiveSheet.PageSetup.HeaderMargin := 3/0.035;e.顶边距2cm:ExcelApp.ActiveSheet.PageSetup.TopMargin := 2/0.035;f.底边距2cm:ExcelApp.ActiveSheet.PageSetup.BottomMargin := 2/0.035;g.左边距2cm:ExcelApp.ActiveSheet.PageSetup.LeftMargin := 2/0.035;h.右边距2cm:ExcelApp.ActiveSheet.PageSetup.RightMargin := 2/0.035;i.页面水平居中:ExcelApp.ActiveSheet.PageSetup.CenterHorizontally :=2/0.035;j.页面垂直居中:ExcelApp.ActiveSheet.PageSetup.CenterVertically := 2/0.035; k.打印单元格网线:ExcelApp.ActiveSheet.PageSetup.PrintGridLines := True;15) 拷贝操作:a.拷贝整个工作表:ed.Range.Copy;b.拷贝指定区域:ExcelApp.ActiveSheet.Range[ 'A1:E2' ].Copy;c.从A1位置开始粘贴:ExcelApp.ActiveSheet.Range.[ 'A1' ].PasteSpecial;d.从文件尾部开始粘贴:ExcelApp.ActiveSheet.Range.PasteSpecial;16) 插入一行或一列:a. ExcelApp.ActiveSheet.Rows[2].Insert;b. ExcelApp.ActiveSheet.Columns[1].Insert;17) 删除一行或一列:a. ExcelApp.ActiveSheet.Rows[2].Delete;b. ExcelApp.ActiveSheet.Columns[1].Delete;18) 打印预览工作表:ExcelApp.ActiveSheet.PrintPreview;19) 打印输出工作表:ExcelApp.ActiveSheet.PrintOut;20) 工作表保存:if not ExcelApp.ActiveWorkBook.Saved thenExcelApp.ActiveSheet.PrintPreview;21) 工作表另存为:ExcelApp.SaveAs( 'C:\Excel\Demo1.xls' );22) 放弃存盘:ExcelApp.ActiveWorkBook.Saved := True;23) 关闭工作簿:ExcelApp.WorkBooks.Close;24) 退出 Excel:ExcelApp.Quit;(二) 使用Delphi 控件方法在Form中分别放入ExcelApplication, ExcelWorkbook和ExcelWorksheet。
导出EXCEL设置单元格格式怎么设置导出的EXCEL⽂件的列格式如何设置导出的EXCEL⽂件的列格式在office的EXCEL中我们可以在⼀个EXCEL⽂件中,选中⼀列再点击⿏标右键,选择设置单元格格式,可以将这⼀列设为⽂本格式等;请问各位,如果我想在导出EXCEL时在代码中实现这个将列的格式设置为⽂本格式的功能,要怎样做呢?那位能否帮下忙,------解决⽅案--------------------⽤excel组件导出------解决⽅案--------------------C# code//⽂本:vnd.ms-excel.numberformat:@//⽇期:vnd.ms-excel.numberformat:yyyy/mm/dd//数字:vnd.ms-excel.numberformat::#,##0.00//货币:vnd.ms-excel.numberformat¥#,##0.00//百分⽐:vnd.ms-excel.numberformat:#0.00%//在excel中数字位数⼤于11位,都会默认以科学技术法出现,所以有E+.protected void GridView1_RowDataBound(object sender, GridViewRowEventArgs e){for(int i=0;i<e.Row.Cells.Count;i++){if(e.Row.RowType==DataControlRowType.DataRow){//表⽰对每⼀⾏以字符串的形式输出e.Row.Cells[i].Attributes.Add("style","vnd.ms-excel.numberformat:@");}}}//如果你想对导出的execl的某⼀⾏进⾏以字符串输出,⽽不想⽤科学计数法出现,则需要上⾯⽅法,最好对某⼀列以字符串输出,excel也是从0列开始的.------解决⽅案--------------------设置单元格的⽂本 Excel.Application.get_Range(excelApp.Cells[x1, y1], excelApp.Cells[x2, y2]).NumberFormatLocal="@"------解决⽅案--------------------mySheet.Cells(1,9).NumberFormatLocal = "@"Excel.Range r = mySheet.get_Range(mySheet.Cells[1, 1], mySheet.Cells[1,3]);r.NumberFormat = "@";r.NumberForma = "0.00_ "r.NumberForma = "¥#,##0.00;¥-#,##0.00"r.NumberForma = _"_ ¥* #,##0.00_ ;_ ¥* -#,##0.00_ ;_ ¥* ""-""??_ ;_ @_ "r.NumberForma = "yyyy-m-d"r.NumberForma = "[$-F400]h:mm:ss AM/PM"r.NumberForma = "000000"myExcel.get_Range(myExcel.Cells[1, 1], myExcel.Cells[1, 1]).Font.Bold = true;myExcel.get_Range(myExcel.Cells[1,1],myExcel.Cells[1,1]).Font.Size = 16;------解决⽅案--------------------dataTable 导出------解决⽅案--------------------//⽂本:vnd.ms-excel.numberformat:@//⽇期:vnd.ms-excel.numberformat:yyyy/mm/dd//数字:vnd.ms-excel.numberformat::#,##0.00//货币:vnd.ms-excel.numberformat¥#,##0.00//百分⽐:vnd.ms-excel.numberformat:#0.00%。
Delphi中调用Excel制作报表的方法
蒋丽华;雷佳兵
【期刊名称】《智能计算机与应用》
【年(卷),期】2007(000)001
【摘要】介绍了在Delphi中利用OLE自动化技术调用Excel对象制作报表的方法,并结合具体实例,给出了实现源代码.
【总页数】2页(P61-62)
【作者】蒋丽华;雷佳兵
【作者单位】不详;武汉工业学院计算机与信息工程系讲师,430023
【正文语种】中文
【中图分类】TP311.52
【相关文献】
1.在Delphi 5中调用Excel [J], 惠恩刚
2.用Delphi和VBA制作Excel报表 [J], 于瑞甫;华钢
3.PowerBuilder中调用Excel制作复杂报表的方法 [J], 邹运兰;张怡芳
4.基于Delphi+Excel 2000制作复杂报表 [J], 曹芝兰;王汉江
5.Delphi中调用和编辑Excel的实现 [J], 田一源;姚博
因版权原因,仅展示原文概要,查看原文内容请购买。
【Delphi】汇出Excel时,Excel单元格格式设置(附Delphi操作Excel方法)一个例子:excelworksheet1.Cells.Item[row,3]. numberformatlocal:='$#,##0.00;[红色]-$#,##0.00';excelworksheet1.Cells.Item[row,3].Formula:='=SUM(R[-'+inttostr(row-rowflag+1)+']C:R[-1]C)';excelworksheet1.Cells.Item[row,3].Borders[3].LineStyle :=xlContinuous; excelworksheet1.Cells.Item[row,3].Borders[4].LineStyle :=xlDouble; excelworksheet1.Cells.Item[row,4].Borders[3].LineStyle :=xlContinuous; excelworksheet1.Cells.Item[row,4].Borders[4].LineStyle :=xlDouble; excelworksheet1.Cells.Item[row,4].Formula:='=R[-1]C';注:不知道公式及格式,均可通过录制宏找出对应公式及格式。
效果如下图:资料来自网络单元格设置1.设置单元格线框Excel.ActiveSheet.Range[B10:C13].Borders[N].LineStyle := xlNoneExcel.ActiveSheet.Range[B10:C13].Borders[N].Weight := xlThin边框的类型 Borders[N]xlEdgeLeft 左=1xlEdgeRight 右=2xlEdgeTop 顶=3xlEdgeBottom 底=4xlDiagonalUp 左上右下=5xlDiagonalDown 左下右上=6xlEdgeLeft 外部左边框=7xlEdgeTop 外部上边框=8xlEdgeBottom 外部下边框=9xlEdgeRight 外部右边框=10xlInsideVertical 内部竖线=11xlInsideHorizontal 内部横线=12(其中1:为左 2:右 3:顶 4:底 5:斜\ 6:斜/)线条类型LineStyle,宽度Weight单条线的LineStyle := xlContinuous双条线的LineStyle := xlDouble虚线 xlHairline 1实线 xlThin中实线 xlMedium粗实线 xlThick2.给单元格赋值:Excel.Cells[1,4].Value := 第一行第四列;3.设置第一行字体属性(隶书,蓝色,加粗,下划线):Excel.ActiveSheet.Rows[1] := 隶书; Excel.ActiveSheet.Rows[1].Font.Color := clBlue; Excel.ActiveSheet.Rows[1].Font.Bold := True; Excel.ActiveSheet.Rows[1].Font.UnderLine := True;4.设置整个表字体为9Excel.Cells.Font.Size:=9;5.在第8行之前插入/删除分页符:Excel.WorkSheets[1].Rows[8].PageBreak := 1; (0为删除)6.清除第一行第四列单元格公式:Excel.ActiveSheet.Cells[1,4].ClearContents;7.从数字类型转换成文本类型(不知道格式化字符串,请录制宏,抽出宏中格式化字符串。
)excelworksheet1.Cells.Item[row,10].numberformatlocal:='@'; excelworksheet1.Cells.Item[row,10].NumberFormat :='hh:mm:ss' excelworksheet1.Cells.Item[row,9].numberformatlocal:='$#,##0.00;[红色]-$#,##0.00';8.加公式(不知道公式格式,请录制宏,抽出宏中公式格式。
) excelworksheet1.Cells.Item[row,10].Formula:='=R[-1]C+RC[-1]';ExApp.cells[9+iLoop,6].value:='=SUM(G'+ inttostr(9+iLoop)+':H'+inttostr(9+iLoop)+')';附:Delphi操作Excel方法(一) 使用动态创建的方法(二) 使用Delphi 控件方法一) 使用动态创建的方法首先创建 Excel 对象,使用ComObj:var ExcelApp: Variant;ExcelApp := CreateOleObject( 'Excel.Application' );1) 显示当前窗口:ExcelApp.Visible := True;2) 更改 Excel 标题栏:ExcelApp.Caption := '应用程序调用 Microsoft Excel';3) 添加新工作簿:ExcelApp.WorkBooks.Add;4) 打开已存在的工作簿:ExcelApp.WorkBooks.Open( 'C:\Excel\Demo.xls' );5) 设置第2个工作表为活动工作表:ExcelApp.WorkSheets[2].Activate;或 ExcelApp.WorksSheets[ 'Sheet2' ].Activate;6) 给单元格赋值:ExcelApp.Cells[1,4].Value := '第一行第四列';7) 设置指定列的宽度(单位:字符个数),以第一列为例:ExcelApp.ActiveSheet.Columns[1].ColumnWidth := 5;8) 设置指定行的高度(单位:磅)(1磅=0.035厘米),以第二行为例:ExcelApp.ActiveSheet.Rows[2].RowHeight := 1/0.035; // 1厘米9) 在第8行之前插入分页符:ExcelApp.WorkSheets[1].Rows.PageBreak := 1;10) 在第8列之前删除分页符:ExcelApp.ActiveSheet.Columns[4].PageBreak := 0;11) 指定边框线宽度:ExcelApp.ActiveSheet.Range[ 'B3:D4' ].Borders[2]. Weight := 3;1-左 2-右 3-顶 4-底 5-斜( \ ) 6-斜( / )12) 清除第一行第四列单元格公式:ExcelApp.ActiveSheet.Cells[1,4]. ClearContents;13) 设置第一行字体属性:ExcelApp.ActiveSheet.Rows[1] := '隶书';ExcelApp.ActiveSheet.Rows[1].Font.Color := clBlue;ExcelApp.ActiveSheet.Rows[1].Font.Bold := True;ExcelApp.ActiveSheet.Rows[1].Font.UnderLine := True;14) 进行页面设置:a.页眉:ExcelApp.ActiveSheet.PageSetup.CenterHeader := '报表演示';b.页脚:ExcelApp.ActiveSheet.PageSetup.CenterFooter := '第&P页';c.页眉到顶端边距2cm:ExcelApp.ActiveSheet.PageSetup.HeaderMargin := 2/0.035;d.页脚到底端边距3cm:ExcelApp.ActiveSheet.PageSetup.HeaderMargin := 3/0.035;e.顶边距2cm:ExcelApp.ActiveSheet.PageSetup.TopMargin := 2/0.035;f.底边距2cm:ExcelApp.ActiveSheet.PageSetup.BottomMargin := 2/0.035;g.左边距2cm:ExcelApp.ActiveSheet.PageSetup.LeftMargin := 2/0.035;h.右边距2cm:ExcelApp.ActiveSheet.PageSetup.RightMargin := 2/0.035;i.页面水平居中:ExcelApp.ActiveSheet.PageSetup.CenterHorizontally := 2/0.035; j.页面垂直居中:ExcelApp.ActiveSheet.PageSetup.CenterVertically := 2/0.035; k.打印单元格网线:ExcelApp.ActiveSheet.PageSetup.PrintGridLines := True;15) 拷贝操作:a.拷贝整个工作表:ed.Range.Copy;b.拷贝指定区域:ExcelApp.ActiveSheet.Range[ 'A1:E2' ].Copy;c.从A1位置开始粘贴:ExcelApp.ActiveSheet.Range.[ 'A1' ].PasteSpecial;d.从文件尾部开始粘贴:ExcelApp.ActiveSheet.Range.PasteSpecial;16) 插入一行或一列:a. ExcelApp.ActiveSheet.Rows[2].Insert;b. ExcelApp.ActiveSheet.Columns[1].Insert;17) 删除一行或一列:a. ExcelApp.ActiveSheet.Rows[2].Delete;b. ExcelApp.ActiveSheet.Columns[1].Delete;18) 打印预览工作表:ExcelApp.ActiveSheet.PrintPreview;19) 打印输出工作表:ExcelApp.ActiveSheet.PrintOut;20) 工作表保存:if not ExcelApp.ActiveWorkBook.Saved thenExcelApp.ActiveSheet.PrintPreview;21) 工作表另存为:ExcelApp.SaveAs( 'C:\Excel\Demo1.xls' );22) 放弃存盘:ExcelApp.ActiveWorkBook.Saved := True;23) 关闭工作簿:ExcelApp.WorkBooks.Close;24) 退出 Excel:ExcelApp.Quit;25)锁定 Excel:ExcelApp.Cells.Select;//Select All CellsExcelApp.Selection.Locked = True;// Lock Selected Cells(二) 使用Delphi 控件方法在Form中分别放入ExcelApplication, ExcelWorkbook和ExcelWorksheet。