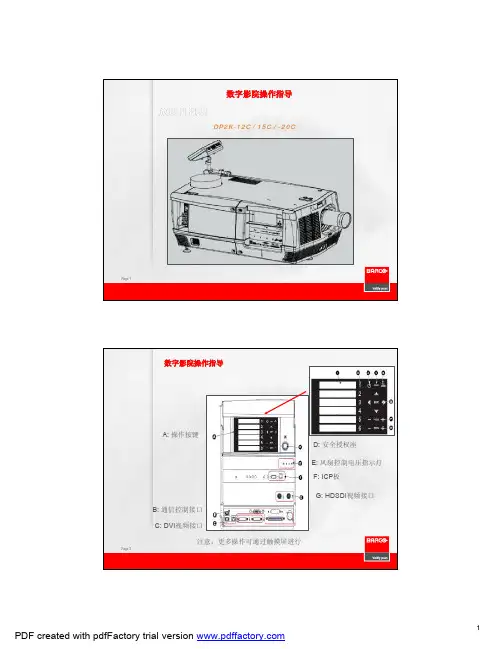
DP2KE-系列数字电影放映机R5906699ZH快速启动–操作人员
- 格式:pdf
- 大小:1.40 MB
- 文档页数:9
![DP2K数字放映机常见报警信息与处理[优质文档]](https://uimg.taocdn.com/163b41a4dc3383c4bb4cf7ec4afe04a1b071b035.webp)
DP2K数字放映机常见报警信息与处理[优质文档] 常见报警信息与处理报警尾灯代码信息描述中文描述处理方法类型颜色正确维护放映机后在“诊断-智能维护”中,关闭6200 提醒蓝色maintenance-maintenance required 提醒用户放映机需要维护此提醒 5801 错误“安全问题-需安全认证” 用Dallas kay 安全钥匙进行认证蓝色 ti-link-delcryptor-service door tanper event5834 错误“安全问题-需安全认证” 用Dallas kay 安全钥匙进行认证蓝色ti-link-delcryptor-physical marriage tanper event5850 错误 IMB 插拔IMB或联系服务器厂商蓝色 imb-no communicaion 5646 错误开灯失败加大灯电流或更灯泡蓝色 lamp-set lamp on failed 5647 错误自动关灯加大灯电流或更灯泡蓝色 lamp-lamp is off due to an error6091 警告没检测到外部排风或风量小检测排风是否打开风速是否达到要求黄色 ail flow-on ail flow“插拔光传感器CLO连接,如果亮度值为“,”,5003 错误黄色 light sensor-no communication 光传感器没有连接则需要置光输出亮度测量值,如12fl。
”5180 错误灯箱没有连接重新安装灯箱黄色 lamp house-not connected 5659 警告灯泡运行时间将近注意灯泡运行时间,及时更换灯泡蓝色 lamp run time-warning5020 警告读不出机器序列号拔出控制板后,重新安装背板上的SIM卡蓝色system-read projerctor identification failed调整机器位置/倾角,调整镜头并保存,拔掉图中5191 警告蓝色 prism switch-warning(lens probably touches prism 镜头限位压缩敏传感器 5230 警告镜头限位微整机器位置/倾角,重做镜头文件黄色 lens zoom position-requested target not reached5231 警告镜头聚焦限位调整镜头,重做镜头文件黄色 lens focus position-requested target not reached5232 警告镜头水平偏移限位微整机器位置/倾角,重做镜头文件黄色 lens horizontal shift position-requested target not reached5233 警告镜头垂直偏移限位微整机器位置/倾角,重做镜头文件黄色 lens vertical shift position-requested target not reached5103 警告 SMPS左侧风扇转速低插拔或对换风扇的接口,检查故障是否转移黄色 smps fan 1(left side)-speed low5113 警告 SMPS右侧风扇转速低插拔或对换风扇的接口,检查故障是否转移黄色 smps fan 2(left side)-speed lowDP1200、1500、2000、3000、xxC、xxB系列放映机快速启动指南-操作人员镜头操作注意事项警告:镜头清洁操作,注意先使用吹刷去除表面灰尘,使用不掉毛的擦镜头,从内向外擦拭,不要用强烈溶剂,禁止使用气泵吹操作注意事项:为了保证放映质量,应该经常检查画面的聚焦和不同画面格式一幕框的匹配在某个macro设置通道下(你需要调试图像的通道),点击触摸屏(软件)导航菜单的配置?镜头。

K16二合一视频控制器用户手册更新记录目录更新记录 (ii)1 概述 (1)2 外观 (2)前面板 (2)后面板 (3)3 应用场景 (5)4 主界面 (6)5 菜单操作 (9)屏体亮度 (9)智能配屏 (9)5.2.1 快捷点屏 (9)5.2.2 载入箱体配置文件 (10)5.2.3 固化至接收卡 (12)5.2.4 高级点屏 (12)5.2.5 更多设置 (13)窗口属性 (14)5.3.2 主窗口及PIP属性 (14)5.3.3 背景设置 (15)输入设置 (17)5.4.1 选择输入源 (17)5.4.2 设置输入源分辨率 (17)5.4.3 DVI拼接 (19)画面控制 (21)场景设置 (21)拼接带载 (22)高级设置 (22)5.8.1 热备份设置 (22)5.8.2 同步设置 (23)5.8.3 FN键设置 (23)5.8.4 高级功能 (23)5.8.4.1 HDR设置 (23)5.8.4.2 光口工作模式 (24)5.8.4.3 3D设置 (26)5.8.4.4 自检 (26)5.8.5 输出帧频 (26)5.8.6 返回主界面时长 (26)5.8.7 恢复出厂设置 (27)5.8.8 关于我们 (27)工厂复位 (27)通讯设置 (27)5.10.1 通讯模式 (27)5.10.2 网络设置 (27)设备工作模式 (28)6 产品规格 (30)1 概述K16是诺瓦科技最新推出的一款All-in-One产品,集视频处理、视频控制以及LED屏体配置等功能于一体,具备多种类的视频信号接收能力、超高清全4K×2K@60Hz的图像处理能力和发送能力。
K16可通过智能管理软件V-Can控制,可实现丰富的画面拼接效果和便捷快速的操作。
K16可通过网口和光纤口将处理后的视频发送到LED显示屏上。
K16强大的视频处理和发送能力可被广泛应用于舞台、会议、活动、展会等高端租赁及小间距显示屏等多种应用场景。

234E5/welcomeZH 用户手册 1客户服务与保修 27故障排除和常见问题解答23目录1.重要 (1)1.1 安全措施与维修 (1)1.2 标志说明 (2)1.3 产品和包装材料的废弃 (3)2. 设置显示器 (4)2.1 安装 (4)2.2 操作显示器 (6)2.3 MHL(移动高清链接)简介 (9)3. 图像优化 (10)3.1 SmartImage Lite (10)3.2 SmartContrast (11)3.3 Philips SmartControl Lite (11)4. 技术规格 (17)4.1 分辨率和预设模式 (20)5. 电源管理 (21)6. 有关规定 (22)7. 客户服务与保修 (27)7.1 飞利浦平板显示器像素缺陷规定 (27)7.2 客户服务与保修 (29)8. 故障排除和常见问题解答 (32)8.1 故障检修 (32)8.2 SmartControl Lite 常见问题解答 (33)8.3 一般常见问题解答 (34)8.4 MHL (36)1. 重要此电子版用户指南适合使用 Philips 显示器的所有用户。
请在使用您的显示器之前花点时间阅读本 User Manual (用户手册) 。
它包含与使用显示器相关的重要信息和注意事项。
产品享受飞利浦保修须符合下列条件:产品适当用于其设计目的、符合操作说明、返修时提供原始帐单或付款收据,帐单或收据应载明购货日期、销售商名称、产品型号及生产号。
1.1 安全措施与维修警告使用本文档中未介绍的控制、调整或过程可能导致碰撞、电气危险和/或机械危险。
连接和使用电脑显示器时,请阅读并遵循以下说明。
操作:• 请使显示器远离阳光直接照射、明亮强光线、以及任何其他热源。
长期暴露于此类环境可能导致显示器褪色和损坏。
• 移开任何可能掉入通风孔的物品或者会妨碍显示器电子器件正常冷却的物品。
• 请勿堵塞机壳上的通风孔。
• 放置显示器时,确保电源插头和插座便于插拔。
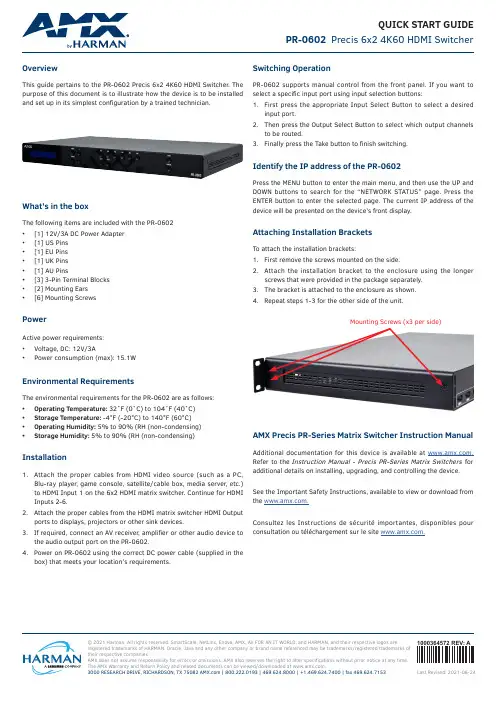
© 2021 Harman. All rights reserved. SmartScale, NetLinx, Enova, AMX, AV FOR AN IT WORLD, and HARMAN, and their respective logos are registered trademarks of HARMAN. Oracle, Java and any other company or brand name referenced may be trademarks/registered trademarks of their respective companies.AMX does not assume responsibility for errors or omissions. AMX also reserves the right to alter specifications without prior notice at any time. The AMX Warranty and Return Policy and related documents can be viewed/downloaded at .3000 RESEARCH DRIVE, RICHARDSON, TX 75082 | 800.222.0193 | 469.624.8000 | +1.469.624.7400 | fax 469.624.71531000364572 REV: A Last Revised: 2021-06-24QUICK START GUIDE PR-0602 Precis 6x2 4K60 HDMI SwitcherOverviewThis guide pertains to the PR-0602 Precis 6x2 4K60 HDMI Switcher. The purpose of this document is to illustrate how the device is to be installedand set up in its simplest configuration by a trained technician.What’s in the boxThe following items are included with the PR-0602• [1] 12V/3A DC Power Adapter• [1] US Pins• [1] EU Pins• [1] UK Pins• [1] AU Pins• [3] 3-Pin Terminal Blocks• [2] Mounting Ears• [6] Mounting ScrewsPowerActive power requirements:• Voltage, DC: 12V/3A• Power consumption (max): 15.1WEnvironmental RequirementsThe environmental requirements for the PR-0602 are as follows:• Operating Temperature: 32˚F (0˚C) to 104˚F (40˚C)• Storage Temperature: -4°F (-20°C) to 140°F (60°C)• Operating Humidity: 5% to 90% (RH (non-condensing)• Storage Humidity: 5% to 90% (RH (non-condensing) Installation1. Attach the proper cables from HDMI video source (such as a PC,Blu-ray player, game console, satellite/cable box, media server, etc.) to HDMI Input 1 on the 6x2 HDMI matrix switcher. Continue for HDMI Inputs 2-6.2. Attach the proper cables from the HDMI matrix switcher HDMI Outputports to displays, projectors or other sink devices.3. If required, connect an AV receiver, amplifier or other audio device tothe audio output port on the PR-0602.4. Power on PR-0602 using the correct DC power cable (supplied in thebox) that meets your location’s requirements.Switching OperationPR-0602 supports manual control from the front panel. If you want to select a specific input port using input selection buttons:1. First press the appropriate Input Select Button to select a desiredinput port.2. Then press the Output Select Button to select which output channelsto be routed.3. Finally press the Take button to finish switching.Identify the IP address of the PR-0602Press the MENU button to enter the main menu, and then use the UP and DOWN buttons to search for the “NETWORK STATUS” page. Press the ENTER button to enter the selected page. The current IP address of the device will be presented on the device’s front display.Attaching Installation BracketsTo attach the installation brackets:1. First remove the screws mounted on the side.2. Attach the installation bracket to the enclosure using the longerscrews that were provided in the package separately.3. The bracket is attached to the enclosure as shown.4.Repeat steps 1-3 for the other side of the unit.Mounting Screws (x3 per side)AMX Precis PR-Series Matrix Switcher Instruction Manual Additional documentation for this device is available at . Refer to the Instruction Manual - Precis PR-Series Matrix Switchers for additional details on installing, upgrading, and controlling the device.See the Important Safety Instructions, available to view or download from the .Consultez les Instructions de sécurité importantes, disponibles pour consultation ou téléchargement sur le site .。

数字电影播放机操作规程数字电影播放机操作规程一、操作前准备1. 确保数字电影播放机处于稳定的电源供应。
2. 根据播放需求,准备好所需的数字影片以及播放媒介(如U盘、光盘等)。
3. 确保电影播放机与显示设备(如电视、投影仪等)连接良好。
4. 打开数字电影播放机及显示设备的电源。
二、电影播放机基本操作1. 开机与关机a. 按下电影播放机的电源按钮,即可开机。
待开机完成后,电影播放机进入待机状态,可以进行相关操作。
b. 在操作完毕后,按住电源按钮数秒后,电影播放机会提示“是否确认关机”。
此时,选择“确认关机”进行关机操作。
2. 播放数字影片a. 使用遥控器或电影播放机前面板的按钮,进入数字影片选择界面。
b. 选择所需播放的数字影片。
c. 点击“播放”按钮,或按下遥控器上的“确认”按钮,即可开始播放数字影片。
3. 暂停与继续播放a. 在播放过程中,按下遥控器上的“暂停”按钮,即可暂停播放。
b. 再次按下遥控器上的“继续”按钮,即可继续播放。
4. 快进与快退a. 在播放过程中,按住遥控器上的快进或快退按钮,即可实现快进或快退功能。
松开按钮后,即可恢复到正常播放速度。
5. 声音调节a. 通过遥控器上的音量加减按钮,可以调节数字电影播放机的音量。
6. 切换显示模式a. 若显示设备支持多种显示模式(如16:9、4:3等),可以通过电影播放机的显示设置选项切换不同的显示模式。
7. 选择字幕与音轨a. 在播放过程中,通过遥控器上的相应按钮,可以选择不同的字幕和音轨。
8. 停止播放a. 在播放过程中,按下遥控器上的“停止”按钮,即可停止当前播放的数字影片。
三、其他注意事项1. 在使用数字电影播放机的过程中,尽量避免强烈的震动和碰撞,以保证其正常使用寿命。
2. 按照相关规程,及时清理电影播放机的散热口和机身表面的灰尘,保持机器良好散热。
3. 在电影播放机长时间不使用时,应将其断电,并妥善保存。
4. 遵守版权法律法规,不得随意复制、传播他人的数字影片。

现场培训资料北京数码视讯科技股份有限公司用户服务部2009年2月现场培训大纲:1.设备基本功能2.设备前面板及后面板组成3.菜单结构及作用4.设备使用注意事项5.常见故障处理6.模拟试题设备操作1.1设备通用操作和常见故障 1.1.1指示灯面板上提供三个指示灯,包括● 电源灯 ● 工作灯● 报警灯确定设备被正确连接后,把电源线插入设备后面板电源插座中,打开设备,如果电源灯亮,说明设备已经通电,具备了设备运行的条件。
当设备正常运行,没有任何异常现象和报警提示,则设备面板的工作灯将被点亮。
当设备运行异常,则设备面板的报警灯将被点亮,提示用户当前设备出错。
【注】当设备通电后,只要打开设备,电源灯就会一直被点亮;并工作灯和报警灯不会同时点亮。
1.1.2 液晶显示在设备运行过程中,设备将通过液晶显示当前运行的各项参数。
用户可以通过查询液晶显示,了解到当前设备的各项参数设置及运行情况,尤其,当设备面板上的报警灯被点燃时,用户可以通过液晶显示的【状态查询】菜单中查询到相应的报错信息。
【注】小部分设备没有液晶1.1.3 操作键盘要使设备正常运行,必须通过操作键盘来设置当前设备的运行参数。
在此键盘中,设置有● 向上键(△) ● 向下键(▽) ● 向左键() ● 向右键( ) ● 取消键(Esc ) ● 确认键(Ent )“向上键”用户每按一次,数值将加一;“向下键”用户每按一次,数值将减一;“向左键”用户每按一次,光标将左移一位;“向右键”用户每按一次,光标将右移一位;“取消键”用户每按一次,将取消当前操作,返回上一级菜单;“确认键”用户每按一次,将确认当前操作,进入下一级菜单。
用户可以将这六个键结合起来,参照设备菜单结构,按照实际需要,完成设备参数设置、设备参数查询等操作。
【注】带液晶设备均有按键,操作方法都相同2.1编码器8010系列2.1.1概述1、编码器是整个广电网络处于最前端的设备,其主要作用就是对输入的模拟/数字视音频进行压缩、编码处理,然后输出符合DVB标准的TS流。
常见报警信息与处理DP1200、1500、2000、3000、xxC、xxB系列放映机快速启动指南-操作人员镜头操作注意事项警告:镜头清洁操作,注意先使用吹刷去除表面灰尘,使用不掉毛的擦镜头,从内向外擦拭,不要用强烈溶剂,禁止使用气泵吹操作注意事项:为了保证放映质量,应该经常检查画面的聚焦和不同画面格式一幕框的匹配在某个macro设置通道下(你需要调试图像的通道),点击触摸屏(软件)导航菜单的配置→镜头。
(1)“激活LENS file”下方的文件名就是你现在调整通道的LENS文件,准确几下该文件名(分清大小写),该文件名在对镜头调试后会消失,镜头调试完后需要保存到该文件。
点击“lens setting”,顺序(1)(2),即可根据屏幕的大小对镜头进行调试,必要时借助右边的测试图形,调整位移、变焦、聚焦,完成后点击“关闭”。
点击“保存”后会出现弹出的文件列表,找到刚才几下的文件名,保存,这时候刚才的调整结果就保存在下来了。
故障判断:问题一:图像不清晰1.进入镜头调整菜单,打出测试图,调整镜头聚焦2.如不好,联系影院技师或打巴可公司拂去热线,寻求技术支持问题二:图像大小与银屏不匹配1、进入镜头调整菜单,打出测试图,调整镜头聚焦2、如不好,联系影院技师或打巴可公司拂去热线,寻求技术支持问题三:镜头无法到位黄灯报警1、出现镜头偏移到限位位置或到不了设置,会报警,图像与屏幕也对不齐,这时就需要挪动机器的位置,找到一个合适的余量。
2、镜头跑位时,需要进入镜头调整菜单打出测试图,调整镜头位移。
3、如不好,联系影院技师或打巴可公司拂去热线,寻求技术支持更换新氙灯、清洁灯箱操作注意事项警告:操作时应佩戴上防护手防护面罩。
操作时请提前准备就等的防爆防护包装。
操作注意事项:一、取出灯箱1、使用一字改锥打开外壳的两颗快锁螺钉2、使用一字改锥一次松开灯箱的三颗固定螺钉3、双手握住上下把手,平行向外拉出灯箱,平放在台面上二、取出氙灯1、应佩戴防护用具2、使用5mm内六角,松开阴极Z轴出螺钉3、拆下灯箱侧面网状侧板4、右手从侧面伸进灯箱内持灯,左手拆下圆形UV镜阳极支架及阳极白色圆柱型座5、左手平行取出氙灯,放置先准备好的包装内,放置安全三、清洁全部灯箱要点按照有外到内的顺序清洁灯箱1、应使用无尘布清洁灯箱的反光镜、UV镜,过程应避免手指触碰到镜子表面2、检查Z轴内的球型转轴是否可以转动,如不能转动应使用工具恢复其润滑使之可以转动3、清洁固定灯阴阳极的固定螺柱及螺母四、安装氙灯阳极(白色)、阴极(黄铜)连接器、适配器重点1、安装灯阳极(小辫)的适配器,注意螺母与圆柱之间的距离为2-3扣,扭力9Nm2、检查灯阴极的螺母及螺口是否紧固,同样之间的距离为2-3扣,扭力9Nm3、安装灯阴极黄铜色适配器扭力2.5Nm五、安装固定氙灯1、右手持灯送进灯箱,右手从侧面辅助,并安装上UV镜面板2、使用5MM内六角,扭力2.5Nm固定氙灯阴极适配器螺钉;阴极、阳极连接器应正确安放到凹槽内。
开机与准备1、打开放映室灯、影厅灯2、打开排风3、打开放映机1.放映机开关位置在右上角边缘位置,向上按到底为开。
2.打开放映机后,等待放映机显示屏出现眼睛图案,再进入下一步骤4、打开服务器1.服务器开关在中央位置,圆形,有ON/OFF标志。
5、打开音响1.开关位置在最下排的插头旁边。
2.打开音响后,在最上排调音:选择第一个DIGITAL,数字转到5.2 / 5.1 2号厅:5.13号厅:5.55号厅:5.26、将抽湿机里水倒掉1、打开配电箱总闸1.总闸为配电箱内第二个开关,向上推为开。
2、打开放映厅灯、影厅灯3、打开排风4、打开放映机1.总电源为白色开关,向上按下去之后接通电源2.接通电源后,按住开机键,一直按住,直到放映机发出启动的声响后松开,这个时候屏幕显示Power on。
3.等放映机显示屏显示常规屏幕之后,再进入下一步骤。
5、打开服务器1.服务器开关在中央位置,圆形,下面有ON/OFF标志。
5、打开音响1.开关位置在最下排的插头旁边。
2.打开音响后,在最上排调音:选择第一个DIGITAL,数字转到5.56、将抽湿机里水倒掉1、打开放映机灯泡1.触摸屏里最上面两个按钮“灯”和“光栅”都打开(蓝色会打开,灰色为关闭)2.选择合适的数字通道1,2为进口通道3,4为国产通道11,12为3D通道放映机触摸屏上显示正常之后,再进入下一步骤。
2、播放电影1.点击第四个按钮进入播放列表2.点击右边列表中的电影,点击移除按钮(减号按钮)3.点击左边列表中feature,会显示文件夹里面的电影4.选中要播放的电影后,点击添加按钮(加号按钮)。
5.点击下方“载入此放映表”6.在播放界面点击三角形播放按钮,即开始播放电影3、关灯1、打开放映机灯泡1. 按放映机右上角解锁键,变成白色后表示解除按键锁,可以进行操作。
2.在下方按灯泡图案按键,一直按住,直到变成红灯再松开。
此时屏幕显示please wait a moment / ,等屏幕显示正常后再继续下一步骤。
Quick Start GuideThe manufacture accepts no liability for installations not performed by professional technician.uick Use and HookupGuideImmediately after unpacking and plugging in your new television, run the auto program function to set up the TV for the broadcast or cable channels available in your area. If you do not run the auto program function to set up the channels , your television may not operate properly.1234Features InstallLanguage Manual store Channel setting Auto store Television Keys• VOLUME + / - : To adjust sound level.• CHANNEL + / - : To select programs.• MENU : To access or close onscreen menu.Power button, LED light and infrared sensor• • Aim remote control at infrared sensors to activate TV controls.Rear connectorsThe connectors at the rear of the LCD TV.Bottom connectorsLocated at the bottom of the set.Please follow these steps to install TV channels:Select a TV source via AV button on your remote control.Press the CURSOR RIGHT button to confi rm.Press MENU button on your remote control to open the onscreen menu. Press CURSOR DOWN to move to INSTALL, press CURSOR RIGHT on your remote control to enter INSTALL.Press CURSOR DOWN to move to AUTO STORE and press CURSOR RIGHT to enter it.Press CURSOR RIGHT to start auto install the TV Channels.1234For more detailed explanation of AUTO STORE, please refer to AUTO STORE section on page 5.5123When you unpack this unit, make sure it includes the following:Power cableWarranty CardRemove the battery compartment lid on the bottom of the remote control.Place two AA batteries in the remote. Be sure the (+) and (-) ends of thecompartment lid.A/CH buttonSleep buttonUnused keyor Multimedia.Menu buttonscreen menu.Volume buttonlevel.Mute buttonUnused keyPicture Format buttonPress the FORMAT button repeatedly to toggle among the six screen format sizes; Super Zoom, 4:3, Movie expand14:9, Movie expand16:9, 16:9 Subtitle, Widescreen.Power buttonPress to turn the LCD TV on or off.I-II button / Sound modePress repeatedly to select Mono, Stereo, Dual I, Dual II, Nicam Mono, Nicam Stereo, Nicam Dual I, Nicam Dual II.Smart Picture buttonPress repeatedly to select either Personal, Rich, Nature, Soft, or Multimedia of picture setting.Virtual Surround buttonAdds greater depth and dimension to TV sound.Select from Virtual Surround ON or Virtual Surround OFF.Channel buttonPress to adjust the channel up or down.Number buttonsPress the number buttons for direct access to the TV channels. For a 2 digit channel, enter the 2nd digit after enter 1st digit.AV buttonPress to select the video input source: TV, HDMI, COMP VIDEO 1, COMPVIDEO 2, S-video1, S-video 2 (Side), AV1, AV2(Side), PC.A combination antenna receives normal broadcast channels. Your connection is easy because there is only one 75 Ω (ohm) antenna jack on the back of your TV, and that’s where the antenna goes.Outdoor or Indoor AntennaTwin-lead wireIf your antenna has a round cable (75 ohm) on the end, then you’re ready to connect it to the LCD TV. If your antenna has fl at, twin-lead wire (300 ohm), you fi rst need to attachthe antenna wires to the screws on a 300- to 75-ohm adapter(not supplied).Connect the antenna (or adapter) to the TV jack on the back of the LCD TV.Plug the power cable into AC inlet on LCD TV set. Plug the power cable into an outlet and switch TV set on.Run the AUTO STORE function to set up the TV for the broadcast or cable channels available in your area. If you do not run the auto program function to set up the channels , your television may not operate properly.1234Your Cable TV input into your home may be a single (75 ohm) cable or use a cable box decoder. In either case the connection is verysimple. Follow the steps below to connect your cable signal to your new television.Direct cable connections:Connect the Cable TV signal to the TV jack on the LCD TV.Plug the power cable into AC inlet on LCD TV set. Plug the power cable into an outlet and switch TV set on.Run the AUTO STORE function to set up the TV for the broadcast or cable channels available in your area. If you do not run the auto program function to set up the channels , your television may not operate properly.123Your LCD TV can automatically set itself for local area (or cable TV) channels. This makes it easy for you to select only the TV stations in your area by pressing the CH(+) or CH(-) button.Press the MENU button on the remote control to show the onscreen menu.Press the CURSOR DOWN button to highlight the INSTALL menu.Press the CURSOR RIGHT button to enter the INSTALL menu.Press the CURSOR DOWN button tohighlight the AUTO STORE control and press CURSOR RIGHT to enter it.Press the CURSOR RIGHT button to start the AUTO STORE scanning of channels.Press the MENU button repeatedly to clear the menu from the screen, after AUTO STORE has fi nished.123456You can also choose to tune your TV channels. Manual tuning allows you to store each programme manually.Press the MENU button on the remote control to show the onscreen menu.Press the CURSOR DOWN button to highlight the INSTALL menu, then press CURSOR RIGHT to enter.Select the MANUAL STORE, then press the CURSOR RIGHT button to enter and press CURSOR RIGHT to activate auto search channel frequence or press number button to show your desired channel frequence, then press CURSOR RIGHT to start searching.After the channel frequence is confi rmed, select PROG. NO by pressing CURSOR DOWN and pressing CURSOR RIGHT to enter.Press CURSOR UP/DOWN to adjust the channel number and press CURSOR RIGHT/LEFT to confi rm the channel. If the channel reception is not satisfactory, press CURSOR DOWN button to highlight the FINETUNE and press CURSOR RIGHT to enter, then press CURSOR UP/DOWN to adjust, press CURSOR RIGHT/LEFT to confi rm.Press CURSOR DOWN to highlight STORE function. Press CURSOR RIGHT to enter, then press CURSOR RIGHT to confi rm sotred.Press the MENU button repeatedly to clear the menu from the screen.12345678Features InstallLanguage Manual store Channel setting Auto storeConnect the Cable TV signal to the IN jack (or RF IN or CABLE IN) on the Cable Box.Connect an RF coaxial cable (not supplied) to the OUT jack (or TO TV or RF OUT) of the Cable Box.Connect the other end of the coaxial cable to the TV jack on the LCD TV.Plug the power cable into AC inlet on LCD TV set. Plug the power cable into an outlet and switch TV set on.Set the Channel 3/4 (or Output channel) switch of the Cable Box to 3 or 4. Set the TV to the same channel. When watching TV programming, change channels at the Cable Box, not the LCD TV.12345This connection will supply stereo sound to the LCD TV.Connect the Cable TV signal to the IN jack (or RF IN or CABLE IN) on the Cable Box.Using a S-video cable (not supplied) connect one end of the video cable to the Video Out jack of the Cable Box. Connect the other end of the cable to the back of the TV.Using RCA-type, stereo audio cables (not supplied), connect one end of the cables to the left and right Audio Out jacks of the Cable Box. Connect the other end of that cable to the Audio jack on the back of the LCD TV. Audio cables are usually marked with red and white and are available from Philips or electronics retailers. The right audio jack is red and the left audio jack is white. Match the cable colors to the jack colors.Plug the power cable into AC inlet on LCD TV set. Plug the power cable into an outlet and switch TV set on.123Note: Use the AV button on the remote control to tune to the AV channel for the cable box signal. Once tuned, change channels at the cable box, not the television.When you watch programs using VCR, it’s recommended to select Soft Mode via Smart picture.412312The AV IN jacks on the rear of the LCD TV enable quickconnections of other equipment. Connect a DVD player, VCR Video Game, Camcorder, etc., to these jacks. To view thematerial playing on the other equipment, set the LCD TV to its AV mode.Component Video Input (Y, Pb, Pr) provide the highest possiblecolor and picture resolution in the playback of digital signal source material, such as with DVD player.34Using an RCA-type Video and Audio cable (usually marked yellow, red, and white), connect the VCR’s Video and Audio Out jacks to the TV’s Video and Audio In jacks.Plug the power cable into AC inlet on LCD TV set. Plug the power cable into an outlet and switch TV set on.Use AV button on the remote control to select AV 1 (or AV2(Side), S-Video1, or S-Video2 (Side) if you use the different jacks for this hookup) to watch VCR.Note:1. If your VCR equipped with a S-Video Out jack, uses S-Videoconnection for better picture detail and clarity. Use the S-Video cable to connect the VCR’s S-Video Out jacks to the TV’s S-Video In jacks.2. When you watch programs using VCR, it’s recommended to select SOFT Mode via Smart Picture.3. You can also use the Video and Audio jacks in AV IN 1 and Side AV located on the rear of the TV to connect your VCR or other Video Devices.4. If your DVD Player is equipped with Component (Y, Pb, Pr) Output Jacks, please refer to “Connecting a DVD Player or other Video Equipments with Component Video Connectors” section for use of Component Video Connection for highest color and picture resolution in video playback.Using a Component Video cable (not supplied), connect the DVDplayer’s Y, Pb, Pr jacks to the Y, Pb, Pr jacks on the TV. Use the COMP VIDEO1 or COMP VIDEO2 connections.Using an AUDIO cable, connect the DVD player’s AUDIO OUT jacks to the TV’s AUDIO IN jacks in COMP VIDEO1 or COMP VIDEO2 connections.Plug the power cable into AC inlet on LCD TV set. Plug the power cable into an outlet and switch TV set on.Use AV button on the remote control to select COMP VIDEO1 or COMP VIDEO2 to watch DVD.Note:The Y, Pb, Pr jacks do not provide audio, so audio cables must be connected to provide sound.This LCD TV can be used as a PC monitor. Your computer will have to equipped with a VGA type video output and VGA cable.Using a VGA cable (not supplied), connect PC’s VGA OUT connector to the VGA connector on the TV. Use the PC IN ing a MINI-JACK type AUDIO cable (not supplied), connect the PC’s AUDIO OUT connector to the AUDIO connector on the TV. Use the PC IN connections.Plug the power cable into AC inlet on LCD TV set. Plug the power cable into an outlet and switch TV set on.Use AV button on the remote control to select PC to use your LCD TV as a PC monitor.Note: Please refer to “Setting Up the PC Mode” section for all the supported PC display modes. If possible, use the 1280 x 768@60Hz video mode to obtain the best PC image quality.1234Connect one end of the yellow Video Cable to the VIDEO jack of AV OUT connection.Connect the other end to the VIDEO IN jack on the VCR.Connect one end of the red and white Audio Cable from the L and R AUDIO jack of AV OUT connection to the AUDIO IN jack on the VCR.Connect audio cable form the SPDIF jack on the rear of the TV to the DIGITAL IN jack on the rear of the hi-fi system.Note: The SPDIF out is for digital audio output, digital receiver, or amplifi er.The SPDIF out supports PCM(plus widthmodulate) format and stereo mode only when the HDMI input source is selected.Turn the VCR on, insert a blank VHS tape and it’s ready to record what’s being viewed on the TV screen.Note: The Program recording is only possible when the input signal is TV, AV1, AV2(Side).The AV (Audio/Video) out jacks are great for recording with a VCR or used to connect an external audio system for better audio.12For VCR Connection/Recorder:3Disconnect all power sources before making any connections.4Using HDMI cable (not supplied), connect the DVD player’s HDMI jack to the HDMI jack on the TV.Plug the power cable into AC inlet on LCD TV set. Plug the power cable into an outlet and switch TV set on.HDMI is the leading new standard for Digital video and audio interconnection. With the HDMI connector you can connect HDMI Set-Top-Box compatible DVD-R or DVD player with HDMI, or DVI-equipped devices like a computer or other HDMI devices to your TV. With this connection, you can display high-defi nition pictures on this TV in digital format.12Disconnect all power sources before making any connections.Notes:Due to legal requirements, it is possible that audio may be muted when playing certain copy protected PCM audio from a device connected to the HDMI input.Your TV supports HDCP (High-bandwidth Digital ContentProtection). This is a system for protecting DVD content outputted via DVI from being copied. It provides a secure digital link between a video source (DVD,PC,etc.) and your TV. Content is encrypted at the source device to prevent unauthorized copies from being made.Proper working is only guaranteed with HDMI compliant consumer products.Digital devices from different manufacturers may differing output standards, which may prevent your television from properly displaying output.If your TV does not detect a signal from your HDMI device, turn off and then turn on the HDMI device. For optimal viewing, we suggest you adjust your DVD player to one of the following TV display standards:1920x1080i,1280x720p,720x480i, 720x480p, 720x576i, or 720x576p.When HDMI is connected with DVI, there is picture display only and no audio support.快速使用與連線指南遙控器. . . . . . . . . . . . . . . . . . . . . . . . . . . . . . . . . . . . . . . 3天線電視. . . . . . . . . . . . . . . . . . . . . . . . . . . . . . . . . . . . 4 基本的有線電視連接 . . . . . . . . . . . . . . . . . . . . . . . . . .. . . . . . .4DVD 播放机或其它帶有COMPONENT 視頻連接器的視頻設備. . . . . . . . . . 7AV 輸出 . . . . . . . . . . . . . . . . . . . . . . . . . . . . . . . . . . . . . . . . . . . . . . . . 8PC(顯示器)連接. . . . . . . . . . . . . . . . . . . . . . . . . . . . . . . . . . . . . . . . . .8帶有 HDMI 連接器的DVD 播放机. . . . . . . . . . . . . . . . . . . . . . . . . . . . . . .9制造商對于非專業人士進行的安裝不承担任何責任。