CISCO ASA 防火墙 IOS恢复与升级 简明教程!
- 格式:doc
- 大小:28.50 KB
- 文档页数:2
![CISCO+3750+IOS恢复方法[1]](https://uimg.taocdn.com/ecac54bc50e79b89680203d8ce2f0066f4336451.webp)
CISCO+3750+IOS恢复方法[1]CISCO3750 IOS恢复方法1、用控制线连接交换机console口与计算机串口1,用带有xmodem功能的终端软件连接(win2000 and XP的超级终端就带这功能)。
2、设置连接方式为串口1(如果连接的是其他串口就选择其他串口),速率9600,无校验,无流控,停止位1。
或者点击默认设置也可以。
3、连接以后计算机回车出现交换机无IOS的界面,一般的提示符是:switch:4、拔掉交换机后的电源线5、按住交换机面板左侧的mode键(一般交换机就着一个键),插入交换机后边的电源插头给交换机加电。
等到看到交换机面板上没有接线的以太口指示灯都亮和交换机的几个系统指示灯都常亮。
6、在超级终端输入:switch: flash_init会出现如下提示:Initializing Flash...flashfs[0]: 1 files, 1 directoriesflashfs[0]: 0 orphaned files, 0 orphaned directoriesflashfs[0]: Total bytes: 3612672flashfs[0]: Bytes used: 1536flashfs[0]: Bytes available: 3611136flashfs[0]: flashfs fsck took 3 seconds....done Initializing Flash.Boot Sector Filesystem (bs installed, fsid: 3Parameter Block Filesystem (pb installed, fsid: 47、switch: load_helper输入后无提示8:输入拷贝指令:switch :copy xmodem : flash: image_filename.bin例如:switch: copy xmodem : flash:c3500xl-c3h2s-mz.120-5.wc5.bin出现如下提示:Begin the Xmodem or Xmodem-1K transfer now...9、系统提示不断出现C这个字母就可以开始传文件了10、点击超级终端菜单:传送---发送文件,在协议选项中选择Xmodem 或者Xmodem-1K协议,然后选择IOS的影像文件(*.bin),开始传送。
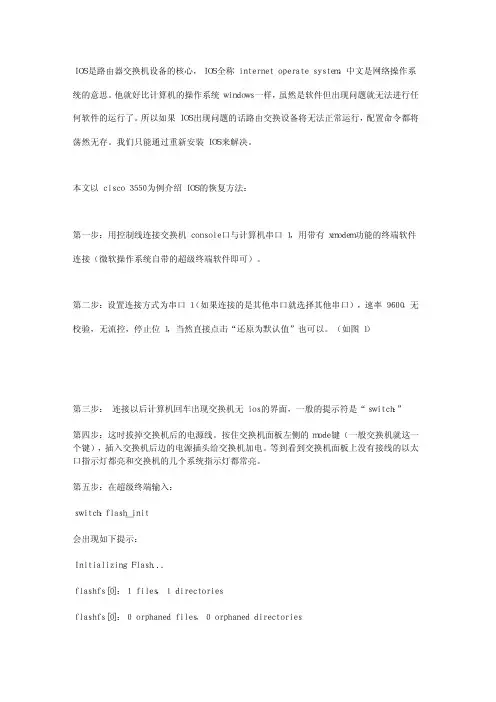
Cisco设备IOS的两种恢复方法一般cisco的交换机或者路由器在FLAHS损害或者误删IOS的情况下,需要使用到IOS的恢复功能,对于思科的设备来说,主要分为路由器和交换机,目前来说不论对于交换机还是路由器,IOS的恢复方法主要有以下2种,第一种是基于串口自带的x-modem传送IOS 到交换机或者路由器;第二种是基于tftp服务器传送IOS到交换机或者路由器,以上这2种方法的前提是需要进入路由器和交换机的ROMMON模式进行一些参数的配置,进入ROMMON的方法和之前的路由器交换机的密码恢复的方式一样,下面就2种方法分别介绍第一种方法:X-Modem先打开超级终端,进入rommon 模式(Ctrl+Break组合键),键入confreg,如下:~~~~~~~~~~~~~~~~~~~~~~~~~~~~~~~~~~~~~~~~~~~~~rommon 1 > confreg 回车Configuration Summaryenabled are:load rom after netboot failsconsole baud: 9600boot: image specified by the boot system commandsor default to: cisco2-C2600do you wish to change the configuration? y/n [n]: y (选择 yes)enable "diagnostic mode"? y/n [n]: n (选择 no)enable "use net in IP bcast address"? y/n [n]: n (选择 no) disable "load rom after netboot fails"? y/n [n]: n (选择no)enable "use all zero broadcast"? y/n [n]: n (选择 no)enable "break/abort has effect"? y/n [n]: n (选择 no)enable "ignore system config info"? y/n [n]: n (选择 no) change console baud rate? y/n [n]: y (选择 yes)enter rate: 0 = 9600, 1 = 4800, 2 = 1200, 3 = 24004 = 19200,5 = 38400,6 = 57600,7 = 115200 [0]: 7 (选择7,用最大的115200速率的xmodem传输)change the boot characteristics? y/n [n]: n (选择 no)Configuration Summaryenabled are:load rom after netboot failsconsole baud: 115200boot: image specified by the boot system commandsor default to: cisco2-C2600do you wish to change the configuration? y/n [n]: n (选择 no)You must reset or power cycle for new config to take effect rommon 2 > reset 回车【注意】在此时键入 reset键之前,开始定义串口速度(我的电脑---端口属性----串口速度调为115200),然后再修改超级终端里设置速率为115200,记住,一定这么做!否则出现乱码!然后关闭这个超级终端,重新建立一个超级终端连接,(期间系统重新启动)启动后,出现rommon 1> 提示符然后,输入rommon 1> xmodem -rDo not start the sending program yet...Invoke this application only for disaster recovery.Do you wish to continue? y/n [n]: y (选择 yes)Ready to receive file ...此时,在超级终端的菜单上的“传送”---“发送文件”----选择IOS 镜像文件所在地以及选择使用“xmodem”协议,点击“发送”即可然后等待10-20分钟左右就把3-6M的IOS灌进去了!~~~~~~~~~~~~~~~~~~~~~~~~~~~~~~~~~~~~~~~~~~~~~(修改回计算机串口与超级终端、路由器confreg下的xmodem 等9600的传输速率)(注:实际用的时候,我发现这个命令总是改不成功,后来发现在line con 0 下面有了一个speed 115200,所以即使改register成功,启动以后router又执行speed 115200,还是不行,所以如果有这个问题,记得把这个语句no掉)Router>en 进入新IOS的特权模式Router#reload 重启系统Proceed with reload? [confirm] 回车00:01:04: %SYS-5-RELOAD: Reload requestedSystem Bootstrap, Version 11.3(2)XA4, RELEASE SOFTWARE (fc1)Copyright (c) 1999 by cisco Systems, Inc.TAC:Home:SW:IOS:Specials for infoPC = 0xfff0a530, Vector = 0x500, SP = 0x680127b0C2600 platform with 24576 Kbytes of main memoryPC = 0xfff0a530, Vector = 0x500, SP = 0x80004684monitor: command "boot" aborted due to user interrupt rommon 1 > confreg (输入“confreg”命令)Configuration Summaryenabled are:load rom after netboot failsconsole baud: 115200boot: image specified by the boot system commandsor default to: cisco2-C2600do you wish to change the configuration? y/n [n]: y (选择 yes)enable "diagnostic mode"? y/n [n]: n (选择 no)enable "use net in IP bcast address"? y/n [n]: n (选择 no) disable "load rom after netboot fails"? y/n [n]: n (选择no)enable "use all zero broadcast"? y/n [n]: n (选择 no)enable "break/abort has effect"? y/n [n]: n (选择 no)enable "ignore system config info"? y/n [n]: n (选择 no) change console baud rate? y/n [n]: y (选择 yes)enter rate: 0 = 9600, 1 = 4800, 2 = 1200, 3 = 24004 = 19200,5 = 38400,6 = 57600,7 = 115200 [7]: 0 (选择0,改回用标准速率速率9600的xmodem传输)change the boot characteristics? y/n [n]: n (选择 no)Configuration Summaryenabled are:load rom after netboot failsconsole baud: 9600boot: image specified by the boot system commandsor default to: cisco2-C2600do you wish to change the configuration? y/n [n]: nYou must reset or power cycle for new config to take effectrommon 2 >此时手工改回计算机串口与超级终端2者传输速率为9600,然后敲入rommon 2 >reset(最好关电源)第二种方法:TFTP在一台机器上安装TFTP服务器软件,将IOS 文件放置在TFTP服务器的默认根目录下,打开TFTP服务器,用控制线将这台机器与ROUTER连接起来,另外用交叉网线连接机器的网卡和ROUTER的以太口。
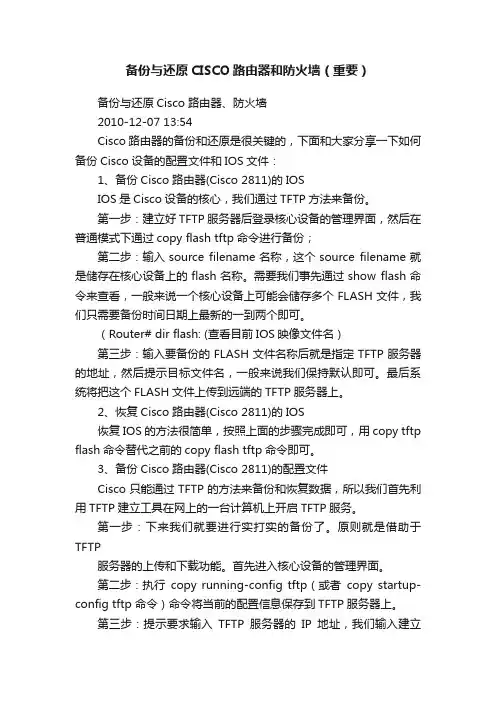
IOS是路由器交换机设备的核心,IOS全称internet operate system,中文是网络操作系统的意思。
他就好比计算机的操作系统windows一样,虽然是软件但出现问题就无法进行任何软件的运行了。
所以如果IOS出现问题的话路由交换设备将无法正常运行,配置命令都将荡然无存。
我们只能通过重新安装IOS来解决。
本文以cisco 3550为例介绍IOS的恢复方法: 第一步:用控制线连接交换机console口与计算机串口1,用带有xmodem功能的终端软件连接(微软操作系统自带的超级终端软件即可)。
第二步:设置连接方式为串口1(如果连接的是其他串口就选择其他串口),速率9600,无校验,无流控,停止位1,当然直接点击“还原为默认值”也可以。
(如图1) 第三步: 连接以后计算机回车出现交换机无ios的界面,一般的提示符是“switch:” 第四步:这时拔掉交换机后的电源线。
按住交换机面板左侧的mode键(一般交换机就这一个键),插入交换机后边的电源插头给交换机加电。
等到看到交换机面板上没有接线的以太口指示灯都亮和交换机的几个系统指示灯都常亮。
第五步:在超级终端输入: switch:flash_init 会出现如下提示: Initializing Flash... flashfs[0]: 1 files, 1 directories flashfs[0]: 0 orphaned files, 0 orphaned directories flashfs[0]: Total bytes: 3612672 flashfs[0]: Bytes used: 1536 flashfs[0]: Bytes available: 3611136 flashfs[0]: flashfs fsck took 3 seconds. ...done Initializing Flash. Boot Sector Filesystem Parameter Block Filesystem 第六步:在switch:后面输入load_helper,输入后无任何提示。
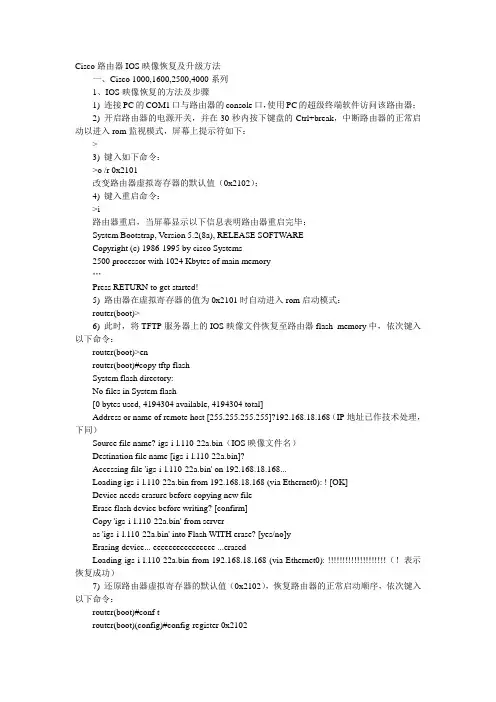
备份与还原CISCO路由器和防火墙(重要)备份与还原Cisco路由器、防火墙2010-12-07 13:54Cisco路由器的备份和还原是很关键的,下面和大家分享一下如何备份Cisco设备的配置文件和IOS文件:1、备份Cisco路由器(Cisco 2811)的IOSIOS是Cisco设备的核心,我们通过TFTP方法来备份。
第一步:建立好TFTP服务器后登录核心设备的管理界面,然后在普通模式下通过copy flash tftp命令进行备份;第二步:输入source filename名称,这个source filename就是储存在核心设备上的flash名称。
需要我们事先通过show flash命令来查看,一般来说一个核心设备上可能会储存多个FLASH文件,我们只需要备份时间日期上最新的一到两个即可。
(Router# dir flash: (查看目前IOS映像文件名)第三步:输入要备份的FLASH文件名称后就是指定TFTP服务器的地址,然后提示目标文件名,一般来说我们保持默认即可。
最后系统将把这个FLASH文件上传到远端的TFTP服务器上。
2、恢复Cisco路由器(Cisco 2811)的IOS恢复IOS的方法很简单,按照上面的步骤完成即可,用copy tftp flash命令替代之前的copy flash tftp命令即可。
3、备份Cisco路由器(Cisco 2811)的配置文件Cisco只能通过TFTP的方法来备份和恢复数据,所以我们首先利用TFTP建立工具在网上的一台计算机上开启TFTP服务。
第一步:下来我们就要进行实打实的备份了。
原则就是借助于TFTP服务器的上传和下载功能。
首先进入核心设备的管理界面。
第二步:执行copy running-config tftp(或者copy startup-config tftp 命令)命令将当前的配置信息保存到TFTP服务器上。
第三步:提示要求输入TFTP服务器的IP地址,我们输入建立TFTP 服务器的计算机IP。
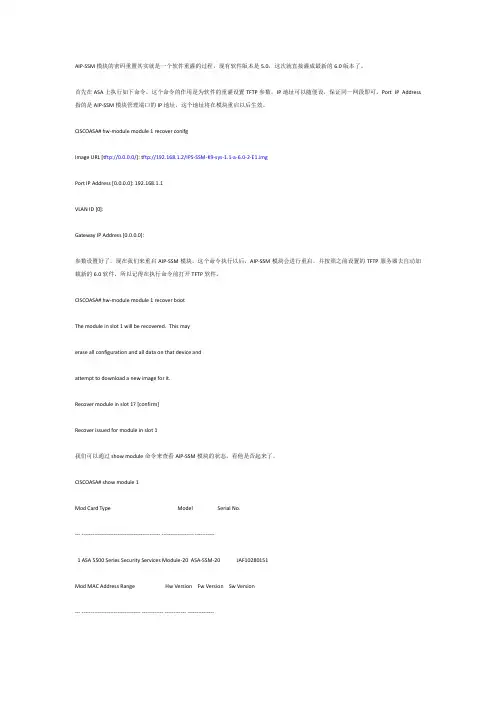
AIP-SSM模块的密码重置其实就是一个软件重灌的过程,现有软件版本是5.0,这次就直接灌成最新的6.0版本了。
首先在ASA上执行如下命令。
这个命令的作用是为软件的重灌设置TFTP参数,IP地址可以随便设,保证同一网段即可。
Port IP Address 指的是AIP-SSM模块管理端口的IP地址,这个地址将在模块重启以后生效。
CISCOASA# h w-module module 1 recover conifgImage URL [t ftp://0.0.0.0/]: t ftp://192.168.1.2/IPS-SSM-K9-sys-1.1-a-6.0-2-E1.imgPort IP Address [0.0.0.0]: 192.168.1.1VLAN ID [0]:Gateway IP Address [0.0.0.0]:参数设置好了,现在我们来重启AIP-SSM模块。
这个命令执行以后,AIP-SSM模块会进行重启,并按照之前设置的TFTP服务器去自动加载新的6.0软件,所以记得在执行命令前打开TFTP软件。
CISCOASA# h w-module module 1 recover bootThe module in slot 1 will b e recovered. This mayerase all configuration and all d ata on th at device andattempt to downlo ad a n ew image for it.Recover module in slot 1? [confirm]Recover issued for module in slot 1我们可以通过show module命令来查看AIP-SSM模块的状态,看他是否起来了。
CISCOASA# sho w module 1Mod Card Type Model Serial No.--- -------------------------------------------- ------------------ -----------1 ASA 5500 Series Security Servic es Module-20 ASA-SSM-20 JAF10280151Mod MAC Address Ran ge Hw Version Fw Version Sw Version--- --------------------------------- ------------ ------------ ---------------1 0018.1900.4b88 to 0018.1900.4b88 1.0 1.0(11)2 5.0(2)S152.0Mod SSM Application Name Status SSM Application Version--- ------------------------------ ---------------- --------------------------1 IPS Not Applicable 5.0(2)S152.0Mod Status Data Plane Status Comp atibility--- ------------------ --------------------- -------------1 Recover Not Applicable还是R ecover状态。
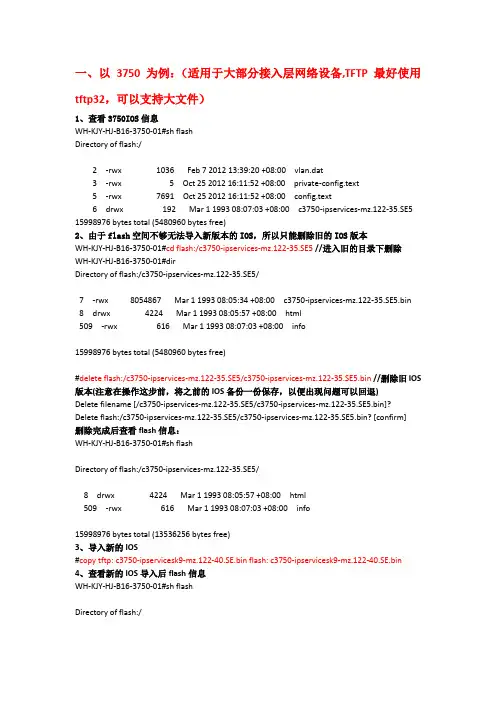
一、以3750为例:(适用于大部分接入层网络设备,TFTP最好使用tftp32,可以支持大文件)1、查看3750IOS信息WH-KJY-HJ-B16-3750-01#sh flashDirectory of flash:/2 -rwx 1036 Feb 7 2012 13:39:20 +08:00 vlan.dat3 -rwx 5 Oct 25 2012 16:11:52 +08:00 private-config.text5 -rwx 7691 Oct 25 2012 16:11:52 +08:00 config.text6 drwx 192 Mar 1 1993 08:07:03 +08:00 c3750-ipservices-mz.122-35.SE5 15998976 bytes total (5480960 bytes free)2、由于flash空间不够无法导入新版本的IOS,所以只能删除旧的IOS版本WH-KJY-HJ-B16-3750-01#cd flash:/c3750-ipservices-mz.122-35.SE5//进入旧的目录下删除WH-KJY-HJ-B16-3750-01#dirDirectory of flash:/c3750-ipservices-mz.122-35.SE5/7 -rwx 8054867 Mar 1 1993 08:05:34 +08:00 c3750-ipservices-mz.122-35.SE5.bin8 drwx 4224 Mar 1 1993 08:05:57 +08:00 html509 -rwx 616 Mar 1 1993 08:07:03 +08:00 info15998976 bytes total (5480960 bytes free)#delete flash:/c3750-ipservices-mz.122-35.SE5/c3750-ipservices-mz.122-35.SE5.bin//删除旧IOS 版本(注意在操作这步前,将之前的IOS备份一份保存,以便出现问题可以回退)Delete filename [/c3750-ipservices-mz.122-35.SE5/c3750-ipservices-mz.122-35.SE5.bin]? Delete flash:/c3750-ipservices-mz.122-35.SE5/c3750-ipservices-mz.122-35.SE5.bin? [confirm]删除完成后查看flash信息:WH-KJY-HJ-B16-3750-01#sh flashDirectory of flash:/c3750-ipservices-mz.122-35.SE5/8 drwx 4224 Mar 1 1993 08:05:57 +08:00 html509 -rwx 616 Mar 1 1993 08:07:03 +08:00 info15998976 bytes total (13536256 bytes free)3、导入新的IOS#copy tftp: c3750-ipservicesk9-mz.122-40.SE.bin flash: c3750-ipservicesk9-mz.122-40.SE.bin4、查看新的IOS导入后flash信息WH-KJY-HJ-B16-3750-01#sh flashDirectory of flash:/2 -rwx 1036 Feb 7 2012 13:39:20 +08:00 vlan.dat3 -rwx 5 Oct 25 2012 16:11:52 +08:00 private-config.text4 -rwx 9975530 Mar5 2013 17:59:01 +08:00 c3750-ipservicesk9-mz.122-40.SE.bin5 -rwx 7691 Oct 25 2012 16:11:52 +08:00 config.text6 drwx 128 Mar 5 2013 17:53:23 +08:00 c3750-ipservices-mz.122-35.SE5 //不带bin后缀这种事目录)15998976 bytes total (3560448 bytes free)WH-KJY-HJ-B16-3750-01#sh bootBOOT path-list : flash:c3750-ipservices-mz.122-35.SE5/c3750-ipservices-mz.122-35.SE5.binConfig file : flash:/config.textPrivate Config file : flash:/private-config.textEnable Break : noManual Boot : noHELPER path-list :Auto upgrade : yesAuto upgrade path :5、更改设备IOS启动顺序,并保存WH-KJY-HJ-B16-3750-0(config)#boot sys flash:/c3750-ipservicesk9-mz.122-40.SE.binWH-KJY-HJ-B16-3750-0(config)#endWH-KJY-HJ-B16-3750-01#wrBuilding configuration...[OK]6、查看设备IOS启动项是否是新升级的ios名称WH-KJY-HJ-B16-3750-01#sh bootBOOT path-list : flash:/c3750-ipservicesk9-mz.122-40.SE.binConfig file : flash:/config.textPrivate Config file : flash:/private-config.textEnable Break : noManual Boot : noHELPER path-list :Auto upgrade : yesAuto upgrade path :7、启动项正常后,重启网络设备WH-KJY-HJ-B16-3750-01#reload二、堆叠设备的IOS升级(以C3750为例)1、相关配置信息WH-KJY-HJ-B14-3750-01#sh verCisco IOS Software, C3750 Software (C3750-IPBASE-M), Version 12.2(35)SE5, RELEASE SOFTWARE (fc1)Copyright (c) 1986-2007 by Cisco Systems, Inc.Compiled Thu 19-Jul-07 19:15 by nachenImage text-base: 0x00003000, data-base: 0x01080000ROM: Bootstrap program is C3750 boot loaderBOOTLDR: C3750 Boot Loader (C3750-HBOOT-M) Version 12.2(25r)SEE3, RELEASE SOFTWARE (fc1)WH-KJY-HJ-B14-3750-01 uptime is 51 weeks, 6 days, 7 hours, 13 minutesSystem returned to ROM by power-onSystem restarted at 10:23:38 beijing Wed Mar 7 2012System image file is "flash:c3750-ipbase-mz.122-35.SE5/c3750-ipbase-mz.122-35.SE5.bin"cisco WS-C3750G-12S (PowerPC405) processor (revision W0) with 118784K/12280K bytes of memory.Processor board ID FDO1334Y12VLast reset from power-on2 Virtual Ethernet interfaces24 Gigabit Ethernet interfacesThe password-recovery mechanism is enabled.512K bytes of flash-simulated non-volatile configuration memory.Base ethernet MAC Address : 00:26:CA:A5:9A:00Motherboard assembly number : 73-9678-11Power supply part number : 341-0048-03Motherboard serial number : FDO13340G0JPower supply serial number : DTN1330301JModel revision number : W0Motherboard revision number : A0Model number : WS-C3750G-12S-SSystem serial number : FDO1334Y12VTop Assembly Part Number : 800-25856-09Top Assembly Revision Number : A0Version ID : V11CLEI Code Number : COMX310ARAHardware Board Revision Number : 0x06Switch Ports Model SW Version SW Image------ ----- ----- ---------- ----------* 1 12 WS-C3750G-12S 12.2(35)SE5 C3750-IPBASE-M2 12 WS-C3750G-12S 12.2(35)SE5 C3750-IPBASE-M Switch 02---------Switch Uptime : 51 weeks, 6 days, 7 hours, 11 minutesBase ethernet MAC Address : 00:26:CB:75:22:00Motherboard assembly number : 73-9678-11Power supply part number : 341-0048-03Motherboard serial number : FDO13340J4SPower supply serial number : LIT133203Y3Model revision number : W0Motherboard revision number : A0Model number : WS-C3750G-12S-SSystem serial number : FDO1334Y16UTop assembly part number : 800-25856-09Top assembly revision number : A0Version ID : V11CLEI Code Number : COMX310ARAConfiguration register is 0xFWH-KJY-HJ-B14-3750-01#sh bootBOOT path-list : flash:c3750-ipbase-mz.122-35.SE5/c3750-ipbase-mz.122-35.SE5.bin Config file : flash:/config.textPrivate Config file : flash:/private-config.textEnable Break : noManual Boot : noHELPER path-list :Auto upgrade : yesAuto upgrade path :-------------------Switch 2-------------------BOOT path-list : flash:c3750-ipbase-mz.122-35.SE5/c3750-ipbase-mz.122-35.SE5.bin Config file : flash:/config.textPrivate Config file : flash:/private-config.textEnable Break : noManual Boot : noHELPER path-list :Auto upgrade : noAuto upgrade path :WH-KJY-HJ-B14-3750-01#dirDirectory of flash:/2 -rwx 856 Mar 1 1993 08:01:03 +08:00 vlan.dat4 -rwx 6287 Oct 25 2012 16:07:34 +08:00 config.text5 -rwx 5 Oct 25 2012 16:07:34 +08:00 private-config.text510 drwx 192 Mar 1 1993 08:09:18 +08:00 c3750-ipbase-mz.122-35.SE515998976 bytes total (6363136 bytes free)2、删除旧的IOS#delete flash1:/c3750-ipbase-mz.122-35.SE5/c3750-ipbase-mz.122-35.SE5.binDelete filename [/c3750-ipbase-mz.122-35.SE5/c3750-ipbase-mz.122-35.SE5.bin]?Delete flash:/c3750-ipbase-mz.122-35.SE5/c3750-ipbase-mz.122-35.SE5.bin? [confirm]#delete flash2:/c3750-ipbase-mz.122-35.SE5/c3750-ipbase-mz.122-35.SE5.binDelete filename [/c3750-ipbase-mz.122-35.SE5/c3750-ipbase-mz.122-35.SE5.bin]?Delete flash2:/c3750-ipbase-mz.122-35.SE5/c3750-ipbase-mz.122-35.SE5.bin? [confirm]3、拷贝新的IOS到flash中#copy tftp: c3750-ipservicesk9-mz.122-40.SE.bin flash1: c3750-ipservicesk9-mz.122-40.SE.bin 4、查看导入新的IOS后flash信息WH-KJY-HJ-B14-3750-01#sh flashDirectory of flash:/2 -rwx 856 Mar 1 1993 08:01:03 +08:00 vlan.dat3 -rwx 9975530 Mar 5 2013 17:41:13 +08:00 c3750-ipservicesk9-mz.122-40.SE.bin4 -rwx 6287 Oct 25 2012 16:07:34 +08:00 config.text5 -rwx 5 Oct 25 2012 16:07:34 +08:00 private-config.text510 drwx 128 Mar 5 2013 17:36:02 +08:00 c3750-ipbase-mz.122-35.SE515998976 bytes total (3562496 bytes free)WH-KJY-HJ-B14-3750-01#sh flash1Directory of flash:/2 -rwx 856 Mar 1 1993 08:01:03 +08:00 vlan.dat3 -rwx 9975530 Mar 5 2013 17:41:13 +08:00 c3750-ipservicesk9-mz.122-40.SE.bin4 -rwx 6287 Oct 25 2012 16:07:34 +08:00 config.text5 -rwx 5 Oct 25 2012 16:07:34 +08:00 private-config.text510 drwx 128 Mar 5 2013 17:36:02 +08:00 c3750-ipbase-mz.122-35.SE515998976 bytes total (3562496 bytes free)WH-KJY-HJ-B14-3750-01#sh flash2Directory of flash2:/2 -rwx 856 Mar 1 1993 08:01:06 +08:00 vlan.dat3 -rwx 6287 Oct 25 2012 16:07:34 +08:00 config.text4 -rwx5 Oct 25 2012 16:07:34 +08:00 private-config.text6 drwx 128 Mar 5 2013 17:36:37 +08:00 c3750-ipbase-mz.122-35.SE515998976 bytes total (13538304 bytes free)5、上面flash2中无新的ios,重新拷贝#copy tftp: c3750-ipservicesk9-mz.122-40.SE.bin flash2: c3750-ipservicesk9-mz.122-40.SE.bin然后在查看:WH-KJY-HJ-B14-3750-01#sh flash2Directory of flash2:/2 -rwx 856 Mar 1 1993 08:01:06 +08:00 vlan.dat3 -rwx 6287 Oct 25 2012 16:07:34 +08:00 config.text4 -rwx5 Oct 25 2012 16:07:34 +08:00 private-config.text5 -rwx 9975530 Mar 5 2013 17:44:11 +08:00 c3750-ipservicesk9-mz.122-40.SE.bin6 drwx 128 Mar 5 2013 17:36:37 +08:00 c3750-ipbase-mz.122-35.SE515998976 bytes total (3562496 bytes free)6、更改启动项(新的IOS启动)WH-KJY-HJ-B14-3750-0(config)#boot sys switch all flash:/c3750-ipservicesk9-mz.122-40.SE.bin 7、保存并查看启动项WH-KJY-HJ-B14-3750-01#wrBuilding configuration...[OK]WH-KJY-HJ-B14-3750-01#sh bootBOOT path-list : flash:/c3750-ipservicesk9-mz.122-40.SE.binConfig file : flash:/config.textPrivate Config file : flash:/private-config.textEnable Break : noManual Boot : noHELPER path-list :Auto upgrade : yesAuto upgrade path :-------------------Switch 2-------------------BOOT path-list : flash:/c3750-ipservicesk9-mz.122-40.SE.binConfig file : flash:/config.textPrivate Config file : flash:/private-config.textEnable Break : noManual Boot : noHELPER path-list :Auto upgrade : noAuto upgrade path :8、重启网络设备WH-KJY-HJ-B14-3750-01# reload三、6509交换机IOS升级1、导出原有IOS镜像(使用tftp32软件进行导入导出IOS,导出IOS主要是备份,以便由于bootflash空间不够,需要删除原有IOS)#copy sup-bootflash: tftpAddress or name of remote host []? 10.1.1.2Source filename []? s3223-ipbasek9-mz.122-18.SXF6.bin(拷入的IOS名称)Destination filename [s3223-ipbasek9-mz.122-18.SXF6.bin]?Accessing tftp://10.1.1.2/s3223-ipbasek9-mz.122-18.SXF6.bin...Loading s3223-ipbasek9-mz.122-18.SXF6.bin from 10.1.1.2(via FastEthernet1/1):!!!!!!!!!!!!!!!!!!!!!!!!!!!!!!!!!!!!!!!!!!!!!!!!!!!!!!!!!!!!!!!!!!!!!!!!!!!!!!!!!!!!!!!!!!!!!!!!!!!!!!!!!!!!!!!!!!!!!!!!!!!!!!!!!!!!!!!!!!!!!!!!!!!!!!!!!!!!!!!![OK - 27966916 bytes]27966916 bytes copied in 222.684 secs (125590 bytes/sec)Verifying compressed IOS image checksum...Verified compressed IOS image checksum for sup-bootflash:/s3223-ipbasek9-mz.122-18.SXF6.bin2、删除原有IOS,保障新的IOS有足够的空间#delete sup-bootflash:s72033-pk9sv-mz.122-14.SX1.bin然后再传。
CISCO路由器IOS升级方法总结概述在网络设备中,CISCO路由器是一种常见且广泛使用的设备。
为了保持设备的正常运行和维护安全性,定期升级路由器的操作系统(IOS)是必要的。
本文将总结CISCO路由器IOS升级的方法,以帮助用户顺利完成相关操作。
准备工作在开始升级路由器IOS之前,需要完成以下准备工作: 1. 确定当前路由器的型号和支持的IOS版本。
2. 下载最新的IOS版本文件,确保文件的完整性和正确性。
3. 使用一个TFTP(Trivial File Transfer Protocol)服务器,用于从服务器传输IOS文件到路由器上。
确保服务器能够正常工作,并连接到路由器所在的网络。
步骤一:备份当前的配置在进行任何升级操作之前,最重要的是备份当前的路由器配置。
这样,在升级过程中出现问题时,可以恢复到之前的配置状态。
以下是备份配置的步骤: 1. 连接到路由器的控制台界面或使用SSH(Secure Shell)进行远程登录。
2. 输入以下命令进入特权模式:enable3.进入全局配置模式:configure terminal4.输入以下命令将路由器配置保存到TFTP服务器上:copy running-config tftp:5.根据提示输入TFTP服务器的IP地址和备份文件保存的位置。
6.验证备份文件是否成功保存。
步骤二:升级IOS完成备份操作后,接下来是升级路由器的IOS。
根据下载的IOS版本文件以及路由器型号,执行以下步骤: 1. 确认当前IOS版本:show version2.通过TFTP服务器将新的IOS版本文件上传到路由器上:copy tftp: flash:3.根据提示输入TFTP服务器的IP地址和IOS文件的名称。
4.确认升级文件的完整性和正确性。
5.设置路由器引导文件指向新的IOS版本:boot system flash <IOS文件名>6.保存配置并重新启动路由器:write memoryreload7.确认路由器已经成功升级并正常运行。
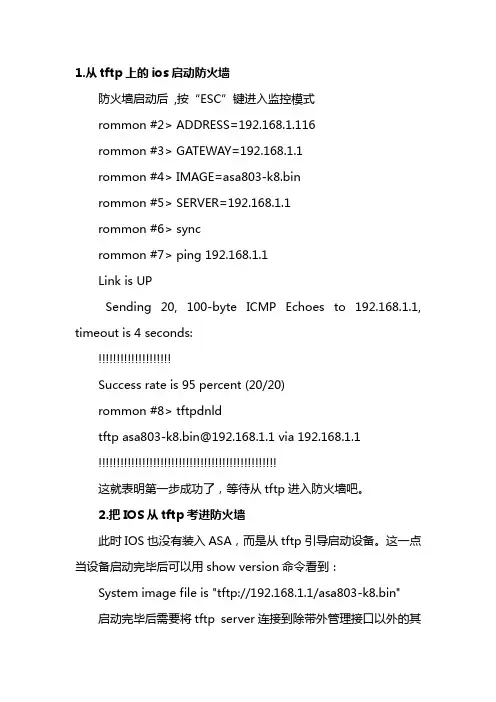
1.从tftp上的ios启动防火墙防火墙启动后,按“ESC”键进入监控模式rommon #2> ADDRESS=192.168.1.116rommon #3> GATEWAY=192.168.1.1rommon #4> IMAGE=asa803-k8.binrommon #5> SERVER=192.168.1.1rommon #6> syncrommon #7> ping 192.168.1.1Link is UPSending 20, 100-byte ICMP Echoes to 192.168.1.1, timeout is 4 seconds:!!!!!!!!!!!!!!!!!!!!Success rate is 95 percent (20/20)rommon #8> tftpdnldtftp asa803-k8.bin@192.168.1.1 via 192.168.1.1!!!!!!!!!!!!!!!!!!!!!!!!!!!!!!!!!!!!!!!!!!!!!!!!!这就表明第一步成功了,等待从tftp进入防火墙吧。
2.把IOS从tftp考进防火墙此时IOS也没有装入ASA,而是从tftp引导启动设备。
这一点当设备启动完毕后可以用show version命令看到:System image file is "tftp://192.168.1.1/asa803-k8.bin"启动完毕后需要将tftp server连接到除带外管理接口以外的其它接口,然后再升级IOS注意:配置IP地址。
命令很简单不用说了但就是这接口需要注意一下必须配置成inside口才能让你升级的,我在管理接口下折腾了半天都没搞好,换了口就OK了。
Asa#conf tAsa(config)#int e0/0Asa(config-if)#nameif insideAsa(config-if)#ip add 192.168.1.116 255.255.255.0Asa(config-if)#no shAsa#ping 192.168.1.1通后就可以升级ios了Asa5510#copy tftp:flash:Tftp server IP address:192.168.1.1Source file name:asa803-k8.binDestination file name:asa803-k8.binAsa5510#copy tftp:flash:Tftp server IP address:192.168.1.1Source file name:asdm-608.binDestination file name:asdm-608.bin到这一步并没有结束,此时还需要进行boot system的设置使用命令Asa(config)#boot system disk0:/asa808-k8.binAsa(config)#asdm image disk0:/asdm-608.binAsa(config)#wr然后reload一下就可以了重启之后在dir查看一下,基本上就大功告成了。
试谈cisco路由器口令和IOS恢复试谈cisco路由器口令和IOS恢复针对最常见的cisco路由器设备的IOS系统,店铺下面给大家讲解一下路由器口令和IOS恢复的步骤和方法。
一、先说说路由器口令恢复的方法前提:口令恢复需要使用Console线将路由器和PC连接。
恢复步骤:1.在路由器加电60S内,在超级终端按+3-5s(最好按的时间长一些),可以进入rommon模式。
提示符如下:rommon1>2.rommon1>confreg 0x21423.rommon2>reset 重启路由器4.进入setup初始化配置模式,选择NO不用配置,进入用户模式router> 。
5.router>en Router#copy startup-config running-config ,Router#configure terminal Router(config)#设置Router的名称为01r1或01r2 Router(config)# 删除secret Router(config)# 删除password Router(config)# 设置secret 为s301 Router(config)# 设置password 为cisco Router(config)# 关闭域名查找 Router(conf)# 进入console线路Router(conf-line)# 设置password为con Router(conf-line)#启动口令Router(conf-line)#设置输入同步Router#config terminal Router(config)#config-register 0x2102 ,Router#show version Router#copy running-config startup-config 。
二、再来讲讲IOS恢复和升级前提:如果有真实设备实现IOS的升级和恢复的话,在PC上需要安装TFTP服务器,并保证TFTP服务器处于运行状态。
1.从tftp上的ios启动防火墙防火墙启动后 ,按“ESC”键进入监控模式rommon #2> ADDRESS=192.168.1.116rommon #3> GATEWAY=192.168.1.1rommon #4> IMAGE=asa803-k8.binrommon #5> SERVER=192.168.1.1rommon #6> syncrommon #7> ping 192.168.1.1Link is UPSending 20, 100-byte ICMP Echoes to 192.168.1.1, timeout is 4 seconds:!!!!!!!!!!!!!!!!!!!!Success rate is 95 percent (20/20)rommon #8> tftpdnldtftp asa803-k8.bin@192.168.1.1 via 192.168.1.1!!!!!!!!!!!!!!!!!!!!!!!!!!!!!!!!!!!!!!!!!!!!!!!!!这就表明第一步成功了,等待从tftp进入防火墙吧。
2.把IOS从tftp考进防火墙此时IOS也没有装入ASA,而是从tftp引导启动设备。
这一点当设备启动完毕后可以用show version命令看到:System image file is "tftp://192.168.1.1/asa803-k8.bin"启动完毕后需要将tftp server连接到除带外管理接口以外的其它接口,然后再升级IOS注意:配置IP地址。
命令很简单不用说了但就是这接口需要注意一下必须配置成 inside口才能让你升级的,我在管理接口下折腾了半天都没搞好,换了口就OK了。
Asa#conf tAsa(config)#int e0/0Asa(config-if)#nameif insideAsa(config-if)#ip add 192.168.1.116 255.255.255.0Asa(config-if)#no shAsa#ping 192.168.1.1通后就可以升级ios了Asa5510#copy tftp: flash:Tftp server IP address:192.168.1.1Source file name:asa803-k8.binDestination file name:asa803-k8.binAsa5510#copy tftp: flash:Tftp server IP address:192.168.1.1Source file name:asdm-608.binDestination file name:asdm-608.bin到这一步并没有结束,此时还需要进行boot system的设置使用命令Asa(config)#boot system disk0:/asa808-k8.binAsa(config)#asdm image disk0:/asdm-608.binAsa(config)#wr然后reload一下就可以了重启之后在dir查看一下,基本上就大功告成了。
在“为什么要升级Cisco IOS”一文中为大家讲述了Cisco网络设备升级IOS的意义和作用,接下来我们就为大家介绍四种Cisco 升级IOS的方法,供大家参考!Cisco升级IOS的四种简单方法1、最简单的:向思科购买IOS升级包把购买到的IOS升级包直接解压到思科网络设备的Flash中,这是最正式和最简单的一种升级IOS的方法。
当需要升级IOS时,我们可以向山东思科总代理购买相应的IOS(一般是一个IOS的压缩包),其中包括操作系统文件和其他的一套配套文件(如支持网页化管理的文件)。
把这个压缩包直接解压释放到Cisco网络设备的Flash中,就可以完成升级。
2、最常用的:直接复制新版的IOS到Flash芯片中,替换老版IOS具体操作是:通过TFTP服务器,直接将IOS文件复制到Cisco设备的Flash芯片中替换原有的IOS文件。
大多有经验的思科网络工程师都喜欢用这种方式升级IOS。
对于资深的网络工程师,即使在购买了IOS升级包的情况下,他们也喜欢用这种方式来进行Cisco IOS升级。
3、最慢的:通过XMODEM升级IOS这种升级是利用Cisco设备的AUX接口来升级IOS。
与通过以太网接口升级不同的是,这种方法传输文件的速度是相当的慢!因为它是通过AUX(实际上属于COM口)来进行的,其速度受到串行接口的限制。
这种升级IOS的方法只有在以下情况才用的到:1)设备以太网端口无法使用或损坏;2)异地操作,网络中没有TFTP服务器。
这种情况下的具体操作是:在Cisco路由器的AUX口上连一台MODEM,通过远程连接到设备上,然后进行IOS的升级操作,很慢哦:)升级IOS一般是为了使用思科网络设备更高性能,但有些时候却是不得已而为之。
大家有没有遇到过这种情况:思科网络设备启动后自动进入了rommon monitor配置模式,这时出现的提示符为"rommon"。
这是怎么回事呢?这说明你的IOS被误删了。
掌握Cisco IOS测试命令的多种用法以及IOS恢复方法无论是在现实世界还是试验室环境中,Cisco IOS测试命令都是一个非常有用并且功能强大的命令。
学习这个命令的基本用法,并且了解几个有用的子命令。
如果你从未用过Cisco IOS test命令,这并不奇怪。
我遇到过许多从未听说过这个命令的网络管理员。
根据我的经验,无论是在现实世界还是实验室环境中,这个test是一个非常有用并且功能强大的命令。
正如你可能知道的,即使只是以正确的顺序使用Cisco IOS命令有时也是不容易的。
而且在你以正确的顺序使用了正确的命令之后,你才能知道这些命令正确执行呢?这就是需要测试命令的原因。
让我们对此做一个亲密接触。
要想查看你的IOS上可用于测试的选项,请以特权方式进入,并且输入:Router# test ?这个命令返回一个选项列表。
例如,在我运行了IOS 12.3(6a)的3600 Series路由器上,我有34个子命令。
而在我的Catalyst 3524 IOS交换机上,我只有八个子命令可用。
为了使你了解能做些什么,这里给出我的路由器和交换机对该命令的输出。
router# test ?aaa : AAA Authentication, Authorization and Accountinginterfaces : Network interfacesmemory : Non-volatile and/or multibus memorypas : Port Adaptor Testsscp : SCP test commandsservice-module : Service module sgbpVirtual-Template: Virtual Template interfaceappletalk : APPLETALK diagnostic codecac : test the l2 cac functionalitycall : Call test commandscns : CNS agentscrypto : Test crypto functionsdsp : Test DSP functionseigrp : IPX EIGRP test commandsenum : test enumgssapi : GSSAPI test codehpi : host port interfaceifs : IFS TEST codeipc : Inter-Process Communication Test Commandsipmobile : IP Mobility Test commandspasvc : PPP over ATM SVC Test Driverpm : Port Manager test commandspppatm : PPP over ATM SSS Testpppoe : PPPoE test commandssctp : SCTP test commandssource-group : Test Source IP Groupspanning-tree : Spanning Tree Subsystemssl : SSL Testsw-vlan : Test VLAN Manager featuretpu : TPU test systemtranslation-rule : Test translation rule table voice Voice related test commandsrouter#CAT1#test ?cns : CNS agentsifs : IFS TEST codel2protocol-tunnel : layer 2 tunnel portl3tcam : Test L3TCAM Managerspanning-tree : Spanning Tree Subsystemstats : Test statssw-vlan : Test VLAN Manager featuretcam : Test TCAM MgrCAT1#test正如你看到的,你通常只使用其中几个子命令来进行测试,特别是在路由器上。
2.升级交换机IOS
首先,用Console连接交换机的Console口与电脑的COM1口(或USB口,依据配置线不同而定,设置方法请查看第5章的相关内容),网线连接交换机Fast Ethernet0/1口与计算机的以太网口,打开TFTP服务器软件,并将其根目录设为IOS文件所在的目录。
为使交换机能与TFTP服务器相互通信,需要为交换机和TFTP服务器设置IP地址。
1)设置TFTP服务器地址
首先需要将运行TFTP的计算机IP地址设为192.168.0.1,如图6-8所示。
此时,选择超级终端中【传送】→【发送文件】命令,在协议选项中选择XMODEM或者XMODEM-1K协议,选择IOS文件,开始传送。
当传输完毕后,重新启动路由后开始使用被恢复的IOS。
此时,需要再次启动路由器,将传输速度恢复到默认状态,即在enter rate: 部分选择0,即9 600的传输速度。
Cisco ASA 配置文件+IOS 备份与恢复Cisco 路由器+ASA亲测,交换机理论上可以,期待测试...前言以下所有配置过程以ASA为例,路由器与其区别不大......Cisco ASA防火墙自带TFTP 导入导出配置命令(ASA 5505 ASDM界面访问ASA也有体现)......从一开始接触ASA到现在为止,已经有约半年时间,这么长时间的努力,多数时间浪费在了该死的英文界面以及网上区区的极少文章。
我们长时间的奋斗是否该助新入手的朋友一臂之力?ubuntu(linux 系统的一种)主张的一句话叫做:”我的存在,是因为大家的存在!“我决定要这么做!鄙视微软和cisco代码等技术不透明....吼吼.....奋斗了2天的成果,分享一下!目的:为了防御不测,网络受到黑客恶性攻击等因素,熟练掌握备份与还原配置文件以及IOS文件。
流程:1. 在客户端搭建TFTP服务器,并保持TFTP服务在自动启动状态.2.备份还原ASA配置文件3.备份还原IOS配置文件一准备工作:(在此特意说明一下,我是用笔记本server 2003系统通过telnet登录ASA 命令行)在2003系统中安装TFTP服务,使2003系统成为TFTP服务器。
在此强烈推荐solarwinds—TFTP-server ,下载地址:/soft/480772/,默认安装完成后,启用solarwinds-tftp服务!二备份还原ASA配置文件cisco 只能通过TFTP的方法来备份和恢复数据....(1)备份第一步:登录ASA防火墙命令行界面(如图)第二步:执行 copy running-config tftp命令(如图)Source filename[running-config] 意思是确认备份默认文件running-config吗?按照默认,按回车下一步即可!第三步:指定TFTP服务器IP地址address or name of remote host [192.168.1.13]? 意思是需要将TFTP服务器IP设置为默认192.168.1.13吗?在此我不需要,手动输入正确的TFTP服务器IP即可。
1ASA防火墙升级思科防火墙ASA软件版本的升降级的操作步骤类似。
为了保证配置文件在升级过程中的正确性,在升级ASA软件主版本的时候,需要按版本顺序升级。
如需要从7.0版本升级到8.2版本的时候,需要先从7.0版本到7.1,然后从7.1到7.2,最后从7.2升到8.2(特别说明:8.1版本只适用于ASA5580。
)。
如升级到8.3及以后版本,配置文件会有所改变,详情请参考思科官方文檔。
一、备份原有IOS和ASDM文件以及配置文件Show versionShow asdmShow inventoryShow cpuShow memoryShow moduledir //显示文件目录copy disk0:/ old asa file.bin tftp: //将原有IOS文件备份到TFTP服务器上copy disk0:/ old asa file.bin tftp: //将原有asdm文件备份到TFTP服务器上二、软件升级1.显示文件目录dir2.将新的IOS文件从TFTP服务器拷贝到ASA中Copy tftp: disk0: //指定TFTP服务器中的镜像名3.将新的asdm文件从TFTP服务器拷贝到ASA中Copy tftp: disk0: //指定TFTP服务器中的镜像名4.再次显示文件目录,检查是否拷贝成功。
dir5.修改启动文件关联no boot system disk0:/old asa file.bin //取消原来的启动文件关联boot system disk0:/new asa file.binasdm image disk0:/new asdm file.bin //设置IOS文件及ASDM文件的关联Device Manager image set, but not a valid image file disk0:/asdm-603.bin //由于新的IOS文件在重新启动前并未生效,所以会提示新的ASDM镜像在设置关联的时候会提示无效。
在“为什么要升级Cisco IOS”一文中为大家讲述了Cisco网络设备升级IOS的意义和作用,接下来我们就为大家介绍四种Cisco 升级IOS的方法,供大家参考!Cisco升级IOS的四种简单方法1、最简单的:向思科购买IOS升级包把购买到的IOS升级包直接解压到思科网络设备的Flash中,这是最正式和最简单的一种升级IOS的方法。
当需要升级IOS时,我们可以向山东思科总代理购买相应的IOS(一般是一个IOS的压缩包),其中包括操作系统文件和其他的一套配套文件(如支持网页化管理的文件)。
把这个压缩包直接解压释放到Cisco网络设备的Flash中,就可以完成升级。
2、最常用的:直接复制新版的IOS到Flash芯片中,替换老版IOS具体操作是:通过TFTP服务器,直接将IOS文件复制到Cisco设备的Flash芯片中替换原有的IOS文件。
大多有经验的思科网络工程师都喜欢用这种方式升级IOS。
对于资深的网络工程师,即使在购买了IOS升级包的情况下,他们也喜欢用这种方式来进行Cisco IOS升级。
3、最慢的:通过XMODEM升级IOS这种升级是利用Cisco设备的AUX接口来升级IOS。
与通过以太网接口升级不同的是,这种方法传输文件的速度是相当的慢!因为它是通过AUX(实际上属于COM口)来进行的,其速度受到串行接口的限制。
这种升级IOS的方法只有在以下情况才用的到:1)设备以太网端口无法使用或损坏;2)异地操作,网络中没有TFTP服务器。
这种情况下的具体操作是:在Cisco路由器的AUX口上连一台MODEM,通过远程连接到设备上,然后进行IOS的升级操作,很慢哦:)升级IOS一般是为了使用思科网络设备更高性能,但有些时候却是不得已而为之。
大家有没有遇到过这种情况:思科网络设备启动后自动进入了rommon monitor配置模式,这时出现的提示符为"rommon"。
这是怎么回事呢?这说明你的IOS被误删了。
[原创] CISCO ASA 防火墙 IOS恢复与升级简明教程!
By zizizhe@
2010-11-21
客户的误操作,把ios给删了,这下麻烦到我了。
说来恢复也不难,晚上找的一大堆,不过自己真正用来才发现有很多细节需要注意的。
小弟愚钝,花了2小时才搞定(QQ远程借助,我在北京,客户在包头),特把经验共享给大家。
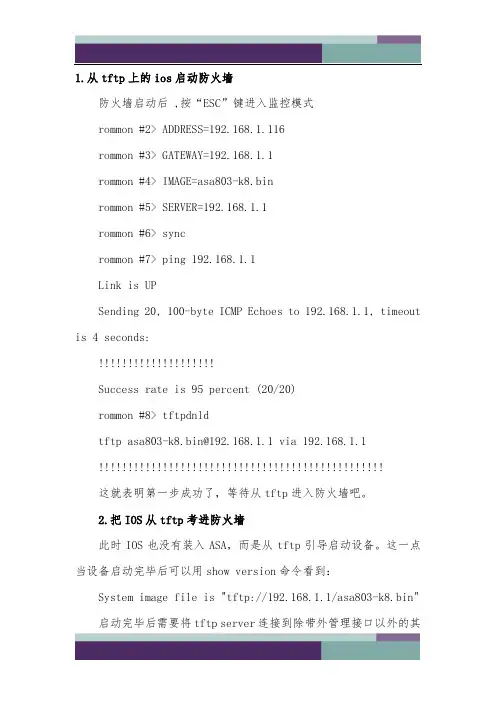
1.从tftp上的ios启动防火墙
防火墙启动后 ,按“ESC”键进入监控模式
rommon #2> ADDRESS=192.168.1.116
rommon #3> GATEWAY=192.168.1.1
rommon #4> IMAGE=asa803-k8.bin
rommon #5> SERVER=192.168.1.1
rommon #6> sync
rommon #7> ping 192.168.1.1
Link is UP
Sending 20, 100-byte ICMP Echoes to 192.168.1.1, timeout is 4 seconds:
!!!!!!!!!!!!!!!!!!!!
Success rate is 95 percent (20/20)
rommon #8> tftpdnld
tftp asa803-k8.bin@192.168.1.1 via 192.168.1.1
!!!!!!!!!!!!!!!!!!!!!!!!!!!!!!!!!!!!!!!!!!!!!!!!!
这就表明第一步成功了,等待从tftp进入防火墙吧。
2.把IOS从tftp考进防火墙
此时IOS也没有装入ASA,而是从tftp引导启动设备。
这一点当设备启动完毕后可以用show version命令看到:
System image file is "t ftp://192.168.1.1/asa803-k8.bin"
启动完毕后需要将tftp server连接到除带外管理接口以外的其它接口,然后再升级IOS 注意:配置IP地址。
命令很简单不用说了
但就是这接口需要注意一下
必须配置成 inside口
才能让你升级的,我在管理接口下折腾了半天都没搞好,换了口就OK了。
Asa#conf t
Asa(config)#int e0/0
Asa(config-if)#nameif inside
Asa(config-if)#ip add 192.168.1.116 255.255.255.0
Asa(config-if)#no sh
Asa#ping 192.168.1.1
通后就可以升级ios了
Asa5510#copy tftp: flash:
Tftp server IP address:192.168.1.1
Source file name:asa803-k8.bin
Destination file name:asa803-k8.bin
Asa5510#copy tftp: flash:
Tftp server IP address:192.168.1.1
Source file name:asdm-608.bin
Destination file name:asdm-608.bin
到这一步并没有结束,此时还需要进行boot system的设置
使用命令
Asa(config)#boot system disk0:/asa808-k8.bin
Asa(config)#asdm image disk0:/asdm-608.bin
Asa(config)#wr
然后reload一下就可以了
重启之后在dir查看一下,基本上就大功告成了。
加了一点细节上的东西,呵呵
都是我遇到的问题,希望对大家有帮助!。