苏泊尔空气净化器使用说明书(型号KJ620G-S30)
- 格式:pdf
- 大小:13.15 MB
- 文档页数:15
空气净化器用户使用手册Scqair1苍穹空气净化器用户使用手册企业简介........................................................... 2 整机及配件......................................................... 3 产品部件介绍...................................................... 4 快速使用指南...................................................... 5 注意事项............................................................ 6-7 操作说明............................................................ 8-9 净化功能........................................................... 10 技术创新........................................................... 11 工作原理........................................................... 12 技术参数........................................................... 13 保养维护........................................................... 14 故障排除........................................................... 15 使用前操作事项.................................................. 16 售后服务........................................................... 17 产品合格证........................................................ 17 售后服务卡.. (18)感谢您使用苍穹空气净化器,使用前请仔细阅读使用手册并妥善保管。
LFZK型自洁式空气过滤器使用说明书LFZK自洁式空气过滤器,请参照说明书使用要求。
保证过滤器以优良的性能正常运行,并合理的使用,正常的操作,科学的管理与维护。
1、概述LFZK系列气动自洁式空气过滤器是机电一体化设备,在微型计算机的控制下自动实现空气的过滤和过滤元件的自动清洁。
在过滤元件的自动清洁的过程中,LFZK空气过滤器照常工作。
过滤器的阻力损失较小。
小型自洁式过滤器初阻力损失小于750PaLFZK型适应空气湿度范围广,任何潮湿多雾地区,其运行也不受影响.自耗压缩空气量极小,仅为0.2m³/min(吸入状态) 占地面积小,大型LFZK型采用多层结构,并不多占地.LFZK型为积木组装式结构,对于客户的特殊要求均能满足.过滤元件的使用寿命长,更换为12~18个月.1、结构及工作原理简介2.1结构LFZK-400型气动自洁式空气过滤器由钢结构框架、过滤箱体、出风口管、微机控制系统和自洁气源系统五部分组成。
过滤箱体的上部为净气室,下半部分为过滤筒,包括:文氏管、自洁系统(含电磁阀)等。
2.2工作原理2.2.1过滤过程空气经过过滤筒、由于重力、惯性扩散、静电、接触阻留等综合作用,灰尘沉降、堆积在过滤元件上,干净空气经文氏管再到出风口送出。
2.2.2自洁过程空气过滤元件上的灰尘,用定时或定差压的方式,由微电脑自动控制,依次对过滤筒反吹,,将沉降物的颗粒灰尘吹落到大气中,每次仅一组(五个)过滤筒处于自洁过程,间隔时间为60秒,其它过滤筒仍处于正常过滤工作状态,ZKG照常运行。
3、电控系统LFZK型气动自洁式空气过滤器的控制系统,采用全数字控制,它可长期运行,具有工作稳定,控制精度高,并可根据生产情况修改程序等特点。
所有的控制回路用一台可编程序控制器来完成,由电脑输出的指令信号使电磁阀开闭,从而开闭自洁气源,达到过滤器自洁的目的。
3.1正常工作的三种状态3.1.1自动方式当系统需要采用自动方式时,将方式开关处在“自动方式”的位置上,此时过滤器按定时状态工作3.1.2差压方式当系统的阻力损失超过预设定值时,差压控制器开始动作。
1.安全注意事项2.安装注意事项3.安装参考图4.控制盒说明5.外形尺寸6.设备安装7.管道连接8.试运行9.使用注意事项10.产品特点11.工作原理12.使用方法13.设备保养14.规格性能参数为预防对使用人员和其他人员造成害,避免财产损失,安装使用之前请仔细阅读“产品使用手册”,请务必遵守以下事项安全注意事项1.安装工程须严格按照本手册2.在将机子接到管网中之前不可长时间空机试运行。
若要检查风机是否能启动,即应将进风口面积堵塞约2/3后再开机试运行,时间不宜超过5分钟,以免损伤烧毁电机。
3.安装请委托专业人员,不可自行安装或移动,如有不当,会发生掉落、触电、火灾等。
4.本产品要安装于能够承受重量的地方,以免强度不够,安装不牢固造成设备掉落等伤人损物事故。
5.安装工程使用的零件必须是指定的零件(包括附件)6.电气工程要按照国家尘土作使用手册进行施工,必须使用专用线路,以免电源线路施工不当造成触电或火灾事故。
7.需安装专用断路器,根据安装位置的情况,有必要时应安装漏电断路器8.电源线以及连线要使用指定的电缆连接牢固,接线器连线部位应固定结实,不受电缆外力影响,电控盒要压实以免电源盖板翘起造成漏电。
9.地线不可与燃气管道、自来水管、避雷针、电话线等连接在一起。
10.必须使用额定电压,以免电器损坏引起火灾或触电。
11.不可安装在有易燃易爆气体可能泄漏的地方。
12.不可安装在化工厂等易产生酸、碱、有机溶剂、涂料等有害气体以及含有腐蚀性气体的地方。
13.天花板内高温多湿时,应在天花板内安装换气设备。
14.保养检修时必须关掉开关,并关掉专用断路器以免引起触电。
安装注意事项1.无论因任何原因耽搁吊顶式空气净化机的安装,以及净化机在现场作短期或长期的保存,都必须采取相应的保护措施,以防止建筑灰尘和碎石进入主机及其他附件之中。
2.为平时能免对设备内部的各层净化器进行清洁和维修,请务必留下维护空间。
维护口详见图13.安装空气净化机的位置必须保证天花板内高度不小于表内尺寸(B),祥见图2图1图24.不可安装在热水器附近。
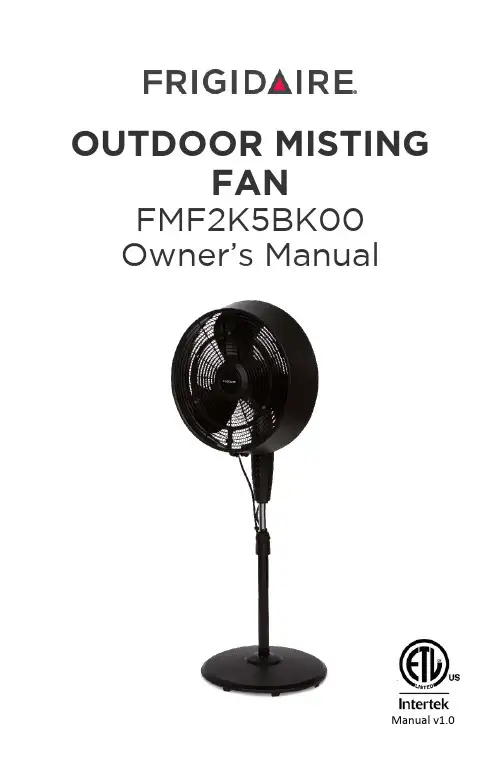
Manual v1.0OUTDOOR MISTINGFANFMF2K5BK00 Owner’s Manual2R EAD AND SAVE THESEINSTRUCTIONS . Register Your Product Online (3)Important Safety Instructions/Warnings ................................................ 4 Parts Lists .. (6)Assembly Instructions (7)Operating Instructions (9)Cleaning and Maintenance (10)Troubleshooting (12)Limited Manufacturer’s Warranty (13)MODEL NOFMF2K5BK00 RATED VOLTAGE120V RATED FREQUENCY60 Hz RATED POWER55W CURRENT0.45A FAN SPEEDS3 SPRAY NOZZLES3 AIRFLOW2400 CFM COVERAGE 500 square feetFrigidaire is a registered trademark of Electrolux Home Products, Inc. All rights reserved. Manufactured under license by: NewAir, LLC 6600 Katella Ave, Cypress, CA 90630 Comments/questions: ******************|855-963-92473Register Your Frigidaire Product Online Today!Take advantage of all the benefits product registration has to offer:Service and SupportDiagnose troubleshooting and service issues faster and more accuratelyRecall NotificationsStay up-to-date on safety notices, system updates, and recall notificationsSpecial PromotionsOpt-in for NewAir promotions and offersRegistering your product information online is safe &secure and takes less than 2 minutes to complete:Alternatively, we recommend you attach a copy of your sales receipt below and record the following information, which can be found on the manufacturer’s nameplate on the back of the unit. You will need this information if it becomes necessary to contact the manufacturer for service inquiries.Date of Purchase: ___________________________________________ Serial Number: _____________________________________________ Model Number: ____________________________________________4CAUTION: Read rules for safe operation and instructions carefully.When using any electrical appliance, basic safety precautions must be followed in order to reduce the risk of fire, electrical shock and/or injury to persons or property. Be sure to read all instructions before using this appliance and observe the following safety tips:1.To reduce the risk of fire or electrical shock, do not use this fan withany solid state speed control device (e.g. a dimmer switch).2.This product must be grounded properly when plugged in. If theunit should malfunction or break down, a grounded power cord will keep you safe. This product is equipped with a grounded powercord. Plug into an appropriate outlet that is properly installed and grounded in accordance with all local codes and ordinances.3.This fan is provided with a ground fault circuit interrupter (GFCI)built into the power supply cord. This device provides additionalprotection from the risk of electric shock. Should replacement ofthe plug or cord become necessary, use only identical replacement parts that include GFCI protection.4.Do not leave the fan running unattended.5.Do not use the fan where it may get wet from rain, sprinklers, etc.Water could leak inside of the unit and damage the internalcomponents.6.Do not insert anything through the fan cover, especially while thefan is running.7.Before using the unit, check if the voltage indicated correspondswith the intended outlet (120V).8.Connect power after the fan is fully assembled.9.Unplug from the outlet when not in use, when moving the fan fromone location to another, before putting on or taking off parts, and before cleaning.10.Be sure the fan is on a stable surface when operating to avoid itfalling over, and ensure the power cord is not a trip hazard.11.Do not use any appliance with a damaged cord or plug. Discard fanor return to an authorized service facility for examination and/orrepair if the power cord or plug are damaged.12.Children should be supervised to ensure they do not play with oraround the appliance.513.This product employs overload protection (fuse). A blown fuseindicates an overload or short-circuit. If the fuse blows, unplugthe product from the outlet. Replace the fuse as per the userservicing instructions and check the product. If the replacement fuse blows, a short-circuit may be present and the product should be discarded or customer service should be contactedimmediately.14.Press the TEST button (then RESET button) on the power cableGFCI box once every month to ensure proper operation.15.Risk of Fire: Do not replace or modify any part of the power cord,GFCI or wall plug. Do not remove the fuse unless you arereplacing it. If any of these parts are damaged, contact customer service immediately.16.Place the fan on a level surface. Plug the grounding typeattachment plug into a standard 120V AC 3-Pring wall outlet.SAVE THESE INSTRUCTIONS6A.Front grilleB.Blade capC.Fan bladeD.Plastic nutE.Rear grilleF.Motor shaftG.Clutch knobH. Motor housing I.Control panelJ.Thumb screwK.Power cordL.Waterproof cover M.Misting line clipN.Internal poleO.Height adjustment knob P.External poleQ.Misting line R.Filter washer S.Water valve T.Fan base U.Screw for base7Before beginning assembly of this product, make sure all parts are included in the box (see chart on previous page). If any part is missing or damaged, do not attempt to assemble the product. Contact customer service for replacement parts. You should only need a philips head screwdriver for assembly, and about 15 minutes of time.81.Unscrew the screw (U) from the external pole (P) andattach the external pole (P) to the base (T) bytightening the screw (U).2.Remove the height adjustment knob (O) by unscrewing itcounterclockwise.e your finger to pull out the internal pole (N), slide heightadjustment knob (O) over internal pole (N). Fasten it to external pole (P) by turning the knob while holding the pole. Make sure the knob (O) is tightly fastened before final assembly.1.Remove the blade cap (B) by turning clockwise. Remove the plasticnut (D) by turning counter clockwise.2.Position the rear grille (E) over the motor shaft (F), making certain that the handle is at the top, and that the one notch on the back of of rear grille (E) fits over the three prong attachment on the motor housing (H on parts list).3.Secure rear grille (E) by turning the plastic nut (D) clockwiseand tightening firmly.4.Slide the fan blade (C), with the hollow interior of the blade facingtoward rear grille (E), onto motor shaft (F).5.Secure fan blade (C) onto motor shaft (F) by turningthe blade cap (B) counterclockwise until firmly inplace.6.Loosen the bolt on the bottom of front grille (A) and mount the front grille (A) with the logo right side up to rear grille (E) by snapping both together firmly. Ensure all snaps around frontgrille (A) are secured onto rear grille (E).7.Tighten the bolt on the bottom of front grille (A).1.Loosen the thumb screw (J) by turning it counterclockwise.2.Always keep the waterproof cover (L) match with the height adjustable knob (O) when adjusting the internal pole (N).3.Insert internal pole (N) into the neck joint and tighten byturning thumb screw (J) clockwise. Make sure it is tightenough to support the fan head.4.Attach the Misting Line holder (M) onto the Internal pole (N).5.Secure the Misting Line (Q) to the clip under front grille (A) and themisting line clip (M).91. Plug in the unit, press the reset button on theGFCI, and select a fan speed on the controlpanel. The fan will start running as soon as youselect a fan speed.2. To start/stop fan oscillation, push down/pull upthe clutch knob (G).3. To adjust the airflow upward or downward,simply tilt the fan head by hand and move to thedesired angle.4. The height of the fan can be adjusted byloosening the height adjustment knob (O) andcarefully raising or lowering the fan and retightening the knob.1. Connect a standard ¾” garden hose to the misting hosevalve (S). Water pressure should not exceed 550 kPa (5.6 kfg/cm2). Only use a hose in good condition.2. With the garden hose turned on at the spigot, turn the leveron the misting hose valve to the right to turn on water to the fan.3. Turn the lever back (to the left) to temporarily disable themisting feature. To disable the misting feature for a longer period of time, close the water valve lever and turn the spigot off as well.3 2 10101.Disconnect from the electrical socket during cleaning or initialassembly.2.To ensure adequate air circulation to the motor, keep the ventsat the rear of the motor housing clear of dust, dirt, etc. Unplug the fan before using a vacuum cleaner or compressed air toclean the grilles. It should not be necessary to disassemble the fan to clean it.3.Wipe the exterior housing of the fan with a soft cloth soaked ina mild detergent. Do not use any abrasive detergents orsolvents to avoid damaging the surface. Do not use gasoline,thinner, or bending to clean the fan.4.Do not allow water or any other liquid into the motor housing orinterior parts.5.When dismantling the fan (we recommend following theassembly instructions in reverse), be sure to clean each of the components before storage. Allow all parts to dry completely before storing.6.To test the GFCI feature, press the "TEST" button. The fanshould immediately shut off as if the GFCI has been tripped.Press the "RESET" button and the fan should be able to beturned on again, and the light on the GFCI box should light up orange. If it does, then the unit (as well as the GFCI feature) are functioning normally.7.If the fuse in the power cord plug needs to be replaced, followthese instructions:a)Pull the power plug from the outlet, being careful not topull from the cord.b) Slide open the fuse access cover.c) Remove the fuse slowly and carefully by inserting a smalltool into the fuse slot and prying it out. When one side of the fuse has been lifted out, you will be able to remove it entirely.d) Only replace the fuse with 5 Amp / 125 Volt fuses. Using anincompatible fuse may cause a fire.e) Close the fuse cover.f) Caution: Do not attempt to replace the plug or the powercord itself. Only replace a broken fuse with a compatible fuse.If any part of the plug or cord are damaged, contact customer service for assistance.111.Grasp plug and remove from the receptacle or other outletdevice. Do not unplug by pulling on cord.2.Open fuse cover. Slide open fuse access cover on top ofattachment plug towards blades.3.Remove fuse carefully. Insert the tip of your tool into fuseslot (close with the terminal), then prize the fuse graduallyand slowly, but not overexert. If you feel tight, you can try itat several times and prize the fuse little by little. When oneside of the fuse has been prized, then you can get the fuseout entirely.4.Risk of fire. Replace fuse only with 5 Amp, 125 Volt fuse.5.Close fuse cover. Slide closed the fuse access cover on topof attachment plug.6.Risk of fire. Do not replace attachment plug. Contains asafety device (fuse) that should not be removed. Discardproduct if the attachment plug is damaged.If the misting nozzles become clogged, unscrew them from the fan grille and soak in vinegar or a lime scale remover until they are clear of buildup. Use a non-metallic brush to scrub them if necessary. If the nozzles remain obstructed, contact customer service for replacement.Warning: never try to clear the nozzles with pins or other sharp objects as this can cause damage to the nozzles, affecting their efficiency.If the misting hose valve becomes clogged, unscrew the head of the valve and flush it with running water to clear debris. Make sure the screen inside the misting hose is clean as well.12The fan has no power. The unit may beplugged in using adifferent voltage.Check if using the wrongvoltage.The circuit breakermay be tripped orthere is a blown fuse.Reset the circuit breaker orcheck for a broken fuse.The fan is not rotating. There is anobstruction.Check for obstructions inthe fan. If you findsomething, turn the fanoff. Unplug the fan andcarefully remove theobstruction. Plug the fan inand turn it on again byreferring to the operatinginstructions.No mist is produced. There is no watercoming from the hose.Make sure the garden hoseis correctly connected tothe spigot and the mistinghose valve, that the spigotis turned on, and that thevalve is open.Nozzles are leaking or dripping. The nozzles areclogged.Clean the clogged nozzleson the front of the fan asdescribed under “Cleaning& Maintenance.”13This appliance is covered by a limited manufacturer’s warranty.For one year from the original date of purchase, themanufacturer will repair or replace any parts of this appliancethat prove to be defective in materials and workmanship,provided the appliance has been used under normal operating conditions as intended by the manufacturer.Warranty Terms: During the first year, any components of this appliance found tobe defective due to materials or workmanship will be repaired or replaced, at the manufacturer’s discretion, at no charge to theoriginal purchaser. The purchaser will be responsible for anyremoval or transportation costs.Warranty Exclusions:The warranty will not apply if damage is caused by any of the following:•Power failure•Damage in transit or when moving the appliance•Improper power supply such as low voltage, defective household wiring or inadequate fuses•Accident, alteration, misuse or abuse of the appliance such as using non-approved accessories, inadequate air circulationin the room or abnormal operating conditions (extremetemperatures)•Use in commercial or industrial applications•Fire, water damage, theft, war, riot, hostility or acts of God such as hurricanes, floods, etc.•Use of force or damage caused by external influences•Removal of stickers and/or screws•Partially or completely dismantled appliancesObtaining Service: When making a warranty claim, please have the original bill ofpurchase with purchase date available. The purchaser will be responsible for any removal or transportation costs.Replacement parts and/or units will be new, remanufactured or refurbished and are subject to the manufacturer’s discretion.For technical support and warranty service, please email******************Frigidaire is a registered trademark of Electrolux Home Products, Inc.All rights reserved.Manufactured under license by:NewAir, LLC6600 Katella Ave, Cypress, CA 90630。
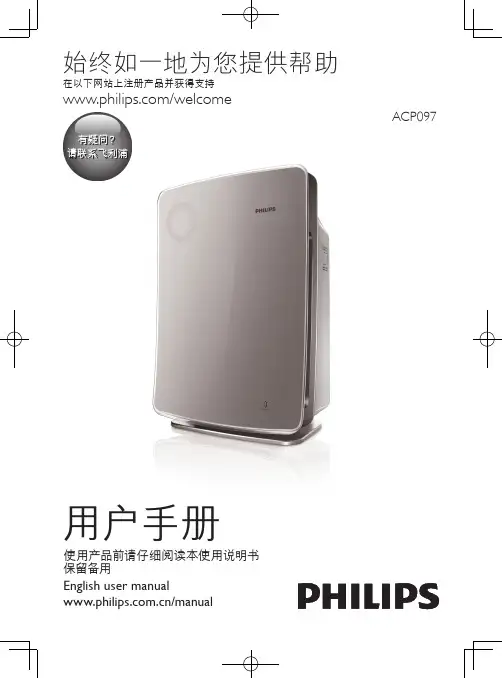
始终如一地为您提供帮助用户手册English user manual /manual使用产品前请仔细阅读本使用说明书有疑问?请联系飞利浦目录1 重要信息4安全4 2 您的空气净化器6包装盒内物品6 3 使用入门7安装过滤网7 4 使用空气净化器9了解空气质量指示灯9了解自动模式9了解健康空气滤网更换提醒指示灯9了解健康空气智能锁9打开或关闭10更改风速10自动10手动10静音模式11设置定时器115 清洁空气净化器136 清洁预过滤网147 更换过滤网16更换甲醛过滤网16 8 重置过滤网使用寿命计数器18重置甲醛过滤网使用寿命计数器189 故障种类和处理方法1910 保修与服务20订购部件或附件20 11 注意事项21电磁场 (EMF) 21符合 EMF 标准21回收213简体中文1 重要信息安全使用本产品之前,请仔细阅读本用户手册,并妥善保管以备日后参考。
危险•切勿让水或任何其它液体或易燃性清洁剂进入产品,以免发生触电和/或火灾。
•切勿用水或任何其它液体或(易燃性)清洁剂来清洁产品,以免发生触电和/或火灾。
警告•在将产品接通电源以前,首先确认产品背面或底部所标示的电压是否与当地的电压相符。
•如果电源软线损坏, 为了避免危险, 必须由制造商, 其维修部或类似部门的专业人员来更换。
•如果插头、电源线或产品本身受损,请勿再使用本产品。
•器具不打算由有肢体、感官或精神能力缺陷或缺少使用经验和知识的人(包括儿童)使用,除非有负责他们安全的人对他们进行与器具使用有关的监督或指导。
•应照看好儿童,确保他们不玩耍本产品。
•请勿堵塞进风和出风口,例如不要将物体放置在出风口上或进风口前方。
警告•本产品不能替代正常通风、日常吸尘或者在烹饪时使用的抽油烟机。
•如果连接产品的电源插座接触不良,则产品的插头可能会变得很热。
确保所连接的电源插座接触良好。
•一定要在干燥、稳固、平整且水平的表面上放置和使用本产品。
•产品的后侧及两侧均要留出至少20 厘米的空间,产品上方至少要留出 30 厘米的空间。
室内空气净化器的使用说明室内空气净化器使用说明为了保障家庭成员的健康和舒适,室内空气净化器成为现代家庭必备的电器。
它可以有效去除室内空气中的异味、细菌和有害物质,提供一个清新、健康的室内环境。
但室内空气净化器的使用也需注意一些细节,下面,我们将详述使用说明。
1. 选购合适的空气净化器。
首先,根据室内面积选择合适的空气净化器。
一般来说,小型空气净化器适用于小型卧室或办公室,而大型空气净化器适用于客厅或大面积空间。
其次,需要根据需要选择不同类型的净化器,如活性炭过滤器、HEPA过滤器或光触媒过滤器等,以满足不同的净化需求。
最后,确保选购的空气净化器符合国家相关标准,具备合格的净化效果和可靠的品质。
2. 安装净化器。
在安装空气净化器之前,需要将净化器放置于远离阳光直射和异味源的地方。
保持周围空间畅通,不要堵塞空气进出口。
同时,确保电源线路的接地良好,以确保电器的正常运行和安全使用。
3. 清洁和更换滤芯。
空气净化器的滤芯需要定期清洁和更换。
根据使用频率和环境,一般建议每3-6个月更换一次滤芯。
在更换滤芯之前,务必关闭电源,然后按照说明书的指导清洁或更换滤芯。
清洁滤芯时,可以用软毛刷轻轻刷洗,或者用适量清洁液清洗,然后晾干。
更换滤芯时,注意选择适合的滤芯规格,确保净化器的正常运行。
4. 正确使用空气净化器。
在使用空气净化器时,为了保证净化效果,可以根据环境需要选择合适的净化模式。
一般为了达到最佳净化效果,可以选择自动模式或者静音模式。
同时,需要定期清洁空气净化器的外壳和面板,以保持设备的整洁和正常运行。
5. 定期检测空气质量。
空气净化器需要定期检测室内空气质量,以确定净化器的净化效果和滤芯的更换时机。
可以使用空气质量检测仪器进行测量,或者根据净化器的显示器显示的空气质量状况进行判断。
如果发现净化效果下降,或者显示器显示空气质量较差,应及时清洁或更换滤芯。
总结:室内空气净化器的使用对于保障家庭成员的健康和舒适环境非常重要。
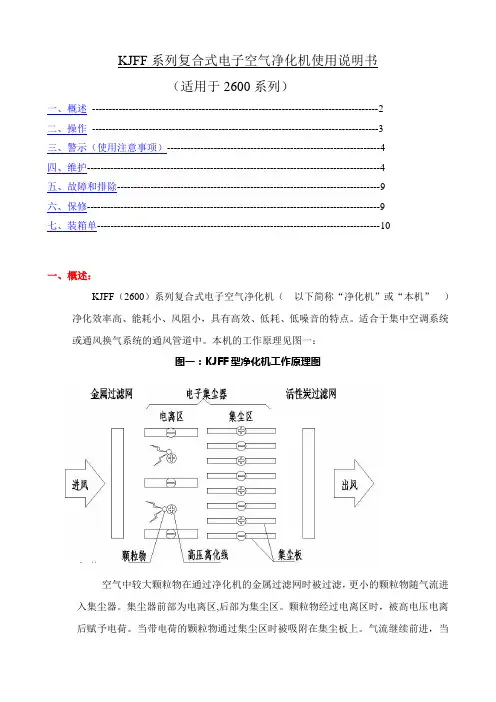
KJFF系列复合式电子空气净化机使用说明书(适用于2600系列)一、概述--------------------------------------------------------------------------------------2二、操作--------------------------------------------------------------------------------------3三、警示(使用注意事项)----------------------------------------------------------------4四、维护----------------------------------------------------------------------------------------4五、故障和排除-------------------------------------------------------------------------------9六、保修----------------------------------------------------------------------------------------9七、装箱单-------------------------------------------------------------------------------------10一、概述:KJFF(2600)系列复合式电子空气净化机(以下简称“净化机”或“本机”)净化效率高、能耗小、风阻小,具有高效、低耗、低噪音的特点。
适合于集中空调系统或通风换气系统的通风管道中。
本机的工作原理见图一:图一:KJFF型净化机工作原理图空气中较大颗粒物在通过净化机的金属过滤网时被过滤,更小的颗粒物随气流进入集尘器。
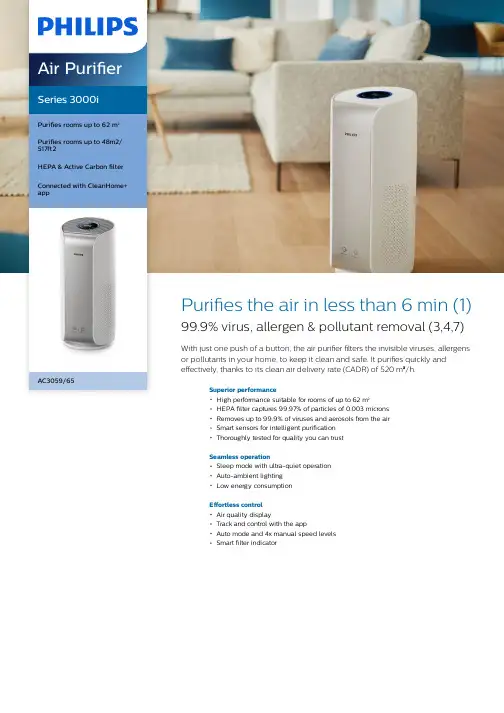
Series 3000iPurifies rooms up to 62 m²Purifies rooms up to 48m2/ 517ft2HEPA & Active Carbon filterConnected with CleanHome+ appAC3059/65Purifies the air in less than 6 min (1) 99.9% virus, allergen & pollutant removal (3,4,7) With just one push of a button, the air purifier filters the invisible viruses, allergens or pollutants in your home, to keep it clean and safe. It purifies quickly andeffectively, thanks to its clean air delivery rate (CADR) of 520 m³/h.Superior performanceHigh performance suitable for rooms of up to 62 m²HEPA filter captures 99.97% of particles of 0.003 micronsRemoves up to 99.9% of viruses and aerosols from the airSmart sensors for intelligent purificationThoroughly tested for quality you can trustSeamless operationSleep mode with ultra-quiet operationAuto-ambient lightingLow energy consumptionEffortless controlAir quality displayTrack and control with the appAuto mode and 4x manual speed levelsSmart filter indicatorHighlightsHigh performance360° airflow intake effectively covers rooms up to 62 m ² and distributes clean air in everycorner of the room. This boosts performance to 520 m ³/hr (2) CADR (Clean Air Delivery Rate).It cleans 20 m ² in only 6 min. (1)99.97% particle removal3-layer filtration with NanoProtect HEPA,active carbon filter and pre-filter captures 99.97% of ultra-fine particles as small as0.003 microns (4), so you are safe from PM2.5,bacteria, pollen, dust, pet dander, gas and other pollutants (7). Certified by the European Centre for Allergy Research Foundation.Up to 99.9% virus removalCaptures aerosols including those which may contain respiratory viruses. Testedindependently by airmid health-group to remove up to 99.9% of viruses and aerosols from the air (3). Also tested for coronavirus (5).Intelligent sensorsScans the air 1000x a second to detect ultra fine-particles. Reports the air quality in real time, and intelligently chooses the right speed for your home (in auto mode).Quality you can trustPhilips purifiers go through 170 mandatory and strict inspection tests before releasing from factory. They are subjected to rigorous life and durability tests, for continuous operation 24/7.Ultra-quiet operationIn Sleep mode, display lights are dimmed, and the purifier operates in near silence for clean air while you sleep. Certified by Quiet Mark.Auto-ambient lightingThe display light automatically adjusts according to the environment in your room,giving you all the benefits without any of the disturbance.Low energy consumptionThanks to its energy efficient design, the air purifier runs at max. 55 W power. This is equivalent to one standard light bulb.Air quality displaySee the real-time air quality in your home at a glance. The display shows the level ofallergens, gases and PM2.5 in numerical form,as well as with an intuitive color ring.Track and control with the appMonitor the air quality and control your air purifier anytime, anywhere with the CleanHome+ app. Get alerted when air quality is not right.SpecificationsPerformanceCADR (Particle, GB/T): 520 m³/hRoom size (G/BT): 62Air quality sensor(s): PM2.5 particle, Gas Filtration: HEPA, Active Carbon, Prefilter Particle filtration: 99.97% at 0.003 microns Allergens filtration: 99.99%Virus & aerosol filtration: 99.9%UsabilityMin. sound level (Sleep mode): 34 dB Max. sound level (Turbo mode): 66 dB Automatic modeSleep modeManual speed settings: 4 (Sleep, Speed 1, 2, Turbo)Air quality feedback: Color ring, numericalAuto-ambient lightCord length: 1.8 mEnergy efficiencyMax. power consumption: 58 WStand-by power consumption: <2 WVoltage: 230 VConnectivityApp, connects via Wi-Fi: Clean Home+Smartphone compatibility: iPhone andAndroid devicesVoice control: Alexa, Google Home (7)Weight and dimensionsWeight: 8.6 kgDimensions (L*W*H): 295*295*657Color(s): White, SilverMaintenanceRecommended filter change: 3 years (6)Replacement filter: FY3430/30Service: 2-year worldwide guarantee* (1)From the air that passes through the filter, it is atheoretical time for one-time cleaning calculated bydividing its CADR 520 m³/h by the room size of 48 m³(assuming the room is 20 m² in floor area and 2.4 m inheight).* (2)CADR is tested by a certified third party lab,according GB/T18801-2015. Following improvements inour testing method and production quality control, weupgraded the CADR values of our products.* *If you buy a product where this info is not updated onthe box yet, rest assured that the product performs atthe higher specification mentioned online.* (3) Microbial Reduction Rate Test conducted at AirmidHealth group Ltd. tested in a 28.5m³ test chambercontaminated with airborne influenza A(H1N1).* An air purifier by itself does not protect against Covid-19, but can be part of plan to protect yourself and yourfamily (US Environmental Protection Agency)* (4)From the air that passes through the filter, testedwith NaCl aerosol by iUTA according to DIN71460-1.* (5)Microbial Reduction Rate Test at external lab, in atest chamber contaminated with avian coronavirus (IBV)aerosols, with Philips HEPA NanoProtect filter.* (6)The recommended service life for the device is basedon a theoretical calculation of the average annualregional values of harmful air particles outdoors anddaily use of the air purifier for 16 hours in automaticmode.* (7)Tested on the filter media for 1 pass efficiency at5.33cm/s air flow, by a third party lab./From the air thatpasses through the filter, tested to JISB 9908-2015* (8)Alexa and Google Home availability depends onyour location© 2021 Koninklijke Philips N.V.All Rights reserved.Specifications are subject to change without notice. Trademarks are the property of Koninklijke Philips N.V. or their respective owners.Issue date 2021‑05‑12 Version: 5.0.1EAN: 08 71010 39502 95 。
空气净化器的使用和维护
来源:机械论坛( )
空气净化器是用来净化室内空气的小型家电产品,主要解决由于装修或者其他原因导致的室内空气污染问题。
依据种类不同,空气净化器使用、维护有很多专业要求:
1、 初次使用应在室温条件下放置半小时后再开机使用。
2、 使用环境温度低于10-40度。
3、 使用温度低于40度的清洁水。
4、 机器工作时远离其它家电产品。
5、 请勿在水中加入非专业生产线或监制的添加剂。
6、 请勿将加湿器放置于空洞的物体上,以免产生共频共振噪音。
7、 请勿在无水状态下开机。
[
8、 空气净化器的进风口有粗效滤网或集尘网,要注意经常清洗,洗净后自
然干燥,以免产生放电声响。
9、 使用空气净化器要注意定期更换滤芯,更换滤芯的时间要根据产品实际
使用时间来确定。
10、 查看产品说明书有什么注意事项。
比如使用二氧化氯型甲醛清除剂放
在衣橱内吸附甲醛时,其可能产生氧化气体会使挂在衣橱中的靓丽衣物颜色褪色。
11、 要看看需不需要商家配合施工或使用,比如一些光触媒涂料,它是需
要专业人员采用特殊器具才可以喷涂使用,不然是无法完全发挥其使用效果的。
12、 负离子是模拟自然界空气离子化的原理来制的,它在空气中寿命很
短,因此出口应尽量靠近人的呼吸带。
13、 在负离子发生的过程中,由于静电作用,周围环境易积尘,应及时擦
拭掉。
文章来源:/thread-176670-1-1.html。
空气净化器的使用方法及注意事项现代社会的空气质量受到了越来越多的关注,空气净化器作为一种能够净化室内空气的电器产品也越来越广泛地使用。
但是,如何合理地使用空气净化器,才能够发挥其最大的效果?下面,本文将为大家详细介绍空气净化器的使用方法及注意事项。
一、如何正确使用空气净化器?1.选择合适的空气净化器空气净化器的品牌和型号繁多,用户在选择时应根据自己的实际需求,选择适合自己的型号。
一般来说,选择空气净化器时应考虑以下几个因素:(1)CADR值:CADR值是衡量空气净化效果的重要指标,一般来说,CADR值越高,净化能力越强。
(2)空气净化器的过滤技术及过滤效能:不同品牌、不同型号的空气净化器采用的过滤技术也不同,有些采用的是静电集尘技术,而有些则采用的是HEPA过滤技术,购买时选择适合自己的过滤技术。
(3)噪音水平:噪音水平也是考虑的一个因素,购买时选择噪音水平较小的空气净化器。
2.正确放置空气净化器放置空气净化器无疑是使用空气净化器的第一步,正确地放置空气净化器才能够保证净化效果的最大化。
一般来说,空气净化器应选择离窗户、门口等空气流动频繁的地方并放置离地面30厘米以上的高处,能够使净化器的净化效果能够覆盖到整个房间。
同时,注意不要将空气净化器放在过靠近灯照射的位置,否则会影响净化器的工作效果。
最好把它放在阳台或靠近墙壁的角落。
3.使用空气净化器在使用空气净化器时,应按照说明书的指导进行操作,一般来说开机前要先将窗子关起来,并且把房间内的电器设备一并关掉,以保证空气净化器的优秀效果。
空气净化器的净化速度有快有慢,有些空气净化器需要一段时间以达到较好的净化效果。
因此,不建议在室内开窗通风,也不建议在空气中喷雾香气。
从安全的角度来看,最好将空气净化器一直打开以达到最好的效果。
二、空气净化器使用过程中需要注意的问题1.空气净化器使用时间一些用户在使用空气净化器时,为了追求室内空气质量的完美,而过度使用空气净化器。
LOGO智能空气净化烟灰缸使用说明书产品简介:本品采用国际领先的负离子净化技术:高纯三原离子技术,通过负电荷的三原离子体和空气中正电荷的三原离子体相结合,瞬间分解有害物质,从而达到快速净化的目的。
具有除烟、除霾、除菌等效果。
本品工作时无需添加任何消耗品,整个净化过程无污染、无残留物,噪音更低,运行更可靠,可连续不断净化空气。
产品清单:外包装盒×1USB充电设备×1产品使用说明书×1产品参数:产品尺寸:100*70*50mm(待定)产品重量:300g(待定)工作电压:5V(待定)额定功率:8W(待定)电池容量:5000mAh(待定)开关方式:触屏开关工作指示灯:支持产品主要部件分解图:1.外盖2.石英表3.触屏开关4.蓝光工作指示灯-电源5.蓝光工作指示灯-风速16.蓝光工作指示灯-风速27.蓝光工作指示灯-风速38.出风口B充电孔操作说明:1.净化模式:打开盒盖,按下触屏开关键,蓝灯亮即为设备开始工作。
再次按下触摸屏即为关闭净化模式。
设备工作时,风速可调节1-3档,请根据实际情况酌情调节。
2.充电方式:使用设备配套USB充电线,一端插入智能空气净化设备,另一端插入电源即可。
充电时,黄灯亮起为充电中,绿灯亮起为充电结束。
温馨提示:1.负离子因带有负电,请放置距离电器30cm外使用;2.使用时请远离盛水容器,水是导体,影响负离子净化效果;3.请勿使用非指定的电源线,否则可能会导致触电事故或火灾;4.使用时,请确保通风口通畅无遮挡,以确保设备正常运行;5.请勿将设备置于高温及火源附近区域;6.请放置在儿童无法触摸的地方。
服务保障:1.购买此商品后,凭购买凭证可享受7天无理由退款服务;2.非人为原因造成的损坏,30天内我公司免费为您换新一次;3.本商品保修期为365天,如需维修,请联系客服并出示购买凭证。
AC4373AC4375用户手册扫描二维码,按照屏幕上的说明进行下一步操作。
或目录1 重要事项12安全12 2 您的空气净化器13总体说明14 3 使用入门15安装过滤网15首次设置 Wi-Fi 连接16在网络已更改时设置 Wi-Fi连接17 4 使用空气净化器18开启空气净化器18了解空气质量指示灯19设置空气质量感应器的灵敏度19选择风速20设置定时器20启用儿童锁21夜间模式21打开或关闭 Wi-Fi 21出厂重置22 5 清洁空气净化器23清洁空气净化器23清洁空气质量感应器236 清洁预过滤网257 更换过滤网27重置过滤网锁29 8 故障排除309 保修与服务32订购部件或附件32 10 注意事项32电磁场 (EMF) 32回收321 重要事项安全使用产品前请仔细阅读本使用说明书,并妥善保管以备日后参考。
危险•切勿让水或任何其它液体或易燃性清洁剂进入产品,以免发生触电和/或火灾。
•切勿用水或任何其它液体或(易燃性)清洁剂来清洁产品,以免发生触电和/或火灾。
警告•在将产品接通电源以前,首先确认产品背面或底部所标示的电压是否与当地的电压相符。
•如果电源软线损坏,为避免危险,必须由制造厂或其维修部或类似的专职人员来更换。
•如果插头、电源线或产品本身受损,请勿再使用本产品。
•本产品不打算由肢体不健全、感觉或精神上有障碍或缺乏相关经验和知识的人(包括儿童)使用,除非有负责他们安全的人对他们使用本产品进行监督或指导。
•应照看好儿童,避免他们玩耍本产品。
•不要让儿童在无人监督的情况下进行清洁和保养。
•请勿堵塞进风和出风口,例如不要将物体放置在出风口上或进风口前方。
注意•本产品不能替代正常通风、日常吸尘或者在烹饪时使用的抽油烟机。
•如果连接产品的电源插座接触不良,则产品的插头可能会变得很热。
确保所连接的电源插座接触良好。
•一定要在干燥、稳固、平整且水平的表面上放置和使用本产品。
•产品的后侧及两侧均要留出至少20 厘米的空间,产品上方至少要留出 30 厘米的空间。
空气净化器的使用方法空气净化器是一种能够过滤空气中灰尘、细菌、病毒、花粉和异味等有害物质的电器产品。
它通过吸入室内空气,经过过滤和净化后释放净化后的空气,提供给人们一个清洁、健康的室内环境。
那么,如何正确使用空气净化器呢?首先,选择适合的空气净化器。
市场上有很多品牌和型号的空气净化器,消费者可以根据自己的需求和预算选择适合自己家庭的净化器。
一般来说,家庭空气净化器的空气净化能力应该与房间的面积相匹配,能够有效覆盖房间的空气污染物。
此外,净化器的噪音也是一个需要考虑的因素,尽量选择噪音小的产品。
在使用空气净化器之前,需要将房间的门窗关闭,确保室内空气流通时不会受到外界的污染。
同时,及时清理房间内的灰尘,保持环境整洁,减少空气中的污染源。
对于有过敏体质的人群,空气净化器的使用更加重要,可以帮助过滤室内空气中的过敏原,减少过敏反应的发生。
接下来,正确放置空气净化器。
将净化器放置在房间中心位置,不要与墙壁或其他大型家具太靠近,保持一定的空间让它吸纳空气。
净化器的进风口最好不要靠近门窗或者其他容易吸入污染物的地方。
同时,不要在空气净化器周围摆放物品,以免阻碍空气流动。
使用空气净化器时,要注意合理调节净化器的工作模式。
根据实际情况选择自动模式、舒适模式或者睡眠模式等不同功能。
自动模式下,净化器会根据室内空气质量自动调节风速和工作时间;舒适模式下,净化器会在低噪音的情况下进行工作,确保用户的舒适体验;睡眠模式下,净化器工作噪音更低,给用户一个静谧的睡眠环境。
此外,还可以根据需要调节净化器的定时功能,设定净化器工作的时间段。
定期保养和维护空气净化器也是很重要的。
经常更换空气净化器的滤芯,一般建议每3个月更换一次,如果家庭成员有特殊需求,如过敏体质,滤芯更换的频率可以更快一些。
及时清洗净化器的外壳,以保持净化器的整洁。
同时,定期检查和清洗净化器的其他部件,如进风口和出风口等。
如果空气净化器出现故障,需要及时维修或更换。
kj306-j说明书
1、接通电源
打开空气净化器电源开关,当电源开关指示灯亮了说明已经开启。
2、速净模式
当开始开启空气净化器时,可以使用这个模式快速的净化掉空气中的污染物。
3、智能模式
使用速净模式净化后可以开启智能模式,当智能模式启动后,它会根据室内空气的质量来自动调节风速,这个模式下比较方便快捷,不需要任何操作。
4、睡眠模式
当我们晚上需要睡觉时,可以将空气净化器调节到睡眠模式,它就会以较小的功率运行。
5、风速调节
如果我们想调节史密斯空气净化器的风速,只需要按下风速键位就可以变换风速,通过重复按下风速键可以调节风速,一共有三挡,分别是低速、中速、极速。
6、PM2、5和气体检测
显示屏中两个比较大数值代表着PM2、5和空气气体检测的数值,它会根据数值显示出不同的颜色,红色表示空气质量比较差,橙色表示空气质量中等,黄色代表空气质量良好,蓝色代表空气质量优秀。
7、更换主滤芯
当主滤芯的消耗显示进度红灯亮时,说明需要更换主滤芯了,操作非常简单,只要打开盖子,任何提起旧的滤网,然后对其放下新滤网。
8、更换初滤网
当初滤网显示寿命红灯亮起时,更换初滤芯就可以解决问题,更换步骤是打开盖子,然后取出旧滤芯,在将新的滤网换上即可。
如何使用空气净化器使用空气净化器是一种有效改善室内空气质量的方法,尤其对于城市中的居民来说,它可以过滤室内空气中的污染物,如灰尘、花粉、细菌、病毒等,从而减少人们的过敏反应和嗓子痒、流鼻涕等不适症状。
但是,如何合理、有效地使用空气净化器却是很多人关心的一个问题。
下面就从多个方面来介绍如何使用空气净化器。
一、选择合适的空气净化器首先,选择一台适合自己家庭的、可靠的空气净化器是很重要的。
市面上已经有很多品牌的空气净化器,而我们应该考虑的是空气净化器的洁净度、净化效率、噪音和能耗等方面。
我们可以通过阅读产品说明、用户评价、比较不同品牌及型号之间的差异来选择一款适合自己家庭使用的空气净化器。
二、安装空气净化器安装空气净化器是关于使用它的一项关键步骤。
通常,我们需要将空气净化器放置在空气流动良好的地方,保持与墙面和其他物品的距离一定。
此外,我们需要检查是否有适当的空气流动,在此基础上确定最佳放置位置。
这样可保证空气净化器能够实现最佳的过滤效果。
三、了解空气净化器的滤网类型空气净化器通常有不同类型的滤网,如普通滤网、HEPA滤网,和活性炭滤网等,这些滤网也有一定的过滤效果和使用寿命等。
因此,在选用空气净化器时,了解不同滤网的过滤效果和使用寿命是很重要的。
我们可以通读产品说明和购买建议,然后根据我们的需求选择一个合适的滤网类型。
四、空气净化器常规维护空气净化器也需要一定的维护。
通常,我们应该将空气净化器主体外壳和滤网清洁空气净化器的有效使用时间通常是6-12个月,在此期限内应定期更换滤网。
此外,空气净化器还需要定期消毒抗菌,以保持空气质量的控制。
五、保持室内通风空气净化器不仅应该作为室内空气质量改善的一种手段,同时我们还应该关注室内通风。
通风可以让室内空气更好地流通,从而使室内空气更加清新。
开窗、使用室内空气循环通风设备等,都是可以让室内空气更加清新的方法。
在使用空气净化器的过程中,我们还需要注意:空气净化器不能完全代替室内空气的全面清洁,因此,我们还需要控制室内污染源的如使用烹饪时,开启烟囱、放置烟灰缸等行为会对空气质量产生负面影响。