U3S_MP教程
- 格式:doc
- 大小:628.00 KB
- 文档页数:26
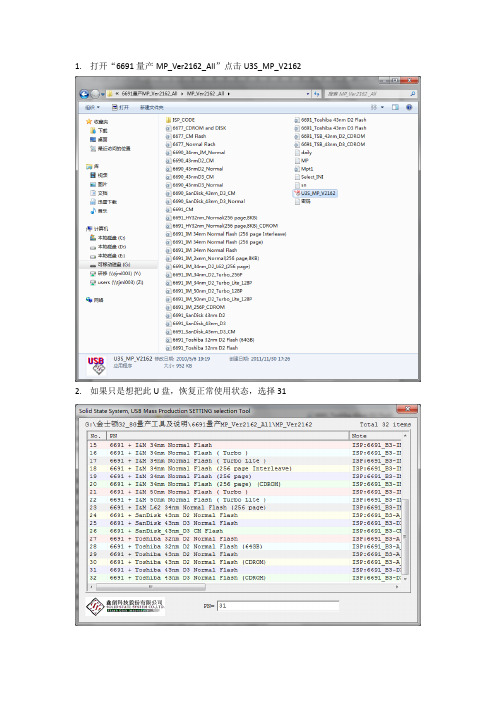
1.打开“6691量产MP_Ver2162_All”点击U3S_MP_V2162
2.如果只是想把此U盘,恢复正常使用状态,选择31
3.如果想量产出带ISO文件的CD-ROM来,就选32,不过在选32之前,需要相对应的INI
配置文件,文件名为“6691_TSB_43nm_D3_CDROM.ini”
4.双击打开“6691_TSB_43nm_D3_CDROM.ini”文件,之后更改你要添加的ISO文件
的位置及文件名,然后保存关闭。
(但要注意,存放的目录位置里不能有“中文字”,只能是“英文”路径)
默认打开时状态:
更改后状态:
5.下一步,就可以开始量产了,打开以下这个窗口后,直接点击”Start”就可以啦~~~(如果
量产过程中提示失败,可以再次点击“Start”重新量产,直到成功为止)
6.成功后,把U盘拨下,再插回去就可以正常看到CDROM了。

慧荣SM32x主控最新量产工具V1.17.42 H1029 (20081101发布) /read.php?tid=65117SM324BC+K9W SLC FLASH专用版量产工具(20081022发布)/read.php?tid=60187SM3251_321CC_DG_针对黑片的最新量产工具V1.17.40 (20081008发布)/read.php?tid=59116SM32X量产工具H0828版/read.php?tid=57092慧荣SM32x主控最新量产工具V1.17.38 H0821/read.php?tid=51044SM32X量产工具H0328汉化版/read.php?tid=30538SM32X量产工具H0229(V1.17.20汉化版)/read.php?tid=27371SMI SM32x H20080109量产修复工具简体中文汉化版/read.php?tid=272232008年首版SMI H0109量产工具及FLASH支持列表/read.php?tid=27218SM32x量产工具G2*******汉化版-每个字都是手工输入的,望支持/read.php?tid=25553SM32x量产工具G1219汉化版/read.php?tid-25553.htmlSM321&SM323 U盘量产修复工具下载,适用朗科U盘/read.php?tid=3970SMI32X主控U盘量产修复程序下载/read.php?tid=5811SM321最新版本1.7量产工具(支持多种芯片)/read.php?tid=15377最新惠荣SMI SM223 CF卡量产工具,支持SSD固态硬盘量产!/read.php?tid=52025群联Phison方案群联Phison UP10 UP12 UP13 UP14 u盘量产工具V1.06官方版本Phison PS2233 量产工具v1.03 破解版支持自定义VID PID【仅发数码之家】/read.php?tid=65779PS2233量产工具V1.03数码之家首发/read.php?tid=61127PS2232(UP13/UP14) MP TOOL V1.05.00新鲜版(目前最新)/read.php?tid=60779&fpage=3群联UP13/14(PS2232)最新量产工具放出(版本号奇怪,为1.0.20.3,不是1.96往后排)! /read.php?tid=60541Phison UP13/UP14/UP12量产工具V1.96/read.php?tid=31113PHISON UP12(PS2231) &UP10(PS2136)量产工具V1.89/read.php?tid-20398.html群联phison 2143-2134系列U盘量产格式化修复程序下载V1.28/read.php?tid=5806群联phison UP8-R 主控U盘量产格式化工具下载V2.0/read.php?tid=5800PHISON UP8-Y 专用量产工具V1.65/read.php?tid-18943.html群联UP10(PS2136)、UP11低格工具/read.php?tid=15433phison UP10主控U盘量产修复工具下载v1.78,感谢zhby9462提供/read.php?tid=6984群联Phison最新版量产工具V1.81 适用于PS2136(UP10)等主控/read.php?tid=15046群联Phison UP12 (PS2231)量产修复工具V1.85/read.php?tid-17925.htmlPNY U盘修复工具Pretest v1.11(群联)/read.php?tid=16858群联Phison UP10低格工具 1.30.0.0版下载/read.php?tid-23352.html群联Phison UP14(PS2232)主控u盘加密工具!/read.php?tid=60599群联Phsion UP10 ~14(PS2232)u盘主控最新加密工具V2.64中文版。

Unity3D教程:动画系统教程(一)Unity的动画系统非常的灵活强大,动画系统支持动画融合、混合、叠加动画,行走循环的时间同步,动画层,控制动画的各个方面,以及支持基于物理的布娃娃系统和程序动画。
这里做个笔记文章,记录整个从0开始使用Unity的动画系统。
下载官网的CharacterAnimation例子里面带有3个动画模型,以及这三个模型的简单调用的例题。
这里例题中包含三个基本的数据模型,Goober是一个简单的小丑,Robot则是一个机器人战士,Soldier是一个人类战士。
Unity3D教程:动画系统教程(一)在自带的动画模型里,除了模型Robot以外,还包含了很多@XXX结尾的动作,我们调用的时候,只需要按照@后面的动作名称调用即可。
1)新建一个场景,创景地形,并且将Robot模型拖到场景中。
Unity3D教程:动画系统教程(一)这个时候的场景中是没有任何代码的,直接运行场景,你就能看到这个模型在运行“idle”动作。
Unity3D教程:动画系统教程(一)看来Unity不但自己加载了模型,而且识别出了动作,自动调用了待机动作。
为了防止Unity自己的动作影响到我们的代码操作,在开始的时候我们就把默认动作关闭。
创建一个JS脚本,加入如下代码:function Start (){animation.Stop();}<!--DVFMTSC-->在动画播放方式上,Unity有两种方法,一种是Play(),这种方式的动画没有任何混合,直接播放动作,这样的动作看起来比较生硬,而且在Unit用的官方文档里建议个别动画可以使用Play()方式播放,那似乎是不建议使用Play来播放动画;另外一种是Animation.CrossFade。
这是一种再带混合的动画播放模式,他可以让动画逐渐变化,而不是生硬的切换。
Unity3D教程手册这就是动画融合的用武之地。
在Unity同一个角色可以拥有任意数量的动画。
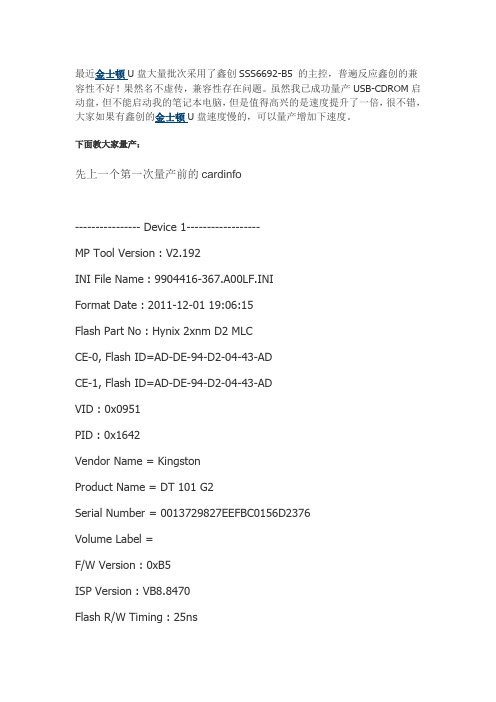
最近金士顿U盘大量批次采用了鑫创SSS6692-B5 的主控,普遍反应鑫创的兼容性不好!果然名不虚传,兼容性存在问题。
虽然我已成功量产USB-CDROM启动盘,但不能启动我的笔记本电脑,但是值得高兴的是速度提升了一倍,很不错,大家如果有鑫创的金士顿U盘速度慢的,可以量产增加下速度。
下面教大家量产:先上一个第一次量产前的cardinfo---------------- Device 1------------------MP Tool Version : V2.192INI File Name : 9904416-367.A00LF.INIFormat Date : 2011-12-01 19:06:15Flash Part No : Hynix 2xnm D2 MLCCE-0, Flash ID=AD-DE-94-D2-04-43-ADCE-1, Flash ID=AD-DE-94-D2-04-43-ADVID : 0x0951PID : 0x1642Vendor Name = KingstonProduct Name = DT 101 G2Serial Number = 0013729827EEFBC0156D2376Volume Label =F/W Version : 0xB5ISP Version : VB8.8470Flash R/W Timing : 25nsChannel : Byte ModeHomogeneous Mode : OnHID Function : DisablePlanes(F/W) : 2Pages/Block : 256 pagesMax Current : 100 mATotal Blocks : 8192Bad Blocks : 0Capacity : 31324016 Sectors, 16037896192 Bytes15662008 KBytes, 15294.93 MBytes, 14.94 GBytes第一次量产后的截图,上面设备序列号已经改变。

U3S_MP教程一、U3S_MP的基本原理U3S_MP是通过在电容电压型触摸屏上放置多个感应电极来实现多点触控的。
每个感应电极通过接地和外部电源形成一个电容,并与控制器相连。
当用户的手指或者其他导电物体接触触摸屏时,就会在感应电极产生电流变化,控制器通过对这些电流变化的检测,来确定触摸点的位置和数量。
二、U3S_MP的使用方法1.准备工作:a.安装U3S_MP控制器:将U3S_MP控制器连接到电容触摸屏以及适当的电源。
b.安装驱动程序:将U3S_MP的驱动程序安装到您的计算机上。
2.触摸点校准:在首次使用U3S_MP之前,需要进行触摸点校准,以确保准确检测到触摸点的位置。
a.打开控制面板,找到“触控板”或“触摸屏”选项。
b.进入触摸屏设置,并找到“校准”选项。
c.按照屏幕上的指示,用手指轻轻触摸屏幕上的几个标记点。
d.完成校准后,保存设置并退出。
3.多点触摸应用:当校准完成后,U3S_MP可以通过相应的应用程序实现多点触控操作,例如缩放、旋转、拖动等。
a.打开支持多点触控的应用程序,例如图片查看器或网页浏览器。
b.使用两个或更多的手指触摸屏幕,可以实现不同的操作。
c.根据应用程序的说明,通过手势控制进行多点触控操作。
三、常见问题解决方法1.触摸不灵敏或无法触发:a.检查U3S_MP的电源和连接线是否正常连接,并确保没有松动或损坏。
b.检查驱动程序是否正确安装,并且是最新版本。
c.检查触摸屏是否清洁,如果有污垢或油脂,可以使用干净的软布蘸取少量清洁剂轻轻擦拭。
2.触摸屏显示不准确或位置偏移:a.尝试重新校准触摸点,按照前面的步骤进行校准。
b.检查电容触摸屏是否损坏,如有损坏,需要更换触摸屏。
3.无法识别多个触摸点:a.检查驱动程序是否支持多点触控功能,并且是最新版本。
b.检查控制面板的触摸屏设置,确保多点触摸功能已启用。
总结:本教程介绍了U3S_MP的基本原理、使用方法和常见问题解决方法。
通过正确安装和配置U3S_MP控制器,进行触摸点校准,以及使用合适的驱动程序,您可以轻松地实现电容触摸屏的多点触控功能,带来更加便利和灵活的触摸体验。

由于本人比较懒,基本上混迹于问答板块与朋友们交流U3D开发很少发主题帖,由在这里准备写一些自己学习shader的一些经验与心得,然后与朋友们分享一些写sha 交流,欢迎指出错误之处)一:工欲善其事必先利其器首先推荐两本学习shader非常有必要而且很不错的书。
学习shader你首先应该必备一些写shader的语法支持GPU的编程的语法有三种微软提供的HLSL,OpenGL提供的GLSL,还有NVIDIA提供的Cg在这里推荐使用Cg因为Cg编写的Shader同时兼容Direct3D和OpenGL。
那么要怎么学好Cg语言呢?那么《 Cg教程---可编程实时图形权威指南》一定可以满足你的需求这是一本英译书,所以建议有点英语基础的小伙伴去购买英译版的然后自己理解,学习shader教程中比较不错的书《unity 3D ShaderLab开发实战详解》二:Shader原理及基础书本介绍完了那么首先来了解下shader的工作原理吧从字面意思来说shader翻译过来就是着色器,所以可以理解为给我们想要看见的道计算机的GPU就是为此服务的,而我们写shader的目的也就是告文章来自【狗刨诉GPU我们画在屏幕什么位置,什么颜色,什么形态等等。
他们的工作流程是:1.坐标系变换,(物体空间坐标->世界坐标->摄像机坐标->裁剪空间坐标)2.流水线图形,(着色顶点->图元装配->光栅化->插值,贴图,着色)3.unity3d渲染流程(固定关系和可编程管线的渲染)4.光栅操作(像素所有权测试->裁剪测试->alpha测试->模板测试->深度测试->混合这些之中与我们shader编程密切相关的就是第三点固定渲染管线这是标准的几何&光照(Transforming&Lighting)管线,功能是固定的,它控制着纹理混合。
T&L管线可以被渲染状态控制,矩阵,光照和采制参数。
unity3d入门教程Unity3D是一款非常强大的游戏引擎,它为开发者提供了丰富的功能和工具,帮助他们创建出令人惊叹的游戏作品。
下面是一个简单的入门教程,带你了解Unity3D的基本使用方法。
第一步:下载和安装Unity3D首先,你需要去Unity官网下载最新版本的Unity3D并进行安装。
安装过程很简单,只需按照提示进行即可。
第二步:创建新的Unity项目打开Unity3D,点击菜单栏上的“File”,然后选择“New Project”来创建一个新的项目。
在弹出的窗口中,你可以选择项目的名称和保存路径。
第三步:了解Unity编辑器一旦项目创建好了,你将会看到Unity的编辑器界面。
它由多个窗口组成,包括场景视图、层次视图、检查器视图等。
你可以根据自己的喜好进行调整和布局。
第四步:导入资源在创建游戏之前,你需要导入一些资源,比如模型、纹理、音频等。
点击菜单栏上的“Assets”,然后选择“Import Package”来导入资源包。
你也可以将资源文件直接拖拽到项目窗口中进行导入。
第五步:创建游戏对象游戏对象是Unity中的一个重要概念,它代表着场景中的物体或角色。
你可以点击菜单栏上的“GameObject”,然后选择“Create Empty”来创建一个空的游戏对象。
你还可以在“Hierarchy”视图中右键点击空白处,选择“Create Empty”来创建游戏对象。
第六步:添加组件游戏对象可以通过添加组件来增加功能。
比如,你可以给一个游戏对象添加刚体组件,使其具有物理效果。
点击游戏对象,在“Inspector”视图中点击“Add Component”按钮,然后选择你想要添加的组件。
第七步:调整场景你可以在场景中调整游戏对象的位置、旋转和缩放。
在“Scene”视图中点击游戏对象,然后使用移动、旋转和缩放工具进行调整。
第八步:编写脚本如果你想要给游戏对象添加更复杂的行为,你需要编写脚本。
点击菜单栏上的“Assets”,然后选择“Create”和“C# Script”来创建一个新的脚本。
金士顿G3 4G U盘量产教程(目前市面上最傻瓜的量产方法)量产软件名称:U3S_MP_V2162
用ChipGenius 检测主控芯片为sss6691
设备名称: [H:]USB Mass Storage Device(Kingston DataTraveler G3 USB Device)
PNP设备ID: VID = 0951 PID = 1643
设备序列号: 001CC07CEDA4F0811*******
设备版本: 1.00
设备类型: 标准USB设备 - USB2.0全速 (USB1.1)
芯片制造商: SSS(鑫创)
芯片型号: SSS6691
产品制造商: Kingston
产品型号: DataTraveler G3
1.解压Kinston+G3.rar 打开usb mp
2.选择第一个模式意思是量产成2个分区
3.其余的就别动了唯一的操作就是把你要量产的PE文件命名为WINPE.ISO 放在d盘根目录下
4.点击 start开始 50秒后弹出OK 拔插下U盘 OK!
特别说明一点:
你的U盘的【PNP设备ID: VID=0951 PID=1643】信息需要和
6691_Kingston G3 CDROM Flash.INI配置文件中的
VID=0x0951
PID=0x1643
一致才能量产成功,如果不一致,就需要修改为一致再量产;。
Unity3D基本操作教程(15分钟)由unity3dcn 于星期四, 12/24/2009 - 00:20 发表用Unity3D创建简单漫游1. 建模中使用的图片、文件、文件夹等以及模型中物体、材质等的名称都不能使用中文或者特殊符号,可以使用英文字母、数字、下划线等2. 调整Max的单位为米3. 烘培光影的设置4. 模型的中的植物效果,第一种是单面片植物,需要设置其轴心为其物体的对称中心;第二种是十字交叉的植物效果;第三种则是到Uni ty3D编辑器中通过地形编辑器系统添加基本设置5. Fbx导出插件下载地址:/adsk/servlet/item?siteID=123112&id=107758556. 将Max文件中用到的图片都拷贝到Textures目录下,如7. 再打开Max文件,导出为FBX文件,使用默认设置,FBX文件也放置在和Max文件相同的目录下,如导出的时候,可以将模型简单的分类,如地面、植被、楼房等,也可以将模型分为几个区域,如小区1,小区2,学校等等分开导出8. 将包含Max文件、Fbx文件和Textures文件夹的文件夹拷贝到Unity3D项目的Assets 目录下,如下图中红圈在下一次用Unity3D编辑器开启本项目的时候,编辑器将自动导入/更新该文件夹中的信息,并生成Materials文件夹,如9. 启动Unity3D编辑器10. 选择刚才拷贝进来的文件中的Fbx文件,如修改其中的Meshes下的Scale Factor和Generate Colliders,如点击其他Fbx文件或者单击其他区域将弹出如下的对话框点击Apply即可,类似的方式设置其他Fbx文件注意,其中植物/植被类的Fbx文件不需要设置Generate Colliders项11. 将Fbx文件直接拖放到Hierarchy区域,如12. 点击Hierarchy区域中的对象,同时将鼠标移动三维显示区域,同时点击键f,则该对象自动适配显示到三维区域中心,如13. 将全部fbx添加完成后,提高场景亮度如下单击Am bient Light,如下调整为即可设置完成14. 设置第一人称浏览删除场景中Main Cam era将Project区域的Standard Assets下的Prefabs下的First Person Controller拖到Hierarchy 区域中点选First Person Controller,调整First Person Controller的位置到场景中合适的位置,并设置其高度为1.37到2.1左右设置First Person Controller的高度在场景中地面之上15. 点击运行,即可测试修改视角控制键为右键16. 打开Project区域中的StandardAssets下的Cam eraScripts下的MouseLook脚本,在在Quaternion originalRotation;void Update (){if (axes == RotationAxes.MouseXAndY){// Read the m ouse input axis中添加一行代码修改为Quaternion originalRotation;void Update (){if(Input.GetAxis ("Fire2")==0) return;if (axes == RotationAxes.MouseXAndY){// Read the m ouse input axis如何取消浏览窗口上的右键菜单只要设置Unity对象的参数即可禁止右键菜单的显示,如下:<object id="UnityObject" classid="clsid: 444785F1-DE89-4295 -863A-D 46C3A781394"width="600" height="450"codebase="/download_webplayer/UnityWebPlayer.cab# version=2,0,0,0"><param nam e="src" value="MyDataFile.uni ty3d" /><param nam e="disableContex tMenu" value="true" /><em bed id="UnityEm bed" src="MyDataFile.uni ty3d" width="600" height="450"type="application/vnd.unity"pluginspage="/unity-web-player-2.x"disableContextMenu="true" /></object>植物效果设置17. 对于单面片的植物效果,需要设定其材质为Transparent/VertexLit类型,并为其添加公告板脚本设定前设置材质类型为Transparent/VertexLit类型,如下给单面片植物添加公告板脚本的方法是先选择该植物,然后点击菜单com ponent下的scripts下的cam era Facing Billboard即可,如下设置材质类型和添加公告板脚本后,如下如果没有该脚本组件,可以打开脚本编辑器,拷贝如下代码到脚本中,保存到Assets\Scripts下,命名为Cam eraFacingBillboard.cs即可using UnityEngine;using System.Collections;public class Cam eraFacingBillboard : MonoBehaviour{public Cam era cam eraToLookAt;void Start(){cam eraToLookAt = Cam era.m ain;}void Update(){Vector3 v = cam eraToLookAt.transform.position - transform.position;v.x = v.z = 0.0f;transform.LookAt(cam eraToLookAt.transform.position - v);}}18. 对于十字交叉的植物,需要将其材质设定为Nature/Vegetation Two Pass unlit类型设置前的效果设置后的效果水面效果的设置19. 创建一个网格面片20. 给该水面面片设置水材质和水脚本,如即可烘培光影贴图的处理21. Unity3D光影烘培的要求U3D的光影贴图使用的是3Dm ax中的标准材质的自发光贴图通道来存储光影贴图相关参数,如22. 给每个物体都附上贴图,如果是纯色物体,也付给纯色贴图23. 打光后,选择要烘培的物体设置输出路径添加烘培输出的贴图类型添加“LightingMap”类型设置烘培贴图大小和目标贴图位置为“自发光”设置烘培材质,选择“输出到源”点击“渲染”即可24. 标准材质贴图的烘培光影处理a) 物体据有标准材质b) 烘培渲染后,物体具有两个贴图c) 导出Fbx即可25. 多重子材质贴图的烘培光影处理a) 物体据有多重子材质贴图b) 渲染烘培后每个子材质都据有两个贴图c) 选择该物体,执行“多维材质2标准材质.m s”脚本,将该多维材质物体按其材质数量分解为标准材质的多个物体,新物体的名字以“原多维材质物体名字~其材质名称”命名,如点击“开始转换”,则将该物体从多维材质物体按期子材质分解为多个具有标准材质的物体d) 将全部的具有多维材质类型的物体分解完成后,即可导出26. 多个物体使用同一贴图的烘培光影处理因为我们在导入fbx文件到Unity3D编辑器中的时候,使用的都是按贴图来生成材质文件,所以多个物体使用同一贴图时会发生错误,修改其中任何一个的材质设置时,其他的使用该贴图的物体都会受到影响,解决的方法便是在Unity3D编辑器中生成一个具有该贴图的新材质,然后重新付给当前物体。
unity3d教程Unity3D教程 - 创建第一个游戏首先,我们来创建一个新的Unity项目。
打开Unity编辑器,点击"New Project"按钮,然后输入项目名称并选择项目保存的路径。
点击"Create"按钮确认创建项目。
等待Unity编辑器打开新项目后,我们可以开始创建我们的第一个游戏场景。
点击"Assets"菜单,选择"Create" -> "Scene"创建一个新的场景。
接下来,我们需要向场景中添加一些游戏对象。
点击"Hierarchy"面板上的"+"按钮,选择"3D Object" -> "Cube",将一个立方体添加到场景中。
现在,我们需要为立方体添加一些组件以使其具备一些基础功能。
点击"Inspector"面板,在"Add Component"输入框中搜索并选择"Rigidbody"组件。
这将为立方体添加一个刚体组件,使其具有物理碰撞和运动的特性。
此外,我们还可以为立方体添加一些脚本以实现更复杂的逻辑。
点击"Add Component"输入框,搜索并选择"Script"。
在弹出的对话框中,输入脚本名称并点击"Create and Add"按钮。
这将创建一个新的脚本,并自动将其添加到立方体上。
现在,我们可以打开刚创建的脚本,在其中编写我们的游戏逻辑。
在脚本中,我们可以通过Unity的API来访问和控制游戏对象的属性和行为。
最后,点击"Play"按钮以启动游戏运行。
你将能够在场景中看到立方体,并且应用刚刚编写的脚本中的逻辑。
这只是一个简单的Unity3D教程,帮助你创建并运行一个基础的游戏场景。
3S-66X X U S B F l a s h D i s kM P T o o lU s e r M a n u a lMP Version:V2.153Document Version:V1.01Editor:Henry Lo Date:2009/12/9INDEXINDEX (1)I.Basic of MP (2)II.Procedure of MP (3)III.MPT1 Setting for MP (12)IV.Configuration File for MP (15)V.Error-Code List (23)VI.MP Flow (25)I. Basic of MPThe MP tool of 3S USB Flash Disk is used to format the pen driver designed by Solid State System Corporation. It also provides the function for flash-disk manufacturer to set the parameters to meet the design targets. Some files are essential and listed for MP tool as below.(1) ISP_CODE:The folder which involves the F/W ISP-Code(2) CONFIGURATION FILEA file, which records the parameters and path to meet the configuration of DUTs, isessential. The file name is strongly recommended being named with the attributes of flash type, 3S-controller, firmware version, and so on, in case of a great number of INI-file existences.EX:6691_43D3_V A206-6691:Part number of 3S-Controller-43D3:Process of flash supported-V A206:Firmware version used(3) MPT1.INI:A file, which provides the options for MP tool(4) MP TOOLDouble click the MP icon to launch the MP Tool. The software would read MPT1.INI and the configuration file selected by users to get all parameters ready. Naming rule of MP Tool is U3S_MP_MPVersion, such as U3S_MP_V2150.《Folder & File for MP》II. Procedure of MPMP steps would be divided into two sections :The first one is must-do to complete the disk formatting, and the second one is to provide functions for users to get realized what MP program did and more detailed format information about flash equipped.Step1:Double click the MP icon to launch MP tool.Step2:Choose the specified configuration to get the appropriate setting for DUT.Step3:After selecting the configuration, the UI would show up as below.- Setting-Mode = 6 (refer to MPT1 setting for details.)ISP information from Configuration FileInformation of Detected DeviceStart & StopButton Information of Card & MP Extra Function& Setting MP-TimesCounting & ResetClockError Code Look-Up Table- Setting-Mode = 8 (refer to MPT1 setting for details.)※ In order to precisely find the location out, please make sure of connectingDUTs via hub if the mode is set to 8.Step4:Plug-in the device, which needs formatting, and then the disk would be detectedautomatically and listed by order onto the field of Device Information.ISP information from Configuration File Information of Detected DeviceError Code Look-Up TableStart & Stop Button Information of Card & MP Extra Function & SettingMP-TimesCounting & ResetClockDetected DevicesDisk-H :Disk Label (0xB3):FW VersionTwo devicesStep5:Click the START button to start MP, and wait until the completion.The following steps are not necessary for MP process. Just in case the detailed information is required, there are several functions are always active to provide the further data and do some modifications. Step6:ReportingClick the …Report ” icon to read the report, which records the information of flash and system over MP. Here is the example of report.Completion & Display the Disk Size for EachThe overall result is “OK ”.Two devices formattingare counted.Check to enable the soundafter MP completion.Device 1:0xB3MP Version:2.150INI_File_Name:6691_43D3_V A206.INIRandom delay 0 msec--- Download MP ISP ---CE-0, Flash ID=98-D5-98-B2-76-54-0A-04Found BACKUP Table (00000159-0001)Defect Table (00000400-0004)Original Bad Block - 0:0x00AEOriginal Bad Block - 0:0x00F7Original Bad Block - 0:0x0115Original Bad Block - 0:0x0307Original Bad Block - 0:0x0309Original Bad Block - 0:0x030AOriginal Bad Block - 0:0x037EOriginal Bad Block - 0:0x0397Original Bad Block - 0:0x03EAOriginal Bad Block - 0:0x04D4Original Bad Block - 0:0x04DBOriginal Bad Block - 0:0x051FDefect Table shows 1392 Good blocks, 12 Bad blocks SafeErase (0,1404)Erase failed Block - 0:0:0x00AEErase failed Block - 0:0:0x00F7Erase failed Block - 0:0:0x0115Erase failed Block - 0:0:0x0307Erase failed Block - 0:0:0x0309Erase failed Block - 0:0:0x030AErase failed Block - 0:0:0x037EErase failed Block - 0:0:0x0397Erase failed Block - 0:0:0x03EAErase failed Block - 0:0:0x04D4Erase failed Block - 0:0:0x04DBErase failed Block - 0:0:0x051F---> Max Bad of Plane (5,7)---> Max BAD/DIE = 7Total good blocks after SCAN: 1392 / 1404, Bad block=12==> 2-Plane modeMax. Bad Block Allowed = 79(12)Adjust Max LBA = 3913728, 3913664MaxWindows=1/1274, MaxLBA=3913664, Size=1910 MBMax BAD of one plane is 7 (39),1404,1,1RootSector=0x21E,Sec/Cluster=64, SuperPage=32 ---> Alignment=2Boot Block=0x0001,0x0002Lun0(3913664), Lun1(0), Public=3913664, Secure=0, CDROM=0Special FE Config = 54-0B-00Defect Table Block=0x0004--- Download ISP Code:C:\DOCUMENTS AND SETTINGS\UPTON\ DESKTOP\3S-MP\ISP_CODE\6691_B1-D3_20090527_V A206_434C.BIN--- --- ISP Code installed.Lun0(3913664), Lun1(0), Public=3913664, Secure=0, CDROM=0Public,Secure,CDROM = 3913664,0,0SN=001FD0D46C92F9B0D0650AE9=== Preformat Done ===Low Level Format DONEStore INI/ERROR MSG to Block-0x0001:119.Total=3913664,CDROM=0, PublicArea=3913536, SecureArea=0Create SECURE(CDROM=0,Public=1910 MB,Secure=0 MB)--- T2 start ---FW version is: 0xB3Vendor ID is:0x0C76Product ID is:0x0005Vendor=3SYSTEMProduct=USB Flash DiskDevice capacity : 0 > 19568 > 0DOS V olume=Device is formatted.--- T2 is done ---Total Capacity: 3913664 sectors, 1910 MBytesElasped Time = 00:00:04Step7:Card-InfoClick the …Card Info‟ icon to read the information recorded onto the flash after MP. Here is the example of card-info.---------------- Device 1------------------MP Tool Version : V2.150INI File Name : 6691_43D3_V A206.INIFormat Date : 2009-11-13 14:06:58Flash Part No : Toshiba 43nm D3 MLCCE-0, Flash ID=98-D5-98-B2-76-54-0AVID : 0x0C76PID : 0x0005Vendor Name = 3SYSTEMProduct Name = USB Flash DiskSerial Number = 001FD0D46C92F9B0D0650AE9V olume Label =F/W Version : 0xB3ISP Version : V A2.0600Flash R/W Timing : 25nsChannel : Byte ModeHomogeneous Mode : OnHID Function : DisablePlanes(F/W) : 2Pages/Block : 192 pagesMax Current : 100 mATotal Blocks : 1404Bad Blocks : 12Capacity : 3912512 Sectors, 2003206144 Bytes1956256 KBytes, 1910.41 MBytes, 1.87 GBytesStep8:SettingClick the …Setting‟ icon to set the parameters for MP, including Disk Information, Disk Capacity Limitation, Boot & Partition Setting, and Read/Write Test.This function is protected by a default password, 5526568. Enter this password to modify the setting of disk and its capacity, and to enable or disable the read/write test.Press the button OK of authentication-window when the password is typed correctly. After authentication, the setting would be turned on for user to modify the parameters of MP according to the real demands.Step9:Enable Blinking TestClick the …Enable ‟ icon to enable the blinking test of access LED.Set Disk Information by requests.The setting field isn ’t supported.Enable/Disable the testfunction and its parameters of testing On Every Block. (Only for 2013!)calculated automatically.Formula between Capacity and Boundary :n-MB = m ×100KB (m=n ×1024/100)Set Boundary :Set the boundary by requests.Step10:Reset CounterThere is a function to count how many devices have been formatted by MP, and the time passed and failed would be counted respectively as well. Click the …Reset‟ icon to reset the value to zero.RESETIII. MPT1 Setting for MPThere are four categories parameters within MPT1 and the most common settings are listed as follows. The necessity of parameters depends on the DUTs.(1) Category - INISetting_Mode = n Mode selectionn=6:None port alignment moden=8:8-Port alignment modeEnableMouseSelect = n Mouse function at selection menun=0:Disablen=1:Enable(2) Category - OPERATORDUTs = n Maximum number of DUT (for Setting_Mode=6)n>8:Using 16-DUT screenn<=8:Using 8-DUT screenT1/T2 Function = n MP Function selection (for 3S Tester only)n=1:T1 onlyn=2:T1+T2SOUND_ENABLE = n Sound effect (Default n=0)n=0:Disablen=1:EnableShowPhysicalDiskSize = n Show Physical Disk Size (Default n=1)n=0:Disable (1MB = 2048 sectors)n=1:Enable (1MB = 2000 sectors)Note:After formatting successfully, the capacity would be displayed onto the field of the MP‟s UI.Language = n Language selection for display (Default n=0)n=0:Englishn=1:Traditional Chinesen=2:Simplified ChineseCurrentSN = xxxx Current SN, MP will update it all the time.(Only for SN_Format = 1 / 2 / 4 / 7)(3) Category - TESTERPOWER_ON_TIME = n Time to wait for device plugging-in after power on(Unit:ms) (Default n=10000)SUSPENDED_TIME = n Time to delay after suspend current check(Unit:ms) (Default n=30000)CHECK_SUSPENDED = n Check suspended current (Default n= 0)n=0:Disablen=1:EnablePOWER_CHECK_DISABLE = n Check power status (Default n=0)n=0:Enable (Error if Current>100mA)n=1:Disable(4) Category - ARCHAISM RegCleanCycle = n Cycle to clean the setting in the registry(Default n=1) (Suggestion n=500)Note :If several disks are tested by MP, the clean will remove all 3S removable disksettings in the registry to avoid the system from being unstable under the situation of too many settings are recorded in the registry.《Example of MPT1 File 》 [TESTER]POWER_ON_TIME=30000 SUSPENDED_TIME=2000 POWER_CHECK_DISABLE=0 CHECK_SUSPENDED=1 [ARCHAISM]RegCleanCycle=100[INI]Setting_Mode=6EnableMouseSelect=1 [OPERATOR] T1/T2 Function=1ShowPhysicalDiskSize=0 Language=0 DUTs=16SOUND_ENABLE=1 CurrentSN=2799IV. Configuration File for MPThere are three categories parameters under configuration and the most common settings are listed as follows. The necessity of parameters depends on the DUTs.(1) Category - OEMVENDOR_NAME=”3SYSTEM”8-character at most (Default = NULL)PRODUCT_NAME=”USB Flash Memory”16-character at most (Default = NULL)PN = XXXXXXX Part Number displayed on selection menuNote = XXXXXXX Note displayed on selection menuVersion = XXXXXXX Version displayed at the title bar onMP dialogVID = 0x0000Vendor ID (Default 0x0C76)PID = 0x0000Product ID (Default 0x0005)FAT32 = n Set disk format (Default n=0)n=0:auto mode-FAT when capacity < 2048MB-Otherwise, FAT32n=1:FAT32STRING_DESC_ENABLE = n S et the CIS table to enable device return USBstring descriptor to Host (Default n=1)n=0:Disablen=1:EnableBOUNDARY_CHECK = n (Unit:100Kbyte) (Default n=0; Disable)BOUNDARY_CHECK_LOW = n (Unit:100Kbyte) (Default n=0; Disable)Note:a. 1MB = 1024 / 100(100KB per unit)b. “BOUNDARY_CHECK” is used to set the upper-limit of the capacity, and“BOUNDARY_CHECK_LOW” is for low-boundary.FW_VERSION = n Set fixed FW version (Default n=0)n=0:Disable FW version checkn=x:Enable FW version checkDOS_Volume = USB Test Disk DOS volume (max. 11 characters) Note:The string is listed at the left-hand side of the drive letter for a disk under the windows explorer.SN_Format = n SN format (Default n=0)n=0:3S format 13-Byte (YYMMDDhhmmssX)YYMMDD → Year / Month / Dayhhmmss → Hour / Minute / SecondX → DUTn=1:TREK format 13-Byte (YYMMDDhhXxxxx)YYMMDD → Year / Month / Dayhh → HourX → DUTxxxx → Serial Numbern=2:KTCFE format 24-Byte (MACcYMDDtttxxxx)MAC → PC MAC address (12 char)c → SN Customer CodeYMDD → Year / Month / Dayttt → Tester Numberxxxx → Serial Numbern=4:Only serial format 13-byte (000000000xxxx)xxxx → Serial Numbern=5:Preformat flash without changing SN(for 2090/2091 only)n=6:Fixed string (for 2090/2091 only)String is set by SN_Fixed String=xxxxn=7:Biwin serial format 14-byte(FFFFFFFFFXXXXX) (for 2090/2091 only)FFFFFFFFF → Set by SN_FixedString=xxxxxn=8:Biwin random format 14-byte(YYMDDhhmmssSS) (for 2090/2091 only)YYMMDD → Year / Month / Dayhhmmss → Hour / Minute / SecondSS → DUTSN_INC = n Step to count up for SN (Default n=1)SN_CustomerCode = n Customer code (Default n = 0x0F)(Only for SN_Format = 2)n=0x0F → Kingstonn=0x0C → ToshibaTesterNo = n Used in 24-Byte USB SN (Default n=random#)(Only for SN_Format = 2)SN_FixedString = xxxxx SN fixed string (max. 24 characters)(Only for SN_Format = 6)PreCopyFolder = d:\123 Path of source files. MP copies files to diskand these files are verified by QC tool.RewriteTestFolder = d:\456 Path of source files. MP copies files to diskand these files are verified and deleted by QCtool.(2) Category – FEATURE_SETTINGFLASH_OP =”ALL123”Support all kinds of flash (Default = ”ALL123”)EraseAllFirst = n n=1:Erase all before MP. It‟s necessary for dice/waferform of flashn=2:Safe erase only without MP (for 2090/2091)(Default n=0 -> disable)SortFlash = n Specify how many sorted flashed are mounted(for 2090/2091 CM flash only)ID0 = “n”Set flash timing (Default n=”00”)“00”:Auto mode, set flash timing depends on numbers of flash“01”:Set flash timing to 1/2 (33ns-30MHz)“02”:Set flash timing to 1/3 (50ns-20MHz)“03”:Set flash timing to 1/4 (67ns-15MHz)“04”:Set flash timing to 1/6 (100ns-10MHz)“05”:Set flash timing (16ns-60MHz)“06”:Set flash timing (25ns-40MHz)Note:In auto mode, flash timing depends on CE #.0~3 → 40MHz4~7 → 30 MHz8 → 20MHzID4 = n IO Driving Currentn=0x00:2mA (Default for 2090 IM flash)n=0x01:4mA (Default for others)n=0x02:6mAn=0x03:8mAID17 = n Maximum Capacityn=0:Normal mode / Fixed size (Default)n=1:Maximum capacity mode / Variable SizeNote:ID17, ID18, ID19 and DiskSize-x are exclusive to set disk capacity.ID18 = n Maximum bad-block allowed (Default n=0)n=0:Use program defaultn=x:Maximum bad-block allowedID19 = n Fixed card size (Default n=0)n=0:Use program defaultn=x:Data block number (includes system block)n=-x:Disk size for user only (Unit:MB)ID28 = n Flash erase status check (Default n=1) (for all flash of2080 and only CM flash of 2090/2091)n=0:Disablen=1:EnableID32 = n Intel/Micron driving strength[b7:b4]=0000:Timing mode – mode0 (Default)[b7:b4]=0001:Timing mode – mode1[b7:b4]=0010:Timing mode – mode2[b7:b4]=0011:Timing mode – mode3[b7:b4]=0100:Timing mode – mode4[b7:b4]=0101:Timing mode – mode5[b3:b2]=00:RDY pull down driving – full[b3:b2]=01:RDY pull down driving – 3/4 (Default for 2091)[b3:b2]=10:RDY pull down driving – 1/2[b3:b2]=11:RDY pull down driving – 1/4 (Default for 2080)[b1:b0] : I/O driving[b1:b0]=00:(128-Page) full / (256-Page) over-drive2[b1:b0]=01:(128-Page) 3/4 / (256-Page) over-drive1[b1:b0]=10:(128-Page) 1/2 / (256-Page) nominal (default)[b1:b0]=11:(128-Page) 1/4 (default) / (256-Page) under-driveID34 = n Option of interleave mode (Default n=0)n=0:Disable interleaven=1:Internal interleaven=2:External interleaveID35 = n Homogenous mode (Default n=0)n=0:Disablen=1:EnableID36 = n Flash Latching timing (Default n=0)n=0:Falling edgen=1:Rising edgeID38 = n FT NAND test mode (for 2090/2091TSB D2/D3 only)n=0:Disable(Default)n=1:Test all steps (device ID change & all MLC test)n=2:Test MLC Test onlyNote:ID38, ID39, and ID42 are used to specify the items under test.ID39 = n FT NAND test mode2 (for 2090/2091 TSB D2/D3 only)Bit-0:Select MLC Test 1Bit-1:Select MLC Test 2Bit-2:Select MLC Test 3Bit-3:Select MLC Test 4(no support for Toshiba D3)Bit-4:Select MLC Test 5Bit-5:Select MLC Test 6(no support for Toshiba D2)Value of each bit:Bit=0 → No SelectBit=1 → Select (Default)ID40 = n Auto hub alignment mode for VID=0x0951 & 0x0930(for 2090/2091 only)n=0:Disablen=1:Enable (Default)ID41 = n Fixed disk mode (for 2090/2091 only)n=0:Disable, don‟t check fixed disk (Default)n=1:Enablen=2~255:Check fixed disk & MP to be a removable diskID42 = n FT rewrite device ID (for 2090/2091 TSB D2/D3 only)(Default n=0xD7)ID43 = n Cache number for turbo-lite mode (for 2090/2091 only)TSB-D2 → n= 0 ~ 20(Default)TSB-D3 → n= 0 ~ 13(Default)IM → n= 0 ~ 40(Default)ID44 = n Enable “sorting defect table check on CM flash” forVID=0x0951(for 2090/2091 only)n=0:Disablen=1:Enable (Default)ID45 = n Windows XP FAT16/FAT32 format (Default n=0)n=0:Disablen=1:EnableNote:1. For the disk of capacity less than 2GB, ID45=1 does XP FAT16 format on disk.2. For FAT32 XP format, it only supports 93% and 87% capacity. Other percentage settingwould cause an error.-FAT32 XP format with 93% capacity:Skip the setting of ID17, ID18, ID19, DiskSize-x, but only set ID45=1-FAT32 XP format with 87% capacity:Use ID19=n to set about 87.5% capacity and ID45=1(3) Category – ISPCODE= filename.bin ISP binary code(4) Category – SecureHID_Enable = n HID function (Default n=0)n=0:Disablen=1:Enable(5) Category – Auto Disk SizeDiskSize-x = n x = 1 ~ 20, indicates capacity of bin 1 ~ bin20Capacity of formatted disk is compared with value of bin-setting from bin1 to bin20 in order. If the capacity is less than the setting of bin1, try to compare with bin2; otherwise, the device is classified into bin1, and so on.(6) Category – FLASHForceFlashID=xxxxxx Set flash ID (at most 6 byte)e.g. ForceFlashID = 98D394BA64《Example of Configuration》[OEM]PN=6691 + Normal TSB-43nm-D3 V A206Note=ISP:6691_B1-D3_20090527_V A206_434CVID=0PID=0VENDOR_NAME="3SYSTEM"PRODUCT_NAME="USB Flash Disk"STRING_DESC_ENABLE=1SN_CustomerCode=0x0F[FEATURE_SETTING]FLASH_OP="ALL123"ID35=1[ISP]Code=6691_B1-D3_20090527_V A206_434C.BINV. Error-Code ListHere is one look-up table for user to check and get the information of MP result according to the error-code. Moreover, the possible defects are considered correspondingly as well.ErrorCodeError Message Possible Defect Note0 O.K. (No Error)1 Operating current is abnormal(>100mA)Short-circuitry2 Write-protect switch is turned on ASIC3 No flash chips onboard. ASIC, NAND4 The flash chips are not supported ASIC, NAND5 Process is terminated. User Break6 Some CEs are shorted together ASIC, NAND7 Too many bad blocks ASIC, NAND8 Disk capacity is mismatched withthe setting of "Boundary Check"NAND9 CIS block is not found NAND10 Wrong USB IDs (VID / PID) NAND11 Wrong vendor name NAND12 Wrong product name NAND13 Disk capacity is not clippedsuccessfullyNAND14 Wrong FAT NAND15 Suspend current test is failed ASIC, NAND16 ASIC test error 1 ASIC17 ASIC test error 2 ASIC18 ASIC version is not the same asthe definition file (INI) MPT1.ini / MPTest.INI19 DOS format error ASIC, NAND20 The device capacity mismatchsetting MPT1.ini / MPTest.INI21 Device capacity is not adequateto CLIP MPT1.ini / MPTest.INIContinuous…ErrorError Message Possible Defect Note Code22 The CLIP value is over-range MPT1.ini /MPTest.INI23 Disk hasn‟t been recognized ASIC, NAND,ComponentsASIC24 Disk is connected at the speed ofUSB 1.1NAND, MP25 Preformat Error (Boot, Info,Relink block write Error)28 DOS format fail29 Copy test fail42 Original defect scan fail ASIC43 Max bad block found Flash44 No available boot block Flash60 ISP code install fail61 MP ISP code install fail ASIC70 Defect table is not found if enableFlashdefect table checking81 Not turbo mode chip ASIC255 This controller is not supported MPT1.ini /MPTest.INIVI. MP FlowSeveral steps are involved into the MP process. All of them would be completed automatically if each step is detected and executed well. The flow diagram is …。