方太吸油烟机产品综合知识手册
- 格式:ppt
- 大小:2.04 MB
- 文档页数:42
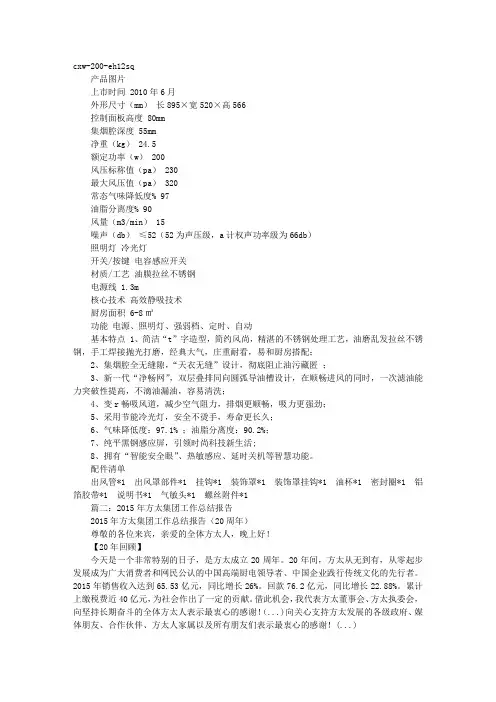
cxw-200-eh12sq 产品图片上市时间 2010年6月外形尺寸(mm)长895×宽520×高566 控制面板高度 80mm集烟腔深度 55mm净重(kg) 24.5额定功率(w) 200风压标称值(pa) 230最大风压值(pa) 320常态气味降低度% 97油脂分离度% 90风量(m3/min) 15噪声(db)≤52(52为声压级,a计权声功率级为66db)照明灯冷光灯开关/按键电容感应开关材质/工艺油膜拉丝不锈钢电源线 1.3m核心技术高效静吸技术厨房面积 6-8㎡功能电源、照明灯、强弱档、定时、自动基本特点 1、简洁“t”字造型,简约风尚,精湛的不锈钢处理工艺,油磨乱发拉丝不锈钢,手工焊接抛光打磨,经典大气,庄重耐看,易和厨房搭配;2、集烟腔全无缝隙,“天衣无缝”设计,彻底阻止油污藏匿;3、新一代“净畅网”,双层叠排同向圆弧导油槽设计,在顺畅进风的同时,一次滤油能力突破性提高,不滴油漏油,容易清洗;4、变r畅吸风道,减少空气阻力,排烟更顺畅,吸力更强劲;5、采用节能冷光灯,安全不烫手,寿命更长久;6、气味降低度:97.1% ;油脂分离度:90.2%;7、纯平黑钢感应屏,引领时尚科技新生活;8、拥有“智能安全眼”、热敏感应、延时关机等智慧功能。
配件清单出风管*1 出风罩部件*1 挂钩*1 装饰罩*1 装饰罩挂钩*1 油杯*1 密封圈*1 铝箔胶带*1 说明书*1 气敏头*1 螺丝附件*1 篇二:2015年方太集团工作总结报告2015年方太集团工作总结报告(20周年)尊敬的各位来宾,亲爱的全体方太人,晚上好!【20年回顾】今天是一个非常特别的日子,是方太成立20周年。
20年间,方太从无到有,从零起步发展成为广大消费者和网民公认的中国高端厨电领导者、中国企业践行传统文化的先行者。
2015年销售收入达到65.53亿元,同比增长26%。
回款76.2亿元,同比增长22.88%。
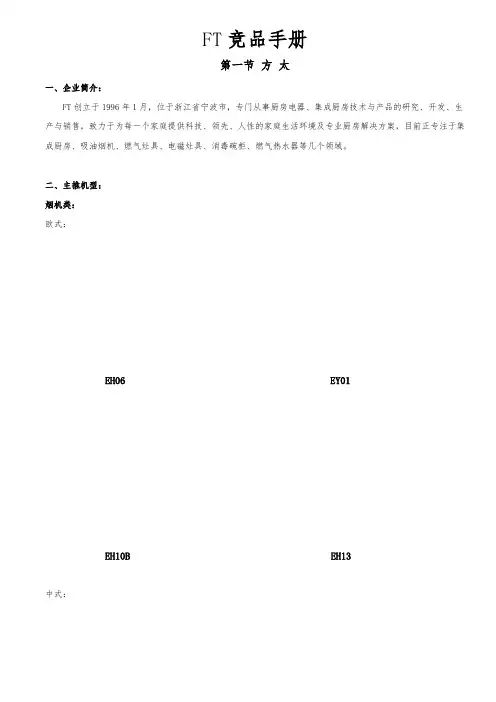
FT竞品手册第一节方太一、企业简介:FT创立于1996年1月,位于浙江省宁波市,专门从事厨房电器、集成厨房技术与产品的研究、开发、生产与销售,致力于为每一个家庭提供科技、领先、人性的家庭生活环境及专业厨房解决方案,目前正专注于集成厨房、吸油烟机、燃气灶具、电磁灶具、消毒碗柜、燃气热水器等几个领域。
二、主推机型:烟机类:欧式:EH06 EY01EH10B EH13中式:SY10 SY09近吸双核:JX01B JX02三、主推概念及卖点:1、净畅网:双层叠排同向圆弧导油槽设计,不会滴油漏油打击说辞:油网采用双层交差结构,进风面十分有限,吸力大大损耗。
并且油网需要经常拆下来清洗,使用起来十分麻烦。
因为油网采用不锈钢的材质,经常拆装,油网边缘与进风口密封性容易破坏,会导致滴油漏油。
2、变R畅吸风道:受鹦鹉自然完美螺线启发,按照流畅鹦鹉对数曲线设计。
有力保障了空气动力。
减少了阻力,使得排烟更顺畅,吸力更强劲。
打击说辞:其实变R畅吸风道就是按照阿基米德线型原理进行设计的,华帝风柜全都是按照空气动力学阿基米德线型原理进行设计,效果都一样。
3、三维离子风幕技术(EH10)在烟腔的前、左、右三面特设三维风幕,形成一个完整的风幕罩,增加了集烟腔深度,完全隔离油烟。
打击说辞:这个功能主要目的是弥补烟机集烟腔设计的太浅,油烟容易外逸的缺点。
海尔烟机早在2004年的时候就采用过这个功能,但是现在已经淘汰了,因为烟机产生风幕力度不够,且风幕存在死角,没有办法真正解决油烟外逸的现象。
烟机专家提醒:防止油烟外逸最有效的办法还是增大烟机排风量和加深烟机集烟腔的深度。
4、烟灶连动功能:创新采用烟灶无线联动技术,开启灶具旋钮,烟机立刻自动感应。
打击说辞:在烟灶内部分别安装了一个感应器,开启灶具的同时,感应烟机开启。
其实此功能完全属于哗众取宠的功能,烟灶是否联动,不是顾客购买烟机主要考虑的方面。
再则此功能性能非常不稳定。
(无人在家或半夜,打雷闪电产生局部磁场有可能无故开启烟机,使得烟机空转,影响使用寿命)。
吸油烟机培训标题:吸油烟机培训手册尊敬的用户,您好!感谢您选择使用吸油烟机。
为了帮助您更好地了解吸油烟机的功能、性能和使用方法,提高生活品质,我们特别编写了本培训手册。
本手册将详细介绍吸油烟机的选购技巧、安装方法、使用与保养、故障处理等方面的知识。
请您仔细阅读,以确保吸油烟机的正常使用和延长使用寿命。
一、选购吸油烟机1.1 类型选择吸油烟机主要分为顶吸式、侧吸式和潜吸式三种类型。
顶吸式吸油烟机安装在灶具正上方,吸烟效果好,但容易碰头;侧吸式吸油烟机安装在灶具侧面,节省空间,吸烟效果较好;潜吸式吸油烟机安装在灶具下方,美观大方,吸烟效果一般。
用户可根据自己的厨房布局和需求选择合适的吸油烟机类型。
1.2 功率选择吸油烟机的功率越大,吸烟效果越好。
一般来说,功率在200-400W之间的吸油烟机适合家庭使用。
用户可根据自己的烹饪习惯和厨房大小选择合适的功率。
1.3 风量选择风量是衡量吸油烟机吸烟效果的重要指标。
一般来说,风量在15-20立方米/分钟之间的吸油烟机适合家庭使用。
用户可根据自己的烹饪习惯和厨房大小选择合适的风量。
1.4 噪音选择吸油烟机在运行过程中会产生一定的噪音。
国家标准规定,吸油烟机的噪音不得超过68分贝。
用户在选购时,应尽量选择噪音较低的吸油烟机。
二、安装吸油烟机2.1 安装位置吸油烟机应安装在灶具的正上方或侧方,以确保吸烟效果。
同时,应避免安装在高温、潮湿、易燃易爆等危险环境中。
2.2 安装高度吸油烟机的安装高度应根据灶具的类型和使用者的身高来确定。
一般来说,顶吸式吸油烟机底部距离灶具台面高度为650-750mm,侧吸式吸油烟机底部距离灶具台面高度为350-450mm。
2.3 电源插座吸油烟机需要接电源插座,用户在安装前应确保电源插座符合国家标准,且具有良好的接地措施。
三、使用与保养3.1 使用方法使用吸油烟机前,请确保电源插座已接通,然后按下电源开关,调整风速和灯光。
在烹饪过程中,应根据油烟大小调整风速。
油烟机产品知识手册一、 产品基础知识(一)产品概念油烟机是指抽吸室内的油烟气体,经分离油雾清除油雾和气体的机器。
(二) 产品分类2.1按净化方式分类 a ) 外排式:是指抽吸室内的油烟气体,经分离油雾后通过管道排向室外的吸油烟机。
b ) 循环式:是指抽吸室内的油烟气体,经过滤装置清除油雾和气味,并重新返回室内的吸油烟机。
c ) 两用式:是指既能装上过滤装置作循环式吸油烟机使用,又能拆除过滤装置,装上排气管作为外排式吸油烟机使用的吸油烟机。
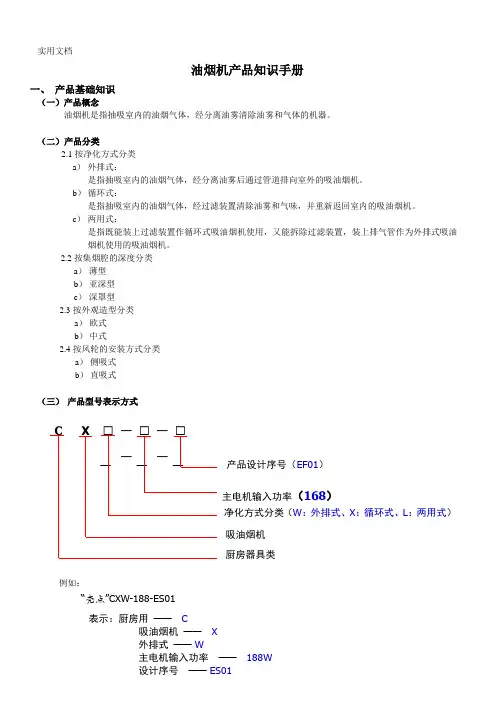
2.2按集烟腔的深度分类 a ) 薄型 b ) 亚深型 c ) 深罩型2.3按外观造型分类a ) 欧式b ) 中式2.4按风轮的安装方式分类a ) 侧吸式b ) 直吸式(三) 产品型号表示方式例如:C X • _ • _ ——• _—— 产品设计序号(EF01) 主电机输入功率(168)净化方式分类(W :外排式、X :循环式、L :两用式) 吸油烟机 厨房器具类“亮点”CXW-188-ES01表示:厨房用 —— C吸油烟机 —— X 外排式 —— W主电机输入功率 —— 188W 设计序号 —— ES01(四)油烟机工作原理通过电机的工作来带动风轮的运转,风轮运转时所产生的吸力能将油烟、废气抽吸到风道,再通过烟管排出到室外。
(五)主要部件组件及作用5.1外壳5.1.1外壳的材质A、单一材质,如:冷扎钢板——绝大多数中式烟机均如此不锈钢板——欧式塔型机、个别中式烟机B、多种材质,如:冷扎钢板+工程塑料(方太“日后”系列)不锈钢板+玻璃(伊莱克斯的ER01)5.1.2外壳的表面处理外壳的表面处理分成以下情况:A、表面不处理,如采用不锈钢材料的欧式烟机B、表面喷粉处理,这样的处理多用于冷扎钢板,其作用是防止冷扎钢板腐蚀和实现油烟机的色彩C、表面喷金属漆,这样的处理的作用与喷粉处理相同,但防腐蚀效果更好,表面也更加光滑、明亮、美观。
5.1.3外壳的作用有两个:A、实现吸油烟机的造型B、安装及固定其它零部件5.2集烟罩集烟罩的作用主要有两点:A、拢烟,使油烟在吸入油烟机之前不会四处逃逸。


吸油烟机第一章吸油烟机的基础知识吸油烟机是指安置在炉灶等烹调器具的上部,用来收集受烹饪油烟污染的空气的机器。
它可以使受污染的空气中油烟分离后排往室外,也可以使受污染的空气经过滤后再排放于室内。
一、吸油烟机的分类1、按净化方式分:a、外排式(W);b、循环式(X);c、两用式(L)。
a、外排式:是指吸入受油烟污染的空气,把油雾分离、收集,然后经过管道排往室外的吸油烟机。
b、循环式:是指吸入受油烟污染的空气,通过过滤装置过滤后排放在室内的吸油烟机。
c、两用式:是指装上过滤装置做循环式使用,又可拆除过滤装置,装上排气管道做外排式使用的吸油烟机。
目前好生活生产的吸油烟机均为外排式。
2、按吸风电机的数量分:a、单电机(单头);b、双电机(双头)。
目前市场上出售的多为单头吸油烟机,也有部份为双头(J017和J023)。
3、按结构分:a、中式机;b、欧式机c.侧式机a、中式机按柜体高度分又有:超薄型(高度小于200mm);亚深型(高度在200-400mm);深吸型(高度在400mm以上)。
4、按排烟方式分;顶吸式和侧吸式。
二、吸油烟机的型号编制三、吸油烟机的结构组成1、机壳部份:材料一般是冷扎板,也有的是用不锈钢板的,比较坚固,用于固定电机、风柜、控制系统和各种附件;收集烹调时产生的油烟;安装时作为一个支架;印制各种功能标志。
2、电器控制部份:由开关按键(控制)板、电源盒(电脑型)、接线盒等组成。
主要作用是控制吸油烟机实现各种功能。
3、油烟的排放系统:由电机、风轮、风柜、止回阀、排烟管等组成。
主要是吸入受油烟污染的空气再通过排烟管排出室外,或者是把受污染的油烟经过滤后排入室内。
是吸油烟机的核心组件。
4、附件:由照明灯、油路系统、壁挂系统等组成。
照明灯主要是LED冷光灯白炽灯也有用日光灯,起照明作用;壁挂及膨胀螺栓是用于安装油烟机的。
四、目前好生活公司生产的吸油烟机有1、中式吸油烟机:产品型号CXW-200-Z003, 004, 001A ,001 ,008 ,0832、侧式吸油烟机:产品型号CXW-200-J558, J023 ,J024, J021,J018, J0173、欧式罩型吸油烟机:产品型号CXW-200-E003, E388, E002A ,E005第二章机械型深吸式吸油烟机一、产品特点(以CXW-200-Z003为例)1、按键式开关3、金属覆拉丝覆膜面板4、整体拉伸无缝内腔5、超静音风道设计二、产品实物图三、产品电气原理图CXW-200-Z003型吸油烟机电气原理图机械式吸油烟机电气原理图四、工作原理叙述操作一:插上电源插头,按下电源开关按钮,吸油烟机得电,处于待机状态。
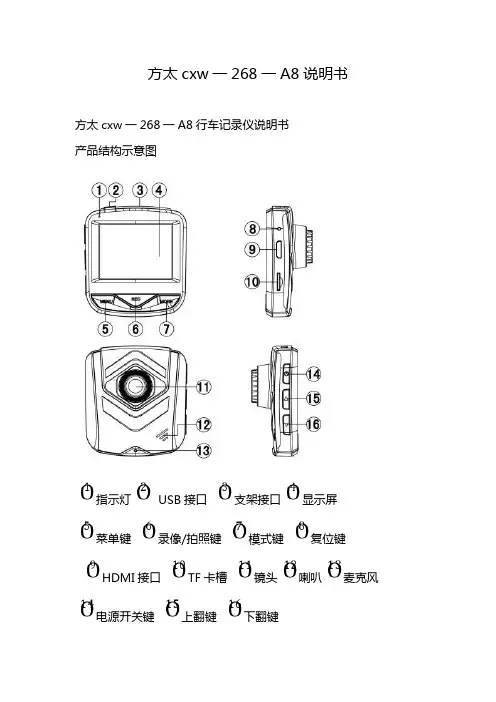
方太cxw一268一A8说明书方太cxw一268一A8行车记录仪说明书产品结构示意图指示灯USB接口支架接口显示屏菜单键录像/拍照键模式键复位键HDMI接口TF卡槽镜头喇叭麦克风电源开关键上翻键下翻键菜单功能设置开机按菜单键进入设置界面。
使用下翻/上翻键选择项目。
按REC键进入下一级菜单选择具体功能项,然后按REC键确认。
确认后按菜单键退出。
进入系统菜单设置界面时,需连续按两次菜单键。
注意:DVR关机时会保留最后一次的设置操作说明DVR具有录像、拍照、预览、HDMI、G-sensor、屏保、网络摄像头等功能,使用时根据需要自行选择,使用前请先插入TF卡(请选用CLASS6以上原装正品卡)。
【1】录像模式1、连接充电器工作时,DVR自动开机并开始录像,此时蓝色指示灯闪烁。
在录像过程中可通过上翻/下翻键进行数字变焦调整,按REC 键停止录像,此时蓝色指示灯长亮。
当充电器电源断开时,DVR延迟5秒后自动关机。
2、内置电池供电时,短按电源开关键开机进入待机状态,按REC键开始录像。
【2】拍照模式开机后按模式键选择进入拍照模式,可通过上翻/下翻键进行数字变焦调整,按REC键进行拍照。
【3】预览模式开机后按模式键选择进入预览模式,按上翻/下翻键选择视频文件或照片文件,按REC键播放或暂停,按模式键退出预览模式。
【4】HDMI 功能通过HDMI连接线,将本设备与电视输出终端相连接,音视频信号可以在电视输出终端显示。
【5】运动检测功能在视频设置菜单<运动检测>项,选择<开>,启动运动检测功能。
当有物体在DVR前面运动时,DVR会自动启动录像,当物体停止移动时,自动停止录像,进入侦测待机状态。
退出运动检测时,需将视频设置菜单<运动检测>项,设置为<关>的状态。
【6】G_SENSOR功能在录像过程中,当重力加速度达到设定值(2g/4g/6g)时,DVR会自动强制保存当段视频文件,此文件本机不可删除,不会被循环覆盖掉。

Manuals+— User Manuals Simplified.FRANKE FCS 90 O1 EV8 Arkade Wall Hood User Manual Home » Franke » FRANKE FCS 90 O1 EV8 Arkade Wall Hood User ManualUSER MANUALFCS 90 O1 EV8/FCS 90 NF EV8/FCC 90 NF EGCFCC 90 O2 EGC/FCL 90 NF EGC/FCL 60 A2 EGCFCL 60 NF EGC/FCL 90 A2 EGCContents1 SAFETY INFORMATION2 USE3 CARE AND CLEANING4 CONTROLS5 LIGHTING6 Documents /Resources6.1 ReferencesSAFETY INFORMATIONFor your safety and correct operation of the appliance, read this manual carefully before installation and use. Always keep these instructions with the appliance even if you move or sell it.Users must fully know the operation and safety features of the appliance.The wire connection has to be done by specialized technician.The manufacturer will not be held liable for any damages resulting from incorrect or improper installation.WARNING:Use only screws and small parts in support of the hood.WARNING:Do not look directly at the light through optical devices (binoculars, magnifying glasses…).This applianceAccessible parts may become hot when used with cooking appliances.Clean and/or replace the Filters (Fire hazard). See paragraph Care and Cleaning.There shall be adequate ventilation of the room when the range hood is used at the same time as appliancesThe symbol on the product or on its packaging indicates that this product may not be treated as household Insteadelectronic equipment. By ensuring this product is disposed of correctly, you will help prevent potential negative consequenceshandlinghousehold waste disposal service or the shop where you purchased the product.“In case of replacement with halogen lamp use only self-shielded tungsten halogen lamps or self-shielded– every 2 months of operation, or more frequently for particularly heavy usage, and can be washed in aFranke S.p.a.Via Pignolini, 237019 Peschiera del Garda (VR)www.franke.it ReferencesHome Manuals+,。

吸油烟机基础知识手册目录第一章吸油烟机基础知识1一、吸油烟机执行标准1二、吸油烟机标准术语1三、吸油烟机解析23.1、................................................................................................................................. 吸油烟机分类23.2、................................................................................................................................. 型号命名33.3、................................................................................................................................. 吸油烟机排放方式分类及代号33.4、................................................................................................................................. 红日吸油烟机产品特征序号解析33.5、................................................................................................................................. 产品型号示例33.6、................................................................................................................................. 吸油烟机出风管外径尺寸3第二章吸油烟机产品结构与工作原理4一、红日在线吸油烟机产品型号汇总41.1、产品型号整机图片汇总4二、吸油烟机结构与工作原理72.1、................................................................................................................................. 近吸式烟机不锈钢爆炸图72.2、................................................................................................................................. 欧式烟机爆炸图82.3、................................................................................................................................. 中式烟机爆炸图92.4、................................................................................................................................. 吸油烟机结构与功能102.4.1动力部分102.4.2控制部分132.4.3机壳部分142.4.4导油部分152.4.5附属功能部分152.5、................................................................................................................................. 基本工作原理162.6、................................................................................................................................. 电气控制原理17第一章吸油烟机基础知识吸油烟机是专供厨房使用的电动器具,它能迅速有效的排除厨房由于烹饪所产生的油烟和有害气体,保持厨房的清洁卫生和空气清新,是现代家庭不可缺少的电器设备。
Please read these instructions and warranty information carefully before use and keep them handy for future reference.U S E R M A N U A LChimney Type Range Hood RDC-S SERIESRDC-6356S / RDC-7356S / RDC-8356S / RDC-9356SRDC-6457S / RDC-7457S / RDC-8457S / RDC-9457SOnline Warranty RegistrationContentFor safety purpose, you should read the instructions carefully before using the appliance for the first time. Save the instructions for future reference. The appliance is designed for domestic use and may only be installed and operated in accordance with these instructions for use.• This appliance complies with all current European safety legislation, however, the Manufacturer must emphasise that this compliance does not prevent the surfaces of the appliance fromheating up during use and remaining hot during its operation.• Accessible parts may become hot during use. Young children should be kept away. Care should be taken to avoid touching the appliance.• Highly recommends that this appliance be kept out of the reach of babies and young children.• This appliance can be used by children aged from 8 years and above and persons with reduced physical, sensory or mental capabilities or lack of experience and knowledge if they have been given supervision or instruction concerning use of the appliance in a safe way and understand the hazards involved. Children shall not play with the appliance. Cleaning and user maintenance shall not be made by children unless they are older than 8 and supervised.• Keep the appliance and its cord out of reach of children less than 8 years.• Regularly check the power plug and power cord for damage. If the supply cord is damaged, it must be replaced by the manufacturer, its service agent or similarly qualified persons in order to avoida danger or injury.• Do not allow the electric cables to touch the hot parts of the appliance.• Make sure that the power cord is not caught under or in the appliance and avoid damage to the power cable.• Do not install the appliance outdoors in a damp place or in an area which may be prone to water leaks such as under or near a sink unit. In the event of a water leak, allow the machine to dry naturally.• Please dispose of the packing material carefully.• Do not use flammable sprays in close vicinity to the appliance.• We recommend that great care be taken during use and cleaning. Read the cleaning and maintenance sections for this appliance carefully.• A steam cleaner is not to be used.• The appliance is not intended to be operated by means of external timer or separated remote-control system.• The appliance is for domestic use only.• To avoid the risk of fire, clean the metal filter regularly and closely watch and regulate pans containing hot oil.• Do not use the hood if it shows signs of damage or imperfection. Contact customer services centre.• Flambe cooking must not be carried out underneath this appliance.• When installing the appliance, make sure that the following distances between the top of cooker or hob and the lowest part of the hood must be observed: Gas Hobs 750mm; Electric hobs650mm.• The manufacturer declines all liability for personal or material damage as a result of misuse or incorrect installation of this appliance.• Regarding the information pertaining to installation, please refer to the “Installation Instruction”of Manual.theProduct Structure1. Motor cover (optional purchase)2. Control panel3. Body4. Air Inlet5. LED Light6. Rectification plate (oil collector inside)Things to check before installation• To avoid the constant danger when using electrical appliance, it is important to properly install this range hood and read the safety instructions carefully to avoid misuse and danger. Werecommend that you keep this instruction manual for future reference and pass it to any future owners. After unpacking the range hood, check that the range hood is intact. When in doubt, do not use the device.• Check the package and make sure you have all of the parts listed.• Decide on the appropriate location for your product.• If this product contains glass, please take care with fitting or handing to prevent personal injury or damage to the product.• The specifications plate is available on the appliance. This plate displays all the necessary identification information for ordering replacement parts.• If you sell the appliance, give it away, or leave it behind when you move house, make sure you also pass this manual to the new owner, so that the new owner can become familiar with theappliance and its safety warnings.Installation Tools1. Phillips Screwdriver2. Spirit Level3. Pull Ruler4. Electric Drill5. Drill bit (Ø8mm)6. Pencil7. Aluminium Tape8. Adapter (Ø150mm to Ø120mm) & M4*8 screw x 2Installation Steps1. Type of installation: Ducted option; Failure to install the screws or fixing device in accordance with these instructions may result in electrical hazards.2. Mark on the wall the hole positions as shown in diagram (pic 2); The wall plugs supplied are suitable for solid walls only. When fixing to any other type of wall, please use suitable alternative fixings.3. Distances between the top of cooker or hob and the lowest part of the hood must be observed: Gas Hobs 750mm; Electric hobs 650mm (pic. 3).4. Drill 4 holes according to the marked positions, insert the wall plugs, then screw on the upper 2 screws leaving 2 mm space between the wall and the screw head (pic. 4).5. Hang the range hood on the upper 2 screws, then secure the range hood by tightening the lower two screws from the inside of the hood (pic. 5).6. Open the rectification plate and install the oil cup (fig. 6).Fix the Ducting Tube by using tape or clamp (make use of the Φ150mm to Φ120mm adapter if needed) (pic. 7)7. (Optional) Attach the motor cover onto the top of the range hood (pic. 8).8.Remove all protective films after installation (pic. 9).Before useSwitch on the product at the switched fused connection unit. The product is ready for use.Touch Control Panel1. Gear Up Key:Tap to move up one level.2. Gear Down Key:Tap to gear down one level.3. Booster Key:Tap to enter Turbo Boost Mode and count down for 3 minutes. After the timing is over, return to the level before entering Turbo Boost Mode.4. Gear Display5. RPM Display:When in Turbo Boost Mode, Countdown Timer and RPM will be shown on LED Display alternately.6. Lighting Key:Tap to turn on or turn off LED light.7. Self-cleaning Key:Tap and hold for 2 seconds to enter the 11 minutes countdown. The first 10 minutes are the heating state of the electric heater. The last 1 minute is the time when the motor is running. Tap and hold for 2 seconds to turn off Self-Cleaning Function.8. On / Off Key:• Tap once to turn on the product.• When the product is operating, tap once to enter 90-second delay shutdown; anytime during the 90-second delay shutdown period, tap one more time and the product will shut downimmediately. During the 90-second delay shutdown period, On/Off Key will blink, and LED Display will show Countdown Timer and RPM alternately.Gesture ControlWithin a distance of 8cm from the front of the control panel, Wave to turn on or turn off the hood. When waving the gesture range needs to cover the entire control panel.Waving from left to right:Turn on the hood, the motor and the lights are turned on, the motor remains in the memory of the last shutdown Gear.Waving from right to left:Turn off the motor and lights.Care & MaintenanceCleaning of Oil CupTo avoid fire, please clean the oil cup thoroughly every month or after using the self-cleaning function. To do this, remove the oil cup and soak it in hot water and detergent for an hour. If using a dishwasher, do not exceed 65℃.1. After loosening the screw counterclockwise by philips screwdriver, pull down the rectification plate (pic. 1).2. Pull the oil cup slightly outwards and remove the oil cup (pic. 2).3. Pull the latches on the left and right ends of the rectification plate inward to take off the rectificationplate. The rectification plate is detachable for easy cleaning (pic.3).Daily CleaningIn order to prevent the oil cup from overflowing, it is recommended to clean the oil cup at least once a week; if the product is used frequently, the cleaning frequency of the oil cup should be increased.TroubleshootingRecycling & Disposal• The exhaust flow is affected by factors such as environment, temperature, air pressure, usage, etc.• Specifications are subject to change without prior notice.• If there is any inconsistency or ambiguity between the English version and the Chinese version, the Chinese version shall prevail.• Refer to for the most up-to-date version of the User Manual.目錄為安全起見,初次使用產品前請先細說本說明書,並保存說明書,以便作參考之用。