日立投影机HCP X使用说明
- 格式:pdf
- 大小:6.80 MB
- 文档页数:118
投影机使用说明书一、主要安全注意事项1、请插紧电源插头,否则可能导致起火。
2、请勿将多台电子设备的电源插头连接到一个墙壁插座上,否则,可能会因为墙壁插座过热引起火灾。
3、请勿使用破损的电源线或电源插头或松动的电源插座,否则可能导致触电或起火。
4、切勿过度弯折或缠绕电源线并避免在电源线上放臵重物,否则,可能会因为电源线破损,导致触电或引起火灾。
5、请勿用湿手插拔电源插头,否则可能导致触电。
6、在清洁之前,请先拔下电源插头,否则有触电或引起火灾的危险。
7、在产品出现问题时,必须拔下电源插头,彻底切断电源。
仅使用产品上的电源按钮不能彻底切断电源。
8、请勿通过插拔电源插座的方式来打开或关闭投影机。
(这样会减少灯泡寿命)。
二、安装和连接1、安装投影仪,使投影仪射出的光柱与投影屏幕成直角。
•调整投影仪的位臵,使镜头指向屏幕的中心位臵。
如果屏幕未垂直安装,屏幕上的画面可能不会呈长方形。
•请勿在光线明亮的地方安装投影屏幕。
如果周围环境太亮,则投射到屏幕上的画面将会被冲淡而显示不清楚。
•在明亮的环境中使用投影仪时,请用窗帘挡住光线。
•您可以相对于屏幕将投影仪安装到以下位臵:<桌面正投> / <吊装正投> / <桌面背投> / <吊装背投>.在屏幕前方安装投影仪将投影仪安装到屏幕前方时,可以使用菜单调整画面以使其正常显示,这取决于放臵投影仪的位臵:(1).对于前部落地,请按:菜单 > 设臵 > 安装 > 桌面正投(2).对于前部悬挂,请按:菜单 > 设臵 > 安装 > 吊装正投2、缩放和调焦(在投影机侧面)(1).缩放旋钮,可以转动缩放旋钮,以便在缩放范围内调整图像大小。
(2). 聚焦环,转动聚焦环调整屏幕画面的焦距。
四、更换和清洁过滤器更换投影仪过滤器的注意事项:•过滤器位于投影仪底面。
•关闭投影仪电源,在投影仪充分散热冷却后拔下电源线。

投影仪正确使用方法及投影仪The manuscript was revised on the evening of 2021投影仪正确使用方法及注意事项多媒体投影机是一种贵重的教学设备,使用和保养中必须养成良好习惯,严格按操作要求去做,如若操作不当,就会给投影机带来致命损坏。
一、开机:开启设备前,先打开电源插座开关,后开设备。
1.在连接好电脑之后,先打开头投影机,再打开电脑,尤其是windowsXP系统的机器。
2.投影仪开机时,指示灯闪烁说明设备处于启动状态,当指示灯不再闪烁时,方可进行下一步操作。
开机时,机器有个预热的过程,大概有10秒钟。
在这期间,千万不要以为投影仪还没有工作而反复按压启动键,频繁开机产生的冲击电流会影响灯泡的使用寿命。
3.安装银幕的,放下银幕时,银幕开关掷于向下,放下银幕,放到最低后,一定要记得把银幕开关掷于中间停止位置。
(如学校通用技术教室)二、使用:严禁反复开关机,注意多进行画面切换。
1.快速反复开光投影机会损坏灯泡,缩短灯泡寿命,因此平时尽量减少开关机次数。
关机后请至少等待5分钟再打开投影机。
在使用过程中,如出现意外断电却仍需启动投影仪的情况时,要等投影机冷却5—10分钟后,再次启动。
2.连续使用时间不宜过长,一般控制在4小时以内,夏季高温环境中,使用时间应再短些。
3.使用笔记本电脑时,需要链接电源线,防止中途电源用完,而导致投影机灯泡烧坏。
4.开机后,要注意不断切换画面以保护投影机灯泡,不然会使LCD 板或DMD 板内部局部过热,造成永久性损坏。
5.画面不清楚时,可通过调节投影机上的光圈进行调整。
6.在投影机使用过程若要移动,需轻轻移动,以免振动造成内部部件损坏。
附:投影机使用误区:①开大会时,长时间固定一个标题投影在大屏幕上。
②上课提前小时开机并固定一个画面不动。
③上课中间固定一个画面超过15分钟不切换画面。
④下课后忘记关闭多媒体投影机。
三、关机:关闭设备,先关闭各设备电源,等投影机自动冷却再后关闭插座电源,用遥控器关闭电源(<ON-OFF>键),指示灯不闪烁时才能关闭投影仪。
投影仪操作规程一、概述投影仪是一种常见的多媒体设备,用于投影图象或者视频内容到屏幕或者墙壁上。
本文将详细介绍投影仪的操作规程,包括设备准备、连接设置、投影调整和关闭等方面。
二、设备准备1. 确保投影仪所需的电源线和视频线都齐全,并处于良好的工作状态。
2. 将投影仪放置在稳定的位置,保证投影画面清晰稳定。
3. 清理投影仪镜头和散热孔,确保无尘和顺畅散热。
三、连接设置1. 将投影仪的电源线插入电源插座,并将投影仪的电源开关打开。
2. 将计算机或者其他视频源设备与投影仪连接。
根据设备接口的不同,可以使用VGA、HDMI或者USB等线缆进行连接。
3. 打开计算机或者视频源设备,确保信号输出正常。
四、投影调整1. 打开投影仪的电源,待其预热完毕后,按下投影仪面板或者遥控器上的电源按钮,使其进入投影状态。
2. 调整投影仪的焦距和投影角度,使投影画面清晰且居中。
3. 根据需要,调整投影仪的亮度、对照度、色采等参数,以获得最佳的投影效果。
4. 若需要投影特定区域或者特定内容,可以调整投影仪的投影范围和投影模式。
五、投影内容1. 在计算机或者视频源设备上打开要投影的文件或者视频。
2. 确保投影仪与计算机或者视频源设备的信号连接正常。
3. 调整计算机或者视频源设备的分辨率和屏幕显示模式,以适应投影仪的分辨率和显示比例。
4. 播放文件或者视频,并通过投影仪将内容投影到屏幕或者墙壁上。
六、关闭投影仪1. 在投影结束后,先关闭计算机或者视频源设备。
2. 按下投影仪面板或者遥控器上的电源按钮,将投影仪切换至关闭状态。
3. 拔掉投影仪的电源线,确保彻底断开电源。
4. 等待投影仪冷却后,可以进行清理和收纳。
七、常见问题及解决方法1. 投影画面含糊或者不清晰:调整投影仪的焦距和投影角度,清理投影仪镜头。
2. 无法连接计算机或者视频源设备:检查连接线是否松动或者损坏,确保信号连接正常。
3. 投影画面颜色异常:调整投影仪的亮度、对照度和色采参数,或者检查计算机或者视频源设备的显示设置。


Key Features■ X GA 1024 x 768 resolution■ 5,800 ANSI lumens white/color output ■ 10000:1 contrast ratio■ 4,000 hours lamp life (Standard mode);6,000 hours lamp life (Eco mode)*■ E dge Blending & Warping ■ H DCR / Accentualizer /Image Optimizer■ C onvenient Networking / WirelessCapability■ S mart Device Control ■ H DMI-OutCP-X5550As part of Hitachi’s Collegiate Series, the CP-X5550 combines XGA 1024 x 768 resolution with super-bright 5,800 ANSI lumens white/color light output for a stunning visual achievement. It can transform classrooms,lecture halls, and auditoriums into true learning centers. The CP-X5550 is easily stackable which enables you to place one projector on top of another to project the same image from both onto a screen for added brightness. Incorporating Hitachi's leading-edge technology, the CP-X5550 features an image-enhancing combination of Accentualizer, High Dynamic Contrast Range (HDCR) and Image Optimizer, all of which contribute to the overall visual experience. Plus, Hitachi’s Intelligent Eco and Saver Modes with ImageCare combines optimal picture performance with maximum energy savings for a lower cost of ownership. For added peace of mind, Hitachi’s CP-X5550 is also backed by a generous warranty and our world-class service and support programs.HI0447-04/16-Rev.3All specifications subject to change without notice.3LCD and the 3LCD logo are registered trademarks of the Seiko Epson Corporation.iPad and iPhone are registered trademarks of Apple Inc., registered in the U.S. and other countries. ©2016 Hitachi America, Ltd. All Rights Reserved .UNIQUE FEATURES HDCR (High Dynamic Contrast Range)When average projectors are used in bright rooms, the darker colors of animage deteriorate and images become unclear. Using this function, blurred images caused by room lighting or outside light sources are corrected, andan effect similar to increasing contrast occurs. This results in clear imageseven in bright rooms.AccentualizerHitachi original technology makes pictures look more real by enhancing sharpness, gloss and shade to make pictures as clear as pictures on a flat-panel device. You can also adjust the effects by three levels according to your surroundings so that the colors of projected images are the actual colors of the objects they represent.Sharpness Gloss ShadeWarpingWarping is possible from your computer by using the specialized application. Projection is possible on spherical surfaces and surfaces with corners, as well as conventional flat screens.Edge BlendingProjectors are equipped with the Edge Blending function that achieves the seamless projection of one image using multiple projectors. The 5000 series comes with various blendingfunctions that meet the level users are looking for.Instant blending: Easily perform blending processing without the use of any special equipment.Automatic blending: Use a camera and quickly perform high precision blending processing automatically.Requires installation of a specialized application to your computer.Instant Blending Automatic BlendingDICOM ® Simulation ModeThe DICOM (Digital Imaging and Communications in Medicine) Simulation Mode projects grayscale images which approximate DICOM Part 14specifications. This mode is ideal for viewing grayscale medical images, such as X-rays, for training and educational purposes.The projectors have a DICOM (Digital Imaging and Communications inMedicine) Simulation Mode. This mode simulates the DICOM standard, which is a standard applicable to digital communications in medicine, and is useful for displaying medical images such as X-rays. These projectors are not medical devices and are not compliant with the DICOM standard, and neither the projector nor the DICOM Simulation Mode should beused for medical diagnosis. Comparison photos are simulations.enables you to display one image within another image. These functions are handy when you need to compare two sets of data or othermaterial.Image OptimizerThe Image Optimizer auto-matically adjusts HDCR and Accentualizer to improve visibility as lamp brightness dims over time.CP-X5550Right Side ProfileLeft Side ProfileStackableTop ViewFront View16101115131412163458HDMI Out Computer In HDMI 1 / MHL Audio In 1HDMI 2Monitor Out7. USB Type A (For Wireless)8. LAN9. Audio Out10. Remote Control Out 11. Remote Control In 12. AC Power13. Control (RS-232C)14. Video15. Audio in (L/R)16. Kensington Lock97Trade-Up Program。
曰立HCP-852X投影机摇控器使用说明
1、找到电源开关。
第一次接触到投影仪时,首先要知道电源开
关在哪里。
2、连接电源线。
找到开关以后,就要在使用投影仪之前先要连
电源线,注意电源线有点儿多,要按部就班,连接电源线时不要打开电源开关。
3、连接电脑和投影仪。
用电源线把电脑和投影仪连接器连接起
来以后,再把连接线上两个小螺钉旋紧。
4、开启电源。
把所有的电源线连接好以后,打开投影仪开关和
电脑电源开关。
5、如果打开以后,遇到投影仪无法连接电脑的情况,就是没有
把屏幕内容切换过去。
这时候,键盘上按下Fn+F8(一些电脑是F5,
总之看按键上的显示器图标操作)就可以了,可以多切换几次。
6、投影仪成像纠正。
屏幕内容投影到投影布之后,要进行投影
的位置和大小的矫正。
投影的位置要靠下面的两个螺钉旋钮进行调整。
调整的时候以图像适合投影布为准。
7、对投影仪进行对焦。
由于投影仪放置位置的关系,还需要对
投影的图像进行对焦。
对焦如果还不能达到效果也可以考虑移动一下投影的位置。
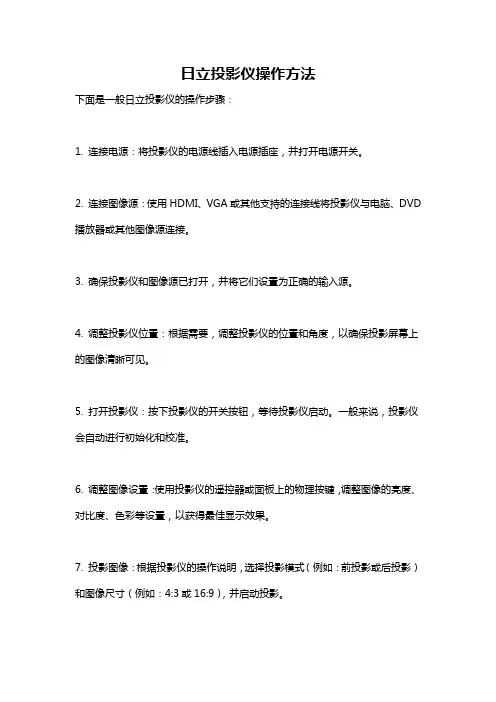
日立投影仪操作方法
下面是一般日立投影仪的操作步骤:
1. 连接电源:将投影仪的电源线插入电源插座,并打开电源开关。
2. 连接图像源:使用HDMI、VGA或其他支持的连接线将投影仪与电脑、DVD 播放器或其他图像源连接。
3. 确保投影仪和图像源已打开,并将它们设置为正确的输入源。
4. 调整投影仪位置:根据需要,调整投影仪的位置和角度,以确保投影屏幕上的图像清晰可见。
5. 打开投影仪:按下投影仪的开关按钮,等待投影仪启动。
一般来说,投影仪会自动进行初始化和校准。
6. 调整图像设置:使用投影仪的遥控器或面板上的物理按键,调整图像的亮度、对比度、色彩等设置,以获得最佳显示效果。
7. 投影图像:根据投影仪的操作说明,选择投影模式(例如:前投影或后投影)和图像尺寸(例如:4:3或16:9),并启动投影。
8. 调整焦距:根据需要,使用投影仪的调焦功能,调整图像的清晰度。
9. 关闭投影仪:在使用结束后,按下投影仪的关闭按钮或关闭电源开关,并等待投影仪完全关闭。
这只是一般的操作步骤,具体的操作方法可能因不同的日立投影仪型号而有所差异。
建议您参考具体的产品说明书或联系厂商得到精确的操作方法。

PLEASE READThis manual is provided as a free service by .We are in no way responsible for the contents of the manual. We do not guarantee its accuracy and we do not make any claimof copyright. The copyright remains the property of their respective owners.ABOUT () is your review and buying guide resource for DLP and LCD video projectors.Visit the site to read the latest projector news and reviews, read and comment on projector specifications, download user manuals and much more.w nl o ad edf r o mPr o j e cr .cE Liquid Crystal ProjectorUSER'S MANUALENGLISH-1Thank you for purchasing this liquid crystal projector.CONTENTSFEATURES....................................P.2BEFORE USE................................P.2Contents of Package...........................P.2Part Names.........................................P.3Loading the Battery.............................P.5Fixing the Handle................................P.5INSTALLATION.............................P.6Installation of the projector and Screen .....P.6Angle Adjustment................................P.6Cabling................................................P.7Power Connection...............................P.8Example of System Setup...................P.8Plug & Play..........................................P.8OPERATIONS................................P.9Switching the Power Supply ON/OFF ....P.9Basic Operation.................................P.10Setup Menu.......................................P.12Input Menu........................................P.13Image Menu......................................P.14Options Menu....................................P.15No Signal Menu.................................P.16MAINTENANCE...........................P.17Lamp.................................................P.17Air Filter Maintenance.......................P.19Other Maintenance............................P.19TROUBLESHOOTING.................P.20OSD Message...................................P.20Indicators Message...........................P.21Symptom...........................................P.22SPECIFICATIONS.......................P.23WARRANTY AND AFTER-SERVICE ...P.24Tables:Table 1. Installation Reference.............P.6Table 2. Basic Operations...................P.10Table 3. Setup Menu...........................P.12Table 4. Input Menu............................P.13Table 5. Image Menu..........................P.14Table 6. Options Menu........................P.15Table 7. No Signal Menu.....................P.16Table 8. OSD Message.......................P.20Table 9. Indicator Message.................P.21Table 10. Symptom.............................P.22Table 11. Specifications......................P.23For "TECHNICAL" and "REGULATORY NOTICE", see the end of this manual.NOTE:• The information in this manual is subject to change without notice.• The manufacturer assumes no responsibility for any errors that may appear in this manual • The reproduction, transmission or use of this document or contents is not permitted without express written authority.TRADEMARK ACKNOWLEDGMENT:• PS/2, VGA and XGA are registered trademarks of International Business Machines Corporation.• Apple, Mac and ADB are registered trademarks of Apple Computer, Inc.• VESA and SVGA are trademarks of the Video Electronics Standard Association.• Windows is a registered trademark of Microsoft Corporation.• Carefully observe the trademarks and registered trademarks of all companies, even when not mentioned.fromProjector.c ENGLISH-2FEATURESThis liquid crystal projector is used to project various computer signals as well as NTSC / PAL /SECAM video signals onto a screen. Little space is required for installation and large images caneasily be realized.• Outstanding brightnessThe UHB lamp and high-efficiency optical system assure a high level of brightness.• Partial magnification functionInteresting parts of images can be magnified for closer viewing.• Distortion correction functionDistortion-free images are quickly available.BEFORE USEContents of packageMake sure all of the following items are included in the package. If anything is missing, pleasecontact your dealer.NOTE: Keep the original packing material for future reshipment.ProjectorUser’s Manual(this manual)Safety InstructionsPower CordUS TypePower CordUK TypePower CordEurope TypeRGB Cable Video/Audio Cable Mouse cable(PS/2)Remote ControlTransmitterBatteriesfor Remote ControlTransmitterHandleCarrying Bagww nl o ar t o r .cENGLISH-3E N Part NamesControl Panel (Refer to P.9 "OPERATIONS")(Refer below)TERMINAL PANELAUDIO IN L AUDIO IN R AUDIO IN 1AUDIO IN 2AUDIO OUTw nlor .cENGLISH-4Part Names (continued)REMOTE CONTROL TRANSMITTER(Refer to P.9 "OPERATIONS")• Do not give the remote control transmitter any physical impact. Take care not to drop. • Do not place the heavy objects on the remote control transmitter.• Do not wet the remote control transmitter or place it on any wet object.• Do not place the remote control transmitter close to the cooling fan of the projector.• Do not disassemble the remote control transmitter in case of malfunction. Please bring it to the service station.LASER button VIDEO buttonRGB buttonMOUSE / RIGHT buttonVOLUME buttonFREEZE button MUTE button POSITION buttonTIMER button: These functions works when the mouse control function is activated. Remember, the POSITION, BLANK ON and MENU ON functions disable the mouse control function.wd edf r or .cENGLISH-5E N Loading the BatteryInstall the AA batteries into the remote control transmitter.1. Remove the battery cover.Push the knob while lifting up the battery cover.2. Load the batteries.Make sure the plus and minus poles are correctly oriented.3. Close the battery cover.NOTE :Replace the batteries when remote control transmitter operation becomes difficult.Fixing the HandleFix the enclosed handle if you need.1. Raise up the handle hook, and pass one end of the handle through the hole of handle hook.2. Buckle the end of the handle, as the right drawing.3. Fix the other end of the handle to the other handle hook in the same way.l od ct o r .cINSTALLATIONInstallation of the Projector and ScreenRefer to the drawing and table below for determining of the screen size and projection distance.a: Distance from the LCD projector to the screen.The projection distances shown in the table below are for full size (1024 x 768 dots).Table 1. Installation ReferenceAngle AdjustmentUse the foot adjuster on the bottom of the projector to adjust the projection angle. It is variable within 0˚ to 9˚ approximately.1. Lift up the front side of the projector, and pressing the foot adjuster button, adjust the projection angle.2. Release the button to lock at the angle to be fixed.3. Turn the rear foot adjuster to adjust the left-right slope.Rearw nf r o mPr o j e ct o r .cENGLISH-7CablingRGB signal input:Connect the RGB IN 1 or 2 terminal of the projector to the RGB signal output of the computer by the enclosed RGB cable.For some modes, the optional Mac adapter is necessary. Consult your dealer to connect with the Apple computer.Some computers may have multiple display screen modes. Use of some of these modes will not be possible with this projector.Audio signal input (from computer) :Connect the AUDIO IN 1 or 2 terminal of the projector to the audio signal output of the computer by the optional audio cable.Video signal input:Connect the VIDEO IN terminal of the projector to the video signal output of the video tape recorder by the enclosed video/audio cable except for S-Video signal.For S-Video signal, use the S-VIDEO IN terminal of the projector and the optional S-Video cable with Mini DIN 4-pin jack.Audio signal input (from video tape recorder) :Connect the AUDIO IN R and L terminals of the projector to the audio output of the video tape recorder by the enclosed video/audio cable with RCA jack.RGB signal output:Connect the RGB OUT terminal of the projector to the RGB signal input terminal of the monitor by the optional RGB cable with D-sub 15-pin shrink jack and inch thread screws.Audio signal output:Connect the AUDIO OUT terminal of the projector to the audio signal input terminal of the speaker by the optional audio cable with stereo mini jack.PS/2, ADB , Serial or RS-232C communication:Connect the CONTROL terminal of the projector to the computer by an appropriate cable.For PS/2 mouse control (for IBM and compatible) use the enclosed mouse cable. For others, consult your B communication (mouse control only):Connect the USB jack (B type) of the projector to the USB jack (A type) of the computer by optional USB cable.• Before connecting, read the instruction manuals of the devices to be connected, and make sure that the projector is compatible with the device.• Secure the screws on the D-sub connectors and tighten.• Refer to the TECHNICAL section for the pin assign of connectors and RS-232C communication data.w nl o ad.cNOTE:When connecting with notebook computer, set to valid the RGB external image output (setting CRT display or simultaneous display of LCD and CRT). Please read instruction manual of the notebook for more information.Plug & PlayThis projector is VESA DDC 1/2B compatible. Plug & play is possible by connecting to a computer that is VESA DDC (Display Data Channel) compatible.(Plug & play is a system configured with peripheral equipment including a computer and display,and an operating system.NOTE :• Use the RGB cable included with this projector when using plug & play. With other cables, pins (12), (15) are sometimes not connected.• Plug & play is available only when the RGB cable is connected to the RGB IN 1 terminal.ENGLISH-8Power ConnectionUse the correct one of the enclosed power cords depending on the power outlet to be used.Connect the AC inlet of the projector to the power outlet firmly by the power cord.w nld ect o r .cENGLISH-9OPERATIONSSwitching the Power Supply ON/OFFSwitching Power ON1. Check that the power cord is connected correctly.2. Set the power switch to [ | ]. The standby mode is selected, and the Power indicator is turned to orange.3. Press the STANDBY/ON button on the control panel or the remote control transmitter.Warm-up begins and the Power indicator blinks in green.4. The Power indicator ceases blinking and turns to green when power is on. Open the slide lens door.5. Adjust picture size using the projection lens Zoom Knob.6. Adjust focus using the projection lens Focus Ring.Power indicator blinks orange during lamp cooling. Pressing the STANDBY/ON button has no effect while the Power indicator is blinking.2. The system assumes the Standby mode when cooling is complete, and the Power indicator ceases blinking and changes to orange. Check that the indicator is orange and set the Power switch to [O ].3. The Power indicator is extinguished when power is off. Do not forget to close the lens door.NOTE:• Except in emergencies, do not turn off unless the Power indicator is orange as it will reduce the life of the projector lamp.• To prevent any troble, turn on/off the projector when the computer or video tape recorder is OFF.Providing a RS-232C cable is connected, turn on the computer before the projector.o r .cBasic OperationThe Basic operations shown in Table 2 is performed from the projector control panel or the supplied remote control transmitter. (items indicated by * may be used from the control panel)NOTE:Use the remote control transmitter at a distance of approximately 3m from the sensor on thefront of the projector, and within a range of 30°left-right. Strong light and obstacles will interfere with operation of the remote control transmitter.Table 2 . Basic Operationl nSetup MenuThe following adjustments and settings are possible when SETUP is selected at the top of the menu. Part of the Setup menu differs andmenu to reduce menu size (see Table 2, MENU SELECT).Table 3. Setup Menunl o aInput MenuThe following functions are available when INPUT is selected on the menu. Select an item with the and buttons, and start or stop operation with the and buttons.Table 4. Input Menunl o ad edf rImage MenuThe following adjustments and settings are available when IMAGE is selected on the menu. Select an item with the and buttons, and start operation.Table 5. Image Menunl o adOptions Menuselected on the menu. Select an item with the and buttons, and start operation.Table 6. Options MenuNo Signal MenuThe same adjustments and settings are available as with the Image and Options menus when the MENU button is pressed during display of the “NO INPUT IS DETECTED ON ***” or “SYNC IS OUT OF RANGE ON ***” message while no signal is received.Table 7. No Signal Menunl o ad edf r o mFor disposal of used lamp, treat according to the instruction ofSince the lamp is made of glass, do not apply shock to it and do Also, do not use old lamp. This could also cause explosion of the If it is probable that the lamp has exploded (explosive sound isheard), disconnect the power plug from the power outlet and ask your dealer to replace lamp. The lamp is covered by front glass , but, in rare cases, thereflector and the inside of the projector may be damaged by scattered broken pieces of glass, and broken pieces could cause injury when being handled. Do not use the projector with the lamp cover removed.MAINTENANCEContact your dealer before replacing the lamp.Before replacing the lamp, switch power OFF, remove the power cord from the power outlet, and wait approximately 45 minutes until the lamp has cooled. The lamp may explode if handled at high Lamp LifeProjector lamps have a finite life. The image will become darker, and hues will become weaker,after a lamp has been used for a long period of time.Replace the lamp if the LAMP indicator is red, or the CHANGE THE LAMP message (see P.20Table 8) appears when the projector is switched ON.NOTE:The LAMP indicator is also red when the lamp unit reaches high temperature. Before replacing the lamp, switch power OFF, wait approximately 20 minutes, and switch power ON again. If the LAMP indicator is still red, replace the lamp.nl o aedf ro Replacing the Lamp1. Switch the projector OFF, remove the power cord from the power outlet, and wait at least 45 minutes for the unit to cool.2. Prepare a new lamp.3. Check that the projector has cooled sufficiently, and gently turn it upside down.4. Loosen the two screws as shown in the diagram, and remove the lamp cover.5. Loosen the three screws, and gently remove the lamp while holding the grips. Touching the inside of the lamp case may result in uneven coloring.6. Install the new lamp and tighten the three screws firmly.Also steadily push the opposite side of the screwed lamp into the unit.7. Replace the lamp cover in position and tighten the two screws firmly.8. Gently turn the projector right-side up.Resetting the Lamp TimerReset the lamp timer after replacing the lamp. When the lamp has been replaced after the LAMP indicator is red, or the CHANGE THE LAMP message is displayed, complete the followingoperation within ten minutes of switching power ON. The power will be turned off automatically in over 10 minutes.button on the control panel, for approximately three seconds. The ‘LAMP xxxx hr ’ message 2. Press the MENU button on the remote control transmitter, or the RESET button on the control panel, while the lamp timer is displayed. The ‘LAMP xxxx →0 I CANCEL ’ message will and select 0, and wait until the timer display is cleared.NOTE:Do not reset the lamp timer without replacing the lamp. Reset the lamp timer always when replacing the lamp. The message functions will not operate properly if the lamp timer is not reset correctly.nl of r o mPr .cAir Filter MaintenanceThe air filter should be cleaned as described below at intervals of approximately 100 hours.1. Switch the projector power supply OFF, and remove the power cord from the power outlet.2. Clean the air filter with a vacuum cleaner.Other MaintenanceMaintenance Inside the Equipment For safety reasons, ensure that the equipment is cleaned and checked by the dealer once every two years. Maintaining the equipment by yourself is dangerous.Cleaning the LensGently wipe the lens with lens cleaning paper. Do not touch the lens with your hands.Cleaning the Cabinet and Remote control transmitterGently wipe with a soft cloth. If dirt and stains etc. are not easily removed, use a soft cloth dampened with water, or water and a neutral detergent, and wipe dry with a soft, dry cloth.wr .cENGLISH-20TROUBLESHOOTINGOSD MessageThe messages as described below may appear on the screen at power ON. Take the appropriate measures when such a message appears.Table 8. OSD Messagesr .cENGLISH-21Indicators MessageThe POWER indicator, LAMP indicator, and TEMP indicator are lit and blank as follows. Take the appropriate measures.Table 9. Indicators Messagew nl or .cENGLISH-22SymptomBefore requesting repair, check in accordance with the following chart. If the situation cannot be corrected, then contact your dealer.Table 10. SymptomSPECIFICATIONSwENGLISH-23w nl o ad edf r o mPr o j e ct o r .cENGLISH-24WARRANTY AND AFTER-SERVICEIf a problem occurs with the equipment, first refer to the P.20 “TROUBLESHOOTING ” section and run through the suggested checks. If this does not resolve the problem contact your dealer or service company. If repairs are possible, and desirable, they will be charged.PLEASE READThis manual is provided as a free service by .We are in no way responsible for the contents of the manual. We do not guarantee its accuracy and we do not make any claimof copyright. The copyright remains the property of their respective owners.ABOUT () is your review and buying guide resource for DLP and LCD video projectors.Visit the site to read the latest projector news and reviews, read and comment on projector specifications, download user manuals and much more.。
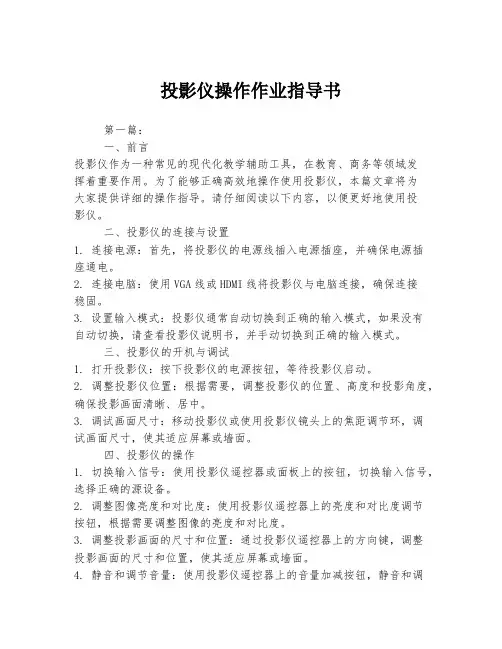
投影仪操作作业指导书第一篇:一、前言投影仪作为一种常见的现代化教学辅助工具,在教育、商务等领域发挥着重要作用。
为了能够正确高效地操作使用投影仪,本篇文章将为大家提供详细的操作指导。
请仔细阅读以下内容,以便更好地使用投影仪。
二、投影仪的连接与设置1. 连接电源:首先,将投影仪的电源线插入电源插座,并确保电源插座通电。
2. 连接电脑:使用VGA线或HDMI线将投影仪与电脑连接,确保连接稳固。
3. 设置输入模式:投影仪通常自动切换到正确的输入模式,如果没有自动切换,请查看投影仪说明书,并手动切换到正确的输入模式。
三、投影仪的开机与调试1. 打开投影仪:按下投影仪的电源按钮,等待投影仪启动。
2. 调整投影仪位置:根据需要,调整投影仪的位置、高度和投影角度,确保投影画面清晰、居中。
3. 调试画面尺寸:移动投影仪或使用投影仪镜头上的焦距调节环,调试画面尺寸,使其适应屏幕或墙面。
四、投影仪的操作1. 切换输入信号:使用投影仪遥控器或面板上的按钮,切换输入信号,选择正确的源设备。
2. 调整图像亮度和对比度:使用投影仪遥控器上的亮度和对比度调节按钮,根据需要调整图像的亮度和对比度。
3. 调整投影画面的尺寸和位置:通过投影仪遥控器上的方向键,调整投影画面的尺寸和位置,使其适应屏幕或墙面。
4. 静音和调节音量:使用投影仪遥控器上的音量加减按钮,静音和调节音量。
5. 其他操作:根据投影仪的具体型号和功能,了解并学习其他常见操作,如横竖屏切换、菜单导航等。
五、投影仪的关机与存放1. 关机操作:按下投影仪遥控器上的关机按钮,或者在投影仪面板上按下关机按钮,等待投影仪完全关闭。
2. 断开连接:先断开电脑与投影仪之间的连接线,然后断开投影仪的电源线。
3. 清洁和存放:定期清洁投影仪镜头和机身,使用专用清洁布擦拭。
将投影仪放置在干燥、通风的地方,避免直接阳光照射。
六、注意事项1. 使用环境:投影仪应放置在干燥、通风的环境中,避免长时间处于高温、潮湿等特殊环境。
日立hcp900x显示参数调整教程
调整教程:
可通过遥控器对投影画面进行电动聚焦调整,还可以通过独立调整投射画面的四角和四边的位置达到最佳效果。
适合在复杂环境下不规则画面的调整。
梯形校正:手动垂直/水平梯形校正
边角校正:支持
网络功能:无线功能:需选购USB无线适配器USB-WL-11N
参数:
型号:HCP-A836+
显示系统:3LCD
显示设备:
面板尺寸:0.63英寸XGA多晶硅有源矩阵式TFT液晶板×3
分辨率:1024 x 768
像素:786,432 像素
镜头:
类型:固定变焦/电子聚焦
投射比:0.3
位移范围:固定
光源类型:250W UHP灯泡
光源寿命*1:4,000小时(标准模式);6,000小时(省电模式)
亮度*2:3300流明
对比度*2:10000:1 (演示模式)
声音输出:16W
噪声:36dB(Normal);32dB(ECO1);29dB(ECO2) 图像处理:
HDCR(高动态对比显示):支持
Accentualizer(图像分明处理):支持
焕影(图像优化技术):支持
DICOM 模拟模式*3:支持。
• • • • • DATA SHEE TUnstructured data growth and application proliferation continue to accelerate. These developments lead to increased server and storage sprawl, with numerous silos of infrastructure supporting traditional and new workloads.Hitachi Content Platform (HCP) is an object storage software solution that connects data producers, users, applications and devices into a central cloud storage plat-form. It enables users to better understand, govern and control the degree of mobility of their data, as well as to identify insights and extract value for data-driven decisions and faster time to market.HCP lets IT organizations and cloud service providers securely and cost-effectively store, share, protect, preserve and analyze data. Beyond its efficiency, ease of use and ability to store data at massive scale, HCP auto-mates day-to-day IT operations like data governance and protection. This approach readily evolves to changes in scale, scope, regulatory compliance, applications, storage, server and cloud technologies over the life of data. HCP also automates the governance of data to ensure proper retention, access control, encryption and disposal of data, while simplifying e-discovery and search. In IT environments where data grows quickly or must live for years or even indefinitely, these capabilities are invaluable.Hitachi Content Platform eliminates the need for a siloed approach to storing unstructured content. The platform provides massive scale, multiple storage tiers, powerfulHitachi Content Platform: Enterprise-Class, Backup-Free Cloud and Archivesecurity, Hitachi reliability, cloud capabilities, broad protocol support, multitenancy and configurable attributes for each tenant. It can support a wide range of applications on a single physical cluster and is backed by a thriving community of third-party software partners. With access to a robust ecosys-tem of cloud applications, Hitachi Content Platform can solve a wide range of current problems and adapt to meet future needs.Flexible, Enterprise-Class CloudHitachi Content Platform multitenancy divides the physical cluster into a variety of tenants. These tenants can be assigned to different IP networks and further subdivided into thousands of namespaces for additional organization of content, more refined poli-cies, and robust access control. Openness is also a hallmark of HCP . It has powerful native REST and Amazon Simple Storage Service (S3) based interfaces, permitting seamless WAN or LAN access for new and existing Web 2.0 and mobile applications. Further, it supports the NFS, SMB, SMTP and WebDAV protocols, and offers dual-stack support for IPV4 and IPV6.The platform can handle all kinds of data and almost any application. It offers high reliability, massive scale, seamless data mobility and storage across private clouds and public cloud services, encryption, access control, easy provisioning, charge-back measurement and more. The HCP G series access nodes allow organizations greater flexibility to support mixed work-loads with varying performance and scalerequirements. These nodes virtualize capac-ity from Hitachi Content Platform S series nodes, local drives, Fibre Channel storage arrays, NFS shares and leading public cloud providers. HCP drastically reduces total cost of ownership and provides cost-effective storage with geographically dispersed era-sure coding data protection for content that must remain behind the firewall. Such attri-butes enable IT to take advantage of cloud and deliver a whole new range of IT services, without compromising security and control of information.Efficient, Backup-Free ArchiveHitachi Content Platform enables your IT organization to protect, preserve and retrieve data in a more efficient manner, without the need for tape-based backups. The high density of HCP storage is enhanced with built-in compression, single instancing and support for a variety of media to keep storage costs in control. With dynamic data protection, data integrity checks, data reten-tion enforcement, erasure coding and many other technologies to preserve and protect content, HCP delivers compliance-quality data protection. It eliminates the need for tape-based backups.Intelligent Structure for Unstructured File DataHitachi Content Platform enables trusted content mobility with full visibility of all the control points where data enters, exits and exists across a global ITlandscape. It optimizes cost by providingWith HCP , you have access to metadata and content search tools that enable more elegant and automated queries for faster, more accu-rate results. Through these features you can gain a better understanding of the content of stored files, how content is used and how objects may be related to one another. This understanding can help you to enable more intelligent automation, along with big data analytics based on best-in-class metadata architecture.Hitachi Content Platform provides morecapabilities, flexibility, configurability and input options for you to take advantage of cloud in your own way. It simplifies management via automation to ensure efficiency, reliability, data mobility and accessibility of your organizations’ data. With HCP you can not only address today’s challenges around storing and protect-ing data, but also set yourself up for the next big thing.provide erasure coding to deliver long-term compliance and protection at the lowest cost. There’s no need to learn any new datamovement procedures or processes. Using the HCP interface, you can orchestrateseamless and policy-based data movement to the HCP S series nodes to optimize agility and efficiency.HCP for Cloud ScaleHitachi Content Platform for cloud scale is designed for applications requiring hyperscale, high-performance and comprehensive S3 API compliance. Its novel microservicedesign enables massive scalability to support hundreds of nodes and trillions of objects, and also features rich, policy-driven management and data enrichment tools. Its globalnamespace allows for unified management across multiple on-premises and cloud deployments. Offering broad flexibility, HCP for cloud scale’s architecture is hardware agnostic. It can be deployed on “white box” servers, leading cloud platforms such as Amazon Elastic Compute Cloud (EC2), or Hitachi Unified Compute Platform using a variety of Linux distributions. HCP S series nodes provide ideal on-premises storage for HCP for cloud scale. HCP for cloud scale also supports any S3 storage endpoint, including Amazon ECS.the flexibility to maintain your critical data securely, on-premises or in public clouds. It automatically moves content based onbusiness value or your storage-related service level agreement to the most appropriate storage tier. For example, content can be moved to Hitachi Content Platform S series nodes or cloud storage services, including Amazon S3, Microsoft Azure, Google Cloud Storage or any other S3-enabled cloud.As shown in Figure 1:●●HCP G series nodes are access nodes.●●HCP S series nodes are optional and pro-vide massive scale.●●Fibre Channel storage and cloud are optional.Performance and Scale To Power Next-Gen Hybrid Data CentersHCP S Series NodesHitachi Content Platform S series nodes provide economical deep data storage and protection in a small footprint. They seamlessly extend your private or hybrid cloud and offload infrequently accessed content from valuable primary storage. These nodes deliver the scale and economics of the public cloud locally with large capacity drives and always-on, self-optimization processes to maintain data integrity, availability and durability. They alsoFigure 1. Flexibility of Hitachi Content PlatformVM = virtual machine, RDM = remote device management, KVM = kernel-based virtual machine, EB = exabyte All capacities raw. Usable capacity will vary based on data protection choices.TABLE 1. HITACHI CONTENT PLATFORM OFFERINGSHITACHI is a registered trademark of Hitachi, Ltd. Microsoft and Azure are trademarks or registered trademarks of Microsoft Corporation. All other trademarks, service marks and company names are properties of their respective owners.DS-125-U BTD March 2020Hitachi VantaraCorporate Headquarters 2535 Augustine DriveSanta Clara, CA 95054 USA | Contact Information USA: 1-800-446-0744Global: /contactHITACHI CONTENT PLATFORM IMPLEMENTATION SERVICEHitachi Vantara provides consulting, implementation, migration and replication services to help you bring the benefits of Hitachi content solutions to your business-driven IT environment. In this implementation service, we can help you address data growth challenges, manage unstructured data throughout its life cycle, enable mobility, cloud and converged infrastructure strategies, and harness the value of your data with sophisticated search and analytics. Complementary services include Hitachi Content Platform Replication Service and Hitachi Content Platform Migration Service.SSD = solid state disk, GbE = gigabit Ethernet, HDD = hard disk drive, RU = rack unit All capacities raw. Usable capacity will vary based on data protection choices. 1Total for both controllersTABLE 2. HITACHI CONTENT PLATFORM HARDWAREWe Are Hitachi VantaraWe guide our customers from what’s now to what’s next by solving their digital challenges. Working alongside each customer, we apply our unmatched industrial and digital capabilities to their data and applications to benefit both business and society.。
日立投影机使用方法
以下是一个常见的日立投影机的使用方法:
1. 将投影机放置在一个平稳的表面上,确保投影机正面无障碍物遮挡。
2. 接通投影机的电源插头,并按下电源按钮,等待投影机完全启动,指示灯显示为绿色。
3. 使用项目幻灯片或者计算机等外部设备,将视频信号输入到投影机。
可以通过HDMI、VGA等接口进行连接。
4. 调整投影机的焦距和镜头,使得投影画面清晰可见。
5. 根据需要,使用投影机的遥控器或者投影机本身的控制面板,调整亮度、对比度、红绿蓝色调等参数。
6. 如果需要调整投影画面的大小和位置,可以使用投影机的横向和纵向移动功能,或者调整投影镜头的变焦和变焦功能。
7. 确保投影机的周围环境光线足够暗,以获得最佳的投影效果。
8. 在使用完投影机后,按下电源按钮,将投影机关闭,同时拔掉电源插头。
请注意,以上仅是一个一般性的使用方法,具体的操作步骤可能因为投影机型号和功能不同而有所差异。
因此,在使用投影机之前,建议先仔细阅读日立投影机的用户手册,以了解具体的使用方法和注意事项。
日立hcp2700x说明书基本参数
型号:HCP-2700X
3D投影:不支持
标准分辨率:1024×768
投影对比度:600:1
调整功能:自动垂直梯形校正
镜头参数
投影镜头:手动聚焦/手动变焦
变焦比:1.2倍手动变焦
灯泡参数
灯泡类型:超高压汞灯,UHB
灯泡功率:200W
灯泡寿命:3000小时(标准),400小时(ECO) 屏幕参数
投影色彩:1677万色
屏幕比例:4:3,16:9
接口参数
输入端子:模拟RGB:15针微型D-sub端子×2
分量视频:15针微型D-sub端子×2
S-视频:微型DIN端子×1
复合视频:RCA 端子×1
微型立体声端子×2
输出端子:模拟RGB:15针微型D-sub端子×1
微型立体声端子×1
控制端子:RS232C:9针D-sub端子×1
USB鼠标接口:USB(B)×1
功耗参数
扬声器:1W扬声器×1
电源:AC 120- 240 V, 50/60 Hz
正常功耗:290W
其他参数
菜单语言:支持中文
视频信号:NTSC,NTSC4.43,PAL,SECAM,M-PAL,N-PAL
配件:电源线×1
VGA线×1
说明书×1
遥控器×1
保修卡×1
保修:2年
体积:306×221×77mm
重量:2.2kg
质保信息:全国联保,享受三包服务。
篇一:投影仪操作指导书1篇二:投影仪操作规程投影仪操作规程投影仪使用:一、打开主机,显示待机时打开程序;二、将需测件固定在相应的夹具上放置玻璃试台上,移动x,y,z轴:将试件在显屏上显示最佳清晰位置;三、校正后进行测量;四、完毕后关闭程序、主机。
投影仪使用注意事项:一. 注意防尘、防潮、防腐蚀、防震动。
除投影仪外,投影柜上部不得放置其他东西。
二. 使用过程中不得搬动投影仪,使用完毕后,也要等到灯丝冷却后再搬动。
三. 不要用手及坚硬物触摸投影仪的光学部件。
不得擅自打开投影仪盖板,投影仪内部有电。
四. 在投影仪使用过程中,不得阻挡投影仪的进、出风口。
五. 投影教学中,投影台上投影片的四周要遮光。
六.使用投影仪时,反射镜的张角要调整到使投影光轴与银幕垂直。
七.一定要注意安全,不要拽线拔电源插头。
八.在不接电源的情况,投影柜、投影仪盖板平台表面可以用拧干或干的干净软布擦拭,除此之外的部分由专业人员清洁,防止漏电事故。
篇三:光学投影仪操作保养作业指导书德信诚培训网光学投影仪操作保养作业指导书一.主要用途:用于测量各种形状复杂工件的轮廓尺寸和表面形状尺寸。
二.型号及种类:1.型号:cpj-30002. 品牌:万濠三、操作方法及步骤1.使用前应该注意该仪器是不是在校正周期内.1.1.同时打开总电源开关(io)透射照明电源开关(io) 透射照明电源开关(io)和反射照明开关.1.2将工作量于工作台上,并位于反射照明光斑之内,若为细小工件,需用垫杆或垫片作为支撑物,调好焦,此时屏上出现工作表面的影像.1.3.视工件的大小,可以旋转反射聚光镜的镜筒改变照在工件上的光斑大小,当光班变小时,工件影像将更明亮.1.4将左手握住у轴手轮,右手握住х轴手轮,眼睛目视于投影屏上,待工件清晰,平整后方可进行测量工作.2.轮廓测量2.1将标准放大图用四只弹性压板压在投影屏上.2.2工件放在工作台上,调好焦,移动х、у工作台使零件影像与放大图套准。
投影机使用说明书.操作指南承蒙您购买本投影机,谨向您表示衷心的感谢。
•本说明书中的信息如有变更,恕不另行通知。
•本说明书中的插图用作图解。
与您的投影机可能有少许差异。
•制造商对本说明书中可能出现的任何错误概不负责。
•未经明确的书面许可,不得翻印、转载或复制本文档的全部或任何部分。
通知事项本说明书中使用了各种符号。
这些符号的意义说明如下。
本符号表示如果忽略这些信息,可能会因错误操作而导致人身伤害,甚至死亡。
本符号表示如果忽略这些信息,可能会因错误操作而导致人身伤害或实物损坏。
请参阅本符号后标明的页码。
商标承认•Mac ® 是 Apple Inc. 的注册商标。
• W indows ®, DirectDraw ® 和 Direct3D ® 是微软公司在美国和/或其它国家的㊟册商标。
•VESA 和 DDC 是 Video Electronics Standard Association 的商标。
• H DMI、HDMI 徽标以及 High-Definition Multimedia Interface 是 HDMI Licensing LLC. 在美国和其他国家的商标或注册商标。
• B lu-ray Disc TM 和Blu-ray TM 是Blu-ray Disc Association 的商标。
其他所有商标均为其各自所有者的财产。
HCP-635X通告本条目用于告知可能会导致故障。
介绍. . . . . . . . . . . . . . . . . . . . . . . . . .3特点. . . . . . . . . . . . . . .3关于电磁干扰. . . . . . . . . . .3包装箱中的物品. . . . . . . . . .3部件名称. . . . . . . . . . . . .4设置. . . . . . . . . . . . . . . . . . . . . . . . . .7安装. . . . . . . . . . . . . . .7连接设备. . . . . . . . . . . .10连接电源. . . . . . . . . . . .16固定适配器盖. . . . . . . . . .17使用防盗杆和防盗槽. . . . . . .17遥控器. . . . . . . . . . . . . . . . . . . . . . .18装入电池. . . . . . . . . . . .18关于遥控信号. . . . . . . . . .19改变遥控信号的频率. . . . . . .19用作简易电脑鼠标和键盘. . . . .20电源开/关. . . . . . . . . . . . . . . . . . . .21开启电源. . . . . . . . . . . .21关闭电源. . . . . . . . . . . .22操作. . . . . . . . . . . . . . . . . . . . . . . . .23调节音量. . . . . . . . . . . .23暂时静音. . . . . . . . . . . .23选择输入信号. . . . . . . . . .24搜索输入信号. . . . . . . . . .25选择宽高比. . . . . . . . . . .26调节投影机的支撑脚. . . . . . .27调节变焦和聚焦. . . . . . . . .27使用自动调节功能. . . . . . . .28调节位置. . . . . . . . . . . .28校正梯形失真. . . . . . . . . .29使用放大功能. . . . . . . . . .30静止画面. . . . . . . . . . . .31暂时遮屏. . . . . . . . . . . .31使用菜单功能. . . . . . . . . .32简易菜单. . . . . . . . . . . . . . . . . . . . . .34宽高比、自动梯形校正、梯形校正、图像模式、省电模式、安装、复位、.过滤器使用时间、语言、高级菜单、.关闭图像菜单. . . . . . . . . . . . . . . . . . . . . .36亮度、对比度、伽马、色温、彩色、.色调、清晰度、动态光圈、我的存储器影像菜单. . . . . . . . . . . . . . . . . . . . . .39宽高比、扫描度、垂直位置、水平位置、水平相位、水平尺寸、自动调节执行输入菜单. . . . . . . . . . . . . . . . . . . . . .42逐行、视频降噪、彩色空间、视频格式、HDMI.格式、HDMI范围、COMPUTER-IN、.帧锁定、分辨率设置菜单. . . . . . . . . . . . . . . . . . . . . .46自动梯形校正、梯形校正、自动省电模式、省电模式、安装、待机模式、显示器输出声音菜单. . . . . . . . . . . . . . . . . . . . . .49音量、扬声器、音频源、麦克风级别、麦克风音量屏幕菜单. . . . . . . . . . . . . . . . . . . . . .50语言、菜单位置、遮屏画面、启动画面、自选画面、自选画面锁定、消息、输入源名称、模板、C .C .(隐藏字幕)选项菜单. . . . . . . . . . . . . . . . . . . . . .56自动搜索、自动梯形校正、直接开启电源、自动关闭电源、USB.TYPE.B、灯泡使用时间、过滤器使用时间、快捷按钮、我的端口源、特殊设定网络菜单. . . . . . . . . . . . . . . . . . . . . .67无线设置、无线信息、有线设置、有线信息、投影机名称、我的图像、AMX.D .D .、演示、特殊设定安全菜单. . . . . . . . . . . . . . . . . . . . . .78变更安全密码、自选画面密码、身份识别号码锁、状态监视功能、个人文本密码、显示个人文本、填写个人文本、复制锁定演示工具. . . . . . . . . . . . . . . . . . . . . .84无需电脑演示. . . . . . . . . .84 USB显示(Windows电脑). . . . .94 USB显示(Mac电脑). . . . . . .98维护. . . . . . . . . . . . . . . . . . . . . . . . .100更换灯泡. . . . . . . . . . . .102清洁和更换空气过滤器. . . . . .104其他维护. . . . . . . . . . . .106故障诊断. . . . . . . . . . . . . . . . . . . . . .107相关消息. . . . . . . . . . . .107关于指示灯. . . . . . . . . . .109重设所有设置. . . . . . . . . .112容易误认为是机器故障的现象. . .112规格. . . . . . . . . . . . . . . . . . . . . . . . .117•请妥善保管原包装材料,以备日后重新装运。
当搬运投影机时,请务必使用原包装材料。
特别要小心保护镜头。
•投影机倾斜、移动或晃动时,投影机内部控制通风的薄片会发生移动,投影机可能会发出咔嗒声。
请注意这并非故障。
通知事项本投影机用途广泛,具有以下特点:ü 本投影机拥有多种I/O端口,可满足任何商务场面的需求。
HDMI 端口可支持具有数字接口的各种影像设备,以在屏幕上获得更加清晰的图像。
ü 如果将USB存储设备等USB存储器,插入USB.TYPE.A 端口,并将该端口选为输入源,则可以查看保存在该设备中的图像。
ü 本投影机可通过网络连接进行监控。
此外,您可以使用指定的USB无线适配器(另售)建立无线局域网连接。
ü 双层过滤器系统将延长投影机使用寿命,并减少维护的频率。
ü 内置的16W扬声器能在像教室这样的大空间里发出足够大的声音,而无需外部音箱。
特点包装箱中的物品本投影机应附带以下附件。
请查看包装箱内的所有物品。
若有任何附件缺失,请即与您的销售商联系。
(1) 带两节AA 型号电池的遥控器(2) 电源线(3) RGB 电缆(4) 适配器盖(5) 镜头盖(6) 使用说明书(7) 安全标签(8) 应用程序CD(6)(7)(2)(3)(5)(1)(8)(4)关于电磁干扰警告此为A级产品。
在生活环境中,该产品可能会造成无线电干扰。
在这种情况下, 可能需要用户对干扰采取切实可行的措施。
(1) 灯罩( 102)内有灯泡单元。
(2)扬声器( 23, 49)(3) 过滤器盖( 104)内含空气过滤器和进风口。
(4)支撑脚(x 2) ( 27)(5)支撑脚调校钮(x 2) ( 27)(6)遥控传感器( 19)(7)镜头( 106)(8)镜头盖(9)进风口(10)控制面板( 5)(11)聚焦.环( 27)(12)变焦.环( 27)(13)AC.IN (交流电插口)( 16)(14)排风口(15)后面板( 5)部件名称(接下页)部件名称(续)后面板( 10 ~ 15)(1)LAN端口(2)USB.TYPE.A端口(x2)(3)USB.TYPE.B端口(4)HDMI端口(5)MIC端口( 15)(6)AUDIO.IN1端口(7)AUDIO.IN2端口(8)AUDIO.IN3 (L、R)端口(9)AUDIO.OUT (L、R)端口(10)COMPUTER IN1端口(11)COMPUTER.IN2端口(12)MONITOR.OUT端口(13)CONTROL端口(14)VIDEO端口(15)S-VIDEO端口(16)防盗槽( 17)(17)防盗杆( 17)控制面板(1)待机/电源.按钮( 21)(2)输入选择.按钮( 24)(3)菜单.按钮( 32)(4)灯泡.指示灯( 109)(5)温度.指示灯( 109)(6)电源.指示灯( 109)(4)(5)(接下页)遥控器(1) VIDEO 按钮 ( 24)(2) COMPUTER 按钮 ( 24)(3) SEARCH 按钮 ( 25)(4) STANDBY/ON 按钮 ( 21)(5) ASPECT 按钮 ( 26)(6) AUTO 按钮 ( 28)(7) BLANK 按钮 ( 31)(8) MAGNIFY.-.ON 按钮 ( 30)(9) MAGNIFY.-.OFF 按钮 ( 30)(10) MY.SOURCE/DOC .CAMERA 按钮 ( 25, 59)(11) VOLUME- 按钮 ( 23)(12) PAGE.UP 按钮 ( 20)(13) PAGE.DOWN 按钮 ( 20)(14) VOLUME+ 按钮 ( 23)(15) MUTE 按钮 ( 23)(16) FREEZE 按钮 ( 31)(17) MY.BUTTON.-.1 按钮 ( 58, 59)(18) MY.BUTTON.-.2 按钮 ( 58, 59)(19) KEYSTONE 按钮 ( 29)(20) POSITION 按钮 ( 28, 32)(21) MENU 按钮 ( 32)(22) ▲/▼/◄/► 光标按钮 ( 32)(23) ENTER 按钮 ( 32)(24) ESC 按钮 ( 32)(25) RESET 按钮 ( 32)(26) 电池舱盖 ( 18)遥控器 背面部件名称(续)(2)(1)(6)(5)(8)(9)(接下页)请根据投影机的使用环境和方式来安装投影机。