
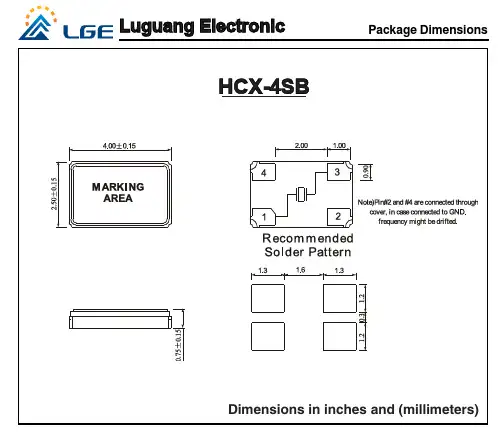
HCX-4SB
- 格式:pdf
- 大小:102.70 KB
- 文档页数:1

HMUX-4-DS User ManualIntroductionThe HMUX-4-DS, 4 Channel, Dual Speed HART® Multiplexer is designed to access your HART devices using Ethernet so you can view, configure, and troubleshoot your devices remotely.System DiagramThe complete system consists of a HART-IP Client running on a computer or mobile device with an Ethernet connection, the Ethernet network, the HMUX-4-DS, a 24Vdc power supply, and up to 4 HART devices.Figure 1. HART Multiplexer System DiagramWiring DiagramScrew terminals provide the interface connections to the HMUX-4-DS. The connections are simply the Ethernet CAT5, +24Vdc power supply, and up to 4 HART device loops. The loops must contain 250 ohms of resistance per the HART specification. There is no polarity.Figure 2. Wiring DiagramEthernet ConnectionConnect a CAT5 cable with a RJ45 connector to the Ethernet Jack. The cable must be connected to an Ethernet Router or Switch in the network.Power ConnectionConnect the 24Vdc power supply to the HMUX-4-DS at GND and 24V terminals. There is no power switch, so the unit will turn on as soon as power is applied.HART ConnectionsThe HMUX-4-DS HART connections can be made in one of two ways: across the loop load resistor (A – B) or across the HART transmitter terminals (C – D). See Figure 3.Figure 3. HART ConnectionsHMUX-4-DS Configuration via Web InterfaceThe HMUX-4-DS is designed to work “out of the box”. The default settings will work for your system in most cases. However, the default settings can be changed using a web browser.IP AddressConnect the HMUX-4-DS to your Ethernet network. The default setting requires the network DHCP to assign an IP address to the HMUX-4-DS. In order to connect your browser to the unit, you need to determine its IP address assignment. There are many ways to do this. A simple way is use a utility such as Advanced IP Scanner. It is a free utility that is included with the HMUX-4-DS.Advanced IP Scanner InstructionsInstall from disk or download from Launch “Advanced IP Scanner”Press “Scan” to scan network.The HMUX-4-DS can found by looking for “Texas Instruments” as the device manufacturer. Note this IP address. It is 192.168.0.101 in the example above. Browser SettingsLaunch your browser and enter the IP address assigned by the DHCP. You should then see a screen similar to the one below:PasswordThe default password is “root” without the quotation marks. It can b e changed by the user. This process is described in Section “General Settings”.Settings Main MenuAfter the correct password is entered you will see the screen below:Note that you will only see devices on this list if they are connected to the HMUX-4-DS and the loops are properly setup with loop resistance. The above devices are an example only - you will see your own devices.Browser Menu ItemsDevice ListThe Device List shows the HART devices connected to the HMUX-4-DS and basic device information. You can get measurement information by clicking on the device of interest. Below is an example:General SettingsClick this button to get additional setting options such as HART Tag settings for the HMUX-4-DS and clock settings. You can even change the HMUX-4-DS password from this page.LAN SettingsClick this button to access the settings related to the Ethernet. This is where you would assign a static IP address instead of using the address assigned by the network DHCP.Protocol SettingsClick this button to access settings related to HART-IP. This also includes polling settings for finding the HART devices connected to the HMUX-4-DS.DiagnosticsClick this button to show diagnostic messages related to the HMUX-4-DS performance. This information could be helpful in determining why a connected HART device cannot be found for instance.Miscellaneous- Reboot DeviceClick this button to reset the HMUX-4-DS without disconnecting power. Allow 5 minutes for devices to be re-discovered before attempting HART-IP communications.- LogoutClick this button to return the browser screen to the initial state. The user must enter a valid password to log back in.HART-IP Settings for DevComConfiguring your HART-IP client (such as the DevCom family of HART Communicator Apps) is straightforward. Simply enter the IP address assigned to the HMUX-4-DS and make sure the HART-IP Port is set to the default HART-IP Port number which is 5094. Below is an example for DevCom2000:Network Hierarchy in DevComOnce the IP address and port are set in the HART-IP client, click New Device to see the network Hierarchy. Below is an example in DevCom2000:Individual DeviceDouble click on the device of interest in the hierarchy to open a HART Communicator instance in DevCom2000. You can now view and edit device parameters, get device status, and save the complete device configuration to disk. Just like if you were at the device with a HART communicator.TroubleshootingProblem:No devices show in the Device ListVerify the following:1. Loop power supply is on.2. Loop resistance between 250 ohms and 1Kohms.3. Loop current within HART limits.4. If multi-drop configuration, all transmitters in loop have unique addresses.WarrantyThe HMUX-4-DS is warranted for 1 year for materials and workmanship. Contact Support at ProComSol, Ltd if having any problems. An RMA (Return Material Authorization) number obtained from ProComSol, Ltd is required on all returned items.Contact InformationProComSol, LtdProcess Communications Solutions13001 Athens AveSuite 220Lakewood, OH 44107USAPhone: 216.221.1550Email: ****************************************Web: 。

泵吸扩散式四合一2018XX检测仪_“SB”系列多合一2018XX气体检测仪
产品简介
“SB”系列多合一2018XX气体检测仪是“SA”系列手持式气体检测仪的升级版,在原有基础上新增了可切换扩散式检测功能、摄像、拍照、照明功能等,让检测更简单、方便是这款仪表的初衷!安全、高端、大气!值得拥有。
并可根据环境需求拓展为二合一、三合一、四合一等复合式气体检测仪。
产品特点
●带现场拍照和摄像功能
●带手电筒功能,现场可以照明作用
●“SB”系列多合一2018XX气体检测仪有泵吸及扩散两种采样模式可切换
●压力补偿设计
●深入式漏斗集气过滤装置
●“SB”系列多合一2018XX气体检测仪内藏式USB调试配置、数据导入导出接口●WIFI、ZIGBEE、GPRS等多种无线通讯方式(选配)
●可拆卸独立充电的电池模组,可选多电池备电续航支持
技术参数
产品分类及型号定义。

HC-04蓝牙串口通信模块用户手册V1.0软件版本:HC-04V1.0硬件版本:V1.0发布日期2020年03月16日修改记录HC-04蓝牙串口通信模块是新一代的基于V2.1(SPP)经典蓝牙协议和V4.0(BLE)蓝牙协议的双模数传模块。
无线工作频段为2.4GHz ISM,调制方式是GFSK。
模块发射功率为3dBm,接收灵敏度为-90dBm。
模块采用邮票孔封装方式,可贴片焊接,模块大小18.5mm×13mm×2.2mm,很方便客户嵌入应用系统之内。
产品尺寸管脚定义HC-04模块适用于贴片焊接,共有16个引脚,板载PCB天线,引脚具体定义如下表:引脚定义I/O方向说明1GND模块公共地2VCC输入电源脚,要求直流3.3V电源,供电电流不小于200mA 3TXD输出UART输出口,3.3V TTL电平4RXD输入,弱上拉UART输入口,3.3V TTL电平5NC悬空6NC悬空7NC悬空8NC悬空9PB1输出模块连线指示,连线前为高电平,连线后输出低电平。
10PB2输入,下拉AT指令设置脚(注②)11PB3输出模块指示灯输出脚(注①)12PB4输入,弱上拉AT指令设置脚(注③)13NC悬空14NC悬空15NC悬空16RST输入,弱上拉模块复位脚,要求不小于100ms的低电平进行复位注①:模块指示灯输出脚,高电平输出,接LED时请串接电阻。
连线前,LED快闪。
连线后,LED常亮。
注②:输入脚,内部下拉。
在连线状态下,此脚接高电平,可以进入AT指令设置模式;此脚接低电平(或者悬空),返回到串口透传模式。
注③:输入脚,内部弱上拉。
在连线状态下,此脚接低电平,可以进入AT指令设置模式;此脚接高电平(或者悬空),返回到串口透传模式。
电气特性:参数测试条件参考值工作电压-DC3.0V~3.6V工作电流BLE未连接20mA~60mA变化已连接约22mA SPP未连接20mA~60mA变化已连接约30mA模块参数设置AT指令AT指令用来设置模块的参数,模块在未连线状态下可以进行AT指令操作,连线后进入串口透传模式。

HC-42蓝牙5.0BLE串口模块用户手册目录一.模块介绍1.1特点简介 (3)1.2基本参数 (3)1.3电气特性 (3)1.4系列产品 (4)二.连接通讯说明2.1模块工作原理简单介绍 (4)2.2模块MCU等设备的连接通讯 (4)2.3模块与手机的连接通讯 (5)三.快速测试3.1参数架与模块连接 (5)3.2通讯测试 (5)四.开发利用4.1模块尺寸和引脚定义 (6)4.2嵌入方式 (7)4.3参考连接电路 (8)五.AT指令5.1模块参数设置AT指令 (9)5.2指令集总 (9)5.3指令说明 (10)六.关于汇承6.1公司简介 (14)软件版本:HC-42V2.02018-06-18硬件版本:V1.02018-01-12更新内容序号更新内容时间1231.1特点简介HC-42蓝牙串口通信模块是新一代的基于Bluetooth Specification V5.0BLE 蓝牙协议的数传模块。
无线工作频段为2.4GHz ISM ,调制方式是GFSK 。
模块最大发射功率为4dBm ,接收灵敏度-96dBm 。
模块大小26.9mm×13mm×2.0mm ,集成了邮票孔封装,可以贴片工艺,很方便嵌入应用系统之内。
1.2基本参数参数名称参数值参数名称参数值型号HC-42模块尺寸26.9X13mm 工作频段 2.4G 空中速率1Mbps/2Mbps 工作电压 1.8~3.6V 天线接口内置PCB 天线工作电流参照1.3表中所述停机电流0.3μA 通讯接口UART接收灵敏度-96dBm@1Mbps 通信电平 1.8~3.6V ,与工作电压一致工作湿度10%~90%发射功率-40~4dBm存储温度-40℃~+85℃参考距离40m/2Mbps (蓝牙5.0)工作温度-25℃~+75℃1.3电气特性数值备注电压特性1.8V~3.6V 若使用纽扣电池,必须保证电压在2.5V 以上参考电流(不包括LED )1.23mA/1.22mA全速广播/全速连接75μA/65uA 低功耗广播/低功耗连接(工作电流随广播间隔变化)0.3μA停机状态注:以上电流数据是基于气温25℃、工作电压3.3V 、出厂默认配置时测得,实际使用可能存在误差。