Rogowski线圈电流传感器的积分器设计
- 格式:doc
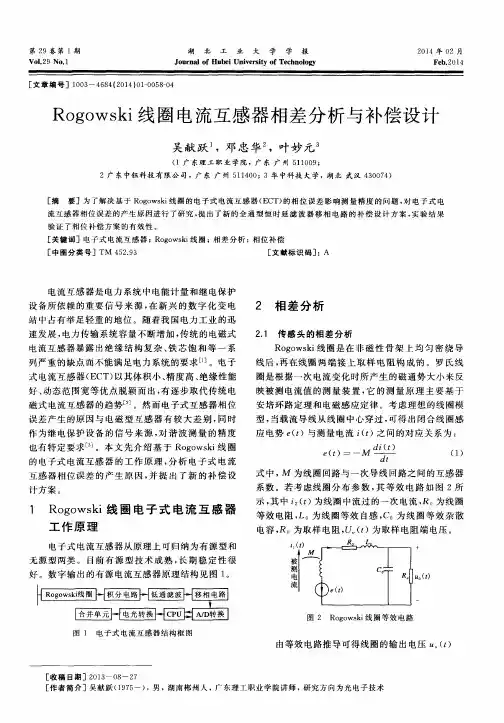
- 大小:5.94 MB
- 文档页数:94


一种基于Rogowski线圈的大电流传感器摘要柔性rogowski线圈是为了解决电子式电能表所用的微型电流互感器小电流精度低,大电流饱和快,频率范围窄,带载能力低,所用磁芯坡莫合金、硅钢片、超微晶等成本高等的问题。
柔性罗氏线圈是在硅胶棒上缠绕漆包线,在缠绕过程中加回线,制造工艺简单,克服上述互感器缺点,并且和被测电流之间没有直接的电路联系。
关键词微型电流互感器;柔性rogowski线圈;积分器;线性度中图分类号tm92 文献标识码a 文章编号 1674-6708(2013)97-0154-020 引言电流互感器是电力系统和电能计量中非常重要的装置,是为电力系统的计量、继电保护、控制与监视系统提供输入信号的重要元件。
目前,电能计量中广泛采用的是电磁式电流互感器。
随着对电能表质量要求的提高,电磁式互感器磁芯饱和问题和测量误差大以及微利时代价格高等问题难以克服。
基于微型的电流互感器主要由一次绕组、二次绕组及磁芯组成。
微型电流互感器磁芯是坡镆合金或超微晶合金,制造材料昂贵,制造工艺复杂,规格型号繁多,而且一次引线和外壳加工工艺复杂,装配费时费力,致使互感器成本很高。
由于微型电流互感器中激磁电流的存在,以及磁芯的磁滞特性,在大的电流情况下,铁芯容易饱和,使误差迅速增加,不能准确使用,并且,这种带铁芯的微型互感器只能工作在频率50hz~400hz,频段很窄,不能正确反映系统的运行情况,这就迫切需要一种在大电流情况下,依然能准确反映系统运行情况的传感器,柔性rogowski线圈就是一种比较理想的传感器,可以解决以上矛盾。
rogowski线圈采用硅橡胶骨架上缠绕线圈,外加屏蔽和绝缘,由于不采用磁芯作为骨架,所以,rogoswki线圈互感器的线性测量范围大,且没有磁饱和现象,使之能够满足测量大范围电流的要求。
可以同时应用于测量和继电保护的场合,由于没有磁心的作用,从而消除了磁饱和和高次谐振的问题,运行稳定。
可测电流的频带宽,采用rogowski线圈互感器测量时,一般频率范围可以设计达到1~1mhz。

罗氏线圈积分器原理豆丁
罗氏线圈积分器原理:
罗氏线圈(Rogowski线圈)是一种用于测量交流电流的传感器,其工作原理基于法拉第
电磁感应定律和安培环路定律。
罗氏线圈通常是一个均匀缠绕在非铁磁性材料上的环形线圈。
它可以直接套在被测量的导体上,以测量交流电流。
当被测电流沿轴线通过罗氏线圈中心时,会在环形绕组所包围的体积内产生相应变化的磁场,磁场强度为H。
根据安培环路定律,磁场强度与电流成正比。
罗氏线圈骨架上的漆包
线会因此感应出电动势。
根据数学推导,该电动势与导体中电流的导数成正比,比例系数与线圈匝数、骨架横截面、磁导通率等有关。
将该电动势进行积分运算后,可以真实还原导体中的电流。
罗氏线圈积分器的原理是基于上述电动势与电流的关系。
积分器对输出的电压信号进行积分,从而将电压信号还原为电流信号。
一个完整的罗氏线圈电流测量系统包括一个线圈和一个积分器。
总之,罗氏线圈积分器原理是基于法拉第电磁感应定律和安培环路定律,通过测量感应电动势并对其进行积分运算,实现对交流电流的测量。
罗氏线圈具有响应速度快、不会饱和等特点,适用于交流尤其是高频大电流测量。


一文看懂罗氏线圈工作原理积分器工作原理罗氏线圈(Rogowski Coil)是一种用于测量电流的传感器,它基于电磁感应原理工作。
而积分器(Integrator)是一种电路,用于对输入信号进行积分运算。
本文将分别介绍罗氏线圈和积分器的工作原理。
我们来看罗氏线圈的工作原理。
罗氏线圈由一根绝缘导线绕成螺旋状,形成一个线圈。
在电流通过罗氏线圈时,根据安培定律和法拉第电磁感应定律,线圈内会产生一个与电流成正比的磁场。
这个磁场的大小和方向与电流大小和方向相关。
当通过罗氏线圈的电流变化时,磁场也会随之变化。
这个变化的磁场将产生一个感应电动势,在线圈两端产生一个电压信号。
根据法拉第电磁感应定律,感应电动势的大小与磁场变化率成正比。
因此,通过测量线圈两端的电压信号,我们可以得到电流的大小和变化情况。
接下来,我们来了解积分器的工作原理。
积分器是一种电路,可以对输入信号进行积分运算。
它由一个运放(操作放大器)和几个电阻、电容组成。
积分器的输入信号通过电阻与运放相连,而输出信号则通过电容与运放相连。
运放的负反馈将使输入信号在电容上积分,输出信号则是输入信号的积分结果。
当输入信号变化时,积分器会根据输入信号的变化率对输入信号进行积分运算。
如果输入信号是一个连续的变化信号,积分器的输出信号将是输入信号的积分值。
通过调整电阻和电容的数值,可以改变积分器的积分时间常数,从而影响输出信号的变化速度。
罗氏线圈和积分器分别基于电磁感应原理和电路原理工作。
罗氏线圈通过感应电动势的方式测量电流的大小和变化情况,而积分器则通过对输入信号进行积分运算来得到输出信号。
这两个设备在电力系统、电力仪表和工业自动化等领域中被广泛应用,为电流测量和信号处理提供了可靠的解决方案。

罗戈夫斯基线圈-罗戈夫斯基线圈??罗戈夫斯基线圈-正文?一种利用电磁感应原理和全电流定律,测量大冲击电流(几十kA到几百kA)或冲击电流的时间变化率的装置。
其结构类似于原边为一匝的变压器(见图)。
图中I是被测的冲击大电流,作为原边;副边的n匝绕组绕在一个骨架上。
在冲击电流I的电磁场作用下,在副边绕组产生正比于dI/dt的感应电动势。
此电动势在副边绕组和积分电阻R中产生电流i,它可近似地表示为:i=I/n。
通过测量R上的电压来确定原边冲击电流I。
用一个RC积分网络代替积分电阻,也可以测出原边的冲击电流。
此时,有近似关系:I=nRCUc/L式中R和C分别为积分网络的电阻值和电容值,Uc是积分电容上的电压,L是线圈的电感。
如果不接积分网络,则在副边绕组输出的信号正比于dI/dt,即测得冲击电流的时间变化率。
为了减小测量冲击电流时的电磁干扰,可在罗戈夫斯基线圈外面装一个开缝的金属屏蔽盒。
采用铁氧体心作为线圈的骨架,并在副边绕组周围装上消除寄生振荡的衰减网络,可以使罗戈夫斯基线圈的频带从百分之几赫到几百兆赫。
罗戈夫斯基线圈因为原、副边之间有很好的绝缘;测量回路对主回路的影响小,电能损失少;频带很宽等优点,广泛地应用于高电压技术、等离子体研究、脉冲功率技术等领域中有关脉冲电流的测量。
?高压开口式电流互感器高压开口式电流互感器产品简介 ?LZKK-10户外环氧树脂浇注开启式电流互感器是我公司近年开发的又一种新型高压电流互感器。
它采用进口优质户外树脂及新工艺真空浇注而成,用于10kV架设空线路高压无功功率自动补偿装置的电流监测与控制,及用于10kV及以下中压架空线路的电流测量、保护、控制等,安装时不需要截断导线,可带电安装。
具有阻燃、防爆、免维护、无渗漏、安全系数大等特点,还具有耐电弧、抗紫外线、防老化、使用寿命长等优点。
产品性能符合GBl208和IECl85标准要求:绝缘水平:12/42/75kV额定电流比:0~1000/5A二次组合:10P15/10P15/0.2S额定负荷:20~50VA爬电比距:31mm/KV一次导线截面:35~400mm?海拔高度:不超过3000米户外开启式电流互感器户外开启式电流互感器产品简介 ?LZKK-10户外环氧树脂浇注开启式电流互感器是我公司近年开发的又一种新型高压电流互感器。


Rogowski线圈的抗干扰设计[摘要] 论述了Rogowski线圈原理结构,详细分析了罗氏线圈抗外界磁场干扰原理。
介绍了罗氏线圈屏蔽杂散磁场干扰的屏蔽盒的结构原理。
另外,对屏蔽电容耦合作了进行了分析说明。
[关键词] Rogowski线圈屏蔽分布电容1.引言罗氏线圈(Rogowski线圈)相对于传统的电磁式电流互感器,有许多优点:(1)线性度好,无磁饱和;(2)测量范围广,可从几A到几百kA;(3)测量频带宽,从几Hz到几百MHz;(4)体积小,重量轻,成本低;(5)易于实现微机化、网络化。
故罗氏线圈的应用日益广泛。
但随着研究的深入,对电流的测量提出了更高要求,有时测试环境存在很强的电磁场干扰,这会明显影响罗氏线圈测量精度。
因此,能否消除外界磁场干扰是罗氏线圈设计成功与否的关键所在。
由于罗氏线圈是非功率输出并且对交链电磁波敏感的检测单元,电磁屏蔽非常重要。
为此,就罗氏线圈的抗干扰的各种设计原理进行分析论证,并制作线圈进行了验证。
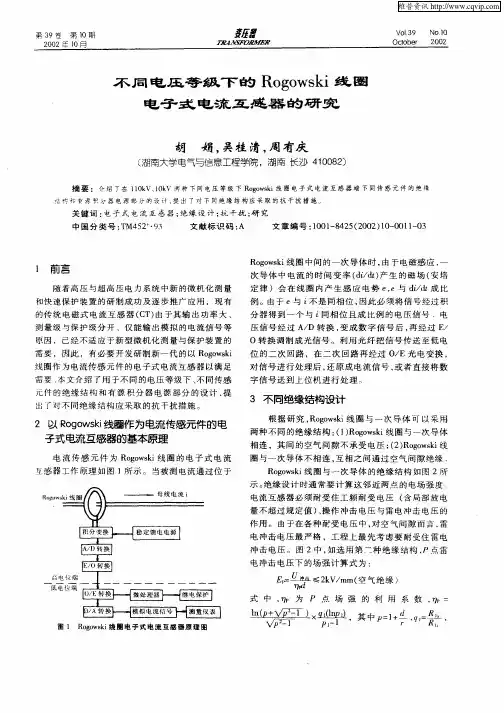
2.罗氏线圈的原理罗氏线圈测量电流的理论依据是电磁感应定律和安培环路定律。
罗氏线圈典型结构如图1。
其一般由漆包线均匀绕在环形骨架上制成,骨架采用环氧玻璃纤维或陶瓷等非铁磁性材料,其相对磁导率与空气中的相对磁导率相同。
图1罗氏线圈尺寸结构罗氏线圈骨架的相对磁导率为1,所以距离中心轴为的任一点的磁感应强度(根据毕奥-萨伐尔定律推导)可表示为:(1)式中,μ0为真空中的磁导率,i(t)为载流导线上的被测电流。
由法拉第电磁感应定律可知,当穿过一定面积的线圈的磁通量发生变化时,该线圈上将感应一定大小的电压,该电压的大小为dφ/dt。
以图1所示结构的罗氏线圈为例,其骨架截面为矩形,单匝线圈上的磁通量的和可用数学表达式表示为:(2)式中,a和b为骨架的内半径和外半径;h为罗氏线圈的厚度;罗氏线圈的绕线匝数为N,则罗氏线圈的感应电压为:(3)(4)M为罗氏线圈的互感系数,罗氏线圈对电流的测量依赖于一个稳定可靠的互感系数,将测得的感应电势进行积分处理,并结合该罗氏线圈的互感系数进行计算,即可得到被测电流的大小。

Copyright © 2023 V: 1.0.2This manual may not be altered or reproduced in whole or in part by any means without the expressed written consent of Accuenergy.The information contained in this document is believed to be accurate at the time of publica-tion, however, Accuenergy assumes no responsibility for any errors which may appear here and reserves the right to make changes without notice. Please ask the local representative for latest product specifications before ordering.SAFETY INFORMATIONPlease read this manual carefully before installation, operation and maintenance of the Rogowski Coil Integrator.The following symbols in this manual are used to provide warning of danger or risk during the installation and operation of the unit.Electric Shock Symbol: Carries information about procedures which must befollowed to reduce the risk of electric shock and danger to personal health.Safety Alert Symbol: Carries information about circumstances which if notconsidered may result in injury or death.This mark indicates that this product is UL listed.Installation and maintenance of the Rogowski Coil Integrator should only be performed by qualified, competent professionals who have received training and should have experience with high voltage and current devices.Accuenergy shall not be responsible or liable for any damages caused by improper meter installation and/or operation.Product is protected by reinforced insulationApplication Around and removal from UNINSULATEDHAZARDOUS LIVE conductors is permitedWARNING: Disconnect power supply before making electrical connections.WARNING: Current Transformers (CT’s) should be installed by trained electrician or technician. WARNING: The secondary circuit of a CT should not be opened when current is flowing through the primary circuit.Table of ContentsChapter 1: Overview (4)1.1 Overview (4)1.2 What's Included (4)Chapter 2: Hardware Overview (7)2.1 Hardware Overview (7)2.2 Installation (10)2.3 Configuration (13)2.4 Measurements (14)Appendix: Key Specifications (15)SPECIFICATIONS (15) V: 1.0.2 Revision Date: Jun 2023RIK mV 40-333mV Rogowski Coil IntegratorChapter 1: Overview1.1 OverviewThe Rogowski Integrator (RIK mV) is designed to provide users with an easy to install, plug and play, retrofit solution that can be used with any power meter or equipment with a 333mV current input from a Current Transformer(CT). The flexibility of the Rogowski Coil CT's reduces the complexity and allows it use to be used for a variety of applications and configurations where special constraints may limit the use of other CT solutions. The RIK is a configurable unit that can measure current from 2.5-60000A making it ideal for any system that operates at both 50Hz and 60Hz further adding to its flexibility.1.2 What's IncludedThe Rogowski Coil includes either the single channel or three channel integrator unit which contains the seven configurable CT ratios for each channel. The integrator unit can be surfaced mounted or mounted on a standard DIN rail.Rogowski coils that will measure the current and the 24Vdc power supply to power the integra-tor are sold separately.Three Phase IntegratorV: 1.0.2 Revision Date: Jun 2023Chapter 1: Overview 51Rogowski Coil InputThree Channels for flexible rope style CT input.2333mV Output Three Channels, 333mV Output.3Power On Light Indicates that the RIK is powered up.4CT Configurator Seven individual field configurable CT ratios for each channel 5Rogowski Coil CT sizes available from 16-47 inches 6Coil Input LeadInput lead for connection with RIKintegrator.Details:Single Phase IntegratorThree Phase Integrator Single Phase Integrator V: 1.0.2 Revision Date: Jun 2023RIK mV 80-333mV Rogowski Coil IntegratorDimensions:Figure 1: Top View Figure 2: Side ViewV: 1.0.2 Revision Date: Jun 20239Figure 4: Side view of Power Supply unitFigure 3: Front viewA-A ( 1 : 1 )48.3V: 1.0.2 Revision Date: Jun 2023102.2 InstallationThe installation of the RIK mV integrator requires the user to simply connect the Rogowski coil CT (sold separately) to the integrator and wire the 333mV output to the power meter or electri-cal equipment which will receive the signal. If the system is single phase or there are two phasesonly the phases that need the CT will need to be connected to the input of the integrator.Figure 5: Single IntegratorV: 1.0.2 Revision Date: Jun 202311100-240Vac-24Vdc Power SupplySourceLoadLoadSourceSingle Phase IntegratorThree Phase IntegratorThe diagram below illustrates how to connect the integrator.V: 1.0.2 Revision Date: Jun 202312Input:The provided Rogowski coils are the input to the integrator. Connect the Rogowski coil leads to the input channel on the integrator. The white leads of the CT are the positive wire and the brown lead is the negative wire. •Connect the white lead to ‘IN+’ or ‘RCT+’ and the brown lead to ‘IN-’ or ‘RCT-’. The Shield of the Rogowski coil should be left floating. Open the coil by pulling apart the black connec -tor of the CT.• Open the coil by pulling apart the black connector of the CT.• Install the CT around the conductor to be measured. Arrow on the Rogowski coil connector should be point to load.• Re-attach the coil together.•Repeat above steps if using more than one CT.Ensure that the CT connected to each channel of the integrator is around the correct phase/line voltage.Output:Connect each output channel to the meter or equipment with 0-5V/0-10V input.• 'OUT+' is to be connected to the positive input terminal of meter.•'OUT-' is to be connected to the negative input terminal of meter.Power Supply: (Sold Separately)The RIK mV requires 24Vdc power to operate. There is a 100-240Vac (50/60Hz) power adapter that is included to provide this power.• Connect the input power supply that is between 100-240Vac to the 'L' and 'N' terminals of the power supply.•Connect the DC output of power supply to the RIK's '24V+' and '24V-' terminals.V: 1.0.2 Revision Date: Jun 2023132.3 ConfigurationOne or three sets of dip switches are used to configure corresponding current ranges with output ratings.When the dip switch is in the up position the dip switch is considered to be Off. When the dip switch is in the down position the dip switch is considered as On.Configure each channels dip switches to output the desired range. For example to measure current rated for 1000A the dip switches 1 through 8 for the three channels must be configured to be 'OFF', 'OFF', 'OFF', 'OFF', 'ON', 'OFF', 'ON' and 'OFF' respectively. •Enter this current ratio into the meter or equipment so it can read accurately from the integrator.Table 1: Three Phase Integrator Current Ratio TableTable 2: Single Phase Integrator Current Ratio TableV: 1.0.2 Revision Date: Jun 2023142.4 MeasurementsFor each current range the integrator will be able to measure the current from 0.5% up to 120% of the rated current. That is when the integrator is configured to measure a current rated for 1000A it will measure the current from 5A to 1200A. The integrator will output 333mV at the rated current of 1000A and will output its maximum of 399.6mV at 1200A.The table below provides all the ranges of current that can be measured for each range.Current Range SettingPrimary INput (A RMS )Sensing Range (A)OutputCT Ratio500 2.5 to 600333mV @500A 500:3331000 5 to 1200333mV @1000A 1000:333250012.5 to 3000333mV @2500A 2500:333500025 to 6000333mV @5000A 5000:3331000050 to 12000333mV @10000A 10000:33325000125 to 30000333mV @25000A 25000:33350000250 to 60000333mV @50000A 50000:333Appendix: Key SpecificationsV: 1.0.2 Revision Date: Jun 202315 V: 1.0.2 Revision Date: Jun 202316TF: 1-877-721-8908INT: +1-416-497-4100FAX: +1-416-497-4130E:************************ACCUENERGY (CANADA) INC.22 Howden RoadToronto, ON M1R 3E4, CanadaR e v i s i o n D a t e : J u n 2023 D o c u m e n t # 5060E 2101MAKE ENERGY USAGE SMARTER。