Aspen plus 安装步骤
- 格式:doc
- 大小:474.50 KB
- 文档页数:4

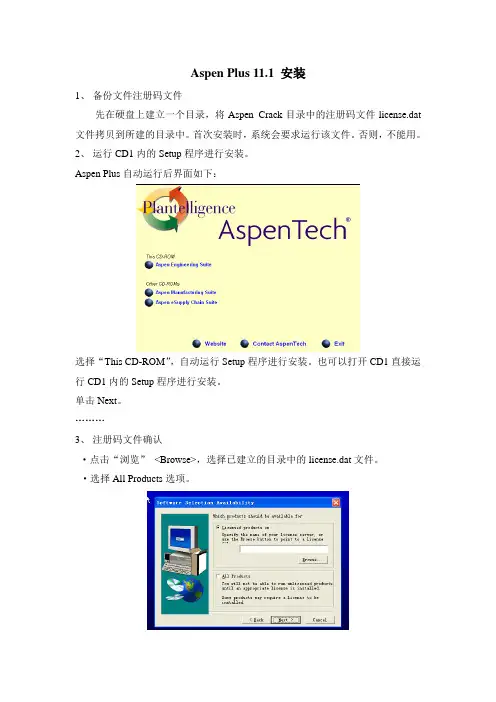
Aspen Plus 11.1 安装1、备份文件注册码文件先在硬盘上建立一个目录,将Aspen_Crack目录中的注册码文件license.dat 文件拷贝到所建的目录中。
首次安装时,系统会要求运行该文件。
否则,不能用。
2、运行CD1内的Setup程序进行安装。
Aspen Plus自动运行后界面如下:选择“This CD-ROM”,自动运行Setup程序进行安装。
也可以打开CD1直接运行CD1内的Setup程序进行安装。
单击Next。
………3、注册码文件确认·点击“浏览”<Browse>,选择已建立的目录中的license.dat文件。
·选择All Products选项。
单击Next。
4、选择安装类型Aspen Plus提供三种安装类型:一个是客户版,一个是服务器版,还有一个是独立运行的(Standard Install)。
请选择独立运行。
选择<Standard Install>。
单击Next。
5、安装的模块选择Aspen Plus11.1主程序是必选模块。
第一次安装时与online, web(网络组件)相关的模块不要选择。
单击Next。
6、选择Aspen License Manager单击Next,进行软件安装。
7、出现插入CD2选项框时,选择CD2内文件所在的位置。
出现插入CD2选项框时,选择CD2内文件所在的位置。
8、安装完成后重启。
9、指定license.dat文件的位置安装后重启,自动运行授权管理器,选取License文件所在目录确定即可(最好将License文件拷贝到硬盘上)10、注意事项·建议:最好是装在xp上,因为D版的2000可能会引起MODEL library不能使用。
·首先安装Aspen11.1,成功后,直接运行SP1的Setup文件,会自动检测已经安装的模块和版本号,·安装完成后,可以继续使用原有License,也可以使用新的,都可以正常使用。
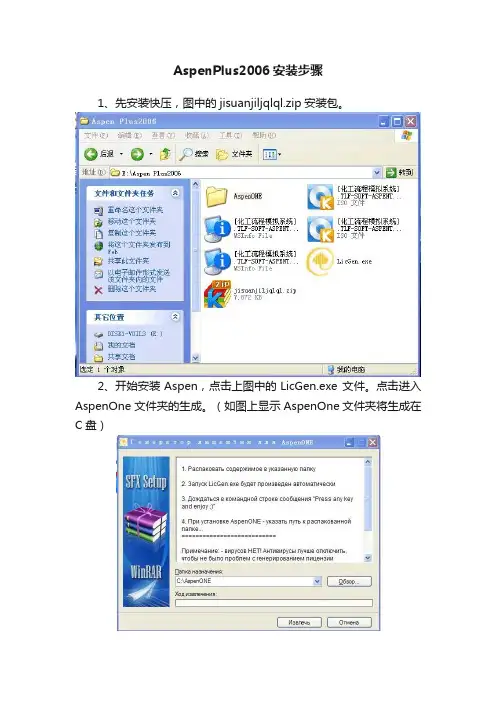
AspenPlus2006安装步骤
1、先安装快压,图中的jisuanjiljqlql.zip安装包。
2、开始安装Aspen,点击上图中的LicGen.exe 文件。
点击进入AspenOne 文件夹的生成。
(如图上显示AspenOne文件夹将生成在C盘)
点击之后,弹出如下框图,此时等待AspenOne文件夹自动生成(5分钟左右的时间)。
当出现下列图像时就可以进行第3步
3、选择图中“化工流程模拟系统”图标为(此处有2个,只需选择大小为 2.61GB的哪一个打开)。
打开时会在电脑右下角的任务栏显示
(如图中的K)
4、然后打开“我的电脑”(如图)在有可移动存储的设备一栏显示
5、右击打开,显示如图:
6、点击上图中setup.exe打开。
在C 盘选择刚刚生成的文件添加进去
选yes
选择标准安装(standard install)
点击Aspen plus和Properties左边的三角符,选择“this feature and all subfeatures,will be installed on local hard drive”
选择需要重新安装的模块
直接点击next
直接点击Install
等待安装
点击完成
重启计算机!Aspen安装完成。
以上步骤只适用2006版本的Aspen安装。
Aspen plus安装方法:分为两种破解方式的
1、有licence.dat的安装方法
这里以aspen plus 11.1 3CD版本为例,先用虚拟光驱将3CD分别调入,之后将第一盘中的crack文件夹拷贝值任意一个驱动器,我是放在C盘根目录下,以备装asplen plus过程中使用licence。
先安装第一盘,刚开始阶段是选择目录等,选择Standard Install 单击Next,选择要安装的模块,ASPEN PLUS 必选,第一次安装时和online,web(网络组件)相关的模块不要选择。
期间有一个窗口让我们选择1.licence的;2.all product;这里我们必须选择第一种,licence,这个文件从我们刚才放在C盘根目录下的crack 文件夹内的licence.dat导入。
之后会遇到让我们选择sever的,我这里就选择i don't wish to use framework.经过这几个关键步骤后,第一盘安装完成,会自动弹出提示插入第二盘的信息,选择第二盘所在的位置,选择ok即可完成aspen plus的安装。
提示重启机子,照作,重启。
之后弹出最后一次licence检测(licence selector based on flexlm窗口),选择单选框licence file,再点browse,选择C盘根目录下的crack文件夹里的licence.dat,点击ok。
到此,我恭喜大家已经顺利完成aspen plus的安装了。
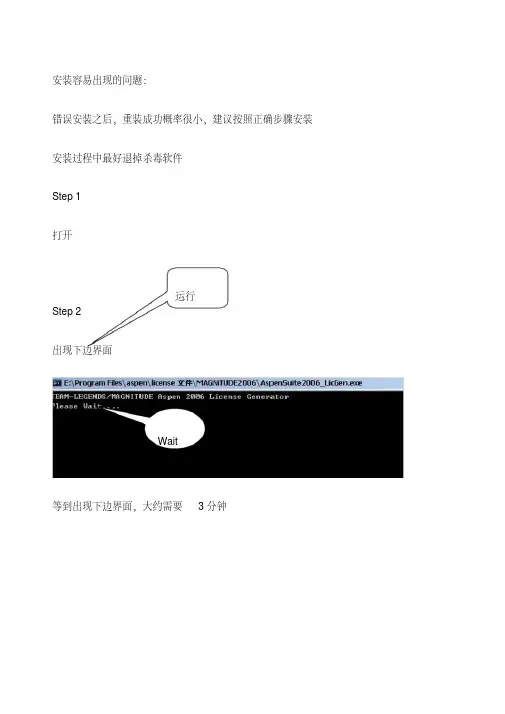
安装容易出现的问题:
错误安装之后,重装成功概率很小,建议按照正确步骤安装安装过程中最好退掉杀毒软件
Step 1
打开
运行
Step 2
出现下边界面
Wait
等到出现下边界面,大约需要3分钟
此时生成
Step 3 安装程序
运行
单击选择
单击
添加第1步生成的license
选择
选择
单击开始
更改安装单击选择
单击选择
只需要安装第一个
这个位置
直接跳过安装过程遇到对话框就回车,安装完成出现以下对话框
Step 4
重启
重启之后,从开始菜单运行程序出现以下对话框
选择
确定
运行成功
BY:苏正杰、徐晓鹤。
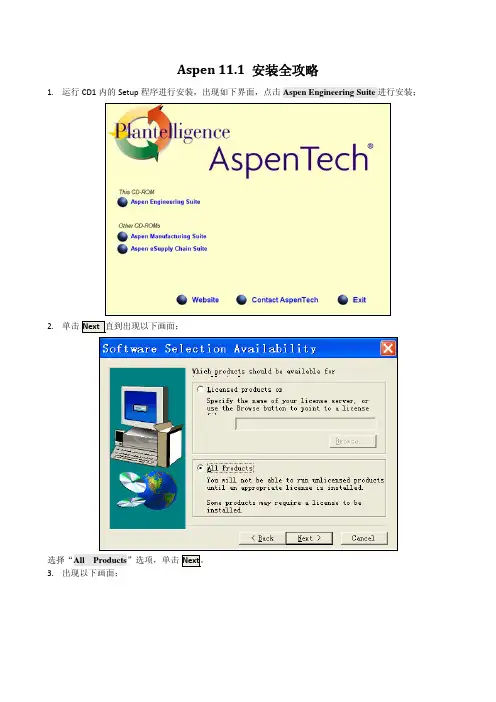
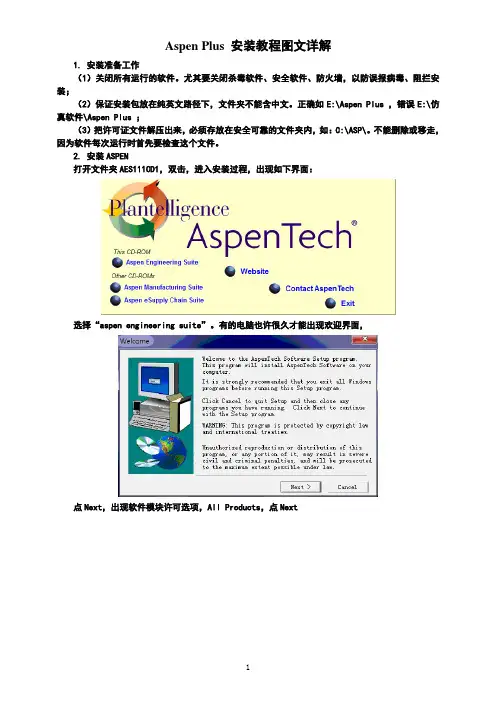
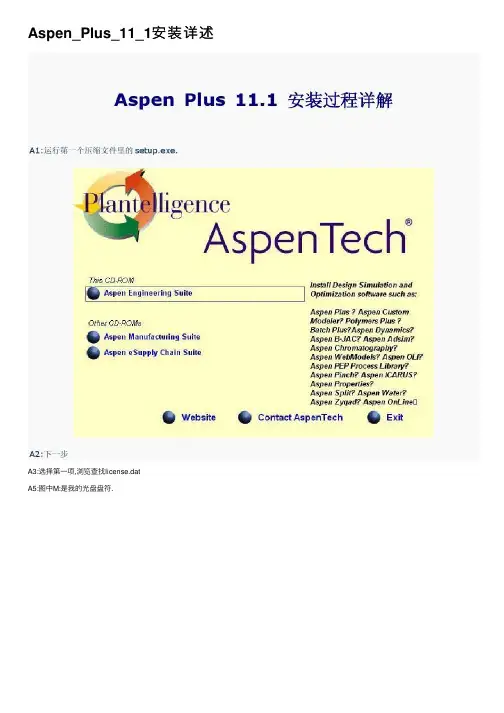
Aspen 11.1 安装全攻略1. 运行CD1内的Setup 程序进行安装,出现如下界面,点击Aspen Engineering Suite 进行安装;2. 单击Next 直到出现以下画面;选择“All Products ”选项,单击Next 。
3. 出现以下画面;选择“Standard Install”安装选项;4.单击Next出现以下画面;指定ASPEN安装路径;5.单击Next出现以下画面;选择要安装的模块,其中“ASPEN PLUS 11.1 ”为核心组件,必选。
其它组件根据需要选择,建议初学者先不必安装其它组件,如要选择其他组件则要注意,一些需要网络支持的模块不能安装,如Aspen Online 和Aspen Webmodels Author等。
6.单击Next出现以下画面;(在安装最后一步确认时,有一个选项是“Force the installation of all core components”(是否强制安装所有核心组件) ,这一项不要选,不然安装过程中可能有错。
点击Start Installing开始安装,安装过程中,将出现要求插入CD2选项框时,选择CD2内文件所在的位置即可,安装完成后重启计算机。
重启后将自动出现以下窗体;如上图指定license.dat(许可证文件)的位置,完成安装。
(若某种原因重启后未出现此窗体,可以手动打开此窗体:开始→所有程序→AspenTech→Common Utilities→FLEXlm License Management Selector;如下图)建议:1)最好是装在xp上,因为盗版的win2000可能会引起MODEL library不能使用。
2)启动时新建模拟,会出现以下提示要求连接引擎,选“Local PC”选项,并勾选上“Save as DefaultConnect”选项,以后再运行程序,就不会再出现这个对话框了。
3)模拟计算时,请在菜单Data→Setup→Specifications→Accounting的User Name内随意输入一些信息即可,如下图所示:若没有输入,运行后不能正常计算。
Aspen Plus 安装教程图文详解1. 安装准备工作(1)关闭所有运行的软件。
尤其要关闭杀毒软件、安全软件、防火墙,以防误报病毒、阻拦安装;(2)保证安装包放在纯英文路径下,文件夹不能含中文。
正确如E:\Aspen Plus ,错误E:\仿真软件\Aspen Plus ;(3)把许可证文件解压出来,必须存放在安全可靠的文件夹内,如:C:\ASP\。
不能删除或移走,因为软件每次运行时首先要检查这个文件。
2. 安装ASPEN打开文件夹AES111CD1,双击,进入安装过程,出现如下界面:选择“aspen engineering suite”。
有的电脑也许很久才能出现欢迎界面,点Next,出现软件模块许可选项,All Products,点Next选出现软件授权许可声明界面:点Yes,出现安装模式的界面:选择标准安装standard install,点Next。
默认或指定一个安装的路径,文件夹名称不能有中文,点Next:继续Next,出现选择安装组件的界面:初学者选Aspen 就行。
不要选Online、Web(网络组件)相关的模块!点Next:若出现下列对话框,选择Aspen License Manager,不使用Aspen Framework Server:点Next:点start installing,出现安装速度框:安装一段时间后,会跳出对话框,提示加载第二张光盘,浏览、打开文件夹AES111CD1,OK确定即可继续安装。
安装完成后会弹出下列提示框:点击finish,出现重启电脑的提示框:点确定,重启电脑。
重启过程中,会跳出如下的对话框,提示导入许可证书:选license file,并指定证书的具体位置,如上图所示,点击OK即可。
3. 试用ASPEN Plus开始→所有程序→aspentech→aspen engineering suit→aspen →aspen plus user interface,(建议将其发送到桌面快捷方式):点击Blank Simulation → OK在save as default connect前打勾→ OK,能看到如下界面,则大功告成!全部安装完成后,可以运行CD4中的SP1升级包,升级软件。
Aspen_Plus_11_1安装详述A3:选择第⼀项,浏览查找license.datA5:图中M:是我的光盘盘符.Installing the Aspen Process Manual ...AES-2006 !!Winodws XP Professional ... Installation successfulWinodws XP Home ... It does not work because you can not install IISWindows Vista ... Not tested1) Go on "Add/Remove components of the windows" and install the IIS (Internet Information Services) ... alternately you can install thisfeature from the Windows installation CD ...2) Open the IIS ... To find the IIS go to Administrative Tools (Control Panel) ... Leave it open ... will be used later ...3) Here's what the name of your computer ... Go to System> Computer Name ... may want to consider changing the name of the computer to a simpler expression (requires restart) ...In some cases the installer of the AES2006 not allow you proceed with the installation without first completing a field that is being asked ... They use the following criteria:-- When the installer suggest some expression ... simply accepted ...-- If possible leave the text boxes blank or skip the step ... make it!-- If you're required to enter any expression ... enter the name of the computer ... whenever possible!4) Start the installation of the AES2006 as MAGNITUDE ...I installed all the software in the package aes2006, except the two applications below:-- Aspen OnLine-- Aspen Online Deployment5) At some point of the installation process will emerge the following screens:-- "rocess Intranet manual configuration"-- "Set manual process database"-- "Information" ... saying this: To complete the configuration of the web application you will need to add the application to IIS ...I will not remember the order in which these screens appear ... But the important thing is:-- You must do as described in step 3 and be attentive to the bottom of the page ...-- If you see some words in red at the bottom of the page you should take an action before continuing ... as typing something or click on "Create Database" ... -- When the screen: "Set manual process database" ... Type tab ... select "Direct database access"6) When the screen "information"-- Return to the IIS ...-- Expand the tree on the left ...-- Click right on "Web Site standard" ... go into new > Virtual directory ...-- Name this virtual directory as "roMan" ...-- Point the following address to this directory: ".....\AspenTech\Aspen Process Manual 2006\Web"-- Now that the directory has been created ... right click on it ... click properties ...-- In "ermissions for implementing" select ... "scripts and executable"-- In "Protection Application" ... select "Lower (procedure for IIS)"-- Make sure the box "A directory located in this computer" is selected and that the directory pointed confers with the above ...-- Go the tab: "directory of security"-- Click the first "Edit" button ...-- Select only the following box: "Certification of the windows integrated"-- Accept the changes ... close the IIS and proceed with the installation ...-- It may appear an error message ... do not worry ...7) When you finish the installation ...-- Open Internet Explorer-- Access the following address: "http://computer name/proman/proman.asp" ...-- If you see a window asking username and password ... use the term "computer name" for both ... this is the importance of step 3 ...-- If you have not followed the step 3 ... the user will be the computer name and password is something you entered during the installation ...-- If everything is OK the window will close ... perhaps appear a yellow bar in Internet Explorer ... click on it ... you must accept the intranet settings-- You may need to restart the Internet Explorer and access the address above again ...-- Now the ProMan will ask you to sign a new user ... fill in the fields with any expression ... for example: computer name ...-- Sometimes the ProMan delay to load ... be patient ... the times he asks you to restart Internet Explorer ... This also is normal ...7a.I have a lot of problems to push up ProMan!!-------------------------->>>>>>>>> **************************************************- look to--services: Process Manual Authentication (PMA) Service (must to be:Automatic) !!- DEP by me block PMA service!!----> but: goto: Control panel-->system--->Advancet-->Data Ex Prev---- follow:If you are logged on as an administrator, you can manually configure DEP to switch between the OptIn and OptOut policies by using the Data Execution Prevention tab in System Properties. The following procedure describes how to manually configure DEP on the computer: 1. Click Start, click Run, type sysdm.cpl, and then click OK.2. On the Advanced tab, under Performance, click Settings.3. On the Data Execution Prevention tab, use one of the following procedures: ? Click Turn on DEP for essential Windows programs and services only to select the OptIn policy.Click Turn on DEP for all programs and services except those I select to select the OptOut policy, and then click Add to add the programs that you do not want to use the DEP feature.4. Click OK two times.(from:h**p:///doc/a618f5da5022aaea998f0fab.html /kb/875352)****************************************************************************************7b: restart computer7c: run rocess Manual Admin---> Configure--->Database---> Next, next(6x)... then--> Finish7d: run Internet explorer and voila: WORKING(ps.: RUN 7c and 7d EACH TIMES WHEN START COMMPUTER)Process Manual的介绍,不安装也可。
Aspen aspenONE plus安装教程作者:cuifucheng摘要:安装注意: 1、安装之前请最好确认下系统以前没有装过aspenONE V9的老版本。
2、安装之前请最好确认下系统以前没有装过microsof安装注意:1、安装之前请最好确认下系统以前没有装过aspenONE V9的老版本。
2、安装之前请最好确认下系统以前没有装过“microsoft sql server”。
3、建议使用windows 7 旗舰版 64位操作系统(安装教程在windows7 sp1 64位系统上的)。
4、系统平台最好使用超级管理员身份登陆,即administrator用户。
安装教程(断开网络安装):第一步、请预先参照本站的安装视频将许可工具安装配置好。
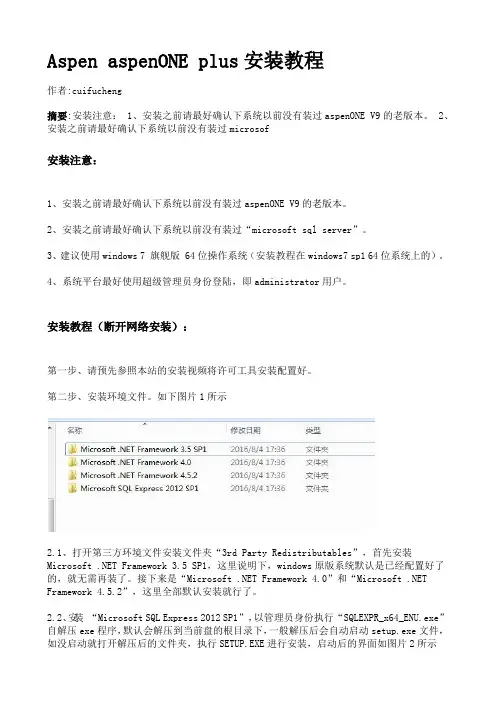
第二步、安装环境文件。
如下图片1所示2.1、打开第三方环境文件安装文件夹“3rd Party Redistributables”,首先安装Microsoft .NET Framework3.5 SP1,这里说明下,windows原版系统默认是已经配置好了的,就无需再装了。
接下来是“Microsoft .NET Framework4.0”和“Microsoft .NET Framework 4.5.2”,这里全部默认安装就行了。
2.2、安装“Microsoft SQL Express 2012 SP1”,以管理员身份执行“SQLEXPR_x64_ENU.exe”自解压exe程序,默认会解压到当前盘的根目录下,一般解压后会自动启动setup.exe文件,如没启动就打开解压后的文件夹,执行SETUP.EXE进行安装,启动后的界面如图片2所示这里选择第一项继续往下安装,一直下一步(中间会错误警告直接忽略),到选择安装模块和安装位置时,建议全部默认,不要更改,如图片3所示一直下一步到实例配置选项时,建议还是全部默认。
如图片4所示接下来的一步“SQL Server Browser”我们修改成手动。
安装步骤注意:1、以管理员身份运行‘LicGen.exe’,产生执照文件‘LSERVRC_004_2874F.lic’2、以管理员身份运行双击WlmAdmin 应用程序。
3、严格按照一到七的安装步骤,如果最后一步出现我所说的重启后再次打开Aspen plus 有执照错误问题,请再一次复制一遍,如果成功复制后(结束占用任务才能成功复制),还是同样错误原因在于没有以管理员身份运行‘LicGen.exe ’,产生执照文件(执照文件名称各不相同)。
4、Win7安装也是同样的步骤,以下步骤适用于64位操作系统。
一、安装环境文件一、1、打开第三方环境文件安装文件夹“3rd Party Redistributables”,首先安装Microsoft .NET Framework 3.5 SP1,说明:windows原版系统默认是已经配置好了的,就无需再装了。
2、接下来是“Microsoft .NET Framework 4.0”和“Microsoft .NET Framework 4.5.2”,这里全部默认安装就行了。
3、安装“Microsoft SQL Express 2012 SP1”。
说明:以管理员身份执行“SQLEXPR_x64_ENU.exe”自解压exe程序,默认会解压到当前盘的根目录下,一般解压后会自动启动setup.exe文件,如没启动就打开解压后的文件夹,执行SETUP.EXE进行安装,启动后的界面如图片2所示4、这里选择第一项继续往下安装,一直下一步(中间会错误警告直接忽略),到选择安装模块和安装位置时,建议全部默认,不要更改一直下一步到实例配置选项时,建议还是全部默认。
如图所示接下来的一步“SQL Server Browser”我们修改成手动。
下一步之后要选择混合选项,密码这儿随便输入。
继续下一步,直到成功安装。
安装成功后二、以管理员身份运行‘LicGen.exe’,产生执照文件‘LSERVRC_004_25508.lic’执照文件已经生成。
安装步骤:1.用户名不能有中文,必须为英文/英文+数字2.安装时的安装路径也不能有中文3.关闭杀毒软件、防火墙(包括win10自带安全中心)4.给予软件足够的权限,win10家庭版需要打开超级管理员(不打开也可能会安装成功)5.打开设置6.点击更新和安全7.点击windows安全中心8.打开windows安全中心9.关闭防火墙和网络保护、应用和浏览器控制10.全部关闭11.关闭完成12.解压下载的安装包13.进入01-组件文件夹14.安装framework 3.515.选择以管理员身份运行16.下载并安装此功能(无反应则是安装过,请进行下一个安装)17.安装中18.安装完成19.安装framework 4.7.120.选择以管理员身份运行21.如果显示已经安装了,关闭即可,未安装过安装即可22.进入sql201223.选择以管理员身份运行24.点击new sql…25.选择I accept点击next26.更新中如已安装,则无需安装)28.选择Dafault instance更改安装位置后,点击next29.next30.next31.安装完成,点击close32.进入控制面板33.选择右上角类别,点击卸载程序34.点击启用或关闭windows功能35.勾选internet information services、internet information services 可承载的web核心,点击确定36.更改完成,关闭37.来到破解文件夹38.进入文件夹39.找到setup,以管理员身份运行40.next41.选择I accept,next42.更改安装位置后next43.选complete,点击next44.install45.finish46.右键此电脑,选择属性47.更改设置48.复制计算机名49.来到高级,点击环境变量50.点击下面的新建变量值:刚刚复制的计算机名52.确定53.进入tools文件夹54.找到wlmadmin选择以管理员身份运行55.点开subnet services,右键计算机名,依次选择add feature、froma file、to sever and its file56.在上面的查找范围选择破解文件夹57.选择aspen.slf点击打开58.卡顿无响应为正常现象,大概持续30分钟59.当出现3130关闭即可60.来到03-aspen文件夹61.进入aspenone v11ENG文件夹62.选择setup以管理员身份运行63.点击install aspenone products64.选择I accept点击next65.不要勾选aspen online点击file location66.更改安装位置,点击next67.next68.输入密码,密码包括大小写英文与数字的组合,例如Aa123456,输入完成后点击next69.install now开始安装70.安装中,大概30分钟71.安装完成,点击finish72.close73.找到开始菜单的aspen plus V11拖拽到桌面74.双击运行75.点击register now76.点击I don’t have a support account,点击next77.填写信息后点击next78.点击上面submit by interner左侧的网页79.点击OK80.关闭弹出的帮助文件81.安装完成。
安装步骤
第一步:打开文件夹【ASPEN Plus7.2 安装】,如下界面:
第二步:解压第一个文件夹,方法:点击右键选择【】
注意:此时解压第一个压缩文件,四个压缩文件会一次性同时解压完
成,解压完毕后文件大小为10G。
第三步:双击第二个文件安装虚拟机:
连续点击:Next,直到出现安装完成界面:
点击Finish选项、忽略警告信息,出现以下界面,虚拟机安装完成:
第四步:点击左上角图标:,出现以下界面:
在名称里输入ASPEN,点击下一步,再下一步,出现以下界面:
此时选择、然后点击右边黄色图标:,打开刚才解压缩出来的xp20110704文件,出现以下界面:
点击上图的:创建,出现下边界面:
点击,运行软件、安装完成。
Aspen Plus V7.2安装说明详见如下:一、安装Microsoft SQL1、“以管理员身份运行”SQLEXPR_RUS.exe2、点击“是”3、勾选4、点击5、点击注意:若有“×”出现,则暂停安装,删除电脑中原有的所有SQL,再行安装SQL 6、点击7、点击“Next”注意:(1)若只有,可忽略(2)若其它选项有警告,则需逐项查明原因(把内容复制到百度中),以便消除警告,之后再重新从第1步开始(3)提示com+警告,则Services.exe,开启com+服务提示“依赖的服务或组无法启动”仔细检查了下com+服务的依存关系,COM+ 目录要求和COM+ System Application这个服务有关,直接启动COM+ SystemApplication,此服务依赖于System Event Notification Service。
也就是说要启动com+服务要先启动System Event Notification Service,然后启动COM+ System Application,再看看Distributed TransactionCoordinator 服务有没有打开,再看下com+是不是可以打开了8、点击“Next”9、点击10、点击下图中最上面的倒三角“”11、点击12、点击13、选中14、点击15、点击16、点击17、点击注意:若有“×”出现,则暂停安装,可先删除所有电脑中原有SQL后,再行安装SQL 18、点击“Next”19、点击“Finish”二、获取License文件1、“以管理员身份运行”LicGen.exe2、点击“是”2、点击第一个按钮3、等待知道屏幕上显示如下:4、按“任意键”即可注意:License文件默认在C:\AspenOne\,文件后缀名为lic 三、安装虚拟光驱DAEMON Tools1.双击DAEMON.exe2.点击“下一步”3.点击“我同意”4.选择“免费许可”5.点击“下一步”6.点击“下一步”7.点击“安装”8.点击“完成”。
1.打开你的下载文件,复制license.dat到你的C盘下。
2.用虚拟光驱加载AES111.iso文件,并打开。
3.双击SETUP.exe
4.如图所示点击 Aspen Engineering Suite
5.点击NEXT
6.点击 Browse…
7.打开C盘下的 license.dat
9.点击Standard.
10.红框内的两个不要勾选,其余的全部勾选。
然后点NEXT
11.打开我的电脑查看计算机名,并复制。
12.填入到下面的HOST中
13.点击Next.
14 .选择 I do not want to use a
15 .选择Aspen license manager
16 .点击next
17.如图所示选择
18.点击start installing
19.软件已经开始安装
20.安装到第10个的时候,就会弹出以下的窗口。
21.在虚拟光驱中弹出你的AES111 同时加载 AES112,然后点OK .
22.软件会自动的安装完成。
请重启你的电脑。
23。
重启后。
打开开始/程序/AspenTech/Common Utilities/FLEXlm License Management Selector。
点击 Browse 选择你C盘下的 license.dat。
然后点OK
24.打开
开始/程序/AspenTech/Aspen Engineering Suite/Aspen Plus 11.1/Aspen Plus User Interface。
即可运行了。
废话不多说,对于安装Aspen Plus,其实也简单,并不是想象中的那么难,什么要重装系统?什么要32位?什么要xp好装?装一次出问题就更难装了?。
面对一些误解,先做一下澄清:Aspen Plus其实跟一般的软件是一样的,所以安装和卸载跟一般的软件也是类似的,只要都是在程序管理里正常卸载, 干净程度跟其他软件一样,所以没有说会首次安装用不了后会对后来的安装产生影响;Aspen Plus跟其他的软件一样,也是用不同的版本适用与不同的操作系统的,只要安装兼容的版本就不会说一定要装xp,而且难易程度基本都一样。
本人装Aspen Plus v7.1,v7.2和v7.3的比较多,所以主要是概括的说这几个版本,其他的版本也差不多,可以参考。
这三个版本,v7.1安装在xp上更好些,windows 32位系统安装也没问题;v7.2要求32位系统,所以安装在windows 32位上和xp上都行;v7.3是完美支持64系统,所以要是64位的系统的话,只能安装这个版本,不过这个版本也可以安装在32位系统上,但是在安装的过程中会有提示系统不兼容错误,只要忽略这个错误也能装成功。
以上的是系统要求,再说说大概的情况。
Aspen Plus的安装需要最高权限,所以要使用管理员账户进行安装,在管理员的账户下安装好兼容的sql后再安装Aspen。
下面就开始安装过程,安装的孩子注意看就没问题了,文字也要注意。
1、前期准备安装Aspen Plus需要用到一些,具体是什么,对于非机专业的我也不懂,还有一些其他的基本补丁什么的,所以安装Aspen Plus前最好是安装有office,这样后面需要的补丁就少了。
对于windows系统,已经集成了功能,只要开启使用就好,不用另外安装,xp的话就要另外自己安装,建议是到安装过程中提示要安装时再相应安装上即可。
启用方法是:打开控制面板中的“程序与功能”(也就是一般使用的卸载程序的地方)→“启用或者关闭windows功能”之后把他们勾选确定即可然后是启用administrator账户(大多数的电脑都不是用的这个账户,如果是的话就不用进行这一步)“开始”→“附件”→“命令提示符”→右键“以管理员身份运行”(也可以用cmd命令行启动)如上运行命令行,这样就开启了管理员账户接下来就是切换到管理员账户,注销现有账户然后再选择管理员账户登入就可以了。
安装步骤
第一步:打开文件夹【ASPEN Plus7.2 安装】,如下界面:
第二步:解压第一个文件夹,方法:点击右键选择【】
注意:此时解压第一个压缩文件,四个压缩文件会一次性同时解压完
成,解压完毕后文件大小为10G。
第三步:双击第二个文件安装虚拟机:
连续点击:Next,直到出现安装完成界面:
点击Finish选项、忽略警告信息,出现以下界面,虚拟机安装完成:
第四步:点击左上角图标:,出现以下界面:
在名称里输入ASPEN,点击下一步,再下一步,出现以下界面:
此时选择、然后点击右边黄色图标:,打开刚才解压缩出来的xp20110704文件,出现以下界面:
点击上图的:创建,出现下边界面:
点击,运行软件、安装完成。