ESM_TIIDA (骐达)维修手册DI
- 格式:pdf
- 大小:289.40 KB
- 文档页数:12

维修实例Maintenance Cases栏目编辑:高中伟 ******************70·December-CHINA 东风日产骐达无法启动◆文/河南 魏文洋故障现象一辆2012年的新款东风日产骐达轿车,搭载MR16DDT涡轮增压发动机,行驶里程18053km,客户在行驶中因故停车,再次启动时发现车辆无法启动。
故障排除与诊断我店技师到现场救援时发现车辆蓄电池没电,给蓄电池充电后启动机能正常运转,但车辆仍然无法启动,只好拖回店内进行维修。
先用电脑检查ECM内故障码(图1)为P0611(燃油喷射控制模块,当前)、P062B(ECM,当前);前大灯调平系统故障码为B2084(电压低于极限);ABS内故障码为C1109(蓄电池电压异常,过去)。
电压低是蓄电池没电造成的,所以P0611和P062B应该是车辆无法启动的故障原因。
虽然故障码指出ECM有问题,但技师不能贸然断定就是ECM坏了,发动机正常运转的三要素分别是:良好的点火、良好的汽缸压力、良好的可燃混合汽,我们对其进行逐一排查。
技师首先检查了点火系统,发现火花塞跳火正常;再查看汽缸压力,各缸缸压均为1400kPa左右,正常(标准值为1560kPa,最小值为1190kPa)。
检查过程中技师发现往进气道内喷一点清洗剂车辆便可以启动,但机器运转不良,至此开始怀疑是喷油系统问题。
由于没有找到维修手册,而且技师是第一次检查缸内直喷的高压喷油系统,所以感觉无从下手,最后还是决定拆开油头进行检查,但喷油头外边有一个铁环紧紧地卡在缸盖上,拆不下来。
技师转而测量了4个油头的电阻值,均为2Ω左右,正常,又测量了油头的供电情况,所有油头的1号线处于“ON”位置时均为2.4V左右,正常,测量所有油头插头端子到ECM之间的线路导通性也正常。
启动车辆时用二极管试灯测量油头插头有喷油信号,说明喷油头的控制也正常。
结合以上检查,技师分析供油系统可能存在的问题还有:①油头问题;②低压油路问题;③高压油路问题(高压油泵问题、高压油轨压力传感器问题、高压油泵线路问题、ECM内部控制问题)。
概述A 概述目录C D E F G H I J K L M B GI部分GI注意事项 (2)燃油的注意事项 (2)HR16DE 发动机(普通汽油) (2)CONSULT-II 诊断仪检查系统 (3)功能和系统应用 (3)检查设备 (4)CONSULT-II 诊断仪启动步骤 ....................................4识别信息 . (6)车型种类 (6)识别号码 (7)尺寸 (8)车轮和轮胎 (8)注意事项注意事项PFP:00001燃油的注意事项CAS0001H HR16DE 发动机(普通汽油)SAIA0915ECDEFGHIJKLMBGICONSULT-II 诊断仪检查系统PFP:00000功能和系统应用CAS00018x :适用*1: NA TS (日产防盗系统)诊断测试模式功能发动机A /T安全气囊仪表I P D M E /RB C MA B S智能钥匙N A T S *1后视相机E P SWork support 此模式可使维修技师根据 CONSULT -II 诊断仪的指示更迅速更准确地对某些装置进行调整。
x x ---x -x -x -Self-diagnostic results可以迅速地读取并擦除自诊断结果。
x x x x x x x x x -x Troublediagnostic record 可以读取当前自诊断结果和以前所有的故障诊断记录。
--x --------Data monitor 可以读取 ECU 中的输入/输出数据。
x x -x x x x x -x x CAN diagnosis support monitor 可以读取 CAN 通讯线路的状态。
x x -x x x x x --x Active test CONSULT -II 诊断仪用这种诊断测试模式驱动一些脱离 ECM 的执行器,也可以在指定的范围内改变某些参数。
x ---x x x x ---ECU (ECM/TCM) part number 可以读取 ECU (ECM/TCM )零部件号。
骐达11款保险丝翻译教学内容精品文档精品文档(空气滤清下面,方盒)F/L 40A IGW SW 点火开关F/L 40A P/WDW 电动门窗继电器 F/L40A ABS MTR 防抱死制动系统电机 20A AUDIO 音响系统10A CVT CONT 1 无级变速器控制器 1 10A STOP LAMP 刹车灯10A CVT CONT2无级变速器控制器 2 10A HORN&ALT 喇叭F/L 60A EPS 电动助力转向系统F/L30A HEAD LAMP CLEANER 头灯清洗器F/L 30A ABS SOL 电磁阀故障F/L 40A RAD FAN 冷却风扇HORN 喇叭(空气滤清器侧面长条保险盒)F1:RR DEF 后窗除雾器 20AF3:EGI ECU 继电器电源 NATS 放大器电源 20AF4:ESCL 电子转向管柱锁 10A F5:FR WIPER 前雨刷30AF6:POS LAMPS R 右前后示宽灯 10A F7:POS LAMPS L 左前后示宽灯10A F9:A/C CLUTCH 空调离合器10A F10:FR FOG LAMP 前雾灯 15AF11:H/LAMP HI RH 大灯右远光 10A F12:H/LAMP HI LH 大灯左远光 10A F13:H/LAMP LO RH 大灯右近光 15A F14:H/LAMP LO LH 大灯左近光 15A F15:A/T ECU IGN 自动变速箱 10A F16:REV LAMP IGN 倒车灯10AF17: ABS ECU IGN 防抱死制动系统10A F20:FUEL PUMP 燃油泵 15A F21:IGN COIL 点火开关15A F22:INJECTOR 喷油器 15A F24: ETC 等 15A(方向盘左侧)15A p/socket cig lighter 点烟器10A AUDIO/MIRROR 1 音频/电动后视镜 1 10A AUDIO/MIRROR 2 音频/电动后视镜 2 10A IPDM IC2智能电力拖动模块 15A BLOWER 鼓风机 10A AIR COND 空调 15A BLOWER 鼓风机10A ELEC PARTS (BAT) 电子部件10A METER (BAT )20A TRAILER 拖车10A ROOM LAMP 室内灯10A PUSH ENG START 发动机启动 10A HEATER MIRROR 后玻璃加热 10A METER(IGN) 点火系统表10A ELEC PARTS2(IGN) 点火系统电的身体上的某些部分10A ELECPARTS(IGN) 点火系统电子零件 10AWASHER 清洗电机10AIR BAG 安全气囊系。
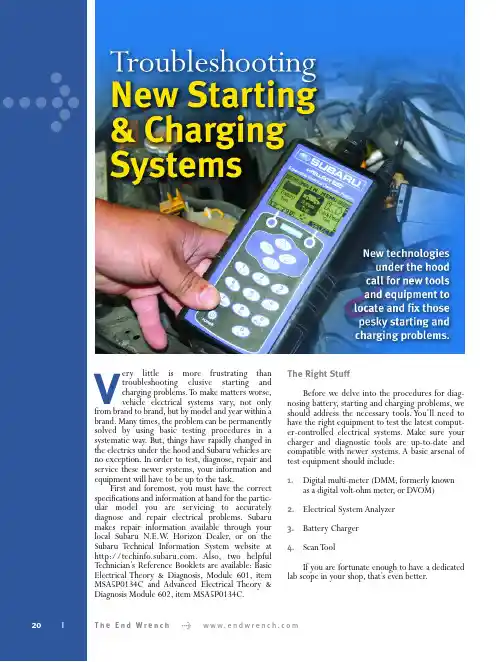
>Very little is more frustrating than troubleshooting elusive starting and charging problems.T o make matters worse,vehicle electrical systems vary,not only from brand to brand,but by model and year within a brand.Many times,the problem can be permanently solved by using basic testing procedures in a systematic way.But,things have rapidly changed in the electrics under the hood and Subaru vehicles are no exception.In order to test,diagnose,repair and service these newer systems,your information and equipment will have to be up to the task.First and foremost,you must have the correct specifications and information at hand for the partic-ular model you are servicing to accurately diagnose and repair electrical problems.Subaru makes repair information available through your local Subaru N.E.W .Horizon Dealer,or on the Subaru T echnical I nformation System website at .Also,two helpful T echnician’s Reference Booklets are available:Basic Electrical Theory & Diagnosis,Module 601,item MSA5P0134C and Advanced Electrical Theory &Diagnosis Module 602,item MSA5P0134C.The Right StuffBefore we delve into the procedures for diag-nosing battery,starting and charging problems,we should address the necessary tools.You’ll need to have the right equipment to test the latest comput-er-controlled electrical systems.Make sure your charger and diagnostic tools are up-to-date and compatible with newer systems.A basic arsenal of test equipment should include:1.Digital multi-meter (DMM,formerly known as a digital volt-ohm meter,or DVOM)2.Electrical System Analyzer3.Battery Charger4.Scan T oolIf you are fortunate enough to have a dedicated lab scope in your shop,that’s even better.20T h e E n d W r e n c h > w w w.e n d w r e n c h.c omDigital Multi-MeterLong gone are the days when checking a battery or elec-trical charging system could be performed with a simple voltmeter and test light.The sophisticated electronically-controlled systems on late model vehicles require the diag-nostic capabilities of a digital multi-meter.The most accept-able method for checking battery draw is with the use of an ammeter with an inductive pickup.DMMs usually have a DC ammeter function that will read from a few milliamps (mA) up to 10 amps.Make sure your DMM is internally fused for protection against high amperage.With the use of an induction clamp,or “amp clamp,”you can observe the ampere variance as accessory loads are applied.Electrical System AnalyzerMany new electrical system diagnostic tools are on the market today.These dedicated analyzers read the conditions existing in the electrical system and signal malfunctions or weaknesses.They also direct corrective measures and verify that the problem was eliminated by the repair.Many of these tools not only test the condition of the battery,but also monitor alternator output,check diodeA good quality multi-fun ction digital multi-meter (DMM) is essen tial for diagnosing electrical problems.Be sure to learn how to use all of its features.22|T h e E n d W r e n c h > w w w.e n d w r e n c h.c o mcondition,and find short circuits.Rate of discharge is meas-ured by internal microprocessors and compared against known standards to establish “rate of decay”and recovery ability to predict the power-holding potential and life expectancy of the battery.Another approach is to measure the conductance quality of the battery by sending a fre-quency signal through it to estimate the usable plate area,thereby determining the power retention life.Cold crank-ing capacity (CCA) is also measured,both without and under load.The end result is more accurate decisions on borderline batteries,and the identification of battery defects even at extremely low voltages,thus eliminating the time-consum-ing need to charge and retest the battery.A good example of the latest technologies for analyzing and testing the starting and charging systems is the inTELLECT EXP -1000,made by Midtronics.This handheld analyzer allows a technician to diagnose every part of the electrical system,from the battery to the starter and alter-nator.T est results can be printed out via an optional printer.The tool’s expandable platform combines the full functions of an advanced analyzer,digital multimeter (with scope mode),and data management tool.t’s upgradeable for future applications and features.Modern ChargersThe newest types of battery chargers have also been integrated with computerized logic and databases to deter-mine the quality of the battery,its life expectancy and to pro-vide optimum charging.Many can measure over 1,000 amps of starter draw using inductive amp probes,and voltage drop at connections and cables with test leads.These units can also test alternator output with carbon pile load,and detect bad diodes and faulty stators with an automatic ripple indicator.Some units even have battery decay logic programs to deter-mine battery life expectancy.The Midtronics GR-1 features “diagnostic conductance controlled charging”for solving battery problems.It tests the battery at the beginning,during and after charging.This unit effectively controls the charging process using the optimal charging voltage and current to quickly charge even weak batteries.New electrical system an alyzers,such as the Midtron ics in TELLECT EXP-1000,have made diagnosing electric system problems much easier.A n ew con ductan ce-based diagn ostics battery charger can provide quick,accurate battery testing and charging.New Starting & Charging SystemsScan ToolWhile a scan tool isn’t the first tool you may think to grab when troubleshooting a starting and charging problem, it can give you insight into any malfunctions in other areas of the vehicle that could have a bearing on the electrical prob-lem.Be sure to check the ECM for any diagnostic trouble codes (DTCs) prior to tackling the problem.It can save you a great deal of time and effort.Battery TestingBegin your troubleshooting efforts with the battery. You’ll need to determine the state of charge,the battery’s condition and its ability to hold a charge.If the battery is in good condition,it will hold a charge and deliver its rated amperage as needed.If the battery is in poor condition,it won’t deliver on demand.Use a voltmeter or DMM to check the charge level. Don’t trust the battery’s integrated charge indicator as it may only be reading one cell,not all.When fully charged,a battery should read 12.6 volts at room temperature.At 75% charged, the reading will be 12.4 volts.Lower readings indicate the need for recharging.T est the battery with an analyzer to deter-mine its condition and ability to hold a charge.If you don’t have an analyzer,recharge the battery,then retest it.The following steps can be taken to checkthe battery:O Check the battery for physical damage.O Check the positive and negative leads for corrosion and proper installation.O Check that the electrolyte is at the full level.O Check the color of the electrolyte to assess plate deterioration:•Clear means there’s no damage or deterioration.•Red means there’s positive plate deterioration.•Gray means there’s negative plate deterioration.O Check the specific gravity.It should be at least 1.230 at room temperature to test the battery.There should be no more than a .050 point differential among the cells.O On sealed maintenance-free batteries,check the open circuit voltage and compare its value with the manufac-turer’s specifications.If the specific gravity is below 1.230 or the open circuit voltage is below the recom-mended value,charge the battery and recheck the specific gravity or open circuit voltage.A u g u s t2006•N u m b e r35|23Adding JuiceBefore recharging (or replacing) a battery,check the operating condition of the charging system.Refer to the vehicle’s service manual for correct specifications.As a rule,it should read 14 volts during idle,with all acces-sories off,but may vary according the battery’s condition, charge level,load,ambient temperature and design.Cold weather will normally raise the charging level,while hot weather will normally lower it.If you have a tester with an adjustable carbon pile,you can check the charging output while the engine is operating at 2,000 rpm.AlternatorBefore testing the alternator (or installing a new one), make sure the battery is fully charged and in good condi-tion.Remember that the alternator’s job is to maintain the battery’s charge,not to recharge a faulty e a DMM or system analyzer to test the alternator output.Make sure the belt is in good condition and the tension is correct. Most electrical system analyzers and testers can also detect a faulty diode.StarterJust because a starter spins when power is applied is not an indicator that it is free from problems.In order to get an accurate reading,you’ll need to check how many amps it is drawing and measure the spin speed.It may be necessary to use a bench tester if your equipment in not capable of meas-uring the starter’s rotating rpm.Check the OE specs for the starter and compare to the unit you’re testing.Starter malfunctions can be caused by a faulty solenoid,shorts or opens in the field coil or armature, worn brushes,shaft damage or corrosion – internally or on the connections.Subaru recommends a starter performance test under these conditions:O No-load test (free spin).O Load test (under applied load).O Stall test (armature locked).While specifications will vary,we’ll use a 2000 Legacy with an automatic transmission as a typical example. Measured values must meet the following standards:O No-load test @ 11V/90 A,or more,and the rotating speed must be 3,350 rpm,or more.O Load test @ 8V/13.7 Nm (10.1 ft-lb),370 A or less, and the speed must be 880 rpms,or more.O Stall test @ 5V/1,050 A,or less,and the torque must be 27.5 Nm (20.3 ft-lb),or more.Of course,remember to consult the Subaru Service Manual for the vehicle you are diagnosing for the correct specifications.How’s the Weather?The local temperature and weather play a big part in starting and charging problems.People who live in the northern part of the country know that cold temps wreak havoc on batteries,alternators and starters — and expose any weaknesses in the system.When the mercury dips,the battery’s power is reduced by significant numbers.A fully-charged,battery is essential to spin the starter at speeds necessary to turn over the engine.Meanwhile,the engine oil has thickened and engine metal has contracted,making the job of moving the pistons,valves and the viscous oil much harder on the starter.More cranking amps are required to handle the load.At the same time,the driver may have turned on his heater/defroster,windshield wipers,rear window defog-ger,seat heaters and radio.The demand on the charging system has just maxed out!Not only does the power demand tax the system,but in many cases the electrical accessories may be the cause of elec-trical problems.When searching for elusive electrical grem-lins,first check the starting and charging system with all accessories off.If the problem is not found,one by one,turn each electrical accessory on,until the problem is isolated.Those of you who live in areas that use salt to de-ice roads need to check for salt corrosion on exposed terminals, grounds and connections.Hot climates can cause electrical system problems,too. For one thing,batteries don’t like excessive heat.Electrolyte evaporation and high temps promote battery deterioration. Also,the radiator and A/C cooling fans,blowers and the compressor clutch all add to the electrical demand.In short,extreme temperatures place high demands on the battery,starter and charger,so always take the climate into consideration during diagnosis.We’ll conclude with one crucially important,yet often overlooked,point that applies to all electrical trou-bleshooting:Always check for good grounds before you condemn any components.ONew Starting & Charging Systems24|T h e E n d W r e n c h>w w w.e n d w r e n c h.c o m。
G H I J K ML 快速参考索引A 概述信息B 发动机C 离合器/变速箱D 传动系统/车桥E 悬架WT车轮和轮胎F 制动BR制动系统PB驻车制动系统BRC制动控制系统G 转向PS动力转向系统STC转向控制系统H 约束系统SB安全带SRS辅助约束系统 (SRS )I 车身BL车身、门锁和安全系统GW玻璃、车窗系统和后视镜RF车顶EI外饰和内饰IP仪表板SE座椅J 空调ATC自动空调MTC手动空调K 电气系统SC起动和充电系统LT照明系统DI驾驶信息系统WW雨刮器、洗涤器和喇叭BCS车身控制系统LANLAN 系统AV音响、视频、导航和电话系统PG 供电、接地和电路元件L 保养MA 保养M 索引IDX索引本公司保留所有权利。
事先未经东风汽车有限公司东风日产乘用车公司的书面许可,本维修手册的任何部分不得复制或存储在检索系统中,或以任何形式,任何方法传播,如使用电子、机械、录音或其他方法。
版本: 2005年4月出版号 SM5C-0C11P0前言本手册包含了东风日产乘用车公司TIIDA(颐达)系列车型的保养和修理步骤。
为了保障你的人身安全和车辆的正常使用功能必须仔细阅读本手册。
在开始修理工作前一定要透彻理解GI 部分中注意事项的内容。
出版时,本手册中的全部内容都是最新的产品信息。
本公司保留在任何时候不预先通知而变更技术参数和维修方法的权利。
重要安全须知正确的维修操作对保证维修人员的人身安全和车辆性能的可靠是至关重要的。
本手册中描述的维修步骤尽可能的使维修操作更安全准确。
维修质量依据所采用的维修步骤、工具、零部件和维修技师的经验有所不同。
如果不采用本公司推荐的维修步骤、工具或零部件,必须完全确认所选择的维修方法不会对人身安全和车辆的安全造成损害。
A CD E F G H I J K L B ALPHABETICAL INDEX M INDEXSECTIONIDXAA/C HFC134a (R134a) 系统维修步骤 ...ATC-226, MTC-96 A/C HFC134a 系统维修设备的注意事项 ...ATC-9, MTC-7 A/C HFC134a(R134a)系统注意事项 ......ATC-6, MTC-4 A/C HFC134a(R134a)系统维修工具 ..ATC-13, MTC-11 A/C,A-电路图 ..................................... ATC-36, ATC-112 A/C,M - 电路图 ...................................................MTC-28 A/C单元总成 ......................................................... MTC-80 A/C 工作情况检查 .................. ATC-52, ATC-129, MTC-32 A/C 故障诊断(手动 A/C) .................................. MTC-22 A/C 空气流量 ..........................................ATC-27, MTC-20 A/C 控制操作(手动 A/C) .................................. MTC-19 A/C 控制操作(自动 A/C) ..................................ATC-23 A/C 控制器 ............................................................. MTC-77 A/C 润滑剂(R134a) ...ATC-7, ATC-18, MTC-5, MTC-16 A/C 压缩机安装 .....................................................MTC-98 A/C 压缩机注意事项 ..................................ATC-9, MTC-7 A/C 元件布置 ..........................................ATC-17, MTC-15 A/C 诊断工作流程(自动 A/C) ........................ATC-168 A/C 诊断工作流程(自动空调) .........................ATC-91 A/C 蒸发器 ........................................................... MTC-104 A/C 自诊断(自动 A/C) .................... ATC-121, ATC-168 A/C自诊断(自动空调) ........................ ATC-44, ATC-91 A/T 电路图 AT - NONDTC .....................................AT-293 A/T 故障诊断 ...........................................................AT-39 A/T 换档控制系统 .................................................AT-333 A/T 换档锁止系统 .................................................AT-339 A/T 换档锁止系统 - 电路图 .................................AT-340 A/T 液更换 ............................................................... MA-24 A/T 液检查 ............................................................... MA-23 A/T 液温传感器 .....................................................AT-115 A/T 指示灯 ................................................................DI-38 A/T指示灯- 电路图 .................................................DI-39 ABS 传感器转子 ...................................................... RAX-4 AC 压缩机安装 ....................................................ATC-228 AC 蒸发器 ............................................................ATC-234 APPS1 - 电路图 ......................................................EC-688 APPS2 - 电路图 ......................................... EC-369, EC-694 APPS3 - 电路图 ......................................................EC-707 APPS3 - 接线图 ......................................................EC-382安全带(前) .............................................................SB-3安全带检查 .................................................................SB-7安全带预张紧器的处理 ......................................... SRS-46安全气囊 ................................................................... SRS-3安全气囊注意事项 ................................................... SRS-3BBACK/L - 电路图 .....................................................LT-149 BCM(车身控制模块) ............................................ BCS-3保险杠(前) ............................................................ EI-11保险丝 ....................................................................... PG-16保险丝和熔断线盒 ................................................... PG-72爆震传感器(KS) .................................... EC-241, EC-598备用灯 .....................................................................LT-149闭环控制 ...................................................... EC-25, EC-435变矩器壳体安装 ....................................................AT-467变速箱壳体(M/T) ....................................................MT-17标准继电器 ............................................................... PG-69玻璃 ...............................................GW-11, GW-46, GW-50拨叉杆(M/T) ............................................................MT-20CCAN ............................................................................. DI-59 CAN(控制器区域网络) ...BL-24, BL-49, BL-91, GW-55, LAN-21CAN-电路图 ... EC-133, EC-527, LAN-26, LAN-50, LAN-76 CAN 通讯 EC-29, EC-132, EC-135, EC-439, EC-526, EC-529, AT-31, AT-103, BRC-30, BL-24, BL-49, BL-91, GW-55, LT-104, WW-10, LAN-21COOL/F - 电路图 ........................................ EC-334, EC-658差速器齿轮 (FF M/T) ...............................................MT-21侧内饰 ........................................................................EI-31侧气囊(卫星)传感器 ........................................SRS-43侧气帘 .....................................................................SRS-40拆除和安装(A/T) ..............................................AT-357拆卸与安装 .........................ATC-190, ATC-201, ATC-218拆卸与安装后组合灯 .............................................LT-168拆卸与安装气体传感器 ...................... ATC-191, ATC-202超速档控制开关 .......... AT-197, AT-202, AT-287, AT-292车窗(车门) ............................................GW-46, GW-50车辆救援(救助受困的车辆) ................................. GI-41车轮传感器(VDC) .............................................. BRC-36车轮定位(后) .......................................................RSU-5车轮定位(前) .......................................................FSU-5车轮平衡 ....................................................... WT-5, MA-24车轮轴承(后) ...................................................... RAX-4车门(后) .............................................................. GW-50车门(前) .............................................................. GW-46车门玻璃 ....................................................GW-46, GW-50车门玻璃安装调节(前) ...................................... GW-49车门玻璃装配调节(后) ...................................... GW-52车门后视镜 .............................................................. GW-77车门内饰 ....................................................................EI-28车内传感器 ...........................ATC-96, ATC-172, ATC-207车桥 .......................................................................... MA-29车身定位 .................................................................BL-204车身修理 .................................................................BL-204车速表 .......................................................................... DI-4车速传感器(VSS) .................................. EC-271, EC-622车载诊断系统 .............................................. EC-37, EC-447齿轮元件(M/T) ........................................................MT-18充电 - 电路图 ........................................................... SC-26充电系统 ................................................................... SC-25DD/LOCK - 电路图 .......................................................BL-26 DTC 工作支持 .........................................................EC-105大尺寸活塞 ............................................................. EM-105怠速 ..................................... EC-58, EC-63, EC-455, EC-460怠速空气量学习 .......................................... EC-65, EC-462挡风玻璃 .................................................................. GW-11挡泥板 - 请参见外饰 ................................................EI-25挡圈 (M/T) ................................................................MT-18导向衬套更换 - 请参见导向转换器 ........................ EM-86A C D E F G H I J K LB 倒车灯开关(M/T) ................................................. MT-10倒车灯开关(M/T)- 请参见倒车灯开关(M/T) MT-10倒档惰轮轴 (M/T) ..................................................... MT-18倒档主齿轮 (M/T) ..................................................... MT-18道路测试 .............................. AT-57, AT-60, AT-63, AT-64灯泡规格 .................................................................. LT-201地毯 ........................................................................... EI-36底盘和车身的保养 .................................................. MA-22点火控制系统 ............................................ EC-404, EC-743点火线圈 .................................................... EC-404, EC-743点火正时 ............................. EC-58, EC-63, EC-455, EC-460点烟器 .................................................................... WW-42点烟器 - 电路图 ..................................................... WW-42电磁离合器 ............................. ATC-75, ATC-152, MTC-41电动车窗 .................................................................. GW-17电动门后视镜 ............................................................ BL-22电动天窗 .................................................................... RF-10电路图 ........................................................ GI-16, MTC-61电路图(单元代码)列表 ...................................... PG-58电气单元 ................................................................... PG-67电气单元的位置 ....................................................... PG-61电气单元位置 ........................................................... PG-61电气负载信号电路 .................................... EC-390, EC-715电源 - 电路图 ............................................................. PG-5电源电路 ..................................................................... PG-3电子点火(EI)系统 .................................. EC-26, EC-436电子节气门控制执行器 . EC-283, EC-285, EC-634, EC-637顶衬 - 请参见车顶内饰 ............................................ EI-38定角度拧紧的应用 ..................................................... EM-4冻结帧数据 ....................... EC-41, EC-101, EC-450, EC-497动力转向机 ................................................................ PS-12动力转向液液位 ...................................................... MA-28断电器 ...................................................................... PG-16多点燃油喷射系统的注意事项 .................................. GI-6EECM 电源 .................................................................. EC-126ECM 电源 ................................................................. EC-520ECM 输入/输出信号 ................................... EC-90, EC-110ECM 输入/输出信号 ................................. EC-487, EC-504ECTS - 电路图 ........................................... EC-154, EC-550ETC1 - 电路图 ........................................... EC-286, EC-638ETC2 - 电路图 ........................................... EC-294, EC-646ETC3 - 电路图 ........................................... EC-299, EC-651EVAP 碳罐 ................................................... EC-33, EC-443EVAP 碳罐清洁量控制电磁阀 .................. EC-264, EC-615EVAP 蒸发管检查 ................................................... MA-21FF/FOG - 电路图 ......................................................... LT-92F/PUMP - 电路图 ........................................ EC-399, EC-724FRO2 - 电路图 ......................................................... EC-730FUEL - 电路图 ............................................ EC-216, EC-223发动机“安全 - 失效”系统 ..................... EC-77, EC-474发动机拆卸 ............................................................... EM-81发动机机油 ................................................................. LU-5发动机机油的注意事项 .............................................. GI-7发动机机油更换 ...................................................... MA-18发动机机油滤清器更换 .......................................... MA-19发动机控制电路图 ...................................... EC-88, EC-485发动机控制零部件位置 .............................. EC-82, EC-479发动机控制模块(ECM) EC-135, EC-273, EC-529, EC-624, EC-627发动机控制系统图 ...................................... EC-23, EC-433发动机冷却液 ............................................................. CO-6发动机冷却液温度传感器(ECTS) ............ EC-152, EC-548发动机用 CONSULT-II 诊断仪 .................... EC-98, EC-495方向盘和转向柱 ................................................ PS-6, PS-9方向盘转向力 .............................................................. PS-6放气(液压离合器) .................................................. CL-8飞轮(离合器) ........................................................ CL-13蜂鸣器-电路图 ........................................................ DI-46符号和缩略语 ................................................. GI-11, GI-24辅助约束系统 ........................................................... SRS-5G 缸盖 .......................................................................... EM-70缸盖螺栓的拧紧 ....................................................... EM-73缸体 .......................................................................... EM-86缸体加热器 .............................................................. EM-86格栅 - 请参见外饰 ..................................................... EI-18更换冷却液 ............................................................. MA-14工作流程图 ............................................................... GI-25鼓风机电机 ATC-68, ATC-145, ATC-214, MTC-37, MTC-84鼓风机电阻器 ......................................................... MTC-88故障诊断 ................................................................... GI-12故障指示灯(MIL) .................................... EC-50, EC-451故障指示灯和数据连接接口(MIL/DL) - 电路图 ... EC-419管路压力测试(A/T) ............................................. AT-55过热 ........................................................... EC-331, EC-655H H/LAMP - 电路图 ....................................................... LT-41HFC134a 系统维修设备的注意事项 ........... ATC-9, MTC-7HFC134a (R134a)系统注意事项 ............. ATC-6, MTC-4HFC134a (R134a)系统维修步骤 ....... ATC-226, MTC-96HFC134a (R134a)系统维修工具 ......... ATC-13, MTC-11HO2S1 - 电路图 . EC-165, EC-173, EC-183, EC-561, EC-568HO2S1H - 电路图 ....................................... EC-190, EC-575HO2S2 - 电路图 . EC-196, EC-203, EC-318, EC-326, EC-581HO2S2H - 电路图 ....................................... EC-210, EC-588后包裹架饰件 ............................................................. EI-35后车窗除雾器 .......................................................... GW-53后车门 ..................................................................... GW-50后桥 ......................................................................... RAX-4后视镜(车门) ...................................................... GW-77后视镜(外侧) ...................................................... GW-77后悬架 ...................................................................... RSU-5后组合灯的拆卸与安装 .......................................... LT-168后座安全带 ................................................................. SB-6环境传感器 .......................................................... ATC-206环境温度传感器 ....... ATC-93, ATC-169, MTC-73, MTC-76换档表 ...................................................................... AT-66换档拨叉(M/T) ......................................................... MT-20换档杆 ......................................................................MT-11换档控制元件(M/T) .................................................MT-20换档锁止系统 ........................................................AT-339活塞到缸套的间隙 ................................................. EM-104活塞环检查 ............................................................. EM-102活塞销 - 请参见活塞销检查 .................................. EM-101活塞销检查 ............................................................. EM-101活塞总成 ................................................................. EM-104火花塞 ....................................................................... EM-31火花塞更换 .............................................................. MA-20IIATS - 电路图 ............................................ EC-149, EC-545 IGNSYS - 电路图 ....................................... EC-405, EC-744 INJECT - 电路图 ........................................ EC-393, EC-718 IPDM(智能配电模块发动机室) ........................... PG-17 ISO 15031-5 Service $01 - 09 ...................................EC-37 IVC - 电路图 .............................................. EC-279, EC-630J基本检查 ...................................................... EC-58, EC-455机油滤清器 ................................................................. LU-8机油压力(发动机) ................................................. LU-5技术参数值 ................................................ EC-115, EC-509加热型氧传感器 1 .. EC-163, EC-170, EC-180, EC-303, EC-309, EC-559, EC-566, EC-729加热型氧传感器 1 加热器 ........................ EC-188, EC-573加热型氧传感器 2 .. EC-194, EC-200, EC-315, EC-323, EC-579, EC-737加热型氧传感器 2 加热器 ........................ EC-208, EC-586加速踏板释放位置学习 .............................. EC-64, EC-461加速踏板位置(APP)传感器 EC-361, EC-367, EC-380, EC-686, EC-692, EC-705加速踏板位置传感器 1(APPS1) - 电路图 .............EC-363驾驶员安全气囊 ..................................................... SRS-35检漏染料注意事项 ................................................ MTC-10减振器(后) ........................................................... RSU-8降压电阻器(自动变速箱) ...................AT-159, AT-255接地描述 ................................................................... PG-30节气门关闭位置学习 .................................. EC-65, EC-462节气门控制电机 ............EC-285, EC-298, EC-637, EC-650节气门控制电机继电器 EC-285, EC-292, EC-637, EC-644节气门位置传感器(TPS)EC-157, EC-228, EC-341, EC-343, EC-374, EC-553, EC-592, EC-665, EC-667, EC-699节气门位置传感器 3 (TPS3) - 电路图 ..... EC-376, EC-701警告灯 .......................................................................DI-24警告灯-电路图 ........................................................DI-26警告蜂鸣器 ...............................................................DI-43进气传感器 .........................ATC-102, ATC-178, ATC-209进气门电机 ...........................ATC-65, ATC-142, ATC-215进气门控制连杆调整 ATC-67, ATC-144, MTC-36, MTC-85进气门正时控制 ........................................ EC-137, EC-531进气门正时控制电磁阀 EC-137, EC-278, EC-531, EC-629进气温度传感器 ........................................ EC-148, EC-543聚光灯 .....................................................................LT-189KKS - 电路图 ................................................ EC-242, EC-599空调切断控制 .............................................. EC-28, EC-438空调润滑油 .......................................... ATC-240, MTC-110空调维修数据技术参数 ...................... ATC-240, MTC-110空气混合门电机 ...................ATC-61, ATC-138, ATC-216空气混合门控制连杆调整 .....................MTC-35, MTC-86空气流量计-参阅质量型空气流量传感器 ... EC-141, EC-536空气滤清器滤的更换 .............................................. MA-18空气通道和格栅 .................................... ATC-221, MTC-91控制单元(端口排列) ........................................... PG-67控制杆(M/T) ............................................................MT-11控制器区域网络(CAN) ...BL-24, BL-49, BL-91, GW-55, LAN-21控制台盒 - 请参见仪表板 ........................................ IP-10L喇叭 ......................................................................... WW-44喇叭 - 电路图 ......................................................... WW-44冷凝器 .................................................. ATC-232, MTC-102冷却风扇 ................................................................... CO-16冷却风扇电机 ............................................ EC-331, EC-655冷却风扇继电器 ........................................ EC-331, EC-655冷却液混合比 .......................................................... MA-12冷却回路(发动机) ................................................. CO-5离合器盖 ...................................................................CL-13离合器片 ...................................................................CL-13离合器踏板 .................................................................CL-5离合器总泵 .................................................................CL-9连杆 ......................................................................... EM-102连杆衬套间隙 ......................................................... EM-103连杆轴承间隙 ......................................................... EM-106连结杆 .......................................................................PS-12联接套筒(M/T) ........................................................MT-18零部件和线束接头位置 ......................................ATC-183零部件及线束接头位置 ........................ ATC-193, MTC-59轮胎换位 .................................................................. MA-26螺旋电缆 .................................................................SRS-37螺旋弹簧(后) ..................................................... RSU-10MM/T 拆卸与安装 .......................................................MT-15 M/T 大修 ..................................................................MT-17 MAFS - 电路图 ........................................... EC-143, EC-538 MAIN-电路图 ............................................. EC-126, EC-520 MIL 数据接口电路 ..................................................EC-758 MIL 数据连接接头电路 ..........................................EC-419 MIL/DL - 电路图 ......................................................EC-758密封胶的应用 ................................................... EM-4, LU-2模式门电机 ...........................ATC-57, ATC-134, ATC-217模式门控制连杆调整 ATC-59, ATC-136, MTC-34, MTC-87NNATS - 电路图 ........................................................BL-185A C D E F G H I J K LB NATS (日产防盗系统)的注意事项 ........................ GI-3NVH 故障排除(RSU) ............................................ RSU-4NVH 故障排除(制动系统) ..................................... BR-5内饰 ........................................................................... EI-31粘度值 (SAE) ........................................................... MA-12OOBD 系统的诊断故障码 (DTC) .................................. EC-11OBD 系统的诊断故障码 (DTC) ................................. EC-40OBD 系统的诊断故障码(DTC) ................................ EC-423OBD 系统的诊断故障码(DTC) ........................... EC-449PPCV (曲轴箱强制通风) ........................... EC-35, EC-445PGC/V - 电路图 ......................................... EC-266, EC-617PHASE - 电路图 ......................................... EC-254, EC-611Plasmacluster ......................................... ATC-182, ATC-192PNP/SW - 电路图 ....................................... EC-352, EC-676PTC ............................................ MTC-63, MTC-75, MTC-76排气系统检查 .......................................................... MA-22喷油器 ....................................................... EC-392, EC-717喷油嘴 ..................................................................... EC-717膨胀阀 ................................................. ATC-235, MTC-105碰撞诊断 ................................................................. SRS-53Q起动 - 电路图 ........................................................... SC-16起动机 ...................................................................... SC-14起动系统 ................................................................... SC-14气门导管 ................................................................... EM-77气门间隙 ................................................................... EM-64气门弹簧 ................................................................... EM-80气门挺柱 ................................................................... EM-49气门座 ...................................................................... EM-79气囊的处理 ............................................................. SRS-46前保险杠 .................................................................... EI-11前车门 ..................................................................... GW-46前大灯-电路图 ....................................................... LT-11前大灯对光控制 ....................................................... LT-87前大灯对光控制-电路图 ........................................ LT-87前大灯校准仪 - 请参见前大灯对光控制 ................ LT-87前排安全带预张紧器 ........................ SB-2, SRS-3, SRS-44前排乘客安全气囊 ................................................. SRS-39前围上盖板 ................................................................ EI-19前雾灯 ...................................................................... LT-89前洗涤器 ................................................................... WW-4前雨刮器 ................................................................... WW-4前撞传感器 ............................................................. SRS-42前座安全带 ................................................................. SB-3嵌条 - 请参见外饰 .......................................... EI-22, EI-23曲轴 .......................................................................... EM-87曲轴箱通风系统 - 请参见曲轴箱强制通风 EC-35, EC-445曲轴位置传感器(位置) ........................ EC-245, EC-602驱动轴 ..................................................................... MA-29R R/FOG - 电路图 ........................................................ LT-106ROOM/L- 电路图 ...................................................... LT-177RP/SEN - 电路图 ...................................................... EC-754RRO2 - 电路图 ......................................................... EC-738燃油泵 ....................................................... EC-398, EC-723燃油表 ......................................................................... DI-4燃油多点喷射系统(MFI) ........................ EC-24, EC-434燃油管路检查 .............................................................. FL-3燃油喷射系统 ............................................ EC-214, EC-221燃油切断控制(发动机高速且空载时) ... EC-26, EC-437燃油压力检查 .............................................. EC-67, EC-464燃油蒸发排放(EVAP)系统 .................... EC-30, EC-440日照传感器 ........................... ATC-99, ATC-175, ATC-208熔断线 ...................................................................... PG-16如何清除 OBD 系统的 DTC ...................................... EC-48如何为 OBD 系统清除 DTC EC-34 .......................... EC-450润滑剂 ..................................................................... MA-11润滑剂(R134a)A/C .... ATC-7, ATC-18, MTC-5, MTC-16润滑油(空调) .................................... ATC-240, MTC-110润滑油路(发动机) .................................................. LU-4润滑脂 ..................................................................... MA-11S SEN/PW-电路图 ......................................... EC-346, EC-670SHIFT - 电路图 ....................................................... AT-340SMJ (超级多路连接器) ........................................ PG-68SRS - 请参阅辅助约束系统 ..................................... SRS-5SRS 故障诊断 ........................................................... SRS-7STOP/L - 电路图 ...................................................... LT-147三元催化的注意事项 .................................................. GI-6三元催化器功能 ...................................................... EC-258散热器 ............................................................ CO-9, CO-12失速测试(A/T)AT-150 ........................................ AT-52释放燃油压力 .............................................. EC-67, EC-464使用检漏染料的注意事项 ..................................... ATC-12室内灯 ..................................................................... LT-171室内照明灯 - 请参见室内灯 .................................. LT-171手动空调 - 电路图 ................................................. MTC-28输入轴 (FF M/T) ....................................................... MT-18数据接口 ................................................................. EC-496数据连接接口 ............................................ EC-100, EC-108双行程检测逻辑 .......................................... EC-37, EC-447水泵 .......................................................................... CO-18水温表 ......................................................................... DI-4水温传感器 ............................................................ MTC-76T TCM 检测表 .............................................................. AT-81TPS1 - 电路图 ........................................... EC-230, EC-594TPS2 - 电路图 ........................................... EC-159, EC-555碳罐-请参见 EVAP 碳罐 ....................................... EC-443碳罐-请参见“EVAP 碳罐” ................................... EC-33天窗 ............................................................... RF-10, RF-21天窗 - 电路图 ............................................................ RF-12通风空气滤清器 .................................... ATC-220, MTC-90。

A B C D E F G H I J K ML 快速参考索引A 概述信息GI概述信息B 发动机EM发动机结构LU发动机润滑系统CO发动机冷却系统EC发动机控制系统FL燃油系统EX排气系统ACC加速控制系统C 离合器/变速箱CL离合器MT手动变速箱AT自动变速箱D 传动系统/车桥FAX前桥RAX后桥E 悬架FSU前悬架RSU后悬架WT车轮和轮胎F 制动BR制动系统PB驻车制动系统BRC制动控制系统G 转向PS动力转向系统STC转向控制系统H 约束系统SB安全带SRS辅助约束系统 (SRS )I 车身BL车身、门锁和安全系统GW玻璃、车窗系统和后视镜RF车顶EI外饰和内饰IP仪表板SE座椅J 空调ATC自动空调MTC手动空调K 电气系统SC起动和充电系统LT照明系统DI驾驶信息系统WW雨刮器、洗涤器和喇叭BCS车身控制系统LANLAN 系统AV音响、视频、导航和电话系统PG 供电、接地和电路元件L 保养MA 保养M 索引IDX索引本公司保留所有权利。
事先未经东风汽车有限公司东风日产乘用车公司的书面许可,本维修手册的任何部分不得复制或存储在检索系统中,或以任何形式,任何方法传播,如使用电子、机械、录音或其他方法。
版本: 2005年4月出版号 SM5C-0C11P0前言本手册包含了东风日产乘用车公司TIIDA(颐达)系列车型的保养和修理步骤。
为了保障你的人身安全和车辆的正常使用功能必须仔细阅读本手册。
在开始修理工作前一定要透彻理解GI 部分中注意事项的内容。
出版时,本手册中的全部内容都是最新的产品信息。
本公司保留在任何时候不预先通知而变更技术参数和维修方法的权利。
重要安全须知正确的维修操作对保证维修人员的人身安全和车辆性能的可靠是至关重要的。
本手册中描述的维修步骤尽可能的使维修操作更安全准确。
维修质量依据所采用的维修步骤、工具、零部件和维修技师的经验有所不同。
如果不采用本公司推荐的维修步骤、工具或零部件,必须完全确认所选择的维修方法不会对人身安全和车辆的安全造成损害。
___骐达2008款1.6自动挡时尚型维修手册本手册是针对___骐达2008款1.6自动挡时尚型车型的维修手册。
它旨在提供详细的维修信息和操作指南,帮助车主和维修人员更好地理解和修理该车型。
手册的内容涵盖了骐达2008款1.6自动挡时尚型车型的各个方面,包括引擎系统、电气系统、传动系统、制动系统、悬挂系统、车身外观、内部装配等。
每个系统和部件都有详细的说明、技术规格和维修步骤,方便用户进行维修和保养。
通过研究本手册,车主和维修人员可以更好地了解骐达2008款1.6自动挡时尚型车型的构造和工作原理,并学会正确维修和保养方法。
本手册旨在使用户能够维持车辆的性能和安全性,并延长车辆的使用寿命。
请注意,本手册只适用于骐达2008款1.6自动挡时尚型车型,不适用于其他型号和配置的车辆。
在进行任何维修前,请务必先阅读并理解本手册中的所有说明和警告提示,并按照指导进行操作。
祝愿您在使用本手册时取得愉快和有益的经验!如有任何疑问或需要进一步的协助,请随时联系我们。
本手册的目的是为___骐达2008款1.6自动挡时尚型车主和维修人员提供一份全面且易于理解的维修手册。
通过手册中所提供的信息和指导,用户可以更加有效地维修和保养车辆,确保车辆的可靠性和安全性。
手册的目标是:提供详细的车辆结构和系统功能说明,帮助用户了解车辆的工作原理。
提供准确的维修步骤和操作指南,帮助用户正确地进行维修和保养工作。
提供技术规格和注意事项,帮助用户进行维护和故障排除。
强调安全操作和事故预防,确保用户维修过程中的安全性。
本手册的目的是为了满足用户对骐达2008款1.6自动挡时尚型车辆维修的需求,并提供一种更加便捷和可靠的解决方案。
我们希望通过本手册的使用,用户能够更加熟悉和了解他们的车辆,并能够进行正确的维修和保养。
希望这本维修手册能够给您带来实质性的帮助,并使您在维修骐达车辆时感到更加自信和满意!如果您有任何问题或需要进一步的协助,请随时联系我们。
雨刮器、洗涤器和喇叭K 电气系统目 录CDEFGHIJLMWWABWW注意事项 ......................................................................3辅助约束系统(SRS)“安全气囊” 和 “安全带预张紧器” 的注意事项 .........................................................3在无前围上盖板情况下操作的注意事项 ....................3电路图及故障诊断 ....................................................3前雨刮器和洗涤器系统 ................................................4零部件和线束接头的位置 ..........................................4系统说明 ...................................................................4OUT LINE ..............................................................4低速雨刮器的操作 .................................................5高速雨刮器的操作 .................................................5间歇操作 ................................................................5自动停止的操作 .....................................................6洗涤器的操作 .........................................................6MIST 操作 .............................................................6“安全-失效”模式功能 .......................................7组合开关读取功能 .................................................7CAN 通讯系统说明 .................................................10CAN 通讯装置 ........................................................10图解 ........................................................................11线路图 — 雨刮器 — ...............................................12BCM 端口和参考值 .................................................15BCM(输入)参考值 ................................................18IPDM E/R 端口和参考值 .........................................19如何进行故障诊断 ..................................................19初步检查 .................................................................19检查电源和接地电路 ............................................19CONSULT -II 诊断仪的功能(BCM) ..........................21CONSULT -II 诊断仪的基本操作 ...........................21工作支持 ..............................................................22数据监控 ..............................................................22主动测试 ..............................................................23CONSULT -II 诊断仪的功能 (IPDM E/R) ..................24CONSULT -II 诊断仪的基本操作 ...........................24数据监控 .. (25)主动测试 (25)前雨刮器无法操作 ...................................................26前雨刮器无法回到停止位置(前雨刮器工作 10 秒钟之后,停止 20 秒钟,在重复此操作五次之后,便无法对其进行操作) .............................................28仅前雨刮器 LOW 不工作 .........................................30仅前雨刮器 HI 不工作 .............................................31仅前雨刮器间歇不工作 ............................................33前雨刮器间隔时间不受车速控制 .............................33前雨刮器间歇操作开关位置无法调节 ......................34前洗涤器工作时雨刮器不进行擦拭 ..........................34前雨刮器无法停止 ...................................................34前雨刮臂的拆卸和安装,及雨刮臂停止位置的调整 ............................................................................35拆卸 .....................................................................35安装 .....................................................................35调整 .....................................................................35前雨刮器驱动总成的拆卸和安装 .............................36拆卸 .....................................................................36安装 .....................................................................36前雨刮器驱动总成的解体与组装 .............................37解体 .....................................................................37组装 .....................................................................37洗涤器喷嘴的调整 ...................................................38洗涤器管的布置 ......................................................38前洗涤器喷嘴的拆除和安装 ....................................39拆卸 .....................................................................39安装 .....................................................................39洗涤器喷嘴的检查 ...................................................39单向阀检查 ..........................................................39前雨刮器和洗涤器开关电路的检测 ..........................39前雨刮器和洗涤器开关的拆卸和安装 ......................39拆卸 .....................................................................39安装 .....................................................................40洗涤器灌的拆除和安装 ............................................40拆卸 (40)安装 (40)前洗涤器电机的拆除和安装 (41)拆卸 (41)安装 (41)点烟器 (42)电路图 — CIGAR — (42)拆卸和安装 (43)拆卸 (43)安装 .....................................................................43喇叭 . (44)电路图 — 喇叭 — (44)拆卸和安装 (45)拆卸 (45)安装 (45)注意事项CDEFGHIJLMABWW注意事项PFP:00011辅助约束系统(SRS)“安全气囊” 和 “安全带预张紧器” 的注意事项EKS00OVQ辅助约束系统如 “安全气囊” 和 “安全带预张紧器” 与前座椅安全带同时使用,有助于减少车辆碰撞时驾驶员和前排乘客受伤的危险性或严重程度。
BODY&TRIMSECTION BT 5For seat belt,refer to MA and RS section.5For wiring diagrams of body electrical systems,refer to EL section.Go to Table of ContentsGo to Quick Reference IndexPRECAUTIONSPrecaution¼When removing or installing various parts,place a cloth or padding onto the vehicle body to prevent scratches.¼Handle trim,molding,instruments,grille,etc.carefully during removing or installing.Be careful not to soil or damage them.¼Apply sealing compound where necessary when installing parts.¼When applying sealing compound,be careful that the sealing compound does not protrude from parts.¼When replacing any metal parts(for example body outer panel,members,etc.),be sure to take rust pre-vention measures.Supplemental Restraint System(SRS)“AIRBAG”The Supplemental Restraint System“AIR BAG”,used along with a seat belt,helps to reduce the risk or severity of injury to the driver and front passenger in a frontal collision.The Supplemental Restraint System consists of air bag modules(located in the center of the steering wheel and on the instrument panel on the passen-ger side),a diagnosis sensor unit,warning lamp,wiring harness and spiral cable.If the vehicle is equipped with side air bag as the Supplemental Restraint System,the supplemental side air bag used along with the seat belt helps to reduce the risk or severity of injury to the driver and front passen-ger in a side collision.The supplemental side air bag consists of air bag modules(located in the outer side of front seats),satellite sensor,diagnosis sensor unit(which is one of components of supplemental air bags for a frontal collision),wiring harness,warning lamp(which is one of components of supplemental air bags for a frontal collision).Information necessary to service the system safely is included in the RS section of this Service Manual.WARNING:¼To avoid rendering the SRS inoperative,which could increase the risk of personal injury or death in the event of a collision which would result in air bag inflation,all maintenance must be performed by an authorized NISSAN dealer.¼Improper maintenance,including incorrect removal and installation of the SRS,can lead to per-sonal injury caused by unintentional activation of the system.¼Do not use electrical test equipment on any circuit related to the SRS unless instructed to in this Service Manual.SRS wiring harnesses can be identified with yellow harness protector or yellow insulation tape before the harness connectors.Clip and Fastener¼Clips and fasteners in BT section correspond to the following numbers and symbols.¼Replace any clips and/or fasteners which are damaged during removal or installation.SymbolShapes Removal&Installation No.kC101SBF258G SBF708EkC205kC206SBF648B SBF649BkCF118SBF078BSBF992GBody Front End¼When removing or installing hood,place a cloth or other padding on hood.This prevents vehicle body from being scratched.¼Bumper fascia is made of plastic.Do not use excessive force and be sure to keep oil away from it.¼Hood adjustment:Adjust at hinge portion.¼Hood lock adjustment:After adjusting,check hood lock control operation.Apply a coat of grease to hood locks engaging mechanism.¼Hood opener:Do not attempt to bend cable forcibly.Doing so increases effort required to unlock hood. WARNING:¼Be careful not to scratch hood stay when installing hood.A scratched stay may cause gas leak-age.¼The contents of the hood stay are under pressure.Do not take apart,puncture,apply heat or allow fire near it.REMOVAL—Front bumper assemblyk 1Remove bolts securing engine undercover from the front side.k 3Remove clip securing grille and remove the grille.k 6Remove screws securing left and right turn signal lamps and remove the lamps.k 8Remove nuts and bolts securing headlamps.Then remove left and right headlamps.k11Remove nuts securing fascia from both bumper sides.Then pull bumper fascia out.k 13Remove nuts securing bumper reinforcement and remove the reinforcement.Body Rear End and Opener¼When removing or installing trunk lid,place a cloth or other padding on trunk lid.This prevents vehicle body from being scratched.¼Bumper fascia is made of plastic.Do not use excessive force and be sure to keep oil away from it.¼Trunk lid adjustment:Adjust at hinge-trunk lid portion for proper trunk lid fit.¼Trunk lid lock system adjustment:Adjust striker so that it is in the center of the lock.After adjustment, check trunk lid lock operation.¼After installation,make sure that trunk lid and fuel filler lid open smoothly.5For Wiring Diagram,refer to“TRUNK LID AND FUEL FILLER LID OPENER”in EL section. REMOVAL—Rear bumper assemblyk 1Remove bolts from lower side of rear bumper fascia.k 4Remove nuts from each fender side.k8Pull reinforcement out.SBT340Body Rear End and Opener(Cont’d)¼For removal of door trim,refer to“Door Trim”in“INTERIOR TRIM”,BT-19.¼After adjusting door or door lock,check door lock operation.CAUTION:¼Disconnect ground terminal from battery in advance.¼Disconnect air bag system line in advance.¼Never tamper with or force air bag lid open,as this may adversely affect air bag performance.¼Be careful not to scratch pad and other parts.REMOVAL—Instrument panel assemblyInstrument panel assembly Combination meter Audio&A/C control Console boxRemove air bag module(driver)and steering wheel.Refer to“SUPPLEMENTAL RESTRAINT SYSTEM”in RS section for details.k1Glove box assembly¼Remove upper screws and lower screws.¼Then disconnect passenger air bag module connector.k2Instrument lower panel on driver side¼Remove screws.k6Combination meter¼Remove screws then disconnect harness connectors.k7Center ventilator with switch panel¼Pull out with a miniature flat-bladed screwdriver.k9Ashtrayk10Audio&A/C control unit assembly¼Remove upper&lower screws from the instrument panel.k10-1A/C or heater controlk10-2Cluster lid Ck10-3Audiok10-4Card&coin casek11Console box¼Remove screws under the shifter cover plate and also remove rear screws.k12Front pillar garnishk14Defroster grilleSide and Floor TrimCAUTION:Wrap the tip of flat-bladed screwdriver with a cloth when removing metal clips from garnishes. REMOVAL—Body side trimk1Remove front and rear seats.Refer to“SEAT”for details,BT-27,32.k2Remove front and rear kicking plates.k3Remove dash side lower finishers.k4Remove front and rear body side welts.Refer to“Body side welt”in“EXTERIOR”for details,BT-23. k5Remove front pillar garnishes.k6Remove center pillar upper garnishes.k7Remove center pillar lower garnishes.k8Remove rear pillar garnishes.k9Remove high-mounted stop lamp.k10Remove rear parcel shelf finisher.Side and Floor Trim(Cont’d)SBT367Removal—Door trimk1Remove inside handle escutcheon.k2Remove power window switches,then disconnect the connectors.k3Remove screw securing pull handle,and then remove pull handle.k4Remove step lamp lens and screws securing step lamp,and then disconnect step lamp connector.k5Remove screws.(Front door only)k6Remove clips securing door finisher.k7Lift out door finisher.Disconnect harness connectors.SBT368REMOVAL—Headliningk1Remove front and rear seats.Refer to“SEAT”for details,BT-27,32.k2Remove front and rear seat belts.Refer to“SEAT BELTS”in RS section for details. k3Remove body side trim.Refer to“Side and Floor Trim”for details,BT-16.k4Remove sunroof switch or spot lamp switch.k5Remove inside mirror assembly.k6Remove sun visors.k7Remove interior lamp assembly.k8Remove assist grips.k9Remove metal clips securing headlining.k10Remove headlining from vehicle through front passenger side.Trunk RoomTrimINTERIOR TRIMSBT345k 1k 2Hood molding and hood frontseal SBT343k 3k 4Cowl top seal and cowl top grilleSBF341HBk 5Windshield side moldingMounted with screws.k6Windshield upper moldingSBF342HF k7Drip weatherstripSBF343HA k8Body side weltSBF454EA k9Door weatherstripSBF455EAk10Door sash moldingSBF345H k11Front door parting sealSBF346HA k12Rear door corner moldingSBF347H k13Door outside moldingSBF348Hk14Sunroof lid weatherstripSBF349HAk15Side guard moldingSBF460EAk16k17Rear window upper molding and side moldingBasically the same as windshield upper molding. Refer to k6Windshield upper molding.k18Rear window lower moldingSBF350H k19Trunk lid weatherstripSBF461EA k20MudguardSBF357Hk21Rear combination lamp¼Rear combination lamps are installed with nuts and butyl seal.SBF358H k22Rear air spoiler¼When removing,first disconnect high-mounted stop lamp connector located on the back of trunk lid,then remove air spoiler taking care the stop lamp harness does not get caught.¼When installing,make sure that there are not gaps or waves at ends of air spoiler.¼Before installing spoiler,clean and remove oil from surface where spoiler will be mounted.SBT941¼When removing or installing the seat trim,carefully handle it to keep dirt out and avoid damage. 5For Wiring Diagram,refer to“POWER SEAT”in EL section.Front SeatPOWER SEATPOWER SEAT(With SRS side air bag)CAUTION:¼Before removing the front seat,turn the ignition switch off,disconnect both battery cables and wait at least3minutes.¼When checking the power seat circuit for continuity using a circuit tester,do not confuse its con-nector with the side air bag module connector.Such an error may cause the air bag to deploy.¼Do not drop,tilt,or bump the side air bag module installed in the seat.Always handle it with care.MANUAL SEAT¼When handling seat,be extremely careful not to scratch heating unit.¼To replace heating unit,seat trim and pad should be separated.¼Do not use any organic solvent,such as thinner,benzene,alcohol,gasoline,etc.to clean trims.5For Wiring Diagram,refer to“HEATED SEAT”in EL section.Seatback heating unit removal&installationSBF424HAMBT077AAADJUSTMENTInstall motor&limit SW assembly and sunroof rail assembly in the following sequence:1.Arrange equal lengths of link and wire assemblies on both sides of sunroof opening.2.Connect sunroof connector to sunroof switch and positive(+)power supply.3.Set lid assembly to fully closed positionREMOVAL¼After any adjustment,check sunroof operation and lid alignment.¼Handle finisher plate and glass lid with care so not to cause damage.¼It is desirable for easy installation to mark each point before removal. CAUTION:Always work with a helper.Link and wire assem-bly Sunroof frameassemblyShade assembly Lid assembly Motor assemblyTilt glass lid up.k1Side trim¼Remove side trim clips.k2Sunroof lid mount nutsk3Lid assemblyk4Rear drain assemblyOperate sunroof switch to tilt glass lid down.k5Shade assemblyk8Wind deflector assemblyk9Drain hosesk10Sunroof unit bracketk11Sunroof frame assemblyk12Link and wire assembly5For Wiring Diagram,refer to“ELECTRIC SUNROOF”in EL section.SBT516Trouble DiagnosesDIAGNOSTIC TABLENOTE:For diagnosing electric problem,refer to“ELECTRIC SUNROOF”in EL section.Check items(Components)Wind deflector Adjustment Drain hoses Weatherstrip Link and wire assemblyReference page BT-37BT-38BT-39BT-39BT-40SymptomExcessive windnoise123 Water leaks123Sunroof rattles1423 Excessive opera-tion noise123The numbers in this table mean checking order.SBT331WIND DEFLECTOR1.Open lid.2.Check visually for proper installation.3.Check to ensure a proper amount of petroleum jelly has beenapplied to wind deflector connection points;apply if necessary.SBT3324.Check that wind deflector is properly retracted by hand.If it isnot,remove and visually check condition.(Refer to removal procedures,BT-34.)If wind deflector is damaged,replace with new one.If wind deflector is not damaged,re-install properly.ADJUSTMENTIf any gap or height difference between glass lid and roof is found, check glass lid fit and adjust as follows:SBT482Gap adjustment1.Open shade assembly.2.Tilt glass lid up then remove side trim.3.Loosen glass lid securing nuts(3each on left and right sides),then tilt glass lid down.4.Adjust glass lid from outside of vehicle so it resembles“A-A”as shown in the figure above.5.Tilt glass lid up and down until it is adjusted to“B-B”as shownin the figure above.6.After adjusting glass lid,tilt glass lid up and tighten nuts.7.Tilt glass lid up and down several times to check that it movessmoothly.Height difference adjustment1.Tilt glass lid up and down.2.Check height difference between roof panel and glass lid tosee if it is as“A-A”as shown in the figure above.3.If necessary,adjust it by using one of following procedures.¼Adjust by adding or removing adjustment shim(s)between glass lid and link assembly.¼If glass lid protrudes above roof panel,add shim(s)or plain washer(s)at sunroof mounting bracket or stud bolt locations to adjust sunroof installation as required.DRAIN HOSESSBT483(The figure shows only the front side.)4.Remove drain hoses and check visually for any damage,cracks,or deterioration.5.Pour water into drain hoses and find damaged portion.¼If any damaged portion is found at each step,replace thedamaged part.WEATHERSTRIP¼In the case of leakage around glass lid,close glass lid and pourwater over glass lid to find damaged or gap portion.1.Remove glass lid assembly.(Refer to removal procedures,BT-34,for details.)2.Visually check weatherstrip for proper installation.If a gapexists between glass lid and weatherstrip,check for sufficientamount of butyl seal.If required,remove weatherstrip andapply butyl seal.Refer to“EXTERIOR”,BT-22,for details.3.Check weatherstrip visually for any damage,deterioration,orflattening.¼If any damage is found,replace weatherstrip.CAUTION:Do not remove weatherstrip except when replacing,or filling up butyl seal.LINK AND WIRE ASSEMBLYNOTE:Before replacing a suspect part,carefully ensure it is the source of noise being experienced.1.Check link to determine if coating film has peeled off to suchan extent that substrate is visible.Check also to determine if link is the source of noise.If it is,replace it.2.Visually check to determine if a sufficient amount of petroleumjelly has been applied to wire or rail groove.If not,add petro-leum jelly as required.3.Check wire for any damage or deterioration.If any damage isfound,remove rear guide(refer to removal procedures,BT-34, for details),then replace wire.SBF034BREMOVALSBT472SBT473After removing moldings,remove glass using piano wire or power cutting tool and an inflatable pump bag.WARNING:When cutting the glass from the vehicle,always wear safety glasses and heavy gloves to help prevent glass splinters from entering your eyes or cutting your hands.CAUTION:¼Be careful not to scratch the glass when removing.¼Do not set or stand the glass on its edge.Small chips maydevelop into cracks.INSTALLATION¼Use a genuine Nissan Urethane Adhesive Kit or equivalent and follow the instructions furnished with it.¼While the urethane adhesive is curing,open a door win-dow.This will prevent the glass from being forced out by passenger compartment air pressure when a door is closed.¼The molding must be installed securely so that it is inposition and leaves no gap.¼Inform the customer that the vehicle should remain sta-tionary until the urethane adhesive has completely cured (preferably 24hours).Curing time varies with temperature and humidity.WARNING:¼Keep heat and open flames away as primers and adhesiveare flammable.¼The materials contained in the kit are harmful ifswallowed,and may irritate skin and eyes.Avoid contact with the skin and eyes.¼Use in an open,well ventilated location.Avoid breathingthe vapors.They can be harmful if inhaled.If affected by vapor inhalation,immediately move to an area with fresh air.¼Driving the vehicle before the urethane adhesive has com-pletely cured may affect the performance of the wind-shield in case of an accident.CAUTION:¼Do not use an adhesive which is past its usable term.Shelf life of this product is limited to six months after the date of manufacture.Carefully adhere to the expiration or manufacture date printed on the box.¼Keep primers and adhesive in a cool,dry place.Ideally,they should be stored in a refrigerator.¼Do not leave primers or adhesive cartridge unattendedwith their caps open or off.¼The vehicle should not be driven for at least 24hours oruntil the urethane adhesive has completely cured.Curing time varies depending on temperature and humidities.The curing time will increase under higher temperatures and lower humidities.Windshield and Rear WindowSBF355HAREPAIRING WATER LEAKS FOR WINDSHIELDLeaks can be repaired without removing and reinstalling glass.If water is leaking between the urethane adhesive material and body or glass,determine the extent of leakage.This can be done by applying water to the windshield area while pushing glass outward.To stop the leak,apply primer(if necessary)and then urethane adhesive to the leak point.Door MirrorCAUTION:Be careful not to scratch door rearview mirror body.5For Wiring Diagram,refer to“POWER DOOR MIRROR”in EL section.REMOVAL—Door mirror1.Remove door trim.Refer to“Door Trim”in“INTERIOR TRIM”for details,BT-19.2.Remove inner cover front corner of door.3.Disconnect door mirror harness connector.4.Remove door mirror harness clips.5.Remove bolts securing door mirror assembly.6.Remove the mirror glass.Do not insert screwdriver too far.SBF356HAk1Mirror glass k2Mirror body k3Inner cover k4Door mirror harness MIRROR¼All dimensions indicated in figures are actual ones.¼When using a tracking gauge,adjust both pointers to equal length.Then check the pointers and gauge itself to make sure there is no free play.¼When a measuring tape is used,check to be sure there is no elongation,twisting or bending.¼Measurements should be taken at the center of the mounting holes.¼An asterisk(*)following the value at the measuring point indicates that the measuring point on the other side is symmetrically the same value.¼The coordinates of the measurement points are the distances measured from the standard line of“X”,“Y”and“Z”.SBF874GBEngine CompartmentMEASUREMENTSBF390HCEngine Compartment(Cont’d)MEASUREMENT POINTSUnit:mmSBF391HAUnderbody MEASUREMENTUnderbody(Cont’d) MEASUREMENT POINTSBODY&TRIMSECTION BT CONTENTSPRECAUTIONS (2)Precaution (2)Supplemental Restraint System(SRS)“AIRBAG” (2)GENERAL SERVICING (3)Clip and Fastener (3)BODY END (6)Body Front End (6)Body Rear End and Opener (9)DOOR (11)Front Door (11)Rear Door (12)INSTRUMENT PANEL (13)INTERIOR TRIM (16)Side and Floor Trim (16)Door Trim (19)Roof Trim (20)Trunk Room Trim (21)EXTERIOR (22)SEAT (27)Front Seat (27)Heated Seat (31)Rear Seat (32)SUNROOF (33)Trouble Diagnoses (37)WINDSHIELD AND WINDOWS (41)Windshield and Rear Window (42)MIRROR (43)Door Mirror (43)BODY ALIGNMENT (44)Engine Compartment (44)Underbody (46)。
颐达,骐达新手必看!经典!转贴/:转自爱卡骐达车友会--版主一大二小的文章目录:关于nissan的转速表:自动档也能用脚换档轮胎的选择。
1启动问题I-key问题。
关于水温灯问题雾灯音响mp3刻录CD问题胎压和减震问题点不上火的情况低速转弯方向助力变重车窗和天窗升降功能的重新设置底盘扰流板过低对燃油和润滑有更高的要求转向时方向机异响喷油嘴的问题低速转弯方向助力变重中控台异响问题EBD电子制动力分配系统;及BA刹车何时换档更合适颐达驾驶技术(自动档AT)TIIDA 磨合期驾驶常识TIIDA 拉高速一、颐达一般性保养项目二、颐达保养注意事项提车注意事项怠速1000/900算不算高?排气管排出黑色颗粒状物质冷天颐达车窗多雾应该如何处理?开暖风并不影响油耗吧颐达油耗增高提速迟钝转速不稳?颐达车O/D档开关对油耗是否影响?----------------------------------------------------------------------------------------------------------nissan独有的8000转转速表1、关于nissan的转速表:仔细的朋友可以发现,nissan的转速表是其他多数庭用车所不具备的。
他的最高转数是8000转,这就是所以阳光等车型在全国场地锦标赛2000cc组别能多次夺冠的原因之一。
那么高转速发动机,对于颐达来说,他的峰值出现在4000转,那么最大扭力的输出的峰值我没有了解到,如果在有图表交错点的话,估计在3800-4500左右。
[狠狠的笑TX:dd发动机最高扭矩出现在4400转,特此补充]所以颐达的不省油模式启动后,在这个转速换档应该提速是最快的。
2、自动档也能用脚换档另外关于自动档也能用脚换档。
这个对于磨合期的朋友来说非常有用。
在一脚油门下去,挡位是会不提升的。
有时在一档可能达到3000转,您不妨收点油门。
你会发现,车会自己感觉,而切入二档低转速。
2005款东风日产天籁(TEANA)车身外饰与内饰部分维修手册--非OBD版本: 2004 年 12 月快速参考索引出版号 SM4C-0J31P0 A 概述信息 GI 概述信息AB 发动机 EM 发动机结构LU 发动机润滑系统CO 发动机冷却系统BEC 发动机控制系统FL 燃油系统EX 排气系统ACC 加速控制系统C 变速箱 / 变速驱动桥 AT 自动变速箱D 传动系统/ 车桥FAX 前桥DRAX 后桥E 悬架 FSU 前悬架RSU 后悬架EWT 车轮和轮胎F 制动 BR 制动系统PB 驻车制动系统BRC 制动控制系统G 转向 PS 动力转向系统H 约束系统SB 安全带GSRS 辅助约束系统 SRSI 车身 BL 车身、门锁和安全系统GW 玻璃、车窗系统和后视镜 HRF 车顶EI 外饰和内饰IP 仪表板SE 座椅J 空调ATC 自动空调JK 电气系统 SC 起动和充电系统LT 灯光系统DI 驾驶信息系统KWW 雨刮器、洗涤器和喇叭BCS 车身控制系统LAN LAN 系统LAV 音响、视频、导航和电话系统PG 供电、接地和电路元件L 保养MA 保养MM 索引 IDX 索引本公司保留所有权利。
事先未经东风汽车有限公司乘用车公司的书面许可,本维修手册的任何部分不得复制或存储在检索系统中,或以任何形式,任何方法传播,如使用电子、机械、录音或其他方法。
前言本手册包含了东风乘用车公司 TEANA (天籁)系列车型的保养和修理步骤。
为了保障你的人身安全和车辆的正常使用功能必须仔细阅读本手册。
在开始修理工作前一定要透彻理解 GI 部分中注意事项的内容。
出版时,本手册中的全部内容都是最新的产品信息。
本公司保留在任何时候不预先通知而变更技术参数和维修方法的权利。
重要安全须知正确的维修操作对保证维修人员的人身安全和车辆性能的可靠是至关重要的。
本手册中描述的维修步骤尽可能的使维修操作更安全准确。
维修质量依据所采用的维修步骤、工具、零部件和维修技师的经验有所不同。
汽车原厂维修手册汽车原厂维修手册全套500G 汽车维修资料详细目录以下是资料详细目录全车系维修手册本田飞度原厂维修手册2009 本田思域原厂维修手册2009 本田新雅阁原厂维修手册2008 本田CR-V电子版维修手册单项资料版2007本田CR-V原厂维修手册2004 本田CR-V文档版维修手册本田CR-V(05款)用户手册本田款新CR-V原厂维修手册2007 本田本田CR-V原厂维修手册2001 本田奥德赛维修手册2002 本田奥德赛 ODYSEEY维修手册2006 本田本田飞度原厂维修手册2004年本田飞度原厂维修手册2009 本田飞度原厂维修手册2006 本田飞度原厂维修手册2008 本田时韵原厂维修手册2002 本田时韵原厂维修手册2004 本田思迪原厂维修手册2006 本田思迪原厂维修手册本田思域原厂维修手册2006 本田civic电子版维修手册本田CIVIC混合动力版原厂维修手册本田civic原厂维修手册(92-04款) 本田本田雅阁原厂维修手册98 本田2.3原厂维修手册本田2.0 2.4 3.0原厂维修手册2003款本田雅阁原厂维修手册2006 本田雅阁 2.0 R20A3发动机维修手册本田CD7_CD9英文维修手册新款广州雅阁维修手册本田讴歌原厂维修手册2007 本田讴歌 TL 中文原厂维修手册2009丰田威姿原厂维修手册2007 丰田雅力士原厂维修手册2008 丰田RAV4 英文原厂维修手册2006 丰田RAV4培训教材2009丰田大霸王小客车结构图解与维修规范丰田大霸王发动机彩色电路图丰田大霸王汽车故障码检修流程丰田新款大霸王培训丰田大霸王原厂维修手册2000款丰田1RZ 2RZ-E原厂维修手册丰田大霸王2AZ-FE发动机原厂维修手册丰田新大霸王原厂维修手册丰田汉兰达原厂维修手册2007 丰田汉兰达新车培训2007丰田台湾花冠原厂维修手册2001 丰田花冠AE111,EE111,SEP原厂维修手册1998丰田花冠原厂维修手册(04年英文)丰田花冠原厂维修资料扫描版丰田花冠轿车原厂维修手册丰田柯罗那发动机电路图2007 丰田1ZZ-FE.3ZZ-FE发动机(花冠)维修手册丰田威驰花冠特锐检修专辑丰田花冠NZE12.ZZE12原厂维修手册丰田新皇冠维修手册2006丰田新皇冠Crown新车型培训2010 进口丰田皇冠汽车结构图解与维修规范一汽丰田皇冠培训丰田新皇冠原厂维修手册2006 凌志LS400皇冠CROWN3.0轿车电脑控制系统结构与维修丰田新皇冠维修手册丰田卡罗拉维修手册(04年英文) 丰田新卡罗拉培训资料丰田卡罗拉原厂维修手册2007 丰田凯美瑞轿车原厂维修手册2006 丰田凯美瑞原厂维修手册混合动力2010年丰田佳美ACV30L-AEPNKW原厂维修手册丰田佳美轿车结构图解与维修规范丰田佳美原厂维修手册ACV3.MCV30 2001年丰田佳美.大霸王维修手册丰田佳美2.4原厂维修手册丰田凯美瑞原厂维修手册2006 丰田凯美瑞特性丰田凯美瑞维修手册丰田新款佳美维修手册丰田四川考斯特客车丰田酷路泽原厂维修手册丰田陆地巡洋舰检修专辑2005 丰田新霸道PRADO新车型培训2010丰田陆地巡洋舰 1FZ-FE .3RZ-F.3RZ-FE杌械,电器维修手册6654321丰田陆地巡洋舰检修专辑丰田陆地巡洋舰结构图解与维修规范丰田沙漠王子原厂维修手册丰田陆地巡洋舰原厂维修手册4500 丰田霸道4000和陆地巡洋舰4700汽车原厂维修手册丰田陆地巡洋舰3400原厂维修手册丰田陆地巡洋舰4500原厂维修手册丰田丰田普瑞斯原厂维修手册2003-04 丰田普锐斯新车型培训2010 丰田普瑞斯原厂维修手册2006 丰田普锐斯丰田混合动力丰田新锐志原厂维修手册2009 丰田REIZ新车特征 05年丰田锐志原厂维修手册2005 丰田特锐原厂维修手册丰田威驰培训丰田威驰原厂维修手册丰田威姿原厂维修手册丰田Avalon丰田亚洲龙原厂维修手册雷克萨斯1991 ES 250 原厂维修手册雷克萨斯1993 ES 300 原厂维修手册雷克萨斯1993 ES 300 原厂维修手册雷克萨斯1997 ES 300 原厂维修手册雷克萨斯2001 ES 300 原厂维修手册英文雷克萨斯2005 ES 330 原厂维修手册英文雷克萨斯2005 ES330原厂维修手册雷克萨斯ES350原厂维修手册英文07 雷克萨斯GS430.GS300原厂维修手册丰田凌志GS430-300培训资料雷克萨斯IS250原厂维修手册雷克萨斯is300 原厂维修手册2000-05 雷克萨斯IS300 原厂维修手册2004 雷克萨斯LS400原厂维修手册雷克萨斯LX470 2004雷克萨斯LS_430雷克萨斯LS600h混合动力车型培训雷克萨斯LS400皇冠CROWN3.0轿车电脑控制系统结构与维修日产阿蒂玛原厂维修手册2003日产碧莲原厂维修手册1999年日产A32风度原厂维修手册1994-1998 日产A33风度原厂维修手册2001 日產CEFIRO(A33)原厂维修手册台灣(00年)\ 日产CEFIRO、风度、蓝鸟、阳光原厂维修手册日产风度维原厂维修手册日产Y50风雅原厂维修资料2006年日产尼桑贵士原厂维修手册2005年日产 E24佳奔旅行车原厂维修手册1987 日产 E25佳奔原厂维修手册2001 日产骏逸原厂维修手册2006年日产350Z原厂维修手册英文跑车2002 日产350Z Z33原厂维修手册2006年日产蓝鸟U13原厂维修手册1992 日产风神蓝鸟轿车维修手册\日产风神蓝鸟(EQ7200-II型)原厂维修手册日产蓝鸟原厂维修手册2003 日产新蓝鸟原厂维修手册日产骊威原厂维修手册2007日产D22帕拉丁原厂维修手册1998-2003 日产郑州日产 P27原厂维修手册2005 日产郑州帕拉丁原厂维修手册2002日产郑州奥丁原厂维修手册2007日产帕拉丁原厂维修手册2003日产郑州帕拉丁原厂维修手册日产 T30奇骏原厂维修手册2001日产 T30奇骏原厂维修手册2003日产骐达颐达原厂维修手册2005日产(千里马)原厂维修手册2004日产锐骐原厂维修手册日产东风日产尼桑新天籁原厂维修手册2004~06 日产尼桑天籁原厂维修手册2005日产新天籁原厂维修手册2006日产新天籁4缸2.0原厂维修手册2007 日产尼桑天籁原厂维修手册2008年日产Y61 途乐原厂维修手册日产Q45(无限)原厂维修手册2002 日产无限QX4原厂维修手册日产西尔维亚 S14 SR20DET原厂维修手册1994 日产F50西玛原厂维修手册2004-05年日产西玛(CIMA)原厂维修手册2004 日产逍客原厂培训资料日产原厂逍客原厂维修手册日产轩逸原厂维修资料2006日产 B14阳光原厂维修手册1994-97 日产N16阳光原厂维修手册2002年日产N16阳光EQ7202原厂维修手册2003年日产阳光原厂维修手册2005款日产英菲尼迪 EX35培训手册中文原厂2008 日产英菲尼迪 EX35原厂维修手册中文原厂2008 日产英菲尼迪 Y50原厂维修手册中文原厂2009 日产御轩原厂维修手册(C24)YUMSUN系列2008 日产郑州奥丁原厂维修手册2007马自达Mazda RX-8原厂维修手册马自达2 原厂维修手册 2008 马自达M2培训手册马自达福美来原厂维修手册2003 马自达新M3原厂维修手册2006 马自达长安马自达3 M3两厢原厂维修手册2010马自达长安M3培训手册马自达海马福美来原厂维修手册进口马自达3原厂维修手册马自达5参数配置表(终版发布) 马自达M6轿车学习手册马自达M6原厂维修手册06-08款马自达M6 睿翼原厂维修手册09 马自达m6原厂维修手册一汽M6原厂维修手册一汽马自达M6原厂维修手册-07年海南马自达MPV原厂维修手册马自达MPV原厂维修手册马自达普利马原厂电路及原厂维修手册新一代普力马培训手册斯巴鲁森林人原厂维修手册2007 斯巴鲁富士力狮原厂维修手册2007年斯巴鲁森林人原厂维修手册软件版2009 斯巴鲁翼豹原厂维修手册中文版斯巴鲁富士云雀GHK7071原厂维修手册斯巴鲁MY富士森林人原厂维修手册2004 斯巴鲁MY 力狮原厂维修手册2005 斯巴鲁MY力狮原厂维修手册2006 斯巴鲁弛鹏0207 斯巴鲁富士森林人2008斯巴鲁森林人原厂维修手册( 05款 ) 斯巴鲁森林人原厂维修手册( 06款 ) 三菱新戈蓝培训手册三菱格蓝迪原厂维修手册2004三菱格蓝迪原厂维修手册2006 三菱格蓝迪原厂维修手册2010三菱格蓝迪_原厂维修手册2008 三菱格蓝迪原厂维修手册2007 三菱格蓝迪车间维修光盘2007三菱蓝瑟原厂维修手册2007三菱三菱蓝瑟翼豪陆神原厂维修手册2009年10月三菱长丰猎豹汽车CS6原厂维修手册三菱长丰猎豹汽车原厂维修手册三菱猎豹CJY6421D及CJY2030原厂维修手册三菱猎豹汽车车间维修手册三菱猎豹维修维修培训三菱新猎豹CS6原厂维修手册07款三菱长丰CS7原厂维修手册09款三菱猎豹越野车原厂维修手册三菱欧蓝德原厂维修手册2004三菱欧蓝德原厂维修手册2008三菱欧蓝德原厂维修手册2009年10月三菱欧蓝德维修手册2009三菱欧蓝德自学教材三菱PAJERO原厂维修手册2008 三菱帕杰罗英文原厂维修手册2006 三菱帕杰罗V86V93V98W原厂维修手册2009年10月三菱帕杰罗V87V97V93原厂维修手册2010 三菱Pajero Pinin原厂维修手册2000-2001 三菱帕杰罗V87V97V93原厂维修手册2010三菱帕杰罗原厂维修手册2006三菱帕杰罗原厂维修手册2002三菱帕杰罗原厂维修手册(06年英文) 三菱帕杰罗速跑原厂维修手册2002 三菱Pajero原厂维修手册1999-2000 三菱帕杰罗(速跑)原厂维修手册(02年) 三菱帕杰罗蒙太罗MONTERO V75 英文原厂维修手册三菱V73 6G72发动机电控系统检修. 三菱V73车间检修手册(发动机与变速箱机械) 三菱帕杰罗V73V75原厂维修手册三菱L200原厂维修手册1999-2001 三菱车系-Montero车型发动机针脚电压1994 三菱4G6FF发动机三菱电喷系统维修手册三菱伊柯丽斯原厂维修手册2010 三菱菱绅(原厂维修手册)三凌4G64发动机维修培训三菱Carisma原厂维修手册1997-2000 三菱MONTERO原厂维修手册V75三菱MONTERO原厂维修手册V75(04年英文 ) 三菱V73全车检修手册三菱发动机维修资料三菱伊柯丽斯原厂维修手册2009东南4G63 4G64S4 MPI维修手册\东南得利卡汽车维修手册东南富力利中文维修手册东南戈蓝原厂维修手册东南凌绅原厂维修手册东南凌帅维修手册东南菱帅原厂维修手册东南新菱绅台湾版大众CC原厂维修手册2010款大众CC培训大众宝来原厂维修手册大众宝来01年维修资料大众宝来02年维修资料大众宝来03年维修资料大众宝来04年维修资料大众宝来05-06年维修资料大众新宝来原厂维修手册2008 大众宝来培训资料2004大众宝来运动版培训教材大众宝来维修资料大众波罗1.4中文原厂维修手册2001-2003大众劲情劲取原厂维修手册2007 大众POLO 原厂维修手册大众POLO 1.6原厂维修手册大众上海波罗维修手册大众GOL原厂维修手册(2003) 大众高尔原厂维修手册大众golf-a4教案大众一汽高尔夫A6原厂维修手册2009 大众一汽高尔夫A6维修手册+3月版2010大众Golf A4 培训资料大众辉腾培训资料大众甲克虫原厂维修手册大众新甲壳虫原厂维修手册大众捷达柴油电喷发动机培训资料大众大众捷达柴油捷达配书光盘大众捷达SDI原厂维修手册大众捷达轿车包括柴油车培训一汽大众捷达柴油车原厂培训08大众捷达1.6L四缸汽油发动机(BJG)机械部分大众捷达1.6L四缸汽油发动机(BJG_BWG)自诊断大众捷达LPG 机械部分大众捷达双燃料CNG LPG 电器部分大众捷达双燃料CNG 机械部分大众捷达双燃料CNG LPG 电器部分大众捷达双燃料CNG LPG 机械部分大众捷达柴油机电子控制系统大众Jetta双燃料喷射系统大众捷达(2V)轿车发动机数据流分析大众捷达(5V)轿车发动机数据流分析大众捷达.宝来五气门发动机电控系统的维修大众捷达2V电喷车维修手册大众捷达LPG燃气原理大众捷达SDI 发动机维修诊断手册[原厂] 大众捷达电喷系列轿车维修手大众捷达都市先锋维修手册大众捷达两阀电喷轿车维修手册大众捷达前卫数据流分析大大众一汽大众开迪维修手册及培训资料大众朗逸4缸汽油发动机(1.6升4缸链式) 大众迈腾原厂维修手册2007大众迈腾警车原厂维修手册大众PASSAT领域原厂维修手册2007 大众帕萨特B5培训资料大众上海帕萨特B5轿车电系故障检测与维修大众国产帕萨特全车维修手册大众帕萨特B5 1.8T维修手册大众帕萨特使用手册大众上海大众桑塔纳3000原厂维修手册大众桑塔纳2000轿车电控与电气系统检修图解大众桑塔纳入2000原厂维修资料2004款大众桑塔纳2000原厂维修手册大众桑塔纳GLI 世纪新秀原厂维修手册大众桑塔纳2000结构与维修大众速腾原厂维修手册2006 大众速腾电气系统培训09大众途安原厂维修手册2004 大众途安原厂维修手册2005 大众途安Touran多用途乘用车产品手册大众途安Touran培训教材大众途锐自学手册长安铃木燕雨原厂维修手册铃木吉姆尼原厂维修手册铃木SOLIO(所力歐)1.3L原厂维修手册羚羊轿车原厂维修手册羚羊世纪星轿原厂维修手册铃木天语SX4原厂维修手册铃木维特拉原厂维修手册新奥拓YC5原厂维修手册长安奥拓轿车原厂维修手册长安铃木初级技术培训教材铃木羚羊CNG原厂维修手册铃木全新天语SX4维修手册五十铃UBS英文原厂维修手册江铃陆风(JX6474E)原厂维修手册江铃皮卡原厂维修手册江铃全顺4G64原厂维修手册江铃全顺客车全车电路图江铃全顺原厂维修手册江铃陆风SUV龙腾版(配VM发动机)培训教材江铃陆风风华原厂维修手册2007 江铃陆风风尚原厂维修手册2006五十铃T型皮卡REDEO9(竞技者)原厂维修手册江铃全顺欧III发动机原厂维修手册2006 江铃N系列欧III发动机原厂维修手册2007 江铃T系列欧三发动机原厂维修手册2007 江铃全顺欧III发动机原厂维修手册2007 江铃汽车09款T系列(N301)原厂维修手册2008 江铃T系列欧三原厂维修手册江铃电喷柴油T系列欧三原厂维修手册轻骑兵 Isuzu Trooper 英文原厂维修手册庆铃600P原厂维修手册五十铃N系列发动机维修说明五十菱原厂维修手册大宇蓝龙原厂维修手册大宇希望原厂维修手册大宇蓝龙新巧龙旅行家典雅轿车原厂维修手册大宇(DAEWOO)王子超级沙龙轿车电控燃油喷射系统原厂维修手册大宇Daewoo贵族希望ESPERO轿车电喷系统原厂维修手册大宇貴族原厂维修手册大宇蓝龙发动机电控系统检修起亚东风悦达福瑞迪原厂维修手册起亚嘉华骄车原厂维修手册起亚嘉华原厂原厂维修手册进口嘉华原厂维修手册起亚千里马原厂维修培训手册起亚普莱特原厂维修手册起亚锐欧G 1.4 DOHC原厂维修手册2009 起亚赛拉图汽车维修电路图起亚赛拉图原厂维修手册起亚狮跑维修手册起亚2009狮跑原厂维修手册起亚狮跑原厂维修手册起亚sorento索兰托原厂维修手册起亚威客 G3.8原厂维修手册 2006 起亚威客G3.8DOHC(VVT)原厂维修手册 2007起亚远舰原厂维修手册起亚远舰新车技术培训教材现代XG君爵XG原厂维修手册现代劳恩斯原厂维修手册2009 现代领翔NFC原厂维修手册2009 现代领翔NFC 培训手册现代美佳(FC)原厂维修手册2009 现代瑞风与风行检修专辑2005年瑞风英文原厂维修手册瑞风与风行检修专辑2005年现代新圣达V6原厂维修手册2008 现代圣达菲培训资料现代圣达菲维修手册现代索纳塔AT原厂维修手册2007 现代北京索纳塔原厂维修手册北京现代索纳塔发动机培训北京现代索纳塔原厂维修手册北京现代索纳塔专辑现代华泰现代特拉卡原厂维修手册2002 华泰现代培训现代特拉卡柴油发动机原厂维修手册现代特拉卡原厂维修手册现代途胜维修手册2009现代途胜培训教材现代途胜维修手册现代维拉克斯维修手册2008 现代雅科仕维修手册现代雅申特原厂维修手册2009 现代雅绅特维修手册现代雅尊维修资料2009 现代悦动维修手册2008 现代伊兰特维修手册2009 现代伊兰特维修手册现代NF御翔原厂维修手册2005 富豪VOLVO S80原厂维修手册 VOLVO S80检修专辑-迪威2004,12.pdf宝马X3 E83培训资料宝马X5 E53培训教材宝马X5 培训教材2003 宝马X5 培训教材2004 宝马新X5E70底盘培训宝马08新七系培训教材宝马BMWE65培训教材宝马E65-原厂2001宝马新一代发动机 N73培训教材宝马E38 E39原厂维修手册宝马E65-E66新系统原厂维修手册宝马745 E65原厂维修手册宝马E65系列保养灯归零宝马745控制系统检修专辑2004年宝马E 90 培训教材宝马E90培训教材宝马E90培训教材宝马3系培训手册宝马E60 E61培训教材宝马华晨新5系培训教材宝马MINI和E60培训教材宝马525i维修手册宝马国产维修手册华晨宝马新5系原厂中文维修手册宝马99 培训教材宝马BMW525i维修手册新宝马5系使用手册-原厂保时捷Boxster车间维修手册保时捷卡宴维修手册保时捷汽车培训与自学习保时捷 993 911 车间维修手册保时捷911维修手册保时捷968维修手册保时捷968原厂维修手册 Maybach迈巴赫车间维修手册奔驰BENZ-06BENZ奔驰培训教材奔驰SLK 171培训教材奔驰W210培训教材奔驰W211娱乐系统培训奔驰W220车间维修手册奔驰600车间维修手册奔驰w202车间维修手册奔驰W203,W210系统检修奔驰轿车维修数据(35 43 59 79奔驰车系电脑控制检修技术资料库奔驰BENZS320维修手册2006 奔驰s系使用手册奔驰车系电脑控制检修技术资料库奔驰车系维修手册标致206-406原厂维修手册标致306原厂维修手册标致307原厂维修手册标致307综合资料东风标致206原厂发动机电喷系统培训东风标致408培训标致307-607维修软件系统标致系列中文.nrg东风标致307 2004-2006 新雅途EPS维修资料捷豹Jaguar Tis 2004 捷豹JAGUAR XK8 1997电路图捷豹维修手册 XJ6 - XJ40 拉古娜英文原厂维修手册梅甘娜英文原厂维修手册雷诺新风景2英文原厂维修手册雷诺轿车维修手册(英文) 雷诺RENAULT维修手册欧宝新款欧美佳原厂维修手册欧宝赛飞利英文原厂维修手册欧宝汽车维修手册欧宝赛飞利培训欧宝威达原厂维修手册欧宝威达VECTRA-B英文原厂维修手册欧宝威达VECTRA-C英文原厂维修手册欧宝雅特英文原厂维修手册欧宝CECTRA-B原厂维修手册萨博9-3 原厂维修手册进口绅宝轿车修理手册机工2000 绅宝车系维修手册斯柯达法比亚原厂维修手册斯柯达昊锐培训教材斯柯达技术通报斯柯达新明锐培训教材PICASSO原厂维修手册2007 雪铁龙c2培训与电路图雪铁龙C2培训-原厂雪铁龙爱利舍原厂维修手册雪铁龙爱丽舍轿车雪铁龙毕加索轿车原厂维修手册雪铁龙新毕加索课堂练习图册雪铁龙毕加索萨拉改进型技术资料-美河提供雪铁龙富康电气维修资料东风雪铁龙凯旋雪铁龙凯旋维修手册雪铁龙塞纳维修手册雪铁龙世嘉培训内容1-1 雪铁龙世嘉车型介绍路虎Land Rover RAVE 原厂维修手册(英文)路虎发现者和自由人原厂维修手册路虎拦胜原厂维修手册陆虎更早陆虎览胜车间手册路虎览胜车主手册2006 英国陆虎英文原厂维修手册路虎维修手册(修理指南别克陆尊原厂维修手册别克GL8 2.5L原厂维修手册2006 别克GL8陆遵原厂维修手册2005 别克GL8原厂维修手册2001 别克昂科雷原厂维修手册别克新君威原厂维修手册2008别克君威原厂维修手册2003别克新君威2。