
ASUS MultiFrame
- 格式:ppt
- 大小:1.84 MB
- 文档页数:16

1CREATOR CENTER for Creation NOTEBOOK2ContentsAbout CREATOR CENTER (4)CREATOR CENTER Basics (5)Main Screen (5)Information Bar (5)Main Menu (6)Sub Menu (6)Creative Applications Optimization (7)Creator Mode (7)How to Enable Creator Mode (8)User Scenario (9)Selecting User Scenario (9)General Settings (10)Monitor (11)True Color (12)True Color Preset Options (12)Mystic Light (13)Voice Command (16)Noise Cancellation (21)Duet Display (22)Create a New Screen Profile (23)Activating Duet Screen Capture (23)Gaming Gear (24)Product Registration (25)Live Update (26)System Info (27)Microsoft APP (28)Battery Master (29)Calibrating Battery (29)Backup (30)Notices (31)Copyright (31)Revision History (31)3ContentsAbout CREATOR CENTER∙Optimize performance for creative applications.∙System performance tuning—you can choose overclock or silent.∙Monitor system information.∙Adjust the best display settings for your eyes.∙Register your MSI products.∙Control LED light effects and synchronize effects to your devices.∙Use utilities to control special features.∙Set the charging method and calibrate the battery.∙Backup system.⚠ImportantTHE SOFTWARE FEATURES IN THIS USER GUIDE VARY BY PRODUCT.THE SCREENSHOTS FOR THE UI IN THIS USER GUIDE ARE FOR REFERENCE ONLY AND THE ACTUAL UI DESIGN MAY VARY.4About CREATOR CENTER5CREATOR CENTER Basics CREATOR CENTER Basics Main Screen⚠Important The screenshots for the UI in this user guide are for reference only and the actual UI design may vary.Operation PanelInformation Bar Display System Profile Picture/Login/ Logout Display Creator Mode Status.Main MenuSub Menu Information Bar Display MSI product currently in use. Click to enter the control page.Display mode currently applied. Switch between different modes by selecting a mode from the drop-down menu.6CREATOR CENTER BasicsSub MenuMain MenuHomeMy DeviceSupportToolsSettingCollapse Button7Creative Applications Optimization Creative Applications OptimizationThe Creator Mode feature will optimize the computer system, monitor, cooler and other peripherals to provide the best experience while using creative applications.Creator Mode Creator Mode main switchSelect Creator Mode in the sub menu to enter Creator Mode control panel You can drag and drop to set the priority List software that supported by creator modeEdit the software listRefresh the software listAdd software to the software listCreator Mode selection User Priority Mode: User-defined software priority Real-Time Mode: Automatically optimize software performance.8Creative Applications OptimizationHow to Enable Creator Mode You can enable the Creator Mode for Processor Affinity, System Performance and Application Priority while using creative applications.1.Go to Home > Creator Mode, and turn on Creator Mode main switch.Turn on Creator Mode main switch2.Select User Priority Mode or Real-Time Mode.Check the box Check the boxor3. Run the application.⚠ImportantIn order to apply the settings, the creator mode must be enabled before running the software.9User Scenario User Scenario Selecting User Scenario The CREATOR CENTER has default scenarios and customized preset options.1. Go to Home > User Scenario.2. Select one of the options. ▪Extreme Performance – A configuration that boosts the highest possible performance. ▪Balanced - MSI recommended settings for average users. ▪Silent - A configuration that allows system to run smoothly with minimum loading. ▪Super Battery - A power-saving mode that lowers the power consumption forbasic needs.Adjust Panel Brightness, Keyboard Brightness and Fan Speed for each scenario.Click to reset to defaultGeneral SettingsYou can enable/disable some general settings in this panel.⚠ImportantThe features in the General Settings vary by product.Windows Key - Click to enable or disable the Windows key on the keyboard. Switch Key - Click to switch the Windows key and the Fn key on the keyboard. WebCam - Click to enable or disable the webcam.Display OverDrive - Only available on certain displays. Once enabled, the response time of the will be overclocked.USB Lighting - Control the USB port lighting mode.GPU Switch - Click to switch the MSHybrid Graphics Mode and the Discrete Graphics Mode.Crosshair Display - Click to enable or disable the Crosshair Display. Click the gear icon to open the True Color control and choose the type of crosshair and its color.10General Settings11Monitor Monitor Monitor feature provides a custom hardware monitor gadget to display the system status.Click to free up memory Click to clean up the disk Select Monitor in the sub menu to enter Monitor page12True ColorTrue Color With True Color function, you can adjust the best screen gamma, saturation, brightness and contrast settings for your eyes.The Ture Color feature supports games in windowed mode.Select True Color in the sub menu to enter True Color control panelSelect the quick screen color optionTrue Color Preset Options When you click the preset option, the screen settings will be immediately applied to your computer. The detailed options are as follows: ⚠Important The features in the True Color vary by product. ▪Gamer - For playing games. ▪Anti-Blue - For reducing the amount of blue light that is emitted from the display to reduce eye fatigue. ▪sRGB - For accurate color when viewing images on websites. ▪Designer - For design applications.▪Office - For office and productivity applications.▪Movie - For watching movies. ▪AdobeRGB - For accurate color when viewing images and other media created in the Adobe RGB color space. ▪Display P3 - For accurate color in wide-gamut cinema mode. ▪Customize - For the True Color 3 application setting.13Mystic Light Mystic Light Mystic Light feature allows you to control LED light effects of MSI & partner products. For some earlier products, you can go to product download page to download the applicable LED control software. ⚠ImportantThe Mystic Light feature is only available when MSI Gear devices are connected.When you click the Apply button, the LED effect settings can be saved to Profile1~3, and you can switch to different settings by clicking Profile1~3.Device synchronizationClick to access Ambient Link All Synchronization LED item drop-down menu Light effect, LED color, speed and brightness lever selectors Apply buttonVoice Command14Mystic Light∙Device synchronization - In this section, you may synchronize LED light effect to your devices.Chain icon - indicates the device has been synchronized.Broken-chain icon - indicates thedevice is not synchronized.Device icon - click it to change LED effect setting for this device. When the device icon turns blue, it indicates the device you’re currently setting.▪Individual - You can also change settings for one single device. To do that, click the chain icon and the color will turn gray as below.▪To synchronize devices - Click the chain icon above device icon. When the chain icon turns blue, it indicates that the device has synchronized LED effect settings with other devices.▪All synchronization - Click the big chain icon on the left side of all the devices.Click the big chain icon∙LED item drop-down menu - Click it to select the LED item on the device. The LED effects vary depending on your LED item selection.15Mystic Light ∙Light effect drop-down menu Click it to select LED light effects. Please note that the options about light effects would be more or less depending on the devices you have. It will only list the light effects which are available for all applicable devices.∙LED Color selector - In this section, you may select the color for one single light effect (Stack, Breathing, Flashing etc.).The outer arc is a custom color picker and the inner arc is the default color picker that cannot be changed. You can simply change the LED color by clicking on the color on the outer or inner arc. To store a custom color, click one of the color slotson the outer arc to store the color of your choice.Use the Hue Circle to choose the color you want. The color you choose will be displayed on the center circle.You can specify a color by editing an RGB (red, green, blue) color value between 0 and 255.Drag the brightness slider up to increase brightness or drag down to decrease brightness. ∙Effect speed and brightness levelDrag the sliders to adjust the LED light effect for switching speed and light brightness.Please note that these function will only be available if your device supports it.Voice CommandMystic Light allows you to use your voice to change LED effects.⚠ImportantThe Voice Command feature is only available for the Notebook with the Per Key RGB keyboard or connected to MSI Gear devices.To start Voice Command, you need to install Windows 10 Speech Voices.1. Go to Windows Settings, and select Time & Language.2. Select Add a preferred language, then add English and the voice packages.3. Change your default speech options to English by selecting Speech.16Mystic Light17Mystic Light How to Control Mystic Light via Voice Command Go to Home > Mystic Light, and click setting in the upper right corner. Enable Voice Command and then you can change the LED style by saying Hey Lucky.Click hereEnable Voice CommandA list of Hey Lucky commands Click to open the list of Hey Lucky commands18Mystic LightAmbient Link With the Ambient Link feature, it will provide visual color feedback on Philips Hue and Nanoleaf depending on what is happening in games. To use Ambient Link, you need to follow the instructions below to complete the link setup.⚠ImportantThe Ambient Link feature is only available for the Notebook with the Per Key RGB keyboard or connected to MSI Gear work Requirements ∙The router is broadcasting a 2.4GHz network. ∙The Wi-Fi network is using WPA/WPA2 security.∙The router is configured for any of the Wi-Fi modes a/b/g/n.Philips Hue Setup (optional)1. Plug in your Hue bridge and it will automatically power up.2. Connect it to the router LAN port.3. Wait for the two lights to come on and you are good to go. (Left is power light and center is local network Nanoleaf Setup (optional) ∙The router is compatible with Bonjour (mDNS).Click to enter the Ambient Link control panelSelect Mystic Light in the sub menu to enter Mystic Light menu19Mystic Light Ambient Link Control PanelGame Mode and Ambient Mode can only be activated one at a time on the Ambient Link control panel.∙Game Mode tab Click to synchronize/ non-synchronize the game Synchronization main switch Click to access the game control panelBack Select Game Event, color and brightnessPreview the effect Apply changes20Mystic Light∙Ambient Mode tab∙Ambient Link tabClick to select an effect asbackground lightClick to switch to PhilipsHue and Nanoleaf Status indicator Click to detectdevicesClick tosynchronize Re-synchronize Removethe device Adjust orientation orpositionApply changesPreview the effectON/OFF backgroundlight & musicDrag the slider to adjust lightbrightness21Noise Cancellation Select Noise Cancellation in the sub menu to enter MSI Sound Tune panel Enable/ Disable Speaker Noise Cancellation.Enable/ Disable Microphone Noise Cancellation.Select Microphone (MSI Sound Tune) in the communication software.Select Speaker (MSI Sound Tune) in the communication software.Noise Cancellation The AI-powered noise cancellation is trained through a deep neural network (DNN), the model is generated with more than 500 million data, simulates the way the human brain works. When a sound is heard, the model automatically recognizes and separates the vocal sound from background noises. Hence, filtering out all the unwanted noise. This feature greatly improves the users’ communication experience.22Duet DisplayDuet Display Duet turns your iOS device & Android phone, tablet, or Chromebook into the most advanced extra display, and offers unparalleled performance and display quality.Click to open the Duet Display introduction window Duet Display InstructionsiOS mode Scan the QR code to download Duet Coach app on your iOS device and follow the app instructions to mirror screen.Screen Profiles Hotkey SettingClick to review the screen profile for 5 seconds Click to remove the screen profileCreate a New Screen Profile1. Connect to a second display.2. Click the New button.3. Enter the name of this new profile and click the Apply button.4. Drag through the portion of the display you want to capture.5. Click the Next Segment button to set maximum 3 segments.6. Click the Done button.Activating Duet Screen Capture1. Connect to a second display.2. Check the hotkey setting of the screen profile and remember it.3. Run the application.4. Press the hotkey and the selected portion will be projected on to the second display.23Duet Display24Gaming GearGaming Gear This panel allows you to control MSI’s gaming gear and supported third-party devices. ⚠ImportantThe Gaming Gear feature is only available when MSI Gear devices are connected.Select Gaming Gear in the sub menu to enter Gaming Gear menu Supported devices will be displayed here. Click the device to enter the control panel of the device.25Product Registration Product RegistrationRegister your MSI product to get exclusive updates, quicker service and product support.Login to your MSI account on this My Devices tab. If you don’t have an MSI account, please click the Join MSI Member button or use Facebook/ Google Plus to login.Click the Product Register button and fill in the product registration form.Select My Device in the sub menuto register your product26Live UpdateLive UpdateLive Update feature allows you to scan system and download the latest drivers and utilities. With Live Update, you don’t need to search the drivers on websites. Live Update will download the appropriate drivers automatically. Some software/ drivers will be installed automatically after downloading, please follow the instructions of the installer.To use Live Update:1. Connect your computer to the internet. 2.Go to Support > Live Update.Select which item you want to update Click to scan the systemUtility and driver listClick to install27System Info System Info The System Info provides information about OS, Product Name, Serial Number and Software information.To open System Info:1. Go to Support > System Info.To export system information:1. Go to Support > System Info.2. Click Export System Info button in the upper right corner.3. Browse to the location where you want to save the new text file, and then click Save.To send the serial number to MSI online customer service:1. Go to Support > System Info.2. Click Content Transfer button in the upper right corner.3. Follow customer service’s instructions, and enter 5-digit encryption code.System InformationClick to export system information to a text file.Click to send the serial number of the laptop to MSI online customer service.28Microsoft APPMicrosoft APPThe Microsoft App feature detects installed drivers and displays a relative Microsoft application download links.To install Microsoft App:1. Go to Support > Microsoft App.2. Click the Get it from Microsoft icon on the right side of the item.3.Download and install the application from Microsoft Store.Click to install29Battery Master Battery Master Battery Master is a function tab related to battery maintenance such as RemainBattery Percentage, Battery Health Option, and Battery Calibration.Battery Health Option - Select the battery charging capacity Remain battery percentage Click to calibrate the batteryCalibrating Battery We recommends doing Battery Calibration every 3 months to have the best battery life.1. Go to Tools > Battery Master.2. Click the Battery Calibration icon.3. Follow the instructions on the Battery Calibration screen to connect to the power adapter, install the battery and close the other windows.4. Click Start.30BackupBackupBackup utility designed to backup the recovery image to a USB flash disk or ISO files. They can be used to recover the system to manufacturer’s default settings when it is needed.⚠ImportantUsage of this application on any product with no authorization may be prohibited.Select to create arecovery USB flashdiskSelect to create anISO image fileAfter choosing the type ofbackup, click Next to start thebackup process.NoticesThe MSI logo used is a registered trademark of Micro-Star Int’l Co., Ltd. All other marks and names mentioned may be trademarks of their respective owners. No warranty as to accuracy or completeness is expressed or implied. MSI reserves the right to make changes to this document without prior notice.Copyright© Micro-Star Int’l Co.,Ltd. 2020 All rights reserved.Revision HistoryVersion 1.0, 2020/11, First release31Notices。
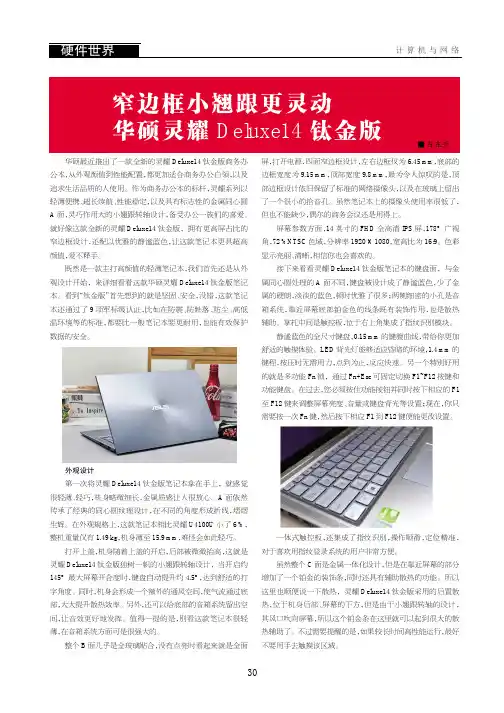
华硕最近推出了一款全新的灵耀Deluxe14钛金版商务办公本,从外观颜值到性能配置,都更加适合商务办公白领,以及追求生活品质的人使用。
作为商务办公本的标杆,灵耀系列以轻薄便携、超长续航、性能稳定,以及具有标志性的金属同心圆A 面,灵巧作用大的小翘跟转轴设计,备受办公一族们的喜爱。
就好像这款全新的灵耀Deluxe14钛金版,拥有更高屏占比的窄边框设计,还配以优雅的静谧蓝色,让这款笔记本更具超高颜值,爱不释手。
既然是一款主打高颜值的轻薄笔记本,我们首先还是从外观设计开始,来详细看看这款华硕灵耀Deluxe14钛金版笔记本。
看到“钛金版”首先想到的就是坚固、安全,没错,这款笔记本还通过了9项军标级认证,比如在防震、防跌落、防尘、高低温环境等的标准,都要比一般笔记本要更耐用,也能有效保护数据的安全。
外观设计第一次将灵耀Deluxe14钛金版笔记本拿在手上,就感觉很轻薄、轻巧,机身略微细长,金属质感让人很放心。
A 面依然传承了经典的同心圆纹理设计,在不同的角度形成折线,熠熠生辉。
在外观规格上,这款笔记本相比灵耀U4100U 小了6%,整机重量仅有1.49kg ,机身薄至15.9mm ,难怪会如此轻巧。
打开上盖,机身随着上盖的开启,后部被微微抬高,这就是灵耀Deluxe14钛金版独树一帜的小翘跟转轴设计,当开启约145°最大屏幕开合度时,键盘自动提升约4.5°,达到舒适的打字角度。
同时,机身会形成一个额外的通风空间,使气流通过底部,大大提升散热效率。
另外,还可以给底部的音箱系统留出空间,让音效更好地发挥。
值得一提的是,别看这款笔记本很轻薄,在音箱系统方面可是很强大的。
整个B 面几乎是全玻璃贴合,没有点亮时看起来就是全面屏,打开电源,四面窄边框设计,左右边框仅为6.45mm ,底部的边框宽度为9.15mm ,顶部宽度9.8mm ,最为令人惊叹的是,顶部边框设计依旧保留了标准的网络摄像头,以及在玻璃上留出了一个很小的拾音孔。


【阿双】勇敢面对——就可以解决问题,A42 K42JV 显卡切换不再让你纠结一直深信,出现问题勇敢面对,就一定可以解决问题,最近一段时间很多网友为了A42 K42 JV 双显卡系列机型而懊恼,有些网友反映更新驱动也没有反映,也不会流畅游戏,有些人甚至说根本玩不了游戏,但是隐约中听到个别网友说更新后会好很多,一直不敢放弃,想找个机会尝试下。
昨天快下班的时候有位网友推荐同学过来买电脑,当时要购买A42JV,当时我这里没货了,就推荐了K42JV,一样的配置,不同的外观,也是双显卡的,当时他们来的时候已经是下班的点了,提货有点慢了,检测屏幕,硬盘,基本都到8点了,我简单的教了下显卡设置,没有当面用游戏检测机器,我告诉他回去再检测,有问题随时联系我,他在村里转悠的两天了,我问他是想寻找一个最低价格还是纠结不知道买哪款好,他说纠结于显卡,怕双显卡不好用,当时我就告诉他,如果显卡不好用,有问题,我可以给你更换机器,并说明有少部分网友尝试更新显卡是有效果的,有些人怀疑说可以正常使用双显卡的网友,是托,真是杯具。
费话不多说,先告诉大家设置显卡吧)就是那个全局设置里面的“首选图形处理器”,那个就是把所有的程序都用NVIDIA高性能选卡运行,如果想单独用某个显卡运行某个程序就要用它右面的“程序设置”添加自己玩的游戏,点击保存哦。
第二步,就是需要更新显卡)/object/notebook-winvista-win7-64bit-257.15-beta-cn.html 64位系统/object/notebook-win7-winvista-258.96-whql-dri ver-cn.htm l 32位系统以上的步骤,请机油们仔细的认真的,操作下,同样的方法,现在的他就可以完全流畅游戏了。
聊天记录奉上。
1楼本人于8月10日入手华硕K42JV。
由于本机是双显卡,以至于出现一系列显卡问题。
注:我没有加内存,2G内存,W IN7 32位系统。