host文件说明书
- 格式:doc
- 大小:41.00 KB
- 文档页数:6
Dell Compellent FS8600: CIFS File Server Consolidation GuideA Dell Compellent Technical TipTHIS TECHNICAL TIP IS FOR INFORMATIONAL PURPOSES ONLY, AND MAY CONTAIN TYPOGRAPHICAL ERRORS AND TECHNICAL INACCURACIES. THE CONTENT IS PROVIDED AS IS, WITHOUT EXPRESS OR IMPLIED WARRANTIES OF ANY KIND.© 2012 Dell Inc. All rights reserved. Reproduction of this material in any manner whatsoever without the express written permission of Dell Inc. is strictly forbidden. For more information, contact Dell. Trademarks used in this text: Dell TM, the DELL TM logo, and Compellent TM are trademarks of Dell Inc. Other trademarks and trade names may be used in this document to refer to either the entities claiming the marks and names or their products. Dell Inc. disclaims any proprietary interest in trademarks and trade names other than its own.June 2012 Rev. AContentsGeneral Syntax (5)Document Revision (5)Preface (5)Customer Support (5)Introduction (6)Core concerns (6)Active Directory (6)Active Directory Domains (6)Active Directory Domain Controllers (6)Active Directory Security Identifiers (7)Active Directory Domain Trusts (7)Hypothetical Example (7)Permissions (8)Access Control Lists & Access Control Entries (8)Inheritance (8)Migrating with permissions (9)Shares (9)Share names, DNS and networking (9)Shares and subshares (10)Antivirus (10)NAS Volumes (10)Snapshots (10)Replication (10)Initial file ingestion (11)Initial ingestion and Storage Center tiering (11)Optimizing performance (11)Ingestion from production (11)Ingestion from backups (11)Migration tools (12)Robocopy (12)Xcals (12)TablesTable 1. Conventions (5)Table 2. Revision History (5)FiguresFigure 1. Domains before and after migration (8)General SyntaxTable 1. ConventionsItem ConventionMonospace FontConsole or file trace. (Commands are shown with system prompt‘#’ in console traces.)Other user input (file names and paths, field names, keys) Monospace FontWebsite addresses Email addresses *************Document RevisionTable 2. Revision HistoryDate Revision DescriptionJune 12, 2012 A Initial draft.PrefaceThis document is intended to be a resource used in the planning for the consolidation of multiple CIFS file shares and CIFS servers on to a Dell Compellent FS8600 NAS platform.It is not intended to be a walkthrough of a migration, or a direct template for migration planning. It is similarly not intended to be the authoritative document for all FS8600 CIFS related subjects.Customer SupportFor support, email Dell Compellent at **********************. Dell Compellent responds to emails during normal business hours.IntroductionAs unstructured file data continues to grow at challenging rates, IT file server infrastructure supporting business and mission critical systems can easily become strained and fragmented. This can manifest in a variety of painful forms such as overall system availability, lost storage efficiencies, complicated or fickle backup architectures and rising management costs.The Dell Compellent FS8600 is uniquely suited to overcoming the challenges presented by explosive file data growth and file sprawl. With the combination of FluidFS’s Scale-Out Single Namespace and Storage Center’s Data Progression and Dynamic Capacity, IT teams can reduce management overhead, and leverage the platforms unique storage efficiencies and cost of ownership attributes while providing class leading availability and data protection.It should be noted that the FS8600 is a member of the Dell FluidFS NAS product family, and is in many ways conceptually very similar to the FluidFS products available on the Dell PowerVault and Dell EqualLogic product lines. While many of the concepts, particularly front end NAS concepts are similar or even identical, some subjects such as management of the platform and interaction with backend storage may be radically different, and the relevant resources for each FluidFS product should be leveraged for the appropriate product.Core concernsFile server migrations and consolidation efforts can be daunting challenges, with unforeseen roadblocks and complex management of interdependent systems. An understanding of the core concerns and concepts involved, along with proper planning can limit the scope of effort required to consolidate established file server and file share sprawl onto an FS8600.Active DirectoryAs Active Directory continues to have a dominant foot print in data center and office IT infrastructure, understanding the topology and specific details of any Active Directory systems that may be involved in file server migrations and consolidations is crucial. Outlining all the elements and concepts of Active Directory falls outside the scope of this document, however the following sections outline the subjects directly related to CIFS migrations and consolidation onto an FS8600.Active Directory DomainsDomains are one of the fundamental building blocks of Active Directory. Domains represent the primary mechanism for outlining or limiting the scope of pools of resources that should be logically managed together.Active Directory Domain ControllersDomain controllers (DC or DCs) are logical server hosts that have been specifically designated to be an authority and resource manager for a specific domain. More than one domain controller can be present within a domain, and through various replication technologies the configuration for the domain is kept consistent across all domain controllers in the domain, and in some cases, with resources outside the domain.When a FS8600 is said to “bind” or “join” to an Active Directory domain, it does so by communicating with the domain controllers in the environment and incorporating itself into the Domain topology. Aslong as the FS8600 continues to be a member of that domain, it will use the domain controllers in that domain as the point of visibility into the rest of the domain topology.It should be noted here that in order to join an FS8600 to a domain, an Active Directory user with sufficient privileges must be used to complete the operations required to bind the FS8600 to that domain. If requesting or provisioning a user with the needed privileges requires an administrative escalation, (e.g. filing a ticket with a corporate I.T. team) that should be noted and the time required to complete that escalation included in the planning timeline.Active Directory Security IdentifiersActive directory creates a unique security identifier (SID) for each user, group, machine or other object created within an active directory topology. When an attribute or parameter has to be set for any of these objects, the attribute references the SID, which is translated into a human readable name by the Active Directory services of the domain that owns the SID. Any time a SID must be interacted with, a DC for the associated domain must be visible to identify and own that SID.Active Directory Domain TrustsDomain trusts are the mechanisms through which a logically isolated domain establishes a logical relationship with another domain with the intent of sharing or negotiating access to resources across domains.For the purposes of this document, the primary concern of domain trusts are user management and visibility, and the available points of visibility for a host responsible for migrating file and permission data from the source file share to the FS8600.Hypothetical ExampleIn conjunction with other efforts to unify various development teams, it is decided that various shares and domains will be consolidated onto an FS8600, and a new domain created with the intent of consolidating established domains over time. For the first phase of a staggered migration, it is determined that the following shares will be migrated:\\nas01.corp.local\appsteam\\nas02.corp.local\appsusers\\files.apps.corp.local\appsrepo\\test3.devapps.corp.local\devappsrepo\\util.devops.corp.local\sourceThese shares will be migrated to the new FS8600 and new domain to create the following shares: \\fs8600.systems.corp.local\appsteam\\fs8600.systems.corp.local\appsusers\\fs8600.systems.corp.local\appsrepo\\fs8600.systems.corp.local\devappsrepo\\fs8600.systems.corp.local\sourcecorp devops apps devapps corp systems apps devappsitself or root folder for the share may override the inheritance polices of the first sub-folder, so this should be checked as well before a migration begins.Migrating with permissionsSimilar to requiring that tools used to move files be SID aware, the tools should also be permissions aware, in that they can walk and maintain the ACEs in a ACL (as they correspond to SIDs) and copy those properly with the file to the destination share.If the tools available, or the migration path available, do not allow for the proper migration of permissions, there are tools available to “re-apply” a permission tree to a file set after they have been copied.SharesFor some platforms, shares represent isolated containers that must remain largely static over their lifetime. For FluidFS and the FS8600, shares are views for CIFS clients into various assigned parts of the overall single namespace of the file system, as isolated by the NAS Volumes. This provides significant flexibility in creating a file set structure optimal for file system consolidation.Share names, DNS and networkingOne of the decisions that must be made early on in the planning phase is if DNS can be changed to reflect share movements across hosts, or if IP addresses can move with the share, or if neither of these is possible. The overall effort that may be required in reconfiguring clients to reflect new IPs, DNS or share names should be evaluated against the effort required to reconfigure all resources dependent on that name.In the case of being able to alter DNS, the overall Universal Naming Convention (UNC) used address the share by various clients may not have to be updated. For example in the case of hypothetical example used earlier, if DNS for \\files.apps.corp.local\appsrepo can be updated to point from the old IP of the host to the new IP pool of the FS8600, any client already configured to target that name will be able to follow migration without being reconfigured. In these sorts of migrations, it is generally considered best practice to reduce the Time To Live (TTL) property for the associated DNS A or CNAME records prior to the migration. An example:•After a share is disabled or marked read only on the original host and the file data migration completed, the DNS can be re-configured to point to the IP pool of the FS8600.If it is possible to move the IP of the original host to the FS8600, this offers another route for maintaining established client configurations. An example:•After a share is disabled or marked read only on the original host and the file data migration completed, the IP for the share/host can be removed from the source host/share andconfigured on the destination FS8600.If it is not possible to change DNS or move the related IP, then a new IP pool and new DNS entries must be assigned to the FS8600, and clients must be reconfigured to target the new DNS entries or IP addresses.It should be noted that the FS8600 is fully VLAN aware, which can be used to overcome some obstacles in many consolidation efforts, where using the earlier example test3.devapps.corp.local may expect untagged frames from VLAN238 and util.devops.corp.local may be dependent on VLAN686. In this case,both VLANs can be left tagged to the FS8600 Ethernet ports at the switch level, and the FluidFS platform is left responsible for understanding and managing the VLAN tagged frames.Please note to consult the Dell Compellent FS8600 Best Practices document for further information about DNS, IP addresses and VLANs with the FS8600 platform.Shares and subsharesBecause shares represent points of visibility into the file system as isolated by NAS Volumes, the creation of shares below shares (subshares) can provide much needed control granularity. These can be created at arbitrary points within the file system, as needed, for either migrations or ongoing use cases. It should be noted that subshares can introduce a level of management complexity with regards to permissions and particularly inheritance, and should be used only as needed as opposed to a default assumption.AntivirusEach share or subshare can be configured to enable Antivirus scanning, via the ICAP protocol to a pre-determined Antivirus host. For more information regarding Antivirus support, please consult the Dell FluidFS NAS Solutions Administrator’s Guide.NAS VolumesNAS Volumes represent the primary abstraction and isolation mechanism on top of the single namespace, single instance FluidFS file system. The FS8600 features Snapshots and Replication are NAS Volume Centric; therefore planning should include considerations towards a NAS Volume scheme. For more information about NAS Volumes, please consult the Dell FluidFS NAS Solutions Administrator’s Guide and Dell Compellent FS8600 Best Practices documents.SnapshotsFluidFS Snapshots are an elegant, efficient and high performance data protection technology built into the core FluidFS architecture. Because of their performance, reliability and ease of use, they can provide the primary data protection mechanism for any data set profile. One of the primary benefits of consolidation of file shares to a unified FluidFS platform is the collapsing of administrative overhead required to manage the backups of the distributed or unorganized file share hosts.The FS8600 also provides two methods for user recovery of files from snapshots. Snapshotted versions of files can be access through the “View Previous Versions” Windows tool. They can also be access through a hidden “.snapshots” folder that FluidFS places in every share. System Administrators, as well as users, can access these areas to recover file data preserved in an existing Snapshot. ReplicationMany data sets may be required to be backed up to an offsite location or otherwise be stored in more than one system or location. With the replication available through the FluidFS platform, this data can be replicated from an active FS8600 in one site, to another FS8600 either in same location or in a separate geographic location entirely. This can significantly simplify the backup systems involved in meeting data protection and data retention requirements.For environments that intend to use a replication in such a way as to “stand up” on the replication destination, all Active Directory resources available in the primary site must be available in the site with the replication target.Initial file ingestionInitial ingestion and Storage Center tieringAny planning for the initial seeding of the FS8600 should be aware of the size of the data set to be imported, and the total available capacity in the Storage Centers Tier 1 storage. In order to avoid any overall Storage Center performance degradation, imports should either be planned in such a way as to not overrun Tier 1 storage, or the Storage Center volumes assigned to the FS8600 should have their storage profiles altered to a lower tier. Initial replication between FS8600s should also be considered in the planning, as initial replication of large data sets can similarly threaten to overrun Tier 1 storage. Optimizing performanceFor data sets that can be broken up during initial ingestion so that data can be migrated from multiple hosts, there are both migration and life-cycle performance benefits from performing that migration from multiple hosts. For performance during the migration, the extra hosts can improve overall throughput of data from the source to the FS8600. Migrating data from multiple hosts also takes best advantage of the overall FluidFS architecture, ensuring that data is best placed evenly around the entire cluster in order to provide best performance for the data set going forward.Ingestion from productionOften the simplest method for migrating file data to a new platform is to simply move or copy it from its production platform. While this may be the simplest, it is also likely to impact the current platform and the production file data set.If the current platform has access to the new FS8600 and provides the functionality for mounting other shares on other hosts (e.g. Windows Storage Server platforms), it may be easiest to simply mount the intended destination FS8600 share directly on the current platform, and copy file data directly from the current platform to the FS8600. This minimizes the amount network “hops” required to seed the FS8600. It is important to remember that the FS8600 must be bound to Domain Controllers with the required visibility to translate the SIDs and other Active Directory file information associated with the data set.If it is not possible to mount the share from the current platform, a host with visibility to both the source platform and the destination FS8600 can be used to migrate the file data to the destinationFS8600. In this case, the host being used to perform the migration, as well as the FS8600 must have visibility to the Domain Controllers responsible for the domains involved.Ingestion from backupsIn environments where the performance impact or network exposure required are the limiting factors in migrating file data, a common strategy is to seed and populate from the backup system associated with the current platform. Because this introduces no performance impact to the current system, and requires no network exposure, it is often used for massive file sets or complicated migration strategies.A strategy that builds on this is to use a backup system as the mechanism responsible to initially seed the destination FS8600, and then use host level tools to keep that seeded data in sync or at least in close proximity to the state of the current platform.The inclusion of another system in the strategy can add complexity and introduce new challenges, such as performance contention for resources on the backup system. Another area of concern is that thepermissions scheme of the current platform may be proprietary, and items such as file permissions ACEs or other attributes may not be stored in a translate-able way. Because the backups are taken from the perspective of the current platform, this may mean that file data attributes could not be understood by the destination FS8600. A final example of this introduced complexity is that due to the ways many enterprise backup systems catalog or maintain data on medium such as tape drives or libraries, file attributes such as access and write time stamps may be inaccurate when the data is seeded to the new FS8600.The seeding of data to the FS8600 can be performed using share mounts of the FS8600 to the backup host. As the FS8600 only supports NDMP restores from data that was initially backed up via NDMP from an FS8600, NDMP backup systems must be able to export NMDP data through open files.Migration toolsThere are a number of tools and utilities available to assist in the various tasks required for file data migrations or consolidations. The list below is not a complete list of available tools, nor is it a list of tools supported by Dell Compellent. It is simply a list of tools widely used by IT organizations for file data migrations and are commonly understood.RobocopyRobocopy, and a number of similarly purposed tools, is specifically designed for moving large file sets of complex data to new destinations. It has earned a reputation for reliability and performance, with modern versions of robocopy including support for ACLs and ACEs, as well as features such as multithreading for improved performance on multi-CPU systems across large file sets. There are a number of ways to automate robocopy activity, either through built in tools such as robocopy’s “run hours” flag or through tools such as Microsoft Windows’s “Scheduled Tasks” automation tool. Using this automation, file sets can be kept in sync or in a close proximity state for a period of time running up to a migration window.XcaclsXcacls, and other similarly purposed tools, provide the functionality to harvest or save permissions data and schemes across large file sets, and re-apply them to a similar or copied file set. For environments where the tool used to migrate the file data itself is unable to migrate the file permissions, Xcacls can be used to re-apply the permissions after the file data migration. It can also re-apply permissions to data seeded from a backup system.。

HostRAID_ICH7R_ICH9R_ICH10R 磁盘阵列配置说明V1.0上海思铠麒电子科技有限公司2009年8月文档名称HostRAID_ICH7R_ICH9R_ICH10R磁盘阵列配置说明日期编写人审阅人审批人2009-8-18 刘小敬刘小敬历史信息:版本日期编写人审阅人审批人V1.0 2009-8-18 刘小敬刘小敬V1.1 2011-12-05 刘小敬刘小敬HostRAID_ICH7R_ICH9R_ICH10R磁盘阵列配置说明 一.Intel HostRAID raid支持 (2)二.配置BIOS (2)1Intel HostRAID (2)2Adaptec HostRAID (3)三.HostRAID实用配置 (3)1Intel HostRAID (3)2Adaptec HostRAID (6)四.安装intel’s ESB2驱动和操作系统 (18)Intel HostRAID 支持:Raid 级别驱动器数目原理RAID 0 2个或更多 把连续的数据分散到多个磁盘上存取RAID 1 2个或4个或6个把用户写入硬盘的数据百分之百地自动复制到另外一个硬盘上 RAID 10 4个或6个像RAID0一样,数据跨磁盘抽取;象RAID1一样,每个磁盘都有一个镜象磁盘, 所以RAID 10的另一种会说法是 RAID 0+1RAID 5 3个或更多把数据和相对应的奇偶校验信息存储到组成RAID5的各个磁盘上,并且奇偶校验信息和相对应的数据分别存储于不同的磁盘上配置BIOS 设置的SATA RAID 功能1Intel HostRAIDa. 开机自检时按下<Delete DeleteDelete> 进入main bios 配置界面. b. 按左右键改变高亮区到” IDE/SATA Configure”然后按回车键. c. 向下滚动高亮区到” Configure SATA#1 as”,按<Enter EnterEnter> 选择”RAID’,移动光标到“ICH RAID Code Base ”选择<Intel>. d. 在Exit 菜单下选择” Exit Saving Changes”,按<Enter EnterEnter> 保存改变并退出bios (也可以按快捷键F10保存退出). e. 退出后系统重启f. 在系统启动时,按下<Ctrl>和<I>键运行Intel RAID 配置实用的提示信息:Press<Ctrl> <I> for the Intel RAID Configuration Utility.2 Adaptec HostRAIDa. 开机自检时按下<Delete DeleteDelete> 进入main bios 配置界面. b. 按上下键改变高亮区到” SATA Controller Mode option”然后按<Enter EnterEnter>选择”EnhancedEnhanced”. c. 向下滚动高亮区到” SATA RAID Enabled”,按<Enter Enter Enter> 选择”enabled enabled enabled”. d. 向下滚动高亮区到"ICH RAID Codebase" 选择"Adaptec". 然后按<Enter Enter Enter>.(ICH RAID Codebase:更改设置从intel 改为adaptec.) e. 在Exit 菜单下选择” Exit Saving Changes”,按<Enter Enter Enter> 保存改变并退出bios (也可以按快捷键F10保存退出) f. 退出系统重启g. 在系统启动时,按下<Ctrl><A>键运行intel RAID 配置实用的提示: Press<Ctrl> <A> for Intel RAID Configuration Utility.HostRAID 实用配置 1 Intel HostRAID(1).(1).创建创建创建,,删除删除,,重置RAID RAID 阵列阵列阵列a. a. 退出系统后,从BIOS 安装实用程序,系统会自动重新开机。
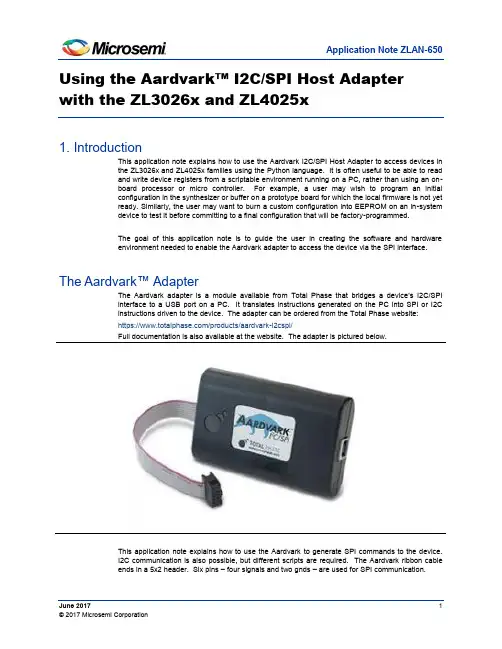
June 20171© 2017 Microsemi CorporationUsing the Aardvark ™ I2C/SPI Host Adapter with the ZL3026x and ZL4025x1. IntroductionThis application note explains how to use the Aardvark I2C/SPI Host Adapter to access devices in the ZL3026x and ZL4025x families using the Python language. It is often useful to be able to read and write device registers from a scriptable environment running on a PC, rather than using an on-board processor or micro controller. For example, a user may wish to program an initial configuration in the synthesizer or buffer on a prototype board for which the local firmware is not yet ready. Similarly, the user may want to burn a custom configuration into EEPROM on an in-system device to test it before committing to a final configuration that will be factory-programmed.The goal of this application note is to guide the user in creating the software and hardware environment needed to enable the Aardvark adapter to access the device via the SPI interface.The Aardvark™ AdapterThe Aardvark adapter is a module available from Total Phase that bridges a device ’s I2C/SPI interface to a USB port on a PC. It translates instructions generated on the PC into SPI or I2C instructions driven to the device. The adapter can be ordered from the Total Phase website: https:///products/aardvark-i2cspi/Full documentation is also available at the website. The adapter is pictured below.This application note explains how to use the Aardvark to generate SPI commands to the device. I2C communication is also possible, but different scripts are required. The Aardvark ribbon cable ends in a 5x2 header. Six pins – four signals and two gnds – are used for SPI communication.Application Note ZLAN-650Using the Aardvark I2C/SPI Host Adapter with the ZL3026x and ZL4025x2The following schematic segment shows how connector pins map to the physical connector:2. System RequirementsThe target board – either a customer board or a Microsemi evaluation board – must provide accessto the SPI interface of the device via a header that the Aardvark adapter can connect to. Thecommon way to do this is to provide a 5x2 header on the board, but a smaller connector could beused on the board, with an adapter cable to connect between the header and the Aardvark 5x2 pinconnector.To avoid potential contention, the board needs to provide a mechanism to isolate SPI signals onthe 5x2 header from any signals that might be driven by an on-board microprocessor or microcontroller. Jumpers or 0 ohm resistors can be used to select between the SPI masters.A Personal Computer with a 64-bit Windows operating system (Windows 7 or later) is alsorequired. A 32-bit operating system is also possible, but this app note explains the steps necessaryfor obtaining software component for a 64-bit system.Using the Aardvark I2C/SPI Host Adapter with the ZL3026x and ZL4025x3Evaluation board considerationsIf a ZLE30267 evaluation board is being used as the target board, the dip switches on SW2 should be set as follows: ∙ sw1: set to 1 ∙ sw2: set to 1 ∙ sw3: set to 0 ∙ sw4: set to 0These settings will connect the Aardvark SPI control signals to the DUT. Other switch settings should be as indicated in the Evaluation Board Quick Start Guide which is available from the device GUI Documentation menu.Note that the USB connector on the board should be left un-connected.A typical example of the setup is shown below:Using the Aardvark I2C/SPI Host Adapter with the ZL3026x and ZL4025x43. Software InstallationThree software components need to be downloaded and installed:∙ USB Drivers for the Aardvark adapter ∙ Software APIs for the Aardvark adapter ∙ Python 2.7The software API supports additional programming environments including C, C-sharp, and Labview. However this application note assumes that user scripts will be written in Python.Note that the following instructions make reference to the Total Phase website, links, and filenames as they existed at the time of this writing. Total Phase may make changes to the website without informing Microsemi. Note also that Total Phase may ask the user to register before allowing file downloads.Create a working directory for the Aardvark files (for example in My Documents).First, download the USB drivers to your Aardvark directory. These are available on a link on the Total Phase webpage cited in Section 2. The file name is totalphaseusb-v2.15.zip. Ensure that the Aardvark adapter is not plugged in. Unzip the files and run the executable to install the drivers.Second, download version v5.15 of Windows 64-bit APIs for Aardvark to the Aardvark directory. It is available at: https:///products/aardvark-software-api/ The filename is aardvark-api-windows-x86_64-v5.15. Extract all files to a directoryThird, download the 64-bit version of Python 2.7.12. It is available at:https:///downloads/release/python-2712/. Choose Windows x86-64 MSI installer . Install Python by double-clicking the MSI file. This will add a Python27 to your C: directory. Later versions of the 2.7 series will likely work, but have not been tested. Please note that the Aardvark APIs do not work with Python 3.Next, create a working directory for your Python 2.7 code, for example: My Documents/python27_64Now copy the files “aardvark.dll ” and “aardvark_py.py ” from the Aardvark Windows API directory to the python27_64 directory. Together with the USB drivers, these files form the interface from the Python environment to the Aardvark adapter.Finally, copy the files that were included in the zip file with this application note into your Python code working directory (for example My Documents/python27_64). The files included are: ∙ microsemi_aardvark_utils_dd.py ∙ microsemi_dump_regs.py ∙ microsemi_load_mfg.py ∙ microsemi_program_eeprom.py ∙ microsemi_read_write_interactive.py ∙ ZL30267_DUT_Config.mfg ∙ ZL30267_EEPROM_Image.txtUsing the Aardvark I2C/SPI Host Adapter with the ZL3026x and ZL4025x54. ExamplesFour examples are provided: ∙ microsemi_dump_regs.py ∙ microsemi_load_mfg.py ∙ microsemi_program_eeprom.py ∙ microsemi_read_write_interactive.pyStart by powering the target board, then plugging the 5x2 connector of the Aardvark adapter into the header on the target board. Connect the USB cable from the PC to the Aardvark adapter.Example 1 Dump RegistersThe first example dumps a number of registers in the device. Run the ‘microsemi _dump_regs.py ’ script by right-clicki ng and selecting “Edit with Idle”. Idle is a Python editor and shell program. Launch the program by selecting Run->Run Module (or press F5).You should see the following results or something similar:Reg 0x0030: 0x1f Reg 0x0031: 0x92 Reg 0x0032: 0x00 Reg 0x0033: 0x00 Reg 0x0034: 0x00 Reg 0x0035: 0x00 Reg 0x0036: 0x00 Reg 0x0037: 0x00 Reg 0x0038: 0x00 Reg 0x0039: 0x00 Reg 0x003a: 0x00 Reg 0x003b: 0x00 Reg 0x003c: 0x00 Reg 0x003d: 0x00 Reg 0x003e: 0x00 Reg 0x003f: 0x00Example 2 Load an MFG FileThe second example loads a .mfg file that was generated by the ZL30267 GUI. Reset the device on the board, then open microsemi_load_mfg.py by right-clicking and selecting Open with Idle. Launch the program by selecting Run->Run Module. The file to be loaded is named “ZL30267_DUT_Config.mfg ”. The program parses this file and applies all the register writes via the Aardvark adapter. The result should be a 156.25 MHz differential signal on OC3. The .mfg file assumes the ZL30267 is driven from a 125 MHz XO, and that OC3 drives into a DC-coupled 100 ohm load. If the device under test has a different clock, the output will be off-frequency, but should still be visible. If the termination is different, the signal may not be visible. Note that the script assumes the device has just come out of reset. If that is not the case, the results may be indeterminate.Using the Aardvark I2C/SPI Host Adapter with the ZL3026x and ZL4025x6Example 3 Program Device EEPROMThe third example programs a non-volatile configuration into config 0 of the device EEPROM. The Python script that writes th e EEPROM image is named “microsemi_program_eeprom.py ”. The EEPROM image file was generated by the GUI after loading the ZL30267_DUT_Config.mfg configuration from Example 2. Run the script by right-clicking, opening with Idle, and selecting Run->Run Module. After the script completes, the image is burned into EEPROM. Ensure that the AC[2:0] pins on the device are set to ‘000’, then reset the device. T he device will generate a 156.25 MHz signal on OC3 after reset and power up. Note that the same assumptions from Example 2 apply here as well.Example 4 Interactive Read and WriteThe fourth example, microsemi_read_write_interactive.py, is used to provide a simple interface for interactive reading and writing of registers on the device. Run the program by right-clicking, opening with Idle, and selecting Run->Run Module.From the Idle command line, read and write commands can be entered.For example, to check the device ID registers, use the following commands:>>> read(0x0030) 0x0030: 0x1f >>> read(0x0031) 0x0031: 0x92The write command is similar. To disable OC3, use the following command:>>> write(0x0221,0x00) >>>To enable the output in the programmable diff format, use the following command:>>> write(0x0221,0x02) >>>Note that addresses and values can be entered in decimal or hex. Hex numbers should be prefixed with a “0x” as in the examples above.When the interactive session is complete, release the Aardvark resource by using the following command:>>> ms.close(handle)5. TroubleshootingIf a script is started, but ends with an exception before the program completes, the Aardvark resource may not be properly released. You may see the following error message on the next attempt to run the program:Unable to open Aardvark device on port 0 Error code = -7This state can usually be cleared from the Idle command line by issuing the following command:>>> ms.close(0)This will close the Aardvark resource, and make it available for the next program.Using the Aardvark I2C/SPI Host Adapter with the ZL3026x and ZL4025x7In rare cases, it may be necessary to quit the python environment and restart by right-clicking a script and using the ‘Edit with Idle’ optionMicrosemi Corporate Headquarters One Enterprise, Aliso Viejo, CA 92656 USAWithin the USA : +1 (800) 713-4113 Outside the USA : +1 (949) 380-6100 Sales : +1 (949) 380-6136 Fax : +1 (949) 215-4996E-mail : ***************************ZLAN-650/06.17Microsemi Corporation (Nasdaq: MSCC) offers a comprehensive portfolio of semiconductor and system solutions for aerospace & defense, communications, data center and industrial markets. Products include high –performance and radiation –hardened analog mixed –signal integrated circuits, FPGAs, SoCs and ASICs; power management products; timing and synchronization devices and precise time solutions, setting the world's standard for time; voice processing devices; RF solutions; discrete components; enterprise storage and communication solutions, security technologies and scalable anti-tamper products; Ethernet solutions; Power –over –Ethernet ICs and midspans; as well as custom design capabilities and services. Microsemi is headquartered in Aliso Viejo, Calif., and has approximately 4,800 employees globally. Learn more at .© 2017 Microsemi Corporation. All rights reserved. Microsemi and the Microsemi logo are trademarks ofMicrosemi Corporation. All othertrademarks and service marks are the property of their respective owners.Microsemi makes no warranty, representation, or guarantee regarding the information contained herein or the suitability of its products and services for any particular purpose, nor does Microsemi assume any liability whatsoever arising out of the application or use of any product or circuit. The products sold hereunder and any other products sold by Microsemi have been subject to limited testing and should not be used in conjunction with mission-critical equipment or applications. Any performance specifications are believed to be reliable but are not verified, and Buyer must conduct and complete all performance andother testing of the products, alone and together with, or installed in, any end-products. Buyer shall not rely on any data and performance specifications or parameters provided by Microsemi. It is the Buyer’s responsibility to independently determine suitability of any products and to test and verify the same. The information provided by Microsemi hereunder is provided “as is, where is” and with all faults, and theentire risk associated with such information is entirely with the Buyer. Microsemi does not grant, explicitly or implicitly, to any party any patent rights, licenses, or any other IP rights, whether with regard to such information itself or anything described by such information. Information provided in this document isproprietary to Microsemi, and Microsemi reserves the right to make any changes to the information in thisdocument or to any products and services at any time without notice.。

Gowin FPGA产品JTAG配置手册TN653-1.07, 2019-11-18版权所有© 2019广东高云半导体科技股份有限公司未经本公司书面许可,任何单位和个人都不得擅自摘抄、复制、翻译本文档内容的部分或全部,并不得以任何形式传播。
免责声明本文档并未授予任何知识产权的许可,并未以明示或暗示,或以禁止发言或其它方式授予任何知识产权许可。
除高云半导体在其产品的销售条款和条件中声明的责任之外,高云半导体概不承担任何法律或非法律责任。
高云半导体对高云半导体产品的销售和/或使用不作任何明示或暗示的担保,包括对产品的特定用途适用性、适销性或对任何专利权、版权或其它知识产权的侵权责任等,均不作担保。
高云半导体对文档中包含的文字、图片及其它内容的准确性和完整性不承担任何法律或非法律责任,高云半导体保留修改文档中任何内容的权利,恕不另行通知。
高云半导体不承诺对这些文档进行适时的更新。
目录目录 (i)图目录 (iii)表目录 (iv)1 关于本手册 (1)1.1 手册内容 (1)1.2 适用产品 (1)1.3 相关文档 (1)1.4 术语、缩略语 (2)1.5 技术支持与反馈 (2)2 配置和烧录(Configuration&Programming) (3)2.1 JTAG配置模式 (3)2.2 配置流程 (5)2.2.1 JTAG引脚定义 (5)2.2.2 TAP状态机 (5)2.2.3 TAP复位 (5)2.2.4 指令寄存器和数据寄存器 (6)2.2.5 读取ID CODE实例 (7)2.2.6 配置SRAM流程 (9)2.2.7 读取SRAM的流程 (12)2.2.8 擦除内部Flash (14)2.2.9 编程内部Flash流程 (18)2.2.10 读取内部Flash流程 (22)2.2.11 背景烧录(Background Programming) (25)2.2.12 编程外部Flash (27)2.2.13 读取Status Register 0x41 (31)2.2.14 读取User Code 0x13 (32)2.2.15 重加载0x3C (32)2.2.16 擦除SRAM 0x15 (32)3 例程文件 (33)图目录图2-1 JTAG配置模式连接示意图 (4)图2-2 TAP状态机 (5)图2-3指令寄存器访问时序 (6)图2-4数据寄存器访问时序 (6)图2-5读取ID Code状态机流程图 (8)图2-6读取ID Code指令-0x11访问时序 (8)图2-7读取ID Code数据寄存器访问时序 (8)图2-8配置SRAM流程 (10)图2-9 Tansfer Configuration Data过程示意 (11)图2-10读取SRAM的流程 (13)图2-11擦除GW1N-2(B)/4(B)/6/9,GW1NZ-1内部Flash擦除流程 (15)图2-12擦除GW1N-1(S)内部Flash流程 (17)图2-13编程内部Flash流程图 (19)图2-14 X-page编程流程图 (21)图2-15 Y-page编程流程图 (22)图2-16读取内部Flash流程图 (23)图2-17读取一个Y-page的过程 (24)图2-18 GW1N-4 Background Programming 流程图 (25)图2-19 Transfer JTAG Instrction Sample & Extest 流程图 (26)图2-20 JTAG接口编程外部Flash连接示意图 (27)图2-21采用config-mode[2:0]=011模式编程SPI Flash流程示意图 (28)图2-22 GW2A系列JTAG模拟SPI发送0x06指令时序图 (28)图2-23 GW1N系列JTAG模拟SPI发送0x06指令时序图 (29)图2-24采用Boundary Scan模式编程SPI Flash流程示意图 (30)表目录表目录表1-1术语、缩略语 (2)表2-1 JTAG配置模式管脚定义 (3)表2-2 Gowin FPGA IDCODE (7)表2-3发送指令过程中TDI和TMS的值变化 (7)表2-4器件SRAM地址数量和地址长度 (12)表2-5 JTAG的TCK频率要求 (14)表2-6 Readback-pattern / Autoboot-pattern (18)表2-7管脚状态 (29)表2-8 Status Register含义 (31)1关于本手册 1.1手册内容1关于本手册1.1手册内容本手册主要介绍Gowin FPGA产品的JTAG配置及烧录相关信息,包含JTAG配置模式、配置流程及相关例程文件。
EURONEXT FILES SERVICES Preface Document titleEURONEXT FILES SERVICESDocument type or subjectUser GuideVersion number Date1.2 26 May 2017Number of pages Author23 EuronextThis document is for information purposes only. The information and materials contained in this document are provided ‘as is’ and Euronext does not warrant the accuracy, adequacy or completeness and expressly disclaims liability for any errors or omissions. This document is not intended to be, and shall not constitute in any way a binding or legal agreement, or impose any legal obligation on Euronext. This document and any contents thereof, as well as any prior or subsequent information exchanged with Euronext in relation to the subject matter of this presentation, are confidential and are for the sole attention of the intended recipient. Except as described below, all proprietary rights and interest in or connected with this publication shall vest in Euronext. No part of it may be redistributed or reproduced without the prior written permission of Euronext. Portions of this presentation may contain materials or information copyrighted, trademarked or otherwise owned by a third party. No permission to use these third party materials should be inferred from this presentation.Euronext refers to Euronext N.V. and its affiliates. Information regarding trademarks and intellectual property rights of Euronext is located at https:///terms-use.© 2016 Euronext N.V. - All rights reserved.© 2016 Euronext N.V. - All rights reserved. i of 23 1.2PREFACEPURPOSEEuronext File Services is a Server providing files necessary for Euronext’s customers that have either an EMDDA (market data), SPA (Service Provider) or TPA (Trading Platform) agreement to get access to the core trading chain of Euronext. This document provides general technical information about Euronext’s File Services.This document intends to provide general technical information about Euronext File Services.TARGET AUDIENCEThe primary audience of this document is Developers, Exchange Connectivity Managers, Trading Support Teams and anybody involved in the setup and the configuration of Optiq MDG solution in End User Acceptance (EUA) and Production environments.ASSOCIATED DOCUMENTSThe following lists the associated documents, which either should be read in conjunction with this document or which provide other relevant information for the user:Euronext Cash and Derivatives Markets - Optiq MDG Client Specifications - v1.4.0CONTACTSFor any questions about this document or technical support please contact the Optiq Support Desk:Optiq Support DeskTel: +33 1 70 48 25 55******************WHAT’S NEW?The following lists only the most recent modification made to this revision/version. For the Document History table, see the Appendix.CONTENTS1.OVERVIEW (5)2.WHY CONNECT TO THE EURONEXT EFS SERVICE? (6)3.ACCESS TO EURONEXT FILE SERVICES USER INTERFACE (7)3.1 General Procedure (7)3.2 Detailed procedure (7)3.2.1Pre-requisite: company agreements (7)3.2.2Accessing the EFS User Interface (7)3.3 Supported Browsers (10)3.4 Protocol and Security (10)3.4.1HTTPS (10)3.4.2CA Certificate (10)3.4.3SSL configuration (11)3.5 Configuration (11)4.CURRENT FOLDERS STRUCTURE (12)4.1 p-EUA environment folder structure ............................................................ Erreur ! Signet non défini.4.1.1p-EUA environment folder content ............................................................................... E rreur ! Signet non défini.4.1.2Futures/ Current p-EUA environment folder content ................................................... E rreur ! Signet non défini.5.ACCESS TO EURONEXT FILE SERVICES USING RESTFUL API (13)5.1 introduction (13)5.2 Steps for accessing EFS (13)5.2.1Step 1 - Authentication (14)5.2.2Step 2 - Check if resource exists (16)5.2.3Step 3 - Browse the content of a folder (17)5.2.4Step 4 - Download a file (19)6.APPENDIX (22)6.1 RESTful API (22)1.OVERVIEWThe Euronext File Services is designed to centralize and provide access to configuration and data files for customers via SFTI network and/or Internet. This new critical service is based on a resilient and secured infrastructure.Customers covered by this Euronext File Services are companies who have signed one of the following agreements:■Euronext Market Data Distribution Agreement (EMDDA)■Service Provider Agreement (SPA)■Trading Platform Agreement (TPA)Euronext plans to leverage on the implementation of the European File Services going forward. The service will be used in the near future to host various files, generic or customized per member, thereby becoming the hub for any file transfer between Euronext and its customers.2.WHY CONNECT TO THE EURONEXT EFS SERVICE?Euronext EFS Services will host key configuration and data files that are to be used for OPTIQ MDG migration.The following files will be available per environment (v-EUA, p-EUA and Production):∙TimetableFile∙CashTickSizeReferentialFile∙SBETemplateAnd per Environment/Optiq Segment:∙OpenInterestFile∙PrevDayCapAndVolTradeFile∙FullTradeInformationFile∙CashStandingDataFile∙DerivativesStandingDataFile∙RepoSettlementPriceFile3.ACCESS TO EURONEXT FILE SERVICES USER INTERFACE3.1GENERAL PROCEDUREIn order to connect to the EFS, customers need to submit a request for a user ID through the Euronext Member Connectivity Administrator (MCA) web portal for each environment they want to access, i. e. p-EUA and Production.The user ID for each environment is emailed directly to the customer. With this id, the customer will be asked to connect once to the Euronext File Services to reset their password. Once this is complete, the user ID and the password can be used to login to the Service via a GUI (browser) or a RESTful API.Requests for p-EUA access will be processed under 2 working days. Customers can start placing their requests to access Production EFS. The requests will be processed at the end of April.During the first weeks after the launch of EFS in p-EUA and until the 6 of June, customers can use a generic user ID to access the Service. The user ID and password are available on the Home page of each customer’s MCA secured section of the Euronext web portal.3.2DETAILED PROCEDURE3.2.1Pre-requisite: company agreementsAs a pre-requisite, customers are required to have a company agreement signed with Euronext (EDDA, SPA or TPA).3.2.2Accessing the EFS User InterfaceTo access the EFS User Interface in both p-EUA and Production, the customers’ Member Connectivity Administrator (MCA) needs to connect to the Euronext web portal and fills the EFS form:https:///en/form/efs-login-creation.Only contacts registered as MCAs are allowed to access and fill the form. For more information about MCAs and their registration, please contact : ****************.MCA can order two types of accesses:-For a physical person : first name, last name, email address and phone number are required-For a software : application name, hostname must be provided3.2.2.1Confirmation of initial request for EFSEach subscriber will receive, in less than 48h following the initial request, an individual EFS subscriber confirmation email (see below). Follow the link and the steps provided in the email to activate the account and get access to the EFS.3.2.2.2Logging In via the user interfaceTo log in to the Euronext File Services application, do the following:1.Start your web browser2.Enter the appropriate test or production URL addressThe Euronext File Services Login box is displayed:3.Type your Euronext File Services username and password as provided by the Customer Access Service(CAS) team and click on the Login button.4.You are now logged on to the Euronext File Services home page.Please note:-If you have lost your password, you can use the “Forgot Password” link or contact ****************.-Subscribers must pay attention to the number of failed logons. After five (5) failed logon attempts (for incorrect username and/or password), their account will be locked. Participants need to contact the CAS team to reset their credentials.3.2.2.3Logging OutTo log out from the Euronext File Services User Interface, click Log Out (Sign-out) at the top right of the title bar, or simply close your browser.3.2.2.4Changing Your PasswordTo change your password, enter the old password, the new password and then confirm the new password. Click ‘done’.Passwords must be a minimum of eight (8) characters and contain the four character types listed below: -At least 1 upper case character – A-Z-At least 1 lower case character – a-z-At least 1 westernised Arabic numeral – 0-9-At least 1 special (non-alphanumeric) character [@#$%^&-+=_{}]Please note :-When logging in for the first time, you need to change your password.-Enter your user ID, then click on “Forgot Password” and follow the directions. You will be asked to enter your username, your email and a verification field to confirm you are not a robot.You can change your password at any time by clicking on “Change Password” at the top left of the window.3.3SUPPORTED BROWSERSThe Euronext File Service User Interface is compatible with the following browsers with Adobe Flash Player installed (at least Flash Player version 13):-Google Chrome-Safari-Internet Explorer 113.4PROTOCOL AND SECURITY3.4.1HTTPSThe EFS protocol is: HTTPS - Hypertext Transfer Protocol SecureThe HTTPS protocol can be used manually through a User Interface such as an Internet browser. Automatic transfer of files are also possible using the EFS API with a RESTful API client such as the Curl command line tool. Details about these methods to download files can be found in section 5.3.4.2CA CertificateCustomers must ensure their Entrust CA Certificate is up-to-date.To prevent any connectivity issue linked to an outdated root certificate, customers must download the latest version of the CA Certificate. Otherwise an error message such as “ curl: (60) Peer certificate cannot be authenticated with known CA certificates “ will appear during the connection phase.3.4.3SSL configurationThe supported TLS/SSL protocols to secure the connectivity are-TLSv1.1-TLSv1.2 (Recommended)The SSL Cipher Suite encryption options are :-Must use:o RSA Cipher Suites,o AES Cipher Suites,o SHA1 hashing Cipher suites.-Not allowed:o Null Ciphers,o Export grade ciphers,o Anonymous Ciphers (ADH),o3DES,o MD5/RC4 hashing-based Ciphers.3.5CONFIGURATIONThe following table provides the links to connect to Euronext File Services User Interface in the EUA and Productions environments.EUA (Test Environment) Production Disaster Recoveryhttps:/// https:/// https:/// Please note:To connect to EFS, the certificate needs the URL name. Connection to EFS must be done using the URL name.-On Internet, URL are provided and can be resolved by using the public DNS service.-On SFTI, if customers have access to Internet public DNS services, then the name can be resolved the same way. Howe ver if customers’ servers are not connected to Internet, then customers have two options:o Add the following mapping in the local DNSo Add the following mapping in the local host file of the server> 212.197.223.241 > 212.197.195.1 > 212.197.225.1 Here is the command to use to activate the session using curl :> curl https://:4434.CURRENT FOLDERS STRUCTUREFor all details on folder structure and naming convention please refer to the last Optiq file specification available here:https:///fr/optiq/documentation?quicktabs_188=1#quicktabs-188Today target for Optiq Step2 version of the document is version 2.0.0 (available on the following direct link):https:///sites//files/euronext_cash_and_derivatives_markets_-_optiq_files_specifications_-_v2.0.0.pdf5.ACCESS TO EURONEXT FILE SERVICES USING RESTFUL API5.1INTRODUCTIONEuronext provides a RESTful API to help customers develop applications to connect to EFS Services regardless of the development language used (see appendix for more information).The following sections describe how to connect to EFS, check for the availability of files and download them using the RESTful API. Equivalent commands and examples in Curl are also available. Curl is a command-line tool that uses URL syntax with a MIT/X derivative license to transfer data. More information is available at https://curl.haxx.se/).Please note:Euronext recommends to use Curl version 7.29 (Feb 2013) or later.FeaturesThere are three different ways to interact with EFS Services:-Check if a file or folder exists-Browse the content of the folder-Download a fileAccessThe RESTful API is accessible through Internet and SFTI. The selection of the EFS Services to access can be done in the Request Headers section by replacing the URL with the correct one.For example:-InternetGET https:///api/files/OptiqMDG/v-EUA/Current HTTP/1.1 -SFTIGET https://:443/api/files/OptiqMDG/v-EUA/Current HTTP/1.15.2STEPS FOR ACCESSING EFSPre-required step :1)Authentication (step 1)Possible scenarios and steps to follow:1)File name already known but never downloaded => Check if the file exists (step 2) and download itdirectly (step 4)2)File name already known and already downloaded at least once => Download the file directly withIf-Modified-Since condition (step 4)3)Unknown file name => Browse the content (step 3) and download the file (step 4)5.2.1Step 1 - AuthenticationRequest HeaderRequest BodyHere the equivalent command using Curl:Command1)If authentication information is invalid or omitted, the status code 401 will be returned:Response Header2)If authentication information is valid, an access token and its validity in minutes will be returnedwith status code 200:Response HeaderResponse Body5.2.2Step 2 - Check if resource existsTo prevent unnecessary download, customers have the possibility to check if a file exists before attempting to download it.Request HeaderAll API requests require to transport the session cookie and the authorization token.Here the equivalent command using Curl:Command1)If the resource doesn’t exist or if the session has expired, the status code 404 will be returned:Response Header2)If the resource exists, the status code 200 will be returned:Response Header5.2.3Step 3 - Browse the content of a folderRequest HeaderAll API requests require to transport the session cookie and the authorization token.Here the equivalent command using Curl:Command1)If the resource doesn’t exist or if the session has expired, the status code 404 will be returned:Response Header2)If the resource exists, the folder content will be returned with status code 200:Response Body Example5.2.4Step 4 - Download a fileRequest HeaderAll API requests require to transport the session cookie and the authorization token.The date when the file was downloaded for the last time must also be provided in order to prevent another download of the same file. This date is returned in the response header when the file is downloaded for the first time (see the third response case below).Command1)If the resource doesn’t exist or the session has expired, the status code 404 will be returned:Response Header2)If the resource exists but was not modified since the last download, the status code 304 will bereturned:Response Header3)If the resource exists, the file content will be returned with status code 200:Response HeaderResponse Body6.APPENDIX6.1RESTFUL APIREST (REpresentational State Transfer) is an architectural style for designing a web service, making maximum use of HTTP capabilities. Its main characteristics are as follows:1)Client / server application: transport over the network is provided by HTTP. Notice that EFS is basedon the HTTP secured protocol (HTTPS).2)Uniform interface: Any element offered by the application to handle is called a resource and isuniquely identified by the Uniform Resource Identifiers (URI below) according to the schema:https_URL = "https:" "//" host [":" port]Two types of URI schemes are distinguished:-URI member that designates a single resource.-URI collection that designates a list of resources of the same type.3)The semantic of messages from the client to the server is that of HTTP:-GET URI: retrieve the representation of a resource (URI member), or a list of resources (URI collection)-POST URI (collection): add a resource to a list of existing resources, thus creating a resource.-PUT URI (member): modify an existing resource or create a new resource.-DELETE URI: Destruction of one (URI member) or multiple (URI collection) resources.4)Server responses to clients also use HTTP messages, especially the following codes:-200 Ok-404 Resource Not Found on Server5)Representation of resources: the format with which a resource is represented is obtained bynegotiation using HTTP headers. The client specifies what it wants as the representation format with the header "Accept", the client and the server use the "Content-type" header to describe therepresentation format of the resource included in the message. The format used by EFS is JSON. Status codeThe following table shows the possible return codes for API requests.。
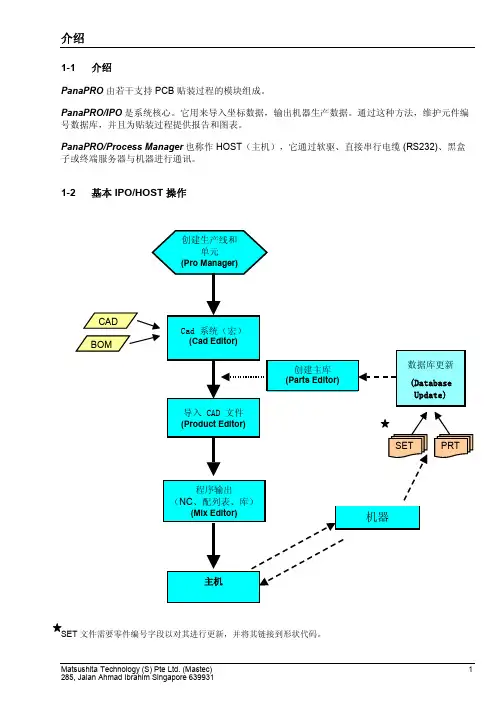
1-1 介绍PanaPRO由若干支持 PCB 贴装过程的模块组成。
PanaPRO/IPO是系统核心。
它用来导入坐标数据,输出机器生产数据。
通过这种方法,维护元件编号数据库,并且为贴装过程提供报告和图表。
PanaPRO/Process Manager也称作 HOST(主机),它通过软驱、直接串行电缆 (RS232)、黑盒子或终端服务器与机器进行通讯。
1-2 基本 IPO/HOST 操作文件需要零件编号字段以对其进行更新,并将其链接到形状代码。
1-3 PanaPRO语法面板基准PanaPro 使用Panel(面板)代表全部板面,使用Pattern(拼板)代表组成面板的、单独的生产板面。
Fiducials(基准)可以用于面板或拼板。
Component or local Fiducials(组件或本地基准)用来精确定位小间距元件。
Bad Board Marks(坏板面标记)表示坏拼板。
如果机器在坏板面标记位置检测到标记,则将跳过所标记拼板的任何任务。
Master Bad Board Mark(主坏板面标记)用来节省时间。
如果被标记,则表示一个或多个拼板已坏,需要进行检查。
如果未被标记,则无需对这个面板进行进一步检查。
Group Bad Board Marks(组坏板面标记)紧挨在一起。
这样可以减少机器检查它们所需要的时间。
Individual Group Bad Marks(单独组坏面板标记)必须与其所代表的拼板具有相同的参考标识符。
问题1. 导入 PanaPRO/IPO 时,CAD 文件需要哪些信息?2. 使用 DbUpdate 以前,SET 文件需要哪些信息?。

Geeetech Prusa I3 X用户使用手册1版权声明本手册版权归属深圳市捷泰技术有限公司(以下简称“捷泰技术”)所有, 并保留一切权力。
非经捷泰技术同意(书面形式),任何单位及个人不得擅自摘录本手册部分或全部,违者我们将追究其法律责任。
技术支持如果您对3D打印、飞控、智能家居等系列产品的成品、开发主板及模块感兴趣,希望获取相关资料或者技术支持,欢迎光临本公司网站进行了解,需要了解或想购买产品的客户请访问 或者,我们将竭诚为您服务。
安全声明安装此打印机要求安装人员具备较强的动手能力、一些基本常识以及对于接下来要进行的安装工作的充分理解。
我们提供此详细说明来帮助您,以使您的安装工作变得更加容易。
我们不会最终对因安装或者操作行为而导致的您的健康或安全问题负责,所以请您务必清楚地知道这一点,请确认自己是否能够开始安装或者购买。
请您仔细阅读整个手册来做出知情条件下的决策。
安装及操作涉及到用电,因此请做好所有必要的防范措施,打印机的运行由一个合格的12V电源提供动力,因此您的所有操作都应该在12V电压以下,但是不排除因为一些原因可2能会产生12V或者12V以上的电压,因此请谨慎操作。
使用前请检查电源的输入电压。
根据国家电源使用标准选择110V 或者220V。
(中国一般为220V)。
使用前请检查电源的输入电压。
根据国家电源使用标准选择110V 或者220V。
(中国一般为220V)。
3D打印过程涉及到高温,热端挤出喷嘴温度可高达230℃,加热后的热床温度高达110℃,挤出的融化塑料初始温度在200℃左右,因此在操作打印机的这些部位时需要格外小心与注意。
我们不推荐您在无人看管的情况下运行您的打印机,即便您足够自信这样做。
如果因为此种情况在安装或是使用打印机时造成任何损失、破坏、危险、受伤或者其他过失,本公司概不负责。
3 Tel: +86 755 2658 4110Fax: +86 755 2658 4074 -8581软件资源1.1 打印机控制软件Repetier-Host我们使用最新的Repetier hostV 1.6.0作为打印机的控制软件,下载地址为: /wiki/index.php/Repetier-Host#Download 下载完成后安装即可使用。

Argox Bartender 10.0 UL Form-making User GuideV2.022013/02/27The contents of this manual are based onBarTender 10.0 2863 and Seagull Driver 7.3.2_M-1Table of Contents1 What is the Form-making label file? (3)2 The Purpose of the Form-making label file (3)3 Supported V ersions (3)4 Supported Languages (4)5 Form-making conversion for BarTender (4)5.1 Argox ArgoKee/Printer (SRAM) (4)5.2 Argox ArgoKee/Printer (FLASH) (5)5.3 Argox READER (FLASH) (5)6 Downloading the Form-making label file (6)6.1 Installing the driver (6)6.2 Set baud rate (7)6.3 Create label and select output printer (8)6.4 Download Form-making label file (9)6.4.1 Downloading to ArgoKee (9)6.4.2 Download to printer (12)7 Using the Form-making label file (12)7.1 Using ArgoKee to input data (12)7.2 Using PS/2 keyboard to enter the data (13)7.3 Using a scanner to input data (13)8 Data variables in Form-making (14)8.1 TT/TD variable (Time/Date variable) (14)8.2 V variable (21)8.3 Reference (27)1What is the Form-making label file?The Form-making data format starts with the FS command, followed by a string inside closed quotation marks “ ” for the form name and ends with the FE command. Anything between FS and FE is the label content. An example of a complete Form-making label file (i.e. the Form name is “EXPORT”) is provided below:ZNFK"EXPORT"FS"EXPORT"I8,1,001q1215OJFZTQ900,37KI81NFE2The Purpose of the Form-making label fileThe label file can be stored in ArgoKee or the printer. The input data devices for different storage devices are as follows:2.1ArgoKeeThe device shown in the illustration below can be used for data input.2.2PrinterA PS/2 keyboard or scanner must be used as the data input device. A PC can alsobe used to send commands directly to the printer for printing Form-making label files.3Supported V ersionsBarTender 9.30 2731 or later versionsSeagull Driver 7.2_M-1 or later versionsAttention: Make sure both devices software are the latest versions. If there an error occurs during the data conversion, check the software versions first.Attention: The different BarTender version may be the user interface will make changes, please note the version number and use the corresponding help file.4Supported LanguagesCurrently, it is only supported PPLB. The Seagull Driver for PPLB must be used for data conversion.5Form-making conversion for BarTenderSince the Form-making data format is different from the original emulation, it must be converted using a different method/path. The converted path is “File -> Export Printer Code Template”.The three conversion methods currently offered by BarTender are “Argox ArgoKee/Printer (SRAM)”, “Argox ArgoKee/Printer (FLASH)”, and “Argox READER (FLASH)”.A description and comparison of these methods will be provided below.For example, the Argox X-3200 PPLB will be used below to create a 4 X 3 inch blank label for data conversion, and :5.1Argox ArgoKee/Printer (SRAM)5.1.1PurposeTo be used with ArgoKee and printers.5.1.2ComparisonThe data saved to ArgoKee will always be stored to FLASH. On theother hand, the data saved to the printer will always be stored to RAM.And those data saved in printers will therefore disappear when power islost.5.1.3Data conversionZNFK"EXPORT"FS"EXPORT"I8,1,001q1215OJFZTQ900,37KI81NFE5.2Argox ArgoKee/Printer (FLASH)5.2.1PurposeTo be used with ArgoKee and printers.5.2.2ComparisonBoth data are stored to FLASH, so data will not disappear when poweris lost.5.2.3Data conversionZSFK"EXPORT"FS"EXPORT"I8,1,001q1215OJFZTQ900,37KI81NFEZN5.3Argox READER (FLASH)5.3.1PurposeTo be used with ArgoKee and printers.5.3.2ComparisonBoth data are stored to FLASH. The difference the two devices, theForm name for the “Argox ArgoKee/Printer (FLASH)”is always“READER” with all capital letters. This option is mainly intended for ascanner usage as the data input device. For this reason, it has one extracommand compared to “Argox ArgoKee/Printer (FLASH)”: “PA1,1”.The command means print one copy only. If it is saved to ArgoKee, theuser will not be prompted to enter the number of copies after enteringthe data. One copy will be printed directly.5.3.3Data conversionZSFK"READER"FS"READER"I8,1,001q1215OJFZTQ900,37KI81NPA1,1FEZN6Downloading the Form-making label fileFor example, the Argox X-3200 PPLB will be used below to create a 4 X 3 inch blank label.6.1Installing the driverUse the Seagull Driver to install the driver for Argox X-3200 PPLB. Set the“Ports” as “COM1” and the printer details should be as shown below.6.2Set baud rateThe default baud rate for the printer and ArgoKee's COM Port is 9600, so the COM Port for the PC, printer and ArgoKee should be set to the value shown below. The illustration shows the three default settings and if one of the settings is changed, the other two settings must be changed as well for a proper connection. Details are beyond the scope of this manual.6.3Create label and select output printer6.3.1After launching BarTender, select “File -> New”. The “NewDocument Wizard” window appears on the screen.6.3.2Follow the wizard's instructions to select “Starting Point -> PrinterSelection -> Stock Selection -> Items Per Page -> Side Edges ->Printed Item Shape -> Printed Item Size -> Template Background-> Finished!”. After completing the installation, select Argox X-3200PPLB for creating a 4 X 3 inch blank label as shown below.6.4Download Form-making label fileThe methods for downloading to ArgoKee and the printer mentioned in section 2 are described below:6.4.1Downloading to ArgoKee6.4.1.1First, check that the transmission setting between the PC andArgoKee compatible with each other, then connect both COMPort with the data cable. Next, press the "D" key on the ArgoKeeto enable data receive mode. The LCD on ArgoKee will nowshow the message “LOADING FORM … (HOST ==>K/BOARD)”.6.4.1.2Use the blank label file created in section 6.3 or another file thathas been prepared earlier, then select “File -> Print”. A windowwill pop up as shown below. At the “Print -> Name” window,select the “Argox X-3200 PPLB”printer, and then click“Close”.6.4.1.3Under “File -> Export Printer Code Template”, run “ArgoxArgoKee/Printer (SRAM)” or ”Argox ArgoKee/Printer(FLASH)”. The “Export Printer Code Template” window willappear as shown below.6.4.1.4Select “More Options”and the following window appears onthe screen. The system defaults for “Template Fields” are:“Format ID/Name” : “Type” => “Set By Driver”.“Copies”and “Serial Numbers”: “Type”=> “Set by Print Dialog”.Attention: To customize the Form name, at “Format ID/Name -> Type”, select “Constant”, then enter the required name in“Name/Value”.After competed settings, click “OK”. Finally, click “Export”.6.4.1.5If the download is successful, ArgoKee's LCD will exit the“LOADING FORM … (HOST ==> K/BOARD)”mode.Otherwise, it will remain in the same mode.6.4.1.6During the above downloading process, if the system default wasused, then the Form name will be “EXPORT”. To verify if theForm-making has been successfully loaded, press the “P” key onArgoKee to enter print mode. ArgoKee's LCD will display“FORM SELECTION:”. Press the “Up/Down” keys to look forthe newly downloaded Form-making. If it exists, it means thedownloading process was successful.6.4.2Download to printer6.4.2.1First, make sure that the PC and the printer are both using theright transmission settings, then connect both COM Port with thedata cable. Turn on the printer, then wait for the message“READY (300,PPLB)” to appear on the printer's LCD.6.4.2.2Follow the steps in section 6.4.1.2.6.4.2.3Under “File -> Export Printer Code Template”, select “ArgoxArgoKee/Printer (FLASH)” or “Argox READER (FLASH)”.6.4.2.4Follow the steps in section 6.4.1.4.6.4.2.5The printer LCD will not show any messages if the downloadwas successful. There are several another methods to verify thedownloading status. Example: Sending a command to the printer,or plugging in a PS/2 keyboard then checking via the printerLCD.6.4.2.6During the above downloading process, if the system defaultswere used, then “Argox ArgoKee/Printer (FLASH)” will havethe Form name “EXPORT”. “Argox READER (FLASH)” willhave the Form name “READER”.7Using the Form-making label file7.1Using ArgoKee to input data7.1.1If “Argox ArgoKee/Printer (FLASH)”was used to download aForm-making to ArgoKee, if the defaults were used, then ArgoKee willcontain a Form named “EXPORT”.7.1.2Connect ArgoKee to the printer using the COM Port cable. ArgoKeenow becomes an input device.7.1.3At ArgoKee's “S:SET -> EMULATION :”, use the “Up/Down” keysto toggle the following settings: ”PPLA/PPLB/BASIC”. Switch to“PPLB”, then press “Enter” to confirm. Now press “<ESC>” to exitand reboot ArgoKee.7.1.4Once ArgoKee reboots, the LCD will display “PPLB MODESELECTION: P:PRINT, D:DL, S:SET”. Now, press “P” and theArgoKee LCD will display the name of a stored Form. Use the“Up/Down” keys to browse the forms and press the “Enter” key to runthe selected Form. If data input is needed for Form, then ArgoKee willenter data input mode. The printer LCD will display the “PromptText”.7.2Using PS/2 keyboard to enter the data.7.2.1If “Argox ArgoKee/Printer (FLASH)”was used to download aForm-making to the printer, if the defaults were used, then the printerwill contain a Form named “EXPORT”.7.2.2First, connect the PS/2 keyboard to the printer, then start the X-3200PPLB. Wait for few moments, then the printer LCD will show themessage “READY (300,PPLB) <ESC> FOR KEYBD”. Press the“<ESC>” key on the keyboard to enter the data.7.2.3The printer LCD will now show the name of a Form stored on theprinter. Use the “Up/Down” keys to browse all the Forms, then click onthe “Enter” key to execute the selected Form. If the Form beingexecuted requires a data input, the printer will enter data input modeand display the “Prompt Text” on the LCD. The “Prompt Text” canbe modified in BarTender.7.2.4To leave the data input mode, simply disconnect the PS/2 keyboard andturn off the printer.7.3Using a scanner to input data7.3.1If “Argox READER (FLASH)”was used to download aForm-making to the printer, and if the defaults were used, then theprinter will contain a Form named “READER”.7.3.2Start the X-3200 PPLB, then in the printer Menu, set the “READERINSTALLED” setting to “YES”, save, and then reboot.7.3.3After printer reboots, it will find a Form named “READER” in Flashand run it. If the Form requires data input the printer will enter datainput mode and display the “Prompt Text” on the LCD. The “PromptText” can be modified in BarTender.7.3.4Now connect the scanner to the printer using a PS/2 cable to allow datainput.7.3.5To exit the data input mode, press and hold the “CANCEL/RESET”button on the printer before turning the printer on. Wait until the printerLCD shows the string “RESET”before releasing the“CANCEL/RESET” button. Only then will the printer exit the datainput mode.8Data variables in Form-makingThe next chapter uses the X-3200 PPLB printer as an example. The following simple examples will only require converted command data. There is one method for acquiring the output command data.The method: Use the “Printer Code Recording”function offered by Seagull Driver. The path “Start -> Printers and Faxes -> Argox X-3200 PPLB -> Properties -> Tools -> Logging Options -> Printer Code Recording”. Check “Record Printer Code”, and then click “OK”. For more information, please refer to the “Guide to Argox Printer Transmission Information.doc”.To start before continuing on to the following example, follow the steps outlined in section 6.4.1.2 to select the Argox X-3200 PPLB printer, create a 4 X 3 inch blank label, and then convert it using the “Argox ArgoKee/Printer (FLASH)”method.8.1TT/TD variable (Time/Date variable)8.1.1Select “Create -> Bar Code”, choose a barcode objects. In this case,select “Code 39 (Full ASCII)”. Then click anywhere on the label tocreate a “Bar Code Object”.8.1.2Right-click on the “Bar Code Object”, then in the newly openedwindow, clicks “Properties”. The window for modifying the content of the “Bar Code Object” will now appear.8.1.2.1Symbology and SizeCheck the “Print Method -> Bar codes and human readable textcontrolled by the printer”option. If this option is not available,then the “TT/TD” variable output is not available.The barcode type can be changed in the “Symbology” menu.8.1.2.2 FontAn Argox font must be selected. A wrong selection will result the “TT/TD” variable cannot be converted.8.1.2.3Data Sources8.1.2.3.1D ata SourceSelect “Change Data Source Type” within “Type” tolaunch the “Change Data Source Type Wizard” popupwindow. Choose “Clock” within “Type” and then click“Finish”. Check the option “Use Printer’s Clock” on thenext screen otherwise the “TT/TD” variables cannot beexported.8.1.2.3.2D ata TypeIf want to use the “TT” variable, please select “Time” from “Type” and then click “Close”.“Type” and then click “Close”.8.1.2.4Any other changes can also be set here. When done, click“Close”.8.1.3Run “File -> Export Printer Code Template” to launch the “ExportPrinter Code Template” popup window. Choose “ArgoxArgoKee/Printer (FLASH)” from “Print System” as shown below.8.1.4Carry out the steps from section 6.4.1.4. As an example, we changedthe Form name to “TIME”, then click “Export”.8.1.5Data conversion8.1.5.1TT variableIn accordance with “Type -> Time” setting in section 8.1.2.3.2, theconverted data will be:ZSFK"TIME"FS"TIME"I8,1,001q1215OJFZTQ900,37KI81NTTh/Zm +B971,663,2,3,4,10,150,B,TTFEZN8.1.5.2TD variableIn accordance with “Type -> Date” setting in section 8.1.2.3.2, theconverted data will be:ZSFK"TIME"FS"TIME"I8,1,001q1215OJFZTQ900,37KI81NTDmn/Odd/Oy2B971,663,2,3,4,10,150,B,TDFEZN8.2V variable8.2.1Run “Create -> Bar Code” and select any barcode object. Forexample, select “Code 39 (Full ASCII)” and click anywhere on thelabel to create a “Bar Code Object”.8.2.2Right-click on the “Bar Code Object”, then in the newly openedwindow, clicks “Properties”. The window for modifying the contentof the “Bar Code Object” will now appear.8.2.2.1Symbology and SizeCheck the “Print Method -> Bar codes and human readable text controlled by the printer”option. If this option is not available, then the “V/C” variable output is not available.The barcode type can be changed in the “Symbology” menu.8.2.2.2FontAn Argox font must be selected. A wrong selection will result the “V/C” variable cannot be converted.8.2.2.3Data Sources8.2.2.3.1D ata SourceSelect “Change Data Source Type” within “Type” tolaunch the “Change Data Source Type Wizard” popupwindow. Choose “Printer Code Template Field” within“Type” and then click “Finish”.T hen in the “Field Name”, enter the desired “Prompt Text”for ArgoKee or printer as shown below during data input. The“Prompt Text” is “INPUT”.8.2.2.3.2D ata TypeSelect “Text” within “Type” and then click “Close”. The“V/C” variables cannot be exported if this option is notselected.8.2.2.3.3T ransformsThis page currently supports “Prefix and Suffix” and“Serialization” only.8.2.2.3.3.1DefaultFields are left blank by default, and then the variable“V” is exported.8.2.2.3.3.2Prefix and SuffixIf this option is used, the variable “V” will beexported. Please enter a custom string if necessary.As shown below, “A” is set as the “Prefix” and “Z” isset as the “Suffix”.8.2.2.3.3.3SerializationIn this page, the variable “C” can only be exported ifthis option is used by itself.Check “Serialization -> Serialize” otherwise the “C”variable cannot be exported. Click “OK” whenfinished.8.2.2.4Any other changes can also be set here. When done, click on“Close”.8.2.3Carry out the steps from section 8.1.3-8.1.4. As an example, wechanged the Form name to “V ARIABLE”, then click on “Export”. 8.2.4Data conversion8.2.4.1DefaultIn accordance with setting in section 8.2.2.3.3.1, the converted datawill be:ZSFK"VARIABLE"FS"VARIABLE"I8,1,001q1215OJFZTQ900,37KI81NV00,20,N,"INPUT"B971,663,2,3,4,10,150,B,V00FEZN8.2.4.2Add Prefix and SuffixIn accordance with setting in section 8.2.2.3.3.2, the converted data will be:ZSFK"VARIABLE"FS"VARIABLE"I8,1,001q1215OJFZTQ900,37KI81NV00,20,N,"INPUT"B971,663,2,3,4,10,150,B,”A”V00”Z”FEZN8.2.4.3Use SerializationIn accordance with setting in section 8.2.2.3.3.3, the converted data will be:ZSFK"VARIABLE"FS"VARIABLE"I8,1,001q1215OJFZTQ900,37KI81NZNC0,20,N,+1,"INPUT"B971,663,2,3,4,10,150,B,C0FEZN8.3Reference8.3.1Carry out the steps from section 8.2.1-8.2.2. In this example, the“Object Name” of this “Bar Code Object” is “Bar Code 1”.8.3.2Run “Create -> T ext” and select any text object. For example, select“Single Line”and click anywhere on the label to create a “TextObject”.8.3.3Right-click on the “Text Object”, then in the newly opened window,clicks on “Properties”. The window for modifying the content of the “Text Object” will now appear.8.3.3.1FontAn Argox font must be selected. A wrong selection will result thecorresponding variable cannot be converted.8.3.3.2Data Sources8.3.3.2.1D ata SourceSelect “Change Data Source Type” within “Type” tolaunch the “Change Data Source Type Wizard” popupwindow. Choose “Object Value” within “Type” and thenclick “Next”.Select the reference object from “Object Name” and pick the preconfigured “Bar Code 1”. Choose the correct “Main Data Source” for “Value” otherwise the corresponding variables will not be exported.8.3.3.3Any other changes can also be set here. When done, click“Close”.8.3.4Carry out the steps from section 8.1.3-8.1.4. As an example, wechanged the Form name to “REFERENCE”, then click “Export”.8.3.5Data conversionZSFK"REFERENCE"FS"REFERENCE"I8,1,001q1215OJFZTQ900,37KI81NV00,20,N,"INPUT"B971,663,2,3,4,10,150,B,V00A971,291,2,3,4,4,N,V00FEZN。
SD Host Controller 2.0设计说明书(仅供内部使用)拟制: 张 杰 日期: 2008-8-13审核: 日期:审核: 日期;批准: 日期;创辉电脑深圳代表处香港创辉电脑有限公司深圳代表处研究管理部文档中心 产品版本 密级 V1.0绝密 产品名称: SD Host Controller 2.0修订记录日期修订版本描述作者2008-8-13 1.0 初稿完成张杰目录目录 .................................................................................................................................................. 3第1章总体设计. (5)§1.1 SD卡控制器综述 (5)§1.2 SD卡控制器应用结构图 (5)§1.3 顶层结构图 (6)§1.4 SD卡控制器主要功能点 (6)§1.5 SD卡控制器接口描述 (7)§1.6 SD卡控制器寄存器定义 (8)第2章模块设计与验证 (29)§2.1 命令控制模块(CCL)设计与验证 (29)§2.1.1 模块说明 (29)§2.1.2 模块接口描述 (30)§2.1.3 状态机设计 (32)§2.1.4 功能仿真 (43)§2.2 中断控制/时钟管理模块(Clockgen/INT)设计与验证 (44)§2.2.1 模块说明 (44)§2.2.2 模块接口描述 (44)§2.2.3 模块结构图 (47)§2.2.4 功能仿真 (47)§2.3 数据控制模块(DCL)设计与验证 (50)§2.3.1 模块说明 (50)§2.3.2 详细功能描述 (50)§2.3.3 模块接口描述 (52)§2.3.4 状态机设计 (56)§2.3.5 功能仿真 (56)第3章系统级功能仿真和FPGA验证 (57)§3.1 功能仿真结果表格 (57)§3.2 FPGA验证 (57)第4章LINUX下SD卡驱动程序 (59)§4.1 SDIO驱动程序流程图 (59)§4.2 SD/MMC/SDHC Host 2.0驱动程序流程图 (61)§4.3 相关Card驱动流程图(2.0标准) (67)第5章附录(SD卡控制器验证计划书) (70)§5.1 SD控制器功能验证方案 (70)§5.1.1 验证环境 (70)§5.1.2 验证平台 (70)§5.1.3 验证流程 (71)§5.2 功能点统计 (72)§5.3 详细测试步骤和寄存器设置 (73)§5.4 FPGA验证 (77)§5.4.1 验证目标 (77)§5.4.2 验证方法 (78)§5.4.3 详细验证计划 (78)第6章参与设计人员 (81)第1章总体设计§1.1SD卡控制器综述本设计遵循SD Host Controller Simplified Specification Version2.00版本。

(机器翻译成中文)Xillybus host application programming guide for LinuxXillybus Ltd.Version3.0本文档已由计算机自动翻译,可能会导致语言不清晰。
与原始文件相比,该文件也可能略微过时。
如果可能,请参阅英文文档。
This document has been automatically translated from En-glish by a computer,which may result in unclear language.This document may also be slightly outdated in relation tothe original.If possible,please refer to the document in English.Xillybus Ltd.(机器翻译成中文) 1介绍52同步streams与异步streams72.1概述 (7)2.2异步streams的动机 (7)2.3Streams从FPGA到host (8)2.4Streams从host到FPGA (8)2.5不确定性与latency (10)3I/O编程实践113.1概述 (11)3.2读取数据指南 (11)3.3数据写入指南 (13)3.4在异步downstreams上执行flush (15)3.5select()和nonblocking I/O (17)3.6监控driver的buffers中的数据量 (18)3.7XillyUSB:需要监控物理data link的质量 (18)4高速连续I/O204.1基础知识 (20)4.2大driver的buffers (21)4.3user space中的RAM buffers (22)4.4fifo.c演示应用程序概述 (23)4.5fifo.c改装笔记 (24)4.6RAM FIFO功能 (24)4.6.1fifo_init() (25)4.6.2fifo_destroy() (25)4.6.3fifo_request_drain() (25)4.6.4fifo_drained() (26)4.6.5fifo_request_write() (26)4.6.6fifo_wrote() (27)Xillybus host application programming guide for Linux2Xillybus Ltd.(机器翻译成中文)4.6.7fifo_done() (27)4.6.8FIFO_BACKOFF define variable (27)5循环frame buffers285.1介绍 (28)5.2改编FIFO示例代码 (28)5.3丢弃和重复frames (29)6具体的编程技术316.1Seekable streams (31)6.2双向同步streams (33)6.3分组通信 (33)6.4模拟hardware interrupts (34)6.5Timeout (35)6.6Coprocessing/Hardware acceleration (38)A内部结构:streams是如何实现的40A.1介绍 (40)A.2“Classic”DMA与Xillybus (40)A.3FPGA至host(upstream) (41)A.3.1概述 (41)A.3.2#1阶段:Application logic到中间FIFO (41)A.3.3#2阶段:中间FIFO到DMA buffer (42)A.3.4Stage#3:DMA buffer到用户软件应用程序 (42)A.3.5buffers部分满载交接条件 (43)A.3.6例子 (44)A.3.7实际结论 (45)A.4Host至FPGA(downstream) (46)A.4.1概述 (46)A.4.2Stage#1:DMA buffer的用户软件应用程序 (46)A.4.3#2阶段:DMA buffer到中间FIFO (47)Xillybus host application programming guide for Linux3Xillybus Ltd.(机器翻译成中文)A.4.4#3阶段:中间FIFO到application logic (48)A.4.5一个例子 (48)A.4.6实际结论 (48)Xillybus host application programming guide for Linux4Xillybus Ltd.(机器翻译成中文)1介绍Xillybus旨在为Linux host提供一个简单而知名的界面,具有自然和预期的行为。
EBSCOhost 6.1 系统使用手册中文完整版April, 2004目录EBSCOhost系统使用手册◎关于EBSCOhost (4)◎系统需求 (4)◎选择检索数据库 (5)数据库内容细部介绍 (6)期刊清单连结 (6)工具列介绍 (7)各别标签区块 (7)◎数据库检索方法 (8)基本检索窗口(Basic Search Window) (8)关键词检索窗口(Keyword Search) (8)设限与扩增值(Limiter and Expander) (9)布尔逻辑概念(Boolean Search) (10)符号检索概念(Wildcard(?) and Truncation(*)) (11)拼字检查功能 (Spell Checker) (11)进阶检索窗口(Advanced Search Window) (12)进阶检索:Single Find Field (13)进阶检索:Single Find Field with a Search Builder (13)进阶检索:Guided Style Find Field (13)延伸卷标功能 (14)主题检索 (14)期刊检索 (15)*期刊选粹服务设定(Journal Alert) (17)索引检索功能 (18)参考文献检索功能 (18)◎彩色图片数据库检索(Image Collections) (20)◎检索结果列表 (21)全文格式 (24)文章引用语特色 (25)HTML Full Text 全文格式特色 (26)◎My EBSCOhost(我的个人EBSCOhost) (27)我的活页夹(My Folder/Folder has items) (29)Delivery Option(数据传送与输出选项) (29)打印/Email/储存功能视选项 (30)储存检索指令及数据(Saved Searches) (34)储存检索结果 (35)建立个人专属账号密码 (36)储存检索结果 (36)取回储存检索数据 (36)打印检索历史数据 (37)◎Web Pages-Page Composer (39)在页面上增加文字 (40)将活页夹内选取之文章汇入至页面上 (40)增加图片档案 (41)增加空白检索之功能 (42)增加网络连结之功能 (43)增加背景图示 (44)增加水平线 (45)关于Page Elements介绍 (46)Email设计完毕之网页成品 (46)Download设计完毕之网页成品 (47)Copy设计完毕之网页成品 (47)成品范例(已台大外语系为例) (48)◎EBSCOhost相关网站资源 (49)学关于EBSCOhostEBSC Ohost 是一个功能强大的数据库检索系统画面,经由因特网直接连结到由EBSCO本身制作之全文型数据库或其它国外较知名之书目型电子数据库(如ERIC、Econlit、Medline、Psyinfo等)。
凝思安全操作系统V6.0.80用户手册北京凝思软件股份有限公司目 录产品概述 (1)关于本书 (6)文档约定 (6)术语简介 (8)如何使用本书 (11)第1章 登录和注销 (12)1.1 登录 (12)1.1.1 从桌面登录 (14)1.1.1.1 桌面的使用 (15)1.1.1.2 控制会话 (16)1.1.1.3 锁定屏幕 (17)1.1.2 从控制台登录 (18)1.2 文档和帮助 (19)1.3 注销 (21)1.3.1 从桌面注销 (21)1.3.2 从控制台注销 (22)第2章 系统基本使用 (23)2.1 Bash 简介 (23)2.1.1 命令 (23)2.1.2 文件和目录 (23)2.1.3 Bash 功能 (26)2.1.4 指定路径 (26)2.1.5 通配符 (26)2.1.6 less和more (27)2.1.7 管道 (27)2.1.8 存档和数据压缩 (28)2.2 用户和访问控制 (30)2.2.1 文件系统权限 (31)2.2.2 修改文件权限 (32)2.2.3 setuid位 (33)2.2.4 setgid位 (34)2.2.5 粘滞位 (34)2.2.6 自主访问控制 (34)2.2.6.1 访问控制列表 (36)2.3 重要的 Linux 命令 (39)2.3.1 文件命令 (39)2.3.2 系统命令 (43)第3章 分区与文件系统 (47)3.1 磁盘分区 (47)3.1.1 命令行分区工具——parted (47)3.1.1.1 parted基本用法 (47)3.1.1.2 创建分区表 (47)3.1.1.3 查看磁盘分区情况 (48)3.1.1.4 添加分区 (48)3.1.1.5 删除分区 (48)3.1.2 图形分区工具——gparted (48)3.1.2.1 启动gparted程序 (49)3.1.2.2 gparted程序首界面 (50)3.1.2.3 创建分区表 (51)3.1.2.4 添加分区 (53)3.1.2.5 删除分区 (57)3.2 文件系统 (59)3.2.1 创建文件系统 (59)3.2.2 修复文件系统 (59)3.3 磁盘阵列RAID (61)3.3.1 创建RAID (61)3.3.2 关闭RAID (62)3.4 逻辑卷管理LVM (63)3.4.1 基本命令介绍 (63)3.4.2 逻辑卷创建 (64)3.4.3 逻辑卷扩容 (65)3.4.4 删除逻辑卷 (65)第4章 中文支持 (66)4.1 多语言环境支持 (66)4.2 字符编码与中文字体 (67)4.3 输入法 (70)第5章 系统管理 (71)5.1 关闭或重新启动系统 (71)5.1.1 关闭系统 (71)5.1.2 重启系统 (71)5.2 初始化设置 (72)5.2.1 设备驱动模块配置 (72)5.2.2 profile文件 (72)5.2.3 issue文件 (74)5.3 系统配置 (75)5.3.1 fstab文件 (75)5.4 挂载和卸载 (77)5.4.1 挂载 (77)5.4.2 卸载 (77)5.5 系统监控 (78)5.6 数据备份与恢复 (80)5.6.1 数据备份的重要性 (80)5.6.2 工具名称 (80)5.6.3 工具安装 (80)5.6.4 备份与恢复策略 (80)5.6.4.1 完全备份 (80)5.6.4.2 增量备份 (81)5.6.4.3 差异备份 (82)5.6.5 工具参数 (83)5.6.6 功能演示 (84)第6章 软件包管理 (86)6.1 软件包管理机制 (86)6.1.1 软件包概述 (86)6.1.2 软件包命名约定 (86)6.1.3 维护脚本 (86)6.1.4 软件包优先级 (87)6.1.5 软件包依赖关系 (88)6.2 软件包管理工具 (89)6.2.1 常用的包管理工具 (89)6.2.2 dpkg (89)6.2.3 apt (89)6.2.3.1 设置软件源 (89)6.2.3.2 apt-get (90)6.2.3.3 apt-cache (90)6.2.4 aptitude (91)6.2.4.1 介绍 (91)6.2.4.2 aptitude安装 (92)6.2.5 安装软件包 (92)第7章 用户管理 (94)7.1 添加用户 (94)7.2 删除用户 (94)7.3 添加用户组 (95)7.4 删除用户组 (95)7.5 将用户添加到用户组 (95)7.6 将用户从用户组中删除 (96)7.7 改变用户当前所在组 (96)7.8 修改用户口令 (96)7.9 修改用户口令时限 (98)7.10 修改用户信息 (100)7.11 修改口令文件 (101)7.12 定义鉴别阈值 (103)第8章 网络管理 (104)8.1 网络参数配置 (104)8.1.1 interfaces文件 (104)8.1.2 resolv.conf文件 (105)8.1.3 hostname文件 (106)8.1.4 services文件 (106)8.1.5 hosts.allow文件 (108)8.1.6 hosts.deny文件 (108)8.1.7 host.conf文件 (109)8.1.8 ifconfig命令 (110)8.2 网络服务 (115)8.2.1 Apache (117)8.2.1.1 简介 (117)8.2.1.2 配置文件 (117)8.2.1.3 配置文件参数 (118)8.2.1.4 日志 (142)8.2.1.5 参考信息 (148)8.2.2 BIND (148)8.2.2.1 简介 (148)8.2.2.2 配置文件 (148)8.2.2.3 配置文件参数 (148)8.2.2.4 参考信息 (152)8.2.2.5 日志 (152)8.2.3 Samba (152)8.2.3.1 简介 (152)8.2.3.2 配置文件 (152)8.2.3.3 配置文件参数 (153)8.2.3.4 日志 (160)8.2.3.5 参考信息 (160)8.2.4 SSH (160)8.2.4.1 简介 (160)8.2.4.2 配置文件 (160)8.2.4.3 配置文件参数 (160)8.3 bonding (166)8.3.1 参数说明 (166)8.3.1.1 参数列表 (166)8.3.2 bonding模式 (168)8.3.3 配置bonding (170)8.3.3.1 操作系统及环境 (170)8.3.3.2 配置文件 (171)第9章 日志与审计 (173)9.1 日志管理 (173)9.1.1 查看系统日志 (173)9.1.2 查看用户信息 (173)9.2 安全审计 (173)9.2.1 审计守护进程 (175)9.2.1.1 环境配置文件 (175)9.2.1.2功能配置文件 (175)9.2.2 审计规则配置程序 (182)9.2.2.1 参数详解 (182)9.2.2.2 用法举例 (186)9.2.2.3 注意事项 (187)9.2.3 审计规则配置文件 (187)9.2.4 审计日志分析工具 (187)9.2.4.1 报表生成工具 (187)9.2.4.2 日志搜索工具 (187)9.2.5 审计分发程序 (188)9.2.6 审计系统附加功能 (188)9.2.7 审计系统设置 (188)第10章 凝思安全机制 (189)10.1 安全模块 (189)10.1.1 安全模块的参数 (189)10.1.2 安全模块的加载与卸载 (191)10.2 强制访问控制(Mandatory Access Control) (192)10.2.1 功能简介 (194)10.2.1.1 安全标签 (194)10.2.1.2 主体标签 (194)10.2.1.3 客体标签 (195)10.2.1.4 规则 (195)10.2.1.5 MAC配置基本流程 (196)10.2.2 规则说明 (196)10.2.3 配置文件 (197)10.2.4 配置工具 (198)10.2.5 功能演示 (199)10.2.6 调试方法 (206)10.3 网络标签 (207)10.3.1 功能简介 (207)10.3.2 配置文件 (208)10.3.3 标签使能 (209)10.3.4 规则说明 (209)10.3.4.1 在网络环境中的主客体定义 (209)10.3.4.2 网络请求接受的条件定义 (209)10.3.4.3 标签网络环境必要条件 (209)10.3.4.4 收/发数据包的细节 (209)10.3.4.5 TCP/UDP连接的区别 (210)10.3.5 功能演示 (210)10.3.6 案例展示 (214)10.3.7 调试方法 (217)10.4 强制行为控制(Mandatory Behavior Control) (220)10.4.1 功能简介 (220)10.4.2 规则说明 (221)10.4.3 配置工具 (223)10.4.4 功能演示 (224)10.4.5 调试方法 (224)10.5 强制能力控制(Mandatory Capability Control) (226)10.5.1 功能简介 (230)10.5.1.1 线程的能力 (230)10.5.1.2 文件的能力 (231)10.5.2 规则说明 (231)10.5.3 配置工具 (232)10.5.4 功能演示 (234)10.5.5 调试方法 (235)10.6 分权管理员 (237)10.6.1 管理员职责 (237)10.6.2 功能演示 (240)10.7 无root系统运行 (241)第11章 开发 (242)11.1 开发环境 (242)11.1.1 java开发环境 (242)11.1.2 C开发环境 (243)11.1.3 C++开发环境 (244)11.1.4 Python开发环境 (245)11.1.5 Perl开发环境 (245)11.1.6 Shell开发环境 (246)11.1.7 Php开发环境 (247)11.1.8 Tcl/tk开发环境 (248)11.2 开发工具 (249)11.2.1 eclipse (249)11.2.2 kdevelop (249)11.2.3 emacs (250)11.2.4 qtcreater (251)第12章 常见问题解答 (253)附录A 文件和目录 (262)A.1 / (263)A.2 /etc (265)A.3 /dev (267)A.4 /usr (267)A.5 /var (268)A.6 /proc (269)产品概述凝思安全操作系统(以下简称为“凝思系统”)是北京凝思软件股份有限公司自主研发、拥有完全自主知识产权、具备等保四级要求、并且达到军B级安全级别的操作系统,是国内首家达到安全服务器保护轮廓EAL3级别的安全产品。
Current Search Criteria: Quickly view your current search selections and update your search results by removing selected items.Limiters: Refine a search without navigating away from the results page.Filters: Filter search results by type of resource, related subjects, publisher or publication and more.Search History: View and combine past search terms and set up alerts to be notified of new articles.Research Starters: Available for the most popular topics, Research Starters provides quick access to an overview article and links users to related information and detailed bibliographies.Create a My EBSCO host Account: Create a personal account to store your favorite articles to a personal folder, and set your user preferences.Sort Results: Sort results by relevance, date, author or source.Share: View alerting, linking and bookmarking options from this menu.Related Images: Preview thumbnail images from full-text articles and EBSCO’s Image Collection.Preview and Add to Folder: Click on icons to preview or add a record to your folder without leaving the results page. Updated Library Catalog Information: When enabled by a library, updated information for locating library materials is available on the search results.SEARCHING Features & Functionality At-A-Glance 16789234510111234567891011Viewing the Detailed RecordFull Text LinksThe complete article is available in HTML, PDF or both. When full text is not available an option to check your library’s collection may appear.Subject TermsClick a subject term for a new list of results.Tools Menu The tools menu allows you to print, email, save, cite or export a single result.123My EBSCO host Personal FolderStore your login credentials here:My EBSCO host UsernamePassword 123Ask your librarian for details.。
host文件的用途和用法一.Hosts文件的位置很多用户都知道在Window系统中有个Hosts文件(没有后缀名),在Windows 98系统下该文件在Windows文件夹。
在Windows 2000/XP系统中位于\%Systemroot%\System32\Drivers\Etc 文件夹中,其中,%Systemroot%指系统安装路径。
例如,Windows XP 安装在C:\WINDOWS,那么Hosts文件就在C:\Widows\System32\Drvers\Etc中。
你也可以用windows自带的查找功能搜索找到hosts文件。
该文件其实是一个纯文本的文件,用普通的文本编辑软件如记事本等都能打开和编辑。
二.Hosts文件的基本内容和语法用记事本打开hosts文件,就可以看见了微软对这个文件的说明。
Hosts文件文一般有如下面的基本内容# Copyright (c) 1993-1999 Microsoft Corp.## This is a sample HOSTS file used by Microsoft TCP/IP for Windows.## This file contains the mappings of IP addresses to host names. Each# entry should be kept on an individual line. The IP address should# be placed in the first column followed by the corresponding host name.# The IP address and the host name should be separated by at least one# space.## Additionally, comments (such as these) may be inserted on individual# lines or following the machine name denoted by a '#' symbol.## For example:## 102.54.94.97 # source server# 38.25.63.10 # x client host127.0.0.1 localhost这个文件是根据TCP/IP for Windows 的标准来工作的。
它的作用是定义IP地址和Host name(主机名)的映射关系,是一个映射IP地址和Host name (主机名) 的规定。
这个规定中,要求每段只能包括一个映射关系,也就是一个IP地址和一个与之有映射关系的主机名。
IP地址要放在每段的最前面,映射的Host name(主机名)在IP后面,中间用空格分隔。
对于这段的映射说明,用“#”分割后用文字说明。
三.Hosts文件的工作方式现在让我们来看看Hosts在Windows中是怎么工作的。
我们知道在网络上访问网站,要首先通过DNS服务器把要访问的网络域名()解析成XXX.XXX.XXX.XXX的IP地址后,计算机才能对这个网络域名作访问。
要是对于每个域名请求我们都要等待域名服务器解析后返回IP信息,这样访问网络的效率就会降低,因为DNS做域名解析和返回IP都需要时间。
为了提高对经常访问的网络域名的解析效率,可以通过利用Hosts文件中建立域名和IP的映射关系来达到目的。
根据Windows系统规定,在进行DNS请求以前,Windows系统会先检查自己的Hosts文件中是否有这个网络域名映射关系。
如果有则,调用这个IP地址映射,如果没有,再向已知的DNS服务器提出域名解析。
也就是说Hosts的请求级别比DNS高。
四.Hosts文件的工作方式和具体作用现在来看一下Hosts文件的工作方式以及它在具体使用中起哪些作用。
1、加快域名解析对于要经常访问的网站,我们可以通过在Hosts中配置域名和IP的映射关系,提高域名解析速度。
由于有了映射关系,当我们输入域名计算机就能很快解析出IP,而不用请求网络上的DNS服务器。
2、方便局域网用户在很多单位的局域网中,会有服务器提供给用户使用。
但由于局域网中一般很少架设DNS服务器,访问这些服务器时,要输入难记的IP地址。
这对不少人来说相当麻烦。
现在可以分别给这些服务器取个容易记住的名字,然后在Hosts中建立IP映射,这样以后访问的时候,只要输入这个服务器的名字就行了。
3、屏蔽网站现在有很多网站不经过用户同意就将各种各样的插件安装到你的计算机中,其中有些说不定就是木马或病毒。
对于这些网站我们可以利用Hosts把该网站的域名映射到错误的IP或本地计算机的IP,这样就不用访问了。
在WINDOWSX系统中,约定127.0.0.1为本地计算机的IP地址, 0.0.0.0是错误的IP地址。
如果,我们在Hosts中,写入以下内容:127.0.0.1 # 要屏蔽的网站A0.0.0.0 # 要屏蔽的网站B这样,计算机解析域名A和B时,就解析到本机IP或错误的IP,达到了屏蔽网站A 和B的目的。
4、顺利连接系统对于Lotus的服务器和一些数据库服务器,在访问时如果直接输入IP地址那是不能访问的,只能输入服务器名才能访问。
那么我们配置好Hosts文件,这样输入服务器名就能顺利连接了。
五.屏蔽不想访问的网站的例子这里给出一些收集到的利用Hosts文件对一些网址屏蔽的例子,共大家学习使用Hosts文件时参考。
例1.在hosts文件中加入如下内容就可以屏蔽文件中定义的对应的网址。
127.0.0.1 localhost127.0.0.1 127.0.0.1 #3721网络实名127.0.0.1 #3721网络实名127.0.0.1 #3721网络实名127.0.0.1 #3721网络实名127.0.0.1 #3721网络实名127.0.0.1 #3721网络实名127.0.0.1 #3721网络实名127.0.0.1 #3721网络实名例2.在hosts文件中加入如下内容就可以屏蔽文件中定义的对应的网址。
127.0.0.1 localhost127.0.0.1 #百度IE搜索伴侣127.0.0.1 #百度IE搜索伴侣127.0.0.1 #百度IE搜索伴侣应用实例1.qq去广告,在ect加入# 屏蔽QQ 游戏0.0.0.0 0.0.0.0 2.视频网页去广告#优酷0.0.0.0 0.0.0.0 0.0.0.0 0.0.0.0 0.0.0.0 0.0.0.0 0.0.0.0 0.0.0.0 0.0.0.0 #去奇艺广告127.0.0.1 127.0.0.1 #CNTV127.0.0.1 127.0.0.1 127.0.0.1 127.0.0.1 127.0.0.1 127.0.0.1 #新浪视频127.0.0.1 #pptv127.0.0.1 #乐视127.0.0.1 #搜狐高清127.0.0.1 @HostsX 国内站点广告/视频类网站#CNTV127.0.0.1 127.0.0.1 127.0.0.1 127.0.0.1 127.0.0.1 127.0.0.1 #我乐网127.0.0.1 127.0.0.1 127.0.0.1 127.0.0.1 127.0.0.1 127.0.0.1 127.0.0.1 127.0.0.1 127.0.0.1 127.0.0.1 #6间房127.0.0.1 127.0.0.1 127.0.0.1 127.0.0.1 #土豆网127.0.0.1 127.0.0.1 127.0.0.1 127.0.0.1 127.0.0.1 **127.0.0.1 127.0.0.1 127.0.0.1 127.0.0.1 127.0.0.1 127.0.0.1 #酷6网127.0.0.1 127.0.0.1 127.0.0.1 127.0.0.1 127.0.0.1 127.0.0.1 127.0.0.1 127.0.0.1 127.0.0.1 127.0.0.1 127.0.0.1 127.0.0.1 127.0.0.1 127.0.0.1 127.0.0.1 127.0.0.1 #激动网127.0.0.1 127.0.0.1 127.0.0.1 #天线视频127.0.0.1 127.0.0.1 127.0.0.1 #迅雷看看屏蔽:127.0.0.1 127.0.0.1 127.0.0.1 127.0.0.1 127.0.0.1 谷歌加密:66.102.7.100 74.125.43.102 74.125.227.4 谷歌HK:74.125.71.99 74.125.71.104 74.125.71.103 74.125.71.106 74.125.71.147 。