WebService客户端代码生成方式总结
- 格式:doc
- 大小:47.50 KB
- 文档页数:4
WebService 四种发布方式总结Author:yczhang1.CXF方式CXF与spring搭建webservice是目前最流行的方式,但是传闻cxf与jdk1.5有些不兼容,我没有遇到过,我遇到的问题是cxf与was6.1.1不兼容,表现在cxf必须的jar包“wsdl4j-1.6.2.jar”报错,报的错为:ng.IncompatibleClassChangeError,明显的jar包不兼容问题,很是头痛,后来查找资料找到解决办法是,将上述jar包新建一个was共享库,可以解决,但是客户周经理不想用此种方式,因为需要修改was,于是改用了axis2方式,下文会介绍。
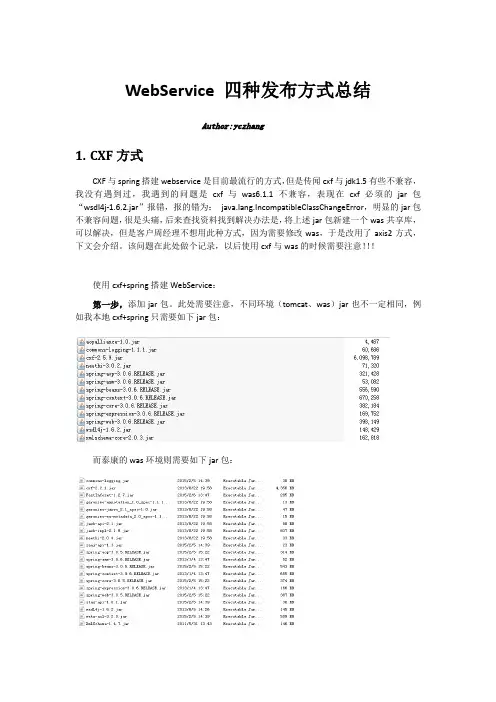
该问题在此处做个记录,以后使用cxf与was的时候需要注意!!!使用cxf+spring搭建WebService:第一步,添加jar包。
此处需要注意,不同环境(tomcat、was)jar也不一定相同,例如我本地cxf+spring只需要如下jar包:而泰康的was环境则需要如下jar包:明显的多了很多,原因应该是服务器jar包池的不同。
根据错误提示缺什么补什么就可以了,注意jar包勿重复。
第二步,配置web.xml文件,如下(重要的地方已标记):<context-param><param-name>contextConfigLocation</param-name><param-value>classpath:/applicationContext.xml</param-value> </context-param><listener><listener-class>org.springframework.web.context.ContextLoaderListener </listener-class></listener><!-- Character Encoding filter --><filter><filter-name>encodingFilter</filter-name><filter-class>org.springframework.web.filter.CharacterEncodingFil ter</filter-class><init-param><param-name>encoding</param-name><param-value>UTF-8</param-value></init-param></filter><filter-mapping><filter-name>encodingFilter</filter-name><url-pattern>/*</url-pattern></filter-mapping><servlet><servlet-name>CXFServlet</servlet-name><servlet-class>org.apache.cxf.transport.servlet.CXFServlet</servlet-c lass><load-on-startup>1</load-on-startup></servlet><servlet-mapping><servlet-name>CXFServlet</servlet-name><url-pattern>/webservice/*</url-pattern></servlet-mapping>上述标记的地方,第一处是spring配置文件路径;第二出是wsdl地址内容;第三步,编写接口类与实现类,注意注解接口类@WebServicepublic interface SendService {public boolean sendOA(@WebParam(name="param")String param);public boolean sendOrg(OrgEntity org);}实现类@WebService(endpointInterface="com.service.SendService",serviceName=" sendService")public class SendServiceImpl implements SendService{public boolean sendOA(String param) {System.out.println("-------sendOA---------param:"+param);if(param.equals("zhoujian")){return true;}return false;}public boolean sendOrg(OrgEntity org) {System.out.println("-------sendOrg--begin-------");return true;}}第四步,Spring配置文件“jaxws:client”该标签可以不必写,访问时可以手动拼接该url 第五步,发布,直接部署到服务器,访问:2.Xfire方式据说xfire方式已经很老了,但个人感觉,xfire方式很简单且容易配置,不知为啥过时了,也没感觉cxf、axis2哪里先进,我当时卡在cxf与was搞不定时想尝试xfire方式被周经理给拒绝了。
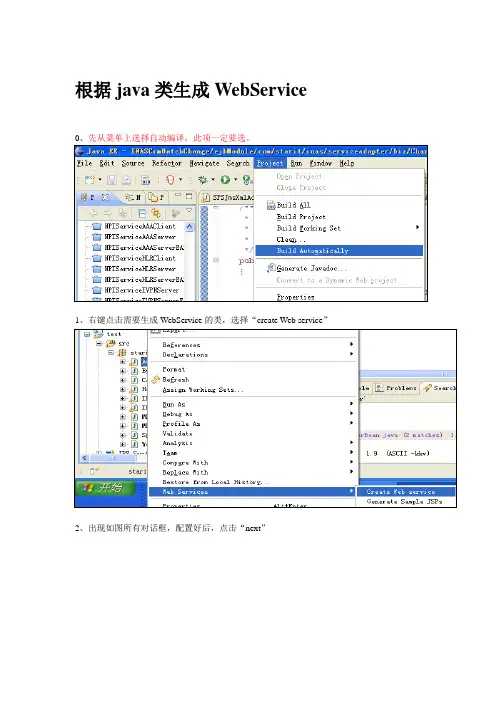
根据java类生成WebService0、先从菜单上选择自动编译,此项一定要选。
1、右键点击需要生成WebService的类,选择“create Web service”2、出现如图所有对话框,配置好后,点击“next”3、出现如下对话框勾上你想公布的WebService 接口方法,其他默认,点击下一步即可,注意要publish 该工程,否则可能无法生成server-config.wsdd ,导致后期无法部署该服务。
此处选择到“start service ”的位置 如果需要同时生成客户端,这里可以适当选择勾上这里这里配置成测试的容器注意这里的EAR 不要选错1.新建项目(Dynamic Web Project)2.填写正确的项目,一路“next”直到完成。
3.新建文件夹wsdl,把厂家提供的wsdl文件放入该文件夹下。
4.5.将文件server-config.wsdd文件copy到WebContent/WEB-INF下面6.7.8.Finsh完成后,修改增加配置文件server-config.wsdd,服务端代码增加在ISPPNPIserviceImpl.java类中,至此,服务端开发已经完成,可以打包ear部署测试。
AAA客户端新建步骤:项目名为NPIServiceAAAClient 1.新建项目(Java Project)2.3.4.新建文件夹wsdl,把厂家提供的wsdl文件放入该文件夹下。
5.6.把lib包copy到项目下,并且添加到项目:7.8.把XmlToRoot.java和RootToXml.java两个类copy放到.ispp.ispp_npi包下。
将Msg_head.java和ResponseSubClass.java中的成员变量设置成public,注意:private ng.String name; // attribute这些属性不要改,保持private。
至此,客户端开发已经完成,可以打包jar测试注意事项:(安徽测试ivpn发现的问题)1.wsdl文件应该取独立的wsdl,不取接口文档里面的,生成客户端代码的时候先修改命名空间为/ivpn/而不是默认的/ispp_npi/2、命令配置:(增加集团)注意节点<?xml version="1.0" encoding="GB2312"?><Interface_msg><Directive><ServiceClass Name="CSService"><ServiceSubClass Name="CSVpnGroupService"><Method Name="CreateVPN"><VPNNUM>9999</VPNNUM><VPNNAME>99</VPNNAME><VPNTYPE>99</VPNTYPE><SERVICESTART>99</SERVICESTART><SERVICESTOP>99</SERVICESTOP><HALL>99</HALL><FEEGROUP>99</FEEGROUP><VPNKIND>99</VPNKIND></Method></ServiceSubClass></ServiceClass></Directive></Interface_msg>3、注意命名空间/ivpn/不是4、乱码问题没解决5、xmltoroot类中elemList = new ArrayList<Leaf>();不能定义为static,否则就会每次发送的xml是一样的Ppc ews_id=23531。
一、介绍Web服务(WebService)指的是一种基于网络的标准化协议,用于在不同应用程序之间进行通信和交换数据。
在现代的软件开发中,Web服务已经成为了一种非常重要的技术。
而Web服务的实现方式多种多样,下面我们将介绍一些常见的Web服务实现方式。
二、SOAPSOAP(Simple Object Access Protocol)是一种基于XML的通信协议,它允许不同的应用程序在网络上进行数据交换。
SOAP通常基于HTTP协议进行通信,使用XML格式来打包和传输数据。
要使用SOAP来实现Web服务,需要定义消息的格式、接口的定义和基于WSDL的描述文件。
SOAP在传输数据时使用了XML格式,因此相对于其他方式,它的数据传输效率可能会略低。
三、RESTfulRESTful是一种基于资源的Web服务架构风格,它假定Web应用程序的基本操作包括对资源的读取、创建、更新和删除。
与SOAP不同,RESTful服务使用标准的HTTP方法来操作资源,比如GET、POST、PUT和DELETE。
它通常使用JSON或XML格式来传输数据。
相比于SOAP,RESTful更加简洁、灵活,而且性能更好。
因此在Web开发中越来越多地采用RESTful作为Web服务的实现方式。
四、JSON-RPCJSON-RPC是一种基于JSON格式的轻量级远程过程调用协议。
与SOAP类似,JSON-RPC也是一种用于在不同应用程序之间进行通信的协议。
JSON-RPC的消息格式非常简洁,通常只包括方法名、参数和返回值,因此在Web服务的实现中往往更加高效。
五、gRPCgRPC是由谷歌开发的一种高性能、开源的远程过程调用框架。
它支持多种编程语言,并且基于HTTP/2协议进行通信。
gRPC的消息格式可以使Protocol Buffers,它相比于XML和JSON格式更加高效。
gRPC支持双向流式传输,使得它在某些场景下性能表现更加优越。
六、总结在实际的软件开发中,我们可以根据具体的需求和场景选择合适的Web服务实现方式。

Java WebService 接口实现方式什么是 WebServiceWebService 是一种基于 Web 的服务通信协议,通过使用标准的 HTTP 协议传输数据,使得不同平台、不同语言的应用程序能够进行互操作。
它使用 XML 格式来描述请求和响应的数据,并使用 SOAP(简单对象访问协议)来封装和传输这些数据。
WebService 可以提供各种功能,例如数据查询、数据传输、远程过程调用等。
它是一种跨平台、跨语言的解决方案,能够实现不同系统之间的集成和通信。
Java WebService 实现方式Java 提供了多种方式来实现 WebService 接口,下面介绍两种常用的实现方式。
JAX-WSJAX-WS(Java API for XML Web Services)是 Java EE 的一部分,用于开发和部署 WebService。
它提供了一种简单的方式来创建和发布 WebService 接口。
创建接口首先,我们需要定义一个接口,用于描述我们要提供的服务。
接口中的每个方法都将成为可远程调用的操作。
import javax.jws.WebMethod;import javax.jws.WebService;@WebServicepublic interface MyWebService {@WebMethodString sayHello(String name);}在上面的例子中,我们定义了一个名为MyWebService的接口,其中有一个名为sayHello的方法,该方法接受一个字符串参数并返回一个字符串结果。
实现接口接下来,我们需要实现上述接口。
这里我们可以使用一个普通的 Java 类来实现接口中的方法。
@WebService(endpointInterface = "com.example.MyWebService")public class MyWebServiceImpl implements MyWebService {@Overridepublic String sayHello(String name) {return "Hello, " + name + "!";}}在上面的例子中,我们创建了一个名为MyWebServiceImpl的类,并实现了MyWebService接口中的sayHello方法。
webservice接口实现方式WebService接口实现方式Web服务(WebService)是一种基于Web的应用程序接口,允许不同应用程序通过网络相互通信。
WebService接口实现方式有多种,本文将介绍其中的几种常见方式。
1. SOAP(Simple Object Access Protocol)SOAP是一种基于XML的通信协议,用于在Web服务之间进行信息交换。
它使用HTTP作为传输协议,并使用XML格式对数据进行编码。
实现一个SOAP接口需要定义Web服务的方法、参数和返回值,并使用SOAP协议进行通信。
SOAP接口实现方式比较复杂,但具有较好的互操作性。
2. REST(Representational State Transfer)REST是一种轻量级的架构风格,用于设计分布式系统。
它使用HTTP作为传输协议,并使用URL来表示资源,通过HTTP方法(如GET、POST、PUT、DELETE)对资源进行操作。
实现一个REST接口只需要定义资源的URL和对应的HTTP方法即可,非常简单和灵活。
3. JSON-RPC(JSON Remote Procedure Call)JSON-RPC是一种基于JSON(JavaScript Object Notation)的远程过程调用协议。
它使用HTTP作为传输协议,并使用JSON格式对数据进行编码。
实现一个JSON-RPC接口需要定义Web服务的方法、参数和返回值,并使用HTTP POST请求进行调用。
JSON-RPC接口实现方式简单快捷,适用于前后端分离的应用。
4. XML-RPC(XML Remote Procedure Call)XML-RPC是一种基于XML的远程过程调用协议。
它使用HTTP作为传输协议,并使用XML格式对数据进行编码。
实现一个XML-RPC接口需要定义Web服务的方法、参数和返回值,并使用HTTP POST请求进行调用。
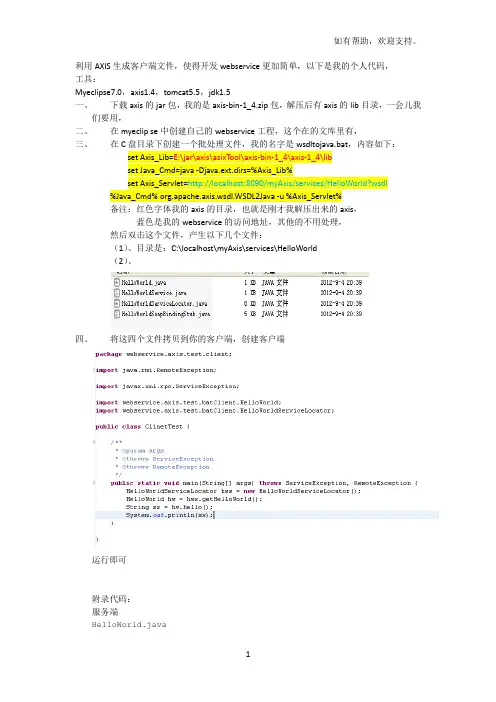
利用AXIS生成客户端文件,使得开发webservice更加简单,以下是我的个人代码,工具:Myeclipse7.0,axis1.4,tomcat5.5,jdk1.5一、下载axis的jar包,我的是axis-bin-1_4.zip包,解压后有axis的lib目录,一会儿我们要用,二、在myeclip se中创建自己的webservice工程,这个在的文库里有,三、在C盘目录下创建一个批处理文件,我的名字是wsdltojava.bat,内容如下:set Axis_Lib=E:\jar\axis\asixTool\axis-bin-1_4\axis-1_4\libset Java_Cmd=java -Djava.ext.dirs=%Axis_Lib%set Axis_Servlet=http://localhost:8090/myAxis/services/HelloWorld?wsdl %Java_Cmd% org.apache.axis.wsdl.WSDL2Java -u %Axis_Servlet%备注:红色字体我的axis的目录,也就是刚才我解压出来的axis,蓝色是我的webservice的访问地址,其他的不用处理,然后双击这个文件,产生以下几个文件:(1)、目录是:C:\localhost\myAxis\services\HelloWorld(2)、四、将这四个文件拷贝到你的客户端,创建客户端运行即可附录代码:服务端HelloWorld.javapackage webservice.axis.test;public class HelloWorld {public String hello(){return"Hello "+"aaaaaaaaaaaaaaaaaa";}}客户端(通过刚才命令生成的四个文件)HelloWorld.java/*** HelloWorld.java** This file was auto-generated from WSDL* by the Apache Axis 1.4 Apr 22, 2006 (06:55:48 PDT) WSDL2Java emitter.*/package webservice.axis.test.batClient;public interface HelloWorld extends java.rmi.Remote {public ng.String hello() throws java.rmi.RemoteException;}HelloWorldService.java/*** HelloWorldService.java** This file was auto-generated from WSDL* by the Apache Axis 1.4 Apr 22, 2006 (06:55:48 PDT) WSDL2Java emitter.*/package webservice.axis.test.batClient;public interface HelloWorldService extends javax.xml.rpc.Service {public ng.String getHelloWorldAddress();public webservice.axis.test.batClient.HelloWorld getHelloWorld() throwsjavax.xml.rpc.ServiceException;public webservice.axis.test.batClient.HelloWorld getHelloWorld(.URL portAddress) throws javax.xml.rpc.ServiceException;}HelloWorldServiceLocator.java/*** HelloWorldServiceLocator.java** This file was auto-generated from WSDL* by the Apache Axis 1.4 Apr 22, 2006 (06:55:48 PDT) WSDL2Java emitter.*/package webservice.axis.test.batClient;public class HelloWorldServiceLocator extends org.apache.axis.client.Service implements webservice.axis.test.batClient.HelloWorldService {public HelloWorldServiceLocator() {}public HelloWorldServiceLocator(org.apache.axis.EngineConfiguration config) { super(config);}public HelloWorldServiceLocator(ng.String wsdlLoc, space.QName sName) throws javax.xml.rpc.ServiceException {super(wsdlLoc, sName);}// Use to get a proxy class for HelloWorldprivate ng.String HelloWorld_address = "http://localhost:8090/myAxis/services/HelloWorld";public ng.String getHelloWorldAddress() {return HelloWorld_address;}// The WSDD service name defaults to the port name.private ng.String HelloWorldWSDDServiceName = "HelloWorld";public ng.String getHelloWorldWSDDServiceName() {return HelloWorldWSDDServiceName;}public void setHelloWorldWSDDServiceName(ng.String name) {HelloWorldWSDDServiceName = name;}public webservice.axis.test.batClient.HelloWorld getHelloWorld() throws javax.xml.rpc.ServiceException {.URL endpoint;try {endpoint = new .URL(HelloWorld_address);}catch (.MalformedURLException e) {throw new javax.xml.rpc.ServiceException(e);}return getHelloWorld(endpoint);}public webservice.axis.test.batClient.HelloWorld getHelloWorld(.URL portAddress) throws javax.xml.rpc.ServiceException {try {webservice.axis.test.batClient.HelloWorldSoapBindingStub _stub = new webservice.axis.test.batClient.HelloWorldSoapBindingStub(portAddress, this);_stub.setPortName(getHelloWorldWSDDServiceName());return _stub;}catch (org.apache.axis.AxisFault e) {return null;}}public void setHelloWorldEndpointAddress(ng.String address) {HelloWorld_address = address;}/*** For the given interface, get the stub implementation.* If this service has no port for the given interface,* then ServiceException is thrown.*/public java.rmi.Remote getPort(Class serviceEndpointInterface) throws javax.xml.rpc.ServiceException {try {if(webservice.axis.test.batClient.HelloWorld.class.isAssignableFrom(serviceEndpointInterface)) { webservice.axis.test.batClient.HelloWorldSoapBindingStub _stub = new webservice.axis.test.batClient.HelloWorldSoapBindingStub(new.URL(HelloWorld_address), this);_stub.setPortName(getHelloWorldWSDDServiceName());return _stub;}}catch (ng.Throwable t) {throw new javax.xml.rpc.ServiceException(t);}throw new javax.xml.rpc.ServiceException("There is no stub implementation for the interface: " + (serviceEndpointInterface == null ? "null" : serviceEndpointInterface.getName()));}/*** For the given interface, get the stub implementation.* If this service has no port for the given interface,* then ServiceException is thrown.*/public java.rmi.Remote getPort(space.QName portName, Class serviceEndpointInterface) throws javax.xml.rpc.ServiceException {if (portName == null) {return getPort(serviceEndpointInterface);}ng.String inputPortName = portName.getLocalPart();if ("HelloWorld".equals(inputPortName)) {return getHelloWorld();}else {java.rmi.Remote _stub = getPort(serviceEndpointInterface);((org.apache.axis.client.Stub) _stub).setPortName(portName);return _stub;}}public space.QName getServiceName() {return new space.QName("http://localhost:8090/myAxis/services/HelloWorld", "HelloWorldService");}private java.util.HashSet ports = null;public java.util.Iterator getPorts() {if (ports == null) {ports = new java.util.HashSet();ports.add(newspace.QName("http://localhost:8090/myAxis/services/HelloWorld", "HelloWorld"));}return ports.iterator();}/*** Set the endpoint address for the specified port name.*/public void setEndpointAddress(ng.String portName, ng.String address) throws javax.xml.rpc.ServiceException {if ("HelloWorld".equals(portName)) {setHelloWorldEndpointAddress(address);}else{ // Unknown Port Namethrow new javax.xml.rpc.ServiceException(" Cannot set Endpoint Address for Unknown Port" + portName);}}/*** Set the endpoint address for the specified port name.*/public void setEndpointAddress(space.QName portName, ng.String address) throws javax.xml.rpc.ServiceException {setEndpointAddress(portName.getLocalPart(), address);}}HelloWorldSoapBindingStub.java/*** HelloWorldSoapBindingStub.java** This file was auto-generated from WSDL* by the Apache Axis 1.4 Apr 22, 2006 (06:55:48 PDT) WSDL2Java emitter.*/package webservice.axis.test.batClient;public class HelloWorldSoapBindingStub extends org.apache.axis.client.Stub implements webservice.axis.test.batClient.HelloWorld {private java.util.Vector cachedSerClasses = new java.util.Vector();private java.util.Vector cachedSerQNames = new java.util.Vector();private java.util.Vector cachedSerFactories = new java.util.Vector();private java.util.Vector cachedDeserFactories = new java.util.Vector();static org.apache.axis.description.OperationDesc [] _operations;static {_operations = new org.apache.axis.description.OperationDesc[1];_initOperationDesc1();}private static void _initOperationDesc1(){org.apache.axis.description.OperationDesc oper;org.apache.axis.description.ParameterDesc param;oper = new org.apache.axis.description.OperationDesc();oper.setName("hello");oper.setReturnType(newspace.QName("/2001/XMLSchema", "string"));oper.setReturnClass(ng.String.class);oper.setReturnQName(new space.QName("", "helloReturn"));oper.setStyle(org.apache.axis.constants.Style.RPC);oper.setUse(e.ENCODED);_operations[0] = oper;}public HelloWorldSoapBindingStub() throws org.apache.axis.AxisFault {this(null);}public HelloWorldSoapBindingStub(.URL endpointURL, javax.xml.rpc.Service service)throws org.apache.axis.AxisFault {this(service);super.cachedEndpoint = endpointURL;}public HelloWorldSoapBindingStub(javax.xml.rpc.Service service) throws org.apache.axis.AxisFault {if (service == null) {super.service = new org.apache.axis.client.Service();} else {super.service = service;}((org.apache.axis.client.Service)super.service).setTypeMappingVersion("1.2");}protected org.apache.axis.client.Call createCall() throws java.rmi.RemoteException { try {org.apache.axis.client.Call _call = super._createCall();if (super.maintainSessionSet) {_call.setMaintainSession(super.maintainSession);}if (super.cachedUsername != null) {_call.setUsername(super.cachedUsername);}if (super.cachedPassword != null) {_call.setPassword(super.cachedPassword);}if (super.cachedEndpoint != null) {_call.setTargetEndpointAddress(super.cachedEndpoint);}if (super.cachedTimeout != null) {_call.setTimeout(super.cachedTimeout);}if (super.cachedPortName != null) {_call.setPortName(super.cachedPortName);}java.util.Enumeration keys = super.cachedProperties.keys();while (keys.hasMoreElements()) {ng.String key = (ng.String) keys.nextElement();_call.setProperty(key, super.cachedProperties.get(key));}return _call;}catch (ng.Throwable _t) {throw new org.apache.axis.AxisFault("Failure trying to get the Call object", _t);}}public ng.String hello() throws java.rmi.RemoteException {if (super.cachedEndpoint == null) {throw new org.apache.axis.NoEndPointException();}org.apache.axis.client.Call _call = createCall();_call.setOperation(_operations[0]);_call.setUseSOAPAction(true);_call.setSOAPActionURI("");_call.setSOAPVersion(org.apache.axis.soap.SOAPConstants.SOAP11_CONSTANTS);_call.setOperationName(newspace.QName("http://test.axis.webservice", "hello"));setRequestHeaders(_call);setAttachments(_call);try { ng.Object _resp = _call.invoke(new ng.Object[] {});if (_resp instanceof java.rmi.RemoteException) {throw (java.rmi.RemoteException)_resp;}else {extractAttachments(_call);try {return (ng.String) _resp;} catch (ng.Exception _exception) {return (ng.String) org.apache.axis.utils.JavaUtils.convert(_resp, ng.String.class);}}} catch (org.apache.axis.AxisFault axisFaultException) {throw axisFaultException;}}}最后要感谢网上资源。
WebService实例代码详解在信息化社会中,数据的交互和共享已经成为企业间合作的重要手段。
而WebService就是一种实现跨平台、跨语言的数据交换的技术。
本文将通过一个简单的WebService实例代码,深入浅出地解析其工作原理和使用方法。
一、WebService简介WebService是一种基于HTTP协议,使用XML进行信息传递,并能通过WSDL描述其接口的一种Web应用程序。
它使得运行在不同操作系统、不同编程语言环境中的应用系统可以相互交换数据,实现业务逻辑的重用。
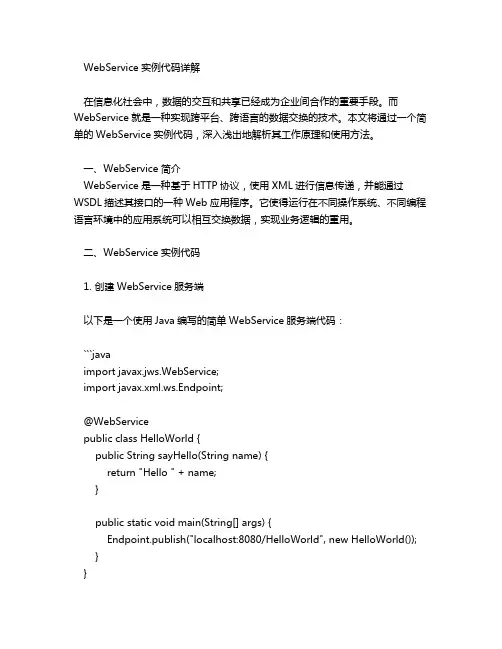
二、WebService实例代码1. 创建WebService服务端以下是一个使用Java编写的简单WebService服务端代码:```javaimport javax.jws.WebService;import javax.xml.ws.Endpoint;@WebServicepublic class HelloWorld {public String sayHello(String name) {return "Hello " + name;}public static void main(String[] args) {Endpoint.publish("localhost:8080/HelloWorld", new HelloWorld()); }}```在这个例子中,我们首先定义了一个名为HelloWorld的类,并用@WebService注解标记为一个WebService服务。
然后,我们在该类中定义了一个sayHello方法,该方法接受一个字符串参数,并返回一个包含"Hello "和参数值的消息。
最后,我们在main方法中启动了WebService服务,指定的服务地址是"localhost:8080/HelloWorld",并且传入了新的HelloWorld实例。
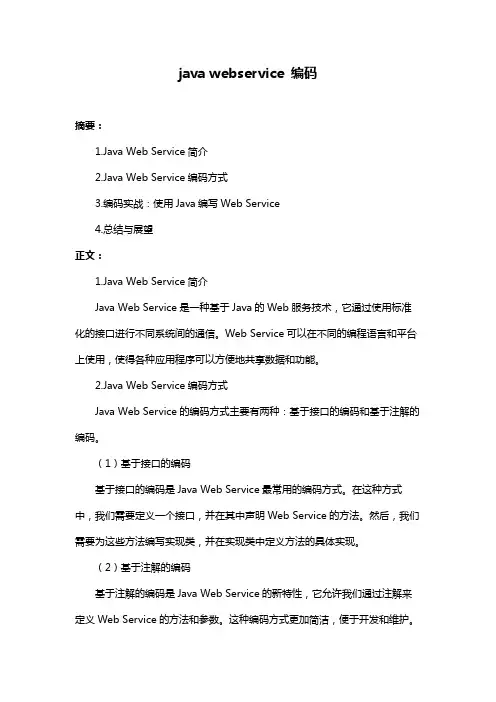
java webservice 编码摘要:1.Java Web Service简介2.Java Web Service编码方式3.编码实战:使用Java编写Web Service4.总结与展望正文:1.Java Web Service简介Java Web Service是一种基于Java的Web服务技术,它通过使用标准化的接口进行不同系统间的通信。
Web Service可以在不同的编程语言和平台上使用,使得各种应用程序可以方便地共享数据和功能。
2.Java Web Service编码方式Java Web Service的编码方式主要有两种:基于接口的编码和基于注解的编码。
(1)基于接口的编码基于接口的编码是Java Web Service最常用的编码方式。
在这种方式中,我们需要定义一个接口,并在其中声明Web Service的方法。
然后,我们需要为这些方法编写实现类,并在实现类中定义方法的具体实现。
(2)基于注解的编码基于注解的编码是Java Web Service的新特性,它允许我们通过注解来定义Web Service的方法和参数。
这种编码方式更加简洁,便于开发和维护。
3.编码实战:使用Java编写Web Service(1)基于接口的编码实战```java// 定义接口public interface HelloService {public String sayHello(String name);}// 接口实现类public class HelloServiceImpl implements HelloService { @Overridepublic String sayHello(String name) {return "Hello, " + name + "!";}}```(2)基于注解的编码实战```java// 定义Web Service@WebServicepublic class HelloServiceImpl {@WebMethodpublic String sayHello(@WebParam(name = "name") Stringname) {return "Hello, " + name + "!";}}```4.总结与展望Java Web Service是一种跨平台、跨语言的通信技术,它可以帮助我们实现不同系统间的数据交换和功能调用。
一、Webservice可以使用的框架很多。
AXIS、CXF 、JAX、XFIRE,这些框架都可以根据wsdl文件生成ws的服务器和客户端代码。
二、Ws的调用方式有三种,http post、http get、soap post。
本人建议使用http post,他访问远程ws接口的速度比使用soap post要快些。
象使用axis框架实现soap post方式来说,简单的接口还好,对于使用了大量代理类及带有soaphead的ws,且还要在本地生成一大堆JAVA类来和服务端对应。
特别如下这种情况,axis好像无法实现。
Soaphead如下<soapHead><appId>0039434454</appId><pwd>67677</pwd></soapHead>象这种只能根据org.apache.axis.client.Call.addHead(ElementSoapHead)来增加报头。
但这个报头没有根元素,无法创建一个这种Element。
下面就如何书写客户端代码详细讲解下。
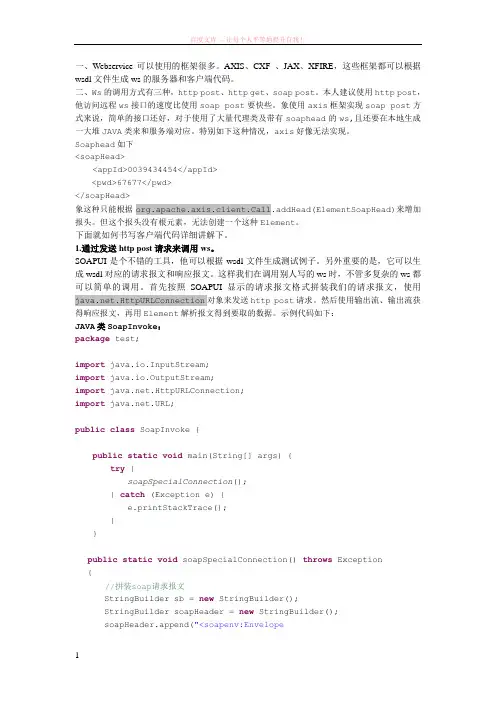
1.通过发送http post请求来调用ws。
SOAPUI是个不错的工具,他可以根据wsdl文件生成测试例子。
另外重要的是,它可以生成wsdl对应的请求报文和响应报文。
这样我们在调用别人写的ws时,不管多复杂的ws都可以简单的调用。
首先按照SOAPUI显示的请求报文格式拼装我们的请求报文,使用.HttpURLConnection对象来发送http post请求。
然后使用输出流、输出流获得响应报文,再用Element解析报文得到要取的数据。
示例代码如下:JAVA类SoapInvoke:package test;import java.io.InputStream;import java.io.OutputStream;import .HttpURLConnection;import .URL;public class SoapInvoke {public static void main(String[] args) {try {soapSpecialConnection();} catch (Exception e) {e.printStackTrace();}}public static void soapSpecialConnection() throws Exception{//拼装soap请求报文StringBuilder sb = new StringBuilder();StringBuilder soapHeader = new StringBuilder();soapHeader.append("<soapenv:Envelopexmlns:soapenv=\"/soap/envelope/\"xmlns:test=\"http://test/\">");soapHeader.append("<soapenv:Header>");soapHeader.append("<spId>zhouyun</spId>");soapHeader.append("<spPassword>123</spPassword>");soapHeader.append("</soapenv:Header>");soapHeader.append("<soapenv:Body>");soapHeader.append("<test:sayHelloMiss>");soapHeader.append("<arg0>");soapHeader.append("<name>zhouyun</name>");soapHeader.append("</arg0>");soapHeader.append("</test:sayHelloMiss>");soapHeader.append("</soapenv:Body>");soapHeader.append("</soapenv:Envelope>");//设置soap请求报文的相关属性String url="http://localhost:8080/CXFServer/SayHelloService";URL u = new URL(url);HttpURLConnection conn = (HttpURLConnection) u.openConnection(); conn.setDoInput(true);conn.setDoOutput(true);conn.setUseCaches(false);conn.setDefaultUseCaches(false);conn.setRequestProperty("Host", "localhost:8080");conn.setRequestProperty("Content-Type", "text/xml;charset=utf-8");conn.setRequestProperty("Content-Length",String.valueOf(soapHeader.length()));conn.setRequestProperty("SOAPAction", "");conn.setRequestMethod("POST");//定义输出流OutputStream output = conn.getOutputStream();if (null != soapHeader) {byte[] b = soapHeader.toString().getBytes("utf-8");//发送soap请求报文output.write(b, 0, b.length);}output.flush();output.close();//定义输入流,获取soap响应报文InputStream input = conn.getInputStream();int c = -1;//sb为返回的soap响应报文字符串while (-1 != (c = input.read())) {sb.append((char)c);}input.close();}}2.通过axis来调用ws。
jax-ws,jax-rs规范的webservice客户端调⽤⽅式及soap安全验证Java调⽤webservice⽅式的总结柿⼦当然要拿软的捏,笔者先讲基于http协议的jax-rs规范的webservice的调⽤⽅式。
客户端调⽤WebService的⽅式:1.通过wximport⽣成代码2.通过客户端编程⽅式(同第⼀种是⼀样都是本地调⽤)3.通过ajax调⽤⽅式(可能存在跨域jax-rs)4.通过URL Connection ⽅式调⽤5.通过HttpClient⽅式调⽤6.xfire框架下⽣成的客户端(不⽤)1.wximport根据wsdl⽂档⽣成客户端代码,再调⽤在eclipse中,根据操作⽣成客户端代码,Eg:调⽤helloWS⽅法即可2.客户单编程⽅式(和第⼀种⽅式⼀样)先⽣成客户端代码后,调⽤以下是经测试后的实例:URL url = new URL("http://localhost:88/webServiceWS/wsWSPort?wsdl");QName sname = new QName("http://ws.webservice.suan/", "wsWSService");Service service = Service.create(url,sname);WsWSDelegate ms = service.getPort(WsWSDelegate.class);System.out.println(ms.helloWS("suansuan"));} catch (MalformedURLException e) {e.printStackTrace();第⼆种⽅式中,还可以直接创建了SOAP消息后使⽤dispatch便可以进⾏传递,通过extractConentAsDocument⽅法得到Document类型的返回值参考⽹页:/doc/e1f26763763231126edb11a2.html /wanghuan203/article/details/92195653.使⽤ajax+xml+js的⽅式调⽤具体使⽤⽅法,参考整理的ajax跨域⽂档4.URL Connection⽅式//服务的地址//服务的地址URL wsUrl = new URL("http://localhost:88/webServiceWS/wsWSPort");HttpURLConnection conn = (HttpURLConnection) wsUrl.openConnection();conn.setDoInput(true);conn.setDoOutput(true);conn.setRequestMethod("POST");conn.setRequestProperty("Content-Type", "text/xml;charset=UTF-8");OutputStream os = conn.getOutputStream();//创建SOAPMessageSOAPMessage msg=MessageFactory.newInstance().createMessage(); SOAPEnvelope envelope =msg.getSOAPPart().getEnvelope();SOAPBody body=envelope.getBody();//创建QName来指定消息中传递数据QName ename=new QName("http://ws.webservice.suan/","HelloWS","wsWSService");//SOAPBodyElement ele=body.addBodyElement(ename);ele.addChildElement("arg0").setValue("suansuan");String soap1=soap.toSoapString(msg);os.write(soap1.getBytes());InputStream is = conn.getInputStream();byte[] b = new byte[1024];int len = 0;String s = "";while((len = is.read(b)) != -1){String ss = new String(b,0,len,"UTF-8");s += ss;}System.out.println(s);is.close();os.close();conn.disconnect();5.httpclient⽅式需要commons-codec-1.3.jar,commons-logging-1.0.4.jar,commons-httpclient-3.1.jar//定义⼀个PostMethod,这时需要指定web服务的Url//soapRequestData是传递的soap协议的信息,可以通过soap建⽴,也可以直接String PostMethod postMethod =new PostMethod("http://localhost:88/webServiceWS/wsWSPort");byte[] b = soapRequestData.getBytes("utf-8");InputStream is =new ByteArrayInputStream(b,0,b.length);//RequestEntity re = new InputStreamRequestEntity(is,b.length,"application/soap+xml; charset=utf-8");//不能设置后⾯的内容,设置了报415错误RequestEntity re =new InputStreamRequestEntity(is,b.length);postMethod.setRequestEntity(re);HttpClient httpClient =new HttpClient();int statusCode = httpClient.executeMethod(postMethod);//请求状态200 okString result =postMethod.getResponseBodyAsString();//返回的字符串形式的soap,进⼀步解析System.out.println(statusCode);System.out.println(result.toString());6.xfire框架下⽣成的客户端也是通过wsdl⽣成客户端程序后调⽤,⾄于soap header的验证,使⽤map加⼊验证信息后验证具体的操作,在我⼯作⽂档中,有⼀个短信平台接⼝⽂档有详细的xfire的使⽤过程,通⽤性不错注意,以上关于soap信息,我是根据⽣成的本地调⽤类的注释,编写soap信息,此外可以直接使⽤String类型的字符串,只要你熟悉soap的格式,就可以⼿动编写传递的soap消息。
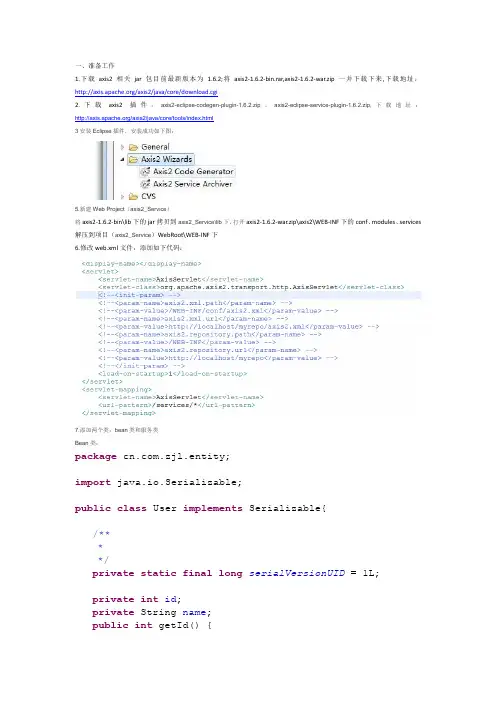
一、准备工作1.下载axis2相关jar包目前最新版本为 1.6.2;将axis2-1.6.2-bin.rar,axis2-1.6.2-war.zip一并下载下来,下载地址:/axis2/java/core/download.cgi2.下载axis2插件:axis2-eclipse-codegen-plugin-1.6.2.zip、axis2-eclipse-serv ice-plugin-1.6.2.zip,下载地址:/axis2/jav a/core/tools/index.html3安装Eclipse插件,安装成功如下图:5.新建Web Project(axis2_Serv ice)将axis2-1.6.2-bin\lib下的jar拷贝到axis2_Serv ice\lib下,打开axis2-1.6.2-war.zip\axis2\WEB-INF下的conf、modules、services 解压到项目(axis2_Serv ice)WebRoot\WEB-INF下6.修改web.xml文件,添加如下代码:7.添加两个类:bean类和服务类Bean类:package .zjl.entity;import java.io.Serializable;public class User implements Serializable{/****/private static final long serialVersionUID = 1L;private int id;private String name;public int getId() {return id;}public void setId(int id) {this.id = id;}public String getName() {return name;}public void setName(String name) { = name;}}要发布的服务类:package .zjl.service;import er;public class UserService {public User getUser(User user) {System.out.println("service:"+user.getId());System.out.println("service:"+user.getName());User po2 = new User();po2.setId(1);po2.setName("zjl");return po2;}}8.Axis2插件工具生成aar文件,发布WebService在项目上右击->new->other选择Axis2 Serv ice Archiv er,点击nextClass File Location选择工程路径下的classes文件,点击Next勾选Skip WSDL项,点击next这里没有jar文件,所以默认,点击Next勾选Generate the serv ice xml automatically项,点击NextServ ice Name 随便写记住就行,Class name包名点类名称点击Load会出现这个类下的所有方法名称,点击NextOutput location选择输出文件位置(具体位置根据具体而定),点击Finsh说明成功。
CXF使⽤教程(⼆)——webService⾃动⽣成客户端代码webService⾃动⽣成客户端代码有四种⽅法:⼀:使⽤Axis⽣产客户端代码(另存为bat⽂件)需要注意的是:⽬录包含空格,⽐如Axis_Lib,Output_Pathset Axis_Lib=F:\axis1.4\axis\WEB-INF\libset Java_Cmd=java -Djava.ext.dirs=%Axis_Lib%set Output_Path=D:\Workspacesset Package=com.axis.sub%Java_Cmd% org.apache.axis.wsdl.WSDL2Java -o%Output_Path% -p%Package% http://192.168.11.62:8090/rainLogin?wsdl pause⼆:使⽤JDK1.6的wsimport.exe(在jdk的bin⽬录下)产⽣客户端代码(之前要将JDK的bin添加到环境变量Path中)wsimport -keep -p com.jdk6.sub -s JavaSrc http://192.168.11.62:8090/rainLogin?wsdl1. -s(src):在当前路径下的JavaSrc(要⼿动创建)⽂件夹中⽣成客户端代码2. -p(package):定义客户端代码的包名3. -keep 保留.class⽂件三:使⽤CXF wsdl2java.bat (要先将CXF的bin⽬录添加到环境变量Path下)在cmd本项⽬SCR⽬录下运⾏下⾯代码,就会在src下⽣成客户端代码wsdl2java http://192.168.11.62:8080/FFWebservice/services/PortalServices?wsdl四:使⽤Myeclipse⾃带⼯具⽣成客户端代码finnish 就可以⽣成客户端代码了。
个⼈⼀般⽐较喜欢⽤第⼆种⽅法。
WebService客户端开发手册1 概述本文描述Web Service接口客户端的开发流程。
2 开发环境需求2.1服务器端软件环境3 开发流程3.1生成客户端代码1.用Eclipse自动生成webservices客户端的插件,根据所提供的wsdl文件生成客户端代码。
打开MyEclipse选择File->New->Other-Web Services下的Web Service Client,如下图:2.进入下一界面,输入wsdl文件地址(测试用的地址http://10.110.0.202:8800/hljwebservice/services/SynchronizeOrganizationService?wsdl):3.选择一个Client Project(需为web project),4.点击下一步:5.点击完成后,在src下生成五个客户端文件SynchronizeOrganizationService.java SynchronizeOrganizationServiceHttpBindingStub.java SynchronizeOrganizationServiceLocator.java SynchronizeOrganizationServicePortType.java SynchronizeOrganizationServicePortTypeProxy.java3.2编写客户端调用自己编写客户端调用程序,例子如下:import .MalformedURLException;import java.rmi.RemoteException;import java.util.ArrayList;import javax.xml.rpc.ServiceException;importorg.codehaus.xfire.SynchronizeOrganizationService.SynchronizeOrganiza tionServiceLocator;importorg.codehaus.xfire.SynchronizeOrganizationService.SynchronizeOrganiza tionServicePortType;public class Client {/***这个方法调用web服务并返回服务执行的结果*@param*@return*@throws ServiceException*@throws RemoteException*@throws MalformedURLException*/public static String callServer() throws ServiceException, RemoteException, MalformedURLException{SynchronizeOrganizationServiceLocator service = new SynchronizeOrganizationServiceLocator();SynchronizeOrganizationServicePortTypeport=service.getSynchronizeOrganizationServiceHttpPort();String[][] inputParas= new String[2][2];inputParas[0][0] = "aaa";inputParas[0][1] = "bbb";inputParas[1][0] = "ccc";inputParas[1][1] = "ddd";String aa = port.modifyOrgaAuthService(inputParas);System.out.println("aa======"+aa);return aa;}/***//***@param args*@throws ServiceException*@throws RemoteException*@throws MalformedURLException*/public static void main(String[] args) throws RemoteException, ServiceException, MalformedURLException {// TODO Auto-generated method stubClient call = new Client();System.out.println(call.callServer());}}。
详解java开发webservice的⼏种⽅式webservice的应⽤已经越来越⼴泛了,下⾯介绍⼏种在Java体系中开发webservice的⽅式,相当于做个记录。
1.Axis2Axis是apache下⼀个开源的webservice开发组件,出现的算是⽐较早了,也⽐较成熟。
这⾥主要介绍Axis+eclipse开发webservice,当然不⽤eclipse也可以开发和发布webservice,只是⽤eclipse会⽐较⽅便。
(3)下载eclipse的axis2插件(4)eclipse安装axis2插件1)在任意⽬录下新建⼀个Axis2⽂件夹,在该⽂件夹下新建eclipse⽬录,在eclipse⽬录中新建plugins⽬录和features⽬录,例如:D:\programSoftware\eclipse-SVN\Axis2\eclipse;2)把下载的axis2插件解压,并把解压的⽂件放到新建的eclipse的plugins⽬录下;3)在%eclipse_home%的⽬录下新建links⽬录,并在links⽬录下新建axis2.link⽂件,内容为:path=D:\programSoftware\eclipse-SVN\Axis2;4)重启eclipse,点击·file-new-other,如果看到Axis2 Wizards,则表明插件安装成功。
(5)安装axis2(6)使⽤eclipse新建web⼯程,创建⼀个普通java类,⾄少包含⼀个⽅法。
(7)发布webservice1)点击eclipse的File-New-other,打开Axis2 Wizards,选择Axis2 Service Archiver,然后Next;2)选择Class File Location,也就是类⽂件存放路径,注意:只选到classes⽬录,不要包括包⽂件夹,然后Next;3)选择Skip WSDL,然后Next4)⼀路Next到Select the Service XML file to be included in the Service archive,勾选Generate theservice xml automatically;5)Service Name-填写你的service名称,Class Name-填写类名称,要包括包名,然后点击load,然后点击Finish,这时webservice就发布成功了;6)然后到%TOMCAT_HOME%/webapps/axis2/WEB-INF/services 看看是否多了⼀个.aar的⽂件;2.Apche CXFCXF开发webservice也是⽐较⽅便和简单的,它和spring的集成可以说是⾮常地好。
Java的WebService用法介绍W e bS er vi ce是一种基于We b标准的服务通信协议,可以在分布式系统中实现跨平台、跨语言的通信。
使用Ja v a语言开发W eb Ser v ic e具有简单易用、可靠性高的特点。
本文将介绍J av a的We bS er vi c e用法。
什么是WebS erviceW e bS er vi ce是一种基于XM L的协议,用于不同系统之间的通信。
它使用标准的H TT P协议传输X ML数据,可以在不同操作系统、编程语言、硬件设备之间互相通信。
Jav a的We bServic e实现方式在J av a中,有多种方式来实现W eb Se rv i ce,常用的有S OA P和R E ST fu l两种方式。
1.S O A PS O AP(S im pl eO bj ec t Ac ce ss Pr ot oc ol)是一种基于XM L的通信协议,它使用H TT P协议进行数据传输。
SO A P是一种严格的规范,定义了消息的格式以及如何发送和接收消息。
开发人员可以使用J ava的AP I来创建SO AP客户端和服务端。
使用Ja va实现SO AP的We bS er vi ce,需要以下步骤:1.定义服务接口:使用Ja va的接口定义需要提供的服务。
2.实现服务接口:编写J a va类来实现服务接口定义的方法。
3.发布We bS er vi ce:使用J av a提供的工具将服务发布到指定的UR L 上。
4.客户端调用:开发客户端代码来调用已发布的We bS er vic e。
2.R E S T f u lR E ST fu l(Re pr es en t at io na lS ta te Tra n sf er)是一种基于H TT P协议的架构风格,它提供了一组约束和原则来设计分布式系统。
R ES Tf ul的W eb Se rv ic e使用H TT P的GE T、POS T、P UT、D EL ET E等方法来进行资源的访问和操作。
java webservice 编码摘要:1.Java WebService 简介2.Java WebService 的编码方式3.编码实例与解析正文:一、Java WebService 简介Java WebService 是一种基于Java 语言的Web 服务技术,它允许Java 开发人员构建可与Web 服务进行交互的应用程序。
Web 服务是一种通过互联网提供互操作性的服务,它允许不同的系统之间进行通信和数据交换。
Java WebService 技术可以使用多种协议和数据格式来实现这种通信,如SOAP、XML 等。
二、Java WebService 的编码方式Java WebService 的编码方式主要包括以下几种:1.WSDL 编码:WSDL(Web 服务描述语言)是一种用于描述Web 服务的XML 格式。
它定义了Web 服务的接口、操作、参数和返回值等元素。
Java 开发人员可以使用WSDL 文件来生成客户端代码,实现对Web 服务的调用。
2.XML 编码:XML(可扩展标记语言)是一种用于存储和传输数据的文本格式。
Java WebService 可以使用XML 格式来表示请求和响应数据,实现与客户端的通信。
3.SOAP 编码:SOAP(简单对象访问协议)是一种用于实现Web 服务通信的协议。
它使用XML 格式来表示请求和响应数据,并在Web 服务之间传递信息。
Java WebService 可以采用SOAP 编码来实现与客户端的交互。
4.JSON 编码:JSON(JavaScript 对象表示法)是一种轻量级的数据交换格式,易于阅读和编写。
Java WebService 也可以使用JSON 编码来实现与客户端的通信。
三、编码实例与解析以下是一个简单的Java WebService 编码实例,采用WSDL 和XML 格式:1.创建一个Java 类,用于表示Web 服务的接口:```javapublic interface HelloWorld {@XMLRootElement(name = "hello")@WebMethodString sayHello(@WebParam(name = "name") String name);}```2.创建一个Java 类,实现上述接口:```javapublic class HelloWorldImpl implements HelloWorld {@Overridepublic String sayHello(String name) {return "Hello, " + name;}}```3.编译上述代码,生成客户端代码和WSDL 文件:```javac -cp.:jaxws-api.jar HelloWorld.java HelloWorldImpl.javawsimport -cp.:jaxws-api.jar HelloWorld.java -s HelloWorld.svc -d HelloWorld_client.java```4.编写客户端代码,调用Web 服务:```javapublic class HelloWorldClient {public static void main(String[] args) {HelloWorld service = newHelloWorldService().getHelloWorldPort();String response = service.sayHello("John");System.out.println(response);}}```通过以上实例,我们可以看到Java WebService 的编码方式主要包括WSDL、XML、SOAP 等。
java webservice 接口实现方式(实用版)目录一、Java WebService 简介二、Java WebService 接口实现方式1.使用 JAX-RPC2.使用 JAX-WS3.使用 Spring WebService三、实例:Java WebService 接口实现方式详解1.使用 JAX-RPC 示例2.使用 JAX-WS 示例3.使用 Spring WebService 示例四、总结正文一、Java WebService 简介Java WebService 是一种基于 Java 语言的 Web 服务技术,它可以使 Java 应用程序通过 Web 进行交互,实现跨平台、跨语言的数据交换和通信。
Java WebService 技术主要包括两个方面:Java WebService 客户端技术和 Java WebService 服务器端技术。
二、Java WebService 接口实现方式Java WebService 接口实现方式主要有以下三种:1.使用 JAX-RPCJAX-RPC(Java API for XML RPC)是 Java WebService 客户端技术的一种,它使用 Java 对象和 XML 数据结构进行通信。
JAX-RPC 可以将Java 对象转换为 XML 格式的数据,并通过 HTTP 协议传输到服务器端。
服务器端收到 XML 数据后,再将其转换为 Java 对象,完成数据交互。
2.使用 JAX-WSJAX-WS(Java API for XML Web Services)是 Java WebService 客户端和服务器端技术的统一标准,它不仅支持 RPC 风格,还支持文档风格。
JAX-WS 使用 WS-*规范来描述 Web 服务,并通过 XML 数据结构进行通信。
与 JAX-RPC 相比,JAX-WS 更加灵活,易于扩展。
3.使用 Spring WebServiceSpring WebService 是基于 Spring 框架的一种 Java WebService实现方式,它支持 JAX-RPC 和 JAX-WS。
一、Webservice可以使用的框架很多。
AXIS、CXF 、JAX、XFIRE,这些框架都可以根据wsdl文件生成ws的服务器和客户端代码。
二、Ws的调用方式有三种,http post、http get、soap post。
本人建议使用http post,他访问远程ws接口的速度比使用soap post要快些。
象使用axis框架实现soap post方式来说,简单的接口还好,对于使用了大量代理类及带有soaphead的ws,且还要在本地生成一大堆JAVA类来和服务端对应。
特别如下这种情况,axis好像无法实现。
Soaphead如下<soapHead><appId>0039434454</appId><pwd>67677</pwd></soapHead>象这种只能根据org.apache.axis.client.Call.addHead(ElementSoapHead)来增加报头。
但这个报头没有根元素,无法创建一个这种Element。
下面就如何书写客户端代码详细讲解下。
1.通过发送http post请求来调用ws。
SOAPUI是个不错的工具,他可以根据wsdl文件生成测试例子。
另外重要的是,它可以生成wsdl对应的请求报文和响应报文。
这样我们在调用别人写的ws时,不管多复杂的ws都可以简单的调用。
首先按照SOAPUI显示的请求报文格式拼装我们的请求报文,使用.HttpURLConnection对象来发送http post请求。
然后使用输出流、输出流获得响应报文,再用Element解析报文得到要取的数据。
示例代码如下:JAVA类SoapInvoke:package test;import java.io.InputStream;import java.io.OutputStream;import .HttpURLConnection;import .URL;public class SoapInvoke {public static void main(String[] args) {try {soapSpecialConnection();} catch (Exception e) {e.printStackTrace();}}public static void soapSpecialConnection() throws Exception{//拼装soap请求报文StringBuilder sb = new StringBuilder();StringBuilder soapHeader = new StringBuilder();soapHeader.append("<soapenv:Envelopexmlns:soapenv=\"/soap/envelope/\"xmlns:test=\"http://test/\">");soapHeader.append("<soapenv:Header>");soapHeader.append("<spId>zhouyun</spId>");soapHeader.append("<spPassword>123</spPassword>");soapHeader.append("</soapenv:Header>");soapHeader.append("<soapenv:Body>");soapHeader.append("<test:sayHelloMiss>");soapHeader.append("<arg0>");soapHeader.append("<name>zhouyun</name>");soapHeader.append("</arg0>");soapHeader.append("</test:sayHelloMiss>");soapHeader.append("</soapenv:Body>");soapHeader.append("</soapenv:Envelope>");//设置soap请求报文的相关属性String url="http://localhost:8080/CXFServer/SayHelloService";URL u = new URL(url);HttpURLConnection conn = (HttpURLConnection) u.openConnection(); conn.setDoInput(true);conn.setDoOutput(true);conn.setUseCaches(false);conn.setDefaultUseCaches(false);conn.setRequestProperty("Host", "localhost:8080");conn.setRequestProperty("Content-Type", "text/xml;charset=utf-8");conn.setRequestProperty("Content-Length",String.valueOf(soapHeader.length()));conn.setRequestProperty("SOAPAction", "");conn.setRequestMethod("POST");//定义输出流OutputStream output = conn.getOutputStream();if (null != soapHeader) {byte[] b = soapHeader.toString().getBytes("utf-8");//发送soap请求报文output.write(b, 0, b.length);}output.flush();output.close();//定义输入流,获取soap响应报文InputStream input = conn.getInputStream();int c = -1;//sb为返回的soap响应报文字符串while (-1 != (c = input.read())) {sb.append((char)c);}input.close();}}2.通过axis来调用ws。
对于使用了复杂代理类的ws,我们在调用时可以使用AXIS、CXF、xfire架包来自动生成ws客户端JA V A代码。
下面以axis为例,来展示。
服务器端主要JAV A代码package test;import javax.jws.WebService;@WebServicepublic class SayHelloImpl implements SayHelloService {public wsResult sayHelloMr(String name) {wsResult retObj = new wsResult();retObj.setResultVal("Hello,mr " + name);return retObj;}public wsResult sayHelloMiss(InputClass input) {wsResult retObj = new wsResult();retObj.setResultVal("Hello,Miss " + input.getName());return retObj;}}客户端:1)新建wsdltojava.bat文件,放到C盘,文件内容如下:set Axis_Lib=E:\axis-bin-1_4\axis-1_4\libset Java_Cmd=java -Djava.ext.dirs=%Axis_Lib%set Axis_Servlet=http://localhost:8080/CXFServer/SayHelloService?wsdl%Java_Cmd% org.apache.axis.wsdl.WSDL2Java -u %Axis_Servlet%其中Axis_Lib为本地axis架包的路径;Axis_Servlet为本地ws的URL,这里也可以设置为此ws服务器对应的wsdl文件的路径。
2)在DOS里,执行wsdltojava.bat。
在C盘根目录下就会生成JA V A客户端的代码了3)新建一个java类Invoke,代码如下:package test;public class invoke {public static void main(String[] args) throws Exception { getResult();}public static void getResult() {try {SayHelloImplServiceLocator svc = new SayHelloImplServiceLocator();SayHelloService stub = svc.getSayHelloImplPort();//调用//WsResult wsResult = stub.sayHelloMr("zhouyun");InputClass inputClass=new InputClass();inputClass.setName("zhouyun");WsResult wsResult = stub.sayHelloMiss(inputClass);System.out.println("结果是:" + wsResult.getResultVal());} catch (Exception e) {System.out.println(e);}}}Ps:1.通过命令生成的java客户端代码里SayHelloImplServiceLocator类是调用ws的入口。