
新缘 MB-900-1型 磨边机使用说明书
- 格式:pdf
- 大小:7.64 MB
- 文档页数:12


陶瓷厂磨边机操作流程As a ceramic factory, the operation process of the edge grinding machine is a crucial part of the production line. The process involves several steps that require precision and attention to detail in order to produce high-quality ceramic products. 作为一个陶瓷厂,边磨机的操作流程是生产线的关键部分。
这个过程包括几个步骤,需要精确和对细节的关注,才能生产出高质量的陶瓷产品。
First and foremost, the operator must ensure that the edge grinding machine is set up correctly before starting the process. This includes adjusting the settings for the specific type of ceramic being processed, as well as ensuring that all safety precautions are in place. 首先,操作员必须确保在开始加工之前正确设置边磨机。
这包括调整特定类型陶瓷的设置,同时确保所有的安全预防措施得到落实。
Once the machine is set up, the operator must carefully feed the ceramic pieces into the edge grinding machine, taking care to position them correctly to avoid any damage during the grinding process. The operator must also monitor the machine closely during operation, making adjustments as needed to ensure that the ceramicpieces are being ground to the correct specifications. 一旦机器设置完成,操作员必须小心地将陶瓷件送入边磨机,注意正确放置,以避免在磨削过程中造成任何损坏。

全自动磨边机安全操作规程范本全自动磨边机是一种用于金属材料磨边的设备。
为了确保操作人员的安全,以下是全自动磨边机的安全操作规程范本。
一、危险警示1. 在操作前,操作人员必须仔细阅读并理解使用说明书,并严格按照说明书的要求进行操作。
2. 全自动磨边机只能由受过专业培训的操作人员操作,未经授权的人员严禁操作。
3. 在操作过程中严禁穿着宽松的衣物、长发必须束起、戴好安全帽和护目镜,以防止意外发生。
4. 操作人员应该时刻保持警觉,严禁在磨边机工作时离开岗位,以免发生危险。
5. 禁止将手部和身体部位伸入磨边机内,以免造成伤害。
二、安全操作流程1. 开机准备(1)在操作前,必须保证全自动磨边机和电源电压相匹配,电源接地正常。
(2)确认刀具安装正确,并保证刀具锁紧牢固。
(3)检查磨边机各个部位是否有杂物,如有必须清理干净。
(4)确认磨边机的润滑系统正常工作。
2. 开机操作(1)按下启动开关,磨边机开始运转,但此时刀具不接触工件。
(2)慢慢调节进给速度,使刀具与工件接触,开始进行磨削。
(3)操作人员应时刻观察磨削过程,如发现异常情况,立即停机检查原因。
3. 停机操作(1)当工件磨削结束或发生异常情况时,立即停机。
(2)停机后,先关闭刀具运转开关,然后再关闭电源。
(3)等待磨边机完全停止后,方可离开岗位。
三、应急措施1. 在磨边机发生故障或异常情况时,操作人员应立即停机,并及时通知维修人员进行检修。
2. 在磨边机发生事故时,应立即切断电源,并报告上级主管领导和安全管理部门。
3. 在处理事故过程中,应妥善保护现场,防止二次事故的发生。
四、设备维护保养1. 磨边机的维护保养工作必须由专业的维修人员进行。
2. 定期检查磨边机的各个部位,并对其进行清洁和润滑处理。
3. 定期检查电气线路和电气设备的安全性能,及时修复和更换损坏的部件。
4. 对磨边机的刀具进行定期检查和更换,确保其正常工作。
五、个人防护措施1. 在操作磨边机前,必须穿戴好个人防护用品,包括安全帽、护目镜、防护手套等。
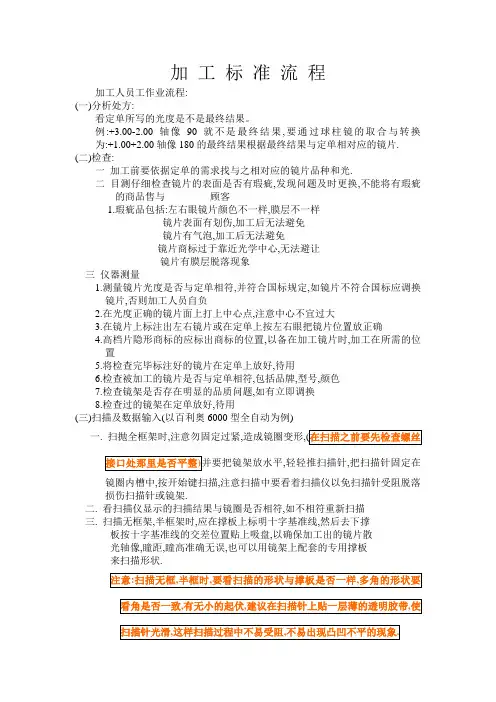
加工标准流程加工人员工作业流程:(一)分析处方:看定单所写的光度是不是最终结果。
例:+3.00-2.00轴像90就不是最终结果,要通过球柱镜的取合与转换为:+1.00+2.00轴像180的最终结果根据最终结果与定单相对应的镜片. (二)检查:一加工前要依据定单的需求找与之相对应的镜片品种和光.二目测仔细检查镜片的表面是否有瑕疵,发现问题及时更换,不能将有瑕疵的商品售与顾客1.瑕疵品包括:左右眼镜片颜色不一样,膜层不一样镜片表面有划伤,加工后无法避免镜片有气泡,加工后无法避免镜片商标过于靠近光学中心,无法避让镜片有膜层脱落现象三仪器测量1.测量镜片光度是否与定单相符,并符合国标规定,如镜片不符合国标应调换镜片,否则加工人员自负2.在光度正确的镜片面上打上中心点,注意中心不宜过大3.在镜片上标注出左右镜片或在定单上按左右眼把镜片位置放正确4.高档片隐形商标的应标出商标的位置,以备在加工镜片时,加工在所需的位置5.将检查完毕标注好的镜片在定单上放好,待用6.检查被加工的镜片是否与定单相符,包括品牌,型号,颜色7.检查镜架是否存在明显的品质问题,如有立即调换8.检查过的镜架在定单放好,待用(三)扫描及数据输入(以百利奥6000型全自动为例)一. 扫抛全框架时,注意勿固定过紧,造成镜圈变形,轻轻推扫描针,把扫描针固定在镜圈内槽中,按开始键扫描,注意扫描中要看着扫描仪以免扫描针受阻脱落损伤扫描针或镜架.二. 看扫描仪显示的扫描结果与镜圈是否相符,如不相符重新扫描三. 扫描无框架,半框架时,应在撑板上标明十字基准线,然后去下撑板按十字基准线的交差位置贴上吸盘,以确保加工出的镜片散光轴像,瞳距,瞳高准确无误,也可以用镜架上配套的专用撑板来扫描形状.四扫描形状后输入想应的加工数据,并注意以下事项:1.全框严格按定单瞳工,特殊情况例外,这些特殊情况包括:a.镜框偏大,考虑到瞳距,应尽可能的做到国标范围内b.镜片度数偏高(-8.00以上)考虑到厚度,美观以及顾客的要求要将瞳距适当做大,也应在国标范围内c.配单只镜片按原瞳距加工d.有片配架者,尽量满足瞳距需求2.无框半框眼镜要注意:扫描形状后,先要镜架的鼻梁尺寸,3.远用镜,光学中心应在镜架水平线以上1.5至2mm(镜架的大小来定)4.近用镜,光学中心应在镜架水平线以下1.5至2mm(镜架的大小来定)5.双光镜,光学中心应根据镜框的大小以及顾客的戴镜习惯和鼻梁的高低来做瞳高(因人和镜框而定)6.多焦点眼镜,光学中心应按定单上的瞳高数据来定7.扫描结果后,根据不同的镜架材料不同的镜片面材料进行数据的缩放(建议将缩放数据贴在加工区明显的位置)五输入磨片:1.加工时应先右后左依次加工镜片2.先将右眼镜片的光学中心对正扫描仪上的十字坐标,如镜架过大,瞳距做不到时应尽量做到最接近的数值。

RBB.1000____________________________________________________________________INSTRUCTION MANUAL____________________________________________________________________ATTENTION: READ THIS MANUAL BEFORE USING YOUR MACHINE.∙The images in this manual are illustrative and are meant to demonstrate the correct operation of your product, there may be small changes in relation to the images.ALWAYS USE PROPER PROTECTIVE EQUIPMENTS TOOPERATETHISMACHINE.Important Safety InstructionsWARNING: When working with machines, always follow the safety precautions to reducethe risk of fire, electric shock and injury, including the following:REPLACE ONLY WITH IDENTICAL PARTS.Repair or replace damaged wiring.surfaces are invite accidents.∙Do not use the Edge Trimmer in hazardous environments . Do not use machine in damp or wet locations or exposed to rain. Keep well clean work area.∙Keep children away . Visitors should be kept at a safe distance from work area.∙Do not force tool . It will perform the job better and safer for the intended use.∙Use appropriate equipment . Do not wear loose clothing, gloves, chains, rings, bracelets or other accessories that could get caught in moving parts.∙It is recommended wearing shoes with non-slip e protection for the hair in order to hold them.∙Always wear safety glasses . Also use hearing protection.∙Do not overreach on the equipment . Maintain balance and feet in comfortable position at all times.∙Keep all tools in order . Keep tools sharp and clean for better and safer performance. Follow the instructions for lubricating and changing accessories.∙Unplug the machine before servicing or changing accessories such as scissors, cutters etc.∙Reduce the risk of unintentional starting . Ensure that the switch is in the "OFF" position (off) before connecting the wire to the plug.∙Use recommended accessories. See the instruction manual to check recommended accessories. Improper use of accessories may cause risk of injury to persons.∙Never step on the machine. May occur serious accident if the machine is dented or if parts are accidentally touched.∙Check for damaged parts . Before continuing the use of Edge Trimmer, a guard or other part that is damaged should be examined carefully to determine its proper operation and perform its function properly.Check the alignment of moving parts, breakage of parts, mounting and any other condition that may affect its operation. Any part that is damaged should be repaired or replaced immediately. Do not use the tool if the switch does not turn on or off.∙Never leave a running tool unattended . Turn off the ignition key.∙The engine of this machine can emit sparks , and explode flammable gases.∙Extension cables . Make sure your extension cord is in good condition. When using an extension, be sure of their ability to transmit the electrical current used by your product. An undersized cord will cause drop in voltage resulting in loss of power and overheating. The following table shows the correct size to be used depending on the cable diameter and amperage rate.If in doubt, use a cable with a higher level of capacity.IMPORTANT: Do not use an extension cord with length above 20 metersAdditional safety rules for Edge Trimmer:CAUTION: FAILURE TO ATTEND THESEWARNINGS MAY RESULT IN PERSONAL INJURY AND SERIOUS DAMAGE TO THE MACHINE. ∙Protect the electric power supply line with at least a 20 amp fuse or a circuit breaker switch.∙Make sure the advance is turning in the right direction.∙Make sure that the knobs and screws are properly tightened and safe before starting any operation.∙Keep sharp tools.∙Keep vents free of chips or dirty engines.∙Keep hands away from moving or sharp parts.∙Turn off the machine and unplug the power cord before maintenance or adjustments of the tool.∙Support long pieces with a clamping device for wood.∙Do not attempt to operate the machine in another voltage beyond designated.∙Do not use larger or smaller tools than recommended.∙Do not apply lubricant to the tools during use.∙Do not operate without some parts of the machine.∙Do not put your hands less than 4in from the shaft.∙Do not put your hands in closed parts of the machine unless it is turned off and unplugged.∙Do not use lubricants or cleaners (particularly sprays and aerosols) in the vicinity of the plastic guard. The polycarbonate material used in the guard is sensitive to certain chemicals.WARNING:Some dust created by the act of sanding, cutting, grinding, drilling and other construction-related activities contains chemicals that can cause cancer, birth defects or other reproductive harm. Some examples of these products are: Lead-based paint; crystal silica bricks, concrete and other masonry products; and arsenic and chromium from chemically treated wood.CAUTION: Do not connect the unit to the poweroutlet until all instructions have been read and understood. Always tighten the adjustment tabs before using the machine. Think: "I can prevent accidents".Do not operate the machine unless the guards are in their proper places. Always use protective ears and goggles.Electrical connectionTo avoid burning risk, check the voltage of your outlet before starting the machine. If necessary make the change of your power with the help of a specialist. Ensure that your power supply is in accordance with the designated on the board. A 10% decrease in voltage or more will cause loss of power and overheating. All equipment MAKSIWA are tested at the factory. If this machine does not work, check the electricity supply. Check the compatibility of your outlet and plug the machine. Do not do patches and adaptations. To avoid electrical shock and damage to the equipment always ground the machine.FamiliarizationPut the machine on a smooth and flat surface. Check the pictures and watch the descriptions to familiarize yourself with its components. The next section will deal with the necessary adjustments for the proper functioning of the machine. You should know these parts and will need to know where they are.EspecificationsInstallationFor packaging purposes, the machine is not fully assembled.If you notice any damage caused by transportation, while you open the package, notify your supplier immediately. Do not operate the machine.Dispose the packaging in a friendly waywith the environment.The Edge Trimmer is designed to operate indoors and should be placed on a firm, stable and level surface. CAUTION: To prevent the machine from moving and causing lack of precision, ensure that the base where it is supported is not uneven.UNPACKINGDue to modern mass production techniques, it is unlikely that Edge Trimmer RBB.1000 MAKSIWA is faulty or have parts missing. If you find anything wrong, do notuse the machine until the parts are replaced or the fault is corrected. Doing this you are avoiding serious injury.1.You will receive your machine packed.2.Remove the machine from the packed with all the parts and accessories that go with it. For ease assembly, place it on a bench. Note the pieces that came with your equipment:1.Clamps8.Hex Hey 10/132.Adjustable Guide9.Collet ¼3.Knobs10.Hex Key 174.Swinging Support11.Cutter5.Bolt M6x1612.Hex Key 106.Piston13.Trimmer / Router7.Phillips KeyASSEMBLY1.Prepare two pieces approximately with 35x15x135mm (1 3/8’’x 5/8’’ x 5 3/8’’) to serve as a spacer between the setting surface and the base of the equipment:2.Choose a table or a bench for installation. Defining its position, considering that the two clamps (1) allows its fixing in any point of the center of the base or outer ends of the equipment. Note the figures below that you can also perform this setting by the side of the tables and / orbenches:3.Assembly of Extension TableEnter the two Adjustable Guides (2) into the holes of the main structure leaving 2inches ends out and screw the knobs (3) by pressing them on the guides:Remove the screws of the guides and insert the extension table on the guides and fix it with screws using the key 10 (8) for final tightening:4.Swinging Support InstallationRemove the screw from the shaft of Swinging Support (4), positioning at its point of attachment to the structure and screwing tightening using the key 13 (8), as the following figures: One of the supports of the Piston (6) is already mounted on the Swinging Support (4) and the other are the group of nut and hexagon socket screw (Allen) M6 (5) to be mounted on the upper end of the scraper set, as shown in the figure below, tightening the nut with the key 10 (8):Remove the locks of the ends of the Piston (6), fitting in their respective supports and replace the locks, as thefollowing figure:The starting point of articulation of the Swinging Support is already set at the factory, but if necessary, for adjustment should follow the instructions under "Settings" in this manual.5.Cutter AssemblyIf the cutter is with shaft Ø ¼", the original collet mounted on the shaft of the router (13), which is Ø 6mm, should be replaced. This procedure should loosen the nut from the axis router using the hex keys (10 and 12) and remove the original collet replacing it with ¼’’(9): Insert the cutter on the shaft and tighten the nut again:6.Trimmer / Router AssemblyLoosen the knob of the Swinging Support (4). Insert the router (13) with the key "ON/OFF" facing up, positioning it so that the blades of the cutter exceed approximately 1.5 mm in front of the frontal guide plate, and tighten the knob again:using your Edge Trimmer RBB.1000 for the first time or when some kind of change is made as thick tape or thickness of the wood.CAUTION: ANY ADJUSTMENT NEEDS TO BEMADE WITH THE MACHINE OFF AND DE-ENERGIZED (unplugged).1.CUTTER ALIGNMENTThe horizontal alignment of the cutter was did at the factory, however, for possible adjustments, using the key 13 (8), loosen the screw of the eccentric washer and turn it until the cutter shaft center is aligned to the line of surface the sliding guide of the table:The vertical cutter alignment should be performed always the router is mounted on the swinging support, noting that the ends of the knives should exceed about 1.5 mm in front of the frontal guide: 2.ADJUSTING THE SPRING OF SCRAPER BLOCK The spring tension of the scraper block copier is set at the factory, but for any adjustments using the key 13 (8). Must loosen the lower nut shown in the figure below and rotating the screw clockwise to increase the tension and counter-clockwise to decrease tension. Retighten the nut. Obs.: This tension is applied pressing the wheel copier of scraper block over the panel surface to reproduce it, ensuring true position of the cutter along the edge.3.ADJUSTING THE SCRAPER BITThe Scraper Bit has a special function to reproduce the final finish along the edges of the tape with a slightly rounded contour, therefore, must be carefully adjustedaccording to the following procedure:Loosen the handle knob of the scraper block and lift it then introducing model of the workpiece already with the edge tape applied and pre-trimmed by router.Get down again the scraper resting it on the surface of the workpiece. With the left thumb exerting a light pressure on it, fixing again the handle knob:Slightly loosen the nut of the scraper using the key 13 (8). To ensure optimal pressure of the screw in this adjustments, pull the screw with only a slight tightening torque using the fingers:The height adjustment of the scraper bit is by the screw positioned on the top side of the scraper block using a Phillips screwdriver (7): The vertical positioning and inclination adjustment is realized by the two screws positioned at the side of the scraper block, also using the Phillips screwdriver (7):4.TIPS FOR A CORRECT ADJUSTMENT OF THE BIT SCRAPER:Before beginning any procedure make sure that the copier wheel is pressed against the workpiece surface. During the adjustment procedures, always keep the side of the workpiece pressed against the side guide (guardrail).The scraper bit has a flat part that will form a small angle with the surface of the workpiece, with the neb or contact point the edge of the workpiece.The rounded part of the bit should edging partially around the edge of the tape, so that it forms only a smallrounded arch enough to sharp the edge:as well as any other machine, can pose risks to the operator if the instructions in this section are not taken into account.ATTENTION: BEFORE TURN ON NOTE IFYOUR POWER SUPPLY IS COMPATIBLE WITH THE VOLTAGE OF THE EQUIPMENT.These instructions are written with the understanding that the operator has the knowledge and skills necessary to operate this machine. If at any time you feel difficulty performing any operation, stop using the machine. If you are an inexperienced operator, we recommend that you read books, technical papers, or seeks training from an experienced operator before performing any operation unknown. The machine must operate with all the protections and security systems that comes standard.Above all, your safety must come first.To get a good result at the finishing with RBB.1000 is important that the preparation of the workpiece and the collage of the edge tape have been carried out correctly. You can only work with straight cuts and straight angles (90°).It is recommended the application of equipment for use only in pieces with edge tapes with a maximum thicknesses up to 1.0 mm.1.EXTENSION TABLEThe extension table should be adjusted according to the width of the piece to be worked, and any position exceeding the median part of the piece width is already satisfactory.2.PROTEÇÃO E EXAUSTÃOIn the operation area is a compartment enclosed by a transparent polycarbonate cover, which serves as a safety device, also forming an exhaust system. To activate the exhaust, just snap on your connection located above this compartment, a hose of an exhaust system or even a professional or residential vacuum cleaner. The transparent cover must be adjusted approximately 5 to 10 mm above the surface of the workpiece.3.SCRAPERThe scraper must be adjusted to the thickness of the piece to be worked.Loosen the knob of the scraper block and lift it then introducing one piece or retail model to be worked. This should be without the edge tape, or if it is already with the tape that should already be pre-shaper, at least a little stretch.Down again the scraper, resting it on the surface of the piece. With the left thumb exerting a light pressure on it, fixing it again the knob.Then, once completed this step, the piece used for the adjustment should be removed.4.OPERATIONSeparate the pieces to be worked, properly prepared, noting that the remains of tapes at the ends of the tops are of no more than 7 to 8 mm (5/16’’)and also no folds:Turn on the trimmer/router through the ON/OFF switch, and when use the exhaustion system, also turn it on:Insert on the table the piece to be worked and moves it toward the cutter and scraper, noting that the edge to be worked always keep in touch against the side guide (guard- rail). Perform this action with a rectilinear and uniform motion until the entire length of the edge pass by the scraper device:Then turn the piece and repeat the action in the opposite edge of the same tape. Repeat these actions on all edges to be worked.At the end of the process should be cleaned the piece, removing the waste of tape from the trimming and also the remaining of glue excesses using a cloth with kerosene or other solvent.the machine must be made with the same OFF and unplugged from the outlet to prevent accidental discharges.Periodic maintenance on your Edge Trimmer RBB.1000 MAKSIWA will ensure optimum performance. Make it a habit to inspect your equipment every time you use it. This section covers the service adjustments or common procedures that may need to be made during the life of your machine.Verify if the following conditions for repair or replacement are needed:•Loosen screws.•Switches or buttons damaged.•Cables, plugs or sockets worn or damaged.•Cutter and scraper bit damaged.•Any other condition that could adversely affect the safe operation of the equipment.CLEANINGThe tape residue contaminating the bearings of the cutter and the scraper device (copiers), causing braking, which may cause marks on the surface of the piece. Is needed to clean and lubricated periodically, usinglubricant spray.Keep the table clean after each use.Periodically (and always with the machine off) it is important to do all the cleaning of the machine, removing glue residue that could affect the proper functioning of the equipment. Clean the guides, the cutter and scraper carefully.MAINTENANCE SCHEDULEDaily:•Aspirate all dust on top and around the machine.•Clean the guides, cutter and scraper keeping clean all residue of glue and edge tape.Weekly:•Clean dust accumulation inside and around the machine.•Check for wear or damage to the buttons and cord.•Check wear on the cutter and scraper bit.MAKSIWA assures the owner of his equipment, identified by the date of issue of the purchase invoice, a warranty of one (1) year, as follows:1.The warranty period begins on the date of the commercial invoice.2.Within the warranty period, the hand labor and the components replaced by manufacturing defect will be provided for free as long as duly proved by Maksiwa Service.3.Third-party manufacturing equipment that makes up MAKSIWA equipment (such as motors, electrical equipment, belts etc.) are subject to the terms and conditions of warranty of their respective manufacturers.4.In case of exchange for the warranty, please return the defective part for the manufacturer urgently.5.Costs and risks of transport will be by the machine owner.6.Equipment installation expenses and workplace adaptations are due to the machine owner.7.When you notice any defect or malfunction when receiving the equipment, get in touch immediately with the manufacturer or resale. Do not turn it on. 8.Not included in this warranty technical visits aimed at cleaning or adjustments caused by wear, resulting from normal use of the equipment.9.The warranty does not cover problems caused by mistreatment, carelessness, misuse or inappropriate use of the functions designed for this equipment in this manual, as well as poorly executed operations by untrained operators to operate it.10.MAKSIWA is not responsible for lost productivity, direct or indirect damages caused to the owner of the equipment or to third parties, or any other expense, including lost profits.11.Even under warranty, you may lose its validity as follows:a)Application of non-original components;b)Alteration of its original features;c)Lack of proper maintenance;d)Improper use of the equipment;e)Change in equipment or electronic connections;f)Damage caused by mechanical shock or exposure to unsuitable conditions (humidity, salt spray, corrosive agents, etc.);g)Damage caused by bad weather (floods, flooding, lightning, power outages etc.).For your safety, trust the repairs, maintenance and adjustments (including inspection and replacement) for technical assistance recommended by MAKSIWA, always use genuine spare parts and accessories, reassembling to its original Edge Trimmer the same way.Manufactured by:Maksiwa Industria e Comercio de Maquinas LTDA.St. Nelson Argenta, 436Colombo – Parana – BrazilZipcode: 83.402-220CNPJ: 76.670.215/0001-81。