LC-Meter需求rev1
- 格式:pdf
- 大小:323.49 KB
- 文档页数:6

Installation Guide Keysight E5061B Network Analyzer This is the Installation Guide for E5061B Network Analyzer.Keysight E4980A/AL Precision LCR MeterThis is the User’s Guide for E4980A/AL Precision LCR Meter. USER’S GUIDENotices© Keysight Technologies2006-2023No part of this manual may be reproduced in any form or by any means (including electronic storage and retrieval or translation into a foreign language) without prior agreement and written consent from Keysight Technologies, Inc. as governed by United States and international copyright laws. Trademark Acknowledgments Manual Part NumberE4980-90230EditionEdition 18, February 2023 Printed in MalaysiaPublished by:Keysight Technologies International Japan G.K,1-3-3 Higashikawasaki-choChuo-kuKobe-shi, Hyogo, Japan WarrantyTHE MATERIAL CONTAINED IN THIS DOCUMENT IS PROVIDED “AS IS,” AND IS SUBJECT TO BEING CHANGED, WITHOUT NOTICE, IN FUTURE EDITIONS. FURTHER, TO THE MAXIMUM EXTENT PERMITTED BY APPLICABLE LAW, KEYSIGHT DISCLAIMS ALL WARRANTIES, EITHER EXPRESS OR IMPLIED WITH REGARD TO THIS MANUAL AND ANY INFORMATION CONTAINED HEREIN, INCLUDING BUT NOT LIMITED TO THE IMPLIED WARRANTIES OF MERCHANTABILITY AND FITNESS FOR A PARTICULAR PURPOSE. KEYSIGHT SHALL NOT BE LIABLE FOR ERRORS OR FOR INCIDENTAL OR CONSEQUENTIAL DAMAGES IN CONNECTION WITH THE FURNISHING, USE, OR PERFORMANCE OF THIS DOCUMENT OR ANY INFORMATION CONTAINED HEREIN. SHOULD KEYSIGHT AND THE USER HAVE A SEPARATE WRITTEN AGREEMENT WITH WARRANTY TERMS COVERING THE MATERIAL IN THISDOCUMENT THAT CONFLICT WITHTHESE TERMS, THE WARRANTYTERMS IN THE SEPARATEAGREEMENT WILL CONTROL.Technology LicensesThe hardware and/or softwaredescribed in this document arefurnished under a license and may beused or copied only in accordancewith the terms of such license.Declaration of ConformityDeclarations of Conformity for thisproduct and for other Keysightproducts may be downloaded fromthe Web. Go to/go/conformity. You can then search by productnumber to find the latest Declarationof Conformity.U.S. Government RightsThe Software is “commercialcomputer software,” as defined byFederal Acquisition Regulation(“FAR”) 2.101. Pursuant to FAR12.212 and 27.405-3 andDepartment of Defense FARSupplement (“DFARS”) 227.7202, theU.S. government acquirescommercial computer softwareunder the same terms by which thesoftware is customarily provided tothe public. Accordingly, Keysightprovides the Software to U.S.government customers under itsstandard commercial license, whichis embodied in its End User LicenseAgreement (EULA), a copy of whichcan be found at/find/sweula The license set forth in the EULArepresents the exclusive authority bywhich the U.S. government may use,modify, distribute, or disclose theSoftware. The EULA and the licenseset forth therein, does not require orpermit, among other things, thatKeysight: (1) Furnish technicalinformation related to commercialcomputer software or commercialcomputer software documentationthat is not customarily provided tothe public; or (2) Relinquish to, orotherwise provide, the governmentrights in excess of these rightscustomarily provided to the public touse, modify, reproduce, release,perform, display, or disclosecommercial computer software orcommercial computer softwaredocumentation. No additionalgovernment requirements beyondthose set forth in the EULA shallapply, except to the extent that thoseterms, rights, or licenses areexplicitly required from all providersof commercial computer softwarepursuant to the FAR and the DFARSand are set forth specifically inwriting elsewhere in the EULA.Keysight shall be under no obligationto update, revise or otherwise modifythe Software. With respect to anytechnical data as defined by FAR2.101, pursuant to FAR 12.211 and27.404.2 and DFARS 227.7102, theU.S. government acquires no greaterthan Limited Rights as defined in FAR27.401 or DFAR 227.7103-5 (c), asapplicable in any technical data.Safety NoticesA CAUTION notice denotes a hazard. Itcalls attention to an operatingprocedure, practice, or the like that,if not correctly performed or adheredto, could result in damage to theproduct or loss of important data. Donot proceed beyond a CAUTIONnotice until the indicated conditionsare fully understood and met.A WARNING notice denotes a hazard.It calls attention to an operatingprocedure, practice, or the like that,if not correctly performed or adheredto, could result in personal injury ordeath. Do not proceed beyond aWARNING notice until the indicatedconditions are fully understood andmet.Contents Table of Contents1. Unpacking and PreparationContents of this Chapter . . . . . . . . . . . . . . . . . . . . . . . . . . . . . . . . . . . . . . . . . . . . . . . . . . . . . 17 Checking the Shipment . . . . . . . . . . . . . . . . . . . . . . . . . . . . . . . . . . . . . . . . . . . . . . . . . . . . . . 18 Preparations before Use. . . . . . . . . . . . . . . . . . . . . . . . . . . . . . . . . . . . . . . . . . . . . . . . . . . . . . 20 Verifying the Power Supply . . . . . . . . . . . . . . . . . . . . . . . . . . . . . . . . . . . . . . . . . . . . . . . . 20 Setting up the Fuse . . . . . . . . . . . . . . . . . . . . . . . . . . . . . . . . . . . . . . . . . . . . . . . . . . . . . . 20 Verifying and Connecting the Power Cable. . . . . . . . . . . . . . . . . . . . . . . . . . . . . . . . . . . . 21 How to Remove the Handle. . . . . . . . . . . . . . . . . . . . . . . . . . . . . . . . . . . . . . . . . . . . . . . . . . . 22 Caution when Using the Handle . . . . . . . . . . . . . . . . . . . . . . . . . . . . . . . . . . . . . . . . . . . . . . . 23 Environmental Requirements. . . . . . . . . . . . . . . . . . . . . . . . . . . . . . . . . . . . . . . . . . . . . . . . . . 24 Operating Environments. . . . . . . . . . . . . . . . . . . . . . . . . . . . . . . . . . . . . . . . . . . . . . . . . . . 24 Ventilation Requirements. . . . . . . . . . . . . . . . . . . . . . . . . . . . . . . . . . . . . . . . . . . . . . . . . . 25 Protection Against Electrostatic Discharge (ESD). . . . . . . . . . . . . . . . . . . . . . . . . . . . . . . 26 Ensuring Adequate Free Space around the LCR meter for Immediate Disconnection of the Power Cable in Case of Emergency. . . . . . . . . . . . . . . . . . . . . . . . . . . . . . . . . . . . . . . . . . 26 Starting the E4980A/AL. . . . . . . . . . . . . . . . . . . . . . . . . . . . . . . . . . . . . . . . . . . . . . . . . . . . . . 27 Turning the Power ON and OFF. . . . . . . . . . . . . . . . . . . . . . . . . . . . . . . . . . . . . . . . . . . . . 27 Disconnecting from the Supply Source. . . . . . . . . . . . . . . . . . . . . . . . . . . . . . . . . . . . . . . 28 2.OverviewProduct Introduction. . . . . . . . . . . . . . . . . . . . . . . . . . . . . . . . . . . . . . . . . . . . . . . . . . . . . . . . . 29 Front Panel: Names and Functions of Parts . . . . . . . . . . . . . . . . . . . . . . . . . . . . . . . . . . . . . . 301. Power switch . . . . . . . . . . . . . . . . . . . . . . . . . . . . . . . . . . . . . . . . . . . . . . . . . . . . . . . . . 312. LCD . . . . . . . . . . . . . . . . . . . . . . . . . . . . . . . . . . . . . . . . . . . . . . . . . . . . . . . . . . . . . . . . 313. Softkeys . . . . . . . . . . . . . . . . . . . . . . . . . . . . . . . . . . . . . . . . . . . . . . . . . . . . . . . . . . . . . 314. Menu keys. . . . . . . . . . . . . . . . . . . . . . . . . . . . . . . . . . . . . . . . . . . . . . . . . . . . . . . . . . . . 315. Cursor keys. . . . . . . . . . . . . . . . . . . . . . . . . . . . . . . . . . . . . . . . . . . . . . . . . . . . . . . . . . . 316. Entry keys. . . . . . . . . . . . . . . . . . . . . . . . . . . . . . . . . . . . . . . . . . . . . . . . . . . . . . . . . . . . 327. LED indicator . . . . . . . . . . . . . . . . . . . . . . . . . . . . . . . . . . . . . . . . . . . . . . . . . . . . . . . . . 328. Preset key. . . . . . . . . . . . . . . . . . . . . . . . . . . . . . . . . . . . . . . . . . . . . . . . . . . . . . . . . . . . 329. Trigger key . . . . . . . . . . . . . . . . . . . . . . . . . . . . . . . . . . . . . . . . . . . . . . . . . . . . . . . . . . . 3210. DC Bias key. . . . . . . . . . . . . . . . . . . . . . . . . . . . . . . . . . . . . . . . . . . . . . . . . . . . . . . . . . 3211. DC Source key . . . . . . . . . . . . . . . . . . . . . . . . . . . . . . . . . . . . . . . . . . . . . . . . . . . . . . . 3212. UNKNOWN terminals . . . . . . . . . . . . . . . . . . . . . . . . . . . . . . . . . . . . . . . . . . . . . . . . . 3313. Front USB port. . . . . . . . . . . . . . . . . . . . . . . . . . . . . . . . . . . . . . . . . . . . . . . . . . . . . . . 3314. Ground terminal. . . . . . . . . . . . . . . . . . . . . . . . . . . . . . . . . . . . . . . . . . . . . . . . . . . . . . 3415. DC Source terminal . . . . . . . . . . . . . . . . . . . . . . . . . . . . . . . . . . . . . . . . . . . . . . . . . . . 34Rear Panel: Names and Functions of Parts. . . . . . . . . . . . . . . . . . . . . . . . . . . . . . . . . . . . . . . 351. GPIB Interface Connector . . . . . . . . . . . . . . . . . . . . . . . . . . . . . . . . . . . . . . . . . . . . . . . 35 Keysight E4980A/AL User’s Guide3Contents2. Interface Connector. . . . . . . . . . . . . . . . . . . . . . . . . . . . . . . . . . . . . . . . . . . . . . . . . . . . .353. USB (USBTMC) Interface Port. . . . . . . . . . . . . . . . . . . . . . . . . . . . . . . . . . . . . . . . . . . . .364. LAN Port . . . . . . . . . . . . . . . . . . . . . . . . . . . . . . . . . . . . . . . . . . . . . . . . . . . . . . . . . . . . .365. External Trigger Input Connector . . . . . . . . . . . . . . . . . . . . . . . . . . . . . . . . . . . . . . . . . .366. Serial Number Plate . . . . . . . . . . . . . . . . . . . . . . . . . . . . . . . . . . . . . . . . . . . . . . . . . . . .367. Power Cable Receptacle (to LINE) . . . . . . . . . . . . . . . . . . . . . . . . . . . . . . . . . . . . . . . . .378. Fan. . . . . . . . . . . . . . . . . . . . . . . . . . . . . . . . . . . . . . . . . . . . . . . . . . . . . . . . . . . . . . . . . .37Screen Area: Names and Functions of Parts. . . . . . . . . . . . . . . . . . . . . . . . . . . . . . . . . . . . . . .381. Display Page Area . . . . . . . . . . . . . . . . . . . . . . . . . . . . . . . . . . . . . . . . . . . . . . . . . . . . . .382. Comment Line Area. . . . . . . . . . . . . . . . . . . . . . . . . . . . . . . . . . . . . . . . . . . . . . . . . . . . .383. Softkey Area. . . . . . . . . . . . . . . . . . . . . . . . . . . . . . . . . . . . . . . . . . . . . . . . . . . . . . . . . . .394. Measurement Data/Conditions Area. . . . . . . . . . . . . . . . . . . . . . . . . . . . . . . . . . . . . . . .395. Input Line Area . . . . . . . . . . . . . . . . . . . . . . . . . . . . . . . . . . . . . . . . . . . . . . . . . . . . . . . .406. System Message Area. . . . . . . . . . . . . . . . . . . . . . . . . . . . . . . . . . . . . . . . . . . . . . . . . . .407. Status Display Area. . . . . . . . . . . . . . . . . . . . . . . . . . . . . . . . . . . . . . . . . . . . . . . . . . . . .40Basic Operation. . . . . . . . . . . . . . . . . . . . . . . . . . . . . . . . . . . . . . . . . . . . . . . . . . . . . . . . . . . . .41 How to Use Cursor Keys . . . . . . . . . . . . . . . . . . . . . . . . . . . . . . . . . . . . . . . . . . . . . . . . . . .41 How to Use Skip Keys. . . . . . . . . . . . . . . . . . . . . . . . . . . . . . . . . . . . . . . . . . . . . . . . . . . . .42 3.Display FormatMEAS DISPLAY Page. . . . . . . . . . . . . . . . . . . . . . . . . . . . . . . . . . . . . . . . . . . . . . . . . . . . . . . . .43 Measurement Function . . . . . . . . . . . . . . . . . . . . . . . . . . . . . . . . . . . . . . . . . . . . . . . . . . . .45 Impedance range. . . . . . . . . . . . . . . . . . . . . . . . . . . . . . . . . . . . . . . . . . . . . . . . . . . . . . . . .49 Test Frequency. . . . . . . . . . . . . . . . . . . . . . . . . . . . . . . . . . . . . . . . . . . . . . . . . . . . . . . . . . .56 Test Signal Level . . . . . . . . . . . . . . . . . . . . . . . . . . . . . . . . . . . . . . . . . . . . . . . . . . . . . . . . .59 DC Bias . . . . . . . . . . . . . . . . . . . . . . . . . . . . . . . . . . . . . . . . . . . . . . . . . . . . . . . . . . . . . . . .62 Measurement Time Mode . . . . . . . . . . . . . . . . . . . . . . . . . . . . . . . . . . . . . . . . . . . . . . . . . .66 Display Setting for Measurement Results. . . . . . . . . . . . . . . . . . . . . . . . . . . . . . . . . . . . . .67 Displaying Errors instead of Measurement Results . . . . . . . . . . . . . . . . . . . . . . . . . . . . . .69 Monitor Information. . . . . . . . . . . . . . . . . . . . . . . . . . . . . . . . . . . . . . . . . . . . . . . . . . . . . . .73 BIN NO. DISPLAY Page . . . . . . . . . . . . . . . . . . . . . . . . . . . . . . . . . . . . . . . . . . . . . . . . . . . . . . .74 Comparator Function ON/OFF . . . . . . . . . . . . . . . . . . . . . . . . . . . . . . . . . . . . . . . . . . . . . .75 BIN COUNT DISPLAY Page . . . . . . . . . . . . . . . . . . . . . . . . . . . . . . . . . . . . . . . . . . . . . . . . . . . .77 Counter Function. . . . . . . . . . . . . . . . . . . . . . . . . . . . . . . . . . . . . . . . . . . . . . . . . . . . . . . . .79 LIST SWEEP DISPLAY Page. . . . . . . . . . . . . . . . . . . . . . . . . . . . . . . . . . . . . . . . . . . . . . . . . . . .80 Sweep Mode . . . . . . . . . . . . . . . . . . . . . . . . . . . . . . . . . . . . . . . . . . . . . . . . . . . . . . . . . . . .82 DISPLAY BLANK Page. . . . . . . . . . . . . . . . . . . . . . . . . . . . . . . . . . . . . . . . . . . . . . . . . . . . . . . .84 4.Configuring Measurement Conditions (Display and Function Related Settings)Initializing the Instrument . . . . . . . . . . . . . . . . . . . . . . . . . . . . . . . . . . . . . . . . . . . . . . . . . . . . .85 MEAS SETUP page . . . . . . . . . . . . . . . . . . . . . . . . . . . . . . . . . . . . . . . . . . . . . . . . . . . . . . . . . .864 Keysight E4980A/AL User’s GuideContents Comment line. . . . . . . . . . . . . . . . . . . . . . . . . . . . . . . . . . . . . . . . . . . . . . . . . . . . . . . . . . . 88 Trigger mode . . . . . . . . . . . . . . . . . . . . . . . . . . . . . . . . . . . . . . . . . . . . . . . . . . . . . . . . . . . 89 Automatic level control . . . . . . . . . . . . . . . . . . . . . . . . . . . . . . . . . . . . . . . . . . . . . . . . . . . 91 DC Bias Current Isolation. . . . . . . . . . . . . . . . . . . . . . . . . . . . . . . . . . . . . . . . . . . . . . . . . . 95 Averaging Factor . . . . . . . . . . . . . . . . . . . . . . . . . . . . . . . . . . . . . . . . . . . . . . . . . . . . . . . . 96 Trigger Delay Time. . . . . . . . . . . . . . . . . . . . . . . . . . . . . . . . . . . . . . . . . . . . . . . . . . . . . . . 97 Step Delay Time. . . . . . . . . . . . . . . . . . . . . . . . . . . . . . . . . . . . . . . . . . . . . . . . . . . . . . . . . 99 DC Bias Voltage Monitor . . . . . . . . . . . . . . . . . . . . . . . . . . . . . . . . . . . . . . . . . . . . . . . . . 101 DC Bias Current Monitor . . . . . . . . . . . . . . . . . . . . . . . . . . . . . . . . . . . . . . . . . . . . . . . . . 102 DCR Range. . . . . . . . . . . . . . . . . . . . . . . . . . . . . . . . . . . . . . . . . . . . . . . . . . . . . . . . . . . . 103 DCI Range. . . . . . . . . . . . . . . . . . . . . . . . . . . . . . . . . . . . . . . . . . . . . . . . . . . . . . . . . . . . . 104 DC Source. . . . . . . . . . . . . . . . . . . . . . . . . . . . . . . . . . . . . . . . . . . . . . . . . . . . . . . . . . . . . 105 Automatic Bias Polarity Control . . . . . . . . . . . . . . . . . . . . . . . . . . . . . . . . . . . . . . . . . . . 106 Deviation Measurement. . . . . . . . . . . . . . . . . . . . . . . . . . . . . . . . . . . . . . . . . . . . . . . . . . 108 CORRECTION page . . . . . . . . . . . . . . . . . . . . . . . . . . . . . . . . . . . . . . . . . . . . . . . . . . . . . . . . 110 To set the correction function to on or off. . . . . . . . . . . . . . . . . . . . . . . . . . . . . . . . . . . . 111 The correction functions of the E4980A/AL are operated as follows:. . . . . . . . . . . . . . . 112 Open Correction. . . . . . . . . . . . . . . . . . . . . . . . . . . . . . . . . . . . . . . . . . . . . . . . . . . . . . . . 113 Short Correction. . . . . . . . . . . . . . . . . . . . . . . . . . . . . . . . . . . . . . . . . . . . . . . . . . . . . . . . 117 Correction Based on User-Specified Frequency Points. . . . . . . . . . . . . . . . . . . . . . . . . . 119 Relationships between Correction Based on All Frequency Points and Correction Based on Specified Frequency Points . . . . . . . . . . . . . . . . . . . . . . . . . . . . . . . . . . . . . . . . . . . . . . . 126 Reading/Writing Correction Data . . . . . . . . . . . . . . . . . . . . . . . . . . . . . . . . . . . . . . . . . . 128 Measurement Functions for the Standard. . . . . . . . . . . . . . . . . . . . . . . . . . . . . . . . . . . . 129 Selecting Single/Multiple Correction Mode . . . . . . . . . . . . . . . . . . . . . . . . . . . . . . . . . . 130 Selecting the Cable Length . . . . . . . . . . . . . . . . . . . . . . . . . . . . . . . . . . . . . . . . . . . . . . . 131 LIMIT TABLE SETUP Page . . . . . . . . . . . . . . . . . . . . . . . . . . . . . . . . . . . . . . . . . . . . . . . . . . . 132 Parameter Swap Feature . . . . . . . . . . . . . . . . . . . . . . . . . . . . . . . . . . . . . . . . . . . . . . . . . 133 Comparator Limit Mode. . . . . . . . . . . . . . . . . . . . . . . . . . . . . . . . . . . . . . . . . . . . . . . . . . 135 Tolerance Mode Nominal Value. . . . . . . . . . . . . . . . . . . . . . . . . . . . . . . . . . . . . . . . . . . . 137 Turning On/Off the Comparator. . . . . . . . . . . . . . . . . . . . . . . . . . . . . . . . . . . . . . . . . . . . 138 Turning On/Off the Auxiliary Bin . . . . . . . . . . . . . . . . . . . . . . . . . . . . . . . . . . . . . . . . . . . 139 Beep Feature . . . . . . . . . . . . . . . . . . . . . . . . . . . . . . . . . . . . . . . . . . . . . . . . . . . . . . . . . . 141 Lower and Upper Limits . . . . . . . . . . . . . . . . . . . . . . . . . . . . . . . . . . . . . . . . . . . . . . . . . 142 LIST SWEEP SETUP Page . . . . . . . . . . . . . . . . . . . . . . . . . . . . . . . . . . . . . . . . . . . . . . . . . . . 145 Sweep Mode. . . . . . . . . . . . . . . . . . . . . . . . . . . . . . . . . . . . . . . . . . . . . . . . . . . . . . . . . . . 146 List Sweep Parameters. . . . . . . . . . . . . . . . . . . . . . . . . . . . . . . . . . . . . . . . . . . . . . . . . . . 147 Sweep Points and Limit Modes . . . . . . . . . . . . . . . . . . . . . . . . . . . . . . . . . . . . . . . . . . . . 148 Sweep Parameter Auto-completion . . . . . . . . . . . . . . . . . . . . . . . . . . . . . . . . . . . . . . . . 151 5.System ConfigurationsSYSTEM INFO Page . . . . . . . . . . . . . . . . . . . . . . . . . . . . . . . . . . . . . . . . . . . . . . . . . . . . . . . . 153 Keysight E4980A/AL User’s Guide5ContentsHandler Interface. . . . . . . . . . . . . . . . . . . . . . . . . . . . . . . . . . . . . . . . . . . . . . . . . . . . . . . .154 Scanner Interface . . . . . . . . . . . . . . . . . . . . . . . . . . . . . . . . . . . . . . . . . . . . . . . . . . . . . . .155 Monitor Information. . . . . . . . . . . . . . . . . . . . . . . . . . . . . . . . . . . . . . . . . . . . . . . . . . . . . .155 SYSTEM CONFIG Page . . . . . . . . . . . . . . . . . . . . . . . . . . . . . . . . . . . . . . . . . . . . . . . . . . . . . .156 Turning On/Off the Beep Feature . . . . . . . . . . . . . . . . . . . . . . . . . . . . . . . . . . . . . . . . . . .157 Changing the Beep Tone . . . . . . . . . . . . . . . . . . . . . . . . . . . . . . . . . . . . . . . . . . . . . . . . .158 Changing the Beep Tone . . . . . . . . . . . . . . . . . . . . . . . . . . . . . . . . . . . . . . . . . . . . . . . . .159 Configuring the System Date . . . . . . . . . . . . . . . . . . . . . . . . . . . . . . . . . . . . . . . . . . . . . .159 Configuring the GPIB Address. . . . . . . . . . . . . . . . . . . . . . . . . . . . . . . . . . . . . . . . . . . . . .161 Configuring the LAN IP address . . . . . . . . . . . . . . . . . . . . . . . . . . . . . . . . . . . . . . . . . . . .162 SELF TEST Page . . . . . . . . . . . . . . . . . . . . . . . . . . . . . . . . . . . . . . . . . . . . . . . . . . . . . . . . . . .164 Choosing a Test Item. . . . . . . . . . . . . . . . . . . . . . . . . . . . . . . . . . . . . . . . . . . . . . . . . . . . .165 SERVICE Page. . . . . . . . . . . . . . . . . . . . . . . . . . . . . . . . . . . . . . . . . . . . . . . . . . . . . . . . . . . . .166 Monitor Information. . . . . . . . . . . . . . . . . . . . . . . . . . . . . . . . . . . . . . . . . . . . . . . . . . . . . .167 Saving the System Information into External Memory. . . . . . . . . . . . . . . . . . . . . . . . . . .167 6.Save/RecallOverview of Save/Recall Functionality . . . . . . . . . . . . . . . . . . . . . . . . . . . . . . . . . . . . . . . . . .169 Save Methods and Their Uses. . . . . . . . . . . . . . . . . . . . . . . . . . . . . . . . . . . . . . . . . . . . . .169 Folder/File Structure on USB Memory . . . . . . . . . . . . . . . . . . . . . . . . . . . . . . . . . . . . . . .170 USB Memory Notes. . . . . . . . . . . . . . . . . . . . . . . . . . . . . . . . . . . . . . . . . . . . . . . . . . . . . .171 Saving/Recalling Instrument Configuration States . . . . . . . . . . . . . . . . . . . . . . . . . . . . . . . .172 Overview of Instrument Configurations . . . . . . . . . . . . . . . . . . . . . . . . . . . . . . . . . . . . . .172 Medium Mode . . . . . . . . . . . . . . . . . . . . . . . . . . . . . . . . . . . . . . . . . . . . . . . . . . . . . . . . . .173 Choosing a Register Number . . . . . . . . . . . . . . . . . . . . . . . . . . . . . . . . . . . . . . . . . . . . . .174 Memory Status Information . . . . . . . . . . . . . . . . . . . . . . . . . . . . . . . . . . . . . . . . . . . . . . .174 Comment Information. . . . . . . . . . . . . . . . . . . . . . . . . . . . . . . . . . . . . . . . . . . . . . . . . . . .175 Saving/Recalling Instrument Configuration States into/from the Internal Memory . . . .175 Saving/Recalling Instrument Configuration States into/from USB Memory. . . . . . . . . .177 Using the Auto Recall Feature. . . . . . . . . . . . . . . . . . . . . . . . . . . . . . . . . . . . . . . . . . . . . .179 Saving Measurement Results into USB Memory . . . . . . . . . . . . . . . . . . . . . . . . . . . . . . . . . .180 Measurement Result Format. . . . . . . . . . . . . . . . . . . . . . . . . . . . . . . . . . . . . . . . . . . . . . .180 To save measurement results into USB memory: . . . . . . . . . . . . . . . . . . . . . . . . . . . . . .183 How to save the measurement result of List Sweep Measurement to USB memory.. . .184 Saving a Screenshot into USB Memory . . . . . . . . . . . . . . . . . . . . . . . . . . . . . . . . . . . . . . . . .186 To save a screenshot into USB memory . . . . . . . . . . . . . . . . . . . . . . . . . . . . . . . . . . . . . .186 7.Measurement Procedure and ExamplesBasic Measurement Procedure . . . . . . . . . . . . . . . . . . . . . . . . . . . . . . . . . . . . . . . . . . . . . . . .187 Impedance Parameters . . . . . . . . . . . . . . . . . . . . . . . . . . . . . . . . . . . . . . . . . . . . . . . . . . . . . .189 Parallel/Series Circuit Mode . . . . . . . . . . . . . . . . . . . . . . . . . . . . . . . . . . . . . . . . . . . . . . . . . .1926 Keysight E4980A/AL User’s GuideContents Selecting Circuit Mode of Capacitance. . . . . . . . . . . . . . . . . . . . . . . . . . . . . . . . . . . . . . 193Selecting Circuit Mode of Inductance . . . . . . . . . . . . . . . . . . . . . . . . . . . . . . . . . . . . . . . 194 Test Signal Level. . . . . . . . . . . . . . . . . . . . . . . . . . . . . . . . . . . . . . . . . . . . . . . . . . . . . . . . . . . 195 Test Signal Level Across the DUT. . . . . . . . . . . . . . . . . . . . . . . . . . . . . . . . . . . . . . . . . . . 195 Test Signal Level Setting . . . . . . . . . . . . . . . . . . . . . . . . . . . . . . . . . . . . . . . . . . . . . . . . . 196 Four-Terminal Pair Configuration. . . . . . . . . . . . . . . . . . . . . . . . . . . . . . . . . . . . . . . . . . . . . . 197 Measurement Contacts . . . . . . . . . . . . . . . . . . . . . . . . . . . . . . . . . . . . . . . . . . . . . . . . . . . . . 199 Capacitance to Ground . . . . . . . . . . . . . . . . . . . . . . . . . . . . . . . . . . . . . . . . . . . . . . . . . . 199 Contact Resistance . . . . . . . . . . . . . . . . . . . . . . . . . . . . . . . . . . . . . . . . . . . . . . . . . . . . . 201 Extending Test Leads . . . . . . . . . . . . . . . . . . . . . . . . . . . . . . . . . . . . . . . . . . . . . . . . . . . . 202 Guarding for Measurement of Low Capacitance Values. . . . . . . . . . . . . . . . . . . . . . . . . 204 Shielding. . . . . . . . . . . . . . . . . . . . . . . . . . . . . . . . . . . . . . . . . . . . . . . . . . . . . . . . . . . . . . 205 Correction Functions . . . . . . . . . . . . . . . . . . . . . . . . . . . . . . . . . . . . . . . . . . . . . . . . . . . . . . . 206 Performing OPEN Correction. . . . . . . . . . . . . . . . . . . . . . . . . . . . . . . . . . . . . . . . . . . . . . 208 Performing SHORT Correction. . . . . . . . . . . . . . . . . . . . . . . . . . . . . . . . . . . . . . . . . . . . . 208 Performing LOAD Correction . . . . . . . . . . . . . . . . . . . . . . . . . . . . . . . . . . . . . . . . . . . . . . 208 Parasitics Incident to DUT Connection . . . . . . . . . . . . . . . . . . . . . . . . . . . . . . . . . . . . . . . . . 210 Characteristics Example. . . . . . . . . . . . . . . . . . . . . . . . . . . . . . . . . . . . . . . . . . . . . . . . . . . . . 211 Capacitor Measurements. . . . . . . . . . . . . . . . . . . . . . . . . . . . . . . . . . . . . . . . . . . . . . . . . . . . 213 Inductance Measurements. . . . . . . . . . . . . . . . . . . . . . . . . . . . . . . . . . . . . . . . . . . . . . . . . . . 216 Measurements Using DC source . . . . . . . . . . . . . . . . . . . . . . . . . . . . . . . . . . . . . . . . . . . . . . 219 8.Overview of Remote ControlTypes of remote control system . . . . . . . . . . . . . . . . . . . . . . . . . . . . . . . . . . . . . . . . . . . . . . . 223 GPIB remote control system. . . . . . . . . . . . . . . . . . . . . . . . . . . . . . . . . . . . . . . . . . . . . . . . . . 224 What is GPIB?. . . . . . . . . . . . . . . . . . . . . . . . . . . . . . . . . . . . . . . . . . . . . . . . . . . . . . . . . . 224 System configuration. . . . . . . . . . . . . . . . . . . . . . . . . . . . . . . . . . . . . . . . . . . . . . . . . . . . 224 Device selector . . . . . . . . . . . . . . . . . . . . . . . . . . . . . . . . . . . . . . . . . . . . . . . . . . . . . . . . 225 LAN remote control system . . . . . . . . . . . . . . . . . . . . . . . . . . . . . . . . . . . . . . . . . . . . . . . . . . 226 System configuration. . . . . . . . . . . . . . . . . . . . . . . . . . . . . . . . . . . . . . . . . . . . . . . . . . . . 226 Control over SICL-LAN server . . . . . . . . . . . . . . . . . . . . . . . . . . . . . . . . . . . . . . . . . . . . . 228 Control over telnet server. . . . . . . . . . . . . . . . . . . . . . . . . . . . . . . . . . . . . . . . . . . . . . . . . 232 Control via Web server. . . . . . . . . . . . . . . . . . . . . . . . . . . . . . . . . . . . . . . . . . . . . . . . . . . 235 USB Remote Control System. . . . . . . . . . . . . . . . . . . . . . . . . . . . . . . . . . . . . . . . . . . . . . . . . 238 System configuration. . . . . . . . . . . . . . . . . . . . . . . . . . . . . . . . . . . . . . . . . . . . . . . . . . . . 238 Sending SCPI command messages. . . . . . . . . . . . . . . . . . . . . . . . . . . . . . . . . . . . . . . . . . . . 244 Types and structure of commands. . . . . . . . . . . . . . . . . . . . . . . . . . . . . . . . . . . . . . . . . . 244 Grammar of messages . . . . . . . . . . . . . . . . . . . . . . . . . . . . . . . . . . . . . . . . . . . . . . . . . . 245 Remote mode. . . . . . . . . . . . . . . . . . . . . . . . . . . . . . . . . . . . . . . . . . . . . . . . . . . . . . . . . . 246 Trigger System . . . . . . . . . . . . . . . . . . . . . . . . . . . . . . . . . . . . . . . . . . . . . . . . . . . . . . . . . . . . 247 Keysight E4980A/AL User’s Guide7。

Optical Power and Wavelength MeterOMM6810B The OMM-6810B is the only power meter capableof measuring the optical power and wavelength ofsemiconductor lasers including short wavelengthlasers, high power pumps, and fiber lasers. A variety of measurement heads cover wavelength ranges from 350 to 1650nm for power only or power andwavelength measurement.In addition to precision power and wavelength measurements, the OMM-6810B is loaded withstandard features such as log/linear display modes, autoranging, user calibration, and reference measurementcapability. All of these features plus an analog output andIEEE-standard GPIB interface combine to make this instrument a cost-effective laser diode development orproduction test tool.NIST traceable calibrationMeasures power and wavelength with ILX Power/Waveheads Integrating sphere-based power measurements Measurement heads cover a wide wavelength range from350 to 1650nm Power measurement up to 10W Free-space and fi ber measurement heads Easy test system integration withstandard GPIB interface The only power meter that measures power and wavelength.Optical Power and Wavelength Meter OMM 6810B Count on High PerformanceThe OMM-6810B is an accurate, low noise power meter capable of measuring optical power over an 80dB dynamic range, and offers the stability and repeatability necessary for precise power measurement. Packed with other features including a novel wavelength measurement technique developed at ILX Lightwave, the OMM-6810B becomes the only power meter to measure wavelength and power in a single, easy to use instrument. Power/Waveheads offer up to 10W of optical power measurement with wavelength measurement accuracies from several tenths of a nanometer to one nanometer. For spectral measurements of high power sources, a fi ber tap is included on the OMH-6790B Power/Wavehead to allow convenient connection to an optical spectrum analyzer. A Wide Variety of Measurement Heads The OMH-6700B Series Optical Measurement Heads, when coupled with the OMM-6810B Optical Multimeter, provide the fl exibility to easily and accurately measure the optical power of most laser diode sources available today including short wavelength lasers, higher power pump, and fi ber laser diodes. In addition, Power/Waveheads are available that measure the power-averaged wavelength.Choose from power only or power and wavelength measurement heads to cover a source wavelength range of 350 to 1650nm and optical power from -50dBm to + 40dBm. Power/Waveheads use proven and efficient integrating sphere technology for both free space measurements and fi ber measurements. Measurement heads can be confi gured for the most common fi ber optic connectors including FC, LC, ST, SC, and bare fi ber.Power Only Heads Power only heads for both free space and fi ber optic measurements offer the capability of measuring power only from laser diode sources while capitalizing on the wide dynamic range of semiconductor detectors. The power measurements are made possible by integrating sphere technology, allowing power measurements up to 30dBm. The fi ber optic heads ensure high sensitivity, high stability, and low noise power measurements by temperature controlling the detectors. Power/Waveheads Power/Waveheads combine precision power measurement capability with ILX Lightwave’s unique wavelength measurement capability to deliver a cost-effective laser diode measurement tool. For example, the OMH-6742B Head with wavelength accuracy of ±1.0nm eliminates the need for additional wavelength measurements in short wavelength laser diode testing, saving time and money.Since these heads measure wavelength, they have the unique capability to “self calibrate” the wavelength dependent response of the detector. There is no need to enter a wavelength for an accurate power measurement ; the instrument does it automatically The Fiber Optic Heads offer high power measurement capability for high power pumps and fi ber lasers.Semiconductor Power/Waveheads provide accuratemeasurements of short wavelength lasers.Optical Power and Wavelength Meter OMM 6810BAffordable optical power and wavelength measurement in a single meter.by sensing the wavelength. This allows the OMM-6810B with one of the power/waveheads to act like a spectrally-fl at thermal detector. Sophisticated, Yet Simple to Operate The OMM-6810B can be intuitively operated from the front panel or via the standard GPIB interface. Optical power can be read on the left hand display in either linear or logarithmic units, while wavelength is displayed on the right hand display in either nanometers or wavenumbers. Both 5-digit, green LED displays are easy to view, even with safety goggles on. For optical alignment, the optical power level is also easy to monitor on the clear, 16-segment, analog intensity bar graph. An analog output port on the rear panel, with a voltage proportional to power, is also provided for remote monitoring.Powerful GPIB Interface Makes Remote Control and Testing Easy For automated control, the GPIB interface allows remote programming and instrument operation in research and development or manufacturing environments. All instrument and measurement head functions accessible from the front panel are also accessible through the GPIB interface, making data gathering quick and accurate. In addition, a LabVIEW ® driver is available for download from the ILX Lightwave website.Measurement Confi dence The OMM-6810B and OMH-6700 Series Measurement Heads are calibrated to NIST traceable standards in our own calibration laboratory where accuracy and traceability are our primary concerns. Our documented quality system ensures conformance to continuous traceability and ultimately your confi dence in the power/waveheads’ measurements.Optical Power and Wavelength Meter OMM 6810B1POWER DISPLAY Type: 5-digit, 7-segment, green LEDs Power Units Linear: pW, nW, µW, mW, W Log: dB, dBm Resolution: .001 unit (log or linear)Power Level Meter: 16-segment bar graph Analog Power Output: 0–10V, for each range, relative to full scale WAVELENGTH DISPLAY Type: 5-digit, 7-segment, green LEDs Units: nm, cm -1Resolution: 0.1nm DISPLAY UPDATE PERIOD (AVERAGING)Slow: 960ms (16 samples/result)Medium: 240ms (4 samples/result)Fast: 60ms (no averaging)GENERAL Power (50–60 Hz): 100V, ±10%, 120V, ±10% 220V, ±10%, 240V, ±10%Operating Temperature: 15°C– 35°C Storage Temperature: –20°C to 60°C Humidity: <85% RH, noncondensing <70% for <100µW input Dimensions (HxWxD): 89mm x 217mm x 313mm3.5" x 8.5" x 12.3"Weight: 2.5kg (5.5lbs)Warm-up: 1 hour NOTES Typical values provide supplemental information beyond guaranteed specifi cation limits.1. Unless otherwise specifi ed, all specifi cations measured at 25°C ±3°Cafter one-hour warm-up period. Fiber optic head specifi cations applicable for 9/125 to 110/140µm, NA = 0.3. 2. Typical photdiode response is linear over a 60 to 70 dB range between the effects of thermal noise and saturation of the diode. ILX power meter heads are calibrated aboe the noise threshold and linearity is verifi ed inorder to produce an accurate calibration for optical power measurements to 10W.3. Includes traceability to NIST. Calibrated to 21o C + 3o C at 10 nm intervals. Uncertainty evaluated according to NIST Technical Note #1297: “Guidelines for Evaluating and Expressing the Uncertainty of NIST Measurement Results.” Accuracy specifi cations are verifi ed with the wavelength entered manually (instrument not in auto-wavelength mode). Add 1% for NA > 0.2, Maximum NA 0.30.4. Range of input power necessary for wavelength measurement.5. This instrument’s wavelength measurement technology provides “power-averaged” wavelength (i.e., spectral contributions to which detectors aresensitive are measured).6. Manual wavelength mode. Add +0.5% for auto-wavelength mode. Add +0.5% for <440 nm and >1000 nm. For input power >100 mW, add+0.05%/100 mW.7. For input power >100 mW, add +0.05%/100 mW.8. +1.5 nm for 950 to 1000 nm range.In keeping with our commitment to continuing improvement, ILX Lightwave reserves the right to change specifi cations without notice and without liability for such changes.ORDERING INFORMATION OMM-6810B-100V Optical Multimeter (GPIB included), 100V OMM-6810B-120V Optical Multimeter (GPIB included), 120V OMM-6810B-220V Optical Multimeter (GPIB included), 220V OMM-6810B-240V Optical Multimeter (GPIB included), 240V Power Only Measurement Heads OMH-6703B Silicon Power Head (1W Power Measurement, 400–1100nm)OMH-6708B InGaAs Power Head (100mW Power Measurement, 800–1600nm)Power/WaveHeads (Power and Wavelength Measurement)OMH-6727B InGaAs Power/Wavehead (1W, 950–1650nm)OMH-6742B Short Wavelength Power/Wavehead (1W, 350–1100nm)OMH-6790B Silicon Fiber Power/Wavehead (10W, 830–1100nm)Accessories BF-820 Bare Fiber Holder (requires either AO120 or CA-120)RM-123 Dual Rack Mounting Kit RM-125 Single Rack Mounting Kit Note: Fiber optic adapters available on request for FC, LC, SC, ST , and bare fi ber.REV10. 0613191-800-459-9459For information call GENERAL OMH-6703B Silicon Power Head OMH-6708B InGaAs Power Head OMH-6727B InGaAs Power/Wavehead OMH-6742B Short Wave-length Power/Wavehead OMH-6790B 10W Silicon Power/Wavehead 6mm 6mm 6mm 6mm 2.54mm Fiber Input 0.4-1.1µm 0.8-1.6µm 0.95-1.65µm 0.35-1.1µm 0.83-1.1µm 69mm (dia.) x 30mm (thick)69mm (dia.) x 30mm (thick)69mm (dia.) x 30mm (thick)69mm (dia.) x 30mm (thick)86mm x 86mm x 100mm -40 to +30dBm -50 to +20dBm -40 to +30dBm -40 to +30dBm -30 to +40dBm ±5.0%6±5.0%±5.0%7±3.5%6±5.0% NA NA -20 to +30dBm -10 to +30dBm 0 to 40dBm --------------------±1.0nm 8±1.0nm ±0.2nm Power Only Power and Wavelength Model Aperture Wavelength Dimensions Range 2 Accuracy 3 Range 4 Accuracy 5 Range Application POWER MEASUREMENT OMH-6700B MEASUREMENT HEADS WAVELENGTH MEASUREMENT 31950 Frontage Road, Bozeman, MT 59715 • FAX: 406-586-9405 /ilxlightwave。

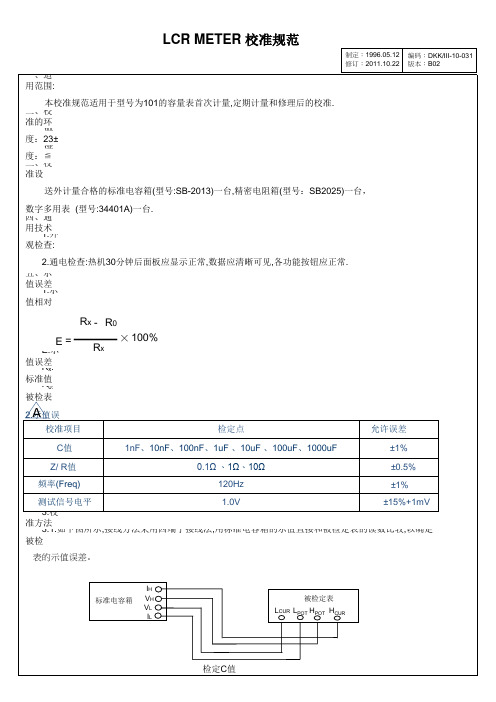
化工工艺管道的标准符号说明(2) 有专门的标准,多学习,多认识,多参与工程。
希望有所帮助。
. 石油化工企业配管工程常用缩写词SH/T 3902-93目次总则1、管子及管件2、法兰3、垫片4、牢固件5、阀门6、管道上用的设备7、隔热、伴热8、配管材料和等级9、装置布置10、尺寸标准11、图、表12、操作方式及工作参数13、施工14、其他总则本标准适用于石油化工企业工艺装置(单元)配管工程设计,其它配管工程设计可参照使用。
本标准未包括的缩写,设计需要时,可采纳其它通用的英文缩写,或参照本标准派生。
1 管子及管件编号缩写中文名称英文名称1.1 P 管子Pipe1.2 EL 弯头Elbow1.2.1 ELL 长半径弯头Long rdius elbow1.2.2 ELS 短半径弯头Short rdius elbow1.2.3 MEL 斜接弯头(虾米腰弯头)Mitre elbow1.2.4 REL 异径弯头Reducing elbow1.3 T 三通Tee1.3.1 LT 斜三通Lterl tee1.3.2 RT 异径三通Reducing tee1.4 R 异径管接头(大小头)Reducer1.4.1 CR 同心异径管接头(同心大小头)Concentric reducer1.4.2 ER 偏心异径管接头(偏心大小头)Eccentric reducer1.5 CPL 管箍Coupling1.5.1 FCPL 双头管箍Full coupling1.5.2 HCPL 单头管箍Hlf coupling1.5.3 RCPL 异径管箍Reducing coupling1.6 BU 内外螺纹接头Bushing1.7 UN 活接头Union1.8 HC 软管接头Hose coupler1.9 SE 翻边短节Stub end1.10 NIP 短节Pipe nipple or stright nipple 1.10.1 SNIP 异径短节Swged nipple1.11 CP 管帽(封头)Cp1.12 PL 管堵(丝堵)Plug1.13 BLK 盲板Blnk1.13.1 SB 8字盲板Spectcle blind (blnk)1.14 RP 补强板Reinforcing pd2 法兰编号缩写中文名称英文名称2.1 PLG 法兰Flnge2.1.1 WNF 对焊法兰Welding neck flnge 2.1.2 SOF 平焊法兰Slip-on flnge2.1.3 SWF 承插焊法兰Socket-welding flnge 2.1.4 T 螺纹法兰Threded flnge2.1.5 LJ 松套法兰Lpped joint flnge2.1.6 REDF 异径法兰Reducing flnge2.1.7 BF 法兰盖(日法兰)Blind flnge2.2 FSF 法兰密封面Flnge scling fce2.2.1 FF 全平面Flt fce2.2.2 RF 凸XX面Rised fce2.2.3 MFF 凹凸面Mle nd femle fce2.2.4 LF 凹面Femle fce2.2.5 LM 凸面Mle fce2.2.6 RJ 环连接面Ring joint fce2.2.7 TG 榫槽面Tongue nd groove fce2.2.8 TF 榫面Tongue fce2.2.9 GF 槽面Groove fce3 垫片编号缩写中文名称英文名称3.1 G 垫片Gsket3.1.1 NMG 非金属垫片Non-metllic gsket3.1.1.1 G 石棉垫片sbestos gsket3.1.1.2 RG 橡胶垫片Rubber gsket3.1.1.3 TEG 聚四氟乙烯包复垫片PTFE envelope gsket 3.1.2 SMG 半金属垫片Semimetllic gsket3.1.2.1 MJG 金属包垫片Met-jcket gsket3.1.2.2 SWG 缠绕式垫片Spirl wound gsket3.1.3 MG 金属垫片Metllic gsket3.1.3.1 FMG 金属平垫片Flt metllic gsket3.1.3.2 SMSG 齿形金属垫片Solid metl serrted gsket3.1.3.3 LER 透镜式金属环垫Lens ring gsket3.1.3.4 OCR 八角形金属环垫Octgonl ring gsket 3.1.3.5 OVR 椭圆形金属环垫Ovl ring gkset3.1.3.6 IR/OR 内外定位环Inner ring nd outer ring 3.1.3.7 IR 内定位环Inner ring3.1.3.8 OR 外定位环Outer ring4 牢固件编号缩写中文名称英文名称4.1 B 螺栓Bolt4.1.1 SB 螺柱Stud bolt4.2 NU 螺母Nut4.3 TB 花蓝螺母Turnbuckle4.4 WSR 垫圈Wsher4.4.1 SWSR 弹簧垫圈Spring wsher5 阀门编号缩写中文名称英文名称5.1 GV 闸阀Gte vlve5.2 GLV 截止阀Globe vlve5.3 CHV 止回阀Check vlve5.4 BUV 蝶阀Butterfly vlve5.5 B V 球阀Bll vlve5.6 PV 旋塞阀Plug vlve (cock)5.7 CV 调节阀Control vlve5.8 SV 安全阀Sfety vlve5.9 RV 减压阀Pressure reducing vlve 5.10 ST 蒸汽疏水阀Stem trp5.11 PRV 泄压阀Pressur relief vlve5.12 BV 呼吸阀Brether vlve5.13 NV 针形阀Needle vlve5.14 V 角阀5.15 DV 隔膜阀5.16 TWV 三通阀5.17 SGV 插板阀6 管道上用的小型设备编号缩写中文名称英文名称6.1 SPR 气液分离器Seprtor6.2 F 阻火器Flme rrester6.3 SR 过滤器Striner6.3.1 SRY Y型过滤器Y-type striner6.3.2 SRT T型过滤器T-type striner6.3.3 SRB 桶式过滤器Bucket type striner 6.3.4 TSR 临时过滤器Temporry striner 6.4 SIL 消声器Silencer6.5 SG 视镜Slight glss6.6 SC 取样冷却器Smple cooler6.7 DF 排液漏斗Drin funnel6.8 LM 管道混合器Line mixer6.9 RO 限流孔板Restriction orifice6.9.1 MO 混合孔板Mixing orifice6.1 RD 爆破片(爆破膜)Rupture disk6.11 EJ 补偿器Expnsion joint7 隔热、伴热编号缩写中文名称英文名称7.1 INS 隔热Therml insultion7.1.1 H 保温Hot insultion7.1.2 C 保冷Cold insultion7.1.3 P 防烫伤隔热Personnel protection insultion 7.2 T&I 伴热Trcing nd insultion7.3 T 管道伴热(冷)Trcing7.3.1 EST 蒸汽外伴热Externl stem trcing7.3.2 IST 蒸汽内伴热Internl stem trcing7.3.3 SJT 蒸汽夹套伴热Stem-jcket trcing7.3.4 ET 电伴热Electric trcing8 配管材料和等级编号缩写中文名称英文名称8.1 M 金属材料Metllic mteril8.1.1 CS 碳钢Crbon steel8.1.2 CS 铸钢Cst steel8.1.3 FS 锻钢Forged steel8.1.4 S 合金钢lloy steel8.1.5 SS 不锈钢Stinless steel8.1.6 USTstinless-steel SS 奥氏体不锈钢ustenitic 8.1.7 CI 铸铁Cst iron8.1.8 MI 可锻铸铁Mlleble iron8.1.9 DI 球墨铸铁Ductile iron8.1.10 L 铝luminum8.1.11 BRS 黄铜Brss8.1.12 BRZ XX铜Bronze8.1.13 CU 紫铜Copper8.1.14 LS 低合金钢Low lloy steel8.1.15 FLS 低合金锻钢Forged low lloy steel 8.1.16 CLS 低合金铸钢Cst low lloy steel 8.2 THK 壁厚Thickness8.2.1 SCH 表号Schedule number8.2.2 STD 标准Stndrd8.2.3 XS 加强Extr strong8.2.4 XXS 特强Double extr strong9 装置布置编号缩写中文名称英文名称9.1 CN 建北Construction north9.2 E 东Est9.3 W 西West9.4 S 南South9.5 N 北North9.6 H 水平Horizontl9.7 V 竖直、铅直、直立Verticl9.8 GRD 地坪Ground9.9 UG 地下Underground9.10 BL 装置边界线Bttery limit line9.11 ESEW 事故沐浴洗眼器Emergency shower nd eye wsher 9.12 HS 软管站Hose sttion9.13 ML 接续分界线Mtch line9.14 PS 管道支架(管架)Piping support9.15 PR 管桥Pipe rck9.16 STRU 构架(构筑物)Structure9.17 BLDG 建筑物Building9.18 PD 清扫设施Purge device9.19 PT 池Pit9.20 SHLT 棚Shelter9.21 COFF 围堰Cofferdm9.22 FL 楼板Floor9.23 PF 平XX Plteform10 尺寸标注编号缩写中文名称英文名称10.1 EL 标高Elevtion10.2 BOP 管底Bottom of pipe10.3 COP 管中心Center of pipe10.4 TOP 管顶Top of pipe10.5 FOB 底平Flt on bottom10.6 FOT 顶平Flt on top10.7 CL(屯) 中心线Center line10.8 TL 切线Tngent line10.9 SYM 对称的Symmetricl10.10 BOS 支架底Bottom of support 10.11 TOS 支架顶Top of support 10.12 CL 净距(净空)Clernce10.13 CTC 中心至中心Center to center 10.14 CTF 中心至面Center to fce 10.15 CTE 中心至端部Center to end 10.16 ETE 端到端End to end10.17 FEF 法兰端面Flnge nd fce10.18 FTF 面到面Fce to fce10.19 D 直径Dimeter10.20 DN 公称直径Nominl dimeter10.21 ID 内径Inside dimeter10.22 OD 外径Outside dimeter10.23 DIM 尺寸Dimension10.24 MX 最大Mximum10.25 MIN 最小Minimum10.26 VG 平均verge10.27 PP 约、近似pproximte10.28 PT.EL 点标高Point elevtion11 图表编号缩写中文名称英文名称11.1 PFD 工艺流程图Process flow digrm11.2 PID 管道和仪表流程图Piping & instrument digrm 11.3 COD 接续图Continued on drwing11.4 DTL 详图Dtil11.5 SPDWG(ISODWG) 管段图Spool drwing (ech line isometric drwing) 11.6 DWGNO 图号Drwing number11.7 DWGI 所在图号Drwing identifiction11.8 LOW 材料表List of mteril11.9 MTO 汇料Mteril tke-off11.10 PPX 附录ppendix11.11 JOB. No. 工号Job Number11.12 BEDD 基础工程设计数据Bsic engineering design dt 11.13 DEDD 详细工程设计数据Detil engineering design dt 11.14 REV. No. 修改号Recision number11.15 REFDWG 参考图Reference drwing11.16 SC 采样接口Smple connection12 操作方式及工作参数编号缩写中文名称英文名称12.1 UT 自动utomtic12.2 ML 手动Mnul control12.3 CHOP 链条操作Chin operted12.4 CSC 铅封关Cr sel close12.5 CSO 铅封开Cr sel open12.6 LC 锁闭Lock closed12.7 LO 锁开Lock open12.8 NC 正常关Normlly close12.9 NO 正常开Normlly open12.10 TM 大气压tmosphere12.11 PN 公称压力Nominl pressure12.12 绝压12.13 G 表压12.14 (T) 温度Temperture12.15 (P) 压力Pressure13 施工编号缩写中文名称英文名称13.1 W 焊接Welding13.1.1 W 电弧焊rc welding13.1.2 GSW 气体保护电弧焊Gs shielded-cr welding 13.1.3 EFW 电熔焊Elecric fusion welding13.1.4 ERW 电阻焊Electric Resistnce welding 13.1.5 GW 气焊Gs welding13.1.6 LW 搭接焊Lp welding13.1.7 BW 对焊Butt welding13.4.8 TW 定位焊Tck welding13.1.9 SW 承插焊Socket welding13.1.10 CW 连续焊Continuous welding13.1.11 SEW 密封焊Sel welding13.1.12 SFG 堆焊Surfcing13.1.13 FW 现场焊接Field welding13.2 HT 热处理Het tretment13.2.1 PH 预热Preheting13.2.2 SR 应力消除Stress relief13.2.3 PWHT 焊后热处理Post weld het tretment13.3 EIT 检查、探伤和实验Exmintion, inspection & testing 13.3.1 VE 外观检查Visul exmintion13.3.2 UI (UT) 超声探伤Ultrsonic inspection (test)13.3.3 RI (RT) 射线探伤Rdiogrphic inspection (test)13.3.4 MPI (MT) 磁粉探伤Mgnetic prticle inspection (test) 13.3.5 LPI (PT) 液体渗透检验Liquid penternt inspection (test)13.3.6 HDT 硬度实验Hrdness testing13.3.7 HYDT 水压实验Hydrulic testing13.3.8 PNET 气压实验Pneumtic testing13.3.9 CE 焊条Covered electrode13.3.10 WW 焊丝Welding wire13.3.11 SSY 装配、组合ssembly13.** F 现场Field13.3.13 F/F 现场制造Field fricted13.3.14 SF 现场决定Suit in field13.3.15 CSP 冷紧Cold spring13.3.16 BCT 螺栓冷紧Bolt cold tightening13.3.17 BHY 螺栓热紧Bolt hot tightening13.3.18 CO 清洗口Clen out13.3.19 NNY 退火nneled13.4 PE 平端面Plin end13.5 BE 坡口端Belelled end13.6 THR 螺纹Thred13.7 HB 布氏硬度Brinnel hrdness13.8 RC 洛氏硬度14 其他编号缩写中文名称英文名称14.1 FDN 基础Foundtion14.2 INF 信息(资料)Informtion14.3 REF 参考Reference14.4 REV 修改Revision14.5 SEQ 序号(顺序)Sequence14.6 W/E 设备带来With equipment 14.7 W/I 仪表带来With instrument 14.8 CM 色标Colour mrk14.9 C 腐蚀裕度Corrosion llownce14.10 UTL 公用系统Utility14.11 UC 公用工程接头Utility connection 14.12 QTY 数量Quntity14.13 WT 重量Weight14.14 MHR 工时Mn hour14.15 BC 螺栓分布圆Bolt circle14.16 HP 高点High point14.17 LP 低点Low point14.18 SUC 吸入(口)Suction14.19 DIS 排出(口)Dischrge14.20 SO 蒸气吹扫(口)Stem out14.21 NPT 美国标准锥管螺纹Ntionl stndrd tperpipe thred 14.22 NPS 美国标准直管螺纹Ntionl stndrd stright pipe thred 14.23 DR 排液Drin14.24 VT 放气Vent14.25 RTG (压力)等级Rting14.26 CL 等级Clss。

LCR测试基础阻抗测量基础⼀.元件阻抗的测量我们⽇常使⽤或⼯⼚⽣产的⽆源元件(主要指各种电感、电容、电阻)均标有⼀定的数值,从使⽤的⾓度说已确定了该元件的数值(标称值),实际上存在下列三个因素需要对元件进⾏测量:电抗X 、导纳Y 、电导G 、电纳B 、损耗D 、品质因素Q 、相位⾓θ。
仪器测量时并不直接测量某单个参数,⽽是测量复阻抗,然后按照其相互关系转换成所需测量将式(3)代⼊式(2)得:Rs ErrEdutZx ×?=----------------------------------------------------(4)这⾥,Err ,Edut 均为⽮量。
令10jV V Edut +=, 32jV V Err +=--------------------------------------------------------(5)将式(5)代⼊式(4)可得:s sR V V V V V V j R V V V V V V Zx 2222322130323120+?+++?=----------------------------------------------------(6)⽐较式(6)与式(1)可得到:s x R V V V V V V R 22323120++?=--------------------------------------------------------------------------------(7) s x R V V V V V V X 22322130+?=----------------------------------------------------------------------------------(8)式(7)与(8)即为所需的阻抗参数。
各类仪器测试电路的实际配置会有很⼤不同。
宽带⾼精度LCR 表和阻抗分析仪所使⽤的I-V 转换器包括复杂的null 检波器、相位检波器、积分器和⽮量调制器,以保证在宽频率范围内的⾼精度。

LCR-58Features:•Resistance•Capacitance•Inductance•ESR•DCR•Diode Test•Parallel or Series Mode•Auto Select Mode•Data Hold•Manual or Auto Range•Manually Selectable Frequency Overview:The LCR-58 Tweezer LCR Meter is a compact LCR (inductance, capacitance, and resistance) meter with a tweezer form factor. It is small enough for one-hand operation and ideally suited to testing Surface Mount Devices (SMD).Although the LCR-58 is much smaller and lighter than traditional LCR meters, it is a high quality, precise full-feature LCR meter with ESR and Diode Test.The Tweezer LCR Meter has Auto Select Mode, which automatically identifies and measures the correct component type. In addition you can manually select between Parallel or Series mode.Tweezer LCR Meter with ESR The LCR-58Capabilities:Specifications:Test frequency 100/120 Hz, 1 kHz, 10 kHzTest signal level0.5 Vrms Basic accuracy1 – 3% + 5 dgts Resistance range (resolution) 60 Ω – 20 M Ω (0.01 Ω) Capacitance range (resolution) 600 pF – 6 mF (0.1 pF) Inductance range (resolution) 60 µH – 200 H (0.1 µH) Display 6000 count LEDPolarity Automatic, ( - )negative polarity indication Over range“OL” mark indicationLow battery indication The “ ” is displayed when the battery voltage drops below the operating level Sampling rate 2 samples per second, nominal Auto power offApprox. 30 minutesOperating environment 0ºC – 40ºC (32ºF – 104ºF) at < 70% R.H. Storage environment -20ºC – 60ºC (-4ºF – 140ºF) at < 80% R.H. with battery removed from meterPower 3.0 V button-type lithium battery ×2, CR2032 Battery life 50 hours continuous operation Size 205mm(H) × 40 mm(W) ×24.5mm(D) WeightApprox. 3.9 oz ( 110g ) including batterySpecifications subject to change without notice. Go to for the latest update.LCR-58 comes with the following items:© 2014 Global Specialties V20140910 22820 Savi Ranch Parkway Yorba Linda, CA 92887 1.800.572.1028LCR-58。
用户手册User’s GuideAT827/AT828Rev.A0固件说明:适用于主程序RevA1.0及以上的版本@Instruments常州安柏精密仪器有限公司.江苏省常州市武进区漕溪路9号14幢电话:*************销售服务电子邮件: *****************技术支持电子邮件: ****************©2005-2023 Applent Instruments Ltd.2 LCR-1000 LCR Meter用户手册目录目录 (2)插图目录 (5)表格目录 (6)1.安装和设置向导 (7)1.1装箱清单 (7)1.2电源要求 (7)1.3操作环境 (7)1.4清洗 (7)1.5更换电池 (8)2.概述 (9)2.1引言 (9)2.2测量功能 (9)2.2.1测量参数 (9)2.2.2等效方式 (10)2.2.3量程 (10)2.2.4测试速度 (10)2.2.5基本准确度 (11)2.2.6测量显示范围 (11)2.3信号源 (12)2.3.1测试频率 (12)2.3.2测试电平 (12)2.3.3源内阻 (12)2.4主要功能 (12)2.4.1校准功能 (12)2.4.2比较器功能 (12)2.4.3系统设置 (12)2.4.4接口 (12)3.开始 (13)3.1前面板 (13)3.2接口 (14)3.2.1电池充电功能 (14)3.3开机 (15)3.4测试端的连接 (15)4.[MEAS DISPLAY] 测量页面 (16)4.1[MEAS DISPLAY] - 测量显示页 (16)4.1.1FUNC - 测量功能 (16)4.1.2FREQ - 测试频率 (17)4.1.3LEVEL - 测试电平 (17)4.1.4RANGE - 测试量程 (17)3安装和设置向导4.1.5 SPEED - 测试速度 ............................................................................ 18 4.1.6 EQU - 等效方式 ................................................................................. 18 4.1.7HOLD – 数据保持 (19)5.[SETUP] 设置页面 ........................................................................................................................ 20 5.1[SETUP] 设置页 .................................................................................................... 20 5.1.1 AUTO LCZ – 自动LCZ 选择 .............................................................. 20 5.1.2 COMP - 比较器开关 .......................................................................... 21 5.1.3 BEEP - 讯响设置 ............................................................................... 21 5.1.4 NOMINAL - 输入[标称值] ................................................................... 22 5.1.5TOL - 输入百分比偏差 (23)6. [OPEN SHORT] 清零页面 ............................................................................................................ 24 6.1 [OPEN SHORT] 清零页 ........................................................................................ 24 6.2 [OPEN TEST]-开路校准 ......................................................................................... 24 6.3 [短路]校准.............................................................................................................. 25 7. [SYST]系统配置页面 (27)7.1[SYSTEM CONFIG] 系统配置页 ............................................................................ 27 7.1.1 KEY BEEP - 按键音开关 .................................................................... 27 7.1.2 BRIGHTNESS – LCD 背光亮度调整 .................................................. 28 7.1.3 TOUCH PANEL – 触摸屏设置 ............................................................ 28 7.1.4 DIM DISPLAY - 降低背光亮度时间设置 .............................................. 30 7.1.5 APO – 自动关机时间设置 .................................................................. 30 7.1.6 VCOM ENDMARK – USB 虚拟串口结束符 ......................................... 31 7.1.7 USB-HID PID – 产品ID 设置 ............................................................ 32 7.1.8 DEFAULT SET – 恢复出厂设置 (32)7.2 [SYSTEM INFORMATION] 系统信息页 (32)8. 测量步骤及示例 ............................................................................................................................. 34 8.1 测量示例 (34)9.远程控制及指令集 (36)9.1 USB-HID 设备类 .................................................................................................... 36 9.2 USB-HID 编程指南 ................................................................................................ 36 9.3 USB-VCOM 虚拟串口 . (38)9.4 指令集 (39)9.4.1 USB-HID 命令包 ................................................................................ 39 9.4.2 说明符 ............................................................................................... 40 9.4.3 数据类型 ............................................................................................ 40 9.5 命令参考 (41)9.5.1 DISP 显示子系统 ............................................................................... 41 9.5.2 FUNC 功能子系统 .............................................................................. 42 9.5.3 FREQ 频率子系统 ............................................................................. 44 9.5.4 APER 速度子系统 ............................................................................. 44 9.5.5 FETC? 查询结果子系统 ..................................................................... 44 9.5.6COMP 比较器子系统 (45)4 LCR-1000 LCR Meter用户手册9.5.7CORR 校准子系统 (46)9.5.8SYST 系统设置子系统 (48)9.5.9IDN?子系统 (48)9.5.10ERR错误子系统 (49)9.6命令汇总 (49)10.规格 (51)10.1一般规格 (51)10.2准确度 (52)10.3准确度 (52)10.3.1电容C及损耗D (52)10.3.2电感L和品质因数 (54)10.3.3阻抗Z与相位角θ (55)10.3.4ESR (55)10.3.5DCR (55)10.4外形尺寸 (56)安装和设置向导5插图目录图1-1 更换电池 (8)图3-1 前面板 (13)图3-2接口挡板 (14)图3-3充电指示灯,充电时显示为橙色 (14)图3-4测试端的连接 (15)图4-1 [MEAS DISPLAY]页 (16)图4-2 [HOLD]数据保存功能 (19)图5-1[SETUP] 页 (20)图5-2键盘输入框 (22)图6-1[OPEN SHORT] 页 (24)图6-2杂散导纳 (24)图6-3剩余阻抗 (25)图7-1<系统配置>页 (27)图7-2亮度调节键 (28)图7-3<系统配置>页 (32)图8-1电容器的测试结果 (34)图9-1在计算机上,仪器被识别为GW Intek HID (36)图9-2在仪器上,在底部提示行显示USB Attached (36)图9-3Windows 主机访问USB-HID设备流程图 (37)6 LCR-1000 LCR Meter用户手册表格目录表2-1 串并联等效电路 (10)表2-2 AT827测量显示范围 (11)表2-3 AT828 测量显示范围 (11)表3-1 前面板功能描述 (14)表3-2 接口挡板描述 (14)表4-1测试量程说明 (17)表4-2 量程与对应的测试范围 (18)表9-1一个指令发送包数据 (39)表9-2说明符 (40)表9-3数据格式列表 (40)表9-4倍率 (40)表9-5错误代码及信息 (49)表9-6所有USB命令汇总 (49)安装和设置向导71. 安装和设置向导感谢您购买我公司的产品!使用前请仔细阅读本章。
文件編號:文件名稱:Chroma LC Meter操作指導書初版日期:版次:核准:審核:制定:新版發行日期:管制章:目錄文件修訂記錄表----------------------------------------------------------------------------------------------------------- 3目的----------------------------------------------------------------------------------------------------------------------------51範圍----------------------------------------------------------------------------------------------------------------------------52權責-----------------------------------------------------------------------------------------------------------------------------53参考文件-----------------------------------------------------------------------------------------------------------------------54使用儀器-----------------------------------------------------------------------------------------------------------------------55使用方法---------------------------------------------------------------------------------------------------------------------5文件修訂記錄表(HISTORY RECORD)作業名稱Chroma LC Meter操作指導文件编號版本A01.目的:正確指導使用Chroma LC Meter2.範圍:Chroma LC Meter。
高精度LCR测量仪V1.0说明一、概述:很多电子制作需要知道元件的参数。
由于元件没有标称技术参数。
比如,需要知道谐振器件、检波器件、天线、耳机、变压器等器件的电抗特性。
其中,高频参数可以使用Q表解决问题,而低频参数Q表难以测定。
为了解决这个问题,只有LCR测量仪能够胜任。
²设计目标:1、能够准确测量电抗器的L、C、R,精度优于0.5%,如果进行人工逐档校准,精度优于0.3%2、取材容易,电路简洁,易于制作,成本应适当控制。
使之具有更强的业余DIY价值及研究价值,并通过设计、DIY学习到LCR电桥的相关细节、原理。
²本LCR表的基本特性AD转换器的字数:约1000字,采用了过采样技术,有效分辨力约为2000字测量方法:准桥式测定,测量原理类似于比例法测电阻。
主要测量范围:1欧至0.5兆欧,精度0.5%(理论),阻抗实测比对,均未超过0.3% 有效测量范围:2毫欧至10兆欧,最小分辨力1毫欧串联残余误差:2毫欧,低阻测量时此误差不可忽略并联残余误差:50M欧,高阻测量时此误差不可忽略Q值误差:±0.003(Q<0.5),Q/300(Q>2,相对误差,简易算法),其它按0.5%左右估算D值误差:±0.003(D<0.5),D/300(D>2,相对误差,简易算法),其它按0.5%左右估算注意:Q = 1/D测试信号幅度:峰值200mV(100Hz),180mV(1kHz),140mV(7.8kHz)电感:0.02uH分辨力,测量范围0.1uH至500H,超出500H未测试(因为我没有更大的电感器)。
电容:分辨力与夹具有关。
夹具好的话,分辨0.1pF或0.05pF,不屏蔽只能分辨到0.2pF,甚至只有1pF。
上限测量,没有测试,只测过10000uF电容,手上没有更大的电容。
实测误差,比上述精度指标好许多。
本表基准源:分别为4个基准电阻,一个时间基准。
LC-Meter需求说明
1. 实践环节描述
实验设计是基于UML在C和C#语言的基础上开发单片机系统,对于想要把本次实验作为练习的同学没有语言的限制,像是C++和JA V A都可以作为PC机接口设计的语言。
C 语言用作编程这个实验的嵌入式系统部分。
C#语言编程用作创建Wondows图形用户界面的应用程序,用来控制嵌入式系统的工作。
嵌入式系统与PC应用程序交互是通过一个简单的串行RS232协议接口来完成需要的功能。
嵌入式系统单片机部分的程序实现LC测试功能,主机可发命令到单片机,实现清零,切换校准功能和测试功能,还有使之切换到L或C的测量状态功能,还有A/D转换功能。
单片机将测试的频率,电容,电感等数据计算出L/C值,并用(UART-RS232)向主机PC 发送测试的频率和计算结果。
本文档将介绍与PC机RS232通信的命令,写出接收到某个命令时,命令的内容,要处理的动作,返回给PC机的内容等。
同时该文档只涉及软件设计部分。
Wondows图形用户界面的应用程序主要是通过RS232端口和A Tmage 16单片机进行通讯。
在WINDOWS环境下利用Visio C#实现和单片机进行通讯。
还可以在win32环境下利用VC 6.0实现和单片机进行通讯。
2. 实践环节的要求
(1)使用UML2.0统一建模语言进行软件的设计;
(2)编程实现使用C,C++或C#语言,完成系统的测试及发布等;
(3)文档要求:项目计划及实施文档、软件需求及设计文档、软件使用说明书等;
(4)测试要求:测试用例、测试报告、测试结果及缺陷报告;
(5)实践过程中对需求不明地方可与辅导教师沟通;
(6)实践中的重要阶段性结果应进行同行评审;
(7)PC机部分使用凌动UP-A TOM510试验平台实现。
3. 开发工具和嵌入式硬件
考虑到用体积小,低成本的单片机容易控制,并且可以学习嵌入式系统的多种功能。
A Tmega16单片机可以用于这个目的,因为它在市场上的供应价格适中,最重要的是它的开发工具是免费的并且还有许多供教学使用的免费资源。
A VR studio 4和WinA VR C编译器用于嵌入式软件开发。
实验的主要目的是掌握单片机I/O端口,定时器/计数器,UART(通用异步串行接收发送器),A/D转换器和单片机的中断控制等使用方法。
LC-Meter用于这个目的。
这个实验的硬件样板包括带有LC振荡器的A TMEL16单片机电路板。
虽然这是一个通过测量振荡频率来计算电容和电感的基础测试器,它在嵌入式软件开发方面还有许多挑战,例如精确测量振荡频率,计算测量电容或电感的浮点算法,还有通过PC的RS232串口实现UART与PC应用程序之间的交互。
LC测试嵌入式硬件电路
3. 软件设计
(1)嵌入式系统和PC接口的规格说明
最重要的部分是建立一个嵌入式系统与PC应用之间的协议,并且使它们共享同一个相同的接口。
嵌入式软件的功能是获得来自PC的命令,然后根据命令在Open,Calibration,Measure
模式中测量频率,其他相关操作例如开关继电器转换测量模式。
该协议基于ASCII码与一
(2)嵌入式软件主要流程
单片机中的嵌入式软件分为三个主要程序函数用来完成从PC接收命令,处理命令动作,和发送处理结果返回给PC。
下图是嵌入式系统的主要流程和对应函数:
(3)LC测量软件设计
LC测量需要用到三个振荡频率值F1,F2和F3。
根据下图及公式由单片机控制硬件电路中的继电器RL1和RL2,分别构成下图的(a),(b),(c)或(d)的拖布结构,从而得到F1,F2和F3, 然后根据下列公式,计算得到相应的被测电容或电感的数值。
(a) F1(b) F2x3x3
(4)UART嵌入式软件设计
这部分程序是单片机与PC交互的部分。
需要认真设计以满足通信协议表中列出的各项接口需求。
如果没有这个接口,单片机将不会获得来自PC的任何信息,PC也不能指导嵌入式系统完成需求的命令。
其中系统的晶振是7372800Hz,波特率是19200bps。
在任何通信发生之前,必须初始化UART。
初始化函数包括设置波特率,使能UART 的发送和接收器还有它们的中断,为8位数据设置帧格式,无校验检查和1个停止位设置。
下图是LC测量的状态图供参考。
(5)PC图形用户界面的软件设计
在PC串口通信中,一个虚拟的RS232端口(USB到RS232转换器)用于这个目的。
虚拟端口的驱动是开源的。
它发送命令给嵌入式系统,然后接收从嵌入式系统返回的数据,处理和在GUI图形用户界面中显示数据。
其中GUI的界面也是根据通信协议和实验的需求显示结果来设计的。
有许多高级语言可供选择来实现GUI应用设计,例如C++,C#,Java或者。
学生可以选择自己喜欢的计算机语言在Windows或者Linux平台下实现GUI的编程实践。
(6)嵌入式系统上的其他功能扩展
虽然A Tmega16是8位的单片机有限定的资源,实验中的嵌入式软件开发应该为其他功能扩展友好结构,例如A/D转换,SPI通信,PWM,实时操作系统实现等。
这些功能可以留作进一步深入学习嵌入式。
学生们可以作为挑战,在这个项目上也可以实践自己的创新性想法。
4. 附件:
(1) 硬件电路原形供参考:
实践用嵌入式硬件
Module (1) is the LC-oscillator with MCU board;
(2) is the USB/RS232 converter module; (3) is the JTAG-ICE.
(2) 上位PC机使用:UP-Atom510或NORCO EMB-3850
(3) 上位机实现界面设计参考:使用触摸屏实现个按钮的功能。