味达维皇家系列说明书
- 格式:pdf
- 大小:853.15 KB
- 文档页数:21

控制面板1.ON/OFF SWITCH (开关按钮/电源开关):开关按钮在机器侧面右边最后端(在控制面板与开关指示灯之下)。
开关按钮控制着料理机的动力(电力)。
插上电源之后,将开关按钮按至ON,料理机便通电并预备好运作了。
晚上或不再使用料理机时请将开关按钮关闭(按至OFF)2.ON/OFF Light(开关指示灯):开关指示灯在控制面板之下。
当开关指示灯亮时,表明电源已经接通,并且开关按钮已经调至ON(开启)状态。
如果您使用预设程序(预设程序包括:SMOOTHIES 冰沙;FROZEN DESSERTS 冷冻甜品, HOT SOUPS 热汤)时,当料理机即将完成您的预设指令时,开关指示灯会闪烁。
3.Start/Stop Switch (开始/停止按钮):向下按压开始/停止开关,料理机便会按照您所选用的转速(1-9 转速)或者预设程序运转(SMOOTHIES,FROZEN DESSERTS,HOT SOUPS)。
4.Variable Speed/ Programming Dial 变速转盘/预设程序转盘:控制面板中央的变速/预设程序转盘具有两个功能:当按钮旋转至左边区域时,并按压START/STOP 开始/停止按钮,料理机会执行预设程序。
当按钮旋转至右边时,料理机会按照您选用的转速运转。
当您需要让机器停止运作时,请再次按压开始/停止按钮。
Pulse Switch 脉冲键:脉冲键是为了让料理机执行短暂性的操作与运转(比如您选用了预设程序打冰沙,但料理机停止运转时,您又想让它打的更细腻些,这时便可按下脉冲键,让机器继续运作一会)当变速/预设程序转盘中间的按钮转向右边区域的时候,在您持续按住脉冲键的期间,料理机会按照按钮指向的转速运转。
当您将中间的旋转按钮转向左边的预设程序,并按住脉冲键,料理机的运转速度是预设程序原先运转速度的50%。
重要提示:在机器按照预设程序键运转期间,如果您要让机器停止运作,请使用Start/Stop Switch 开始/停止按钮,而不是开关按钮。

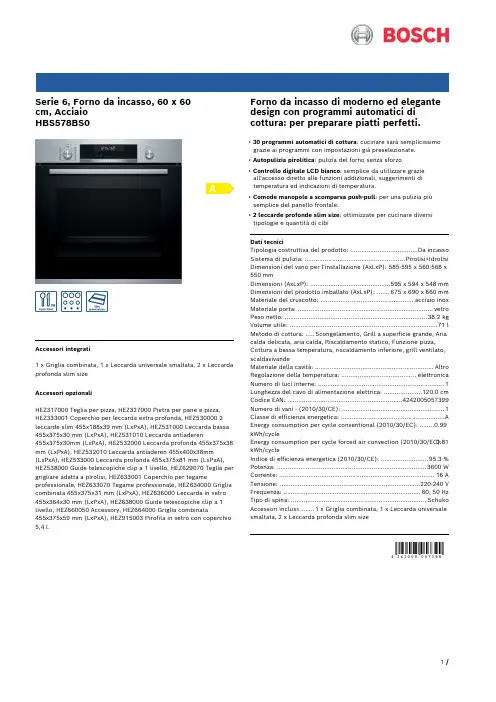
Serie 6, Forno da incasso, 60 x 60cm, AcciaioHBS578BS0Accessori integrati1 x Griglia combinata, 1 x Leccarda universale smaltata,2 x Leccarda profonda slim sizeAccessori opzionaliHEZ317000 Teglia per pizza, HEZ327000 Pietra per pane e pizza, HEZ333001 Coperchio per leccarda extra profonda, HEZ530000 2 leccarde slim 455x188x39 mm (LxPxA), HEZ531000 Leccarda bassa 455x375x30 mm (LxPxA), HEZ531010 Leccarda antiaderen455x375x30mm (LxPxA), HEZ532000 Leccarda profonda 455x375x38 mm (LxPxA), HEZ532010 Leccarda antiaderen 455x400x38mm (LxPxA), HEZ533000 Leccarda profonda 455x375x81 mm (LxPxA), HEZ538000 Guide telescopiche clip a 1 livello, HEZ629070 Teglia per grigliare adatta a pirolisi, HEZ633001 Coperchio per tegame professionale, HEZ633070 Tegame professionale, HEZ634000 Griglia combinata 455x375x31 mm (LxPxA), HEZ636000 Leccarda in vetro 455x364x30 mm (LxPxA), HEZ638000 Guide telescopiche clip a 1 livello, HEZ660050 Accessory, HEZ664000 Griglia combinata455x375x59 mm (LxPxA), HEZ915003 Pirofila in vetro con coperchio 5,4 l.Forno da incasso di moderno ed elegante design con programmi automatici di cottura: per preparare piatti perfetti.• 30 programmi automatici di cottura: cucinare sarà semplicissimo grazie ai programmi con impostazioni già preselezionate.• Autopulizia pirolitica: pulizia del forno senza sforzo• Controllo digitale LCD bianco: semplice da utilizzare grazieall'accesso diretto alle funzioni addizionali, suggerimenti di temperatura ed indicazioni di temperatura.• Comode manopole a scomparsa push-pull: per una pulizia piùsemplice del panello frontale.• 2 leccarde profonde slim size: ottimizzate per cucinare diversi tipologie e quantità di cibiDati tecniciTipologia costruttiva del prodotto: .....................................Da incasso Sistema di pulizia: .......................................................Pirolisi+Idrolisi Dimensioni del vano per l'installazione (AxLxP): 585-595 x 560-568 x 550 mmDimensioni (AxLxP): ............................................595 x 594 x 548 mm Dimensioni del prodotto imballato (AxLxP): .......675 x 690 x 660 mm Materiale del cruscotto: ...................................................acciaio inox Materiale porta: ..........................................................................vetro Peso netto: ..............................................................................38.2 kg Volume utile: .................................................................................71 l Metodo di cottura: .....Scongelamento, Grill a superficie grande, Aria calda delicata, aria calda, Riscaldamento statico, Funzione pizza, Cottura a bassa temperatura, riscaldamento inferiore, grill ventilato, scaldavivandeMateriale della cavità: .................................................................Altro Regolazione della temperatura: .........................................elettronica Numero di luci interne: (1)Lunghezza del cavo di alimentazione elettrica: .....................120.0 cm Codice EAN: (4242005057399)Numero di vani - (2010/30/CE): (1)Classe di efficienza energetica: .........................................................A Energy consumption per cycle conventional (2010/30/EC): ........0.99 kWh/cycleEnergy consumption per cycle forced air convection (2010/30/EC):0.81 kWh/cycleIndice di efficienza energetica (2010/30/CE): ..........................95.3 % Potenza: ..................................................................................3600 W Corrente: .....................................................................................16 A Tensione: .............................................................................220-240 V Frequenza: ...........................................................................60; 50 Hz Tipo di spina: ..........................................................................Schuko Accessori inclusi: .......1 x Griglia combinata, 1 x Leccarda universale smaltata, 2 x Leccarda profonda slim sizeSerie 6, Forno da incasso, 60 x 60cm, AcciaioHBS578BS0Forno da incasso di moderno ed elegante design con programmi automatici di cottura: per preparare piatti perfetti.- HBS578BS0- Forno pirolitico Classe A InoxCaratteristiche principali- 10 programmi di cottura: MultiCottura HotAir 3D, Riscaldamento superiore e inferiore, Grill ventilato, Grill a superficie grande, Funzione pizza, Riscaldamento inferiore, Cottura a bassa temperatura, Scongelamento, Mantenere in caldo- Display digitale LCD bianco- Volume cavità: 71 l- Regolazione della temperatura da 30 °C a 275 °C- Programmi automatici: 30- Autopulizia pirolitica- Cleaning AssistanceAltre caratteristiche- Temperatura porta max. 30 °C- Riscaldamento rapido- Illuminazione interna alogena, Illuminazione disinseribile- Orologio elettronico con impostazione inizio e fine cottura- Settaggio temperatura tramite manopola, Comode manopole a scomparsa push-pullSistema di controllo- Sistema di cottura assistita: Programmi automaticiAccessori- Accessori: 1 leccarda universale profonda smaltata, 1 griglia combinata, Leccarda profonda slim sizeEtichetta energetica- Assorbimento massimo elettrico: 3.6 kW- Classe di efficienza energetica (acc. EU Nr. 65/2014): A(in una scala di classi di efficienza energetica da A+++ a D)- Consumo energetico per ciclo durante funzionamento convenzionale:0.99 kWh- Consumo energetico per ciclo durante funzionamento ventilato:0.81 kWh- Numero di cavità: 1 Tipo di alimentazione: elettrica Volume della cavità:71 lSerie 6, Forno da incasso, 60 x 60cm, Acciaio HBS578BS0。
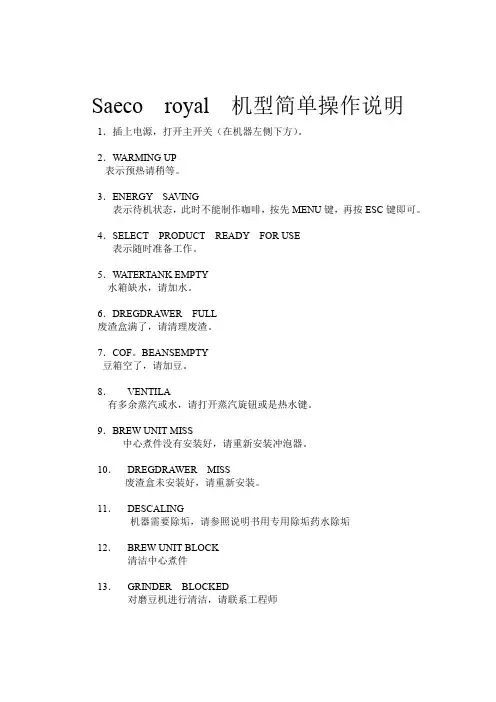
Saeco royal 机型简单操作说明1.插上电源,打开主开关(在机器左侧下方)。
2.WARMING UP
表示预热请稍等。
3.ENERGY SA VING
表示待机状态,此时不能制作咖啡,按先MENU键,再按ESC键即可。
4.SELECT PRODUCT READY FOR USE
表示随时准备工作。
5.WATERTANK EMPTY
水箱缺水,请加水。
6.DREGDRAWER FULL
废渣盒满了,请清理废渣。
7.COF。
BEANSEMPTY
豆箱空了,请加豆。
8.VENTILA
有多余蒸汽或水,请打开蒸汽旋钮或是热水键。
9.BREW UNIT MISS
中心煮件没有安装好,请重新安装冲泡器。
10.DREGDRAWER MISS
废渣盒未安装好,请重新安装。
11.DESCALING
机器需要除垢,请参照说明书用专用除垢药水除垢
12.BREW UNIT BLOCK
清洁中心煮件
13.GRINDER BLOCKED
对磨豆机进行清洁,请联系工程师。

Part # 3104500 Rev. 01 (01/29/08)Page 1Users are cautioned that maintenance and repairs must be performed by a Garland authorized service agent using genuine Garland replacement parts. Garland will have no obligation with respect to any product that has been improperly installed, adjusted, operated or not maintained in accordance with national and local codes or installation instructions provided with the product, or any product that has its serial number defaced, obliterated or removed, or which has been modified or repaired using unauthorized parts or by unauthorized service agents.For a list of authorized service agents, please refer to the Garland web site at . The information contained herein, (including design and parts specifications), may be superseded and is subject to change without notice.GARLAND COMMERCIAL INDUSTRIES 185 East South Street Freeland, Pennsylvania 18224Phone: (570) 636-1000Fax: (570) 636-3903GARLAND COMMERCIAL RANGES, LTD.1177 Kamato Road, Mississauga, Ontario L4W 1X4CANADA Phone: 905-624-0260Fax: 905-624-5669Enodis UK LTD.Swallowfi eld Way, Hayes, Middlesex UB3 1DQ ENGLAND Telephone: 081-561-0433Fax: 081-848-0041Part # 3104500 Rev 01 (01/29/08)© 2005 Garland Commercial Industries, Inc.FOR YOUR SAFETY:DO NOT STORE OR USE GASOLINE OR OTHER FLAMMABLE VAPORS OR LIQUIDS IN THE VICINITY OF THIS OR ANY OTHER APPLIANCE WARNING:IMPROPER INSTALLATION, ADJUSTMENT, ALTERATION, SERVICE OR MAINTENANCE CAN CAUSE PROPERTY DAMAGE, INJURY, OR DEATH. READ THE INSTALLATION, OPERATING AND MAINTENANCE INSTRUCTIONS THOROUGHLY BEFORE INSTALLING ORSERVICING THIS EQUIPMENTINSTALLATION AND OPERATION MANUALGARLAND EFW400 FONDANT WARMERPLEASE READ ALL SECTIONS OF THIS MANUAL AND RETAIN FOR FUTURE REFERENCE.THIS PRODUCT HAS BEEN CERTIFIED AS COMMERCIAL COOKING EQUIPMENT AND MUST BE INSTALLED BY PROFESSIONAL PERSONNEL AS SPECIFIED.INSTALLATION AND ELECTRICAL CONNECTION MUST COMPLY WITH CURRENT CODES:IN CANADA - THE CANADIAN ELECTRICAL CODE PART 1 AND / OR LOCAL CODES.IN USA – THE NATIONAL ELECTRICAL CODE ANSI / NFPA – CURRENT EDITION.ENSURE ELECTRICAL SUPPLY CONFORMS WITH ELECTRICAL CHARACTERISTICS SHOWN ON THE RATING PLATE.GENERAL INFORMATIONUnpackingCarefully remove unit from carton. Remove all packing materials, any protective material covering the stainless steel should be removed immediately after the unit is installed. Serial Plate LocationElectrical rating is shown on the serial plate and is readily visible on the rear of the unit next to the power supply cord inlet.NOTE: Ensure electrical supply conforms with electrical characteristics shown on the rating plate.Safety• A qualified person must make the installation in accordance with the authority having jurisdiction andlocal codes.• This unit must only be operated by a qualified person. DO NOT operate without reading this manual.• DO NOT operate this appliance unless all service and access panels are in place and fastened properly.• DO NOT attempt to repair or replace any part of this appliance unless all main power supplies have beendisconnected.• DO NOT clean this appliance unless the power supply is disconnected.• DO NOT immerse appliance in water. WARNINGTo avoid serious personal injury:• USE EXTREME CAUTION in setting up, operating and cleaning these appliances to avoid coming in contactwith hot surfaces. Suitable protective clothing should be worn or proper utensils to prevent the risk of burns.• NOTE all warning labels and markings on this appliance, which call attention to further dangers and necessaryprecautions.Wall ClearancesBack: 0Sides: 0National Code RequirementsThe installation and connection should comply with current codes: In Canada - The Canadian Electrical Code Part 1 and / or local codes. In USA – The National Electrical Code ANSI / NFPA – current edition.OPERATING INSTRUCTIONSThis appliance has been designed to have water in the tank for even heating. Before first use it is recommended that the inside of the tank be cleaned with a detergent soaked cloth, to remove fabricating and protective oils. Rinse with clean water and dry with a clean cloth.1. Fill the tank with water so that the level is between theminimum and maximum embossed lines on the inside wall of the tank.2. Insert pan with a maximum depth not exceeding 4”(102mm)3. Plug appliance into electrical outlet.4. Turn on appliance with green switch. The appliance willheat the bath of water and maintain it at 130°F to 140°F (54° C to 60°C).Part # 3104500 Rev. 01 (01/29/08)Page 2NOTE: Periodic checks should be made during the operatingduration to ensure that the water level does not get belowthe lower embossed line. Should it do so, top up with freshwater.OPERATING INSTRUCTIONS continued MAINTENANCE AND CLEANINGDaily MaintenanceEmpty the water from the tank and clean any lime deposit with a non-metallic scouring pad. Clean with a cloth soaked in a mild detergent and hot water. Rinse with a sponge dipped in clean hot water dry with a clean cloth. CleaningStainless steel should be cleaned using a mild detergent, a soft cloth and hot water. If it is necessary, use a non-metallic scouring pad to remove stubborn grime. Always rub in the direction of the grain in the metal to prevent scratching. Wash a small area at a time and rinse the washed area with a clean sponge dipped into a disinfectant and wipe dry with a soft clean cloth.Use only stainless steel, wood, or plastic tools to scrape off heavy deposits. Do not use ordinary steel scrapers or knives, as particles of iron may become embedded and rust. NEVER USE STEEL WOOL.Preventative MaintenanceTo ensure long life, efficient and safe operation or your equipment, it is recommended that a maintenance and servicing program be performed at regular intervals, the frequency of which will vary, depending on the installation conditions and amount of usage.Competent persons in accordance with the authority having jurisdiction must carry out all servicing and repairs.It is essential that the instructions in this manual be strictly followed for the safe and economical operation of this equipment. If it is known or suspected that a fault exists on an appliance, then that appliance must not be used until the fault has been rectified by a competent person.Part # 3104500 Rev. 01 (01/29/08)Page 3。

hotline***************************Durable Stainless Steel 3-Burner Gas/Charcoal Combo GrillModel: ZH3003S151920-2122-2326Preparation 67-14151617-18Trouble Shooting Guide Warranty and Customer Service Grilling Recipes24-25LP Gas and Cylinder Information Cylinder SpecificationsLP Cylinder Leak Testatserioushotline. or hot.AT ALL TIMES .2135891513186741412101116172124232225192627202829343133323012141553B6Aback support4A25back support12the shelvesthe rear shelves shelves6A rear AF722andC.rightshelf822andC.leftshelf94A and 4Cfront support10A211cart front beamand to back support1413the124AHwith 2 bolts (I) and 2 nuts (F)with 2 bolts (A).131415161015,i 16Install tank base upper (17) to the bottom shelfAthermal baffles 18 to Assemble8Cand middle brace171819201119Alid handle (20) to lid with 4 bolts (A)419firebox cartHalf screw 4 bolts (A) to shown positions of both sides of firebox.Assemble the side table (L) (21)to the fireboxby hanging it to the half screwed bolts, fasten it with 4 bolts (A). Then secure the half screwed bolts.Assemble the side table (R) (22)to the firebox by hanging it to the half screwed bolts, fasten it with 4 bolts (A). Then secure the half screwed bolts.2112A23248A23252428262728Assemble the grease cup brace (30) to the grease tray (29) with 4 bolts (D) and 4 nuts (G).1330underneath the fireboxes.(31) and grease tray (29)Attach the grease cup (32) underneath the grease tray .33f2s the middle bottle opener fireboxess3414Your new gas grill operates on LP (Liquid Petroleum )Gas.It is odorless,colorless,and non-toxic when produced. You can smell LP gas as it has been given an odor similar to rotten cabbage for your safety.Never leave the grill unattended or move the grill when in use.It will provide you with many years of enjoyment but a minimal amount of maintenance needed.when the burners go out in cookingwhenair ventreconstructiveDo not obstruct the flow of air for combustion and ventilation .1516metricscleaning productsProduction of bubbles indicates a gas leak.17erat all times. regulatorregulator1819grill2021EmergenciesPossible cause Prevention/ SolutionTroubleshooting: Problem Possible cause Prevention/ SolutionGas leaking from cracked/cut/burned hoseGrease fire or continuousexcessive flames above cooking surfaceToo much grease buildup in burner areaTurn off LP Tank. Leave lid open to allow flames to die down. After cooling, clean food particles and excess grease from inside firebox area, grease cup/pan/tray, and other surfacesBurner will not light using ignitorBurner will not light using ignitorGas issues1. Trying to light wrong burner2. Burner not engaged with control valve3. Obstruction in burner4. No gas flow5. Vapor lock at coupling nut to LP tank6. Coupling nut and LP tank valve not fully connected.Electrical issues:1. Electrode cracked or broken;” sparks at crack.”2. Electrode tip not in proper position3. Wire and/or electrode covered with cooking residue.4. Wires are loose or disconnected5. Wires are shorting (sparking) between igitor and electrode.6. Push button sticks at bottom sparking between ignitor and electrode1. Replace electrode.2. Tip of electrode should be pointingtoward port hole in burner. The distance should be 1/8” to 3/16”. Adjust if necessary.3. Clean wire and or electrode with rubbing alcohol and clean swab.4. Reconnect wires or replace electrode/ wire assembly.5. Replace ignitor wire6. Replace ignitor7. Inspect wire insulation and proper connection. Replace wires if insulation is broken.1. See instructions on control panel and section in the Use and Care.2. Make sure valve are positioned inside of burner tubes.3. Ensure burner tubes are not obstructed with spider webs or other matted, see cleaning section of use and care4. Make sure LP tank is not empty. If LP tank is not empty, refer to “sudden drop in gas flow.5. Turn off knobs and disconnect coupling nut from LP tank. Reconnect and retry.6. Turn the coupling nut approximately one-half to three-quartersDamaged hoseTurn off gas at LP tank, if hoes is cut or cracked, replace hose.See LP tank lead test and connection regulator to the LP Gas leaking from LP tank Mechanical failure due to resting or mishandlingTurn off LP tank valveFailure or tank valve from mishandling or mechanical failureTurn off LP tank valve. Return LP tank to gas supplierImproper installation, untight connection , failure of rubber sealTurn off LP tank valve, remove regulator from cylinder and visually inspect rubber seal for damage, see LP tank test and connection regulator to the LP tank Turn off control knobs and LP tank valve. After fire is out and grill is cold, remove burner and inspect for spider nests or rust. see natural hazard and cleaning the burner assembly pages.Fire in burner tube section of burner due to partial blockageGas leaking from LP tank valveGas leaking between LP tank and regulator connectionFire coming through control panel 22Troubleshooting: ProblemBurner will not match light Sudden drop in gas flow or low flameFlames blow outPersistent grease fire Flashback…(fire in burner tube(s)Flare-upUnable to fill LP tankOne burner does not light from other burner(s)See ”gas issues;” on previous page.2. Improper method of match-lighting1. Grease buildup.2. Excessive fat in meat.3. Excessive cooking temperatureHigh or gusting winds. Low on LP gas.Excess flow valve tripped.Grease trapped by food buildup aroundburner system.Burner and burner tubes are blocked1. Grease buildup.2. Excessive fat in meat.3. Excessive cooking temperatureSome dealers have older fill nozzles withworn threads.Grease buildup or food particles in end ofcarryover tubeTurn knobs to OFF. Turn gas off at LP tank.Leave lid in position and let fire burn out.After grill cools, remove and clean all partsTurn knobs to OFF. clean burnerand/or burner tubes. See burner cleaningsection of use and care manual1. Clean burners and inside of grill/firebox2. Trim fat from meat before grilling.3. Adjust (lower) temperatureTurn worn nozzles don’t have enough“bite” to engage the valve. Try a secondLP dealer.Clean carry-over tube with wire brushTurn front of grill to face wind or increaseflame height.Refill LP tank.Refer to “sudden drop in gas flow” above.1. See “Pilot Gas Control Ignition” sectionof use and care.1. Clean burners and inside of grill/ firebox2. Trim fat from meat before grilling. Possible cause Prevention/ SolutionIf your problem is not resolved from the information above, please Contact your local gas dealer.a) Turn the burner on for 15 to 20 minutes. Ensure appliance is cold before continuing.b) Grids should be cleaned periodically by soaking and washing in soapy water.c) The interior surfaces of the grill housing cover should also be washed with hot, soapy water. Use a wire brush, steel wool or a scouring pad to remove stubborn spots.d) Periodically check the burner to see that it is free from insects and spiders which may clog the gas system, deflecting gas flow. Ensure to clean venturi pipes on burner very carefully, make sure that there are no obstructions. We recommend that you use a pipe cleaner to clean the venturi pipe area.e) Any modifications of this appliance may be dangerous and are not permitted.Safety RemindersStand your gas grill on a safe level surface, away from inflammable items such as wooden fences or overhanging tree branches.Never use your gas grill indoors!Once lit do not move your gas grill or leave it unattended.Keep children and pets at a safe distance from the gas grill.Keep a fire extinguisher handy.The gas grill will become hot when in use, so handle lids etc. with the help of gloves.Ensure that the appliance has completely cooled down before storing.Notes:23Direct Heat24STEAK (& ALL MEATS):• Cook food on the charcoal side of the unit, directly above coals/heat.• To grill meats, raise fire grate to high position (hot) and sear for one minute on each side withthe lid o pen to seal in flavor and juices. Then lower fire grate to medium position with lid closed and cook• Control heat with dual dampers and adjustable fire grate.Tip: Place grilled meat back in the marinade for and juicie r.CAUTION: Boil extra marinade first to kill bacteria MARINATED FLANK STEAK:• Mix marinade ingredients in nonmetal dish. • Let steak stand in marinade for no less than 4 hours in refrigerator.• Brown each side for 5 minutes, but center should remain rare.• Cut steak diagonally across the grain into thin slices before serving.• Grill with fire grate in high (hot) position with lid Meat Marinade1/2 cup vegetable or olive oil 1/3 cup soy sauce1/4 cup red wine vinegar 2 tbsp lemon juice 1 tsp dry mustard 1 minced clove garlic 1 small minced onion 1/4 tsp pepper QUAIL OR DOVES:• Cover birds with good seasons and marinate overnight.• Pour remaining dressing and cover with Texas Pete Hot Sauce for 6 hours.• Wrap birds in thick bacon secured by a toothpick. • Place on grill. Keep turning until bacon is black. • Grill for 20 minutes. Sear with lid open and fi re before lowering grate and closing lid.• KABOBS:• Alternating on skewers any combination of meat, onions, tomatoes, green peppers, mushrooms,zucchini, c ircular slice of scallops, lobster, chicken, • Marinate the meat in refrigerator for several hours. • Grill each side approximately 7 minutes turning occasionally while basting with marinade.Leave a small amount of room between pieces in order • to desired doneness.several minutes before serving – it will become tastier remaining from the raw meat.open or closed.corn-on-the-cob, or pineapple. Meatcould consist of shrimp,sausage, pork, beef, etc.grate in high (hot) position for 1 minute on each side Kabob Marinade:1 cup soy sauce ½ cup brown sugar ½ cup vinegar½ cup pineapple juice 2 tsp salt½ tsp garlic powder• Mix all ingredients in a saucepan and bring to boil.• Allow marinade to cool before marinating your meat in it.• Marinate beef in mixture a minimum of 4 hours.HOT DOGS:• Grill with lid up and cooking grates in high(hot)position for approximately 6 minutes.• Turn every few minutes. HAMBURGERS:See meat marinade on prior pages.You may also marinate by allowing to stand in marinade for 1 or 2 hours at room temperture before cooking or let stand in covered dish in refrigerator up to 24 hours.• Bring to room temperature before cooking.• Mix in chopped onions, green peppers, salt, sear 3/4 inch patties on each side with cooking grates in high position for a few minutes.• Lower fi re grate to medium position and grill with lid down to avoid flare-ups.• Cook each side 3 to 7 minutes according to desired doneness.• Cook ground meat to 150 internally or until juice runs clear (free of blood) for prevention of E-coli. • Burgers can be basted with marinade when turning and/or other ingredients can be mixed in with the ground beef such as chili sauce or powder. SHRIMP (Peeled) & CRAYFISH:• Place on skewers.• Coat with melted butter and garlic salt.• Grill 4 minutes on each side or until pink. Cocktail sauce optional.BAKED POTATOES:• Rub with butter and wrap in foil and cook on grill with lid down for 50 minutes.• Turn after 25 minutes (no need to turn if smoked).• Squeeze to check for doneness.SWEET CORN IN HUSKS:• Trim excess silk from end and soak in cold salted water 1 hour before grilling.• Grill 25 minutes – turning several times.To smoke and place brids in center of grates with fire in both ends of fire box.Grill with lid up and the cooking grates in the lowest position. to cook faster.• 25***************************Corpprior to obtainCombo26。
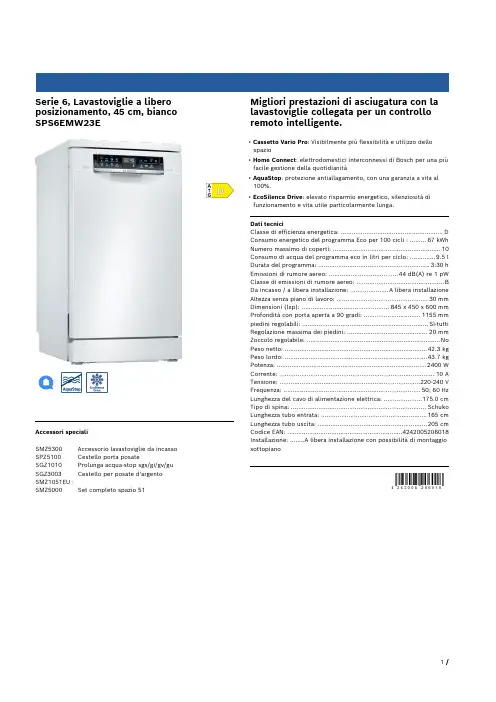
Serie 6, Lavastoviglie a libero posizionamento, 45 cm, bianco SPS6EMW23EAccessori specialiSMZ5300 Accessorio lavastoviglie da incasso SPZ5100 Cestello porta posateSGZ1010 Prolunga acqua-stop sgs/gi/gv/gu SGZ3003 Cestello per posate d'argento SMZ1051EU :SMZ5000 Set completo spazio 51Migliori prestazioni di asciugatura con la lavastoviglie collegata per un controllo remoto intelligente.• Cassetto Vario Pro: Visibilmente più flessibilità e utilizzo dello spazio• Home Connect: elettrodomestici interconnessi di Bosch per una piùfacile gestione della quotidianità• AquaStop: protezione antiallagamento, con una garanzia a vita al 100%.• EcoSilence Drive: elevato risparmio energetico, silenziosità di funzionamento e vita utile particolarmente lunga.Dati tecniciClasse di efficienza energetica: ........................................................D Consumo energetico del programma Eco per 100 cicli : .........67 kWh Numero massimo di coperti: .. (10)Consumo di acqua del programma eco in litri per ciclo: ..............9.5 l Durata del programma: .............................................................3:30 h Emissioni di rumore aereo: ......................................44 dB(A) re 1 pW Classe di emissioni di rumore aereo: ................................................B Da incasso / a libera installazione: .....................A libera installazione Altezza senza piano di lavoro: ..................................................30 mm Dimensioni (lxp): ................................................845 x 450 x 600 mm Profondità con porta aperta a 90 gradi: ...............................1155 mm piedini regolabili: .....................................................................Sì-tutti Regolazione massima dei piedini: ............................................20 mm Zoccolo regolabile: .........................................................................No Peso netto: ..............................................................................42.3 kg Peso lordo: ..............................................................................43.7 kg Potenza: ..................................................................................2400 W Corrente: .....................................................................................10 A Tensione: .............................................................................220-240 V Frequenza: ...........................................................................50; 60 Hz Lunghezza del cavo di alimentazione elettrica: .....................175.0 cm Tipo di spina: ..........................................................................Schuko Lunghezza tubo entrata: ..........................................................165 cm Lunghezza tubo uscita: ............................................................205 cm Codice EAN: (4242005206018)Installazione: ........A libera installazione con possibilità di montaggio sottopianoSerie 6, Lavastoviglie a libero posizionamento, 45 cm, biancoSPS6EMW23EMigliori prestazioni di asciugatura con la lavastoviglie collegata per un controllo remoto intelligente.Prestazioni e consumo- Classe di efficienza energetica¹: D- Energia² / Acqua³: 67 kWh / 9.5 litri- Capacità: 10 coperti- Durata del programma⁴: 3:30 (h:min)- Livello sonoro: 44 dB(A) re 1 pW- Livello di rumore programma Silence: 41(A) re 1 pW- Classe di efficienza di rumore: BProgrammi e opzioni- 8 Programmi: Eco 50 °C, Auto 45-65°, Intensive 70 °C, Express 65°, Express 45°, Glass 40 °C, Silence 50 °C- Prelavaggio- 4 Programmi supplementari: Home Connect, Drying Assistant, Intensive Zone, SpeedPerfect+- Home Connect-capibile via WLAN- Programma manutenzione- Silence on demand (tramite App)Tecnologia lavaggio- Scambiatore di calore e EfficientDry- DosageAssist- EcoSilence Drive- Sistema DuoPower: doppio braccetto nel cestello superiore- Automatismo di pulizia- Sistema di filtri autopulenti con ondulazione a 3 livelli- Contenitore interno: Materiale della vasca interna in acciaio inox Sistema Cestelli- Cestelli VarioFlex Pro- VarioCestello Pro- Ruote con scorrimento facile nel cestello inferiore e nel terzo cestello- Cestello inferiore con blocco (rackStopper) per evitare che fuoriesca dalle guide.- Cestello superiore regolabile in altezza con Rackmatic (3 livelli)- Griglie abbattibili nel cestello superiore (3x)- Griglie abbattibili nel cestello inferiore (4x)- Ripiano per tazze nel cestello superiore- Carrello inferiore con ripiani per tazze- Carrello inferiore con supporto per bicchieri con stelo lungo Indicazione e funzionamento- PiezoTouchControl (nero)- EmotionLight- Iscrizioni di testo in chiaro (inglese)- Indicazione tempo residuo (min.)- Programmatore inizio lavaggio (1-24 h)Sicurezza - AquaStop: una garanzia Bosch per danni causati dall'acqua - durata del dispositivo*- Sicurezza bambini (Tasti)- Tecnologia di protezione del vetro- Aiuto per il riempimento del sale (Imbuto)Dimensioni- Dimensioni del prodotto (HxLxP): 84.5 x 45 x 60 cm¹ In una scala di classi di efficienza energetica da A a G² Consumo di energia in kWh per 100 cicli (nel programma Eco 50°C)³ Consumo di acqua in litiri per ciclo (nel programma Eco 50 °C)⁴ Durata del programma Eco 50 °C* Verificare i termini di garanzia al link/ch/it/condizioni-generali-di-garanziaSerie 6, Lavastoviglie a libero posizionamento, 45 cm, bianco SPS6EMW23E。

MARQUE: DE DIETRICH REFERENCE : DTI 853 X CODIC: 2771411FR GUIDE D’INSTALLATION ET D’UTILISATION EN GUIDE TO INSTALLATION AND USEES MANUAL DE INSTALACIÓN Y UTILIZACIÓN PT MANUAL DE INSTALAÇÃO E DE UTILIZAÇÃO DE EINBAU- UND BETRIEBSANLEITUNG Table de cuissonCooking hobPlaca de cocciónPlaca de cozinhaKochfeld2Chère Cliente, Cher Client,Vous venez d'acquérir une table DE DIETRICH et nous vous en remer-cions.Afin de vous offrir un produit d'excellence, nos équipes de recherche ont conçu pour vous cette nouvelle génération d'appareils, qui par leur qua-lité, leur esthétique, leurs fonctions et leurs évolutions technologiques en font des produits d'exception, révélateurs de notre savoir-faire.Vous trouverez également dans la gamme des produits DE DIETRICH, un vaste choix de fours, de fours à micro-ondes, de hottes aspirantes, de lave-vaisselle, et de réfrigérateurs intégrables, que vous pourrez coordon-ner à votre nouvelle table DE DIETRICH.Bien entendu, dans un souci permanent de satisfaire le mieux possible vos exigences vis à vis de nos produits, notre service consommateurs est àvotre disposition sur notre siteDE DIETRICHLes nouveaux objets de valeurDans le souci d’une amélioration constante de nos produits, nous nous réservons le droit d’apporter à leurs caractéristiques techniques, fonctionnelles ou esthétiques toutes modifi-cations liées à l’évolution technique.ImportantA v a n t d ’i n s t a l l e r e t d ’u t i l i s e r v o t r e a p p a r e i l , v e u i l l e z l i r e a t t e n t i v e m e n t c e g u i d e d ’i n s t a l l a -t io n e t d ’u t i l i s a t i o n q u i v o u s p e r m e t t r a d e v o u s f a m i l i a r i s e r t r ès r a p i d e m e n t a v e c s o n f o n c t i o n -n e m e n t .021*******35Ces tables doivent être branchées sur le réseau par l’intermédiaire d’une prise de cou-rant conforme à la publication CEI 60083 ou d’un dispositif à coupure omnipolaire conforme aux règles d’installations en vigueur.A la mise sous tension de votre table, ou après une coupure de courant prolongée, un codage lumineux apparaît sur le clavier de commande. Attendez 30 secondes environ que ces informations disparaissent pour utili-ser votre table (Cet affichage est normal et il est réservé le cas échéant à votre service après vente. En aucun cas l’utilisateur de la table ne doit en tenir compte).BRANCHEMENT DTI853X••Branchement 220-240V~Votre table doit être branchée sur le réseau par l’intermédiaire d’une prise de courant conforme à la publication CEI 60083 ou d’un dispositif à coupure omnipolaire conforme aux règles d’ins-tallation en vigueur.A la mise sous tension de votre table, ou après une coupure de courant prolongée, un codage lumineux s’affiche. Ces informations disparaitront après 30 secondes.Pour le modèle D T I853X E672 • Principe de l’inductionLe principe de l'induction repose sur un phé-nomène magnétique.Lorsque vous posez votre récipient sur une zone de cuisson et que vous mettez en mar-che, les circuits électroniques de votre table de cuisson produisent des courants " induits”dans le fond du récipient qui élèvent instanta-nément sa température. Cette chaleur est alors transmise aux aliments.Nous avons conçu cette table de cuisson pour une utilisation par des particuliers dans un lieu d’habitation.Cette table de cuisson destinée exclusivement à la cuisson des boissons et denrées alimentaires ne contient aucun composant à base d’amiante.• Les récipientsLa plupart des récipients sont compatibles avec l'induction.Pour vérifier si votre récipient convient,posez-le sur une zone de cuisson (16 ou 23cm) en puissance 4.- Si l’afficheur reste fixe, votre récipient est compatible.- S’il clignote, votre récipient n’est pas utilisa-ble avec l’induction.Vous pouvez aussi vous servir d’un aimant.S’il « accroche » le fond du récipient, il est compatible avec l’induction.Seuls le verre, la terre, l'aluminium sans fond spécial, le cuivre et certains inox non magné-tiques ne fonctionnent pas avec la cuisson induction. Nous vous suggérons de choisir des récipients à fond épais et plat.Lors de vos achats de récipients, assurez-vous que ce logo est présent sur l’emballage,il vous assure la compatibilité avec l’induc-tion.A - InducteurB - Circuit électroniqueC - Courants induits•Choix d’une zone de cuisson82•T o u c h e s d e s él e c t i o nCes touches servent à sélectionner, mettre en marche ou arrêter les zones de cuisson.Quand une zone est sélectionnée, le (ou les)voyant correspondant s’allume, vous pouvez régler ses paramètres. A fonction M E M OB fonction Ppower trackerC zones C ONTINUUM complètesD zone C ONTINUUM avant et arrière •T o u c h e s d e r ég l a g eCes touches permettent de régler les paramè-tres de puissance, minuterie, programma-tion.... pour chacune des zones sélection-nées.E réglage de puissanceF présélection de puissanceG réglage de la minuterieH elapsed timeI verrouillage - déverrouillage - Clean lockEn l’absence d’un récipient sur la zone sélec-tionnée, vos réglages s’effaceront automati-quement au bout de quelques instants.i m e n s i o n s H o r s t o u t (L x l ) - éc o u p e E n c a s t r e m e n t (L ’ x l ’)sélectionnéela puissance la minuterie P o u r u n e z o n e s él e c t i o n n ée2•Minuteur indépendantCette fonction permet de chronométrer unévènement sans réaliser une cuisson.- Sélectionnez une zone non utilisée.- Réglez le temps avec les touches II . Un “t t ” cli-gnote dans l’afficheur.- A la fin de votre réglage, le “tt ” devient fixe et le décompte commence.N o t a :Vous pouvez arrêter un décompte en cours par appui long sur la touche de sélection du foyer.•Elapsed timeCette fonction permet d’afficher le temps écoulé depuis la dernière modification de puissance sur un foyer choisi.Pour utiliser cette fonction, faites un appui sur la touche H. Le temps écoulé clignote dans l’afficheur minuterie du foyer sélectionné.Si vous voulez que votre cuisson se termine dans un temps défini, appuyez sur la touche H puis, dans les 5 secondes, appuyez sur « + »de la minuterie pour incrémenter le temps de cuisson que vous voulez obtenir. L ’affichage du temps devient fixe pendant 3 secondes puis l’affichage du temps restant apparait. Un bip est émis pour confirmer votre choix.Cette fonction existe avec ou sans la fonction minuterie.Remarque : Si un temps est affiché sur la minuterie, il n’est pas possible de changer ce temps dans les 5 secondes après appui sur H.Passé ces 5 secondes, il vous sera possible de modifier votre temps de cuisson.•Cuisson différéeCette fonction permet de différer une cuisson (uniquement disponible sur le foyer arrière droit S TART CONTROL ).Pour programmer une cuisson différée en 6étapes :1 - Sélectionnez la zone de cuisson dédiée àcette fonction.2 - Appuyez simultanément sur les touches G “++” et “––” pour régler l’heure courante sur votre table. Tant que les chiffres clignotent,vous pouvez régler l’heure avec les tou-ches GG , puis attendez quelques instants. Si l’heure affichée est correcte, attendez quel-ques instants. L ’afficheur devient fixe et un bip confirme le réglage.3 - Réglez l’heure de fin de cuisson par appuisur les touches GG Attendez quelques ins-tants. Un bip confirme votre réglage.4 - Réglez la durée de la cuisson par appui surles touches EE Attendez quelques instants.Un bip confirme votre réglage.5 - Réglez la puissance de cuisson par appuisur les touches EE , 4 est proposée par défaut (maximum 6). Attendez quelques instants. Un bip confirme votre réglage et S C s’affiche sur votre table.6 - Au bout de quelques instants, SS C s’éteint et un point clignotant apparaît pour indi-quer la présence d’une cuisson différée en cours.Si vous utilisez un ou plusieurs foyers, lepoint clignotant devient SS C .2 •Sécurité enfantCette fonction permet de verrouiller votre table en position éteinte ou en cours de cuis-son.Pour verrouiller :- Faîtes un appui long sur la touche II . Un bip est émis et le voyant s’allume. Le voyant s’éteindra automatiquement après quelques instants.Pour déverrouiller :- Faîtes un appui long sur la touche I I . Un dou-ble bip est émis et le voyant s’éteint.N o t a :- En mode verrouillage, toute action fera appa-raître un symbole de verrou dans les affi-cheurs. Vous devez déverrouiller votre table avant de l’utiliser.- Si vous activez le verrouillage en cours de cuisson, l’arrêt des foyers sera prioritaire sur le verrou.•Clean lockCette fonction permet le verrouillage tempo-raire de votre table pendant un nettoyage.Pour activer Clean lock :- Votre table doit être éteinte.- Faîtes un appui court sur la touche II . Un bip est émis et le voyant clignote.- Après un temps prédéfini, le verrou sera automatiquement annulé. Un double bip est émis et le voyant s’éteint.•Réglage des présélections de puis-sanceCette fonction permet de modifier les niveaux de puissance définis dans les présélections (excepté pour le boost).- Votre table doit être éteinte.- Sélectionnez la présélection FF à modifier par un appui long sur celle-ci.- Réglez la nouvelle puissance par appui sur latouche EE .- Un bip valide votre action après quelques instants.N o t a :Les puissances doivent être entre :- 1 et 5 pour la première touche.- 6 et 10 pour la seconde.- 11 et 15 pour la troisième.•Power trackerCette fonction permet le déplacement d’une casserole d’un foyer vers un autre en gardant les réglages initiaux (puissance et temps).1 - Faîtes un appui court sur la touche BB , un bip court est émis puis déplacement de la casserole sur le nouveau foyer.2 - Faîtes un appui court sur la touche BB , le retour des informations s’affiche sur le nouveau foyer. Le foyer d’origine s’éteint lorsque les réglages sont affichés sur le foyer de destination.- Si absence de casserole avant appui sur latouche BB , un bip long est émis -> annulation de la fonction.- Si appui sur la touche BB et déplacement de plus d’une casserole -> annulation de la fonction puis affichage NO .Si vous déplacez une casserole à partir d’une zone de cuisson complète vers une autre zone de cuisson complète -> annulation de la fonction puis affichage NO .Si la fonction ”Power tracker” active plus d’un foyer destinataire, la fonction est annulée puis affichage NO .34。

VITA shade, VITA made.VITA classical A1–D4®VITA Toothguide 3D-MASTER ®VITA Linearguide 3D-MASTER ®VITA Bleachedguide 3D-MASTER ®VITA Easyshade ® VVITA tooth shade determinationAlways on the cutting edge for the perfect contemporary tooth. Since 1924.Date of issue: 02. 1719562004Dear business partners, customers and industry proffesionals from the world of esthetic dentistry and dental technology,Every technological development we have launched on the market over the course of our nearly 100 years of company history, was and is, the result of our unique experience in this field. Passion for our core competency in tooth shade deter-mination, state-of-the-art expertise and a desire for optimization, are the powerful values driving this experience. Motivated by your trust in our solutions, we use the comprehensive knowledge that we have accumulated to shape the future each day, to set new benchmarks, and where possible, to exceed your expectations in providing tooth shade determination that is second to none.Our focus is on precise tooth shade reproduction. This also includes establishing reliable processes in laboratories and dental practices, improving the workflow, saving time and money, and ultimately, producing esthetic results. As a company that is focused both on research and on solution development, these are the principles that we follow. We do this by providing dentists and dental technicians worldwide with technically outstanding innovations that support the entire life cycle of dental prosthetics. When we talk about customer satisfaction, we are also talking about the satisfaction of our customers' customers. As I said, our goal is to provide solutions. And the best solutions are those that are developed collabora-tively.As an independent, family-run company, we have remained true to our values and are focused on our relationship with our customers. Reliability and partnership are factors that we cultivate, and are cornerstones that are firmly anchored in our tradition and role as a market leader.In the spirit of tradition and innovation, warm regards from Henry Rauter Managing PartnerTo deliver superior performance, experience is required. A forward-looking approach depends on traditional values as well.Introduction of the first uniform shade standard VITAPAN classical A1–D4, later followed by VITA classical A1–D4VITA Easyshade ®1st generationdetermined and reproduced for the first time2007 200820132015VITA Easyshade®VVITA Easyshade® Advance 4.0 VITA Linearguide 3D-MASTER®VITA Easyshade® CompactA company with added value. And with roots and vision.Change equals motion, which equals the future. This is a phrase that describes the dynamic process we`ve taken since our foundation in 1924, and the path we've followed to develop into an internationally renowned specialist in tooth shades. For example, we were the fi rst dental company to describe natural tooth shades in scientifi c fashion and to document them in the form of shade guides that have become the international standard.Firmly grounded in this competency, VITA is a strong and reliable partner for dental practices and laboratories. The fact that internationally, 4 out of 5 tooth shades are now determined using one of our systems, underlines the importance of our solutions in natural, esthetic tooth reproduction. We consider this to be both a motivational factor as well as aresponsibility in terms of quality assurance and with regard to our consistent, innovative commitment at VITA. This dedication provides you with clear benefi ts that offer conside-rable potential for added value:• Fast and reliable tooth shade determination• Precise and complete communication of the correct tooth shade• Two established shade systems for all your needs– from standard dental prosthetics to highly-esthetic restorations OVERVIEW• Highly experienced: For almost 100 years, we have been the leading, worldwide provider of solutions for tooth shade determination• Thinking constructively, thinking ahead: our solutions always focus on the procedural benefi ts for laboratories and dental practices• We put our heart and soul into our business: as an independent, family-run company, we remain true to our values, including our solution-oriented approach, awareness of quality and customer proximity.VITA Bleachedguide 3D-MASTER®Tool for planning and monitoring the tooth whitening processScientific background.From the color space to the tooth shade system.A world of colors. A color for life.Lightness, chroma and hue are the characteristics, and the basis, on which all natural shades can be uniquely defined. The entire color spectrum can be represented as a sphere, which is effectively a globe of colors. It contains an area comprised of natural tooth shades; a small section in the yellow-red range.Colors can be uniquely described in quantitative fashion by specifying numerical values for the three mutually indepen-dent elements of L (lightness), C (chroma) and h (hue). On the basis of this scientific finding, VITA developed solutions for tooth shade determination and communication that provide a crucial foundation for laboratories and dental practices in order to facilitate dental prosthetics that offer precisely the right shade for every patient. For patients, this plays an incredibly important role in their confidence and comfort level. VITA classical A1–D4® and VITA SYSTEM 3D-MASTER®On the market since 1956, the 16 shades of theVITA classical A1–D4 shade guide provide a worldwide standard, acting as a reference system in tooth shade determination. Their effective reproduction of natural tooth shades was raised to a whole new level with VITA SYSTEM 3D-MASTER. Based on systematic research of the distribution of natural tooth shades within the color space, the development of VITA SYSTEM 3D-MASTER provides a solution that facilitates the exact description, communication and reproduction of each patient's tooth shade.1M21M12L2.52R2.53R2.54R2.52L1.52R1.53R1.54R1.52M23M24M25M22M13M14M13L2.54L2.53L1.54L1.52M33M34M35M35M1B1A1D2C1C2C3C4D3D4A2A3A3,5A4B2B3B4VITA SYSTEM 3D-MASTER ®. Modern efficiency The most important facts and system characteristics:• Shade sample sequence for optimum coverage of the color space of natural teeth in accordance with scientific rules • Reliable tooth shade reproduction, also of intermediate hues • 26 natural shade samples comprehensively cover the natural tooth color space• Longstanding and internationally proven system for the most demanding esthetic needsVITA solutions.The route to the right tooth shade must be a reliable one.Brighter 12Lightness (L) 34Darker 5L M RHue (h)BrighterDarkerMore yellow More redVITA classical A1-D4®. A simple yet effective basis.The most important facts and system characteristics: • Tooth shade determination in just a single step• An internationally established system for more than 50 years• 16 shade samples• Practical shade sample sequence based on hues and empirical findingsSchematic, simplified representationSchematic, simplified representationMore intensivePalerReddish-greygreyReddish-yellowishReddish-brownishLightnessHueHueHueC h r o m a3 More intensive 2.52 Chroma (C)1.51 PalerPerformance based on a reliable system.Establishing and maintaining esthetic and healthy teeth – that is always the focus of individual consultations, examinations and treatments.The tooth shade provides the finishing touch in superior quality for services of this kind, and is the mark of quality that is always visible. Natural reproduction in this respect is a daily challenge. After all, natural tooth shades differ in terms of light-ness, hue and chroma. And depending on the individual interplay of these factors, this has an impact on the entire restoration process. It is good to have a partner like VITA at your side who offers efficient, proven support.Tips on determining tooth shade with a VITA shade guide. By practitioners for practitioners.• Wherever possible, determine the tooth shade using a standardized daylight lamp• Make sure that the surroundings are neutral in terms of color. Lipstick and cosmetics should be removed, and bright clothing covered by a grey cape • Make your selection quickly. In case of doubt, trust your initial decision as the eye already tires after approx. 5 - 7 seconds• Disinfect the shade guide every time after performing shade determinationVITA shade guides.Beautiful teeth visible at a glance – a million times over."VITA tooth shade systems enable reliable, clinically-proven tooth shade determination "Dr. Karl Martin Lehmann, Associate professorUniversity Medical Center of Johannes Gutenberg University in Mainz and Dr. Lehmann's dental practice in BonnVITA Linearguide 3D-MASTER• Tooth shade determination in two steps• Trusted tooth shade determination thanks to classic, linear handling• 26 natural and systematically arranged tooth shades; in addition, three shades for• Clear organization of the shade samples in terms of lightness, chroma and hue• Easy use that is self-explanatory• Possibility of creating intermediate shades by mixingVITA Bleachedguide 3D-MASTER• Instrument for determining the level of lightness for the tooth whitening process• 29 levels of lightness based on VITA SYSTEM 3D-MASTER• Realistic depiction of tooth whitening, as well as simple communication with theVITA Toothguide 3D-MASTER• Tooth shade determination in three steps• 26 natural and systematically arranged tooth shades; in addition, three shades for• Clear organization of the shade samples in terms of lightness, chroma and hue• Possibility of creating intermediate shades by mixingVITA classical A1–D4® shade guide with VITA Bleached Shades• Tooth shade determination in a single step• 16 natural, empirically induced tooth shades• In addition, three shades for tooth whitening using VITA Bleached Shades• Simple shade selection thanks to quick comparison of shade samples with thenatural tooth• Possibility of sorting in accordance with visually perceived levels of lightness VITA classical A1–D4®The basic solution with a bonus.VITA SYSTEM 3D-MASTER®Linearguide, Bleachedguide and Toothguide. Efficient shade determination.VITA Easyshade V is a digital shade measurement device for determining the shade of natural dentition, whitened teeth and ceramic restorations precisely, quickly and independently of the ambient environment. VITA Easyshade V supports dentists and dental technicians with everything from tooth shade deter-mination and communication, to reproduction and checking the shade of the fi nished ceramic dental restoration, improving process reliability.VITA Easyshade V offers dental practices and laboratories effi cient and reliable support with:• o ptimum selection of suitable composites for direct restorations, CAD/CAM and veneering materials and prosthetic teeth • p rofessional planning and documentation of whitening treatments • m anufacturing of layered ceramic restoration thanks to display of shade gradients and deviations • q uality testing of layers ceramic restorations with regard to a target tooth shade • s mooth communication between practice and laboratory thanks to professional communication toolsVITA Easyshade ®VPerfect shade determination, maximum reliability.PRODUCT DETAILS:•Spectrophotometer with a measuring range of 400 - 700 nm•Basic shade measurement, average measurement and tooth area measurement •Measurement results in the worldwide established standard shade systems VITA classical A1 -D4, VITA SYSTEM 3D-MASTER and VITABLOCS shades as well as indication of tooth bleaching shades in accordance with the American Dental Association standard•Display of lab and LCh values•Bluetooth interface for wireless communication withthe VITA Assist PC software and VITA mobileAssist app•Ergonomic, seamless design for maximum hygiene•Intuitive operating concept and brilliant color touch display•Inductive loading station with durable AA batteries incl. self-discharge protection"Tooth shade determination is a keyfactor in the success of prosthetics; inthis respect, correct shade determinationis crucially important for the dentist, thelaboratory and the patient. In terms ofcost, accuracy and clinical processreliability, this is best achieved usingVITA Easyshade Advance 4.0"Prof. Dr. Alexander Hassel,University of Heidelberg andthe "Augustaanlage" dental practice andclinic in MannheimVITA Assist. Professional tooth shade communication and documentation for the practice and laboratory• P C software with VDDS interface • W ireless transmission of the VITA Easyshade data • C ombination of the tooth shadeinformation with digital patient photos • P rofessional graphics processing of patient photos for optimum documen-tation • I ntegration option of digital X-ray images, detail photos and contour images• Versatile comment functionsThanks to the convenient smartphone app VITA mobileAssist, transferring tooth shade information between the practice and the laboratory just got easier. The data of the VITA Easyshade V, as well as of VITA EasyshadeAdvance 4.0, is wirelessly transmitted to the app in a few seconds, via an internal Bluetooth interface, and can be combined with a patient photo and sent using email. In this way, you can perform tooth shade communication using mobile technology at any time and can transfer all relevant informa-tion conveniently with your smartphone or tablet.VITA mobileAssist. Mobile communication of tooth shades couldn't be simpler.VITA systems. Perfect solutions during processing* N ote "Optional process steps/firing": The feldspar and hybrid ceramic materials can be seated directly after milling and polishing. The following process steps mentioned above are optional for feldspar ceramic. The same steps are required for the hybrid ceramic, but with the hybrid ceramic, firing must not be carried out. When using zirconia, sinter firing is carried out prior to characterization/individualization.Shade determination• For digital shade determination, useVITA Easyshade Advance V , and for visual shadedetermination the VITA Linearguide 3D-MASTER orVITA classical A1–D4, for example.CAD/CAM Fabrication • For CAD/CAM fabrication, VITA offers you highly esthetic feldspar ceramic, high-strength glass ceramic, innovative hybrid ceramic materials and zirconia– simply select the best material solution for your individualrequirements.Shademodifi cation*• For feldspar, glass ceramics and zirconia, use VITA AKZENT Plus stains and the VITA VM 9 or VITA VM 11 veneeringceramics. Use VITA ENAMIC Stains for the hybrid ceramic andVITA VM LC flow for individualization.Firing*• Glaze, stains and/or dentine and crystallization firing are best carried out with the VITA VACUMAT 6000 M premiumfurnace.• It is recommended to use the VITA ZYRCOMAT 6000 MS forsinter firing.• Note: When using hybrid ceramic, firing must not be carriedout.Polishing • In the case of VITA feldspar ceramics, use polishing systemssuitable for silicate ceramics (e. g. VITA Karat diamondpolishing set ).• For VITA glass and hybrid ceramics, ideally, VITA SUPRINITY /VITA ENAMIC polishing sets should be used.Bonding • When bonding VITA feldspar, glass and hybrid ceramics, youcan use VITA DUO CEMENT or an alternative bonding systemrecommended by VITA.VITA Zahnfabrik H. Rauter GmbH & Co.KG Spitalgasse 3 · D-79713 Bad Säckingen · GermanyTel. +49(0)7761/562-0 · Fax +49(0)7761/562-299 Hotline: Tel. +49(0)7761/562-222 · Fax +49(0)7761/562-446 ·************************/vita.zahnfabrik 1 0 1 1 4 E –0 2 1 7 ( X . ) S –V e r s i o n ( 0 5 )With the unique VITA SYSTEM 3D-MASTER®, all natural tooth shades can be systematically determined and perfectly reproduced.Please note: Our products must be used in accordance with the instructions for use. We accept no liability for any damage resulting from incorrect handling or usage. The user is furthermore obliged to check the product before use with regard to its suitabi-lity for the intended area of application. We cannot accept any liability if the product is used in conjunction with materials and equipment from other manufacturers that are not compatible or not authorized for use with our product. Furthermore, our liability for the accuracy of this information is independent of the legal basis and, in as far as legally permissible, shall always be limited to the value as invoiced of the goods supplied, excluding value-added tax. In particular, as far as legally permissible, we do not assume any liability for loss of earnings, indirect damages, ensuing damages or for third-party claims against the purchaser. Claims for damages based on fault liability (culpa in contrahendo, breach of contract, unlawful acts, etc.) can only be made in the case of intent or gross negligence. The VITA Modulbox is not necessarily a component of the product.Date of issue of this information: 02.17After the publication of these information for use any previous versions become obsolete. The current version can be found at VITA Easyshade® V bears the CE mark in accordance with the EC directives 2006/95/EC, 2004/108/EC and 2011/65/EC.。
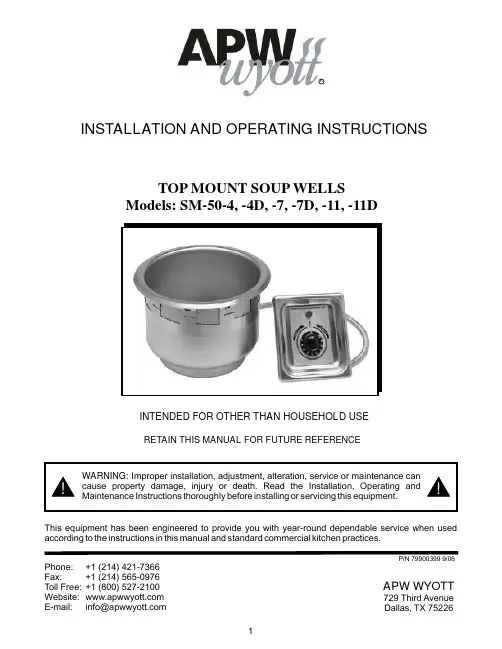
Phone:+1 (214) 421-7366 Fax: +1 (214) 565-0976 Toll Free:+1 (800) 527-2100 Website: E-mail:*****************INTENDED FOR OTHER THAN HOUSEHOLD USERETAIN THIS MANUAL FOR FUTURE REFERENCEP/N 79900399 9/06APW WYOTT729 Third Avenue Dallas, TX 75226This equipment has been engineered to provide you with year-round dependable service when used according to the instructions in this manual and standard commercial kitchen practices.RINSTALLATION AND OPERATING INSTRUCTIONSTOP MOUNT SOUP WELLSModels: SM-50-4, -4D, -7, -7D, -11, -11DTABLE OF CONTENTSSafety Precautions2 General Information4 General Troubleshooting4 Installation4 Dimensions & Shipping Weights5 Electrical Specifications5 Option Specifications5 Operation & Cleaning5 Parts List w/Exploded View6 Wiring Diagrams7 Warranty8IMMEDIATELY INSPECT FOR SHIPPING DAMAGEAll containers should be examined for damage before and during unloading. The freight carrier has assumed responsibility for its safe transit and delivery. If equipment is received damaged, either apparent or concealed, a claim must be made with the delivering carrier.A) Apparent damage or loss must be noted on the freight bill at the time of delivery. It must then be signed by the carrier representative (Driver). If this is not done, the carrier may refuse the claim. The carrier can supply the necessary forms.B) Concealed damage or loss if not apparent until after equipment is uncrated, a request for inspection must be made to the carrier within 15 days. The carrier should arrange an inspection. Be certain to hold all contents and packaging material.Installation and start-up should be performed by a qualified installer who thoroughly read, understands and follows these instructions.APW Wyott takes pride in the design and quality of our products. When used as intended and with proper care and maintenance, you will experience years of reliable operation from this equipment. To ensure best results, it is important that you read and follow the instructions in this manual carefully.Installation and start-up should be performed by a qualified installer who thoroughly read, understands and follows these instruction.If you have questions concerning the installation, operation, maintenance or service of this product, write Technical Service Department: APW/Wyott Foodservice Equipment Company, 729 Third Avenue, Dallas, TX 75226 .SAFETY PRECAUTIONSBefore installing and operating this equipment be sure everyone involved in its operation are fully trained and are aware of all precautions. Accidents and problems can result by a failure to follow fundamental rules and precautions.The following words and symbols, found in this manual, alert you to hazards to the operator, service personnel or the equipment. The words are defined as follows:THIS MANUAL SHOULD BE RETAINED FOR FUTURE REFERENCE!!WARNING:For your safety do not store or use gasoline or other flammable vapors or liquids in the vicinity of this or any other appliance. Keep the area free and clear of combustibles. (See ANZI Z83.14B, 1991)GENERAL INFORMATIONGeneral Installation:1. Always clean equipment thoroughly before first use. (See general cleaning instructions.)2. Check rating label for your model designation & electrical rating.3. For best results, use stainless steel countertops.4. All dimensions in parenthesis in centimeters, unless noted.General Operating Instructions:1. All food service equipment should be operated by trained personnel.2. Do not allow your customers to come in contact with any surface labeled "CAUTION HOT."3. Where applicable: Never pour cold water into dry heated units.4. Where applicable, do not cook, warm or hold food directly in liner pans (well pans). Always usesteam table pans/insets, etc.5. Never hold food below 150°F (66°C)Wet set-up and operation procedures:1. Add hot water 120°-140°F (50°-60°C) to well pan:4 Quart Round use 2 cups (½ litre)7 Quart Round use 3 cups (0.7 litre)11 Quart Round use 5 cups (1.4 litre)2. Turn thermostat control to “10” setting or if equipped with infinite control to “7” or “High”. Preheat forapproximately 30 minutes.3. Place covered inset with preheated product into well.4. Re-adjust control after another 30 minutes of operation to acquire desired temperature dependingon the amount and thickness of product.5. Keep inset/steamtable pan(s) covered to maintain ideal serving temperature.6. Do not let well run dry.General Cleaning Instructions:1. NEVER clean any electrical unit by immersing it in water. Turn off before surface cleaning.2.Always clean equipment thoroughly before first use. Clean unit daily. Use warm, soapy water(except where noted on charts). Mild cleansers and PLASTIC scouring pads may be used to remove baked-on food and water scale.3. Turn off electrical units before cleaning or servicing. All service should be performed by an APWWyott authorized service agency.GENERAL TROUBLESHOOTINGAlways Ask & Check: 1. Is the unit connected to a live power source?2. Check circuit breaker.3. Is power switch on & pilot light glowing?4. Check rating label. Are you operating unit on proper voltage?INSTALLATION3 (above)1.Follow General Installation Instructions on page .2.Make applicable Cut-Out per below table. Note: Unit is designed for installation in stainless steeltops.3. Apply putty tape to underside perimeter of the well rim outer edge.4.Apply a 1/4"(.6) bead of silicone sealant adjacent to the putty tape on the well flange.5.Drop well into opening from the top and push down until entire perimeter of rim is flush with thecounter surface.6.From below the counter surface insert an #8 to #10 (20 to 25 cm) flat tip screwdriver into the lockingring tab slots and twist in a clockwise motion to lock well in place.7.Trim excess putty and sealant from around well rim.GENERAL SPECIFICATIONS (4 QT., 7 QT. AND 11 QT.)OPTION SPECIFICATIONSOPERATION & CLEANING1.Follow General Operating & General Cleaning Instructions on page 4.22 Ga. Min. Close-Out Panel (By Fabricator)Wiring Box (By Fabricator)2 Pole Thermostat(Use Control Plate for hole pattern)8.Mount control to front panel using hardware. Maintain 4" (10.2) clearance between well and front panel.9.Check nameplate for proper voltage. Connect power.10.Maintain 4” clearance around all soup wells.Note: Electrically connect units to comply with local and NEC codes.5/16 Dia. (.4)Cut Out ELECTRICAL SPECIFICATIONS。
VelosterDon’t give in to the dull and conventional.Go off the beaten path.Find out who you are.Fill this monotonous city with your own voice.With Veloster.Gasoline 1.6 Turbo Sports Core in Ignite Flame / Roof in Phantom BlackGasoline 1.6 Turbo Sports Core with Full Option in Shooting StarAdd your own color to another grey city road.Color it with your unique style.Because you own it.Gasoline 1.6 Turbo Sports Core with Full Option in Cobalt Eclipse / Roof in Phantom BlackEnjoy the Attention.Veloster is born to be the object of envy.LED headlamps Radiator grille 18-inch alloy wheels and Michelin summer tires LED rear combination lampsAdd your own sound to your Veloster and create a unique experience.Double your joy during each ride in your Veloster.Your everyday route is transformedinto a space of your own.Gasoline 1.6 Turbo Sports Core with Full Option in Black/Red interior60/40 split folding rear seatsWireless smartphone charging systemSoundHoundHidden-type tailgate handle *SoundHound is a music recognition mobile app that displays information (title, singer, album, etc.) about a tune being played on the on-board audio system.*The navigation map updating service is guaranteed for 8 years from the date of purchase of the vehicle. This service may expire due to the circumstances of Hyundai Motor.Head-up display (combiner) Digital performance gaugeBucket seatsEngine sound equalizer (ESE)Paddle shift ConveniencePerformanceRear-wheel multi-link suspension 6-speed manual transmissionGasoline 1.6 Turbo Sports Core with Full Option in Tangerine Comet / Roof in Phantom BlackGasoline 1.4 turbo engineMaximum torque _24.7kgf·m/1,500~3,200rpm Maximum output _ 140PS/6,000rpmGasoline 1.6 turbo engineMaximum torque _27.0kgf·m/1,500~4,500rpm28.0 kgf·m With over boostMaximum output _ 204PS/6,000rpmInterior package 1.Metal doorstep (front) 2.LED sun visor lamp 3.LED overhead console lamp 4.LED room lamp 5.LED luggage lamp Braking package rge-capacity front-wheel brake system – Red caliper / Large-capacity disk / Low steel pad / Goodrich brake hose 7.Brake oil Engine performance package8. Turbo hose 9.Oil filter 10.Engine oil (synthetic oil 0W40) 11.Intake filter681. LED emblem exclusive for JBL Extreme Sound /2. Metal dome tweeter and metal grille /3. Red gear knob4. Metal doorstep (front) /5. LED sun visor lamp /6. LED overhead console lamp /7. LED room lamp /8. LED luggage lamp Blue-coated paper cone door wooferand high-power hybrid amplifierBBS 18-inch alloy wheelsOZ 18-inch alloy wheelsThe TUIX items of distinctive individuality add sparkle and twist to the model of your choice and enhance the joy of driving.Make your Veloster stand out with JBL Extreme Sound Edition generating powerful, explosive sound and adorned with LED lights.Extreme Sound Edition1.4 Turbo GDi 1.6 Turbo GDi215/45R17 tires and 17-inch alloy wheels (Medium Grey Metal)225/40R18 tires and 18-inch alloy wheels(Dark Metal Grey / renovated front face)225/40R18 tires and18-inch alloy wheels(Strong Dark Metal / renovated front face)225/40ZR18 Michelin tires and 18-inch alloy wheels (Black)Gasoline 1.4 Turbo Modern in Cobalt Eclipse / Roof in Chalk WhiteGasoline 1.6 Turbo Sports Core with Full Option in Ignite Flame / Roof in Phantom Black*Terrestrial DMB can be viewed in standard (320X240) and high (1,280X720) display resolution, however reception may not be possible due to transmission circumstances, DMB broadcasting regulations, or changes in the means of transmission used by DMB providers.*The specifications introduced in this brochure include options and each model is applied with a different set of specifications. Please refer to the monthly price table for the specifications applied to each model.Projection headlamps (LED daytime running lights included) Bulb-type rear combination lamps LED headlampsLED rear combination lamps 7-inch display audio and rear-view camera Manually operated air conditioner 8-inch navigationFully automatic air conditioner Radiator grille exclusive for 1.4 TurboCenter single-tip muffler exclusive for 1.4 Turbo Radiator grille exclusive for 1.6 TurboIntegrated driving mode (smart shift mode)Supervision cluster exclusive for 1.4 Turbo Regular cluster exclusive for 1.4 Turbo Supervision cluster exclusive for 1.6 Turbo Heated steering wheel Heated front seats Tire repair kit Ventilated front seatsWide sunroofExterior Color CombinationColorThunderbolt (TUY)Chalk White (P6W)Chalk White (P6W)Thunderbolt(TUY)Interior Color CombinationInterior in BlackInterior in Black/Machine Red Interior inBlack/Sandstorm GreyInterior in Black/Pulse Grey*Ice Storm and Shooting Star are matte clear paints. Make sure to check the precautions specified in the owner’s manual.#colorful #liVeloud#different#matchInterior Color 4,2402,6508507401,5631,4001,5491,800Unit : mm(Wheel tread is based on 225/40R18 tire)dimensionPlease adhere to the designated speeds on the road for maximum fuel efficiency.- The above fuel economy was calculated based on standard driving conditions. Actual fuel efficiency may vary depending on road conditions, driving styles, cargo weight, maintenance conditions, and outside temperatures. - Some of the photographed vehicles in this brochure depict optional features for illustrative purposes and may differ from the actual vehicles. - The features, colors, and specifications stated in this brochure are subject to change based on improvements in the vehicle’s exterior or performance. - The above engine performance data is based on the net value, which is a legal requirement applied by the Ministry of Land, Infrastructure and Transport from 1997 onwards. To produce the data, an advanced measurement method that takes into account the resistance of vehicle emissions was used. This method may generate results slightly lower than those generated by existing methods based on the gross value. - The leather upholstery partially consists of synthetic leather. - The vehicle colors printed in this brochure may differ from the actual colors. - The specifications of the rental vehicles may be partly different from those of other models. For detailed specifications, please check the price list catalogue for the relevant month. - The information in this brochure is based on the gasoline models, and the specifications may be partly different from those of the LPi models.- Hyundai Motor vehicles are sold by Car Masters of Hyundai Motor Company’s branches and dealers only at prices uniformly applied everywhere across the country to promote fair business practices. - The failure to use authentic parts and oil products (including engine oil and transmission fluid) recommended by Hyundai Motor Company and/or the use o f defective fuel may critically damage your v ehicle. - Please re fer to the owner’s manual for details about new technologies and features stated in this brochure.The images presented here are intended to inform customers and display the best models and options. The specifications described above vary by option, package, powertrain, and exterior color. For specification details by model, please refer to the monthly price table.Pulse Grey(leather)- The seat belts of the Pulse Grey interior are in black. - Seats upholstered in natural leather- Available with the Sports Core trim modelsSandstorm Grey(leather)- The seat belts of the Sandstorm Grey interior are in black. - Seats upholstered in natural leather- Available with the Sports Core trim modelsBlack/Red Stitches(woven+leather)Black/Yellow Stitches(woven)- The seat belts of the Black/Yellow Stitches interior are in black.- Seats upholstered in fabric (woven)- Available with the Sports trim modelsBlack/Machine Red(leather)- The seat belts of the Black/Machine Red interior are in black.- Seats upholstered in natural leather- Available with the Modern Core trim modelsBlack/Blue Stitches(woven)- The seat belts of the Black/Blue Stitches interior are in black.- Seats upholstered in fabric (woven) - Available with the Modern trim models Black/Red(leather)- The seat belts of the Black/Red interior are in red. - Seats upholstered in natural leather- Available with the Sports Core trim models- The seat belts of the Black/Red Stitches interior are in red.- Seats upholstered in a combination of natural leather and fabric (tricot and knit)- Available with the Modern Core and Sports/Sports Core trim models- The stitching applied to Modern Core differs from that applied to Sports/Sports Core. *Available with Modern Core Trim* Basic service(free for 5 years from initial subscription): remote control, safety security, vehicle management, navigation.* When the free basic service period ends, customers are switched, with their consent, to the charged service(KRW11,000/month).The advanced technology of Hyundai’s BlueLink system helps keep both the driver and the vehicle safe in any situation.BlueLink is always there to keep you safe, regardless of the location or time of day. Experience the unique joy of safe and comfortable driving.Remote controlIn the extremely hot summer or cold winter months, you can link your smartphone to the air conditioner or heater to set and control the temperature inside the vehicle. Enjoy a pleasant driving experience with BlueLink.The BlueLink Center works 24 hours a day, 365 days a year. If an airbag opens due to an accident, the Center automatically detects your location and takes appropriate actions according to the situation, such as contacting the police, ambulance, insurance company, etc.Safety securityServices include real-time trouble detection while the vehicle is running and regular vehicle inspections on pre-arranged dates. In the event of vehicle trouble, immediate professional consulting is available, and you may conveniently make reservations for repair at the time and location of your choice.Vehicle managementFumbling with the navigation device while driving can be risky. With BlueLink, all you have to do is just push the BlueLink button and ask the operator for your destination. Then the destination is automatically set up, and you can continue to enjoy a safer and more convenient driving experience.Concierge (paid service)Best routes suggestions based on live analysis of the road network. If the navigation system is unable to find a particular destination, it will automatically connect to the Internet and search for related information.Navigation2019.6.1 ~ 6.30。
新款味达维edition系列高压锅亲们,这个是德国官网带上的哦是新款的,估计国内专柜还没有上市的哦。
这款的样子是不是看起来好美观的,也很时尚的哦。
收到的亲们是不是感觉自己就像是在照镜子的呢~O(∩_∩)O.~~~~下面就给亲介绍下这款锅子的用法的哦~这款的高压锅是6L的一般做饭的时候要按照个人的饭量多少来做的哦最大的水位线要离锅边4com左右的、要不然就会溢出来的不要太高的哦一般做肉类的话是15到20分钟左右的蔬菜的话10分钟左右就可以了水的比例这个就要看亲的控制了,一般用锅蒸米饭的话一般是1:3的比例1是米3是水的要是想起到3层的作用的话锅底要放三角架上面分别放上有孔和无孔的蒸屉的,有孔的可以蒸菜的无孔的是可以米饭的这3个颜色的是出气指示阀的,黄色的是可以升压了,绿色的是已经最佳状态了,可以关系小火了,红色的要是出现了要立即关火了说明压力过大了这个是手动排气的功能,关火后就可以把按钮选择这个地方就可以了,等到压力阀降平之后就可以开盖子了哦备注:这个是手动排气的功能,关火后就可以把按钮选择这个地方就可以了,等到压力阀降平之后就可以开盖子了哦,但是最好少量使用这个手动排气的哦,要不密封圈容易损坏啦,如果着急开盖,最好的降压方式,就是把锅子放到水龙头下冲就可以了结果里边煮的东西,水分全部冒出来了,很吓人的,其实手动排气是会损坏配件,我们也知道的,这个是档位调节的,1档的是108°的2档的是118°的(一般要是想快一点的话就放2档的哦速度是比较快一点的哦)下面给亲们说下计时器的用法的哦~这个是计时器的哦,平时不用的话可以拆卸下来的呢很方便的哦给大家看下图吧:大家在做饭之前把计时器打开按中间那个开始键就是打开的状态的哦把计时器放到出气阀上的哦要是打开的状体就要长按开始键的哦~要是出现时间时间数额了就说明已经打开了哦这个时候就要设定好档位了哦,开火,生到黄线了就要开始设定时间了哦~设定时间就选择+,-的哦设置好了一定要按中间的开始键的才可以开始计时的,按好后只要显示屏上显示,时间标志(如图)就说明已经开始计时了哦,到时间的话他会发出声响的。
Hot drinks machine, TASSIMO FINESSETAS16B5GBOptional accessoriesTCZ6004 4 x Tassimo Descaling Tablets More intensity with a push of abutton.TASSIMO FINESSE – The intense one• Great variety: with up to 70 famous-brand drinks for every taste.• Perfect drink quality thanks to INTELLIBREW™ technology• Simple and easy to use one button operation• Each drink brewed individually to perfection• Upgrade your coffee! Push the button 3 sec. for a more intense coffee experience.Technical DataDimensions: ........................................................265 x 157 x 366 mm Dimensions of the packed product (HxWxD): .....310 x 265 x 395 mm Pallet dimensions: ..............................................201.0 x 80.0 x 120.0 Standard number of units per pallet: . (54)Net weight: ................................................................................2.2 kg Gross weight: ............................................................................2.8 kg EAN code: (4242005308866)Connection rating: ..................................................................1400 W Voltage: ...............................................................................220-240 V Frequency: .................................................................................50 Hz Length of electrical supply cord: ............................................90.0 cm Plug type: ...............................................................................GB plugHot drinks machine, TASSIMOFINESSETAS16B5GBMore intensity with a push of a button. TASSIMO FINESSE – The intense oneHighest drink variety and quality- Large variety of high quality hot beverages: freshly brewed coffee, espresso, cappuccino, latte macchiato, hot chocolate or tea straight away- Two leading companies have joined forces for a high quality hot beverage system- Patented bar code technology identifies the drink selected and adjusts the amount of water, brewing time and the temperature to make the perfect cup everytime- Cleaning disc for purging the system and keeping your machine clean and fresh- IntensityBoost: Just push the button a little longer and have your coffee with a more intense flavour- No transition of taste: brewing takes place within T-DISC capsule; after each brewing cycle system is cleaned through steam purge Highest Convenience- Easy to use, one button operation with Tassimo T-Discs- Innovative flow heater technology means there is virtually noheat-up time.- 5 LED user interface provides user with current information about machine status: Standby, Automatic mode, Manual mode, Refill water tank, machine needs to be descaled- Automatic cleaning and descaling programme- Height adjustable and removable cup stand with stainless steel drip tray: can be fully removed for tall latte glasses or travel mugs- Removable water tank integrated into housing unit 0.7 l Contemporary, high-value design- Space saving design- Trendy and compact designQuick and energy efficient drink preparation- Innovative heating technology: only the required amount of water is heated on demand- Low energy consumption: convenient auto-off after brew cycle Further Specifications- Connected load 1400 W- Brewer dimensions HxWxD: 265 mm x 157 mm x 366 mm- Weight incl. packaging (kg): 2.76Accessories- Descaling tablets (part no 310967) for the automatic TASSIMO machine descaling process, available from Bosch customer service。
Saeco皇家型咖啡机Automatic espresso coffee machine OPERATING INSTRUCTIONS说 明 书目录索引一、安全预防 (2)二、前言 (3)三、机器参数 (3)四、基本介绍 (4)五、安装 (6)六、使用 (7)七、菜单与设置 (10)八、调节与设定 (14)九、清理与保养 (15)十、故障处理 (20)十一、保证书 (21)1一、 安全预防1、 本机不能在户外使用,不要靠近热源。
2、 机器要移动时一定要拔下电源插头。
3、 不要让小孩使用机器。
4、 环境要保持干燥,绝不要将机器浸在水中,不要使用非法的附件。
5、 不要在水箱无水,豆槽无豆的情况下使用机器。
6、 正常的使用和保养会廷长机器的寿命。
7、 原包装箱是根据运输安全设计的,在运输过程中能有效的保护机器,建议保留。
8、 本机已通过欧洲安全法规测试,取得安全证明。
9、 遇到不了解的地方请咨询经销商,维修服务需要专门技术人员,如私自维修保证书无效。
10、在保证期内维修机器本公司只负责零部件及维修费用,不负责其它费用。
11、请遵守本手册内的安全预防说明,说明书要保存好, 并放置在易找处,以供参考。
2二、前 言本说明书介绍了SAECO皇家型咖啡机的操作方法、功能设定及一些注意事项等;它是一部适用于各种场所的多功能咖啡机,具有e智慧,经由简单的操作可获得满意的效果。
为了你能正确地使用机器并发挥其优越的性能,请在使用前详细阅读并了此说明书。
三、机器参数1、品名: 皇家型2、尺寸(宽×高×深度): 390×395×455(厘米)3、重量: 15公斤4、电线长度: 1.2米5、豆槽容量: 300克6、水箱容量: 2.4升7、豆渣槽容量: 308、水泵工作压力: 15帕9、电压: 230伏10、功率: 专业型1600W卡布其诺型 2300W11、电源频率: 50赫兹12、控制面板: 数码液晶13、安全设备: 煮器压力安全阀自动温度控制器3四、Royal 基本介绍机器基本说明:01、输出口高度调节钮 11、单品盖02、输出口 12、液晶显示屏03、热水/蒸汽输出管 13、操作面板04、卡布其诺组件 14、豆渣槽05、蒸汽旋钮 15、废水盘06、温杯盘 16、冲泡器07、水箱 17、豆量调节杆08、水箱盖 18、冲泡器把手09、豆槽盖 19、冲泡器底座接盘10、豆槽4电脑控制面板1、 热水开关键2、单品咖啡键;(在设定中为“▲”,用来向上浏览菜单)3、卡布其诺键;(在设定中为“ENTER”,确认键)4、浓缩咖啡键;(在设定中为“ESC”,取消。