3000TA中文说明书
- 格式:pdf
- 大小:1.70 MB
- 文档页数:52
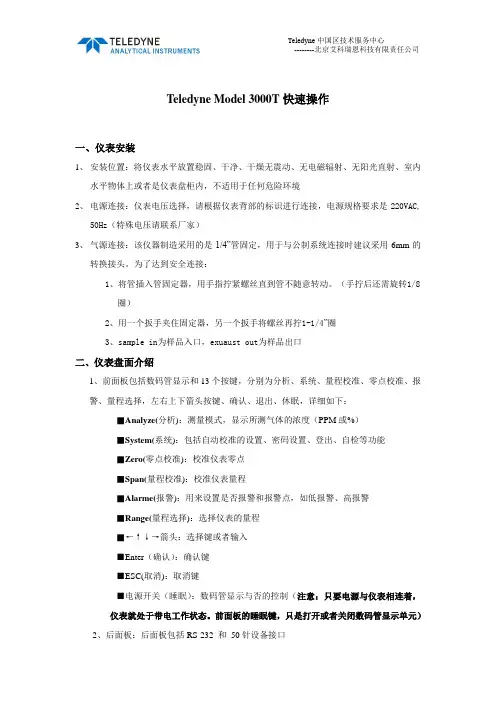
Teledyne Model 3000T快速操作一、仪表安装1、安装位置:将仪表水平放置稳固、干净、干燥无震动、无电磁辐射、无阳光直射、室内水平物体上或者是仪表盘柜内,不适用于任何危险环境2、电源连接:仪表电压选择,请根据仪表背部的标识进行连接,电源规格要求是220VAC,50Hz(特殊电压请联系厂家)3、气源连接:该仪器制造采用的是1/4”管固定,用于与公制系统连接时建议采用6mm的转换接头。
为了达到安全连接:1、将管插入管固定器,用手指拧紧螺丝直到管不随意转动。
(手拧后还需旋转1/8圈)2、用一个扳手夹住固定器,另一个扳手将螺丝再拧1-1/4”圈3、sample in为样品入口,exuaust out为样品出口二、仪表盘面介绍1、前面板包括数码管显示和13个按键,分别为分析、系统、量程校准、零点校准、报警、量程选择,左右上下箭头按键、确认、退出、休眠,详细如下:■Analyze(分析):测量模式,显示所测气体的浓度(PPM或%)■System(系统):包括自动校准的设置、密码设置、登出、自检等功能■Zero(零点校准):校准仪表零点■Span(量程校准):校准仪表量程■Alarme(报警):用来设置是否报警和报警点,如低报警、高报警■Range(量程选择):选择仪表的量程■←↑↓→箭头:选择键或者输入■Enter(确认):确认键■ESC(取消):取消键■电源开关(睡眠):数码管显示与否的控制(注意:只要电源与仪表相连着,仪表就处于带电工作状态。
前面板的睡眠键,只是打开或者关闭数码管显示单元)2、后面板:后面板包括RS-232 和50针设备接口50针接口包括模拟输出、报警、远控校准等三、传感器安装在安装过程中有必要尽量减少Teledyne微量氧传感器在空气中暴露的时间。
装电池的速度越快,TAI 氧传感器恢复到低ppm测量的时间越短。
注意:不要接触电池的传感表面,该电池表面覆盖薄薄的Teflon膜,如果膜被损坏,则必须更换传感器安装新的电池前,检查电池块底部的黑色橡胶圈。

第一章简要介绍1.1 前言MICOLIFT 3000 全电脑控制串行通讯微机自推出以来,以其无可比拟的可靠性、友好的人机界面,低廉的价格,迅速赢得了广大客户的信赖,成为电梯更新、改造的首选产品,代表了当今电梯技术发展的主流方向。
目前已被国内几十家电梯厂所采用。
本说明书以目前使用最多的32层站为例说明,若层站数高达64层站,另有说明书作详细介绍。
1.2 功能简介MICOLIFT 3000 串行通讯微机,采用现场CAN 总线控制,多处理器结构,主控板采用多层制板工艺,表面贴装技术,极大地提高系统的抗干扰能力,通过友好的人机界面,调试人员无需编程,仅根据现场条件输入几个简单的参数即可,它具有如下几下特点:(1)、井道参数自学习(2)、采用高速计数技术及准确定位技术,平层精度更高。
(3)、四线制最少布线,由于采用串行通讯技术,所有呼梯信号只通过两根通讯线连接,并通过高可靠插拔插件直接连接,大大提高工程进度,并可减少现场接线的错误。
(4)、使电柜标准化生产成为可能。
(5)、能直接在微机上呼梯,所有的外呼和内选信号都能在微机上操作并能显示所有的呼梯信号。
(6)、能直接调节自动关门的时间和开、关门保护的时间。
(7)、可以直接在微机上选择不响应某一楼层的信号。
(8)、可以选择单关门和双开门以及某一楼层不开门。
(9)、楼层显示任意设置(如显示-9,-1及字母等等);(10)、能任意设置基站以及消防返回的层站(11)、显示自学习后每层的脉冲数,以及即时轿厢所在位置;(12)、可设置单、多层运行曲线,减速点可越层;(13)、支持远程监控、远程调试;(14)、可群控多台电梯;(15)、可选择七段码、BCD码以及滚动点阵显示;(16)、50个故障历史记录,能记录下故障发生的时间以及电梯出了什么故障。
有了它,你就能在电梯出现故障时及时作出准确的处理,以及做一些事先防范的工作,让你感受到科技的以人为本的真谛。
1.3 附电梯专用控制功能01. 全集选控制02. 安全回路保护功能03. 门联锁安全保护功能04. 开门区间限定保护功能05. 开关门按钮操作功能06. 门安全保护功能07. 到站自动开门功能08. 自动延时关门功能09. 关门故障自动重开门功能10. 本层顺向外呼按钮开门功能11. 端站层自动校正功能12. 端站强制换速功能13. 消防运行功能14. 检修运行操纵功能15. 有无司机操作功能16. 满载自动直驶功能17. 超载报警与保护功能18. 内选自动应答与减速消号19. 内选外呼登记与记忆显示20. 最远端反向外呼应答载车21. 外呼顺向应答与减速消号22. 自动平层停车功能23. 自动定向与换向功能24. 运行方向显示与预报功能25. 高速运行超速保护功能26. 自学习井道数据功能27. 与上位计算机连网通信功能28. 本层反向外呼登记功能29. 外呼开门定向功能30. 独立运行功能31. 单多层运行自动分速度功能(1.5m/s以上)32. 司机运行状态下内选灯闪动指示对应层外呼信号第二章接口2.1 并行输入端子的连接MICOLIFT 3000 微机为CAN BUS 现场总线,串行通讯。
Standard3000中⽂操作⼿册part13.6. 電箱/控制器3.6.1. 技術資料y尺⼨(寬×⾧×⾼) 205×340×345 mm3000W y輸出功率 1000/2000/50/60Hz,y電源供應 230V,單相電源y溝通介⾯ RS232y LCD顯⽰螢幕 16⾏×40字y參數資料庫32組焊接參數y加⼯資料庫儲存最近25組焊接資料y重量約16 kg本電箱達到下列⼯業安全規定所需標準:y EN 61000-6-4 EMVy EN 61000-6-2 EMVy EN 55011 class A/group 1y Low voltage guidelines 73/23/ EWG4 操作前注意事項4.1. 連接電源與機器各部分請完成以下步驟使機器準備就緒:1.固定壓機上的⼯作檯2.連接壓機與電箱之間的電線注意:電源線請務必接地。
3.將壓機上之電線插⼊電箱背⾯插座:1壓機2雙⼿起動開關3RF (與換能器連接)4電源4.1.1. 主動溝通裝置5RS232插座 (9孔D-sub插座)6數位輸⼊ (25孔D-sub插座,序列埠)7數位輸出 (25孔D-sub插座,序列埠)其他資料請⾒第⼋章”資料分析”,插座配置請⾒第九章”主動溝通與信號傳送”。
4.1.2. 壓縮空氣源:最⼤7 bar;105 psi依下列指⽰轉動壓縮空氣閥(21):4.將壓縮空氣喉(21a)與壓縮空氣供應源連接。
5.將壓縮空氣閥(21)轉⾄⼯作位置。
注意:若輸⼊壓縮空氣壓⼒⼤於7 bar,附加安全氣閥會⾃動開啟釋放過多的空氣壓⼒。
4.1.3. 裝備隔⾳罩SSK-H1ADG電箱電源2數位輸⼊ (25孔D-sub插座,序列埠) 3數位輸出 (25孔D-sub插座,序列埠) 4壓機5雙⼿起動開關6RF (與換能器連接)拆除隔⾳罩後⽅⾯板可調整壓機,卸除或裝備隔⾳罩。
4.2. 操作及顯⽰元件4.2.1. 壓機1 換能器外罩內藏超⾳波發振系統及電源線。


OptiPlex 3000 Tower Setup and SpecificationsNotes, cautions, and warningsA NOTE indicates important information that helps you make better use of your product.A CAUTION indicates either potential damage to hardware or loss of data and tells you how to avoidA WARNING indicates a potential for property damage, personal injury, or death.© 2022 Dell Inc. or its subsidiaries. All rights reserved. Dell Technologies, Dell, and other trademarks are trademarks of Dell Inc. or its subsidiaries. Other trademarks may be trademarks of their respective owners.Chapter 1: Set up your computer (4)Chapter 2: Views of OptiPlex 3000 Tower (9)Front (9)Back (10)Chapter 3: Specifications of OptiPlex 3000 Tower (11)Dimensions and weight (11)Processors (11)Chipset (12)Operating system (12)Memory (13)Memory matrix (13)External ports (14)Internal slots (14)Ethernet (14)Wireless module (15)Audio (15)Storage (16)Power ratings (17)Power supply connector (18)GPU—Integrated (18)Multiple display support matrix (18)GPU—Discrete (19)Multiple display support matrix (19)Hardware security (19)Environmental (20)Regulatory compliance (21)Operating and storage environment (21)Chapter 4: Getting help and contacting Dell (22)Contents3Set up your computerSteps1.Connect the keyboard and mouse.2.Connect to your network using a cable.14Set up your computer3.Connect the display.Set up your computer5If you ordered your computer with a discrete graphics card, the HDMI and the display ports on the back panel of 4.Connect the power cable.5.Press the power button.6Set up your computer6.Finish Windows setup.Follow the on-screen instructions to complete the setup. When setting up, Dell recommends that you:●offline account.●On the Support and Protection screen, enter your contact details.7.Locate and use Dell apps from the Windows Start menu—RecommendedTable 1. Locate Dell appsResources DescriptionMy Dellyour computer. It also notifies you about the warranty status, recommended accessories, andsoftware updates if available.SupportAssistcomputer and automates the engagement process with Dell Technical support. It addressesperformance and stabilization issues, prevents security threats, monitors, and detects hardwareSet up your computer7Table 1. Locate Dell apps (continued)8Set up your computerViews of OptiPlex 3000 TowerFront1.Optical disk-drive (optional)2.Power button with diagnostic LED3.Hard-disk drive activity light4.Universal audio jack5.Two USB 2.0 ports6.Two USB 3.2 Gen 1 ports2Views of OptiPlex 3000 Tower 9Back1.HDMI 1.4b port2.DisplayPort 1.4 port3.Two USB 3.2 Gen 1 ports4.Two USB 2.0 ports with Smart Power On5.Three expansion card slotsSupports only Slot 1, Slot 2, Slot 36.Power cord connector port7.Power supply diagnostic light8.Kensington security-cable slot9.RJ45 Ethernet port10.Service tag label11.Padlock ring12.One video port (HDMI 2.0b/DisplayPort 1.4/VGA) (optional)13.Serial/PS2 port (optional)10Views of OptiPlex 3000 TowerSpecifications of OptiPlex 3000 TowerDimensions and weightThe following table lists the height, width, depth, and weight of your OptiPlex 3000 Tower.Table 2. Dimensions and weightProcessorsThe following table lists the details of the processors supported by your OptiPlex 3000 Tower.Global Standard Products (GSP) are a subset of Dell’s relationship products that are managed for availability and Device Guard (DG) and Credential Guard (CG) are the new security features that are only available on Windows today.Device Guard is a combination of enterprise-related hardware and software security features that, when configured together,will lock a device down so that it can only run trusted applications. If it is not a trusted application, it cannot run.Credential Guard uses virtualization-based security to isolate secrets (credentials) so that only privileged system software can access them. Unauthorized access to these secrets can lead to credential theft attacks. Credential Guard prevents these attacks by protecting NTLM password hashes and Kerberos Ticket Granting Tickets.Processor numbers are not a measure of performance. Processor availability is subject to change and may vary by Table 3. ProcessorsProcessorsWattageCore countThre ad cou nt Speed CacheIntegrated graphicsGSPDG/CG ReadyIntel Celeron Gold G690046 W 243.40 GHz4 MBIntel UHD Graphics 710No YesIntel Pentium Gold G740046 W 24 3.70 GHz 6 MBIntel UHD Graphics 710NoYes12thGeneration60 W 483.30 GHz to4.30 GHz12 MBIntel UHD Graphics 730NoYes3Table 3. Processors (continued)Processors Wattage Corecount ThreadcountSpeed Cache Integrated graphics GSP DG/CGReadyIntel Core i3-1210012th Generation Intel Core i3-1230060 W48 3.50 GHz to4.40 GHz12 MB Intel UHD Graphics730Yes Yes12th Generation Intel Core i5-1240065 W612 2.50 GHz to4.40 GHz18 MB Intel UHD Graphics730Yes Yes12th Generation Intel Core i5-1250065 W612 3.00 GHz to4.60 GHz18 MB Intel UHD Graphics770Yes Yes12th Generation Intel Core i5-1260065 W612 3.30 GHz to4.40 GHz18 MB Intel UHD Graphics770Yes YesChipsetThe following table lists the details of the chipset supported by your OptiPlex 3000 Tower.Table 4. ChipsetDescription ValuesChipset Intel B660Processor●Intel Celeron Gold G6900●Intel Pentium Gold G7400●12th Generation Intel Core i3/i5 DRAM bus width64-bitFlash EPROM32 MBPCIe bus Up to Gen4 Operating systemYour OptiPlex 3000 Tower supports the following operating systems:●Windows 11 Home, 64-bit●Windows 11 Pro, 64-bit●Windows 11 Downgrade (Windows 10 image)●Windows 11 Pro National Education, 64-bit●Windows 11 CMIT Government Edition, 64-bit (China only)●Kylin Linux Desktop version 10.1 (China only)●Ubuntu Linux 20.04 LTS, 64-bitMemoryThe following table lists the memory specifications of your OptiPlex 3000 Tower.Table 5. Memory specificationsDescription ValuesMemory slots Two-DIMM slotsMemory type DDR4Memory speed3200 MHzMaximum memory configuration64 GBMinimum memory configuration 4 GBMemory size per slot 4 GB, 8 GB, 16 GB, and 32 GBMemory configurations supported● 4 GB, 1 x 4 GB, DDR4, 3200 MHz, single-channel●8 GB, 1 x 8 GB, DDR4, 3200 MHz, single-channel●8 GB, 2 x 4 GB, DDR4, 3200 MHz, dual-channel●16 GB, 1 x 16 GB, DDR4, 3200 MHz, single-channel●16 GB, 2 x 8 GB, DDR4, 3200 MHz, dual-channel●32 GB, 1 x 32 GB, DDR4, 3200 MHz, single-channel●32 GB, 2 x 16 GB, DDR4, 3200 MHz, dual-channel●64 GB, 2 x 32 GB, DDR4, 3200 MHz, dual-channel Memory matrixThe following table lists the memory configurations supported on your OptiPlex 3000 Tower.Table 6. Memory matrixConfiguration SlotUDIMM1UDIMM24 GB DDR4 4 GB NA8 GB DDR48 GB NA8 GB DDR4 4 GB 4 GB16 GB DDR416 GB NA16 GB DDR48 GB8 GB32 GB DDR432 GB NA32 GB DDR416 GB16 GB64 GB DDR432 GB32 GBExternal portsThe following table lists the external ports of your OptiPlex 3000 Tower.Table 7. External portsDescription ValuesNetwork port One RJ45 Ethernet portUSB ports Front:●Two USB 2.0 ports●Two USB 3.2 Gen 1 portsRear:●Two USB 2.0 ports with Smart Power On●Two USB 3.2 Gen 1 portsAudio port Universal audio jackVideo port●One DisplayPort 1.4 port●One HDMI 1.4b port●One optional video port (HDMI 2.0b/DisplayPort 1.4/ VGA) I/O port One Serial/PS2 port (optional)Media-card reader Not supportedPower-adapter port NASecurity-cable slot●One Kensington security-cable slot●One padlock ringInternal slotsThe following table lists the internal slots of your OptiPlex 3000 Tower.Table 8. Internal slotsEthernetThe following table lists the wired Ethernet Local Area Network (LAN) specifications of your OptiPlex 3000 Tower.Table 9. Ethernet specificationsDescription ValuesModel number●Realtek 8111HSD●Realtek 8111HDTransfer rate10/100/1000 MbpsWireless moduleThe following table lists the Wireless Local Area Network (WLAN) module specifications of your OptiPlex 3000 Tower. Table 10. Wireless module specificationsAudioThe following table lists the audio specifications of your OptiPlex 3000 Tower.Table 11. Audio specificationsDescription ValuesAudio controller Realtek ALC3246-CGStereo conversion24-bit DAC (Digital-to-Analog) and ADC (Analog-to-Digital) Internal audio interface Intel HDA (high-definition audio)External audio interface●One universal audio jack●One Line-out audio port with re-tasking to Line-in (rear) Number of speakers OneInternal-speaker amplifier Integrated in ALC3246-CG (Class-D 2 W)External volume controls Keyboard shortcut controlsSpeaker output:Average speaker output 2 WPeak speaker output 2.5 W Subwoofer output Not supported Microphone Not supportedStorageThis section lists the storage options on your OptiPlex 3000 Tower.Table 12. Storage MatrixStorage1st 2.5-inch harddrive 2nd 2.5-inch harddriveSingle 3.5-inch harddriveSingle M.2socketSingle M.2via Zoom 2PCIe card2.5-inch hard drive Y N N NDual 2.5-inch hard drive Y Y N N3.5-inch hard drive N N Y N2.5-inch hard drive3.5-inch hard drive Y N Y N3.5-inch hard drive 2.5-inch hard drive Y N Y NM.2 solid-state drive 3.5-inch hard drive N N Y YM.2 solid-state drive 2.5-inch hard drive/solid-state driveY N N YM.2 solid-state drive Dual 2.5-inch hard drive Y Y N YM.2 solid-state drive M.2 SSD (via M.2expansion card)N N N Y YM.2 solid-state drive 3.5-inchhard driveM.2 SSD (via M.2expansion card)N N Y Y YM.2 solid-state drive 2.5-inchhard driveM.2 SSD (via M.2expansion card)Y N N Y YDual M.2 solid-state drive 2.5-inch hard drive Y N N Y Y Dual M.2 solid-state drive 3.5-inch hard drive N N Y Y Y M.2 solid-state drive N N N Y N Table 13. Storage specificationsStorage type Interface type Capacity2.5-inch, 5400 RPM, hard-disk drive SATA3.0Up to 2 TB2.5-inch, 7200 RPM, hard-disk drive SATA3.0Up to 1 TB2.5-inch, 7200 RPM, FIPS SelfEncrypting Opal 2.0, hard-disk driveSATA 3.0500 GB3.5-inch, 5400 RPM, hard-disk drive SATA 3.0 4 TBStorage type Interface type Capacity3.5-inch, 7200 RPM, hard-disk drive SATA 3.0Up to 2 TBM.2 2230 solid-state drive PCIe 3 Gen x4 NVMe, Class 35Up to 1 TBM.2 2230 Opal Self-Encrypting solid-state drivePCIe 3 Gen x4 NVMe, Class 35256 GBM.2 2280 solid-state drive PCIe 3 Gen x4 NVMe, Class 40Up to 2 TBM.2 2280 Opal Self-Encrypting solid-state drivePCIe NVMe Gen3 x4, Class 40Up to 1 TBM.2 2230 solid-state drive PCIe NVMe Gen4 x4, Class 35512 GBM.2 2280 solid-state drive PCIe NVMe Gen4 x4, Class 40Up to 512 GB Power ratingsThe following table lists the power rating specifications of OptiPlex 3000 Tower.Table 14. Power ratingsDescription Option one Option two Option threeType180 W internal power supplyunit (PSU), 85% Efficient, 80Plus Bronze 240 W internal power supplyunit (PSU), 85% Efficient, 80Plus Bronze300 W internal power supplyunit (PSU), 92% Efficient, 80Plus PlatinumInput voltage90 VAC–264 VAC90 VAC–264 VAC90 VAC–264 VAC Input frequency47 Hz-63 Hz47 Hz-63 Hz47 Hz-63 Hz Input current (maximum) 3.0 A 4.0 A 4.2 AOutput current (continuous)●12 VA/15 A●12 VB/14 AStandby mode:●12 VA/1.5 A●12 VB/3.3 A ●12 VA/18 A●12 VB/15 AStandby mode:●12 VA/1.5 A●12 VB/3.3 A●12 VA/18 A●12 VB/18 AStandby mode:●12 VA/1.5 A●12 VB/3.3 ARated output voltage●+12 VA●+12 VB ●+12 VA●+12 VB●+12 VA●+12 VBTemperature range:Operating5°C-45°C (41°F-113°F)5°C-45°C (41°F-113°F)5°C-45°C (41°F-113°F) Storage-40°C-70°C (-40°F-158°F)-40°C-70°C (-40°F-158°F)-40°C-70°C (-40°F-158°F)Power supply connectorThe following table lists the Power supply connector specifications of your OptiPlex 3000 Tower.Table 15. Power supply connector180 W (80 PLUS Bronze)●One 4 pin connector for processor●One 8 pin connector for system board240 W (80 PLUS Bronze)●Two 4 pin connectors for processor●One 8 pin connector for system board300 W (80 PLUS Platinum)●Two 4 pin connectors for processor●One 8 pin connector for system board GPU—IntegratedThe following table lists the specifications of the integrated Graphics Processing Unit (GPU) supported by your OptiPlex 3000 Tower.Table 16. GPU—IntegratedController External display support Memory size ProcessorIntel UHD Graphics 710●One DisplayPort 1.4 port(rear)●One HDMI 1.4b port (rear)Shared system memory Intel Pentium Gold G6900and G7400Intel UHD Graphics 730●One DisplayPort 1.4 port(rear)●One HDMI 1.4b port (rear)Shared system memory12th Generation Intel Corei3/i5Intel UHD Graphics 770●One DisplayPort 1.4 port(rear)●One HDMI 1.4b port (rear)Shared system memory12th Generation Intel Core i5 Multiple display support matrixThe following table lists the multiple display support matrix for your OptiPlex 3000 Tower.Table 17. Multiple display support matrixGPU—DiscreteThe following table lists the specifications of the discrete Graphics Processing Unit (GPU) supported by your OptiPlex 3000 Tower.Table 18. GPU—DiscreteController Memory size Memory typeAMD Radeon 540 1 GB GDDR5AMD Radeon 550 2 GB GDDR5AMD Radeon RX640 4 GB GDDR5Multiple display support matrixThe following table lists the multiple display support matrix for your OptiPlex 3000 Tower.Table 19. Multiple display support matrixGraphics Card Memory Ports Supportedexternaldisplayswith DirectConnectSupportedexternaldisplayswith DPMulti-StreamSupported4K DisplaysSupported5KDisplaysResolution TotalPowerAMD Radeon 5401 GBGDDR5TwoDisplayPort1.4 ports22115120 x 2880@60 Hz50 WAMD Radeon 5502 GBGDDR6TwoDisplayPort1.4 ports22115120 x 2880@60 Hz50 WAMD Radeon RX6404 GBGDDR5●TwoMini-DisplayPort 1.4ports●OneDisplayPort 1.4port31215120 x 2880@60 Hz50 WHardware securityThe following table lists the hardware security of your OptiPlex 3000 Tower. Table 20. Hardware securityHardware securityKensington security-cable slotPadlock ringChassis lock slot supportTable 20. Hardware security (continued)Hardware securityChassis intrusion switchLockable cable coversSupply chain tamper alertsSafeID including Trusted Platform Module (TPM) 2.0Smart card keyboard (FIPS)Microsoft Windows Device Guard and Credential Guard (Enterprise SKU)Microsoft Windows BitlockerLocal hard drive data wipe through BIOS (Secure Erase)Self-encrypting storage drives (Opal, FIPS)Trusted Platform Module TPM 2.0China TPMIntel Secure BootIntel AuthenticateSafeBIOS: includes Dell Off-host BIOS Verification, BIOS Resilience, BIOS Recovery, and additional BIOS Controls EnvironmentalThe following table lists the environmental specifications of your OptiPlex 3000 Tower.Table 21. EnvironmentalFeature ValuesRecyclable packaging YesBFR/PVC—free chassis NoVertical orientation packaging support YesMulti-Pack packaging Yes (optional)Energy-Efficient Power Supply StandardENV0424 compliant YesWood‐based fiber packaging contains a minimum of 35% recycled content by total weight of wood‐based fiber.‐based fiber can be claimed as Not Applicable. The anticipated required criteria forRegulatory complianceThe following table lists the regulatory compliance of your OptiPlex 3000 Tower.Table 22. Regulatory complianceRegulatory complianceEPEAT registered configurations availableENERGY STAR compliant configurations availableUS CEC MEPS compliant configurations availableAustralia and New Zealand MEPS compliant configurations availableCELWEEEJapan Energy LawSouth Korea E-standbyEU RoHSChina RoHSOperating and storage environmentThis table lists the operating and storage specifications of your OptiPlex 3000 Tower.Airborne contaminant level: G1 as defined by ISA-S71.04-1985Table 23. Computer environment* Measured using a random vibration spectrum that simulates user environment.† Measured using a 2 ms half-sine pulse.Specifications of OptiPlex 3000 Tower21Getting help and contacting DellSelf-help resourcesYou can get information and help on Dell products and services using these self-help resources:Table 24. Self-help resourcesSelf-help resourcesResource location Information about Dell products and services My Dell appTipsContact SupportIn Windows search, type Contact Support , and press Enter.Online help for operating system/support/windows /support/linuxAccess top solutions, diagnostics, drivers and downloads, and learn more about your computer through videos, manuals, and documents.Your Dell computer is uniquely identified by a Service Tag or Express Service Code. To view relevant support resources for your Dell computer, enter the Service Tag or Express Service Code at /support .For more information on how to find the Service Tag for your computer, see Locate the Service Tag on your computer .Dell knowledge base articles for a variety of computer concerns1.Go to /support .2.On the menu bar at the top of the Support page, selectSupport > Knowledge Base .3.In the Search field on the Knowledge Base page, type thekeyword, topic, or model number, and then click or tap the search icon to view the related articles.Contacting Dell/contactdell .Availability varies by country/region and product, and some services may not be available in your country/region. If you do not have an active Internet connection, you can find contact information about your purchase invoice,422Getting help and contacting Dell。
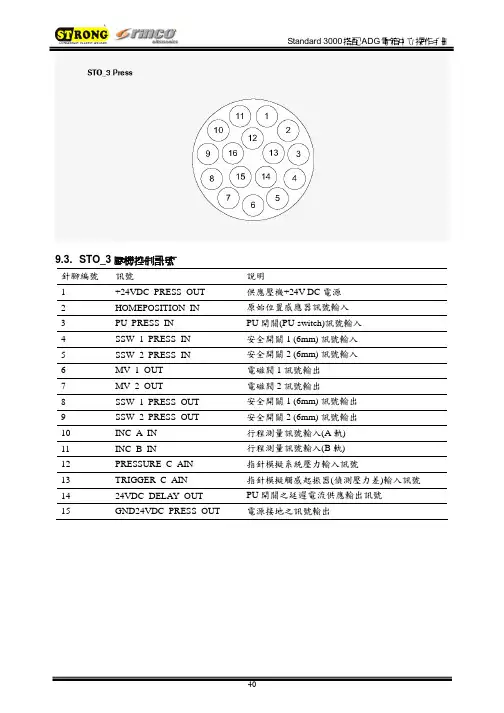
9.3. STO_3壓機控制訊號針腳編號訊號說明1 +24VDC_PRESS_OUT 供應壓機+24V DC電源2 HOMEPOSITION_IN 原始位置感應器訊號輸入3 PU_PRESS_IN PU開關(PU-switch)訊號輸入4 SSW_1_PRESS_IN 安全開關1 (6mm) 訊號輸入5 SSW_2_PRESS_IN 安全開關2 (6mm) 訊號輸入6 MV_1_OUT 電磁閥1訊號輸出7 MV_2_OUT 電磁閥2訊號輸出8 SSW_1_PRESS_OUT 安全開關1 (6mm) 訊號輸出9 SSW_2_PRESS_OUT 安全開關2 (6mm) 訊號輸出10 INC_A_IN 行程測量訊號輸入(A軌)11 INC_B_IN 行程測量訊號輸入(B軌)12 PRESSURE_C_AIN 指針模擬系統壓力輸入訊號13 TRIGGER_C_AIN 指針模擬觸感起振器(偵測壓力差)輸入訊號14 24VDC_DELAY_OUT PU開關之延遲電流供應輸出訊號電源接地之訊號輸出15 GND24VDC_PRESS_OUT9.4. STO_5雙手起動開關控制訊號針腳編號訊號說明1 Nc2 START_1_OUT 起動開關1訊號輸出3 START_1_NC_IN 起動開關1訊號輸入(正常關閉)4 START_1_NO_IN 起動開關1訊號輸入(正常開啟)5 START_2_OUT 起動開關2訊號輸出6 START_2_NC_IN 起動開關2訊號輸入(正常關閉)7 START_2_NO_IN 起動開關2訊號輸入(正常開啟)8 24VDC_DELAY_OUT 控制緊急停止掣之延遲電源供應9 EMERGENCY_1_IN 緊急停止掣1訊號輸入10 EMERGENCY_2_IN 緊急停止掣2訊號輸入11 nc電源接地之訊號輸出12 GND24VDC_PRESS_OUT10 不當使用之錯誤訊息正常ADG錯誤ADG訊號焊接週期階段0>1促動器下壓(焊接前下壓行程)1>2下壓速度漸緩2>3增加功率3>4焊接4>5固化5>6促動器上行裝備隔音罩之正常ADG裝備特殊促動器之ADG焊接週期階段0>2促動器下壓(焊接前下壓行程)1>3下壓速度漸緩2>4增加功率3>5焊接4>6固化5>7促動器上行11 機械維護11.1. 錯誤群組說明錯誤群組002 電箱錯誤003 壓機錯誤004 隔音罩錯誤005 限制值錯誤006 數位控制錯誤007 硬體錯誤008 RS232錯誤009 CANopen錯誤020 限制值警告021 參數值警告11.2. 錯誤代碼詳細說明電箱錯誤(錯誤群組 002:xxx)錯誤代碼優先性說明002:000 低達到最大功率損失(Pv測試)002:001 高電源電壓過低002:002 高Power pack +12V defective002:003 高Minimal level control final stage002:004 高溫度過高002:005 低頻率低於最低值002:006 低頻率高於最高值002:007 低換能器電壓高於最大值002:008 低出力過載002:009 低Full level control of the final stage reached 002:010 低未連接換能器壓機錯誤(錯誤群組 003:xxx)錯誤代碼優先性說明003:000 低測量行程時發生錯誤003:001 低閥門錯誤003:002 低雙手起動開關錯誤003:003 低促動器未回到原始位置Abort 003:004 低安全開關(最後6mm)錯誤003:005 低超過最大焊接週期時間003:006 低焊接過程中斷003:007 低觸感起振器設定錯誤003:008 低超音波起振錯誤003:009 低系統壓力過低隔音罩錯誤(錯誤群組004:xxx)錯誤代碼優先性說明004:000 低安裝錯誤004:001 低開始焊接時工作窗無法開啟004:002 低時間超過而降下工作窗004:003 低時間超過而升起工作窗004:004 低隔音罩門打開004:005 低焊接週期中打開工作窗限制值錯誤(錯誤群組005:xxx)錯誤代碼優先性說明005:000 低超過設定的最大時間005:001 低低於設定的最小時間005:002 低超過設定的最大能量005:003 低低於設定的最小能量005:004 低超過設定的最大出力005:005 低低於設定的最小出力005:006 低超過設定的最大行程005:007 低低於設定的最小行程005:008 低超過設定的最大行程差005:009 低超過設定的最小行程差005:010 低到達設定的良品數數位控制錯誤(錯誤群組006:xxx)錯誤代碼優先性說明006:000 低焊接週期停止006:001 低設定超音波停振1006:002 低設定超音波停振2006:003 低設定重設006:004 低退出外置起動006:005 低需要外製起動006:006 低資料傳遞輸入訊號錯誤硬體錯誤(錯誤群組007:xxx)錯誤代碼優先性說明007:001 高輸出群組1短路007:002 高輸出群組2短路007:003 高輸出群組3短路007:004 高輸出群組4短路007:005 高輸出群組5短路007:006 高輸出群組6短路007:007 低壓力輸入低於1mA007:008 低觸感起振器輸入低於1mA007:009 低數控振幅輸入超過120%或12VRS232錯誤(錯誤群組008:xxx)錯誤代碼優先性說明008:001 低資料溢出錯誤(符號丟失)008:002 低同等性錯誤(同等性符號錯誤)008:003 低結構錯誤(無有效停止符號→bit rate錯誤) 008:004 低傳輸中斷(位元組過長→bit rate錯誤) 008:005 低未連接接收器CANopen錯誤(錯誤群組009:xxx)錯誤代碼優先性說明009:001 低 SDO讀取錯誤(暫停)009:002 低 SDO寫入錯誤(暫停)009:003 低 SDO服務(錯誤參數)009:004 低 SDO無法進入(設定值範圍錯誤)009:005 低 SDO其他錯誤限制警告(警告群組020:xxx)錯誤代碼優先性說明020:000 警告超過設定的最大時間020:001 警告低於設定的最小時間020:002 警告超過設定的最大出力020:003 警告低於設定的最小出力020:004 警告超過設定的最大功率020:005 警告低於設定的最小功率020:006 警告超過設定的最大行程020:007 警告低於設定的最小行程020:008 警告超過設定的最大行程差020:009 警告低於設定的最小行程差參數警告(警告群組021:xxx)錯誤代碼優先性說明021:000 警告資料組是空的 / 未載入資料組021:001 警告警告資料未刪除11.3. 清潔機器注意:清潔與維護須由受過專業訓練之人員操作,開始維護前,確認電源與壓縮空氣源均未接上。
发酵工艺设计3000t/a苹果酒工艺设计设计人:张清俊学校:开封大学专业:生物化工工艺班级: 10生化2学号:指导老师:***2012年10月20日目录一、前言 (3)1、课程设计的目的 (3)2、目前生产存在问题及对策 (4)二、设计任务书 (5)三、可行性分析 (6)四、生产工艺流程图及生产过程 (7)1、3000t/a苹果酒生产工艺流程示意图 (7)2、合成苹果酒工艺叙述 (8)五、3000t/a苹果酒生产工艺流程设计的物料衡算 (9)1、工艺技术指标及基础数据 (9)2、3000t/a苹果酒生产工艺流程设计的物料衡算 (10)3、3000t/a苹果酒生产工艺流程设计的物料衡算表 (11)六、生产主要设备(发酵罐)的设计与选型 (12)1、设计原则与内容 (12)2、容积、生产能力、数量的计算 (13)3、设备选材 (14)4、设备的选型 (14)5、发酵罐的计算 (15)七、环境保护 (16)1、三废状况 (16)2、三废的治理 (16)八、对设计进行评价 (17)九、体会与收获 (18)十、参考文献 (19)一、前言1、课程设计目的本课程是生物化工工艺专业的一门实用性和技术性很强的专业课程。
学习本课程的目的是使学生在学完本专业的有关课程后,尤其是在学完《生化工艺》、《发酵工程及设备》、《化工设计》这门课程后,综合运用3年所学的全部知识,进行工厂的初步设计。
通过专业课程设计使学生掌握应具备的基本设计技能。
待学生走上工作岗位后既能担负起工厂技术改造的任务,又能进行车间或全厂的工艺设计。
2、目前生产存在问题及对策我国大规模生产苹果酒起步较晚,正处于发展阶级,技术水平与发达国家成熟的酿造行业相比相对薄弱,存在一些急待解决的问题.1 缺少苹果酒酿造专用苹果品种苹果酒的品质好坏与苹果的品种有着直接的关系,酿酒用的苹果果体较小,甜中带有轻微的苦涩味,果汁酸度较高,香气浓郁,酿成酒后,酒体丰满"有骨架",果香鲜明,风格独特。
目 录一、产品简介 (1)1.1产品铭牌 (1)1.2产品型号说明 (1)1.3产品外观 (2)1.4技术规范 (3)1.5产品设计执行标准 (4)1.6安全事项 (4)1.7注意事项 (4)1.8日常检查和保养 (6)二、控制面板 (7)2.1面板说明 (7)2.2面板操作 (10)2.3参数设置 (10)2.4功能码区内和区间的切换 (11)2.5面板显示内容 (12)三、安装接线 (13)3.1变频器安装 (13)3.2接线 (13)3.3功率回路推荐配线 (16)3.4保护导体(地线)的截面积 (16)3.5总体接线与“三线制”接法 (17)3.6数字输入端子接线方法 (18)四、操作及简单运行 (20)4.1控制方式 (20)4.2频率设定方式 (20)4.3运行命令控制方式 (20)4.4变频器的工作状态 (20)4.5控制面板及其操作方法 (21)4.6电机参数测量操作流程 (21)4.7简单运转操作流程 (22)4.8基本操作举例 (24)五、功能参数 (30)5.1基本参数 (30)5.2运行控制 (39)5.3多功能输入输出端子 (47)5.4模拟量输入输出 (52)5.5多段速度控制 (56)5.6辅助功能 (60)5.7故障与保护 (62)5.8电机参数 (65)5.9通讯参数 (68)5.10PID参数区 (69)附录1 常见故障处理 (70)附录2 产品一览表及结构型式一览表 (73)附录3 制动电阻选型表 (76)附录4 通 讯 手 册 (77)附录5 功能码速查表 (87)敬告用户: (104)产 品 简 介一、产品简介本使用手册简要介绍了F2000-G 系列变频器的安装接线、参数设定及操作使用的有关事项,务请妥善保管。
如果使用中发生故障,请与厂家或经销商联系。
1.1 产品铭牌以F2000-G 系列三相交流380V 输入,7.5KW 变频器为例,其铭牌如图所示。
3PH 表示三相输入;380V、50/60Hz 表示输入电压和额定频率。
[分类:受限制]Check Point版权声明©2020Check Point Software Technologies Ltd.保留所有权利。
本产品及相关文档受版权保护,并且凭限制其使用、复制、分发及反编译的许可进行分销。
未经Check Point的事先书面授权,不得对本产品或相关文档的任何部分,以任何形式或任何方式进行复制。
在本手册编制过程中已非常谨慎,但Check Point不对任何错误或疏漏承担责任。
本出版物及其中所述功能如有更改,恕不另行通知。
限制权利图注:政府的使用、复制或纰漏须符合DFARS252.227-7013和FAR52.227-19的“技术数据和计算机软件权利”一条中第(c)(1)(ii)款规定的限制。
商标:参考版权页以获取我们的商标清单。
参考第三方版权声明以获取相关版权和第三方许可的清单。
重要信息最新软件我们建议您安装最新版软件,以获得最新的完善功能、更好的稳定性、更高的安全级别,并防止发展中的新攻击入侵。
认证有关Check Point产品的第三方独立认证,请参见Check Point认证页面。
Check Point3000设备如需更多有关此版本的信息,请参见主页。
此文档的最新版本请打开网页浏览器中此文档的最新版本。
请下载此文档(PDF格式)的最新版本。
反馈Check Point一直在致力于完善其文档。
请发送您的意见给我们,以帮助我们不断改进。
修订历史目录安全和环保声明7合规信息9符合性声明9引言14欢迎14 3000设备概述14装运箱内容物15术语15将3000设备安装于机架16设备物理规格16设备通风口16配置3000设备18启动设备18可用软件映像18初始配置18创建网络对象18高级配置18连接至3000设备CLI19 3000设备硬件20前面板20后面板22在3100/3200设备中安装电源配适器固定夹22双冗余BIOS25更换和升级组件26恢复出厂默认设置27通过Gaia门户进行恢复27通过启动菜单恢复27通过Gaia Clish进行恢复28注册和支持29注册29支持29如何进阶?29安全和环保声明请在设置或使用设备前阅读以下警告。
3000TA微量氧分析仪中文说明书3000TA微量氧分析仪介绍1.1、概述Teledyne Analytical Instruments的3000TA微量氧分析仪是基于微处理器的测量气体中ppm级O2的分析仪。
本手册只包含通用的3000TA的盘装或架装仪表的内容,这些仪表应用于非危险的室内环境中。
1.2、典型应用·惰性气体的保护监测;·空气分离和液化;·化学反应监测;·半导体生产;·石化过程控制;·质量保证;·气体分析检验。
1.3、分析仪的主要特点3000TA微量氧分析仪先进而便于使用,主要特点:·两行字符显示,微电子驱动,连续的提示和通知操作者;·大型高亮度显示器,高分辨率、精确的O2读数,从ppm级到25%氧含量;·不锈钢传感器模块;·先进的微燃料电池,专门设计用于微量分析,保用期1年,使用寿命达2年;·通用的宽量程分析应用;·8位微处理器(CMOS),32KB RAM和128KB ROM;·3个用户可定义的输出范围(0-10ppm到0-25%),能最好地与用户的过程设备匹配;·用传统的20.9%作空气标定;·对于给定的测量,自动量程使分析仪自动地选择预置的量程,手动切换允许固定在一个希望的范围内分析;·两个可调的含量报警和系统故障报警;·在启动初期和根据命令进行自诊断,连续的电源监测;·两种RFI防护方法;·4个模拟量输出:两个用于测量(0-1vdc和隔离的4-20mAdc)和两个量程定义输出;·传统的通用的钢制盘装或架装机壳,带有滑出型电气抽屉。
1.4、型号设计3000TC:标准型。
3000TC-C:除标准配置外,还有分立的用于零点和量程气接口和内置的控制阀,控制阀由3000TC控制,与分析仪的操作同步地在气体间切换。
Eaton 9PX3000IRTNEaton 9PX UPS Netpack, 3000 VA, 3000 W, Input: C20, Outputs: (8) C13, (2) C19, Rack/tower, 2U, Network card includedGeneral specificationsEaton 9PX UPS 9PX3000IRTN 74317208144560.5 cm 8.65 cm 44 cm 27.57 kg 2 year CE Marked TUV cULus Listed CSA 22.2FCC part 15 Class B CISPR22 Class B EAC CEENERGY STAR certified IEC/EN 62040-1 UL 1778 IEC/EN 62040-2Eaton 9PX 3000i RT2U NetpackProduct Name Catalog Number UPCProduct Length/Depth Product Height Product Width Product Weight Warranty Compliances Certifications Model CodeView runtime graph Hot-swappable internal batteries and extended battery modules (EBMs)612 V / 9 Ah Sealed, lead-acidYes(8) C13, (2) C19Online/Double-conversion 3000 W 3000 VA Sine wave 230V1230V default (200/208/220/230/240V)200/208/220/230/240 V +/- 1%350/60 Hz 1C20 41.8m230V default (200/208/220/230/240V)176-276 V (100-276 V with derating)Runtime graph Battery management Battery replacementBattery quantity Battery rating Battery type Extended battery capability Receptacle TopologyWattage VA rating Output waveform Voltage Output power factor Output nominal voltageOutput voltage rangeVoltage distortion output (linear load) - max Output frequency Feed type Input connection Input cord length Input nominal voltageInput voltage rangeCommunicationABM & Temperature compensated charging method (user selectable)Automatic battery test Deep discharge protection Automatic recognition of external battery units USB port (HID compliant)Serial port (RS232)Mini terminal block for remote On/Off Mini-terminal block for remote power off Mini-terminal block for output relayDry contacts (3 outputs, 150/60 Hz40-70 Hz >.99One slot, network card included YesYesEaton Intelligent Power Manager, Eaton Intelligent Power Protector Multilingual graphical LCD display OtherYes3000 m Online: 614<40 dB at 1 meter 0-96% non-condensing 0° to 40°C (32° to 104°F)Nominal frequency Input frequency range Input power factor Expansion slotsEthernet interface Includes network card Software compatibilityUser interfaceType of interface Potential free switch contact Altitude BTU Rating Noise level Relative humidity Temperature range Special featuresinput, optocoupler, DB9)Network Card Double conversion topology Constantly monitors power conditions and regulates voltage and frequency First UPS in its class to provide Unity power factor (VA=W)Energy Star qualified, provides the highest efficiency level to reduce energy and cooling costs Internal bypass allows service continuity in case of UPS faultNext-generation graphical LCD display Network card and rackmounting kit delivered as standardCompatible with VirtualRack/tower2U482.6 mm (19 inch) device Yes9411Yes Eaton UPS and battery servicesEaton UPS Services Quick Guide 2021EU declaration of conformity Eaton 9PX UPSEaton 9PX 1-3 kVA UPS and 9PX EBM 48V and 72V - Installation and user manualEaton 9PX 1-3 kVA UPS - Quick Start GuideEaton Bypass Power Module (BPM) user guideEaton Specification Sheet - 9PX3000IRTNEaton 9PX 1000-3000W UPS - DatasheetForm factorRack size Construction type Rack mounting kit Efficiency Package contentsPhase (input) Phase (output) Internal bypass Hot swap power BrochuresCompliance information Manuals and user guidesSpecifications and datasheets Technical data sheetsenvironments (VMware, Hyper-V, Citrix Xen, Redhat) Meter energy consumption (down to the managed outlet groups)Hot swappable batteries Advanced Battery Management (ABM) technology to increase battery lifetimeUPSInput cable(2) IEC-IEC output cables Network Management Card USB cableSerial cable(2) Supports for tower mounting(2) brackets for 19’ mounting (2) Rack-mounting kitCable locking systemSafety instructions Quickstart guideEaton Corporation plc Eaton House30 Pembroke Road Dublin 4, Ireland © 2023 Eaton. All rights reserved. Eaton is a registered trademark.All other trademarks areproperty of their respectiveowners./socialmediaNoYesAuto shutdown function。
Philips Series 3000Kettle - 1.7 litre, FamilySize, Black1.7 LSpring lidLight indicatorHD9318/21Enjoy hot drinks in no timeFamily-size 1.7L capacity, perfect for everyoneThe new Philips plastic kettle with 1.7 L capacity, automatic lid opening and light indicatorgives you the opportunity to easily make your favorite drink in no time.Safe to use•Strix controllerFast, safe boiling•Flat heating element for fast boiling•Removable filter captures limescale particles•Multi safety system against boil-drySimple to fill, use and clean•Cord winder for easy adjustment and storage•Cordless kettle with 360° pirouette base•Easy refilling through lid or spout•Pilot light indicates when the kettle is switched on•Easy-to-read water level indicator•A cup indicator to boil only the water you need•Spring lid with large opening for cleaningHighlightsFlat heating elementA concealed stainless steel heating element ensures fast boiling and easy cleaning.Removable filterThe removable and washable anti-calc filter gives you clear water for perfect drinks.Multi safety systemMulti safety system against boil-dry, with auto-switch off when the water is ready.Pilot light Elegant indicator light incorporated in the power switch illuminates when the kettle is turned on.Water level indicatorThe water level is easy to read with an indicator located on one side of the kettle.A cup indicatorEnabling consumers to boil the amount of water they need, and therefore saving up energy and water, contributing to a better environment.Spring lid with large openingA push-button lid opens smoothly at the touch of a button, avoiding steam contact. The large opening simplifies cleaning.Easy refillingThe kettle can be filled through the spout or by opening the spring lid.Cordless + 360° pirouette baseThe cordless kettle sits on a 360° pirouette base for easy lifting and replacing.Issue date 2023-07-15 Version: 4.4.1EAN: 87 10103 94097 5© 2023 Koninklijke Philips N.V.All Rights reserved.Specifications are subject to change without notice. Trademarks are the property of Koninklijke Philips N.V. or their respective owners.SpecificationsCountry of origin•Made in: ChinaTechnical specifications •Power: 1850-2200 W•Cord length: 0.75 m•Capacity bowl:1.7 L •Voltage: 220-240 V •Frequency: 50-60 Hz Consumer Trade Item •Height:25.2•Width: 22.8•Length: 19.2•Net Weight: 0.96•Gross Weight: 1.22•GTIN: 8710103940975•Country of origin: CN •Harmonized system code: 85161080 Outer Carton•Height:53•Width: 24.4•Length: 59.6•Net Weight: 5.76•Gross Weight: 8.2•GTIN: 18710103940972Weight and dimensions •Dimensions of product (LxWxH):160x223x253 mm•Dimensions of packaging (LxWxH):190x226x250 mm•Weight incl. packaging: 1.22 kg•Weight of product: 0.89 kg•Removable and washable filterGeneral specifications•360 degrees base•Cord storage•Type of lid:Spring•Power-on light•Automatic shut-off•Product features: Lid and spout filling, Non-slip feet •Flat heating element•On/off switchDesign and finishing•Color(s): Black•Material of main body: Plastic•Material filter: Stainless steel filterService•2-year worldwide guaranteeSustainability•Packaging: > 90% recycled materials•User manual: 100% recycled paper。