android上传图片至服务器=
- 格式:docx
- 大小:27.56 KB
- 文档页数:5

Android上传⽂件到服务端并显⽰进度条最近在做上传⽂件的服务,简单看了⽹上的教程。
结合实践共享出代码。
由于⽹上的⼤多数没有服务端的代码,这可不⾏呀,没服务端怎么调试呢。
Ok,先上代码。
Android 上传⽐较简单,主要⽤到的是 HttpURLConnection 类,然后加⼀个进度条组件。
private ProgressBar mPgBar;class UploadTask extends AsyncTask<Object,Integer,Void>{private DataOutputStream outputStream = null;private String fileName;private String uri;private String mLineEnd = "\r\n";private String mTwoHyphens = "--";private String boundary = "*****";File uploadFile ;long mTtotalSize ; // Get size of file, bytespublic UploadTask(String fileName,String uri){this.fileName = fileName;this.uri = uri;uploadFile= new File(fileName);mTtotalSize = uploadFile.length();}/*** 开始上传⽂件* @param objects* @return*/@Overrideprotected Void doInBackground(Object... objects) {long length = 0;int mBytesRead, mbytesAvailable, mBufferSize;byte[] buffer;int maxBufferSize = 256 * 1024;// 256KBtry{FileInputStream fileInputStream = new FileInputStream(new File(fileName));URL url = new URL(uri);HttpURLConnection con = (HttpURLConnection) url.openConnection();//如果有必要则可以设置Cookie// conn.setRequestProperty("Cookie","JSESSIONID="+cookie);// Set size of every block for postcon.setChunkedStreamingMode(256 * 1024);// 256KB// Allow Inputs & Outputscon.setDoInput(true);con.setDoOutput(true);con.setUseCaches(false);// Enable POST methodcon.setRequestMethod("POST");con.setRequestProperty("Connection", "Keep-Alive");con.setRequestProperty("Charset", "UTF-8");con.setRequestProperty("Content-Type","multipart/form-data;boundary=" + boundary);outputStream = new DataOutputStream(con.getOutputStream());outputStream.writeBytes(mTwoHyphens + boundary + mLineEnd);outputStream.writeBytes("Content-Disposition: form-data; name=\"file\"; filename=\"" + fileName + "\"" + mLineEnd);outputStream.writeBytes("Content-Type:application/octet-stream \r\n");outputStream.writeBytes(mLineEnd);mbytesAvailable = fileInputStream.available();mBufferSize = Math.min(mbytesAvailable, maxBufferSize);buffer = new byte[mBufferSize];// Read filemBytesRead = fileInputStream.read(buffer, 0, mBufferSize);while (mBytesRead > 0) {outputStream.write(buffer, 0, mBufferSize);length += mBufferSize;publishProgress((int) ((length * 100) / mTtotalSize));mbytesAvailable = fileInputStream.available();mBufferSize = Math.min(mbytesAvailable, maxBufferSize);mBytesRead = fileInputStream.read(buffer, 0, mBufferSize);}outputStream.writeBytes(mLineEnd);outputStream.writeBytes(mTwoHyphens + boundary + mTwoHyphens+ mLineEnd);publishProgress(100);// Responses from the server (code and message)int serverResponseCode = con.getResponseCode();String serverResponseMessage = con.getResponseMessage();fileInputStream.close();outputStream.flush();outputStream.close();} catch (Exception ex) {ex.printStackTrace();Log.v(TAG,"uploadError");}return null;}@Overrideprotected void onProgressUpdate(Integer... progress) {mPgBar.setProgress(progress[0]);}}主要流程为继承AsyncTask,然后使⽤HttpURLConnection 去上传⽂件。

Android使⽤post⽅式上传图⽚到服务器的⽅法本⽂实例讲述了Android使⽤post⽅式上传图⽚到服务器的⽅法。
分享给⼤家供⼤家参考,具体如下:/*** 上传⽂件到服务器类** @author tom*/public class UploadUtil {private static final String TAG = "uploadFile";private static final int TIME_OUT = 10 * 1000; // 超时时间private static final String CHARSET = "utf-8"; // 设置编码/*** Android上传⽂件到服务端** @param file 需要上传的⽂件* @param RequestURL 请求的rul* @return 返回响应的内容*/public static String uploadFile(File file, String RequestURL) {String result = null;String BOUNDARY = UUID.randomUUID().toString(); // 边界标识随机⽣成String PREFIX = "--", LINE_END = "\r\n";String CONTENT_TYPE = "multipart/form-data"; // 内容类型try {URL url = new URL(RequestURL);HttpURLConnection conn = (HttpURLConnection) url.openConnection();conn.setReadTimeout(TIME_OUT);conn.setConnectTimeout(TIME_OUT);conn.setDoInput(true); // 允许输⼊流conn.setDoOutput(true); // 允许输出流conn.setUseCaches(false); // 不允许使⽤缓存conn.setRequestMethod("POST"); // 请求⽅式conn.setRequestProperty("Charset", CHARSET); // 设置编码conn.setRequestProperty("connection", "keep-alive");conn.setRequestProperty("Content-Type", CONTENT_TYPE + ";boundary=" + BOUNDARY);if (file != null) {/*** 当⽂件不为空,把⽂件包装并且上传*/DataOutputStream dos = new DataOutputStream(conn.getOutputStream());StringBuffer sb = new StringBuffer();sb.append(PREFIX);sb.append(BOUNDARY);sb.append(LINE_END);/*** 这⾥重点注意: name⾥⾯的值为服务端需要key 只有这个key 才可以得到对应的⽂件* filename是⽂件的名字,包含后缀名的⽐如:abc.png*/sb.append("Content-Disposition: form-data; name=\"uploadfile\"; filename=\""+ file.getName() + "\"" + LINE_END);sb.append("Content-Type: application/octet-stream; charset=" + CHARSET + LINE_END);sb.append(LINE_END);dos.write(sb.toString().getBytes());InputStream is = new FileInputStream(file);byte[] bytes = new byte[1024];int len = 0;while ((len = is.read(bytes)) != -1) {dos.write(bytes, 0, len);}is.close();dos.write(LINE_END.getBytes());byte[] end_data = (PREFIX + BOUNDARY + PREFIX + LINE_END).getBytes();dos.write(end_data);dos.flush();/*** 获取响应码 200=成功当响应成功,获取响应的流*/int res = conn.getResponseCode();Log.e(TAG, "response code:" + res);// if(res==200)// {Log.e(TAG, "request success");InputStream input = conn.getInputStream();StringBuffer sb1 = new StringBuffer();int ss;while ((ss = input.read()) != -1) {sb1.append((char) ss);}result = sb1.toString();Log.e(TAG, "result : " + result);// }// else{// Log.e(TAG, "request error");// }}} catch (MalformedURLException e) {e.printStackTrace();} catch (IOException e) {e.printStackTrace();}return result;}/*** 通过拼接的⽅式构造请求内容,实现参数传输以及⽂件传输** @param url Service net address* @param params text content* @param files pictures* @return String result of Service response* @throws IOException*/public static String post(String url, Map<String, String> params, Map<String, File> files)throws IOException {String BOUNDARY = java.util.UUID.randomUUID().toString();String PREFIX = "--", LINEND = "\r\n";String MULTIPART_FROM_DATA = "multipart/form-data";String CHARSET = "UTF-8";URL uri = new URL(url);HttpURLConnection conn = (HttpURLConnection) uri.openConnection();conn.setReadTimeout(10 * 1000); // 缓存的最长时间conn.setDoInput(true);// 允许输⼊conn.setDoOutput(true);// 允许输出conn.setUseCaches(false); // 不允许使⽤缓存conn.setRequestMethod("POST");conn.setRequestProperty("connection", "keep-alive");conn.setRequestProperty("Charsert", "UTF-8");conn.setRequestProperty("Content-Type", MULTIPART_FROM_DATA + ";boundary=" + BOUNDARY); // ⾸先组拼⽂本类型的参数StringBuilder sb = new StringBuilder();for (Map.Entry<String, String> entry : params.entrySet()) {sb.append(PREFIX);sb.append(BOUNDARY);sb.append(LINEND);sb.append("Content-Disposition: form-data; name=\"" + entry.getKey() + "\"" + LINEND);sb.append("Content-Type: text/plain; charset=" + CHARSET + LINEND);sb.append("Content-Transfer-Encoding: 8bit" + LINEND);sb.append(LINEND);sb.append(entry.getValue());sb.append(LINEND);}DataOutputStream outStream = new DataOutputStream(conn.getOutputStream());outStream.write(sb.toString().getBytes());// 发送⽂件数据if (files != null)for (Map.Entry<String, File> file : files.entrySet()) {StringBuilder sb1 = new StringBuilder();sb1.append(PREFIX);sb1.append(BOUNDARY);sb1.append(LINEND);sb1.append("Content-Disposition: form-data; name=\"uploadfile\"; filename=\""+ file.getValue().getName() + "\"" + LINEND);sb1.append("Content-Type: application/octet-stream; charset=" + CHARSET + LINEND);sb1.append(LINEND);outStream.write(sb1.toString().getBytes());InputStream is = new FileInputStream(file.getValue());byte[] buffer = new byte[1024];int len = 0;while ((len = is.read(buffer)) != -1) {outStream.write(buffer, 0, len);}is.close();outStream.write(LINEND.getBytes());}// 请求结束标志byte[] end_data = (PREFIX + BOUNDARY + PREFIX + LINEND).getBytes();outStream.write(end_data);outStream.flush();// 得到响应码int res = conn.getResponseCode();InputStream in = conn.getInputStream();StringBuilder sb2 = new StringBuilder();if (res == 200) {int ch;while ((ch = in.read()) != -1) {sb2.append((char) ch);}}outStream.close();conn.disconnect();return sb2.toString();}}⽰例调⽤第⼆种⽅式上传:final Map<String, String> params = new HashMap<String, String>();params.put("send_userId", String.valueOf(id));params.put("send_email", address);params.put("send_name", name);params.put("receive_email", emails);final Map<String, File> files = new HashMap<String, File>();files.put("uploadfile", file);final String request = UploadUtil.post(requestURL, params, files);更多关于Android相关内容感兴趣的读者可查看本站专题:《》、《》、《》、《》、《》、《》及《》希望本⽂所述对⼤家Android程序设计有所帮助。

android传送照⽚到FTP服务器的实现代码本⽂实例为⼤家分享了android传送照⽚到FTP服务器的具体代码,供⼤家参考,具体内容如下在安卓环境下可以使⽤,在java环境下也可以使⽤,本⼈先在Java环境下实现了功能,然后移植到了安卓⼿机上,其它都是⼀样的。
package com.photo;import java.io.File;import java.io.FileInputStream;import java.io.FileNotFoundException;import java.io.IOException;import java.io.InputStream;import .ftp.FTPClient;import .ftp.FTPReply;public class FileTool {/*** Description: 向FTP服务器上传⽂件** @param url* FTP服务器hostname* @param port* FTP服务器端⼝* @param username* FTP登录账号* @param password* FTP登录密码* @param path* FTP服务器保存⽬录,是linux下的⽬录形式,如/photo/* @param filename* 上传到FTP服务器上的⽂件名,是⾃⼰定义的名字,* @param input* 输⼊流* @return 成功返回true,否则返回false*/public static boolean uploadFile(String url, int port, String username,String password, String path, String filename, InputStream input) {boolean success = false;FTPClient ftp = new FTPClient();try {int reply;ftp.connect(url, port);// 连接FTP服务器// 如果采⽤默认端⼝,可以使⽤ftp.connect(url)的⽅式直接连接FTP服务器ftp.login(username, password);//登录reply = ftp.getReplyCode();if (!FTPReply.isPositiveCompletion(reply)) {ftp.disconnect();return success;}ftp.changeWorkingDirectory(path);ftp.storeFile(filename, input);input.close();ftp.logout();success = true;} catch (IOException e) {e.printStackTrace();} finally {if (ftp.isConnected()) {try {ftp.disconnect();} catch (IOException ioe) {}}}return success;}// 测试public static void main(String[] args) {FileInputStream in = null ;File dir = new File("G://pathnew");File files[] = dir.listFiles();if(dir.isDirectory()) {for(int i=0;i<files.length;i++) {try {in = new FileInputStream(files[i]);boolean flag = uploadFile("17.8.119.77", 21, "android", "android","/photo/", "412424123412341234_20130715120334_" + i + ".jpg", in);System.out.println(flag);} catch (FileNotFoundException e) {e.printStackTrace();}}}}}以上为java代码,下⾯是android代码。

Android实现上传图⽚功能本⽂实例为⼤家分享了Android实现上传图⽚功能的具体代码,供⼤家参考,具体内容如下设定拍照返回的图⽚路径/*** 设定拍照返回的图⽚路径* @param image 图⽚路径* @param i 约定值*/protected void image(String image, int i) {//创建file对象,⽤于存储拍照后的图⽚,这也是拍照成功后的照⽚路径outputImage = new File(getExternalCacheDir(),image);try {//判断⽂件是否存在,存在删除,不存在创建if (outputImage.exists()){outputImage.delete();}outputImage.createNewFile();} catch (IOException e) {e.printStackTrace();}//相机拍照返回图⽚路径Uri photoUri;//判断当前Android版本if(Build.VERSION.SDK_INT>=24){photoUri = FileProvider.getUriForFile(TextActivity.this,"包名.FileProvider",outputImage);}else {photoUri = Uri.fromFile(outputImage);}Intent intent = new Intent(MediaStore.ACTION_IMAGE_CAPTURE);intent.putExtra(MediaStore.EXTRA_OUTPUT, photoUri);startActivityForResult(intent, i);}调⽤系统相机拍照接受返回的图⽚路径@Overrideprotected void onActivityResult(int requestCode, int resultCode, Intent data) {super.onActivityResult(requestCode, resultCode, data);if (resultCode == RESULT_OK) {if (requestCode == IMAGE_Y) {getImageView(binding.imageY,"0");}if (requestCode == IMAGE_Q) {getImageView(binding.imageQ,"1");}}}上传图⽚/*** 上传图⽚* @param view 图⽚展⽰ view*/protected void getImageView(@NotNull ImageView view, String type) {Bitmap photo = BitmapFactory.decodeFile(outputImage.getAbsolutePath());view.setImageBitmap(photo);int direction = 0;try {ExifInterface exif = new ExifInterface(String.valueOf(outputImage));direction = Integer.parseInt(exif.getAttribute(ExifInterface.TAG_ORIENTATION));} catch (IOException e) {e.printStackTrace();}Matrix matrix = new Matrix();Uri uri = Uri.fromFile(outputImage);String f = uri.getPath();Bitmap b = rotateBitmap(getBitmapFromUrl(f,900,1200),0);switch (direction) {case 1:Log.d("图⽚⽅向","顶部,左侧(⽔平/正常)");b = rotateBitmap(getBitmapFromUrl(f,900,1200),0);break;case 2:b = rotateBitmap(getBitmapFromUrl(f,900,1200),0);Log.d("图⽚⽅向","顶部,右侧(⽔平镜像)");break;case 3:b = rotateBitmap(getBitmapFromUrl(f,900,1200),180);Log.d("图⽚⽅向","底部,右侧(旋转180)");break;case 4:matrix.postScale(1, -1);b = Bitmap.createBitmap(b,0,0,900,1200,matrix,true);Log.d("图⽚⽅向","底部,左侧(垂直镜像)");break;case 5:matrix.postScale(-1, 1);b = rotateBitmap(getBitmapFromUrl(f,900,1200),270);b = Bitmap.createBitmap(b,0,0,900,1200,matrix,true);Log.d("图⽚⽅向","左侧,顶部(⽔平镜像并顺时针旋转270)");break;case 6:b = rotateBitmap(getBitmapFromUrl(f,900,1200),90);Log.d("图⽚⽅向","右侧,顶部(顺时针旋转90)");break;case 7:matrix.postScale(-1, 1);b = rotateBitmap(getBitmapFromUrl(f,900,1200),90);b = Bitmap.createBitmap(b,0,0,900,1200,matrix,true);Log.d("图⽚⽅向","右侧,底部(⽔平镜像,顺时针旋转90度)");break;case 8:b = rotateBitmap(getBitmapFromUrl(f,900,1200),270);Log.d("图⽚⽅向","左侧,底部(顺时针旋转270)");break;default:break;}try {File files = new File(new URI(uri.toString()));saveBitmap(b,files);} catch (URISyntaxException e) {e.printStackTrace();}try {String file = uploadImage(networkApi.getFormal() + "setImage", uri.getPath(), code, userId);TextBase.FileInfo fileInfo = new TextBase.FileInfo();fileInfo.setFilePath(file);mFileInfos.add(fileInfo);model.load(file,type);} catch (IOException | JSONException e) {e.printStackTrace();}}/*** 上传图⽚* @param url 上传接⼝路径* @param imagePath 图⽚路径* @param code 唯⼀标识* @return 服务器图⽚的路径* @throws IOException* @throws JSONException*/public static String uploadImage(String url, String imagePath, String code, String userId) throws IOException, JSONException { OkHttpClient okHttpClient = new OkHttpClient();Log.d("imagePath", imagePath);File file = new File(imagePath);RequestBody image = RequestBody.create(MediaType.parse("image/jpg"), file);RequestBody requestBody = new MultipartBody.Builder().setType(MultipartBody.FORM).addFormDataPart("file", imagePath, image).addFormDataPart("fileOid", code).addFormDataPart("userId", userId).build();Request request = new Request.Builder().url(url).addHeader("Authorization",令牌).post(requestBody).build();Response response = okHttpClient.newCall(request).execute();JSONObject jsonObject = new JSONObject(response.body().string());return jsonObject.optString("msg");}其他⼯具类/*** 压缩图⽚的⽅法* @param url* @param width* @param height* @return*/public static Bitmap getBitmapFromUrl(String url, double width, double height) {BitmapFactory.Options options = new BitmapFactory.Options();options.inJustDecodeBounds = true; // 设置了此属性⼀定要记得将值设置为falseBitmap bitmap = BitmapFactory.decodeFile(url);// 防⽌OOM发⽣options.inJustDecodeBounds = false;int mWidth = bitmap.getWidth();int mHeight = bitmap.getHeight();Matrix matrix = new Matrix();float scaleWidth = 1;float scaleHeight = 1;// 按照固定宽⾼进⾏缩放if(mWidth <= mHeight) {scaleWidth = (float) (width/mWidth);scaleHeight = (float) (height/mHeight);} else {scaleWidth = (float) (height/mWidth);scaleHeight = (float) (width/mHeight);}// 按照固定⼤⼩对图⽚进⾏缩放matrix.postScale(scaleWidth, scaleHeight);Bitmap newBitmap = Bitmap.createBitmap(bitmap, 0, 0, mWidth, mHeight, matrix, true); // ⽤完了记得回收bitmap.recycle();return newBitmap;}/*** Android保存Bitmap到⽂件* @param bitmap* @param file* @return*/public static boolean saveBitmap(Bitmap bitmap, File file) {if (bitmap == null)return false;FileOutputStream fos = null;try {fos = new FileOutputStream(file);press(pressFormat.JPEG, 100, fos);fos.flush();return true;} catch (Exception e) {e.printStackTrace();} finally {if (fos != null) {try {fos.close();} catch (IOException e) {e.printStackTrace();}}}return false;}/*** 旋转图⽚* @param bitmap 图⽚* @param rotate ⾓度* @return*/public static Bitmap rotateBitmap(Bitmap bitmap, int rotate) {if (bitmap == null)return null;int w = bitmap.getWidth();int h = bitmap.getHeight();Matrix mtx = new Matrix();mtx.postRotate(rotate);return Bitmap.createBitmap(bitmap, 0, 0, w, h, mtx, true);}以上就是本⽂的全部内容,希望对⼤家的学习有所帮助,也希望⼤家多多⽀持。

以前开发java程序时导入jar包都是用一下的方法:工程点击右键->Build Path->Add Libraries->User Library->选择包含需要的jar包的Library(如果没有的话就点击User Libraries新建一个Library,然后再选中)但是,在Android中这样导入jar包会导致程序在模拟器中运行时抛出ng.NoClassDefFoundError异常,在Android中导入jar包的步骤如下:工程点击右键->Build Path->Add External Archives->选择要导入的jar包另外还有一个问题就是:Android模拟器访问Tomcat上部署的webservice程序时,不能用localhost或者本机IP,Android默认访问本机地址为10.0.2.2。
原因猜想对于产生上述NoClassDefFoundError的原因,查看一下工程中的classpath文件就可以找到。
如果是利用第一种方法导入的jar包的话,classpath文件中会生成这样一条语句:<classpathentry kind="con" path="ER_LIBRARY/KSOAP2"/>,这种导入jar包的方法依赖于开发环境eclipse;而如果用第二种方法导入jar包的话,会在classpath中产生如下的语句:<classpathentry kind="lib" path="D:/JAVATOOLS/ksoap2-android-assembly-2.5.2-jar-with- dependencies.jar"/>,这种导入方式是用的绝对路径,与eclipse开发环境无关,而且以这种方式导入后,jar包的信息会被加到工程class.dex中,进而会被打包到apk中。

Android客户端调用webService上传图片到服务器调用服务器的webservice接口,实现从Android上传图片到服务器,然后从服务器下载图片到Android客户端从Android端用io流读取到要上传的图片,用Base64编码成字节流的字符串,通过调用webservice把该字符串作为参数传到服务器端,服务端解码该字符串,最后保存到相应的路径下。
整个上传过程的关键就是以字节流的字符串进行数据传递。
下载过程,与上传过程相反,把服务器端和客户端的代码相应的调换1.客户端代码读取Android sdcard上的图片。
public void testUpload(){try{String srcUrl = "/sdcard/"; //路径String fileName = "aa.jpg"; //文件名FileInputStream fis = new FileInputStream(srcUrl + fileName);ByteArrayOutputStream baos = new ByteArrayOutputStream();byte[] buffer = new byte[1024];int count = 0;while((count = fis.read(buffer)) >= 0){baos.write(buffer, 0, count);}String uploadBuffer = new String(Base64.encode(baos.toByteArray())); //进行Base64编码String methodName = "uploadImage";connectWebService(methodName,fileName, uploadBuffer); //调用webserviceLog.i("connectWebService", "start");fis.close();}catch(Exception e){e.printStackTrace();}}connectWebService()方法://使用ksoap2 调用webserviceprivate boolean connectWebService(String methodName,String fileName, String imageBuffer) { String namespace = "http://134.192.44.105:8080/SSH2/service/IService";// 命名空间,即服务器端得接口,注:后缀没加.wsdl,//服务器端我是用x-fire实现webservice接口的String url = "http://134.192.44.105:8080/SSH2/service/IService";//对应的url//以下就是调用过程了,不明白的话请看相关webservice文档SoapObject soapObject = new SoapObject(namespace, methodName);soapObject.addProperty("filename", fileName); //参数1 图片名soapObject.addProperty("image", imageBuffer); //参数2 图片字符串SoapSerializationEnvelope envelope = new SoapSerializationEnvelope(SoapEnvelope.VER10);envelope.dotNet = false;envelope.setOutputSoapObject(soapObject);HttpTransportSE httpTranstation = new HttpTransportSE(url);try {httpTranstation.call(namespace, envelope);Object result = envelope.getResponse();Log.i("connectWebService", result.toString());} catch (Exception e) {e.printStackTrace();}return false;}2.服务端方法服务器端的webservice代码:public String uploadImage(String filename, String image) { FileOutputStream fos = null;try{String toDir = "C:\\Program Files\\T omcat 6.0\\webapps\\SSH2\\images";//存储路径byte[] buffer = new BASE64Decoder().decodeBuffer(image);//对Android传过来的图片字符串进行解码File destDir = new File(toDir);if(!destDir.exists()) destDir.mkdir();fos = new FileOutputStream(new File(destDir,filename));//保存图片fos.write(buffer);fos.flush();fos.close();return "上传图片成功!" + "图片路径为:" + toDir;}catch (Exception e){e.printStackTrace();}return "上传图片失败!";}。

在Android的客户端编程中(特别是SNS 类型的客户端),经常需要实现注册功能Activity,要用户输入用户名,密码,邮箱,照片后注册。
但这时就有一个问题,在HTML中用form 表单就能实现如上的注册表单,需要的信息会自动封装为完整的HTTP协议,但在Android 中如何把这些参数和需要上传的文件封装为HTTP协议呢?我们可以先做个试验,看一下form表单到底封装了什么样的信息。
第一步:编写一个Servlet,把接收到的HTTP信息保存在一个文件中,代码如下:1.2. public void doPost(HttpServletRequest request,HttpServletResponse response)3. throws ServletException, IOException {4. //获取输入流,是HTTP协议中的实体内容5. ServletInputStream sis=request.getInputStream();6.7. //缓冲区8. byte buffer[]=new byte[1024];9.10. FileOutputStream fos=new FileOutputStream("d:\\file.log");11.12. int len=sis.read(buffer, 0, 1024);13.14. //把流里的信息循环读入到file.log文件中15. while( len!=-1 )16. {17. fos.write(buffer, 0, len);18. len=sis.readLine(buffer, 0, 1024);19. }20.21. fos.close();22. sis.close();23.24. }25.第二步:实现如下一个表单页面,详细的代码如下:1.2.<form action="servlet/ReceiveFile" method="post"enctype="multipart/form-data>3.第一个参数<input type="text" name="name1"/><br/>4.第二个参数<input type="text" name="name2"/><br/>5.第一个上传的文件<input type="file" name="file1"/><br/>6.第二个上传的文件<input type="file" name="file2"/> <br/>7. <input type="submit" value="提交">8.</form>9.从表单源码可知,表单上传的数据有4个:参数name1和name2,文件file1和file2首先从file.log观察两个参数name1和name2的情况。

Android上传⽂件到服务器的⽅法本⽂实例为⼤家分享了Android端实现⽂件上传的具体代码,供⼤家参考,具体内容如下1)、新建⼀个Android项⽬命名为androidUpload,⽬录结构如下:2)、新建FormFile类,⽤来封装⽂件信息package com.ljq.utils;import java.io.File;import java.io.FileInputStream;import java.io.FileNotFoundException;import java.io.InputStream;/*** 上传⽂件*/public class FormFile {/* 上传⽂件的数据 */private byte[] data;private InputStream inStream;private File file;/* ⽂件名称 */private String filname;/* 请求参数名称*/private String parameterName;/* 内容类型 */private String contentType = "application/octet-stream";public FormFile(String filname, byte[] data, String parameterName, String contentType) {this.data = data;this.filname = filname;this.parameterName = parameterName;if(contentType!=null) this.contentType = contentType;}public FormFile(String filname, File file, String parameterName, String contentType) {this.filname = filname;this.parameterName = parameterName;this.file = file;try {this.inStream = new FileInputStream(file);} catch (FileNotFoundException e) {e.printStackTrace();}if(contentType!=null) this.contentType = contentType;}public File getFile() {return file;}public InputStream getInStream() {return inStream;}public byte[] getData() {return data;}public String getFilname() {return filname;}public void setFilname(String filname) {this.filname = filname;}public String getParameterName() {return parameterName;}public void setParameterName(String parameterName) {this.parameterName = parameterName;}public String getContentType() {return contentType;}public void setContentType(String contentType) {this.contentType = contentType;}}3)、新建SocketHttpRequester类,封装上传⽂件到服务器代码package com.ljq.utils;import java.io.BufferedReader;import java.io.InputStreamReader;import java.io.OutputStream;import .InetAddress;import .Socket;import .URL;import java.util.Map;/*** 上传⽂件到服务器** @author Administrator**/public class SocketHttpRequester {/*** 直接通过HTTP协议提交数据到服务器,实现如下⾯表单提交功能:* <FORM METHOD=POST ACTION="http://192.168.1.101:8083/upload/servlet/UploadServlet" enctype="multipart/form-data"><INPUT TYPE="text" NAME="name"><INPUT TYPE="text" NAME="id"><input type="file" name="imagefile"/><input type="file" name="zip"/></FORM>* @param path 上传路径(注:避免使⽤localhost或127.0.0.1这样的路径测试,因为它会指向⼿机模拟器,你可以使⽤或http://192.168.1.101:8083这样的路径测试) * @param params 请求参数 key为参数名,value为参数值* @param file 上传⽂件*/public static boolean post(String path, Map<String, String> params, FormFile[] files) throws Exception{final String BOUNDARY = "---------------------------7da2137580612"; //数据分隔线final String endline = "--" + BOUNDARY + "--\r\n";//数据结束标志int fileDataLength = 0;for(FormFile uploadFile : files){//得到⽂件类型数据的总长度StringBuilder fileExplain = new StringBuilder();fileExplain.append("--");fileExplain.append(BOUNDARY);fileExplain.append("\r\n");fileExplain.append("Content-Disposition: form-data;name=\""+ uploadFile.getParameterName()+"\";filename=\""+ uploadFile.getFilname() + "\"\r\n");fileExplain.append("Content-Type: "+ uploadFile.getContentType()+"\r\n\r\n");fileExplain.append("\r\n");fileDataLength += fileExplain.length();if(uploadFile.getInStream()!=null){fileDataLength += uploadFile.getFile().length();}else{fileDataLength += uploadFile.getData().length;}}StringBuilder textEntity = new StringBuilder();for (Map.Entry<String, String> entry : params.entrySet()) {//构造⽂本类型参数的实体数据textEntity.append("--");textEntity.append(BOUNDARY);textEntity.append("\r\n");textEntity.append("Content-Disposition: form-data; name=\""+ entry.getKey() + "\"\r\n\r\n");textEntity.append(entry.getValue());textEntity.append("\r\n");}//计算传输给服务器的实体数据总长度int dataLength = textEntity.toString().getBytes().length + fileDataLength + endline.getBytes().length;URL url = new URL(path);int port = url.getPort()==-1 ? 80 : url.getPort();Socket socket = new Socket(InetAddress.getByName(url.getHost()), port);OutputStream outStream = socket.getOutputStream();//下⾯完成HTTP请求头的发送String requestmethod = "POST "+ url.getPath()+" HTTP/1.1\r\n";outStream.write(requestmethod.getBytes());String accept = "Accept: image/gif, image/jpeg, image/pjpeg, image/pjpeg, application/x-shockwave-flash, application/xaml+xml, application/vnd.ms-xpsdocument, application/x-ms-xbap, application/x-ms-application, application/vnd.ms-excel, application/vnd.m outStream.write(accept.getBytes());String language = "Accept-Language: zh-CN\r\n";outStream.write(language.getBytes());String contenttype = "Content-Type: multipart/form-data; boundary="+ BOUNDARY+ "\r\n";outStream.write(contenttype.getBytes());String contentlength = "Content-Length: "+ dataLength + "\r\n";outStream.write(contentlength.getBytes());String alive = "Connection: Keep-Alive\r\n";outStream.write(alive.getBytes());String host = "Host: "+ url.getHost() +":"+ port +"\r\n";outStream.write(host.getBytes());//写完HTTP请求头后根据HTTP协议再写⼀个回车换⾏outStream.write("\r\n".getBytes());//把所有⽂本类型的实体数据发送出来outStream.write(textEntity.toString().getBytes());//把所有⽂件类型的实体数据发送出来for(FormFile uploadFile : files){StringBuilder fileEntity = new StringBuilder();fileEntity.append("--");fileEntity.append(BOUNDARY);fileEntity.append("\r\n");fileEntity.append("Content-Disposition: form-data;name=\""+ uploadFile.getParameterName()+"\";filename=\""+ uploadFile.getFilname() + "\"\r\n");fileEntity.append("Content-Type: "+ uploadFile.getContentType()+"\r\n\r\n");outStream.write(fileEntity.toString().getBytes());if(uploadFile.getInStream()!=null){byte[] buffer = new byte[1024];int len = 0;while((len = uploadFile.getInStream().read(buffer, 0, 1024))!=-1){outStream.write(buffer, 0, len);}uploadFile.getInStream().close();}else{outStream.write(uploadFile.getData(), 0, uploadFile.getData().length);}outStream.write("\r\n".getBytes());}//下⾯发送数据结束标志,表⽰数据已经结束outStream.write(endline.getBytes());BufferedReader reader = new BufferedReader(new InputStreamReader(socket.getInputStream()));if(reader.readLine().indexOf("200")==-1){//读取web服务器返回的数据,判断请求码是否为200,如果不是200,代表请求失败return false;}outStream.flush();outStream.close();reader.close();socket.close();return true;}/*** 提交数据到服务器* @param path 上传路径(注:避免使⽤localhost或127.0.0.1这样的路径测试,因为它会指向⼿机模拟器,你可以使⽤或http://192.168.1.10:8080这样的路径测试)* @param params 请求参数 key为参数名,value为参数值* @param file 上传⽂件*/public static boolean post(String path, Map<String, String> params, FormFile file) throws Exception{return post(path, params, new FormFile[]{file});}}4)、新建MainActivity类,实现每隔5秒上传⼀次package com.ljq.activity;import java.io.File;import java.util.HashMap;import java.util.Map;import android.app.Activity;import android.os.Bundle;import android.os.Environment;import android.os.Handler;import android.util.Log;import com.ljq.utils.FormFile;import com.ljq.utils.SocketHttpRequester;public class MainActivity extends Activity {private File file;private Handler handler;private static final String TAG="MainActivity";@Overridepublic void onCreate(Bundle savedInstanceState) {super.onCreate(savedInstanceState);setContentView(yout.main);Log.i(TAG, "onCreate");file = new File(Environment.getExternalStorageDirectory(), "123.rmvb");Log.i(TAG, "照⽚⽂件是否存在:"+file);handler=new Handler();handler.post(runnable);}Runnable runnable=new Runnable() {public void run() {Log.i(TAG, "runnable run");uploadFile(file);handler.postDelayed(runnable, 5000);}};/*** 上传图⽚到服务器** @param imageFile 包含路径*/public void uploadFile(File imageFile) {Log.i(TAG, "upload start");try {String requestUrl = "http://192.168.1.101:8083/upload/upload/execute.do";//请求普通信息Map<String, String> params = new HashMap<String, String>();params.put("username", "张三");params.put("pwd", "zhangsan");params.put("age", "21");params.put("fileName", imageFile.getName());//上传⽂件FormFile formfile = new FormFile(imageFile.getName(), imageFile, "image", "application/octet-stream"); SocketHttpRequester.post(requestUrl, params, formfile);Log.i(TAG, "upload success");} catch (Exception e) {Log.i(TAG, "upload error");e.printStackTrace();}Log.i(TAG, "upload end");}}5)、修改清单⽂件<?xml version="1.0" encoding="utf-8"?><manifest xmlns:android="/apk/res/android"package="com.ljq.activity"android:versionCode="1"android:versionName="1.0"><application android:icon="@drawable/icon" android:label="@string/app_name"><activity android:name=".MainActivity"android:label="@string/app_name"><intent-filter><action android:name="android.intent.action.MAIN" /><category android:name="UNCHER" /></intent-filter></activity></application><uses-sdk android:minSdkVersion="4" /><uses-permission android:name="android.permission.INTERNET" /></manifest>以上就是本⽂的全部内容,希望对⼤家的学习有所帮助,也希望⼤家多多⽀持。

package test;importjava.io.BufferedReader;importjava.io.DataInputStream;importjava.io.DataOutputStream;importjava.io.File;importjava.io.FileInputStream;importjava.io.InputStreamReader;importjava.io.OutputStream;.HttpURLConnection;import .URL;importjava.util.HashMap;importjava.util.Iterator;importjava.util.Map;importjavax.activation.MimetypesFileTypeMap;public class HttpPostUploadUtil {/*** @paramargs*/public static void main(String[] args) {String filepath = "D:\\w2.jpg";String urlStr = "http://127.0.0.1:8080/XCFH/usermanager/backupjpg.action";Map<String, String>textMap = new HashMap<String, String>();// textMap.put("name", "testname");Map<String, String>fileMap = new HashMap<String, String>();fileMap.put("photo", filepath);String ret = formUpload(urlStr, textMap, fileMap);System.out.println(ret);}/*** 上传图片** @paramurlStr* @paramtextMap* @paramfileMap* @return*/public static String formUpload(String urlStr, Map<String, String>textMap, Map<String, String>fileMap) {String res = "";HttpURLConnection conn = null;String BOUNDARY = "---------------------------123821742118716"; // boundary就是request头和上传文件内容的分隔符try {URL url = new URL(urlStr);conn = (HttpURLConnection) url.openConnection();conn.setConnectTimeout(5000);conn.setReadTimeout(30000);conn.setDoOutput(true);conn.setDoInput(true);conn.setUseCaches(false);conn.setRequestMethod("POST");conn.setRequestProperty("Connection", "Keep-Alive");conn.setRequestProperty("User-Agent", "Mozilla/5.0 (Windows; U; Windows NT 6.1; zh-CN; rv:1.9.2.6)");conn.setRequestProperty("Content-Type", "multipart/form-data; boundary=" + BOUNDARY);OutputStream out = new DataOutputStream(conn.getOutputStream());// textif (textMap != null) {StringBufferstrBuf = new StringBuffer();Iterator iter = textMap.entrySet().iterator();while (iter.hasNext()) {Map.Entry entry = (Map.Entry) iter.next();String inputName = (String) entry.getKey();String inputValue = (String) entry.getValue();if (inputValue == null) {continue;}strBuf.append("\r\n").append("--").append(BOUNDARY).append("\r\n");strBuf.append("Content-Disposition: form-data; name=\"" + inputName + "\"\r\n\r\n");strBuf.append(inputValue);}out.write(strBuf.toString().getBytes());}// fileif (fileMap != null) {Iterator iter = fileMap.entrySet().iterator();while (iter.hasNext()) {Map.Entry entry = (Map.Entry) iter.next();String inputName = (String) entry.getKey();String inputValue = (String) entry.getValue();if (inputValue == null) {continue;}File file = new File(inputValue);String filename = file.getName();String contentType = new MimetypesFileTypeMap().getContentType(file);if (filename.endsWith(".jpg")) {contentType = "jpg";}if (contentType == null || contentType.equals("")) {contentType = "application/octet-stream";}StringBufferstrBuf = new StringBuffer();strBuf.append("\r\n").append("--").append(BOUNDARY).append("\r\n");strBuf.append("Content-Disposition: form-data; name=\"" + inputName + "\"; filename=\"" + filename + "\"\r\n");strBuf.append("Content-Type:" + contentType + "\r\n\r\n");out.write(strBuf.toString().getBytes());System.out.println(strBuf.toString());DataInputStream in = new DataInputStream(new FileInputStream(file));int bytes = 0;byte[] bufferOut = new byte[1024];while ((bytes = in.read(bufferOut)) != -1) {out.write(bufferOut, 0, bytes);}in.close();}}byte[] endData = ("\r\n--" + BOUNDARY + "--\r\n").getBytes();out.write(endData);out.flush();out.close();// 读取返回数据StringBufferstrBuf = new StringBuffer();BufferedReader reader = new BufferedReader(new InputStreamReader(conn.getInputStream()));String line = null;while ((line = reader.readLine()) != null) {strBuf.append(line).append("\n");}res = strBuf.toString();reader.close();reader = null;} catch (Exception e) {System.out.println("发送POST请求出错。

android上传图片至服务器本实例实现了android上传手机图片至服务器,服务器进行保存服务器servlet代码publicvoid doPost(HttpServletRequest request, HttpServletResponse response)throws ServletException, IOException {Stringtemp=request.getSession().getServletContext().getRealPath("/")+"temp"; //临时目录System.out.println("temp="+temp);Stringloadpath=request.getSession().getServletContext().getRealPath("/")+"I mage"; //上传文件存放目录System.out.println("loadpath="+loadpath);DiskFileUpload fu =new DiskFileUpload();fu.setSizeMax(1*1024*1024); // 设置允许用户上传文件大小,单位:字节fu.setSizeThreshold(4096); // 设置最多只允许在内存中存储的数据,单位:字节fu.setRepositoryPath(temp); // 设置一旦文件大小超过getSizeThreshold()的值时数据存放在硬盘的目录//开始读取上传信息int index=0;List fileItems =null;try {fileItems =fu.parseRequest(request);System.out.println("fileItems="+fileItems);} catch (Exception e) {e.printStackTrace();}Iterator iter = fileItems.iterator(); // 依次处理每个上传的文件while (iter.hasNext()){FileItem item = (FileItem)iter.next();// 忽略其他不是文件域的所有表单信息if (!item.isFormField()){String name = item.getName();//获取上传文件名,包括路径name=name.substring(stIndexOf("\\")+1);//从全路径中提取文件名long size = item.getSize();if((name==null||name.equals("")) && size==0)continue;int point = name.indexOf(".");name=(newDate()).getTime()+name.substring(point,name.length())+index;index++;File fNew=new File(loadpath, name);try {item.write(fNew);} catch (Exception e) {// TODO Auto-generated catch blocke.printStackTrace();}}else//取出不是文件域的所有表单信息{String fieldvalue = item.getString();//如果包含中文应写为:(转为UTF-8编码)//String fieldvalue = newString(item.getString().getBytes(),"UTF-8");}}String text1="11";response.sendRedirect("result.jsp?text1="+ text1);}android客户端代码publicclass PhotoUpload extends Activity {private String newName ="image.jpg";private String uploadFile ="/sdcard/image.JPG";private String actionUrl="http://192.168.0.71:8086/HelloWord/myForm";private TextView mText1;private TextView mText2;private Button mButton;@Overridepublicvoid onCreate(Bundle savedInstanceState){super.onCreate(savedInstanceState);setContentView(yout.photo_upload);mText1 = (TextView) findViewById(R.id.myText2);//"文件路径:\n"+mText1.setText(uploadFile);mText2 = (TextView) findViewById(R.id.myText3);//"上传网址:\n"+mText2.setText(actionUrl);/* 设置mButton的onClick事件处理 */mButton = (Button) findViewById(R.id.myButton);mButton.setOnClickListener(new View.OnClickListener() {publicvoid onClick(View v){uploadFile();}});}/* 上传文件至Server的方法 */privatevoid uploadFile(){String end ="\r\n";String twoHyphens ="--";String boundary ="*****";try{URL url =new URL(actionUrl);HttpURLConnectioncon=(HttpURLConnection)url.openConnection();/* 允许Input、Output,不使用Cache */con.setDoInput(true);con.setDoOutput(true);con.setUseCaches(false);/* 设置传送的method=POST */con.setRequestMethod("POST");/* setRequestProperty */con.setRequestProperty("Connection", "Keep-Alive");con.setRequestProperty("Charset", "UTF-8");con.setRequestProperty("Content-Type","multipart/form-data;boundary="+boundary);/* 设置DataOutputStream */DataOutputStream ds =new DataOutputStream(con.getOutputStream());ds.writeBytes(twoHyphens + boundary + end);ds.writeBytes("Content-Disposition: form-data; "+"name=\"file1\";filename=\""+newName +"\""+ end);ds.writeBytes(end);/* 取得文件的FileInputStream */FileInputStream fStream =new FileInputStream(uploadFile);/* 设置每次写入1024bytes */int bufferSize =1024;byte[] buffer =newbyte[bufferSize];int length =-1;/* 从文件读取数据至缓冲区 */while((length = fStream.read(buffer)) !=-1){/* 将资料写入DataOutputStream中 */ds.write(buffer, 0, length);}ds.writeBytes(end);ds.writeBytes(twoHyphens + boundary + twoHyphens + end);/* close streams */fStream.close();ds.flush();/* 取得Response内容 */InputStream is = con.getInputStream();int ch;StringBuffer b =new StringBuffer();while( ( ch = is.read() ) !=-1 ){b.append( (char)ch );}/* 将Response显示于Dialog */showDialog("上传成功"+b.toString().trim());/* 关闭DataOutputStream */ds.close();}catch(Exception e){showDialog("上传失败"+e);}}/* 显示Dialog的method */privatevoid showDialog(String mess){new AlertDialog.Builder(PhotoUpload.this).setTitle("Message") .setMessage(mess).setNegativeButton("确定",newDialogInterface.OnClickListener(){publicvoid onClick(DialogInterface dialog, int which){}}).show();}}。
Android实现阿⾥云oss上传流程解析购买了阿⾥云的oss空间,于是⽤它来存储图⽚,不过中间的使⽤算是出了些问题,导致很长的才成功。
不得不说,阿⾥云⽂档真的是⽆⼒吐槽。
乱七⼋糟的。
我完全是东拼西凑,才完成的图⽚上传功能。
⾛了很多的弯路,今天来记录下。
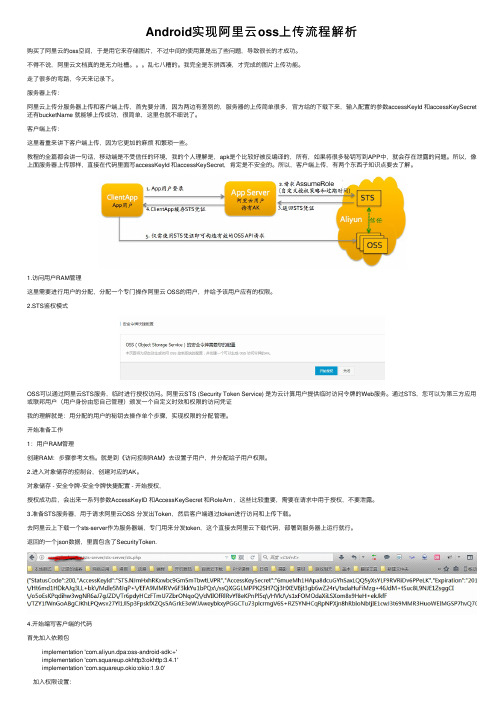
服务器上传:阿⾥云上传分服务器上传和客户端上传,⾸先要分清,因为两边有差别的,服务器的上传简单很多,官⽅给的下载下来,输⼊配置的参数accessKeyId 和accessKeySecret 还有bucketName 就能够上传成功,很简单,这⾥也就不细说了。
客户端上传:这⾥着重来讲下客户端上传,因为它更加的⿇烦和繁琐⼀些。
教程的全篇都会讲⼀句话,移动端是不受信任的环境,我的个⼈理解是,apk是个⽐较好被反编译的,所有,如果将很多秘钥写到APP中,就会存在泄露的问题。
所以,像上⾯服务器上传那样,直接在代码⾥⾯写accessKeyId 和accessKeySecret,肯定是不安全的。
所以,客户端上传,有两个东西⼦知识点要去了解。
1.访问⽤户RAM管理这⾥需要进⾏⽤户的分配,分配⼀个专门操作阿⾥云 OSS的⽤户,并给予该⽤户应有的权限。
2.STS鉴权模式OSS可以通过阿⾥云STS服务,临时进⾏授权访问。
阿⾥云STS (Security Token Service) 是为云计算⽤户提供临时访问令牌的Web服务。
通过STS,您可以为第三⽅应⽤或联邦⽤户(⽤户⾝份由您⾃⼰管理)颁发⼀个⾃定义时效和权限的访问凭证我的理解就是:⽤分配的⽤户的秘钥去操作单个步骤,实现权限的分配管理。
开始准备⼯作1:⽤户RAM管理创建RAM:步骤参考⽂档。
就是到《访问控制RAM》去设置⼦⽤户,并分配给⼦⽤户权限。
2.进⼊对象储存的控制台,创建对应的AK。
对象储存 - 安全令牌-安全令牌快捷配置 - 开始授权,授权成功后,会出来⼀系列参数AccessKeyID 和AccessKeySecret 和RoleArn ,这些⽐较重要,需要在请求中⽤于授权,不要泄露。

Android实现上传图⽚⾄java服务器这⼏天有做到⼀个⼩的案例,⼿机拍照、相册照⽚上传到服务器。
客户端和服务器的代码都贴出来:客户端AndroidManifest.xml添加以下权限<uses-permission android:name="android.permission.INTERNET"/><uses-permission android:name="android.permission.CAMERA"/><uses-permissionandroid:name="android.permission.WRITE_EXTERNAL_STORAGE" /><uses-permission android:name="android.permission.READ_EXTERNAL_STORAGE"/>客户端的上传图⽚activity_upload.xml布局⽂件<?xml version="1.0" encoding="utf-8"?><LinearLayoutxmlns:android="/apk/res/android"android:id="@+id/activity_main"android:layout_width="match_parent"android:layout_height="match_parent"android:orientation="vertical"><ImageViewandroid:id="@+id/imageView"android:layout_width="match_parent"android:layout_height="300dp"/><EditTextandroid:id="@+id/editText"android:layout_width="match_parent"android:layout_height="42dp"android:layout_margin="16dp"android:background="@drawable/edit_text_bg"/><Buttonandroid:id="@+id/choose_image"android:layout_width="match_parent"android:layout_height="wrap_content"android:text="选择图⽚"/><Buttonandroid:id="@+id/upload_image"android:layout_width="match_parent"android:layout_height="wrap_content"android:text="上传图⽚"/></LinearLayout>UploadActivity.java界⾯代码package com.eric.uploadimage;import android.annotation.SuppressLint;import android.app.ProgressDialog;import android.content.Intent;import android.database.Cursor;import android.graphics.Bitmap;import android.graphics.BitmapFactory;import .Uri;import android.os.AsyncTask;import android.provider.MediaStore;import android.support.v7.app.AppCompatActivity;import android.os.Bundle;import android.util.Base64;import android.view.View;import android.widget.EditText;import android.widget.ImageView;import android.widget.Toast;import com.loopj.android.http.AsyncHttpClient;import com.loopj.android.http.AsyncHttpResponseHandler;import com.loopj.android.http.RequestParams;import java.io.ByteArrayOutputStream;import cz.msebera.android.httpclient.Header;@SuppressLint("NewApi")public class UploadActivity extends AppCompatActivity implements View.OnClickListener { private EditText editTextName;private ProgressDialog prgDialog;private int RESULT_LOAD_IMG = 1;private RequestParams params = new RequestParams();private String encodedString;private Bitmap bitmap;private String imgPath;@Overrideprotected void onCreate(Bundle savedInstanceState) {super.onCreate(savedInstanceState);setContentView(yout.activity_main);prgDialog= new ProgressDialog(this);prgDialog.setCancelable(false);editTextName = (EditText) findViewById(R.id.editText);findViewById(R.id.choose_image).setOnClickListener(this);findViewById(R.id.upload_image).setOnClickListener(this);}@Overridepublic void onClick(View view) {switch (view.getId()) {case R.id.choose_image:loadImage();break;case R.id.upload_image:uploadImage();break;}}public void loadImage() {//这⾥就写了从相册中选择图⽚,相机拍照的就略过了Intent galleryIntent = new Intent(Intent.ACTION_PICK,android.provider.MediaStore.Images.Media.EXTERNAL_CONTENT_URI);startActivityForResult(galleryIntent, RESULT_LOAD_IMG);}//当图⽚被选中的返回结果@Overrideprotected void onActivityResult(int requestCode, int resultCode, Intent data) {super.onActivityResult(requestCode, resultCode, data);try {if (requestCode == RESULT_LOAD_IMG && resultCode == RESULT_OK && null != data) { Uri selectedImage = data.getData();String[] filePathColumn = { MediaStore.Images.Media.DATA };// 获取游标Cursor cursor = getContentResolver().query(selectedImage, filePathColumn, null, null, null); cursor.moveToFirst();int columnIndex = cursor.getColumnIndex(filePathColumn[0]);imgPath = cursor.getString(columnIndex);cursor.close();ImageView imgView = (ImageView) findViewById(R.id.imageView);imgView.setImageBitmap(BitmapFactory.decodeFile(imgPath));} else {Toast.makeText(this, "You haven't picked Image",Toast.LENGTH_LONG).show();}} catch (Exception e) {Toast.makeText(this, "Something went wrong", Toast.LENGTH_LONG).show();}}//开始上传图⽚private void uploadImage() {if (imgPath != null && !imgPath.isEmpty()) {prgDialog.setMessage("Converting Image to Binary Data");prgDialog.show();encodeImagetoString();} else {Toast.makeText(getApplicationContext(), "You must select image from gallery before you try to upload", Toast.LENGTH_LONG).show();}}public void encodeImagetoString() {new AsyncTask<Void, Void, String>() {protected void onPreExecute() {};@Overrideprotected String doInBackground(Void... params) {BitmapFactory.Options options = null;options = new BitmapFactory.Options();options.inSampleSize = 3;bitmap = BitmapFactory.decodeFile(imgPath,options);ByteArrayOutputStream stream = new ByteArrayOutputStream();// 压缩图⽚press(pressFormat.PNG, 50, stream);byte[] byte_arr = stream.toByteArray();// Base64图⽚转码为StringencodedString = Base64.encodeToString(byte_arr, 0);return "";}@Overrideprotected void onPostExecute(String msg) {prgDialog.setMessage("Calling Upload");// 将转换后的图⽚添加到上传的参数中params.put("image", encodedString);params.put("filename", editTextName.getText().toString());// 上传图⽚imageUpload();}}.execute(null, null, null);}public void imageUpload() {prgDialog.setMessage("Invoking JSP");String url = "http://172.18.2.73:8080/upload/uploadimg.jsp";AsyncHttpClient client = new AsyncHttpClient();client.post(url, params, new AsyncHttpResponseHandler() {@Overridepublic void onSuccess(int statusCode, Header[] headers, byte[] bytes) {prgDialog.hide();Toast.makeText(getApplicationContext(), "upload success", Toast.LENGTH_LONG).show();}@Overridepublic void onFailure(int statusCode, Header[] headers, byte[] bytes, Throwable throwable) {prgDialog.hide();if (statusCode == 404) {Toast.makeText(getApplicationContext(),"Requested resource not found", Toast.LENGTH_LONG).show();}// 当 Http 响应码'500'else if (statusCode == 500) {Toast.makeText(getApplicationContext(),"Something went wrong at server end", Toast.LENGTH_LONG).show();}// 当 Http 响应码 404, 500else {Toast.makeText(getApplicationContext(), "Error Occured n Most Common Error: n1. Device " +"not connected to Internetn2. Web App is not deployed in App servern3." +" App server is not runningn HTTP Status code : "+ statusCode, Toast.LENGTH_LONG).show();}}});}@Overrideprotected void onDestroy() {super.onDestroy();if (prgDialog != null) {prgDialog .dismiss();}}}服务端这⾥⽤是Intellij Idea 2016.3.1+Tomcat 搭建的本地服务器,前篇⽂章有介绍具体的搭建步骤。

android⽂件上传⽰例分享(android图⽚上传)主要思路是调⽤系统⽂件管理器或者其他媒体采集资源来获取要上传的⽂件,然后将⽂件的上传进度实时展⽰到进度条中。
主Activity复制代码代码如下:package com.guotop.elearn.activity.app.yunpan.activity;import java.io.File;import java.io.FileNotFoundException;import java.io.IOException;import android.app.Activity;import android.content.Intent;import android.content.res.Configuration;import .Uri;import android.os.Bundle;import android.os.Environment;import android.provider.MediaStore;import android.provider.MediaStore.Audio.Media;import youtInflater;import android.view.View;import android.view.View.OnClickListener;import android.widget.Button;import android.widget.LinearLayout;import com.guotop.base.activity.BaseActivity;import com.guotop.base.util.MyFile;import com.guotop.elearn.activity.R;import com.guotop.elearn.activity.app.yunpan.item.YunPanUploadFileItem;/***** @author: 李杨* @time: 2014-4-15下午4:29:35*/public class YunPanUploadFileActivity extends BaseActivity implements OnClickListener{String userId, parentId;private final static int FILECHOOSER_RESULTCODE = 0;// private String openFileType="";private String mVideoFilePath,mPhotoFilePath,mVoiceFilePath;private Button chooseBtn,uploadBtn;private LinearLayout conterLayout;private String actionURL;@Overridepublic void onCreate(Bundle savedInstanceState) {super.onCreate(savedInstanceState, this);setTitle("云盘上传⽂件");setContentView(yout.activity_yunpan_uploadfile);userId = getIntent().getStringExtra("userId");parentId = getIntent().getStringExtra("parentId");actionURL = getIntent().getStringExtra("actionURL");chooseBtn = (Button)findViewById(R.id.chooseBtn);uploadBtn = (Button)findViewById(R.id.uploadBtn);conterLayout = (LinearLayout)findViewById(R.id.conterLayout);chooseBtn.setOnClickListener(this);uploadBtn.setOnClickListener(this);}@Overridepublic void onClick(View v) {if(v.getId()==R.id.chooseBtn){// //选择⽂件startActivityForResult(createDefaultOpenableIntent(), YunPanUploadFileActivity.FILECHOOSER_RESULTCODE); // Intent intent = new Intent(MediaStore.Audio.Media.RECORD_SOUND_ACTION);// startActivityForResult(intent, YunPanUploadFileActivity.FILECHOOSER_RESULTCODE);// Intent intent = new Intent(Media.RECORD_SOUND_ACTION);// ((Activity) context).startActivityForResult(intent, YunPanUploadFileActivity.FILECHOOSER_RESULTCODE);}else if(v.getId()==R.id.uploadBtn){//上传⽂件}}/*** 创建上传⽂件*/public void createUploadFileItem(String filePath){// View view = LayoutInflater.from(context).inflate(yout.activity_yunpan_uploadfile_item, null);new YunPanUploadFileItem(context, conterLayout, filePath,actionURL);}@Overridepublic void onConfigurationChanged(Configuration newConfig) {// TODO Auto-generated method stubsuper.onConfigurationChanged(newConfig);}/**选择⽂件*/private Intent createDefaultOpenableIntent() {Intent i = new Intent(Intent.ACTION_GET_CONTENT);i.addCategory(Intent.CATEGORY_OPENABLE);i.putExtra(Intent.EXTRA_TITLE, "选择⽂件");i.setType("*/*");Intent chooser = createChooserIntent(createCameraIntent(), createCamcorderIntent(), createSoundRecorderIntent()); chooser.putExtra(Intent.EXTRA_INTENT, i);return chooser;}private Intent createChooserIntent(Intent... intents) {Intent chooser = new Intent(Intent.ACTION_CHOOSER);chooser.putExtra(Intent.EXTRA_INITIAL_INTENTS, intents);chooser.putExtra(Intent.EXTRA_TITLE, "选择⽂件");return chooser;}private Intent createCameraIntent() {Intent cameraIntent = new Intent(MediaStore.ACTION_IMAGE_CAPTURE);File externalDataDir = Environment.getExternalStoragePublicDirectory(Environment.DIRECTORY_DCIM); File cameraDataDir = new File(externalDataDir.getAbsolutePath() + File.separator + "e-photos");cameraDataDir.mkdirs();mPhotoFilePath = cameraDataDir.getAbsolutePath() + File.separator + System.currentTimeMillis() + ".jpg"; cameraIntent.putExtra(MediaStore.EXTRA_OUTPUT, Uri.fromFile(new File(mPhotoFilePath)));return cameraIntent;}private Intent createCamcorderIntent() {Intent intent = new Intent(MediaStore.ACTION_VIDEO_CAPTURE);File externalDataDir = Environment.getExternalStoragePublicDirectory(Environment.DIRECTORY_DCIM); File cameraDataDir = new File(externalDataDir.getAbsolutePath() + File.separator + "e-videos");cameraDataDir.mkdirs();mVideoFilePath = cameraDataDir.getAbsolutePath() + File.separator + System.currentTimeMillis() + ".3gp"; intent.putExtra(MediaStore.EXTRA_OUTPUT, Uri.fromFile(new File(mVideoFilePath)));intent.putExtra(MediaStore.EXTRA_VIDEO_QUALITY, 1); // set the videoreturn intent;}private Intent createSoundRecorderIntent() {Intent intent = new Intent(MediaStore.Audio.Media.RECORD_SOUND_ACTION);File externalDataDir = Environment.getExternalStoragePublicDirectory(Environment.DIRECTORY_DCIM); File cameraDataDir = new File(externalDataDir.getAbsolutePath() + File.separator + "e-voices");cameraDataDir.mkdirs();mVoiceFilePath = cameraDataDir.getAbsolutePath() + File.separator + System.currentTimeMillis() + ".amr"; return intent;}protected void onActivityResult(int requestCode, int resultCode, Intent data) {if (requestCode == FILECHOOSER_RESULTCODE) {Uri result= data == null || resultCode != RESULT_OK ? null :data.getData();if (result == null && data == null && resultCode == Activity.RESULT_OK) {File mMediaFile = null;;if(new File(mVideoFilePath).exists()){mMediaFile = new File(mVideoFilePath);}else if(new File(mPhotoFilePath).exists()){mMediaFile = new File(mPhotoFilePath);}else if(new File(mVoiceFilePath).exists()){mMediaFile = new File(mVoiceFilePath);}if (mMediaFile!=null&&mMediaFile.exists()) {result = Uri.fromFile(mMediaFile);sendBroadcast(new Intent(Intent.ACTION_MEDIA_SCANNER_SCAN_FILE, result));}// result = Uri.fromFile(new File(mCameraFilePath));}if(result!=null){if(!new File(result.getPath()).canRead()){try {MyFile.copyFile(new File(mVoiceFilePath),getContentResolver().openInputStream(result));createUploadFileItem(mVoiceFilePath);} catch (FileNotFoundException e) {e.printStackTrace();}}else {createUploadFileItem(result.getPath());}}System.out.println(result);}}}绘制现在⽂件信息后的Item复制代码代码如下:package com.guotop.elearn.activity.app.yunpan.item;import java.io.File;import ng.ref.WeakReference;import java.util.Random;import org.json.JSONException;import org.json.JSONObject;import android.app.AlertDialog;import android.content.Context;import android.content.DialogInterface;import android.content.Intent;import android.os.IBinder;import android.os.Looper;import android.os.Message;import youtInflater;import android.view.View;import android.view.View.OnClickListener;import android.widget.Button;import android.widget.ImageView;import android.widget.LinearLayout;import android.widget.ProgressBar;import android.widget.TextView;import android.widget.Toast;import com.guotop.base.L;import com.guotop.base.handler.BaseHandler;import com.guotop.base.thread.HttpThread;import com.guotop.base.util.MyFile;import com.guotop.base.util.MyHashMap;import com.guotop.elearn.activity.R;import com.guotop.elearn.activity.app.yunpan.Y;import com.guotop.elearn.activity.app.yunpan.bean.UploadYunFileInformaction; import com.guotop.elearn.activity.app.yunpan.thread.UploadYunFileHttpThread; /***** @author: 李杨* @time: 2014-4-21下午12:28:33*/public class YunPanUploadFileItem implements OnClickListener {LinearLayout view,parentView;String filePath;private Context context;private TextView uploadFileProgressText, uploadFileName;private ProgressBar uploadFileProgressBar;private ImageView uploadFileImg;private Button startUploadFileBtn, cancelUploadFileBtn;private String actionURL;BaseHandler handler;UploadYunFileHttpThread t;UploadYunFileInformaction uploadYunFileInformaction ;public YunPanUploadFileItem(Context context,LinearLayout parentView, String filePath,String actionURL) {this.parentView = parentView;this.actionURL = actionURL;this.context = context;File file = new File(filePath);this.view = (LinearLayout) LayoutInflater.from(context).inflate(yout.activity_yunpan_uploadfile_item, null); // this.view = view;this.filePath = filePath;uploadFileProgressText = (TextView) view.findViewById(R.id.uploadFileProgressText);uploadFileName = (TextView) view.findViewById(R.id.uploadFileName);uploadFileProgressBar = (ProgressBar) view.findViewById(R.id.uploadFileProgressBar);uploadFileImg = (ImageView) view.findViewById(R.id.uploadFileImg);cancelUploadFileBtn = (Button) view.findViewById(R.id.cancelUploadFileBtn);startUploadFileBtn = (Button) view.findViewById(R.id.startUploadFileBtn);uploadFileName.setText(file.getName()+" ⼤⼩"+MyFile.formetFileSize(file.getPath()));uploadFileImg.setImageResource(MyFile.getFileIcon(file));startUploadFileBtn.setOnClickListener(this);cancelUploadFileBtn.setOnClickListener(this);parentView.addView(view);uploadYunFileInformaction = new UploadYunFileInformaction(filePath);myHandler = new MyHandler(Looper.myLooper(), this);uploadYunFileInformaction.setNotificationId(new Random().nextInt(10000));uploadYunFileInformaction.setActionURL(actionURL);t = new UploadYunFileHttpThread(myHandler, uploadYunFileInformaction);uploads.put(uploadYunFileInformaction.getNotificationId(), t);}@Overridepublic void onClick(View v) {if (v.getId() == R.id.startUploadFileBtn) {downFile(t);startUploadFileBtn.setClickable(false);}else if(v.getId()==R.id.cancelUploadFileBtn){if(t.isStart){new AlertDialog.Builder(context).setTitle("系统提⽰!").setMessage("该⽂件正在上传确定要强制停⽌?") .setNegativeButton("取消", new DialogInterface.OnClickListener() {public void onClick(DialogInterface dialog, int which) {}}).setPositiveButton("确定", new DialogInterface.OnClickListener() {public void onClick(DialogInterface dialog, int which) {t.interrupt();parentView.removeView(view);uploads.removeKey(uploadYunFileInformaction.getNotificationId());System.gc();}}).show();}else {parentView.removeView(view);uploads.removeKey(uploadYunFileInformaction.getNotificationId());}}}public static MyHashMap<Integer, UploadYunFileHttpThread> uploads = new MyHashMap<Integer, UploadYunFileHttpThread>();private MyHandler myHandler;public IBinder onBind(Intent intent) {return null;}// 下载更新⽂件private void downFile(UploadYunFileHttpThread t) {int len = 3;if (t != null && uploads.size() <= len) {if (!t.isStart) {t.start();}} else if (t == null && uploads.size() >= len) {t = uploads.get(len - 1);if (!t.isStart) {t.start();}}}/* 事件处理类 */class MyHandler extends BaseHandler {private WeakReference<YunPanUploadFileItem> bdfs;public MyHandler(Looper looper, YunPanUploadFileItem yunPanUploadFileItem) {super(looper);this.bdfs = new WeakReference<YunPanUploadFileItem>(yunPanUploadFileItem);}@Overridepublic void handleMessage(Message msg) {YunPanUploadFileItem bdfs = this.bdfs.get();if (bdfs == null) {return;}if (msg != null) {switch (msg.what) {case 0:Toast.makeText(L.livingActivity, msg.obj.toString(), Toast.LENGTH_SHORT).show();break;case L.dowloadStart:break;case L.dowloadFinish:// 下载完成后清除所有下载信息,执⾏安装提⽰try {uploads.removeKey(msg.getData().getInt("notificationId"));bdfs.uploadFileProgressText.setText("上传完成");bdfs.uploadFileProgressBar.setMax(100);bdfs.uploadFileProgressBar.setProgress(100);startUploadFileBtn.setClickable(false);} catch (Exception e) {}bdfs.downFile(null);break;case L.dowloadPercentage:// 更新状态栏上的下载进度信息bdfs.uploadFileProgressText.setText("总共:"+MyFile.formetFileSize(msg.getData().getInt("fileSize"))+ "/" + MyFile.formetFileSize(msg.getData().getInt("finishFileSize")) + " 已上传"+ msg.getData().getInt("percentage") + "%");bdfs.uploadFileProgressBar.setMax(100);bdfs.uploadFileProgressBar.setProgress(msg.getData().getInt("percentage"));break;case 4:// bdfs.nm.cancel(msg.getData().getInt("notificationId"));break;}}}}}⽤来上传⽂件的线程复制代码代码如下:package com.guotop.elearn.activity.app.yunpan.thread;import .SocketException;import com.guotop.base.L;import com.guotop.base.Util;import com.guotop.base.handler.BaseHandler;import com.guotop.base.thread.HttpThread;import com.guotop.elearn.activity.app.yunpan.bean.UploadYunFileInformaction;import com.guotop.elearn.activity.app.yunpan.util.YunPanUploadFile;import com.guotop.elearn.activity.app.yunpan.util.YunPanUploadFileHttpInterface;/**** 下载云服务器上的⽂件***@author: 李杨*@time: 2014-4-11下午6:06:53*/public class UploadYunFileHttpThread extends HttpThread{@SuppressWarnings("unused")private UploadYunFileInformaction uploadYunFileInformaction;public boolean isStart=false;public static int RECONNECT = 1000002;public static int CAN_NOT_RECONNECT = 1000003;YunPanUploadFile yunPanUploadFile;public UploadYunFileHttpThread(){}public UploadYunFileHttpThread(BaseHandler handler,UploadYunFileInformaction dowFile){this.uploadYunFileInformaction=dowFile;this.handler=handler;}int fileSize,finishFileSize,percentage;private boolean isUpdate = true;public void run() {isStart=true;//是启动了new HttpThread(handler){public void run() {while (isUpdate) {try {Thread.sleep(100);} catch (InterruptedException e) {}if(finishFileSize!=0&&fileSize!=0){msg = handler.obtainMessage();if(percentage>=100){// msg.what=L.dowloadFinish;// msg.setData(bundle);// handler.sendMessage(msg);break;}else {bundle.putString("fileName", uploadYunFileInformaction.getFileName());bundle.putInt("percentage", percentage);bundle.putInt("finishFileSize", finishFileSize);bundle.putInt("fileSize", fileSize);msg.what=L.dowloadPercentage;msg.setData(bundle);handler.sendMessage(msg);sendMessage(1000000);// 为了取消等待框}}}}}.start();try {uploadFile();} catch (Exception e) {isUpdate = false;isStart = false;}}private void uploadFile() {yunPanUploadFile = new YunPanUploadFile(dbfInterface, uploadYunFileInformaction, L.COOKIE); result = yunPanUploadFile.post();msg = handler.obtainMessage();bundle.putInt("notificationId", uploadYunFileInformaction.getNotificationId());bundle.putString("path", uploadYunFileInformaction.getPath());bundle.putString("result", result);msg.what = L.dowloadFinish;msg.setData(bundle);handler.sendMessage(msg);isUpdate = false;isStart = false;}YunPanUploadFileHttpInterface dbfInterface = new YunPanUploadFileHttpInterface() { //初始化下载后public void initFileSize(int size) {fileSize=size;msg = handler.obtainMessage();bundle.putInt("fileSize", fileSize);msg.what = L.dowloadStart;msg.setData(bundle);handler.sendMessage(msg);}//现在计划进⾏中public void uploadPlan(int fileSize,int finishSize) {finishFileSize=finishSize;percentage=finishSize/(fileSize/100);if(percentage<-1L){Util.LogGL(this.getClass().getName(), "downloadPlan",percentage+"");}}//下载完成public void uploadFinish(String file) {percentage=101;}};public UploadYunFileInformaction getDowloadFileInformaction() {return uploadYunFileInformaction;}public void setDowloadFileInformaction(UploadYunFileInformaction dowloadFileInformaction) {this.uploadYunFileInformaction = dowloadFileInformaction;}@Overridepublic void interrupt() {yunPanUploadFile.close();super.interrupt();}}记录⽂件信息Bean复制代码代码如下:package com.guotop.elearn.activity.app.yunpan.item;import java.io.File;import ng.ref.WeakReference;import java.util.Random;import org.json.JSONException;import org.json.JSONObject;import android.app.AlertDialog;import android.content.Context;import android.content.DialogInterface;import android.content.Intent;import android.os.IBinder;import android.os.Looper;import android.os.Message;import youtInflater;import android.view.View;import android.view.View.OnClickListener;import android.widget.Button;import android.widget.ImageView;import android.widget.LinearLayout;import android.widget.ProgressBar;import android.widget.TextView;import android.widget.Toast;import com.guotop.base.L;import com.guotop.base.handler.BaseHandler;import com.guotop.base.thread.HttpThread;import com.guotop.base.util.MyFile;import com.guotop.base.util.MyHashMap;import com.guotop.elearn.activity.R;import com.guotop.elearn.activity.app.yunpan.Y;import com.guotop.elearn.activity.app.yunpan.bean.UploadYunFileInformaction;import com.guotop.elearn.activity.app.yunpan.thread.UploadYunFileHttpThread;/***** @author: 李杨* @time: 2014-4-21下午12:28:33*/public class YunPanUploadFileItem implements OnClickListener {LinearLayout view,parentView;String filePath;private Context context;private TextView uploadFileProgressText, uploadFileName;private ProgressBar uploadFileProgressBar;private ImageView uploadFileImg;private Button startUploadFileBtn, cancelUploadFileBtn;private String actionURL;BaseHandler handler;UploadYunFileHttpThread t;UploadYunFileInformaction uploadYunFileInformaction ;public YunPanUploadFileItem(Context context,LinearLayout parentView, String filePath,String actionURL) { this.parentView = parentView;this.actionURL = actionURL;this.context = context;File file = new File(filePath);this.view = (LinearLayout) LayoutInflater.from(context).inflate(yout.activity_yunpan_uploadfile_item, null); // this.view = view;this.filePath = filePath;uploadFileProgressText = (TextView) view.findViewById(R.id.uploadFileProgressText);uploadFileName = (TextView) view.findViewById(R.id.uploadFileName);uploadFileProgressBar = (ProgressBar) view.findViewById(R.id.uploadFileProgressBar);uploadFileImg = (ImageView) view.findViewById(R.id.uploadFileImg);cancelUploadFileBtn = (Button) view.findViewById(R.id.cancelUploadFileBtn);startUploadFileBtn = (Button) view.findViewById(R.id.startUploadFileBtn);uploadFileName.setText(file.getName()+" ⼤⼩"+MyFile.formetFileSize(file.getPath()));uploadFileImg.setImageResource(MyFile.getFileIcon(file));startUploadFileBtn.setOnClickListener(this);cancelUploadFileBtn.setOnClickListener(this);parentView.addView(view);uploadYunFileInformaction = new UploadYunFileInformaction(filePath);myHandler = new MyHandler(Looper.myLooper(), this);uploadYunFileInformaction.setNotificationId(new Random().nextInt(10000));uploadYunFileInformaction.setActionURL(actionURL);t = new UploadYunFileHttpThread(myHandler, uploadYunFileInformaction);uploads.put(uploadYunFileInformaction.getNotificationId(), t);}@Overridepublic void onClick(View v) {if (v.getId() == R.id.startUploadFileBtn) {downFile(t);startUploadFileBtn.setClickable(false);}else if(v.getId()==R.id.cancelUploadFileBtn){if(t.isStart){new AlertDialog.Builder(context).setTitle("系统提⽰!").setMessage("该⽂件正在上传确定要强制停⽌?") .setNegativeButton("取消", new DialogInterface.OnClickListener() {public void onClick(DialogInterface dialog, int which) {}}).setPositiveButton("确定", new DialogInterface.OnClickListener() {public void onClick(DialogInterface dialog, int which) {t.interrupt();parentView.removeView(view);uploads.removeKey(uploadYunFileInformaction.getNotificationId());System.gc();}}).show();}else {parentView.removeView(view);uploads.removeKey(uploadYunFileInformaction.getNotificationId());}}}public static MyHashMap<Integer, UploadYunFileHttpThread> uploads = new MyHashMap<Integer, UploadYunFileHttpThread>();private MyHandler myHandler;public IBinder onBind(Intent intent) {return null;}// 下载更新⽂件private void downFile(UploadYunFileHttpThread t) {int len = 3;if (t != null && uploads.size() <= len) {if (!t.isStart) {t.start();}} else if (t == null && uploads.size() >= len) {t = uploads.get(len - 1);if (!t.isStart) {t.start();}}}/* 事件处理类 */class MyHandler extends BaseHandler {private WeakReference<YunPanUploadFileItem> bdfs;public MyHandler(Looper looper, YunPanUploadFileItem yunPanUploadFileItem) {super(looper);this.bdfs = new WeakReference<YunPanUploadFileItem>(yunPanUploadFileItem);}@Overridepublic void handleMessage(Message msg) {YunPanUploadFileItem bdfs = this.bdfs.get();if (bdfs == null) {return;}if (msg != null) {switch (msg.what) {case 0:Toast.makeText(L.livingActivity, msg.obj.toString(), Toast.LENGTH_SHORT).show();break;case L.dowloadStart:break;case L.dowloadFinish:// 下载完成后清除所有下载信息,执⾏安装提⽰try {uploads.removeKey(msg.getData().getInt("notificationId"));bdfs.uploadFileProgressText.setText("上传完成");bdfs.uploadFileProgressBar.setMax(100);bdfs.uploadFileProgressBar.setProgress(100);startUploadFileBtn.setClickable(false);} catch (Exception e) {}bdfs.downFile(null);break;case L.dowloadPercentage:// 更新状态栏上的下载进度信息bdfs.uploadFileProgressText.setText("总共:"+MyFile.formetFileSize(msg.getData().getInt("fileSize"))+ "/" + MyFile.formetFileSize(msg.getData().getInt("finishFileSize")) + " 已上传"+ msg.getData().getInt("percentage") + "%");bdfs.uploadFileProgressBar.setMax(100);bdfs.uploadFileProgressBar.setProgress(msg.getData().getInt("percentage"));break;case 4:// bdfs.nm.cancel(msg.getData().getInt("notificationId"));break;}}}}}⽂件上传⼯具类复制代码代码如下:package com.guotop.elearn.activity.app.yunpan.util;import java.io.BufferedReader;import java.io.DataOutputStream;import java.io.File;import java.io.FileInputStream;import java.io.FileNotFoundException;import java.io.IOException;import java.io.InputStreamReader;import java.io.UnsupportedEncodingException;import .HttpURLConnection;import .URL;import java.util.Map;import java.util.Map.Entry;import android.R.integer;import com.guotop.elearn.activity.app.yunpan.bean.UploadYunFileInformaction;/****** @author: 李杨* @time: 2013-6-13下午7:07:36*/public class YunPanUploadFile {String multipart_form_data = "multipart/form-data";String twoHyphens = "--";String boundary = "****************SoMeTeXtWeWiLlNeVeRsEe"; // 数据分隔符String lineEnd = "\r\n";YunPanUploadFileHttpInterface yunPanUploadFileHttpInterface;UploadYunFileInformaction uploadYunFileInformaction;String cookie;public YunPanUploadFile(YunPanUploadFileHttpInterface yunPanUploadFileHttpInterface,UploadYunFileInformaction uploadYunFileInformaction,String cookie){this.yunPanUploadFileHttpInterface = yunPanUploadFileHttpInterface;this.uploadYunFileInformaction = uploadYunFileInformaction;this.cookie = cookie;}public void write(UploadYunFileInformaction file, DataOutputStream output) {FileInputStream in;try {if (file.getPath() != null && !"".equals(file.getPath())) {in = new FileInputStream(new File(file.getPath()));int fileSize= in.available();int readySize = 0;yunPanUploadFileHttpInterface.initFileSize(fileSize);byte[] b = new byte[1024];while (in.read(b) > 0) {readySize+=b.length;yunPanUploadFileHttpInterface.uploadPlan(fileSize, readySize);output.write(b, 0, b.length);}}output.writeBytes(lineEnd);} catch (FileNotFoundException e) {e.printStackTrace();} catch (UnsupportedEncodingException e) {e.printStackTrace();} catch (IOException e) {e.printStackTrace();}}/** 构建表单字段内容,格式请参考HTTP 协议格式(⽤FireBug可以抓取到相关数据)。

Android实现图⽚选择上传功能实例效果图:添加依赖:选择图⽚:compile 'com.lzy.widget:imagepicker:0.5.4'上传⽂件:compile 'com.zhy:okhttputils:2.6.2'MainActivity.javapackage com.yechaoa.uploadimage;import android.content.Intent;import android.support.v7.app.AppCompatActivity;import android.os.Bundle;import android.support.v7.widget.GridLayoutManager;import android.support.v7.widget.RecyclerView;import android.view.View;import android.widget.AdapterView;import com.lzy.imagepicker.ImagePicker;import com.lzy.imagepicker.bean.ImageItem;import com.lzy.imagepicker.ui.ImageGridActivity;import com.lzy.imagepicker.ui.ImagePreviewDelActivity;import com.lzy.imagepicker.view.CropImageView;import java.util.ArrayList;import java.util.List;import okhttp3.Call;public class MainActivity extends AppCompatActivity implements ImagePickerAdapter.OnRecyclerViewItemClickListener{ public static final int IMAGE_ITEM_ADD = -1;public static final int REQUEST_CODE_SELECT = 100;public static final int REQUEST_CODE_PREVIEW = 101;private ImagePickerAdapter adapter;private ArrayList<ImageItem> selImageList; //当前选择的所有图⽚private int maxImgCount = 8; //允许选择图⽚最⼤数private HttpUtil httpUtil;@Overrideprotected void onCreate(Bundle savedInstanceState) {super.onCreate(savedInstanceState);setContentView(yout.activity_main);httpUtil = new HttpUtil();findViewById(R.id.btn).setOnClickListener(new View.OnClickListener() {@Overridepublic void onClick(View v) {uploadImage(selImageList);}});//最好放到 Application oncreate执⾏initImagePicker();initWidget();}private void initImagePicker() {ImagePicker imagePicker = ImagePicker.getInstance();imagePicker.setImageLoader(new GlideImageLoader()); //设置图⽚加载器imagePicker.setShowCamera(true); //显⽰拍照按钮imagePicker.setCrop(true); //允许裁剪(单选才有效)imagePicker.setSaveRectangle(true); //是否按矩形区域保存imagePicker.setSelectLimit(maxImgCount); //选中数量限制imagePicker.setMultiMode(false); //多选imagePicker.setStyle(CropImageView.Style.RECTANGLE); //裁剪框的形状imagePicker.setFocusWidth(800); //裁剪框的宽度。

AndroidStudio图⽚上传在做app开发的时候图⽚上传是最基本的功能了,⼀般都是调⽤⼿机相机拍照,然后上传到服务器上。
下⾯就说⼀下,如何调⽤相机拍照并上传到服务器上的。
⾸先要在AndroidManifest.xml添加⽹络权限:调⽤相机权限:<uses-permission android:name="android.permission.CAMERA" />往服务器上上传图⽚,需要⽹络权限:<uses-permission android:name="android.permission.INTERNET"/><uses-permission android:name="android.permission.READ_EXTERNAL_STORAGE"/><uses-permission android:name="android.permission.WRITE_EXTERNAL_STORAGE"/>`上传图⽚我们⼀般不⽤Android studio⾃带的上传⽅法,会⽤插件来实现图⽚上传,这⾥推荐使⽤okhttp.将okhttp插件导⼊⼯程后,下⾯就直接上代码了。
<?xml version="1.0" encoding="utf-8"?><LinearLayout xmlns:android="/apk/res/android"xmlns:app="/apk/res-auto"xmlns:tools="/tools"android:layout_width="match_parent"android:layout_height="match_parent"android:orientation="vertical"tools:context=".GaoWen.CamerIcon"><LinearLayoutandroid:layout_width="match_parent"android:layout_height="0dp"android:orientation="vertical"android:layout_margin="10dp"android:layout_weight="4"><TextViewandroid:layout_width="match_parent"android:layout_height="0dp"android:layout_weight="1"android:text="请填写备注:"android:textSize="20dp"android:gravity="center_vertical"/><EditTextandroid:id="@+id/text_info"android:layout_weight="3"android:layout_width="match_parent"android:layout_height="0dp"android:inputType="textMultiLine"android:layout_gravity="center"android:gravity="left|top"android:background="@drawable/log"android:minLines="6"/></LinearLayout><LinearLayoutandroid:layout_width="match_parent"android:layout_height="0dp"android:orientation="vertical"android:layout_margin="10dp"android:layout_weight="1"><TextViewandroid:layout_width="match_parent"android:layout_height="0dp"android:layout_weight="1"android:text="照⽚列表:"android:textSize="20dp"android:gravity="center_vertical"/></LinearLayout><HorizontalScrollViewandroid:layout_width="match_parent"android:layout_height="0dp"android:layout_weight="3"android:layout_margin="10dp"android:background="@drawable/log"><LinearLayoutandroid:id="@+id/iconlayout"android:layout_width="wrap_content"android:layout_height="wrap_content"android:orientation="horizontal"></LinearLayout></HorizontalScrollView><LinearLayoutandroid:layout_width="match_parent"android:layout_height="0dp"android:layout_weight="2"><ImageViewandroid:id="@+id/addimg"android:layout_width="match_parent"android:layout_height="80dp"android:layout_marginLeft="150dp"android:layout_marginRight="150dp"android:src="@drawable/xiangji"/></LinearLayout><LinearLayoutandroid:layout_width="match_parent"android:layout_height="0dp"android:layout_weight="1"><Buttonandroid:id="@+id/submit"android:layout_width="match_parent"android:layout_height="50dp"android:layout_marginLeft="50dp"android:layout_marginRight="50dp"android:text="提交"android:textColor="@color/white"android:background="@drawable/point_logbtn"/></LinearLayout></LinearLayout>动态开启摄像机权限:public void openCamera() {Intent intent = new Intent(MediaStore.ACTION_IMAGE_CAPTURE);intent.setAction(MediaStore.ACTION_IMAGE_CAPTURE);intent.addCategory(Intent.CATEGORY_DEFAULT);//intent.addFlags(Intent.FLAG_ACTIVITY_NEW_TASK);// intent.addFlags(Intent.FLAG_GRANT_READ_URI_PERMISSION);uri = getImageUri();intent.putExtra(MediaStore.EXTRA_OUTPUT, uri);startActivityForResult(intent, 1);}public Uri getImageUri() {File refile=new File(Environment.getExternalStoragePublicDirectory(Environment.DIRECTORY_DCIM),"path");if (!refile.exists()){refile.mkdirs();}imaname=System.currentTimeMillis()+".png";file = new File(refile, imaname);if (!file.getParentFile().exists()) {file.getParentFile().mkdirs();}String path = file.getPath();if (Build.VERSION.SDK_INT < Build.VERSION_CODES.N) {listpath.add(path);uri = Uri.fromFile(file);} else {//兼容android7.0 使⽤共享⽂件的形式// uri= FileProvider.getUriForFile(MainPage.this, "com.example.appmanager.fileProvider", file);ContentValues contentValues = new ContentValues(1);contentValues.put(MediaStore.Images.Media.DATA, path);uri = this.getApplication().getContentResolver().insert(MediaStore.Images.Media.EXTERNAL_CONTENT_URI, contentValues); }return uri;}/*** 回调* @param requestCode* @param resultCode* @param data*/@SuppressLint("ResourceType")@Overrideprotected void onActivityResult(int requestCode, int resultCode, @Nullable Intent data) {super.onActivityResult(requestCode, resultCode, data);if (requestCode==1){youtParams lytp = new youtParams(300,400);ImageView imageView=new ImageView(this);lytp.setMargins(10,10,0,0);imageView.setLayoutParams(lytp);LinearLayout layout= ((LinearLayout) this.findViewById(R.id.iconlayout));imageView.setOnClickListener(new View.OnClickListener() {@Overridepublic void onClick(View v) {LayoutInflater inflater = LayoutInflater.from(CamerIcon.this);View imgEntryView = inflater.inflate(rgeicon, null); // 加载⾃定义的布局⽂件final AlertDialog dialog = new AlertDialog.Builder(CamerIcon.this).create();ImageView img = imgEntryView.findViewById(rge_image);Bitmap bitmap = ((BitmapDrawable) imageView.getDrawable()).getBitmap();img.setImageBitmap(bitmap);dialog.setView(imgEntryView); // ⾃定义dialogdialog.show();// 点击布局⽂件(也可以理解为点击⼤图)后关闭dialog,这⾥的dialog不需要按钮imgEntryView.setOnClickListener(new View.OnClickListener() {public void onClick(View paramView) {dialog.cancel();}});}});imageView.setOnLongClickListener(new View.OnLongClickListener() {@Overridepublic boolean onLongClick(View v) {new AlertDialog.Builder(CamerIcon.this).setIcon(android.R.drawable.ic_dialog_alert).setTitle("提⽰").setMessage("你确定要删除吗").setPositiveButton("确定", new DialogInterface.OnClickListener() {public void onClick(DialogInterface dialog, int whichButton) {layout.removeView(imageView);if (list.size()>0){int j=0;//需求是删除B和DIterator<Icon> iterator = list.iterator();while (iterator.hasNext()) {Icon value = iterator.next();if (value.getImageID()==v.getId()) {iterator.remove();Log.e("======", value + "已经移除");}}}// finish();//Exit Activity}}).setNegativeButton("取消", new DialogInterface.OnClickListener() {public void onClick(DialogInterface dialog, int whichButton) {}}).create().show();return true;}});layout.addView(imageView);imageView.setImageURI(uri);imageView.setBackgroundResource(R.drawable.log);}if (requestCode==2 && data != null){//获取图⽚路径Uri selectedImage = data.getData();String[] filePathColumns = {MediaStore.Images.Media.DATA};Cursor c = getContentResolver().query(selectedImage, filePathColumns, null, null, null);c.moveToFirst();int columnIndex = c.getColumnIndex(filePathColumns[0]);String imagePath = c.getString(columnIndex);Bitmap bm = BitmapFactory.decodeFile(imagePath);// img.setImageBitmap(bm);c.close();}}@Overridepublic void onRequestPermissionsResult(int requestCode, @NonNull String[] permissions, @NonNull int[] grantResults) {super.onRequestPermissionsResult(requestCode, permissions, grantResults);if(permissions[0].equals(Manifest.permission.CAMERA)){if(grantResults[0]== PackageManager.PERMISSION_GRANTED){Toast.makeText(CamerIcon.this,"已授权",Toast.LENGTH_SHORT).show();}else {Toast.makeText(this, "授权失败", Toast.LENGTH_SHORT).show();}}}/*** 判断是否授权开启摄像机功能*/private void isOpenPhoto(){if (Build.VERSION.SDK_INT >= 23) {int REQUEST_CODE_CONTACT = 101;String[] permissions = {Manifest.permission.WRITE_EXTERNAL_STORAGE};//验证是否许可权限for (String str : permissions) {if (CamerIcon.this.checkSelfPermission(str) != PackageManager.PERMISSION_GRANTED) {//申请权限CamerIcon.this.requestPermissions(permissions, REQUEST_CODE_CONTACT);return;} }}if(Build.VERSION.SDK_INT>=23){ActivityCompat.requestPermissions(CamerIcon.this,new String[]{Manifest.permission.CAMERA},0);int permission = ContextCompat.checkSelfPermission(CamerIcon.this.getApplicationContext(), Manifest.permission.CAMERA);if(permission== PackageManager.PERMISSION_GRANTED){//如果有了相机的权限就调⽤相机}else {AlertDialog.Builder builder=new AlertDialog.Builder(CamerIcon.this);builder.setTitle("提⽰");builder.setMessage("是否开启相机权限");builder.setPositiveButton("是", new DialogInterface.OnClickListener() {@Overridepublic void onClick(DialogInterface dialog, int which) {//去请求相机权限ActivityCompat.requestPermissions(CamerIcon.this,new String[]{Manifest.permission.CAMERA},0);}});builder.setNegativeButton("否", new DialogInterface.OnClickListener() {@Overridepublic void onClick(DialogInterface dialog, int which) {Toast.makeText(CamerIcon.this, "您拒绝了开启相机权限", Toast.LENGTH_SHORT).show();}});builder.show();}}}将图⽚上传到服务器的⽅法:public void uploading(View view,String url,File file) {//创建RequestBody封装参数RequestBody fileBody = RequestBody.create(MediaType.parse("image/png"), file);// MediaType.parse("image/jpeg")//application/octet-stream //创建MultipartBody,给RequestBody进⾏设置MultipartBody multipartBody = new MultipartBody.Builder().setType(MultipartBody.FORM).addFormDataPart("file",file.getName(), fileBody).build();//创建RequestRequest request = new Request.Builder().url(url)//"ip:1111/Api/App/ImgUpload?UId=7".post(multipartBody).build();//创建okhttp对象OkHttpClient okHttpClient = new OkHttpClient.Builder().connectTimeout(10, TimeUnit.SECONDS).readTimeout(10, TimeUnit.SECONDS).writeTimeout(10, TimeUnit.SECONDS).build();//上传完图⽚,得到服务器反馈数据okHttpClient.newCall(request).enqueue(new Callback() {@Overridepublic void onFailure(Call call, IOException e) {Log.e("ff", "uploadMultiFile() e=" + e);}@Overridepublic void onResponse(Call call, Response response) throws IOException { Log.i("ff", "uploadMultiFile() response=" + response.body().string());}});}效果:。

Java向服务器上传图⽚在⽐较绚丽多彩的⽹站或者业务逻辑⽐较丰富的程序设计过程中,图⽚的相关操作时必不少的,尤其时图⽚的上传。
还没有彻底摆脱纸质办公可能需要将纸质的⽂件备份上传,⽹站的建设可能需要上传⽤户头像、图⽚描述等等,这些都需要将图⽚从本地上传到⽹上(服务器)。
下⾯将介绍笔者今天在做图⽚上传过程中所遇到的坑~⼀、业务描述 业务要求是将机器在不断⽣产的照⽚上传到⽹上,以便于能在⽹站上查看。
⼆、解决思路 由于对图⽚这⼀块的处理已经⽐较⽣疏,所以打算⼀点⼀点解决这些业务需求。
⾸先将业务分解为以下⼏个部分: (1)服务器接收浏览器端上传的图⽚。
这⼀点⽐较好实现,因为服务器端的开发⼤多数都是基于B/S架构的,也就是逻辑与浏览器端进⾏开发的。
(2)服务器接收客户端上传的图⽚。
这⼀点看似也不难,但是如何正确的发送出数据确是有点难度,也是笔者今天踩坑的地⽅。
(3)业务逻辑的优化完善。
三、服务器接收浏览器端上传的图⽚ 1、新建⽹页1<!DOCTYPE html>2<html>3<head>4<meta charset="UTF-8">5<title>图⽚上传</title>6</head>7<body>8<form action="/plant/upload.action" enctype="multipart/form-data"9 method="post">10图⽚:<input type="file" name="img"/><br/>11<input type="submit" value="上传"/>12</form>13</body>14</html>查看代码 此处需要注意的是 form标签enctype属性的添加,还有就是input输⼊框中name属性的设置,这与后台的代码相对应。

有时我们可以看到,图片往往被提交到服务器端,这里我通过XFire框架来实现远程上传以及下载图片的功能。
首先我们来看看从服务器端下载图片的功能:这里用的是KSOAP框架,就不多说了,贴上代码。
首先我们看看Acitivity中的代码:1.ackage .connect.app;2.import java.io.File;3.import java.io.FileInputStream;4.import android.app.Activity;5.import android.graphics.Bitmap;6.import android.graphics.BitmapFactory;7.import android.os.Bundle;8.import android.view.View;9.import android.view.View.OnClickListener;10.import android.widget.Button;11.import android.widget.ImageView;12.import android.widget.Toast;13.import com.base.encry.decry.app.Base64;14.import com.base.file.util.FileOperate;15.import .blogs.ksoap.app.MyWebServiceHelper;16.public class UpAndDownPicFileActivity extends Activity {17.ImageView imageView;18.public static final String filename = "xfire.png";19.public static final String fileDir = "/sdcard/xmlfile/";20.public MyWebServiceHelper myWebServiceHelper = newMyWebServiceHelper();21.@Override22.protected void onCreate(Bundle savedInstanceState) {23.// TODO Auto-generated method stub24.super.onCreate(savedInstanceState);25.setContentView(yout.upanddownpic);26.imageView = (ImageView) this.findViewById(R.id.imageView1);27.// Bitmap28.//bitmap=BitmapFactory.decodeFile("/sdcard/xmlfile/"+"xfire.png");29.// imageView.setImageBitmap(bitmap);30.Button downButton = (Button) findViewById(R.id.downbutton);31.downButton.setOnClickListener(new OnClickListener() {32.@Override33.public void onClick(View v) {34.// TODO Auto-generated method stub35.myWebServiceHelper.getTranferFileString(filename);36.// 收到服务器端发送过来的图片,然后显现在图片框中37.Bitmap bitmap = BitmapFactory.decodeFile(fileDir + filename);38.imageView.setImageBitmap(bitmap);39.}复制代码分别实现了远程上传和下载图片的功能。

微信⼩程序上传图⽚到服务器实例代码上传图⽚到服务器:1.先在前端写⼀个选择图⽚的区域来触发wx.chooseImage接⼝并⽤wx.setStorage接⼝把图⽚路径存起来。
-wxml<view class="shangchuan" bindtap="choose"><image style="width:100%;height:100%;" src="{{tempFilePaths}}"></image></view><button formType='submit' class="fabu">发布项⽬</button>/**选择图⽚ */choose: function () {var that = thiswx.chooseImage({count: 1,sizeType: ['original', 'compressed'], // 可以指定是原图还是压缩图,默认⼆者都有sourceType: ['album', 'camera'], // 可以指定来源是相册还是相机,默认⼆者都有success: function (res) {var tempFilePaths = res.tempFilePathsthat.setData({tempFilePaths: res.tempFilePaths})console.log(res.tempFilePaths)wx.setStorage({ key: "card", data: tempFilePaths[0] })}})},2.使⽤wx.uploadFile将刚才上传的图⽚上传到服务器上formSubmit2: function (e) {var that = thisvar card = wx.getStorageSync('card')wx.uploadFile({url: app.globalData.create_funds,filePath: card,name: 'card',formData: {'user_id': er_id,'person': e.detail.value.person,'company': pany,},success: function (res) {console.log(res)}})}}},PS:微信⼩程序上传⼀或多张图⽚⼀.要点1.选取图⽚wx.chooseImage({sizeType: [], // original 原图,compressed 压缩图,默认⼆者都有sourceType: [], // album 从相册选图,camera 使⽤相机,默认⼆者都有success: function (res) {console.log(res);var array = res.tempFilePaths, //图⽚的本地⽂件路径列表}})2.上传图⽚wx.uploadFile({url: '', //开发者服务器的 urlfilePath: '', // 要上传⽂件资源的路径 String类型name: 'uploadFile', // ⽂件对应的 key ,(后台接⼝规定的关于图⽚的请求参数)header: {'content-type': 'multipart/form-data'}, // 设置请求的 headerformData: { }, // HTTP 请求中其他额外的参数success: function (res) {},fail: function (res) {}})⼆.代码⽰例// 点击上传图⽚upShopLogo: function () {var that = this;wx.showActionSheet({itemList: ['从相册中选择', '拍照'],itemColor: "#f7982a",success: function (res) {if (!res.cancel) {if (res.tapIndex == 0) {that.chooseWxImageShop('album')} else if (res.tapIndex == 1) {that.chooseWxImageShop('camera')}}}})},chooseWxImageShop: function (type) {var that = this;wx.chooseImage({sizeType: ['original', 'compressed'],sourceType: [type],success: function (res) {/*上传单张that.data.orderDetail.shopImage = res.tempFilePaths[0],that.upload_file(API_URL + 'shop/shopIcon', res.tempFilePaths[0])*//*上传多张(遍历数组,⼀次传⼀张)for (var index in res.tempFilePaths) {that.upload_file(API_URL + 'shop/shopImage', res.tempFilePaths[index])}*/}})},upload_file: function (url, filePath) {var that = this;wx.uploadFile({url: url,filePath: filePath,name: 'uploadFile',header: {'content-type': 'multipart/form-data'}, // 设置请求的 headerformData: { 'shopId': wx.getStorageSync('shopId') }, // HTTP 请求中其他额外的 form data success: function (res) {wx.showToast({title: "图⽚修改成功",icon: 'success',duration: 700})},fail: function (res) {}})},总结以上所述是⼩编给⼤家介绍的微信⼩程序上传图⽚到服务器实例代码,希望对⼤家有所帮助,如果⼤家有任何疑问请给我留⾔,⼩编会及时回复⼤家的。
android上传图片至服务器本实例实现了android上传手机图片至服务器,服务器进行保存服务器servlet代码publicvoid doPost(HttpServletRequest request, HttpServletResponse response) throws ServletException, IOException {String temp=request.getSession().getServletContext().getRealPath("/") +"temp"; //临时目录System.out.println("temp="+temp);String loadpath=request.getSession().getServletContext().getRealPath(" /")+"Image"; //上传文件存放目录System.out.println("loadpath="+loadpath);DiskFileUpload fu =new DiskFileUpload();fu.setSizeMax(1*1024*1024); // 设置允许用户上传文件大小,单位:字节fu.setSizeThreshold(4096); // 设置最多只允许在内存中存储的数据,单位:字节fu.setRepositoryPath(temp); // 设置一旦文件大小超过getSizeThresh old()的值时数据存放在硬盘的目录//开始读取上传信息int index=0;List fileItems =null;try{fileItems = fu.parseRequest(reques t);System.out.println("fileItems="+fi leItems);} catch(Exception e) {e.printStackTrace();}Iterator iter = fileItems.iterator(); // 依次处理每个上传的文件while(iter.hasNext()){FileItem item = (FileItem)iter.next();// 忽略其他不是文件域的所有表单信息if(!item.isFormField()){String name = item.getName();//获取上传文件名,包括路径name=name.substring(stIndexOf("\\")+1);//从全路径中提取文件名long size = item.getSize();if((name==null||name.equals("")) && size==0)continue;int point = name.indexOf(".");name=(new Date()).getTime()+name.substring(point,name.le ngth())+index;index++;File fNew=new File(loadpath, name);try{item.write(fNew);} catch(Exception e) {// TODO Auto-generated catch bl ocke.printStackTrace();}}else//取出不是文件域的所有表单信息{String fieldvalue = item.getString();//如果包含中文应写为:(转为UTF-8编码)//String fieldvalue = new String(item.getString().getBytes(), "UTF-8");}}String text1="11";response.sendRedirect("result.jsp?text1="+ text1);}android客户端代码publicclass PhotoUpload extends Activity {private String newName ="image.jpg";private String uploadFile ="/sdcard/image.JPG";private String actionUrl ="http://192.168.0.71:8086/HelloWord/myForm";private TextView mText1;private TextView mText2;private Button mButton;@Overridepublicvoid onCreate(Bundle savedInstanceState){super.onCreate(savedInstanceState);setContentView(yout.photo_upload);mText1 = (TextView) findViewById(R.id.myText2);//"文件路径:\n"+mText1.setText(uploadFile);mText2 = (TextView) findViewById(R.id.myText3);//"上传网址:\n"+mText2.setText(actionUrl);/* 设置mButton的onClick事件处理*/mButton = (Button) findViewById(R.id.myButton);mButton.setOnClickListener(new View.OnClickListener(){publicvoid onClick(View v){uploadFile();}});}/* 上传文件至Server的方法*/privatevoid uploadFile(){String end ="\r\n";String twoHyphens ="--";String boundary ="*****";try{URL url =new URL(actionUrl);HttpURLConnection con=(HttpURLConnection)url.openConnection();/* 允许Input、Output,不使用Cache */con.setDoInput(true);con.setDoOutput(true);con.setUseCaches(false);/* 设置传送的method=POST */con.setRequestMethod("POST");/* setRequestProperty */con.setRequestProperty("Connection", "Keep-Alive");con.setRequestProperty("Charset", "UTF-8");con.setRequestProperty("Content-Type","multipart/form-data;boundary="+boundary);/* 设置DataOutputStream */DataOutputStream ds =new DataOutputStream(con.getOutputStream());ds.writeBytes(twoHyphens + boundary + end);ds.writeBytes("Content-Disposition: form-data; "+"name=\"file1\";filename=\""+newName +"\""+ end);ds.writeBytes(end);/* 取得文件的FileInputStream */FileInputStream fStream =new FileInputStream(uploadFile);/* 设置每次写入1024bytes */int bufferSize =1024;byte[] buffer =newbyte[bufferSize];int length =-1;/* 从文件读取数据至缓冲区*/while((length = fStream.read(buffer)) !=-1){/* 将资料写入DataOutputStream中*/ds.write(buffer, 0, length);}ds.writeBytes(end);ds.writeBytes(twoHyphens + boundary + twoHyphens + end);/* close streams */fStream.close();ds.flush();/* 取得Response内容*/InputStream is = con.getInputStream();int ch;StringBuffer b =new StringBuffer();while( ( ch = is.read() ) !=-1 ){b.append( (char)ch );}/* 将Response显示于Dialog */showDialog("上传成功"+b.toString().trim());/* 关闭DataOutputStream */ds.close();}catch(Exception e){showDialog("上传失败"+e);}}/* 显示Dialog的method */privatevoid showDialog(String mess){new AlertDialog.Builder(PhotoUpload.this).setTitle("Message").setMessage(mess).setNegativeButton("确定",new DialogInterface.OnClickListener() {publicvoid onClick(DialogInterface dialog, int which){}}).show();}}。