HttpClient 4 实现文件下载
- 格式:doc
- 大小:37.50 KB
- 文档页数:2

使⽤HttpClient实现⽂件的上传下载⽅法1 HTTPHTTP 协议可能是现在 Internet 上使⽤得最多、最重要的协议了,越来越多的 Java 应⽤程序需要直接通过 HTTP 协议来访问⽹络资源。
虽然在 JDK 的 包中已经提供了访问 HTTP 协议的基本功能,但是对于⼤部分应⽤程序来说,JDK 库本⾝提供的功能还不够丰富和灵活。
HttpClient ⽤来提供⾼效的、最新的、功能丰富的⽀持 HTTP 协议的客户端编程⼯具包,并且它⽀持HTTP 协议最新的版本和建议。
⼀般的情况下我们都是使⽤Chrome或者其他浏览器来访问⼀个WEB服务器,⽤来浏览页⾯查看信息或者提交⼀些数据、⽂件上传下载等等。
所访问的这些页⾯有的仅仅是⼀些普通的页⾯,有的需要⽤户登录后⽅可使⽤,或者需要认证以及是⼀些通过加密⽅式传输,例如HTTPS。
⽬前我们使⽤的浏览器处理这些情况都不会构成问题。
但是⼀旦我们有需求不通过浏览器来访问服务器的资源呢?那该怎么办呢?下⾯以本地客户端发起⽂件的上传、下载为例做个⼩Demo。
HttpClient有两种形式,⼀种是org.apache.http下的,⼀种是mons.httpclient.HttpClient。
2 ⽂件上传⽂件上传可以使⽤两种⽅式实现,⼀种是PostMethod⽅式,⼀种是HttpPost⽅式。
两者的处理⼤同⼩异。
PostMethod是使⽤FileBody将⽂件包装流包装起来,HttpPost是使⽤FilePart将⽂件流包装起来。
在传递⽂件流给服务端的时候,都可以同时传递其他的参数。
2.1 客户端处理2.1.1 PostMethod⽅式将⽂件封装到FilePart中,放⼊Part数组,同时,其他参数可以放⼊StringPart中,这⾥没有写,只是单纯的将参数以setParameter的⽅式进⾏设置。
此处的HttpClient是mons.httpclient.HttpClient。
实现HTTP⽂件下载
HTTP实现⽂件下载时,只要在服务器设置好相关响应头,并使⽤⼆进制传输⽂件数据即可,⽽客户端(浏览器)会根据响应头接收⽂件数据。
⽽在Node.js中,设置好响应头后,读取⽂件流,再使⽤“.pipe()”⽅法将流转接到响应对象Response就可以实现⼀个简单的⽂件下载服务器。
1. ⽂件下载介绍
HTTP基于请求头和响应头实现状态交互,在得到服务器正确响应状态后,⽽客户端⾸先会解析响应头,并根据响应头来接收和展⽰数据(响应体)。
对于⽂件下载来说,其实现过程如下:
1.客户端发起⽂件资源请求
2.服务器查找对应⽂件,并设置”Content-Type”、”Content-Disposition”等响应头,分别⽤于表⽰⽂件的”MIME”类型及⽂件描述
3.客户端根据服务器返回的响应头解析和接收⽂件数据
需要设置的响应头
设置⽂件下载响应头时,除了常⽤的HTTP响应头外,⽐较重要是还要设置以下两个响应头:
1 2Content-Type: application/octet-stream
Content-Disposition: attachment; filename=MyFileName.ext
在上⾯的设置中,”Content-Type: application/octet-stream”告诉浏览器这是⼀个⼆进制⽂件,”Content-Disposition”告诉浏览器这是⼀个需要下载的附件并告诉浏览器默认的⽂件名。
如果不添加”Content-Disposition”响应头,浏览器可能会下载或显⽰⽂件内容,不同浏览器的处理有所不同。

http协议下载⽂件1. 通过在 URL 上调⽤ openConnection ⽅法创建连接对象。
(HttpURLConnection conn = (HttpURLConnection)new URL("⽹址").openConnection();)2. 处理设置参数和⼀般请求属性。
(conn.setRequestProperty())3. 使⽤ connect ⽅法建⽴到远程对象的实际连接。
(conn.connect())4. 远程对象变为可⽤。
远程对象的头字段和内容变为可访问。
(conn.getHeaderField(),conn.getInputStream等⽅法对连接进⾏操作)下⾯是对⽂件下载的具体实现案例(单线程):HttpURLConnection conn = (HttpURLConnection)new URL("资源⽹址").openConnection();conn.connect();InputStream is = connection.getInputStream();FileOutputStream os = new FileOutputStream("保存路径");int count = 1024;if(connection.getResponseCode()==200){while ((count = is.read(b))!=-1) {os.write(b,0,count);}os.close();is.close();}多线程要设置的头⽂件:connection.setRequestProperty("Range", "bytes=0-4194304");/*有个疑惑:代码这样写的话,出现⽂件下载不全。
while (count==1024) {count = is.read(b)os.write(b,0,count);}*/。
Struts2 结合HttpClient 实现远程服务器文件下载1、只实现远程文件下载未处理远程服务器连接失败的状态1.1、页面配置部分<button id="download" class="button" onclick="window.location.href = 'downlo adExample.action';return false;">下载模板</button><s:submit id="importButton" value="上传文件" theme="simple" cssClass="butto n"></s:submit><s:reset value="重置路径" theme="simple" cssClass="button" ></s:reset> 1.2、Struts2配置文件部分<!--下载模板--><action name="downloadExample" class="com.web.action.file.ImportAction "><param name="downFileName">文件下载.xls</param><result name="success" type="stream"><param name="contentType">application/vnd.ms-excel</param><param name="contentDisposition">attachment;filename="${downl oadName}"</param><param name="inputName">downloadFile</param><param name="bufferSize">4096</param></result></action>1.3、Action层中获取远程服务器文件流程序部分public class ImportAction{private String downFileName;private String downloadName;IFileServicefileService;/*** @paramfileService the fileService to set*/public void setEztFileService(IFileServicefileService) {this.fileService = fileService;}/*** @return the downFileName*/public String getDownFileName() {return downFileName;}/*** @paramdownFileName the downFileName to set*/public void setDownFileName(String downFileName) {this.downFileName = downFileName;}/*** @return the downloadName*/public String getDownloadName() {return downloadName;}/*** @paramdownloadName the downloadName to set*/public void setDownloadName(String downloadName) {this.downloadName = downloadName;}public InputStreamgetDownloadFile(){downloadName = fileService.getDownloadFileName(downFileName); //下载文件显示名称转编码Properties properties = ResourceUtil.getProperties("file.properties");//取得远程服务器信息配置属性文件file.properties文件为自定义文件放置在web项目src/conf文件夹下String strRemoteFileUrl = properties.getProperty("serverPath")+ propertie s.getProperty("templateName"); //取得远程文件路径InputStream in = fileService.getDownloadFile(strRemoteFileUrl); //调用S ervice层方法取得远程服务器文件流return in;}}1.4、Service层接口实现public class FileService implements IFileService {public String getDownloadFileName(String downFileName) { //解决下载文件名称中文乱码问题try {downFileName = new String(downFileName.getBytes(), "ISO-8859-1 ");} catch (UnsupportedEncodingException e) {e.printStackTrace();}return downFileName;}publicInputStreamgetDownloadFile(String strRemoteFileUrl) {// TODO Auto-generated method stubHttpClient client = new HttpClient();GetMethodhttpGet = new GetMethod(strRemoteFileUrl);InputStream in = null;try {intintResponseCode = client.executeMethod(httpGet);in = httpGet.getResponseBodyAsStream();} catch (HttpException e) {// TODO Auto-generated catch block//记录日志} catch (IOException e) {// TODO Auto-generated catch block//记录日志}return in;}}1.5、读取properties文件工具类部分public class ResourceUtil {public static Properties getProperties(String fileName) {try {Properties properties = new Properties();ClassLoader cl = Thread.currentThread().getContextClassLoader();properties.load(cl.getResourceAsStream(fileName));return properties;} catch (Exception ex) {ex.printStackTrace();}return null;}}1.6、总结:此项实现,在文件服务器运行正常的情况下文件下载正常,如果文件服务器运行异常或已停止运行则在jsp页面部分将会抛出异常。
ApacheHttpClient4使⽤教程基于HttpClient 4.5.21. 执⾏GET请求CloseableHttpClient httpClient = HttpClients.custom().build();CloseableHttpResponse response = httpClient.execute(new HttpGet("https://"));System.out.println(EntityUtils.toString(response.getEntity()));2. 执⾏POST请求1. 提交form表单参数CloseableHttpClient httpClient = HttpClients.custom().build();HttpPost httpPost = new HttpPost("https://");List<NameValuePair> formParams = new ArrayList<NameValuePair>();//表单参数formParams.add(new BasicNameValuePair("name1", "value1"));formParams.add(new BasicNameValuePair("name2", "value2"));UrlEncodedFormEntity entity = new UrlEncodedFormEntity(formParams, "utf-8");httpPost.setEntity(entity);CloseableHttpResponse response = httpClient.execute(httpPost);System.out.println(EntityUtils.toString(response.getEntity()));2. 提交payload参数CloseableHttpClient httpClient = HttpClients.custom().build();HttpPost httpPost = new HttpPost("https://");StringEntity entity = new StringEntity("{\"id\": \"1\"}");httpPost.setEntity(entity);CloseableHttpResponse response = httpClient.execute(httpPost);System.out.println(EntityUtils.toString(response.getEntity()));3. post上传⽂件CloseableHttpClient httpClient = HttpClients.custom().build();HttpPost httpPost = new HttpPost("https://");MultipartEntityBuilder multipartEntityBuilder = MultipartEntityBuilder.create();//要上传的⽂件multipartEntityBuilder.addBinaryBody("file", new File("temp.txt"));httpPost.setEntity(multipartEntityBuilder.build());CloseableHttpResponse response = httpClient.execute(httpPost);System.out.println(EntityUtils.toString(response.getEntity()));4. post提交multipart/form-data类型参数CloseableHttpClient httpClient = HttpClients.custom().build();HttpPost httpPost = new HttpPost("https://");MultipartEntityBuilder multipartEntityBuilder = MultipartEntityBuilder.create();multipartEntityBuilder.addTextBody("username","wycm");multipartEntityBuilder.addTextBody("passowrd","123");//⽂件multipartEntityBuilder.addBinaryBody("file", new File("temp.txt"));httpPost.setEntity(multipartEntityBuilder.build());CloseableHttpResponse response = httpClient.execute(httpPost);System.out.println(EntityUtils.toString(response.getEntity()));3. 设置User-AgentCloseableHttpClient httpClient = HttpClients.custom().setUserAgent("Mozilla/5.0").build();CloseableHttpResponse response = httpClient.execute(new HttpGet("https://"));System.out.println(EntityUtils.toString(response.getEntity()));4. 设置重试处理器当请求超时, 会⾃动重试,最多3次HttpRequestRetryHandler retryHandler = (exception, executionCount, context) -> {if (executionCount >= 3) {return false;}if (exception instanceof InterruptedIOException) {return true;}if (exception instanceof UnknownHostException) {return true;}if (exception instanceof ConnectTimeoutException) {return true;}if (exception instanceof SSLException) {return true;}HttpClientContext clientContext = HttpClientContext.adapt(context);HttpRequest request = clientContext.getRequest();boolean idempotent = !(request instanceof HttpEntityEnclosingRequest);if (idempotent) {return true;}return false;};CloseableHttpClient httpClient = HttpClients.custom().setRetryHandler(retryHandler).build();httpClient.execute(new HttpGet("https://"));5. 重定向策略1. HttpClient默认情况会对302、307的GET和HEAD请求以及所有的303状态码做重定向处理2. 关闭⾃动重定向CloseableHttpClient httpClient = HttpClients.custom()//关闭httpclient重定向.disableRedirectHandling().build();3. POST⽀持302状态码重定向CloseableHttpClient httpClient = HttpClients.custom()//post 302⽀持重定向.setRedirectStrategy(new LaxRedirectStrategy()).build();CloseableHttpResponse response = httpClient.execute(new HttpPost("https://"));System.out.println(EntityUtils.toString(response.getEntity()));6. 定制cookie⽅式⼀:通过addHeader⽅式设置(不推荐这种⽅式)CloseableHttpClient httpClient = HttpClients.custom().build();HttpGet httpGet = new HttpGet("");httpGet.addHeader("Cookie", "name=value");httpClient.execute(httpGet);由于HttpClient默认会维护cookie状态。
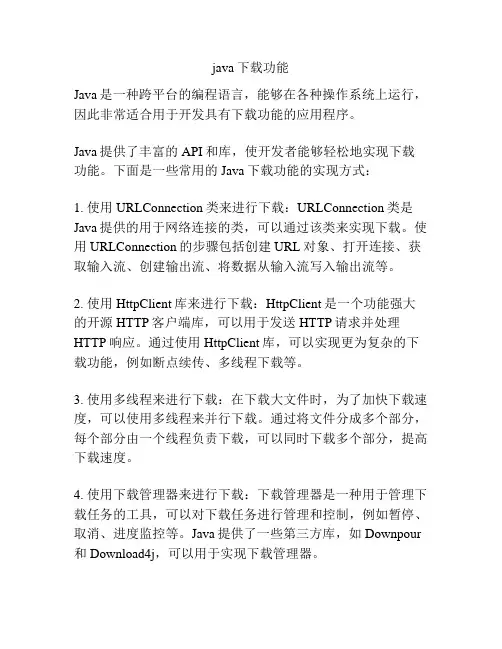
java下载功能Java是一种跨平台的编程语言,能够在各种操作系统上运行,因此非常适合用于开发具有下载功能的应用程序。
Java提供了丰富的API和库,使开发者能够轻松地实现下载功能。
下面是一些常用的Java下载功能的实现方式:1. 使用URLConnection类来进行下载:URLConnection类是Java提供的用于网络连接的类,可以通过该类来实现下载。
使用URLConnection的步骤包括创建URL对象、打开连接、获取输入流、创建输出流、将数据从输入流写入输出流等。
2. 使用HttpClient库来进行下载:HttpClient是一个功能强大的开源HTTP客户端库,可以用于发送HTTP请求并处理HTTP响应。
通过使用HttpClient库,可以实现更为复杂的下载功能,例如断点续传、多线程下载等。
3. 使用多线程来进行下载:在下载大文件时,为了加快下载速度,可以使用多线程来并行下载。
通过将文件分成多个部分,每个部分由一个线程负责下载,可以同时下载多个部分,提高下载速度。
4. 使用下载管理器来进行下载:下载管理器是一种用于管理下载任务的工具,可以对下载任务进行管理和控制,例如暂停、取消、进度监控等。
Java提供了一些第三方库,如Downpour 和Download4j,可以用于实现下载管理器。
5. 使用流式处理来进行下载:在Java中,可以使用流式处理来处理大文件的下载。
通过使用BufferedInputStream和BufferedOutputStream,可以将下载的文件分块读取并写入本地文件,避免一次性读取整个文件导致内存溢出。
总之,Java提供了多种方式来实现下载功能,开发者可以根据需求选择合适的方法来实现。
通过合理利用Java的API和库,能够实现高效、安全的下载功能,并提供给用户优质的下载体验。
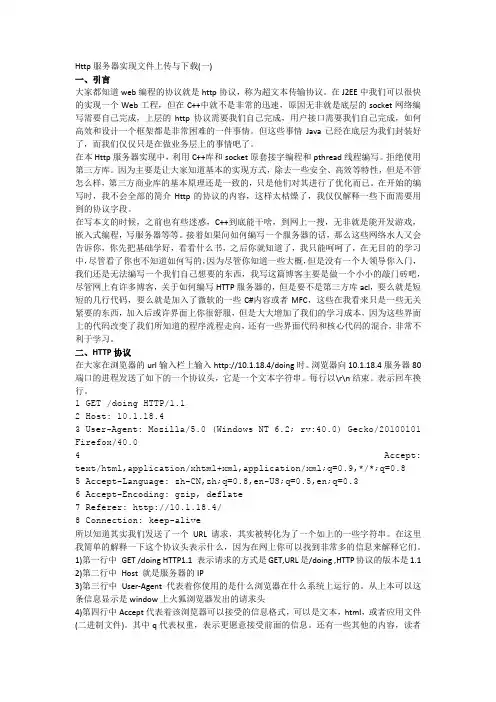
Http服务器实现文件上传与下载(一)一、引言大家都知道web编程的协议就是http协议,称为超文本传输协议。
在J2EE中我们可以很快的实现一个Web工程,但在C++中就不是非常的迅速,原因无非就是底层的socket网络编写需要自己完成,上层的http协议需要我们自己完成,用户接口需要我们自己完成,如何高效和设计一个框架都是非常困难的一件事情。
但这些事情Java已经在底层为我们封装好了,而我们仅仅只是在做业务层上的事情吧了。
在本Http服务器实现中,利用C++库和socket原套接字编程和pthread线程编写。
拒绝使用第三方库。
因为主要是让大家知道基本的实现方式,除去一些安全、高效等特性,但是不管怎么样,第三方商业库的基本原理还是一致的,只是他们对其进行了优化而已。
在开始的编写时,我不会全部的简介Http的协议的内容,这样太枯燥了,我仅仅解释一些下面需要用到的协议字段。
在写本文的时候,之前也有些迷惑,C++到底能干啥,到网上一搜,无非就是能开发游戏,嵌入式编程,写服务器等等。
接着如果问如何编写一个服务器的话,那么这些网络水人又会告诉你,你先把基础学好,看看什么书,之后你就知道了,我只能呵呵了,在无目的的学习中,尽管看了你也不知道如何写的,因为尽管你知道一些大概,但是没有一个人领导你入门,我们还是无法编写一个我们自己想要的东西,我写这篇博客主要是做一个小小的敲门砖吧,尽管网上有许多博客,关于如何编写HTTP服务器的,但是要不是第三方库acl,要么就是短短的几行代码,要么就是加入了微软的一些C#内容或者MFC,这些在我看来只是一些无关紧要的东西,加入后或许界面上你很舒服,但是大大增加了我们的学习成本,因为这些界面上的代码改变了我们所知道的程序流程走向,还有一些界面代码和核心代码的混合,非常不利于学习。
二、HTTP协议在大家在浏览器的url输入栏上输入http://10.1.18.4/doing时。
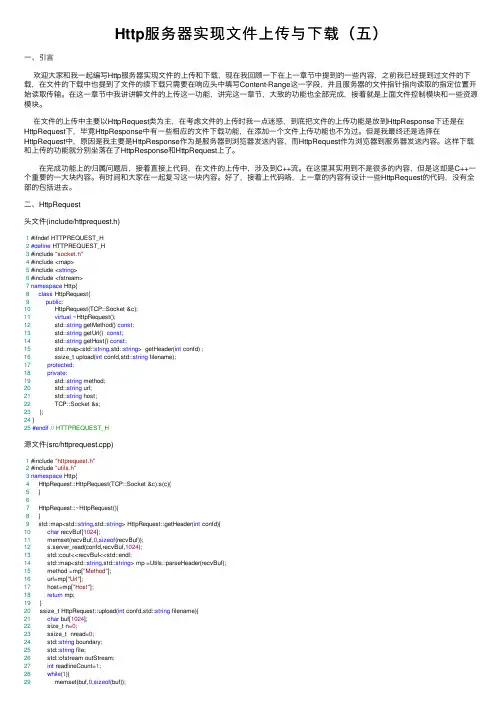
Http服务器实现⽂件上传与下载(五)⼀、引⾔欢迎⼤家和我⼀起编写Http服务器实现⽂件的上传和下载,现在我回顾⼀下在上⼀章节中提到的⼀些内容,之前我已经提到过⽂件的下载,在⽂件的下载中也提到了⽂件的续下载只需要在响应头中填写Content-Range这⼀字段,并且服务器的⽂件指针指向读取的指定位置开始读取传输。
在这⼀章节中我讲讲解⽂件的上传这⼀功能,讲完这⼀章节,⼤致的功能也全部完成,接着就是上⾯⽂件控制模块和⼀些资源模块。
在⽂件的上传中主要以HttpRequest类为主,在考虑⽂件的上传时我⼀点迷惑,到底把⽂件的上传功能是放到HttpResponse下还是在HttpRequest下,毕竟HttpResponse中有⼀些相应的⽂件下载功能,在添加⼀个⽂件上传功能也不为过。
但是我最终还是选择在HttpRequest中,原因是我主要是HttpResponse作为是服务器到浏览器发送内容,⽽HttpRequest作为浏览器到服务器发送内容。
这样下载和上传的功能就分别坐落在了HttpResponse和HttpRequest上了。
在完成功能上的归属问题后,接着直接上代码,在⽂件的上传中,涉及到C++流。
在这⾥其实⽤到不是很多的内容,但是这却是C++⼀个重要的⼀⼤块内容。
有时间和⼤家在⼀起复习这⼀块内容。
好了,接着上代码咯,上⼀章的内容有设计⼀些HttpRequest的代码,没有全部的包括进去。
⼆、HttpRequest头⽂件(include/httprequest.h)1 #ifndef HTTPREQUEST_H2#define HTTPREQUEST_H3 #include "socket.h"4 #include <map>5 #include <string>6 #include <fstream>7namespace Http{8class HttpRequest{9public:10 HttpRequest(TCP::Socket &c);11virtual ~HttpRequest();12 std::string getMethod() const;13 std::string getUrl() const;14 std::string getHost() const;15 std::map<std::string,std::string> getHeader(int confd) ;16 ssize_t upload(int confd,std::string filename);17protected:18private:19 std::string method;20 std::string url;21 std::string host;22 TCP::Socket &s;23 };24 }25#endif// HTTPREQUEST_H源⽂件(src/httprequest.cpp)1 #include "httprequest.h"2 #include "utils.h"3namespace Http{4 HttpRequest::HttpRequest(TCP::Socket &c):s(c){5 }67 HttpRequest::~HttpRequest(){8 }9 std::map<std::string,std::string> HttpRequest::getHeader(int confd){10char recvBuf[1024];11 memset(recvBuf,0,sizeof(recvBuf));12 s.server_read(confd,recvBuf,1024);13 std::cout<<recvBuf<<std::endl;14 std::map<std::string,std::string> mp =Utils::parseHeader(recvBuf);15 method =mp["Method"];16 url=mp["Url"];17 host=mp["Host"];18return mp;19 }20 ssize_t HttpRequest::upload(int confd,std::string filename){21char buf[1024];22 size_t n=0;23 ssize_t nread=0;24 std::string boundary;25 std::string file;26 std::ofstream outStream;27int readlineCount=1;28while(1){29 memset(buf,0,sizeof(buf));30 n=s.server_readline(confd,buf,sizeof(buf));31if(readlineCount==1){32 boundary=std::string(buf,buf+strlen(buf)-2);33 boundary+="--\r\n";34 std::cout<<boundary<<std::endl<<boundary.size();35 }else if(readlineCount==2){36int i=n;37while(buf[i]!='='){38if((buf[i]>='0'&&buf[i]<='9')39 ||(buf[i]>='a'&&buf[i]<='z')40 ||(buf[i]>='A'&&buf[i]<='Z')41 ||(buf[i]=='.'))42 i--;43else{44 buf[i]='*';45 i--;46 }47 }48 file=std::string(buf+i+2,buf+n-3);49 }else if(readlineCount==3){50 std::string rw;51 rw=std::string(buf,buf+strlen(buf));52int pos=rw.find('/');53 rw=rw.substr(0,pos);54 filename=filename+file;55if(rw=="Content-Type: text")56 outStream.open(filename.c_str());57else{58 outStream.open(filename.c_str(),std::ios::binary);59 std::cout<<"ios::binary"<<std::endl;60 }61 }else if(readlineCount==4){62 memset(buf,0,sizeof(buf));63while(1){64 n=s.server_readn(confd,buf,sizeof(buf));65if(n==boundary.size()&&strcmp(buf,boundary.c_str())==0){66goto exit;67 }68 nread+=n;69if(buf[n-1]==0){70 outStream.write(buf,n-1);71 }else{72 outStream.write(buf,n);73 }74 }75 }76 readlineCount++;77 }78 exit:79 outStream.close();80 s.server_close(confd);81return nread;82 }83 std::string HttpRequest::getMethod() const{84return method;85 }86 std::string HttpRequest::getUrl() const{87return url;88 }89 std::string HttpRequest::getHost() const{90return host;91 }92 }好了上传⽂件的代码也已经出来了,现在就是对其稍微的解释⼀下把。
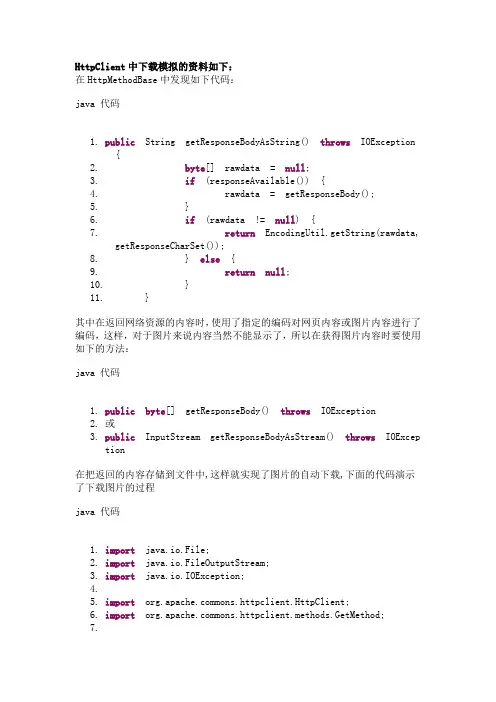
HttpClient中下载模拟的资料如下:在HttpMethodBase中发现如下代码:java 代码1.public String getResponseBodyAsString() throws IOException {2.byte[] rawdata = null;3.if (responseAvailable()) {4. rawdata = getResponseBody();5. }6.if (rawdata != null) {7.return EncodingUtil.getString(rawdata, getResponseCharSet());8. } else {9.return null;10. }11. }其中在返回网络资源的内容时,使用了指定的编码对网页内容或图片内容进行了编码,这样,对于图片来说内容当然不能显示了,所以在获得图片内容时要使用如下的方法:java 代码1.public byte[] getResponseBody() throws IOException2.或3.public InputStream getResponseBodyAsStream() throws IOException在把返回的内容存储到文件中,这样就实现了图片的自动下载,下面的代码演示了下载图片的过程java 代码1.import java.io.File;2.import java.io.FileOutputStream;3.import java.io.IOException;4.5.import mons.httpclient.HttpClient;6.import mons.httpclient.methods.GetMethod;7.8./**9. * 用HttpClient下载图片10. * @author wei11. */12.public class TestDownImage {13.14. public static void main(String[] args) throws IOException{15. HttpClient client = new HttpClient();16. GetMethod get = new GetMethod("/uiue/sohu_logo/beijing2008/2008sohu.gif");17. client.executeMethod(get);18. File storeFile = new File("c:/2008sohu.gif");19. FileOutputStream output = new FileOutputStream(storeFile);20. //得到网络资源的字节数组,并写入文件21. output.write(get.getResponseBody());22. output.close();23. }24.}。
java实现⽂件下载的两种⽅式本⽂实例为⼤家分享了java实现⽂件下载的具体代码,供⼤家参考,具体内容如下public HttpServletResponse download(String path, HttpServletResponse response) {try {// path是指欲下载的⽂件的路径。
File file = new File(path);// 取得⽂件名。
String filename = file.getName();// 取得⽂件的后缀名。
String ext = filename.substring(stIndexOf(".") + 1).toUpperCase();// 以流的形式下载⽂件。
InputStream fis = new BufferedInputStream(new FileInputStream(path));byte[] buffer = new byte[fis.available()];fis.read(buffer);fis.close();// 清空responseresponse.reset();// 设置response的Headerresponse.addHeader("Content-Disposition", "attachment;filename=" + new String(filename.getBytes()));response.addHeader("Content-Length", "" + file.length());OutputStream toClient = new BufferedOutputStream(response.getOutputStream());response.setContentType("application/octet-stream");toClient.write(buffer);toClient.flush();toClient.close();} catch (IOException ex) {ex.printStackTrace();}return response;}public void downloadLocal(HttpServletResponse response) throws FileNotFoundException {// 下载本地⽂件String fileName = "Operator.doc".toString(); // ⽂件的默认保存名// 读到流中InputStream inStream = new FileInputStream("c:/Operator.doc");// ⽂件的存放路径// 设置输出的格式response.reset();response.setContentType("bin");response.addHeader("Content-Disposition", "attachment; filename=\"" + fileName + "\"");// 循环取出流中的数据byte[] b = new byte[100];int len;try {while ((len = inStream.read(b)) > 0)response.getOutputStream().write(b, 0, len);inStream.close();} catch (IOException e) {e.printStackTrace();}}public void downloadNet(HttpServletResponse response) throws MalformedURLException {// 下载⽹络⽂件int bytesum = 0;int byteread = 0;URL url = new URL("/logo.gif");try {URLConnection conn = url.openConnection();InputStream inStream = conn.getInputStream();FileOutputStream fs = new FileOutputStream("c:/abc.gif");byte[] buffer = new byte[1204];int length;while ((byteread = inStream.read(buffer)) != -1) {bytesum += byteread;System.out.println(bytesum);fs.write(buffer, 0, byteread);}} catch (FileNotFoundException e) {e.printStackTrace();} catch (IOException e) {e.printStackTrace();}}//⽀持在线打开⽂件的⼀种⽅式public void downLoad(String filePath, HttpServletResponse response, boolean isOnLine) throws Exception { File f = new File(filePath);if (!f.exists()) {response.sendError(404, "File not found!");return;}BufferedInputStream br = new BufferedInputStream(new FileInputStream(f));byte[] buf = new byte[1024];int len = 0;response.reset(); // ⾮常重要if (isOnLine) { // 在线打开⽅式URL u = new URL("file:///" + filePath);response.setContentType(u.openConnection().getContentType());response.setHeader("Content-Disposition", "inline; filename=" + f.getName());// ⽂件名应该编码成UTF-8} else { // 纯下载⽅式response.setContentType("application/x-msdownload");response.setHeader("Content-Disposition", "attachment; filename=" + f.getName());}OutputStream out = response.getOutputStream();while ((len = br.read(buf)) > 0)out.write(buf, 0, len);br.close();out.close();}以上就是本⽂的全部内容,希望对⼤家的学习有所帮助,也希望⼤家多多⽀持。
⽂件上传下载原理:http协议分析及实现 我们现在⽤得⾮常多互联⽹下载⽂件,⾮常直观。
有⼀个下载按钮,然后我点击了下载,然后⽂件慢慢就下载到本地了。
就好像是⼀个复制的过程。
⽽既然是互联⽹,那么必然会是使⽤⽹络进⾏传输的。
那么到底是怎样传输的呢? 当然,下载⽂件有两种⽅式:⼀是直接针对某个⽂件资源进⾏下载,⽆需应⽤开发代码;⼆是应⽤代码临时⽣成需要的内容⽂件,然后输出给到下载端。
其中,直接下载资源⽂件的场景给我们感觉是下载就是针对这个⽂件本⾝的⼀个操作,和复制⼀样没有什么疑义。
⽽由应⽤代码进⾏下载⽂件时,⼜当如何处理呢?1. 上传下载⽂件demo 在⽹上你可以⾮常容易地找到相应的模板代码,然后处理掉。
基本的样⼦就是设置⼏个头信息,然后将数据写⼊到response中。
demo1. 服务端接收⽂件上传,并同时输出⽂件到客户端@PostMapping("fileUpDownTest")@ResponseBodypublic Object fileUpDownTest(@ModelAttribute EncSingleDocFileReqModel reqModel,MultipartFile file,HttpServletResponse response) {// 做两件事:1. 接收上传的⽂件; 2. 将⽂件下载给到上传端;// 即向双向⽂件的传输,下载的⽂件可以是你处理之后的任意⽂件。
String tmpPath = saveMultipartToLocalFile(file);outputEncFileStream(tmpPath, response);System.out.println("path:" + tmpPath);return null;}/*** 保存⽂件到本地路径** @param file ⽂件流* @return本地存储路径*/private String saveMultipartToLocalFile(MultipartFile file) {try (InputStream inputStream = file.getInputStream()){// 往临时⽬录写⽂件String fileSuffix = file.getOriginalFilename().substring(file.getOriginalFilename().lastIndexOf('.'));File tmpFile = File.createTempFile(file.getName(), ".tmp" + fileSuffix);FileUtils.copyInputStreamToFile(inputStream, tmpFile);return tmpFile.getCanonicalPath();}catch (Exception e){log.error("【加密⽂件】⽂件流处理失败:" + file.getName(), e);throw new EncryptSysException("0011110", "⽂件接收失败");}}/*** 输出⽂件流数据** @param encFileLocalPath ⽂件所在路径* @param response servlet io 流*/private void outputEncFileStream(String encFileLocalPath, HttpServletResponse response) {File outFile = new File(encFileLocalPath);OutputStream os = null;InputStream inputStream = null;try {response.reset();response.setHeader("Cache-Control", "no-cache, no-store, must-revalidate");// response.setHeader("Content-Length", file.getContentLength()+"");String outputFileName = encFileLocalPath.substring(stIndexOf('/') + 1);response.setHeader("Content-Disposition", String.format("attachment; filename=%s", URLEncoder.encode(outputFileName, "UTF-8")));response.setContentType("application/octet-stream; charset=utf-8");response.setHeader("Pragma", "no-cache");response.setHeader("Expires", "0");inputStream = new FileInputStream(outFile);//写⼊信息os = CommonUtil.readInputStream(inputStream, response.getOutputStream());}catch (Exception re) {log.error("输出⽂件流失败,", re);throw new RuntimeException("0011113: 输出加密后的⽂件失败");}finally {os.flush();os.close();}catch (IOException e) {log.error("输出流⽂件失败", e);}}if(inputStream != null) {try {inputStream.close();}catch (IOException e) {log.error("加密⽂件输⼊流关闭失败", e);}}}} 我们在做开发时,⾯对的仅仅是 Request, Response 这种什么都有对象,直接问其要相关信息即可。
Python实现http文件下载在自动化脚本中,文件下载是比较常见的操作,一般情况下,我们会将文件放到某个http 服务器上,这时,当脚本中需要这个文件时,就需要使用到http下载的功能了最基本的下载功能实现实现最基本的功能,传入文件下载路径和文件本地保存路径,下载到本地def DownloadFile(url,savePath):| ##@函数目的: 下载文件| ##@参数说明:url:文件的url路径| ##@参数说明:savePath:文件保存到的位置| ##@返回值:try:url = url.strip()savePath = savePath.strip()InitPath(savePath)r = urllib2.Request(url)req = urllib2.urlopen(r)saveFile = open(savePath, ‘wb’)saveFile.write(req.read())saveFile.close()req.close()except:print traceback.format_exc()代理下载功能实现在有些情况下,比如,为了安全,某些机器不能直接访问服务器时,代理是一个比较好的解决方案,而脚本中涉及到文件下载时,就需要在文件下载过程中增加一些操作了def DownloadFilebyProxy(url , savePath , host , port , user , pwd ):try:url = url.strip()savePath = savePath.strip()InitPath(savePath)#如果代理需要验证proxy_info = {‘host’ : host,‘port’ : int(port),‘user’ : user,‘pass’ : pwdproxy_support = urllib2.ProxyHandler({ http : http://%(user)s:%(pass)s@%(host)s:%(port)d % proxy_info})opener = urllib2.build_opener(proxy_support)urllib2.install_opener(opener)req = urllib2.urlopen(url)saveFile = open(savePath, ‘wb’)saveFile.write(req.read())saveFile.close()req.close()except:print traceback.format_exc()上面对http下载功能做了简单的介绍,当然,有些情况下,我们需要通过脚本对ftp、ssh 等服务器进行操作~ ~。
java实现⼤⽂件下载(http⽅式)java实现⼤⽂件下载,基于http⽅式,控件神马的就不说了。
思路:下载⽂件⽆⾮要读取⽂件然后写⽂件,主要这两个步骤,主要难点:1.读⽂件,就是硬盘到内存的过程,由于jdk内存限制,不能读的太⼤。
2.写⽂件,就是响应到浏览器端的过程,http协议是短链接,如果写⽂件太慢,时间过久,会造成浏览器死掉。
知识点:.apache.http.impl.client.CloseableHttpClient 模拟httpClient客户端发送http请求,可以控制到请求⽂件的字节位置。
2.BufferedInputStream都熟悉,⽤它接受请求来的流信息缓存。
3.RandomAccessFile⽂件随机类,可以向⽂件写⼊指定位置的流信息。
123基于以上信息,我的实现思路就是⾸先判断下载⽂件⼤⼩,配合多线程分割定制http请求数量和请求内容,响应到写⼊到RandomAccessFile指定位置中。
在俗点就是⼤的http分割成⼀个个⼩的http请求,相当于每次请求⼀个⽹页。
废话不说,上代码。
DownLoadManagerTest类:package xxxx;import java.io.File;import java.io.IOException;import java.io.RandomAccessFile;import .HttpURLConnection;import .URL;import java.util.concurrent.CountDownLatch;import ng.exception.ExceptionUtils;import org.apache.http.impl.client.CloseableHttpClient;import org.apache.http.impl.client.HttpClients;import org.apache.http.impl.conn.PoolingHttpClientConnectionManager;import org.junit.After;import org.junit.Before;import org.junit.Test;import org.junit.runner.RunWith;import org.slf4j.Logger;import org.slf4j.LoggerFactory;import org.springframework.beans.factory.annotation.Autowired;import org.springframework.core.task.TaskExecutor;import org.springframework.test.context.ActiveProfiles;import org.springframework.test.context.ContextConfiguration;import org.springframework.test.context.junit4.AbstractTransactionalJUnit4SpringContextTests;import org.springframework.test.context.junit4.SpringJUnit4ClassRunner;/**** ⽂件下载管理类*/@RunWith(SpringJUnit4ClassRunner.class)@ActiveProfiles("test")@ContextConfiguration(locations={"classpath:test/applicationContext.xml"})public class DownLoadManagerTest extends AbstractTransactionalJUnit4SpringContextTests{private static final Logger LOGGER = LoggerFactory.getLogger(DownLoadManagerTest.class);/**** 每个线程下载的字节数*/private long unitSize = 1000 * 1024;@Autowiredprivate TaskExecutor taskExecutor;private CloseableHttpClient httpClient;private Long starttimes;private Long endtimes;@Afterpublic void tearDown() throws Exception{endtimes = System.currentTimeMillis();System.out.println("测试结束!!");System.out.println("********************");System.out.println("下载总耗时:"+(endtimes-starttimes)/1000+"s");System.out.println("********************");}public DownLoadManagerTest() {System.out.println("初始化测试类....");PoolingHttpClientConnectionManager cm = new PoolingHttpClientConnectionManager();cm.setMaxTotal(100);httpClient = HttpClients.custom().setConnectionManager(cm).build();}/**** 启动多个线程下载⽂件*/@Testpublic void doDownload() throws IOException {String remoteFileUrl="http://{host}:{port}/{project}/xx.xml";String localPath="E://test//";String fileName = new URL(remoteFileUrl).getFile();System.out.println("远程⽂件名称:"+fileName);fileName = fileName.substring(stIndexOf("/") + 1,fileName.length()).replace("%20", " ");System.out.println("本地⽂件名称:"+fileName);long fileSize = this.getRemoteFileSize(remoteFileUrl);this.createFile(localPath+System.currentTimeMillis()+fileName, fileSize);Long threadCount = (fileSize/unitSize)+(fileSize % unitSize!=0?1:0);long offset = 0;CountDownLatch end = new CountDownLatch(threadCount.intValue());// 如果远程⽂件尺⼨⼩于等于unitSizeif (fileSize <= unitSize) {DownloadThreadTest downloadThread = new DownloadThreadTest(remoteFileUrl,localPath+fileName, offset, fileSize,end,httpClient);taskExecutor.execute(downloadThread);} else {// 如果远程⽂件尺⼨⼤于unitSizefor (int i = 1; i < threadCount; i++) {DownloadThreadTest downloadThread = new DownloadThreadTest(remoteFileUrl, localPath+fileName, offset, unitSize,end,httpClient);taskExecutor.execute(downloadThread);offset = offset + unitSize;}// 如果不能整除,则需要再创建⼀个线程下载剩余字节if (fileSize % unitSize != 0) {DownloadThreadTest downloadThread = new DownloadThreadTest(remoteFileUrl, localPath+fileName, offset, fileSize - unitSize * (threadCount-1),end,httpClient); taskExecutor.execute(downloadThread);}}try {end.await();} catch (InterruptedException e) {LOGGER.error("DownLoadManager exception msg:{}",ExceptionUtils.getFullStackTrace(e));e.printStackTrace();}// System.out.println("111111");LOGGER.debug("下载完成!{} ",localPath+fileName);//return localPath+fileName;}/**** 获取远程⽂件尺⼨httpConnection.setRequestMethod("HEAD");int responseCode = httpConnection.getResponseCode();if (responseCode >= 400) {LOGGER.debug("Web服务器响应错误!");return 0;}String sHeader;for (int i = 1;; i++) {sHeader = httpConnection.getHeaderFieldKey(i);if (sHeader != null && sHeader.equals("Content-Length")) {System.out.println("⽂件⼤⼩ContentLength:"+ httpConnection.getContentLength());fileSize = Long.parseLong(httpConnection.getHeaderField(sHeader));break;}}return fileSize;}/**** 创建指定⼤⼩的⽂件*/private void createFile(String fileName, long fileSize) throws IOException { File newFile = new File(fileName);RandomAccessFile raf = new RandomAccessFile(newFile, "rw");raf.setLength(fileSize);raf.close();}public TaskExecutor getTaskExecutor() {return taskExecutor;}public void setTaskExecutor(TaskExecutor taskExecutor) {this.taskExecutor = taskExecutor;}}1234567891011121314151617181920212223242526272829303140 41 42 43 44 45 46 47 48 49 50 51 52 53 54 55 56 57 58 59 60 61 62 63 64 65 66 67 68 69 70 71 72 73 74 75 76 77 78 79 80 81 82 83 84 85 86 87 88 89 90 91 92 93 94 95 96 97 98 99108 109 110 111 112 113 114 115 116 117 118 119 120 121 122 123 124 125 126 127 128 129 130 131 132 133 134 135 136 137 138 139 140 141 142 143 144 145 146 147 148 149 150 151 152 153 154 155 156 157 158 159 160 161 162 163 164 165 166 167176177178179180DownloadThreadTest类:package xxxx;import java.io.BufferedInputStream;import java.io.File;import java.io.IOException;import java.io.RandomAccessFile;import java.util.concurrent.CountDownLatch;import ng.exception.ExceptionUtils; import org.apache.http.client.ClientProtocolException;import org.apache.http.client.methods.CloseableHttpResponse; import org.apache.http.client.methods.HttpGet;import org.apache.http.impl.client.CloseableHttpClient; import org.apache.http.protocol.BasicHttpContext;import org.apache.http.protocol.HttpContext;import org.slf4j.Logger;import org.slf4j.LoggerFactory;/**** 负责⽂件下载的类*/public class DownloadThreadTest extends Thread {private static final Logger LOGGER = LoggerFactory.getLogger(DownloadThreadTest.class);/**** 待下载的⽂件*/private String url = null;/**** 本地⽂件名*/private String fileName = null;/**** 偏移量*/private long offset = 0;/**** 分配给本线程的下载字节数*/private long length = 0;private CountDownLatch end;private CloseableHttpClient httpClient;private HttpContext context;/**** @param url 下载⽂件地址** @param fileName 另存⽂件名** @param offset 本线程下载偏移量** @param length 本线程下载长度** @author Angus.wangthis.fileName = file;this.offset = offset;this.length = length;this.end = end;this.httpClient = httpClient;this.context = new BasicHttpContext();LOGGER.debug("偏移量=" + offset + ";字节数=" + length);}public void run() {try {HttpGet httpGet = new HttpGet(this.url);httpGet.addHeader("Range", "bytes=" + this.offset + "-"+ (this.offset + this.length - 1));CloseableHttpResponse response = httpClient.execute(httpGet,context);BufferedInputStream bis = new BufferedInputStream(response.getEntity().getContent());byte[] buff = new byte[1024];int bytesRead;File newFile = new File(fileName);RandomAccessFile raf = new RandomAccessFile(newFile, "rw");while ((bytesRead = bis.read(buff, 0, buff.length)) != -1) {raf.seek(this.offset);raf.write(buff, 0, bytesRead);this.offset = this.offset + bytesRead;}raf.close();bis.close();} catch (ClientProtocolException e) {LOGGER.error("DownloadThread exception msg:{}",ExceptionUtils.getFullStackTrace(e)); } catch (IOException e) {LOGGER.error("DownloadThread exception msg:{}",ExceptionUtils.getFullStackTrace(e)); } finally {end.countDown();(end.getCount() + " is go on!");System.out.println(end.getCount() + " is go on!");}}}1234567891011121314151617181920212223242526272829303140 41 42 43 44 45 46 47 48 49 50 51 52 53 54 55 56 57 58 59 60 61 62 63 64 65 66 67 68 69 70 71 72 73 74 75 76 77 78 79 80 81 82 83 84 85 86 87 88 89 90 91 92 93 94 95 96 97 98 99108109application.xml<bean id="taskExecutor" class="org.springframework.scheduling.concurrent.ThreadPoolTaskExecutor"><!-- 线程池活跃的线程数 --><property name="corePoolSize" value="5" /><!-- 线程池最⼤活跃的线程数 --><property name="maxPoolSize" value="10" /><!-- 队列的最⼤容量 --><property name="queueCapacity" value="600" /></bean><bean id="downLoadManager"class="xx.DownLoadManagerTest"><property name="taskExecutor" ref="taskExecutor" /></bean>123456789101112测试运⾏,500M,我这⽹速得半个⼩时左右。
HttpClient_4用法由HttpClient_3升级到HttpClient_4必看HttpClient程序包是一个实现了HTTP 协议的客户端编程工具包,要想熟练的掌握它,必须熟悉 HTTP协议。
一个最简单的调用如下:import java.io.IOException;import org.apache.http.HttpResponse;import org.apache.http.client.ClientProtocolException;import org.apache.http.client.HttpClient;import org.apache.http.client.methods.HttpGet;import org.apache.http.client.methods.HttpUriRequest;import org.apache.http.impl.client.DefaultHttpClient;public class Test {public static void main(String[] args) {// 核心应用类HttpClient httpClient = new DefaultHttpClient();// HTTP请求HttpUriRequest request =new HttpGet("http://localhost/index.html");// 打印请求信息System.out.println(request.getRequestLine());try {// 发送请求,返回响应HttpResponse response = httpClient.execute(request);// 打印响应信息System.out.println(response.getStatusLine());} catch (ClientProtocolException e) {// 协议错误e.printStackTrace();} catch (IOException e) {// 网络异常e.printStackTrace();}}}如果HTTP服务器正常并且存在相应的服务,则上例会打印出两行结果:GET http://localhost/index.html HTTP/1.1HTTP/1.1 200 OK核心对象httpClient的调用非常直观,其execute方法传入一个request对象,返回一个response对象。
Golang使⽤httpClient下载⽂件的实现⽅法之前使⽤beego的http库的时候,有的情况需要下载⽂件。
beego是能实现,但就是有点问题:不⽀持回调,没法显⽰下载速度,这在⽇常开发中是不可忍受的。
看了下beego的实现主要是使⽤了io.copy函数,于是就深⼊的看了下实现原理,发现挺简单的,于是就根据io.copy原理实现的⼀个简单的下载器//定义要下载的⽂件var durl = "https:///go/go1.10.3.darwin-amd64.pkg";//解析urluri, err := url.ParseRequestURI(durl)if err != nil {panic("⽹址错误")}正常的⼀个流程先看看Url有没有错误filename := path.Base(uri.Path)log.Println("[*] Filename " + filename)使⽤path.Base取出url的⽂件名称,这⾥有个可能会出现bug的地⽅:如果这个⽹址是302跳转过去的话是没法取出跳转过后的⽂件名称。
取⽂件名称这步可以再发送http请求的时候 client.CheckRedirect定义⼀个函数取出⽂件名次即可。
client := http.DefaultClient;client.Timeout = time.Second * 60 //设置超时时间resp, err := client.Get(durl)创建⼀个httpClient,另外这个客户端的Timeout是设置读取数据的时候多少时间算超时。
我这⾥⽐较推崇⽤Do⽅法传递⼀个Reqeust过去,应为有的url需要校验http头之类的,你问我为啥不⽤⼀个字懒。
raw := resp.Bodydefer raw.Close()reader := bufio.NewReaderSize(raw, 1024*32);其实说实话不太清楚bufio能不能真正的加快htpp读取速度,没有做过跟不⽤bufio的对⽐。
有时需要通过httpclient进行文件下载,下面是文件下载的实现过程
Java代码
1.import java.io.File;
2.import java.io.FileOutputStream;
3.import java.io.IOException;
4.import java.io.InputStream;
5.
6.import org.apache.http.HttpEntity;
7.import org.apache.http.HttpHost;
8.import org.apache.http.HttpResponse;
9.import org.apache.http.HttpStatus;
10.import org.apache.http.client.ClientProtocolException;
11.import org.apache.http.client.HttpClient;
12.import org.apache.http.client.methods.HttpGet;
13.import org.apache.http.impl.client.DefaultHttpClient;
14.
15.public class SearchDomain {
16.
17.public static void main(String[] args) throws ClientProtocolException,
IOException {
18.//实例化一个HttpClient
19.HttpClient httpClient = new DefaultHttpClient();
20.//设定目标站点web的默认端口80可以不写的当然如果是其它端口就要标明
21.HttpHost httpHost = new HttpHost("",80);
22.//设置需要下载的文件
23.HttpGet httpGet = new HttpGet("/test.zip");
24.//这里也可以直接使用httpGet的绝对地址,当然如果不是具体地址不要忘记/结尾
25.//HttpGet httpGet = new HttpGet("/");
26.//HttpResponse response = httpClient.execute(httpGet);
27.
28.HttpResponse response = httpClient.execute(httpHost, httpGet);
29.if(HttpStatus.SC_OK==response.getStatusLine().getStatusCode()){
30.//请求成功
31.//取得请求内容
32.HttpEntity entity = response.getEntity();
33.
34.//显示内容
35.if (entity != null) {
36.//这里可以得到文件的类型如image/jpg /zip /tiff 等等但是发现并不是十分有效,
有时明明后缀是.rar但是取到的是null,这点特别说明
37.System.out.println(entity.getContentType());
38.//可以判断是否是文件数据流
39.System.out.println(entity.isStreaming());
40.//设置本地保存的文件
41.File storeFile = new File("c:/0431la.zip");
42.FileOutputStream output = new FileOutputStream(storeFile);
43.//得到网络资源并写入文件
44.InputStream input = entity.getContent();
45.byte b[] = new byte[1024];
46.int j = 0;
47.while( (j = input.read(b))!=-1){
48.output.write(b,0,j);
49.}
50.output.flush();
51.output.close();
52.}
53.if (entity != null) {
54.entity.consumeContent();
55.}
56.}
57.}
58.}
需要说明这里我并没验证文件的类型,实际操作中可以通过url的后缀提取或者ContentType的类型。