网件路由器JWNR2000T使用说明书
- 格式:pdf
- 大小:279.69 KB
- 文档页数:2
Guía de instalación del extensor WiFi WN2000RPTIntroducciónEl extensor WiFi de NETGEAR aumenta la distancia de una red WiFi al amplificar la señal WiFi existente y mejorar la calidad general de la señal a través de distancias extensas. Un extensor repite las señales provenientes de un ruteador o punto de acceso WiFi existentes.Familiarización con el extensorAntes de instalar el extensor, conozca sus indicadores, botones y puertos.Panel frontalIndicador de velocidad de enlaceIndicador de estadoIndicador de dispositivo a extensorIndicador/botón WPSPanel posteriorBotón de restauración de configuraciónde fábricaPuertos EthernetPotencia de entradaBotón de encendido y apagadoDescripción de los indicadoresDurante la instalación, utilice los indicadores para encontrar la mejor ubicación para el extensor o para supervisar el rendimiento del extensor.Indicador de velocidad de enlace Este indicador señala la conexión entre el extensor y el ruteador o punto de acceso.•Verde fijo. Excelente conexión.•Amarillo fijo. Buena conexión.•Rojo fijo. Conexión débil.•Apagado. Sin conexión.Indicador de•Verde fijo. El extensor está encendido.•Apagado. El extensor está apagado.Indicador de dispositivo aEste indicador señala la conexión entre el extensor y una computadora o dispositivo móvil.•Verde fijo. El extensor está conectado a una computadora o a un dispositivo móvil.•Apagado. El extensor no está conectado a una computadora o a un dispositivo móvil.Indicador WPS•Verde fijo. La seguridad de WiFi está activada (WPS oWPA2).•Parpadeo verde. Está en curso una conexión WPS.•Apagado. La seguridad de WiFi no está activada.Instalación del extensorColoque el extensor, enciéndalo y conéctelo a su red WiFi. Coloque el extensor y enciéndalo1.Coloque el extensor en la misma habitación que el ruteador WiFi.Nota: Se requiere proximidad al ruteador WiFi solo durante el proceso de configuración inicial.2.Enchufe el extensor en una toma de corriente.se enciende de color verde. Si elPower (Encendido).Conexión a una red WiFi existentePara ampliar la cobertura de la red WiFi, tiene que conectar el extensor a su red WiFi existente. Puede hacerlo de dos formas diferentes:•Conexión con WPS. Si desea obtener más información, consulte Conexión con WPS en la página7.•Conexión con la configuración inteligente de genie. Si desea obtener más información, consulte Conexión con la configuración inteligente de NETGEAR genie en la página9.Conexión con WPSWi-Fi Protected Setup (WPS) le permite conectarse fácilmente a una red WiFi segura sin tener que introducir el nombre ni la contraseña de la red.WPS no es compatible con la seguridad de red WEP. Si utiliza seguridad WEP, siga las instrucciones en Conexión con la configuración inteligente de NETGEAR genie en la página9.¾Para la conexión con WPS:extensor.1.Pulse el botón WPS del2.Antes de que transcurran dos minutos, pulse el botón WPS delruteador o punto de acceso.Nota: Si el indicador de velocidad de enlace no se enciende,intente nuevamente. Si todavía no se enciende, consulteConexión con la configuración inteligente de NETGEAR genie en la página9.3.Busque el nuevo nombre de la red del extensor.El nombre de red inalámbrica del extensor (SSID) pasa a ser el mismo que el de la red WiFi existente, pero se le añade _EXT al final del nombre.Por ejemplo:•Nombre de red WiFi existente. NombreDeMiRed•Nuevo nombre de red del extensor. NombreDeMiRed_EXT 4.Conecte sus dispositivos WiFi existentes a la nueva red delextensor (NombreDeMiRed_EXT).Use la misma contraseña WiFi que utiliza para el ruteador WiFi.5.Desenchufe el extensor y muévalo a una nueva ubicación cercadel área que presenta baja señal WiFi.La ubicación que elija debe estar dentro del alcance de la red6.Enchufe el extensor en una toma de corriente.se enciende de color verde. Si elPower (Encendido).extensor y el ruteador sea óptima.Conexión con la configuración inteligente de NETGEAR genie1.Utilice el administrador de redes WiFi en una computadora odispositivo móvil para encontrar y conectarse a la red WiFINETGEAR_EXT (SSID)Cuando se haya establecido la conexión con la computadora o2.Abra una ventana de explorador web en la misma computadorao dispositivo móvil.El navegador lo dirige directamente a la configuración inteligente de NETGEAR genie®.Nota: Si no se le dirige automáticamente a NETGEAR genie,inicie un navegador web y escriba en elcampo de dirección. Escriba admin para el nombre de usuario y password como la contraseña.3.Seleccione una red WiFi que desee ampliar y haga clic en elbotón Continue (Continuar).4.Escriba la frase de contraseña de red (también llamadacontraseña o clave de seguridad) en el campo PassPhrase(Frase de contraseña) y haga clic en el botón Continue(Continuar).5.Escriba el nombre (SSID) para su nueva red inalámbrica delextensor en el campo 2.4GHz Network Name (SSID) (Nombre de red de 2.4GHz), y haga clic en el botón Continue(Continuar).Nota: Puede usar la misma configuración de seguridad como su red existente al seleccionar la casilla de verificación.La configuración se aplica y aparece la siguiente pantalla:e el administrador de redes WiFi de la computadora o eldispositivo móvil para conectarse a la red WiFi del extensor creada recientemente.Repita este paso en todas sus computadoras y dispositivos móviles.7.Seleccione la casilla y haga clic en el botón Continue(Continuar).8.Haga clic en el botón Finish (Finalizar).9.Desenchufe el extensor y muévalo a una nueva ubicación cercade un área que presente baja señal WiFi.La ubicación que elija debe estar dentro del alcance de la red10.Enchufe el extensor en una toma de corriente.se enciende de color verde. Si elPower (Encendido).extensor y el ruteador sea óptima.Conecte los dispositivos compatibles con EthernetCuando el extensor está conectado a su red WiFi actual, puede utilizarlo para conectar hasta cuatro dispositivos de manerainalámbrica a su ruteador o punto de acceso WiFi.¾Para conectar un dispositivo compatible con Ethernet a su ruteador o punto de acceso WiFi:1.Configure el extensor.Si desea obtener más información, consulte Coloque el extensor y enciéndalo en la página6.2.Conecte el extensor a una red WiFi existente.Si desea obtener más información, consulte Conexión a una red WiFi existente en la página6.3.Enchufe el cable Ethernet desde un dispositivo compatible conEthernet a un puerto Ethernet en el extensor.El dispositivo compatible con Ethernet se conecta al ruteador o punto de acceso.Acceda a la configuración del extensor Luego de la instalación, puede iniciar sesión en el extensor para ver o cambiar la configuración de este.¾Para iniciar sesión en el extensor luego de la configuración inicial:1.Conecte la computadora o dispositivo móvil a la red delextensor.2.Abra un navegador web y escriba o en el campo de dirección.Se mostrará una pantalla de inicio de sesión.3.Escriba admin para el nombre de usuario y password como lacontraseña.Preguntas frecuentesPara obtener más información sobre el producto, consulte el manual del usuario, disponible en .El asistente de configuración del navegador web me pide la clave de seguridad de la red (frase de contraseña) y estoy seguro de haber ingresado la contraseña correcta. ¿Qué puedo hacer?Es probable que el extensor esté ubicado en el límite del rango de cobertura del ruteador o punto de acceso. Si desea obtener más información, consulte Coloque el extensor y enciéndalo en lapágina6.Si está usando funciones de seguridad WEP, asegúrese de que ha escrito la clave inalámbrica en el campo correcto.Estoy conectado a NETGEAR_EXT y he abierto un navegador. ¿Por qué no puedo ver el asistente de configuración del navegador web?Intente alguna de estas medidas de solución de problemas:•Asegúrese de que su equipo está configurado para utilizar DHCP (la mayoría lo están).•Asegúrese de que el indicador de dispositivo a extensor esté encendido en color verde y de tener una dirección IP válida. •Reinicie el navegador web y escriba o en el campo de dirección. Escriba admin para el nombre de usuario y password como la contraseña.¿Funcionará el extensor si lo conecto al ruteador con un cable Ethernet?No. El extensor está diseñado para conectarse en forma inalámbrica al ruteador o punto de acceso.¿Qué nombre de usuario y contraseña utilizo para iniciar sesión con el extensor?El nombre de usuario predeterminado es admin y la contraseña es password. Tanto el nombre de usuario como la contraseña distinguen entre mayúsculas y minúsculas.¿Cómo restauro el extensor a su configuración predeterminada de fábrica?1.Utilice un objeto puntiagudo, como un lápiz o un clipsujetapapeles para mantener presionado el botón RestoreFactory Settings (Restaurar configuración de fábrica) en elextensor durante al menos cinco segundos hasta que elindicador de estado parpadee en color ámbar.2.Suelte el botón Restore Factory Settings (Restaurarconfiguración de fábrica) y espere a que el extensor se reinicie.El extensor se reinicia y vuelve a su configuraciónpredeterminada de fábrica.Ahora puede acceder al extensor desde el navegador webutilizando la configuración predeterminada de fábrica.AsistenciaGracias por seleccionar productos NETGEAR. Una vez instalado el dispositivo, busque en la etiqueta del producto el número de serie y regístrelo enhttps://.Debe registrar el producto antes de poder empezar a usar el servicio de asistencia telefónica de NETGEAR. NETGEAR recomienda registrar su producto en el sitio web de NETGEAR.Para obtener actualizaciones del producto y asistencia técnica en línea, visite.NETGEAR recomienda el uso exclusivo de los recursos de asistencia oficiales de NETGEAR. Puede acceder a este manual en línea en o mediante un enlace en la interfaz de usuario del producto.Marcas comercialesNETGEAR, el logotipo de NETGEAR y Connect with Innovation son marcas comerciales o marcas registradas de NETGEAR, Inc. o sus filiales en Estados Unidos y otros países. La información contenida en el documento puede sufrir modificaciones sin previo aviso. © NETGEAR, Inc. Todos los derechos reservados. Cumplimiento normativoPara consultar la declaración de conformidad de la Unión Europea completa, visite /app/answers/detail/a_id/11621/.Para obtener más información sobre el cumplimiento de normativas, visite/about/regulatory/. Vea el documento sobre el cumplimiento de normativas antes de conectarse a una fuente de alimentación.NETGEAR, Inc.350 East Plumeria DriveSan José, CA 95134 Estados Unidos。
前言:路由器和无线路由器虽然普及得很快,大伙用得也很方便,但还是有很多刚接触路由器的朋友,不懂得如何设置路由器,毕竟它不是跟非网管交换机一样,插上即可用。
而厂商一般都配有说明书,有些却不够简明,过于复杂,有些虽然提供了傻瓜化的安装向导,但在设置的定制化方面显然无法体现。
今天,我们就用最浅显易懂的图文并茂的方式表达出来,希望对菜鸟朋友们有点帮助。
gear 的路由器在市场上也占有很大的份额,我们的路由器设置向导系列文章当然不能少了Netgear的产品。
今天我们为大家带来Netgear WGR614的路由器设置向导,希望能够为大家带来一点帮助。
进入初始的设置向导后,我们发现有5个步骤。
前面两个步骤是提醒用户需要做的准备工作以及连接设备,这里我们不做详细阐述,跳过前两个步骤,直接进入第三步——激活网络。
页面提示我们是否通过设置向导设置网络。
这里本人建议对路由器设置还不大熟悉的大虾们选择“是”,通过向导设置,方便省事。
然后我们点击下一步。
2.接着,系统要求我们设置无线网络名,用于在多个无线网络下,对此网络进行识别。
如果采用默认名字的话,很有可能跟别人的热点重名,会造成很大干扰,所以我们最好改一个个性化的SSID。
输入好自定义名字之后,点击下一步进入下一个步骤。
3.接着我们进入第四步骤——网络安全。
简单的选择是否引导无线安全设置。
选择是,点击下一步继续设置。
4.接着系统询问我们希望使用哪种加密功能,由于我的设备支持WPA-PSK加密方式,所以选择了这个选项。
大家也可以根据自己设备的具体状况选择相应的加密方式,然后点击下一步输入密匙。
5.接下来的这一步非常简单,输入密码即可。
不过这一页面的亮点在打印按钮上,由此看出Netgear为用户考虑周到,方便用户把密码打印下来,以便日后忘记密码后能够有迹可寻。
6.最后,系统询问我们是否更改管理员的帐号密码。
这里我们建议大家把管理员帐号密码改成一个自己不易忘记而别人又不知道的密码,这样便能防止别人胡乱修改你的设置。
原装网件NETGEAR WGR614 V8 dd-wrt 无线路由器万能中继AP网桥使用说明书一、打开IE浏览器,在地址栏输入:192.168.1.1第一次使用输入用户名root密码admin —定要注意是小写,且不能输错,不然无法进入系统设置界面•进入系统设置界面,然后把界面改成中文语言3 I l.h ulld 1 T?<UI | ■ ■ 1st E lit IM ■ VtnddDVf lift BiEAiit Xfepl fUfi-EMML.-W L^rd bupwtMT1C n-vr-IP Flftrr(drifiatl: Hine fnr P :TB 匚ar”b5 Ccrfcrcrdd-wrt..-nrnccrtnol panel|时机孑&: £Xj-«A"l € i -^xr 厲:!aa.■ r :・artM — e RM 轨灯巧您 册」厢■' I-.-iiiArbwr^t^F^inn™ i .ii 〔.-.naiWBwmt t 申 fti 怯(wtni#whWillFvU 审hs.堆事屮 **ft* ki*■wtw PawRvdi R^jki 」箝”3亡 EnJrr 刊肝rE加卸d EsTtnWebj^CLU Pcdtgriijn Twirls JE?^hh Wa ShniS Sfe P*3£rd h«L£rtli \ Ip-r § 打kWgH M1P '□ HTTPStavw^n AniE ■■■getting<*) Enahb Dusaih捌 turn 怙 Wet 'M fltfriTijri- * 卅*iriitiri^dl d dnc WtuipFngl^i■□-irme liaJlEind•-中文:界面R*uter M*R^perwse<it JTftl' Mil.'置总塑 换炉 工AH) —.申中M 中电n t.2屮时下粒剽止进项如果还没有变成中文界面,请点IE 菜单栏的刷新,就会出现中文界面,或者重新打开IE 浏览器 二、上网设置(此功能相当于一台普通的无线路由器, 下面的“三、无线中继设置”可省略) 1基本设置。
网件jwnr2000路由器怎么设置无线中继网件jwnr2000路由器怎么设置无线中继网件jwnr2000路由器设置无线中继的方法网络拓扑:A连接宽带,B在远端与A桥接。
注意:NETGEAR路由器的MAC地址,可以在设备背面查看条形码,也可以在管理界面的路由器状态下查看,局域网端口下的MAC地址,即为桥接所用的MAC.设置桥接登录A的管理界面192.168.1.1,点击左侧菜单中的安装- 无线设置。
KWGR614默认无线频道为6,若周围有同频道的无线网络,请将频道修改为1或11。
注意:无线网络标识默认NETGEAR,也可以用数字字母任意命名,进行桥接的两个路由器,SSID可以相同,也可以不同。
如果希望无线客户端在两个无线路由器的范围内实现漫游,请将SSID设为相同。
点击左侧菜单中的高级- 无线中继功能,设置桥接:ⅰ)在启用无线中继功能前打钩;ⅱ)选择无线基站,在中继器MAC地址1 中填写路由器B的MAC地址;ⅲ)如果路由器A本身不需要提供无线覆盖,则在禁止无线客户端接入前打钩;本例中,A负责办公区域的无线覆盖,因此不能打钩。
设置完毕,点击应用。
完成设置之前,路由器B先不接入局域网,只用一台电脑有线方式连接到路由B的一个LAN口。
同样用默认的192.168.1.1的地址登录B的管理界面,与步骤一相同,选择与A 相同的无线频道(若步骤一中选择了1或11,B亦要与A保持一致)。
点击左侧菜单中的高级- 无线中继功能,设置桥接:ⅰ)在启用无线中继功能前打钩;ⅱ)选择无线中继器模式,在基站MAC地址中,填入路由器A的MAC地址;ⅲ)当工作在无线中继器模式时,无线路由器变成一台普通的无线AP,中继器IP地址中,可以任意指派局域网中空闲的IP地址,做为这台无线AP的管理地址,例如192.168.1.100,日后如需登录该设备的管理界面,就要使用这个新的IP地址,而非默认的192.168.1.1,这一点请务必留意!设置完毕,点击应用。

RG2000-Q5G工业级5G路由器使用说明书2022-04版本信息RG2000-Q5G工业级5G路由器使用说明书版本:RG2000-Q5G-V1.01-202204目录第一章约定说明 (1)1.1目的 (1)1.2适用范围 (1)1.3本书约定 (1)1.4专业术语 (2)第二章产品介绍 (4)2.1产品概述 (4)2.2功能特点 (5)2.3硬件规格 (6)2.4设备面板 (7)2.5安装说明 (9)第三章联机登录 (12)3.1环境要求 (12)3.2使用准备 (12)3.3配置计算机 (12)3.4登录系统 (15)第四章WEB配置操作 (16)4.1设备状态 (16)4.1.1设备基本信息 (16)4.1.25G网络状态 (17)4.1.3ARP状态 (18)4.1.4端口MAC列表 (18)4.1.5网络接口状态 (19)4.1.6路由状态 (20)4.2网络配置 (20)4.2.1接口管理 (20)4.2.2WIFI配置 (27)4.2.4DDNS配置 (34)4.2.5链路探测 (36)4.2.6负载均衡 (39)4.3路由配置 (40)4.3.1静态路由 (40)4.3.2IPV6静态路由 (41)4.3.3策略路由配置 (41)4.3.4OSPF配置 (42)4.3.5RIP配置 (43)4.3.6ISIS配置 (44)4.4VPN配置 (46)4.4.1GRE配置 (46)4.4.2VXLAN配置 (48)4.4.3IPSec VPN (49)4.4.4L2TP (50)4.4.5IPv4Over IPv6隧道 (53)4.4.6IPv6Over IPv4隧道 (54)4.5网络安全 (55)4.5.1攻击防御 (55)4.5.2访问策略配置 (56)4.5.3PAT配置 (62)4.5.4DMZ配置 (64)4.5.5SNAT配置 (65)4.5.6UPNP配置 (66)4.5.7QOS配置 (67)4.5.8带宽管理配置 (67)4.5.9静态ARP (68)4.6系统维护 (69)4.6.2SNMP配置 (70)4.6.3TR069配置 (70)4.6.4WEB管理 (72)4.6.5TELNET设置 (73)4.6.6SSH设置 (74)4.6.7软件升级 (74)4.6.8配置管理 (75)4.6.9设备重启 (76)4.6.10日志管理 (77)4.6.11通信检测 (78)第一章约定说明1.1目的本说明书用于指导RG2000-Q5G工业级5G路由器的安装调试、使用及维护。
netgear怎么用“什么是netgear?干什么用的?怎么用?”最近小编发现网上有很多使用网件(NETGEAR)路由器的朋友都在问这个问题。
为了更好的帮助大家,小编专门整理了这篇文章,告诉大家如何使用netgear路由器。
其实就是一个路由器,只是它比路由器多一个无限网络功能,笔记本可以利用有限网络和无限路由器实现无线上网,NETGEAR WNR854T 无线路由器参数主要性能网络标准 IEEE802.11n、IEEE802.11g、IEEE802.11b数据传输率 300Mbps频率范围 2.4GHz调制方式OFDM、BPSK、QPSK、16 QAM、64 QAM、CCK、DQPSK、DBPSK支持网络协议TCP/IP、RIPv1/v2、DHCP、NAT、PPPOE、PPTP天线 3根内置天线网络接口 1个WAN口、4个LAN口网络管理基于Web的图形化用户界面,用户名和口令保护安全性能64位、128位WEP有线等效加密,WPA-PSK (Wi-Fi Protected Access)、Pre-Share Key,SSID 打开/关闭,无线局域网打开/关闭,MAC 地址认证,无线访问控制鉴别授权的无线设备环境标准工作温度:0℃-40℃、工作湿度:90%,无冷凝尺寸225.5×172×39mm重量 0.56Kgnetgear无线路由器设置方法:【家庭网络环境布线】:1、有猫(modem):猫(modem)----路由器wan口;路由器lan口----电脑。
2、没有猫(modem):网线----路由器wan口;路由器lan口----电脑。
【电脑进入路由器】:1、电脑ip、dns设置自动获取。
2、打开浏览器,在地址栏输入192.168.1.1(一般路由器地址是这个或者查看路由器背面的登录信息)进路由-输入用户名,密码,(默认一般是admin)。
【设置路由器拨号】:1、在【设置向导】里,选择【PPPoE拨号】(有些是ADSL拨号)这一项,按提示步骤输入上网的用户名和密码,保存。
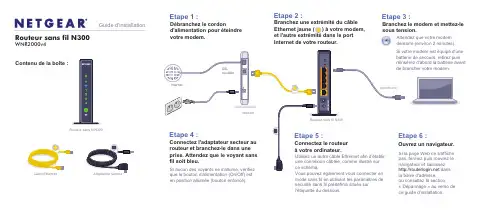
Attendez que votre modem démarre (environ 2 minutes).Si votre modem est équipé d'une batterie de secours, retirez puis réinsérez d'abord la batterie avant de brancher votre modem.Contenu de la boîte :Routeur sans fil N300WNR2000v4Guide d'installationCâble Ethernet sous tension.que le bouton d'alimentation (On/Off) est en position allumée (bouton enfoncé).Vous pouvez également vous connecter en mode sans fil en utilisant les paramètres de sécurité sans fil prédéfinis situés sur l'étiquette du dessous.la barre d'adresse, ou consultez la section« Dépannage » au verso de ce guide d'installation.Routeur sans fil N300(non fourni)Novembre 2012NETGEAR, le logo NETGEAR et Connect with Innovation sont des marques commerciales et/ou des marquesdéposées de NETGEAR, Inc. et/ou des filiales de NETGEAR aux Etats-Unis et/ou dans d'autres pays. Lesinformations sont sujettes à changement sans préavis. Les autres marques et noms de produits sont desmarques commerciales ou des marques déposées de leurs détenteurs respectifs. © NETGEAR, Inc. Tous droitsréservés.Destiné à une utilisation en intérieur uniquement dans tous les états membres de l'UE, les états de l'AELE et laSuisse.Pour consulter la déclaration de conformité complète pour l'UE rendez-vous sur le site/app/answers/detail/a_id/11621/Identifiez les paramètres de réseau sans fil prédéfinis sur votre routeur et Connexion des périphériques sans fil àvotre routeurChoisissez la méthode manuelle ou la méthode WPS (Wi-Fi Protected Setup) pourajouter des ordinateurs portables et divers périphériques à votre réseau sans fil.Méthode manuelle1. Lancez l'utilitaire qui gère vos connexions sans fil sur le périphérique sans filque vous souhaitez connecter à votre routeur (iPhone, ordinateur portable,ordinateur, console de jeu). Cet utilitaire recherche l'ensemble des réseauxsans fil disponibles.2. Recherchez le nom de réseau sans fil (SSID) NETGEAR prédéfini etsélectionnez-le. Le nom de réseau Wi-Fi (SSID) prédéfini est indiqué surl'étiquette du produit, située en dessous du routeur.Remarque : si vous avez modifié le nom de votre réseau lors du processusd'installation, recherchez ce nouveau nom de réseau.3. Saisissez le mot de passe prédéfini (ou votre mot de passe personnalisé sivous l'avez modifié) et cliquez sur Connect (Connecter).4. Répétez les étapes 1 à 3 pour ajouter des périphériques sans filsupplémentaires.Méthode WPSSi votre périphérique sans fil prend en charge la fonctionnalité WPS (Wi-FiProtected Setup), que NETGEAR appelle la méthode Push 'N' Connect, il voussera peut-être demandé d'appuyer sur un bouton WPS situé sur le routeur au lieude saisir un mot de passe. Le cas échéant :1. Appuyez sur le bouton WPS durouteur.2. Dans un délai de 2 minutes, appuyez sur le bouton WPS situé sur lepériphérique client ou suivez les instructions relatives à la fonctionnalité WPSaccompagnant votre périphérique sans fil pour terminer la procédure WPS.Le périphérique est alors connecté à votre routeur.3. Répétez cette procédure pour ajouter des périphériques sans fil WPSsupplémentaires.Remarque : le WPS ne prend pas en charge la sécurité WEP. Si vous tentezde connecter un client WEP à votre réseau à l'aide de la fonctionnalité WPS,cela ne fonctionnera pas.DépannageLe navigateur ne peut pas afficher la page Web.•Assurez-vous que votre ordinateur est connecté au routeur par l'un des quatreports de réseau local Ethernet ou en mode sans fil.•Assurez-vous que le routeur est sous tension, et que son voyant sans fil estbleu continu.•Fermez puis rouvrez le navigateur afin de vérifier que ce dernier ne conservepas la page précédente en mémoire cache.•Accédez à .•Si l'ordinateur est configuré avec une adresse IP fixe ou statique (ce qui estrare), modifiez ce paramètre afin d'obtenir automatiquement une adresse IPauprès du routeur.Après l'installation de votre périphérique, notez le numéro de série inscrit surl'étiquette de votre produit. Il vous sera nécessaire pour enregistrer votre produit àl'adresse https://. Vous devez enregistrer votre produit avant depouvoir utiliser l'assistance téléphonique de NETGEAR. NETGEAR vousrecommande d'enregistrer votre produit sur le site Web de NETGEAR. Pour obtenirdes mises à jour de produits et accéder au support Web, rendez-vous à l'adresse.Vous pouvez télécharger gratuitement le logiciel de filtrage de sites Internetcentralisé Live Parental Controls pour votre routeur à l'adresse suivante :/lpc.Pour accéder aux fonctionnalités supplémentaires, notamment le compteur detrafic, l'accès invité, etc., connectez-vous à l'adresse suivante :.Vous pouvez obtenir le manuel de l'utilisateur en ligne à l'adresse ou via un lien dans l'interface utilisateur duproduit.NETGEAR vous recommande d'utiliser uniquement les ressources d'assistanceofficielles NETGEAR.Téléchargez l'assistant NETGEAR GeniegratuitementRéglez automatiquement les problèmes deréseau courants et gérez les connexions àvotre réseau domestique en toute simplicité./genie。

iTunes Server and AirPlay Setup for RoutersUser ManualSeptember 2015202-11594-01350 East Plumeria DriveiTunes Server and AirPlay Setup for RoutersSupportThank you for purchasing this NETGEAR product. You can visit /support to register your product, get help, access the latest downloads and user manuals, and join our community. We recommend that you use only official NETGEAR support resources.ConformityFor the current EU Declaration of Conformity, visit /app/answers/detail/a_id/11621.ComplianceFor regulatory compliance information, visit /about/regulatory.See the regulatory compliance document before connecting the power supply.Trademarks© NETGEAR, Inc. NETGEAR and the NETGEAR Logo are trademarks of NETGEAR, Inc. Any non-NETGEAR trademarks are used for reference purposes only.ContentsChapter 1Set Up the Router as an iTunes ServerSet Up the Router as an iTunes Server. . . . . . . . . . . . . . . . . . . . . . . . . . . . . . . . . . . 5Supported NETGEAR Routers for iTunes Server. . . . . . . . . . . . . . . . . . . . . . . . . 5Supported USB Storage Devices. . . . . . . . . . . . . . . . . . . . . . . . . . . . . . . . . . . . . . 5Supported File Formates for iTunes Server. . . . . . . . . . . . . . . . . . . . . . . . . . . . . 5Maximum Number of Files iTunes Server Supports. . . . . . . . . . . . . . . . . . . . . . 6 Set Up the Router’s iTunes Server With iTunes. . . . . . . . . . . . . . . . . . . . . . . . . . . . 6Set Up the Router’s iTunes Server With the Remote App . . . . . . . . . . . . . . . . . . . 8 Chapter 2Set Up AirPlay and Stream Media Using iTunes Server Set Up AirPlay and Stream Media Using iTunes Server . . . . . . . . . . . . . . . . . . . . 141This chapter contains the following sections:•Set Up the Router as an iTunes Server•Set Up the Router’s iTunes Server With iTunes•Set Up the Router’s iTunes Server With the Remote AppFor more information about the topics covered in this manual, visit the support website at .Set Up the Router as an iTunes ServerIf your router can be set up as an iTunes server, the router’s iTunes Server lets you play music from a USB storage device that is connected to a USB port on your router with iTunesNote:The router shown in this image is the Nighthawk R7000.Supported NETGEAR Routers for iTunes ServerTo determine if your NETGEAR router can be set up as an iTunes server, see your router’s user manual, which is available at .Supported USB Storage DevicesFor the most up-to-date list of USB storage devices that your router supports, visit/readyshare.Supported File Formates for iTunes ServerThe following music file formats are supported with iTunes Server:•MP3•AAC•FLACMaximum Number of Files iTunes Server SupportsThe maximum number of music files supported is 10,000.Set Up the Router’s iTunes Server With iTunes You can play music from a USB storage device that is connected to your router with iTunes on your Windows or Mac computer using Home Sharing. To set up Home Sharing, you need an Apple account and the latest version of iTunes installed on your computer.Note:The iTunes images used in this section were taken with a MacBookAir with iTunes version 12.2.1.16 installed.To set up the router’s iTunes server to play music on iTunes:1. Connect a USB storage device to a USB port on your router.2. Launch a web browser from a computer or WiFi device that is connected to your router’snetwork.3. Enter .A login window displays.4. Enter the router user name and password.The user name is admin. The default password is password. The user name andpassword are case-sensitive.The BASIC Home page displays.5. Select ADVANCED > USB Functions > ReadySHARE Storage.The USB Storage (Advanced Settings) page displays.Note:This navigation path might be different depending on your router. Seeyour router’s user manual for more information. Your router’s usermanual is available online at .6. Select the Media Server tab.7. Select the Enable iTunes Media Server (Music Only) check box and click the Applybutton.Your settings are saved.8. On your Windows or Mac computer, launch iTunes.9. Select File > Home Sharing > Turn On Home Sharing.10. Enter your Apple ID email address and password and click the Turn On Home Sharingbutton.When Home Sharing is enabled, a Home Sharing icon displays in iTunes .11. Click the Home Sharing icon and from the menu, select your router.The music that is on the USB storage device that is connected to the router displays in iTunes.Set Up the Router’s iTunes Server With the Remote App You can play music from a USB storage device that is connected to your router on your iPhone or iPad using the Apple Remote app.Note:The Remote app images used in this section were taken with aniPhone 5S running iOS 8.4.To set up the router’s iTunes server to play music on your iPhone or iPad:1. Connect a USB storage device to a USB port on your router.2. Connect your iPhone or iPad to your router’s WiFi network.3. Download the Remote app from the Apple App Store.4. Launch the Remote app from your iPhone or iPad.5. Click the Add a Device button.6. Specify the passcode in the router to set up your iTunes Server:unch a web browser from a computer or WiFi device that is connected to your router’snetwork.b. Enter .A login window displays.c. Enter the router user name and password.The user name is admin. The default password is password. The user name andpassword are case-sensitive.The BASIC Home page displays.d. Select ADVANCED > USB Functions > ReadySHARE Storage.The USB Storage (Advanced Settings) page displays.Note:This navigation path might be different depending on your router. See your router’s user manual for more information. Your router’s usermanual is available online at .e. Select the Media Server tab.f. Select the Enable iTunes Media Server (Music Only) check box and click theApply button.g. Enter the passcode and click the Allow Control button.Your settings are saved.Your iPhone or iPad pairs with the router and the iTunes Server is ready. The router displays in the Remote app.7. In the Remote app, tap the router your iPhone or iPad is connected to.The music that is on the USB storage device that is connected to the router displays in the app.2If you own an Apple TV, you can use AirPlay to stream media from a USB storage device connected to your router onto a TV.Set Up AirPlay and Stream Media Using iTunes Server You must first set up iTunes server on your iOS device before you can stream the media from the USB storage device. For more information about setting up iTunes server, see Set Up the Router’s iTunes Server With the Remote App on page8.To use an Apple TV and the Remote app to stream media from your USB storage device to a TV:1. Make sure that your Apple TV is connected to your router’s network.For more information, see the documentation that came with your Apple TV.2. Connect a USB storage device to a USB port on the router.3. Connect your iOS device to the router’s WiFi network.4. Set up iTunes server on your iOS device using the Remote app.For more information see, Set Up the Router’s iTunes Server With the Remote App on page8.5. On your iOS device, swipe up from the bottom of your screen.The Control Center displays.6. T ap AirPlay.7. T ap Apple TV.8. Slide the Mirroring slider to right to display your iOS device’s screen on the TV.9. On your iOS device, open the remote app.10. T ap the router your iPhone or iPad is connected to.11. T ap a media file.The media file displays on your TV.。
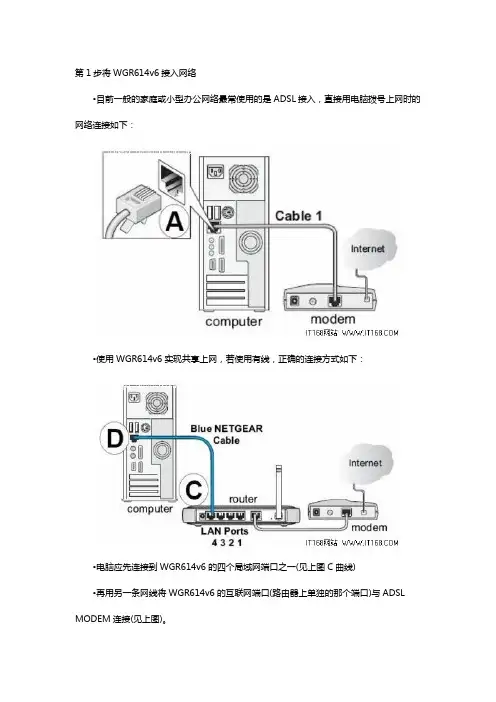
第1步将WGR614v6接入网络•目前一般的家庭或小型办公网络最常使用的是ADSL接入,直接用电脑拨号上网时的网络连接如下:•使用WGR614v6实现共享上网,若使用有线,正确的连接方式如下:•电脑应先连接到WGR614v6的四个局域网端口之一(见上图C曲线)•再用另一条网线将WGR614v6的互联网端口(路由器上单独的那个端口)与ADSL MODEM连接(见上图)。
第2步电脑网络属性配置•在配置路由器前,首先要对用来管理路由器的电脑进行网络属性的配置,下面以Windows XP Home Edition Service Pack 2为例来说明电脑的配置过程:2.1. 启动电脑,右键单击桌面或“开始”中的“网上邻居”选“属性”,右键单击“本地连接”选“属性”,选中“Internet协议(TCP/IP)”,点击“属性”:2.2. 将电脑设为“自动获得IP地址”,“自动获得DNS服务器地址”点击“确定”:第3步登录路由器3.1. 确保电脑已按照第一步所述通过有线连接到路由器的四个LAN口之一,启动路由器。
3.2. 打开电脑的Internet Explorer或者Netscape Navigator等其他浏览器,在浏览器的地址栏键入http://192.168.1.1/basicsetting.htm后回车『注』初次设置路由器须按以上步骤,以后管理路由器或者更改配置,只需要在IE浏览器中输入192.168.1.1,此时路由器会要求提供用户名和密码。
登录路由器用户名:admin,密码:password,都是小写:默认进入的页面是”基本设置”页面,如图:『注意』无论您的宽带采用何种接入方式,都须先通过有线方式连接到路由器,在基本设置页面中进行相应的设置,完成后无线收发功能才会开启,才可使用无线连接。
接下去的内容就将介绍ADSL拨号、固定IP及动态IP三种宽带接入方式在基本设置中的配置。
重要提示:如果3.2的操作结果并非如上所述,而是无法打开网页,则继续3.3步骤,否则跳至第4步。
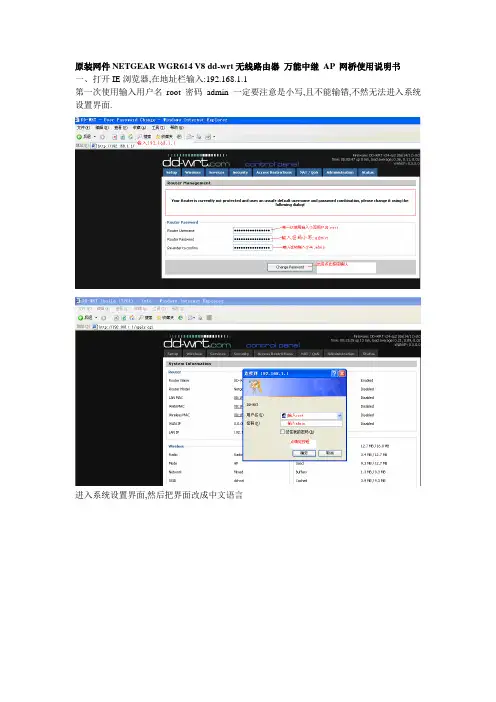
原装网件NETGEAR WGR614 V8 dd-wrt无线路由器万能中继AP 网桥使用说明书一、打开IE浏览器,在地址栏输入:192.168.1.1第一次使用输入用户名root 密码admin 一定要注意是小写,且不能输错,不然无法进入系统设置界面.进入系统设置界面,然后把界面改成中文语言\如果还没有变成中文界面,请点IE菜单栏的刷新,就会出现中文界面,或者重新打开IE浏览器二、上网设置(此功能相当于一台普通的无线路由器,下面的“三、无线中继设置”可省略)1.基本设置。
一般宽带是ADSL上网方式,请按如下设置,设置完后要点保存并应用。
2.无线安全设置三、无线中继设置(此功能相当于一个中继器使用,上面的二、上网设置是可省略的)1.修改路由器的IP,使之跟被中继的路由器IP不一样例如:被中继的前一级无线信号的默认网关192.168.1.1(可点击“无线网络连接”—“支持”选项卡下查看)应把192.168.1.1改为192.168.0.1或192.168.2.1等相异的IP注意:改了之后要及时保存,并且点击应用。
应用后再要成功访问路由器则应在地址栏输入修改后的IP地址才可成功访问。
2.查找无线信号3.选择您需要中继的信号,并点“加入”按钮4.设置物理接口和添加及设置虚拟接口5.如果对方的无线加了密码,还要进行加密设置安全模式可访问对方无线路由器的无线安全查看是什么模式或通过刷新无线网络表列查看无线信号是启用安全的无线网络()中的安全模式还可以通过查看对方的无线设置知道加密计算等信息设置好后要点保存并应用,后再访问一下中继路由器“状态”——“W AN”查看路由器是否分配到了IP地址,而不是0.0.0,如果分配到了说明中继成功。
否则再进入下一步。
对方无线基本设置中的信道(频道)是否为自动,如为自动就应改为1或6或11等固定值,修改后还要保存和重启对方的路由器。
(此步骤是无法中继对方信号下才用)注意:如果设置失败或无法访问路由器可恢复路由器的出厂设置再从新上述设置。
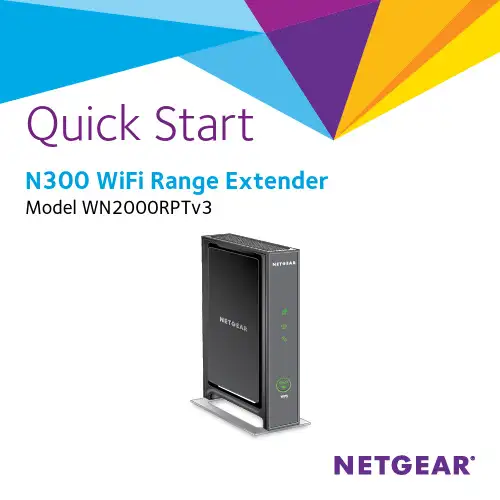
Quick StartN300 WiFi Range ExtenderExisting WiFi Sometimes your routerdoes not provide the WiFicoverage you need.WiFi Range Extender Boosts the range of yourexisting WiFi and createsa stronger signal inhard-to-reach areas.Meet Your ExtenderBefore you install your extender, familiarize yourself with its LEDs,buttons, and port.Status LEDLED with LED LEDLED DescriptionsRouter Link LED This LED indicates the connection between the extender and the router or access point.Solid green. Best connection.Solid ambe r. Good connection.Solid red. Poor connection.Off. No connection.Status LED Solid amber. The extender is booting.Solid green. The extender is powered on.Off. The extender is powered off..Client Link LED This LED indicates the connection between the extender anda computer or WiFi device.Solid green. Connected.Off. No connection.WPS LED Solid green. WiFi security is enabled (WPA or WPA2).Blinking green. A WPS connection is being established.Off. WiFi security is not enabled.Use the Extender in Extender ModeIn extender mode, the extender repeats the signals from an existing WiFi router or access point. Place the extender, apply power, and connect it to your WiFi network.Place the Extender and Apply Power1. Place your extender in the same room as your WiFi router.Proximity to the WiFi router is required only during the initial setup process.2. Connect the power adapter to the extender and plug the poweradapter into an electrical outlet.3.4. If the Status LED does not light, press the Power On/Off button onthe extender.Connect to an Existing WiFi NetworkTo extend the range of your WiFi network, you must connect the extender to your existing WiFi network. You can do this in one of two ways:• Connect with WPS. For more information, see Connect with WPS on page 6.• Connect with web browser setup. For more information, see Connect with Web Browser Setup on page 8.Connect With WPSWi-Fi Protected Setup (WPS) lets you join a secure WiFi network without typing the network name and password.Note: WPS does not support WEP network security. If you are using WEP security, follow the instructions in Connect with Web Browser Setup on page 8.1. Press the2. Within two minutes, press the WPS button on your router or accesspoint.When the extender connects to your existing WiFi network, theRouter Link LED lights. If the Router Link LED does not light, try again.If it still does not light, see Connect with Web Browser Setup onpage 8.3. Unplug the power adapter and move the extender to a new locationthat is about halfway between your router and the area with a poor router WiFi signal.The location that you choose must be within the range of yourexisting WiFi router network.4. Plug the power adapter into an electrical outlet and wait for the5. on the front panel to help you choose aspot where the extender-to-router connection is optimal.6. If the Router Link LED doesn’t light amber or green, plug the extenderinto an outlet closer to the router and try again.Keep moving the extender to outlets closer to the router until theRouter Link LED lights amber or green.7. On your computer or WiFi device, find and connect to the newextended WiFi network.The extender creates a new extended WiFi network. The extender’snew WiFi network names are based on your existing WiFi networkname, with _EXT at the end of the name.For example:• Existing WiFi network name. MyNetworkName• New extended WiFi network name. MyNetworkName_EXT.Use the same WiFi password that you use for your WiFi router.8. Test the extended WiFi range by moving your computer or WiFi deviceto the area with a poor router WiFi signal:a. Leave your computer or WiFi device in the area with a poor routerb. on the extender:• If the Client Link LED is solid green, your extended WiFinetwork reaches the area with a poor router WiFi signal andyour network setup is complete.• If the Client Link LED is red, your extended WiFi network does not reach the area with a poor router WiFi signal.You must move the computer or WiFi device closer to theextender until the Client Link LED turns solid green.Connect With Web Browser Setup1. Use a WiFi network manager on a computer or mobile device to findand connect to the extender WiFi network NETGEAR_EXT.2. Launch a web browser.3. Enter in the address field of the browser.The New Extender Setup page displays.4. Click the NEW EXTENDER SETUP button.The Create Account page displays.5. Complete the fields on the page to set up your login credentials andclick the NEXT button.6. Click the WIFI RANGE EXTENDER button.The extender searches for WiFi networks in your area and displays a list.7. Select a WiFi network to extend and click the NEXT button.8. In the Password (Network Key) field, type the existing WiFinetwork passphrase (also called the passphrase or security key) and click the NEXT button.9. Set the network name (SSID) and password for your extender andclick the NEXT button.Wait for the page to display a list of available extended WiFi networks, which might take up to one minute.10. Use a WiFi network manager on the computer or WiFi device toconnect to the new extended WiFi network.You must connect your computer or WiFi device before you click the Continue button.11. Click the Continue button.A message displays confirming that the extender is connected and ready.12. Click the Next button.The registration page displays.13. Complete the registration fields and click the Finish button tocomplete the setup.If you do not want to register your extender, click the SkipRegistration link. Note that you must register your extender before you can use NETGEAR telephone support.The Status page displays.14. Unplug the adapter and move the extender to a new location that isabout halfway between your router and the area with a poor router WiFi signal.The location that you choose must be within the range of your existing WiFi router network.15.Plug the power adapter into an electrical outlet and wait for the16. to help you choose a spot where theextender-to-router connection is optimal.17. If the Router Link LED doesn’t light amber or green, plug the extenderinto an outlet closer to the router and try again.Keep moving the extender to outlets closer to the router until theRouter Link LED lights amber or green.18. Reconnect your computer or WiFi device to the new extended WiFinetwork.19. Test the extended WiFi range by moving your computer or WiFi deviceto the area with a poor router WiFi signal:a. Leave your computer or WiFi device in the area with a poor routerWiFi signal and return to the extender.b. on the extender:• If the Client Link LED is solid green, your extended WiFinetwork reaches the area with a poor router WiFi signal andyour network setup is complete.• If the Client Link LED is red, your extended WiFi network does not reach the area with a poor router WiFi signal.You must move the computer or WiFi device closer to theextender until the Client Link LED turns solid green.Connect Ethernet-Enabled DevicesAfter the extender is connected to your existing WiFi network, you can connect wired devices to the extender using Ethernet cables. These devices can then access your existing network through the WiFiconnection.WiFirouterTVUse the Extender in Access Point ModeYou can use the extender as a WiFi access point, which creates a new WiFi hotspot by using a wired Ethernet connection.1. Use an Ethernet cable to connect the Ethernet port on the extenderto an Ethernet LAN port on a router or a remote Ethernet LAN jack with LAN access.2. Connect the power adapter to the extender and plug the poweradapter into an electrical outlet. Wait for the Status LED to light green.3. If the Status LED does not light, press the Power On/Off button.4. Use a WiFi network manager on a computer or WiFi device to find andconnect to the NETGEAR_EXT (SSID) WiFi network.lights.5. Launch a web browser and enter in the addressfield.The New Extender Setup page displays.6. Click the NEW EXTENDER SETUP button.The Create Account page displays.7. Complete the fields on the page to set up your login credentials andclick the NEXT button.8. Click the ACCESS POINT button.The extender checks for an Internet connection.9. Set the network name (SSID), security option, and password for eachaccess point network and click the NEXT button.Your settings are applied and the extender is ready to be used as an access point.10. Use a WiFi network manager on the computer or WiFi device toconnect to the new access point WiFi network.11. Click the Continue button.A page displays that says you successfully created an access point.12. Click the Next button.The registration page displays.13. Follow the onscreen instructions to register your extender.Access Extender SettingsAfter installation, you can log in to the extender to view or change the extender’s settings.1. Use a WiFi network manager on a computer or WiFi device to find andconnect to the new extended WiFi network.lights.2. Launch a web browser.3. Enter in the address field of the browser.A login window opens.4. Enter your email address and password and click the LOG IN button.The Status page displays.5. Make any needed changes.Frequently Asked QuestionsYou can find more information about your product in the user manual, which is available at .The web browser setup keeps asking me for my network password (passphrase) or security key, and I am sure I have entered the correct password. What can I do?The extender is probably placed at the borderline of the range covered by the router or access point. For more information, see Place the Extender and Apply Power on page 5.If you are using WEP security, make sure that you are typing the network password in the correct field.Can I set up the extender in extender mode if I connect it to the router with an Ethernet cable?No. The extender is designed to connect wirelessly to the router or access point if it is in extender mode. If the extender is in access point mode, you can connect it to the router or access point with an Ethernet connection. For more information about access point mode, see Use the Extender in Access Point Mode on page 13.I forgot my login email address and password. What can I do?In the login window, click the Username & Password Help link to answer the security questions that you set up during the initial setup.If you forgot the answers to your security questions, do the following to set up your login credentials again:1. Restore the extender to its factory default settings.2. Launch a web browser.3. Enter in the address field of the browser.The New Extender Setup page displays.4. Click the NEW EXTENDER SETUP button.5. When prompted, complete the fields on the page to set up your logincredentials again.How do I restore the extender to its factory default settings?1. Use a sharp object such as a pen or straightened paper clip to pressand hold the Restore Factory Settings button on the extender for at least five seconds until the Status LED lights amber.2. Release the Restore Factory Settings button and wait for theextender to reboot.The extender resets and returns to the factory default settings.I enabled a WiFi MAC filter, WiFi access control, or access control list (ACL) on my router. What should I do when installing the extender?When a device connects through the extender to your router, the MAC address of the device shown on the router is translated to another MAC address. If your router’s MAC filter, wireless access control, or ACL is enabled, the device connects to the extender but cannot get an IP address from the extender and cannot access the Internet.To allow your device to receive an IP address from the extender and access the Internet, you must provide the translated MAC address to the router.1. Log in to your router and disable the MAC filter, wireless accesscontrol, or ACL.For more information about how to disable your router’s MAC filter, wireless access control, or ACL, see your router’s documentation.2. Power on the extender and connect all of your WiFi devices to theextender network.3. Make sure that the Router Link LED remains lit.4. Log in to your extender:a. Launch a web browser.b. Enter in the address field of the browser.A login window opens.c. Enter your email address and password and click the LOG INbutton.The Status page displays.5. Select Settings > Connected Devices.The Connected Devices section displays the MAC addresses andvirtual MAC addresses for the computers and WiFi devices that areconnected to the extender.6. On the router, add the extender’s virtual MAC addresses and all of thevirtual MAC addresses of the devices connected to the extender toyour router’s MAC filter table.7. Enable the router’s MAC filter, wireless access control, or ACL.I am connected to NETGEAR_EXT and launched a browser. Why can’t I see the web browser setup?Try these troubleshooting steps:• Make sure that your computer is set up to use DHCP (most are).• Make sure that the Device Link LED is green and that you are using a valid IP address.• Relaunch the web browser and type in the address field. Type your email address and password and click the LOG IN button.August 2015NETGEAR, Inc.350 East Plumeria DriveSan Jose, CA 95134, USA SupportThank you for purchasing this NETGEAR product. You can visit /support to register your product, get help, access the latest downloads and user manuals, and join our community. We recommend that you use only official NETGEAR support resources.Trademarks© NETGEAR, Inc., NETGEAR and the NETGEAR Logo are trademarks of NETGEAR, Inc. Any non-NETGEAR trademarks are used for reference purposes only.ComplianceFor the current EU Declaration of Conformity, visit: /app/answers/detail/a_id/11621/.For regulatory compliance information, visit: /about/regulatory/.See the regulatory compliance document before connecting the power supply.。
路由器R2000设置步骤图文详解R2000安装全过程本文主要介绍的是关于R2000的安装设置步骤,希望本文能对你有所帮助。
R2000网络标准IEEE 802.11n网络协议TCP/IP协议最高传输速率300Mbps传输速率2.4GHz300Mbps覆盖范围中小型家庭频率范围单频网络接口5个10/100快速以太网端口(1个广域网和4个局域网),采用自动感应技术Qos支持支持WPS功能支持WDS功能支持WDS无线桥接拒绝服务(DoS)攻击保护Exposed Host(DMZ)保护游戏安全无线安全WiFi Protected Access(WPA/WPA2—PSK)和WEP双防火墙保护(SPI和NAT 防火墙)拒绝服务(DoS)攻击保护Exposed Host(DMZ)保护游戏安全产品尺寸132.46×108.7×48mm产品重量0.163kg其它性能系统需求采用以太网连接实现宽带(专线、DSL)互联网服务和调制解调器应用;用于各计算机的802.11 b/g/n 2.4 GHz 无线适配器或以太网适配器和线缆;Microsoft Windows 7、Windows 8、Windows Vista、Windows XP、Windows 2000、Mac OS、UNIX 或Linux;Microsoft Internet Explorer 5.0、Firefox 2.0 或Safari 1.4 及更高版本;与N300无线USB适配器(WNA3100)一起使用可获得最佳性能路由器R2000设置步骤第一步、设置电脑IP地址在设置NETGEAR WNR2000路由器上网之前,需要先把电脑本地连接(以太网)中的IP 地址,设置为自动获得(动态IP),如下图所示。
如果不清楚怎么设置,请点击阅读文章:。
NETGEAR JWNR2000 快速安装指南路由器的安装使用方法共包含两部分:基本的上网设置和无线安全设置。
第1部分基本的上网设置1.1 将JWNR2000正确接入网络①若您的宽带是ADSL/ Cable Modem接入,连接方式如下图:②若您的宽带是直接入户,没有Modem,则计算机连接到路由器的LAN口,原先运营商提供的宽带线或宽带接口,直接连接到路由器的WAN口。
注意:完成上述连接并启动Modem及路由器后,请检查路由器面板的指示灯。
若正确连接,电源/测试指示灯、WAN口指示灯及对应的LAN口指示灯均发亮。
1.2 计算机网络属性配置JWNR2000是基于浏览器管理的设备,计算机可通过浏览器进入路由器的管理界面对其进行配置管理,但首先计算机的相关设置必须正确。
1.2.1 Windows XP 操作系统的计算机,按以下步骤进行配置(以Windows XP Service Pack 2为例):①启动计算机,右键单击“网上邻居”选“属性”(可在桌面或开始菜单中找到网上邻居),右键单击“本地连接”选“属性”,选中“Internet协议(TCP/IP)”,点击“属性”;②将计算机设为“自动获得IP地址”,“自动获得DNS服务器地址”,点击“确定”。
③查看本地连接的状态。
右键单击“本地连接”选“状态”,点击“支持”。
正常情况下,地址类型为通过DHCP 指派,默认网关为192.168.1.1或者10.0.0.1,该地址即为路由器的管理IP。
如图,默认网关为192.168.1.1,通过该地址可以登录路由器的管理界面。
1.2.2 Windows Vista 操作系统的计算机,按以下步骤配置:①启动计算机,打开”控制面板”→”网络和Internet”→”网络和共享中心”,点击左侧”管理网络连接”。
右键单击“本地连接(Local)”选“属性”,选中“Internet协议版本4(TCP/IPv4)”,点击“属性”;②将计算机设为“自动获得IP地址”,“自动获得DNS服务器地址”,点击“确定”。
2013 年 10 月快速安装指南感谢您选择NETGEAR 公司的 N300 系列无线路由器 JWNR2000v5,以下将介绍该路由器的安装使用方法。
只需5步即可完成全部设置,让您享受上网冲浪的乐趣。
包装内容第一步将JWNR2000v5接入网络1.ADSL/ Cable Modem 接入,连接方式如下:使用一条网线将Modem 连接到路由器的因特网端口(蓝色标识),使用另一条网线将一台计算机连接到路由器的局域网端口(灰色标识),或无线连接到路由器(请参照步骤四预设 SSID 及密码)。
JWNR2000v5ModemJWNR2000v5WPS/ѹInternetͧЉխͨ2.若宽带网线到户,没有Modem ,连接方式如下:使用一条网线或无线连结方式将计算机连接到路由器的局域网端口(灰色标识),运营商提供的宽带线或宽带接口;直接连接到路由器的因特网端口(蓝色标识)。
注:路由器指示灯说明,详见本文附录一。
第二步登录路由器管理界面启动Internet Explorer 或者其他浏览器,打开一个网页,在网页的地址栏中输入或 然后回车:通常情况下,浏览器会弹出如下登录框,要求输入用户名和密码,默认如下:用户名:admin 密码:password (字母均为小写)注意:初次设置时,精灵设置向导自动出现,询问“需要NETGEAR 精灵为您提供帮助吗?”请选择“不需要,我想自己配置因特网连接”,点击“下一步”、再点击“确定”;有的用户或许会看到写有“重要的更新”的提示,请点击继续。
第三步将路由器连上因特网最常见的宽带类型有三种:PPPoE 、固定IP 或动态IP 。
设置方法分别如下(如果您不确定自己所用的宽带属于哪种类型,请首先向宽带运营商进行咨询):1.采用PPP O E 拨号上网的配置方式每次连接因特网时都需要用户名和密码进行登录,或者ISP 提供给您的是PPPoE 帐户,均在此列。
例如:中国电信和中国联通 ADSL 宽带业务通常采用此连接类型,部分小区宽带也会采用这种方式。
Push ‘N’ ConnectChoose from a complete line of NETGEAR products that are designed to meet your needs4500 Great America Parkway Santa Clara, CA 95054 USA 1-888-NETGEAR (638-4327)E-mail: info@ System RequirementsBroadband (cable, DSL) Internet servicea nd modem with Ethernet connection 2.4 GHz 802.11n draft specification adapter or 2.4 GHz 802.11b/g wireless adapter. Alternatively, an Ethernet adapter and cable for each computerMicrosoft ® Windows ® Vista™, XP ,2000, Me, Mac ® OS, UNIX ®, or Linux ®Internet Explorer ® 5.0We recommend using this product with RangeMax™ NEXT Wireless-N Adapters (WN511B/T , WN311B/T , WN121T)StandardsIEEE 802.11n draft specification, IEEE 802.11g, IEEE 802.11b, 2.4 GHz Physical SpecificationsDimensions: 225.5 x 172 x 39 mm (8.9 x 6.8 x 1.5 in)Weight: 0.56 kg (1.2 lb)––––––––Ease of UseSmart Wizard ® simplifies setup by automatically detecting andconfiguring your router for virtually all ISP connections SecurityDouble firewall:- Network Address Translation (NAT) to hide PCs and files from outside users - Stateful packet inspection (SPI) firewall to deny outside requests for personal informationDenial-of-service (DoS) attack prevention Intrusion detection and prevention (IDS)WiFi Protected Access (WPA2-PSK, WPA-PSK)Wired Equivalent Privacy (WEP) 64-bit, 128-bit encryption for IEEE 802.11b and IEEE 802.11gSupports 2 VPN pass-through tunnels Wireless access control to identify authorized wireless network devices MAC address authenticationExposed host (DMZ) for secure gaming––––––––––Privacy and Parental Control Time-based usage controls Web site logging URL content filtering WarrantyNETGEAR 1-year Warranty Package ContentsRangeMax™ Premium Wireless-N Gigabit Router (WNR3500)StandEthernet cable Setup CD2V , 1.5A power adapter, localized to country of saleWarranty/support information card––––––––––RangeMax™ Wireless-N Gigabit Router WNR3500©2007 NETGEAR, Inc., the NETGEAR logo, Connect with Innovation, Everybody’s connecting, FrontView, the Gear Guy logo, IntelliFi, ProSafe, RangeMax, ReadyNAS, RAIDar, RAIDiator, X-RAID, and Smart Wizard are trademarks of NETGEAR, Inc. and/or its subsidiaries in the United States and/or other countries. Microsoft and Windows are trademarks of Microsoft Corporation in the United States and/or other countries. Other brand and product names are trademarks or registered trademarks of their respective holders. Information is subject to change without notice. All rights reserved.*Free basic installation support provided for 90 days from date of purchase. Advanced product features and configurations are not included i n free basic installation support; optional premium support available.1Up to 15x more speed and 12x more coverage than Wireless-A. Maximum performance compared to Wireless-A, when used with related wireless adapters.†Maximum wireless signal rate derived from IEEE standard 802.11 specifications. Actual data throughput will vary. Network conditions and environmental factors, including volume of network traffic, building materials and construction, and network overhead, lower actual data throughput rate. NETGEAR makes no express or implied representations or warranties about this product’s compatibility with any future standards.‡“N”, “Wireless-N” and “draft 802.11n” refer to compliance with IEEE 802.11n draft specification version 2.0 only.D-WNR3500-0Why 8 internal smart antennas?• Smart antenna technology adapts on-the-fly and selects the best antenna combination to transmit and receive• Multiple directional antenna direct Wi-Fi signals, extending range and enhancing the reception of weak signals• Internal antennas take the guesswork out of antenna setup。