QFT-中文说明书20110331
- 格式:pdf
- 大小:405.14 KB
- 文档页数:17

人Fas 凋亡抑制分子3 (FAIM3)酶联免疫吸附测定试剂盒使用说明书产品编号:E-EL-H0374(本试剂盒仅供体外研究使用、不用于临床诊断!)声明:尊敬的客户,感谢您选用本公司的产品。
本产品选用世界著名生产厂家的原料,采用专业ELISA kit 生产技术制造。
适用于体外定量检测人血清、血浆、组织匀浆或细胞培养上清液中天然和重组FAIM3浓度。
使用前请仔细阅读说明书并检查试剂组分!如有疑问,请及时联系伊莱瑞特生物科技有限公司。
*: [96T/48T](打开包装后请及时检查所有物品是否齐全完整)w w w .e l a bs ci e n ce检测原理:本试剂盒采用双抗体夹心ELISA 法。
用抗人FAIM3抗体包被于酶标板上,实验时标本或标准品中的FAIM3会与包被抗体结合,游离的成分被洗去。
依次加入生物素化的抗人FAIM3抗体和辣根过氧化物酶标记的亲和素。
抗人FAIM3抗体与结合在包被抗体上的人FAIM3结合、生物素与亲和素特异性结合而形成免疫复合物,游离的成分被洗去。
加入显色底物(TMB),TMB 在辣根过氧化物酶的催化下现蓝色,加终止液后变黄。
用酶标仪在450nm 波长处测OD 值,FAIM3浓度与OD 450值之间呈正比,通过绘制标准曲线求出标本中FAIM3的浓度。
标本收集:1. 血清:全血标本于室温放置2小时或4℃过夜后于1000×g 离心20分钟,取上清即可检测,收集血液的试管应为一次性的无热原,无内毒素试管。
2. 血浆:抗凝剂推荐使用EDTA.Na2,标本采集后30分钟内于1000×g 离心15分钟,取上清即可检测。
避免使用溶血,高血脂标本。
3. 组织匀浆:用预冷的PBS (0.01M, pH=7.4)冲洗组织,以去除残留血液(匀浆中裂解的红细胞会影响测量结果),称重后将组织剪碎。
将剪碎的组织与对应体积的PBS (一般按1:9的重量体积比,比如1g 的组织样本对应9mL 的PBS ,具体体积可根据实验需要适当调整,并做好记录。

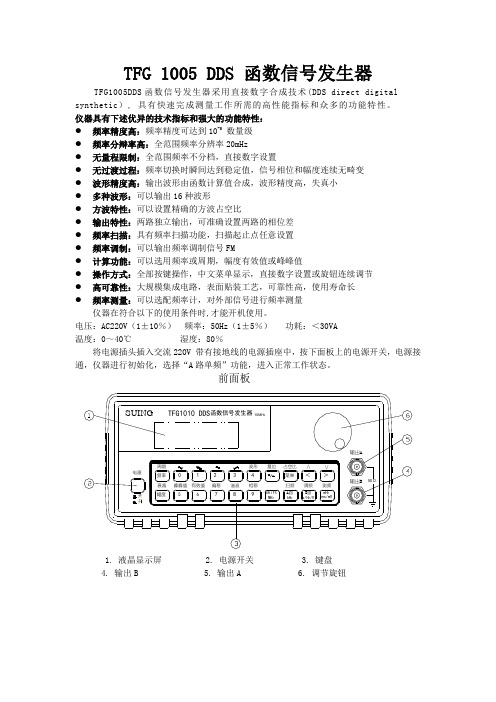
TFG 1005 DDS 函数信号发生器TFG1005DDS 函数信号发生器采用直接数字合成技术(DDS direct digital synthetic ), 具有快速完成测量工作所需的高性能指标和众多的功能特性。
仪器具有下述优异的技术指标和强大的功能特性:● 频率精度高:频率精度可达到10-5数量级 ● 频率分辩率高:全范围频率分辨率20mHz ● 无量程限制:全范围频率不分档,直接数字设置● 无过渡过程:频率切换时瞬间达到稳定值,信号相位和幅度连续无畸变 ● 波形精度高:输出波形由函数计算值合成,波形精度高,失真小 ● 多种波形:可以输出16种波形● 方波特性:可以设置精确的方波占空比● 输出特性:两路独立输出,可准确设置两路的相位差 ● 频率扫描:具有频率扫描功能,扫描起止点任意设置 ● 频率调制:可以输出频率调制信号FM● 计算功能:可以选用频率或周期,幅度有效值或峰峰值● 操作方式:全部按键操作,中文菜单显示,直接数字设置或旋钮连续调节 ● 高可靠性:大规模集成电路,表面贴装工艺,可靠性高,使用寿命长 ● 频率测量:可以选配频率计,对外部信号进行频率测量仪器在符合以下的使用条件时,才能开机使用。
电压:AC220V (1±10%) 频率:50Hz (1±5%) 功耗:<30VA 温度:0~40℃ 湿度:80%将电源插头插入交流220V 带有接地线的电源插座中,按下面板上的电源开关,电源接通,仪器进行初始化,选择“A 路单频”功能,进入正常工作状态。
SUINGTFG1010 DDS函数信号发生器10MH Z频率幅度051234菜单<>mH Z ms/mVB路s/H Z /VA路kH ZShiftMH Z9876前面板有效值调频扫频相移谐波偏移测频波形复位<<占空比峰峰值衰减周期电源开关50Ω输出A输出B1. 液晶显示屏2. 电源开关3. 键盘4. 输出B5. 输出A6. 调节旋钮AC220V/50H Z 0.5A石家庄数英电子科技有限公司石家庄市无线电四厂TTL输出调制/外测输入后面板1. 调制/外测输入2. TTL 输出3. AC220V 电源插座 警告: 为保障操作者人身安全,必须使用带有安全接地线的三孔电源插座。

5.6 测量二氧化碳〔CO2〕测量简介本监护仪采用红外吸收技术测量病人呼吸气路中的二氧化碳(CO2)浓度。
其原理基于CO2分子能吸收特定波长的红外光线能量,且吸收能量的多少与CO2的浓度有直接关系。
当红外光源发射的红外光线穿透含有CO2的气体样本时,局部能量将被气体中的CO2吸收。
在红外光源的另一侧利用光电探测器来测量剩余的红外光线能量,并转换成电信号,该电信号与红外光源的能量进展比拟并调整后,即可准确的反映气体样本中的CO2浓度。
CO2的测量方式分为以下两种:1. 主流式:在直接连接病人的呼吸系统的气道适配器上安装CO2传感器。
2. 旁流式/微流式:对病人呼吸气道中的呼吸气体,采用恒定的采样流量进展采样,通过CO2传感器对其进展分析。
测量准备.1 主流CO2模块1. 连接CO2传感器电缆将CO2传感器电缆插入监护仪侧面板上的CO2插座中。
2. 选择适宜的主流气道适配器按照病人的体形、气管内导管的直径和监护环境来选择适当的气道适配器。
详细的信息可参考以下表格或与制造商联系。
童新生儿〔可重复使用的〕≤3. 将气道适配器嵌放在CO 2传感器上连接气道适配器和传感器时,应确保气道适配器的窗口是干净和枯燥的,如有需要,请清洁或改换气道适配器。
将气道适配器嵌放在CO 2传感器上,等待气道适配器与传感器预热。
屏幕上显示提示信息“传感器加温〞,此时传感器和气道适配器升至工作温度。
当传感器预热完成,该提示信息消失。
注意:预热时间会随传感器周围温度的转变而改变。
4. 参照本说明书章节的描述,进展校零操作。
5. 校零完成后,按下列图5-6-1所示连接气路。
图5-6-1 主流CO 2连接图6. 确认气路的密闭性后,即可开场测量。
.2 旁流CO 2模块CO 2模块带有脱水瓶:1. 将脱水瓶安装在脱水瓶支架上,按下列图5-6-2连接CO 2测量组件。
图5-6-2 旁流CO 2连接图2. 进入CO 2菜单,按下〈启动采样泵〉按钮即开场测量。

****单钩秤仪表使用说明书承德普特智能电子有限公司目录第一章仪表简介一、概述 (2)二、技术性能 (2)第二章接口定义一、接口定义 (3)二、串行通讯协议 (4)第三章标定调试一、参数设置 (7)二、重量标定 (9)三、补偿标定 (10)四、修改标率和标定调试密码 (10)第四章操作使用一、指示灯说明 (11)二、开机置零和按键置零 (11)三、测试 (11)四、超载报警功能 (11)五、自动置零功能 (11)六、信息提示 (11)第五章维护保养及注意事项一、使用 (12)二、维护 (12)警告:请认真阅读本使用说明书后才能使用本仪表,如有不明白之处请先联系我公司,了解清楚后再使用本仪表。
谢谢合作,欢迎使用我公司产品。
第一章仪表简介一、概述******单钩秤仪表由高速高精度A/D转换器和单片计算机组成,经过特殊的数字滤波技术能快速稳定读数。
******单钩秤仪表标定、操作使用均非常方便。
所有电子元件均使用工业级元件,确保在恶劣环境下能正常工作。
二、技术性能⑴输入信号范围:-5~+15mV⑵A/D转换:24位Sigma-Delta 模数转换⑶非线性:≤0.0015﹪F.S.⑷最小分辨率:0.1uV/d⑸供桥电压:10V/300mA(可接8个350Ω传感器)⑹传感器接口:带长线补偿的六线制传感器接口⑺串行通讯接口:RS232C和RS485接口,波特率可选⑻大屏幕接口:电流环接口⑼开关量接口:超载报警继电器输出⑽显示屏:6位0.8英寸超高亮LED显示器⑾指示灯:预警、延时报警和报警指示灯⑿供电电源:AC220V、50Hz⒀工作温度:-40~+85℃⒁相对湿度:≤90﹪R.H⒂外形尺寸:210×230×80 mm⒃重量: 2.3kg一、接口定义1、传感器接口(采用DB-9芯孔连接器)注:在采用四线制传感器时,1、2脚必须短接,4、5脚必须短接2、串行通讯接口注:20mA电流环接口用于接大屏幕显示器,波特率为4800bps。
Technical ManualF-TESTO (Free Testoterone) ELISA Kit (UNFI0105)•Catalogue Code: UNFI0105 •Competitive ELISA Kit •Research Use OnlyContents1. Key features and Sample Types (3)2. Storage & Expiry (3)3. Description and Principle (4)4. Kit Contents (5)Additional materials required: (5)Precautions: (6)5. Workflow Overview (7)6. Sample Preparation (8)7. Standard and Reagent Preparation (9)1. Wash Buffer: (10)2. Standard Dilution: (10)3. Preparation of biotin-labeled Antibody working solution: (11)4. Preparation of HRP-Streptavidin Conjugate (SABC) working solution: (11)8. Assay Procedure (11)9. Data Analysis (12)10. Typical Data & Standard Curve (13)1. Key features and Sample TypesAliases:F-TESTOUniprot:Not availableDetection method:Competitive, Double AntibodySample Type:Serum, Plasma and other biological fluidsReactivity:UniversalRange:15.625-1000pg/mlSensitivity:< 9.375pg/mlStorage:2-8°C for 6 monthsExpiry:See Kit Label2. Storage & ExpiryAssay Genie ELISA Kits are shipped on ice packs. Please store this ELISA Kit at 4°C. Date of expiration will be on the ELISA Box label.3. Description and PrincipleThe Assay Genie ELISA (enzyme-linked immunosorbent assays) assay kits are designed for the mea surement of analytes in a wide variety of samples. As today‘s scientists demand high quality consistent data, we have developed a range of sensitive, fast and reliable ELISA kit assays to meet and exceed those demands.This kit is based on Competitive-ELISA detection method. The microtiter plate provided in this kit has been pre-coated with analyte of interest. During the reaction, the analyte in the sample or standard competes with a fixed amount of target on the solid phase supporter for sites on the Biotinylated Detection Antibody specific to analyte. Excess conjugate and unbound sample or standard are washed from the plate, and HRP-Streptavidin (SABC) is added to each microplate well and incubated. TMB substrate solution is then added to each well. The enzyme-substrate reaction is terminated by the addition of a sulphuric acid solution and the colour change is measured spectrophotometrically at a wavelength of 450nm. The concentration of target in the samples is then determined by comparing the OD of the samples to the standard curve.4. Kit ContentsEach kit contains reagents for either 48 or 96 assays including:Additional materials required:1. 37°C incubator2. Plate shaker3. Plate Reader with 450nm filter4. Precision pipettes and disposable pipette tips5. Distilled water6. Disposable tubes for sample dilution7. Absorbent paperPrecautions:1. To identify the concentration of your target, a pilot experiment using standards and a small number of samples is recommended.2. Ensure unopened and unused plate is kept dry to avoid contamination.3. Before using the kit, centrifuge tubes to spin down standard & antibodies.4. Avoid light for storage of TMB reagents.5. Wash steps are critical for the success of the assay, deviations from wash steps may cause false positives and result in a high background.6. Duplicate wells are recommended for both standard and sample testing.7. Do not let the microplate wells dry during assay. Dry plates will inactivate active components.8. Do not reuse tips and tubes to avoid cross contamination.9. Avoid using the reagents from different batches together.5. Workflow OverviewPrepare plate standards and reagentsAdd 50µl of samples, standards and controls. Immediately add 50µl Biotin-labelled Antibody working solution.Wash plate X3Add 100µl SABC working solution.Wash plate X5Add 90µl TMB Substrate. Add 50µl STOP solution and read absorbance @ 450nmWash plate x 26. Sample PreparationGeneral considerations: According to best practices, extract protein & perform the experiment as soon as possible after sample collection. Alternatively, store the extracts at the designated temperature (-20°C/-80°C). For optimal results, avoid repeated freeze-thaw cycles.Serum:If using serum separator tubes, allow samples to clot for 30 minutes at room temperature. Centrifuge for 20 minutes at 1,000x g. Collect the serum fraction and assay promptly or aliquot and store the samples at -80°C. Avoid multiple freeze-thaw cycles.If serum separator tubes are not being used, allow samples to clot overnight at 2-8°C. Centrifuge for 20 minutes at 1,000x g. Remove serum and assay promptly or aliquot and store the samples at -80°C. Avoid multiple freeze-thaw cycles.Plasma:Collect plasma using EDTA or heparin as an anticoagulant. Centrifuge samples at 4°C for 15 mins at 1000 × g within 30 mins of collection. Collect the plasma fraction and assay promptly or aliquot and store the samples at -80°C. Avoid multiple freeze-thaw cycles.Note: Over haemolyzed samples are not suitable for use with this kit.Cell culture supernatant: Collect the cell culture media by pipette, followed by centrifugation at 4°C for 20 mins at 1000 x g. Collect the clear supernatant and assay immediately.Cell lysates:Commercial RIPA kits are recommended for preparation of cell lysate samples. For 2 x 10⁶cells, lyse cells in 0.5 mL RIPA buffer, removing DNA content. Determine the protein concentration using a BCA assay kit (BN01031) with each sample concentration being ≤ 300μg for analysis.Tissue Homogenates:Rinse tissue with 1X PBS to remove excess blood. Mince tissue after weighing it and homogenize in PBS (the volume depends on the weight of the tissue. 9mL PBS (including protease inhibitors) would be appropriate for 1 gram of tissue. To further lyse cells, you can sonicate the suspension with an ultrasonic cell disrupter or subject it to freeze-thaw cycles. The homogenates are then centrifuged for 5 minutes at 5000 x g and the supernatant is removed for assaying. The total protein concentration was determined by BCA kit and the total protein concentration of each pore sample should not exceed 0.3mg.NotesSamples stored at 2-8°C should be used within 5 days, samples stored at -20°C should be assayed within 1 month and samples stored at -80°C should be assayed within 2 months to reduce the loss of bioactivity. Avoid multiple freeze-thaw cycles. Hemolyzed samples are not suitable for this assay.7. Standard and Reagent PreparationManual WashingDiscard the solution in the plate without touching the side of the wells. Clap the plate on absorbent filter paper or other absorbent material. Fill each well completely with 350µl wash buffer and soak for 1 to 2 mins, then aspirate contents from the plate, and clap the plate on absorbent filter paper or other absorbent material. Repeat this procedure for the designated number of washes.Automated WashingAspirate all wells, then wash plate with 350µl wash buffer. After the final wash, invert plate, and clap the plate on absorbent filter paper or other absorbent material. It is recommended that the washer is set for a soaking time of 1 minute (Note: set the height of the needles; be sure the fluid can be taken up completely).Sample Dilution GuidelinesDetermine the concentration of the target protein in the test sample and then select the optimal dilution factor to ensure the target protein concentration falls within the optimal detection range of the kit. Dilute the samples with the dilution buffer provided with the kit. Several dilution tests may be required to achieve the optimal results. The test samples must be well mixed with the dilution buffer. Standard and sample dilution should be performed before starting the experiment.Note:Matrix components in the sample will affect test results, samples need to be diluted at least ½ with Sample Dilution Buffer before testing.Reagent PreparationBring all reagents and samples to room temperature 20 minutes before use.1. Wash Buffer:Dilute 30ml (15 ml for 48 well assay) of Concentrated Wash Buffer into 750 ml (375 ml for 48 well assay) of Wash Buffer with deionized or distilled water. Store unused solution at 4°C. If crystals have formed in the concentrate, warm at 40°C in water bath (Heating temperature should not exceed 50°C) and mix gently until crystals have completely dissolved. The solution should be cooled to room temperature before use.2. Standard Dilution:1). Add 1ml of Sample dilution buffer into one Standard tube (labelled as Stock Solution), keepthe tube at room temperature for 10 min and mix thoroughly.Note: If the standard vial concentration is different to the highest value in the range (please see page 3), please dilute using sample buffer to match highest range value to create stock solution.2). Label 7 Eppendorf tubes with 1/2, 1/4, 1/8, 1/16, 1/32, 1/64 and blank respectively. Aliquot300μl of the S ample dilution buffer into each tube. Add 300μl of the above (Stock Solution) standard solution into 1st tube and mix thoroughly. Tran sfer 300μl from 1st tube to 2nd tube and mix thoroughly. Transfer 300μl from 2nd tube to 3rd tube and mix thoroughly, and so on.Sample dilution buffer is used as blank control.DILUTION SERIES300μl 300μl 300μl 300μl 300μl 300μl1/2 1/41/81/161/321/64Stock SolutionNote: The standard solutions are best used within 2 hours. The standard solution series should be kept at 4°C for up to 12 hours. Or store at -20 °C for up to 48 hours. Avoid repeated freeze-thaw cycles.3. Preparation of biotin-labeled Antibody working solution:Prepare within 1 hour of starting the experiment.1. Calculate the total volume of the working solution: 50µl / well × quantity of wells (Allow100-200µl more than the total volume).2. Dilute the biotin-detection Antibody with antibody dilution buffer at 1:100 and mixthoroughly (i.e. Add 1µl of biotin-labeled Antibody into 99µl of Antibody Dilution Buffer.)4. Preparation of HRP-Streptavidin Conjugate (SABC) working solution: Prepare within 30 minutes of starting the experiment.1. Calculate the total volume of the working solution: 100µl / well × quantity of wells.(Allow 100-200µl more than the total volume)2. Dilute the SABC with SABC dilution buffer at 1:100 and mix thoroughly. (i.e. Add 1µlof SABC into 99µl of SABC dilution buffer.)8. Assay ProcedureEquilibrate the TMB substrate for at least 30 min at 37°C before use. When diluting samples and reagents, they must be mixed completely and evenly. It is recommended to plot a standard curve for each test.1. Set standard, test sample and control (blank) wells on the pre-coated platerespectively, and then, record their positions. It is recommended to measure each standard and sample in duplicate. Wash plate 2 times before adding standard, sample and control (blank) wells.2. Add Sample and Biotin-labeled Antibody:Add 50µL of Standard, Blank or Sampleper well. The blank well is added with Sample Dilution Buffer. Immediately add 50 µL of biotin-labeled Antibody working solution to each well. Cover with the plate sealer provided. Gently tap the plate to ensure thorough mixing. Incubate for 45 minutes at 37°C. (Solutions are added to the bottom of micro-ELISA plate well, avoid touching plate walls and foaming).3. Wash:Aspirate each well and wash, repeating the process X3 according toinstructions. Let the wash buffer stay in the wells for 1-2 minutes each time. After final wash, remove any remaining wash buffer by aspirating or decanting4. HRP-Streptavidin Conjugate (SABC):Add 100µL of SABC working solution to eachwell.5. Incubate: Cover with a new Plate sealer. Incubate for 30 minutes at 37°C.6. Wash:Repeat the aspiration/wash process X5 according to instructions. Let the washbuffer stay in the wells for 1-2 minutes each time.7. TMB Substrate:Add 90µL of TMB Substrate to each well. Cover with a new platesealer. Incubate for about 10-20 minutes in the dark at 37°C. Protect from light.Note:The reaction time can be shortened or extended according to the actual colour change, but not more than 30 minutes. When apparent gradient appears in standard wells, you can terminate the reaction.8. Stop:Add 50µL of Stop Solution to each well. Wells will turn to yellow immediately.The adding order of stop solution should be as the same as the substrate solution.9. OD Measurement:Determine the optical density (OD Value) of each well at once,using a microplate reader set to 450 nm. You should open the microplate reader ahead, preheat the instrument, and set the testing parameters.9. Data AnalysisRegarding calculation, the standard curve can be plotted as the O.D.450 of each standard solution (Y) vs, the respective concentration of the standard solution (X). The target concentration of the samples can be interpolated from the standard curve. Curve Expert 1.3 or 1.4 is recommended for data analysis.Note: If the samples measured were diluted, multiply the dilution factor to the concentrations from interpolation to obtain the concentration before dilution.10. Typical Data & Standard CurveStandard CurveResults of a typical standard run of a ELISA kit are shown below. This standard curve was generated at our lab for demonstration purpose only. Each user should obtain their own standard curve as per experiment.SpecificityThis assay has high sensitivity and excellent specificity for detection of . No significant cross-reactivity or interference between and analogues was observed.Note:Limited by current skills and knowledge, it is difficult for us to complete the cross-reactivity detection between and all the analogues, therefore, cross reaction may still exist.RecoveryMatrices listed below were spiked with a certain level of and the recovery rates were calculated by comparing the measured value to the expected amount of in the samples.Not AvailableLinearityThe linearity of the kit was assayed by testing the samples spiked with appropriate concentration of and their serial dilutions.Not AvailablePrecision•Intra-Assay: CV<8%•Inter-Assay: CV<10%StabilityThe stability of the ELISA Kit is determined by the loss rate of activity. The loss rate of this kit is less than 10% within the expiration date under appropriate storage conditions.To minimize extra influence on the performance, operation procedures and lab conditions, especially room temperature, air humidity, incubator temperature should be strictly controlled. It is also strongly suggested that the whole assay is performed by the same operator from the beginning to the end.Assay Genie 100% money-back guarantee!If you are not satisfied with the quality of our products and our technical team cannot resolveyour problem, we will give you 100% of your money back.Contact Details。
QOH-1去耦合器使用说明书1.产品用途去耦合器是一种嵌位式排流与浪涌保护器于一体的交流干扰防护产品。
主要应用于埋地长输管道工程。
在如下场合中:如在管道附件有高压输电线路铁塔/通讯铁塔以及它们的接地系统;如在高压输电线路与管道并行段的公共走廊内;如在管道与输电线路交叉位置处以及与电气化铁路并行的管段,安装去耦合器能有效降低直流、交流杂散电流或雷电流对埋地管道的影响,增强管道阴极保护电位测量时的稳定性。
2. 规范和标准—NFPA70 250-6(e)国家电气规程;—IEC61643.1-2005 连接低压配电系统的电涌保护器第1部分:性能要求和试验方法;—NACE RP0177 减轻交流电和雷电对金属构筑物和腐蚀控制系统影响的措施;—GB/T2423.1 电工电子产品环境试验第2部分:试验方法试验A:低温试验;—GB/T2423.2 电工电子产品环境试验第2部分:试验方法试验B:高温试验—GB/T2423.3 电工电子产品环境试验第2部分:试验方法试验C:恒定湿热试验—GB/T2423.5 电工电子产品环境试验第2部分:试验方法试验Ea和导则:冲击—GB/T2423.10 电工电子产品环境试验第2部分:试验方法试验FC和导则:振动(正弦)—GB11032 交流无间隙金属氧化物避雷器;—GB4208 外壳防护等级(IP代码);—GB 18802.1-2002/IEC 61643-1《低压配电系统的电涌保护器(SPD)第1部分:性能要求和试验方法》;—SY/T0032—2002 埋地钢制管道交流排流保护技术标准。
3.定义◆隔离电压去耦合器直流漏电流为1mA时的电压值。
◆额定隔离电压(-U N/+U M)去耦合器运行于隔离直流导通交流状态下的标称电压值。
◆稳态电流去耦合器持续运行于导通状态下,流过去耦合器的最大直流或交流电流。
◆故障电流阴极保护系统中交流干扰源产生的瞬间干扰电流。
4. 主要技术性能4.1环境参数:使用温度:-45℃~+60℃;相对湿度:20%~90%RH;4.2隔离电压(直流漏电流为1mA)不大于1.2U N;4.3 额定隔离电压下的直流泄露电流小于1mA;4.4 稳态直流电流(在-2.6U N/+2.6U M条件下)≥3 A;4.5交流稳态电流(额定隔离电压-U N/+U M条件下)≥45A;4.6故障电流(AC、工频/30周波):≥3500A;4.7 额定雷电冲击通流量(8/20µs):100kA;4.8 防护等级:IP654.9外型尺寸:Φ250×370mm5. 应用安装接线:去耦合器箱体为IP65防护等级,便于室外安装。
非常感谢购置“锐鑫测控”QFT型浮标式气动量仪。
为了更好的使用本量仪,在此说明书中介绍了其原理、结构及正确的操作方法,希望熟读并得到您的喜爱。
产品质量经过严格检查,如果产品出现故障而不能使用的情况下,请与本公司销售技术部或售后服务部联系。
一、概述本量仪(见图1)是将长度尺寸的变化转换成气体流量变化,然后通过浮标进行指示的一种测量仪器。
它与各种类型的气动测量头配合使用,可以完成机械加工中的多种测量。
如:长度、内径、外径、孔的直线度和垂直度等等,本仪器有如下特点:●仪器结构新颖,外形美观大方,调整、使用和维护方便,易于一般工人掌握使用。
●浮标式气动量仪与其他类型的气动量仪相比反应速度快。
●没有回程误差。
●能达到较高的放大倍数,精度较高。
●属于非接触式测量。
●本体和测量装置之间采用软管连接,可实现远距离测量。
●配上各种不同的气动测量头可以进行各种不同参数的测量。
●可以进行多参数测量。
上 盖厂 标输出接头左 侧 板 刻 度 尺锥度玻璃管QFT 系列浮标式气动量仪图1二、产品的型号规格一、型号及规格QFT 系列浮标式气动量仪的基本放大倍数一般有1000倍、2000倍、5000倍、10000倍,共4种倍数。
按拼合的管数又分为单管和多管式(最多拼合为10管)。
因此,型号由量仪的倍数和管数决定(见表1)。
量仪本体规格尺寸如(下表2)。
上界限指针下界限指针稳 压 器右 侧 板倍率调整旋钮 零位调整旋钮进 气 阀浮 标连接螺钉量仪的型号表 1量仪本体规格尺寸表表 2二、仪器附件(见表3)表 3三、主要技术参数技术性能以中华人民共和国机械行业标准JB3760-91为准基本放大倍数1000倍2000倍5000倍10000倍刻度范围(μm)200 100 40 20分度值(μm) 5 2 1 0.5两基准点内示值误差(μm) 4.0 2.0 1.0 0.5四、工作原理浮标式气动量仪实质上是把被测量的尺寸变化转换为相应的空气流量变化的一种仪器,当压缩空气通过锥度玻璃管时,流量的变化就使得浮在玻璃管内的浮标位置作相应的变化,于是从刻度尺上浮标位置的变化量就可以直接读出被测量尺寸的变化。
Hydraulics Catalog 3105/USAParker Hannifin CorporationHydraulic Valve DivisionElyria, Ohio 44035 USA Directional Control Valves ContentsSERIES DESCRIPTION PAGE NO.DL081...........................Manual, Poppet-T ype, Two-Way Valves................................................................DC1-DC3DL101...........................Manual, Poppet-T ype, Two-Way Valves................................................................DC4-DC6DL102...........................Manual, Spool-T ype, Two-Way Valves..................................................................DC7-DC9DL103...........................Manual, Spool-T ype, Three-Way Valves...........................................................DC10-DC12DL104...........................Manual, Spool-T ype, Four-Way Valves.............................................................DC13-DC15DM103..........................Manual, Rotary, Three-Way Valves ..................................................................DC16-DC18DM104..........................Manual, Rotary, Four-Way Valves ....................................................................DC19-DC21DH082..........................Pilot Operated, Two-Way Valves ......................................................................DC22-DC24DH103..........................Pilot Operated, Directional Valves....................................................................DC25-DC28DSL080DC ...................Soft Seat, Direct Acting, Poppet-T ype, T wo-Way Valves...................................DC29-DC31DSL081 & 091..............Solenoid, Poppet-T ype, Two-Way Valves..........................................................DC32-DC35DSH081 & 091.............Solenoid, Poppet-T ype, Two-Way Valves..........................................................DC36-DC39DSL101........................Solenoid, Poppet-Type, Two-Way Valves..........................................................DC40-DC43DSH101........................Solenoid, Poppet-Type, Two-Way Valves..........................................................DC44-DC47DSL121........................Solenoid, Poppet-Type, Two-Way Valves..........................................................DC48-DC51DSH121........................Solenoid, Poppet-Type, Two-Way Valves..........................................................DC52-DC55DS161..........................Solenoid, Poppet-T ype, Two-Way Valves..........................................................DC56-DC59DS201..........................Solenoid, Poppet-T ype, Two-Way Valves..........................................................DC60-DC63DS083BP3....................Solenoid, Poppet-T ype, Three-Way Valves.......................................................DC64-DC67DSL082 & 092..............Solenoid, Spool-T ype, Two-Way Valves............................................................DC68-DC71DSH082 & 092.............Solenoid, Spool-T ype, Two-Way Valves............................................................DC72-DC75DSL102........................Solenoid, Spool-Type, Two-Way Valves............................................................DC76-DC79DSH102........................Solenoid, Spool-T ype, Two-Way Valves............................................................DC80-DC83DS162..........................Solenoid, Spool-T ype, Two-Way Valves............................................................DC84-DC87DSL083........................Solenoid, Spool-Type, Three-Way Valves.........................................................DC88-DC91DSH083........................Solenoid, Spool-Type, Three-Way Valves.........................................................DC92-DC95DSL103........................Solenoid, Spool-Type, Three-Way Valves.........................................................DC96-DC99DSH103........................Solenoid, Spool-T ype, Three-Way Valves.....................................................DC100-DC103DS123B........................Solenoid, Spool-Type, Three-Way Valves.....................................................DC104-DC106DS163..........................Solenoid, Spool-Type, Three-Way Valves.....................................................DC107-DC110DSL084........................Solenoid, Spool-T ype, Four-Way Valves ......................................................DC111-DC114DSH084........................Solenoid, Spool-T ype, Four-Way Valves ......................................................DC115-DC118DSL104........................Solenoid, Spool-T ype, Four-Way Valves ......................................................DC119-DC122DSH104........................Solenoid, Spool-T ype, Four-Way Valves ......................................................DC123-DC126DS085..........................Solenoid, Spool-T ype, Four-Way, Three Position Valves ..............................DC127-DC130DS105..........................Solenoid, Spool-T ype, Four-Way, Three Position Valves ..............................DC131-DC134DSH085........................Solenoid, Spool-T ype, Four-Way, Three Position Valves ..............................DC135-DC138DSH08D1C...................Solenoid, Poppet-T ype, Two-Way Valves......................................................DC139-DC141DSL08D6C ...................Solenoid, Bi-Directional, Poppet-Type, T wo-Way Valves ..............................DC142-DC144DSH08D6C...................Solenoid, Poppet-T ype, Two-Way Valves......................................................DC145-DC147DS086C6M and 096.....Solenoid, Bi-Directional, Poppet-Type, T wo-Way Valves ..............................DC148-DC151DSL106C6....................Solenoid, Bi-Directional, Poppet-T ype, T wo-Way Valves ..............................DC152-DC155DSH106C6...................Solenoid, Bi-Directional, Poppet-Type, T wo-Way Valves ..............................DC156-DC159。