SUSE LINUX 10 Enterprise下安装oracle10g教程
- 格式:pdf
- 大小:1.19 MB
- 文档页数:14

关于这篇文档摘要目录1安装准备 (1)1.1操作系统补丁准备 (1)1.2ORACLE用户及属组 (1)1.3核心参数检查 (2)1.4修改系统限制 (3)1.4.1PAM 配置文件修改 (3)1.5设置ORACLE用户环境变量 (3)2介质安装 (4)2.1修改用户环境变量,启动图形终端 (4)2.2安装步骤 (5)2.3数据库补丁 (9)2.4补丁安装步骤 (10)2.5安装OPATCH (13)2.6安装CPU补丁12419258 (13)3TAR包安装 (14)4创建实例 (15)5配置监听 (24)6客户端本地NET服务名配置 (29)附录A参考资料 (34)A.1附录A.1 ORACLE基础操作命令 (34)图目录图2-2欢迎界面 (5)图2-3产品清单和操作组设置 (6)图2-4选择按照数据库类型 (6)图2-5指定主目录 (7)图2-6检查系统界面 (7)图2-7设置配置选项 (8)图2-8安装组件概要 (8)图2-9安装结束界面 (9)表目录表4-1Oracle8i,oracle 9i, oracle 10g 补丁列表 (9)1 安装准备摘要:介绍orace10G在suse11下安装的准备工作1.1 操作系统补丁准备1. 在图形界面中,以root用户登录选择菜单[yast→Software→SoftwareManagement]2. 在弹出的菜单中,选择[Search]项,输入“orarun”,进行search,检查是否已经安装,如果没有,则进行安装。
3. 安装后的状态如下:1.2 oracle用户及属组安装好orarun环境包后,系统是存在oracle用户和dba组的,只是与我们规范要求的id不一样,需要进行修改。
1. 在图形界面中,以root用户登录选择菜单[yast→Security and Users→User andGroup Management]2. 在弹出的菜单中,设置过滤条件(Set Fitter)为System users或System Groups,然后对oracle用户及dba组进行修改,id为1001,oracle的主目录为/home/oracle。

SuSE Linux Enterprise Server 10 && Oracle 10g R2(10.2.0.1)安装指南作者:Hoheart时间:2010/03/251安装SUSE linux1.1 主要注意事项:1.一般都安装32位版的,因为很多应用程序是32位的。
2.如果要安装oracle,请选择C++开发工具库和oracle service base.1.2 下载安装光盘文件到网站上找到Product下的SuSE Linux Enterprise Server页,并找到Download Eval页,再找到old version版的下载页,搜索并下载。
或者直接到/index.jsp搜索下载。
1.3 安装步骤:1.3.1重启机器,从光盘启动,选择“Installation”回车,如下图1.3.2Language选择“English(US)”点击“NEXT”进入下一步1.3.3同意License1.3.4选择全新安装系统,点击“Next”进入下一步1.3.5选择时区(注:请按照实际应用选择相应的时区,本次运行选择的是“亚洲>> 上海”时区),然后点击“NEXT”进入下一步1.3.6进入安装界面,首先用鼠标点击“Partitioning”进行分区设置1.3.7选择“Create Custom Partition Setup”,点击“NEXT”1.3.8选择“Custom Partitioning(for experts)”,点击“NEXT”1.3.9删除现有磁盘所有的分区,如下图:1.3.10选择Create>>Primary Partition,创建两个分区,Swap和一个主分区1.3.11分区信息如下图,其中Swap一般设置大小为内存的2倍或以上;剩余的空间可以全部分给主分区,主分区的格式选择为“Ext3”,挂在根目录“/”下。
然后点击“Finish”回到安装界面1.3.12再次回到安装界面,鼠标点击“Software”对安装软件进行设置;1.3.13安装软件选择如下图:然后点击“Accept”;1.3.14这时所有安装设置已完成。
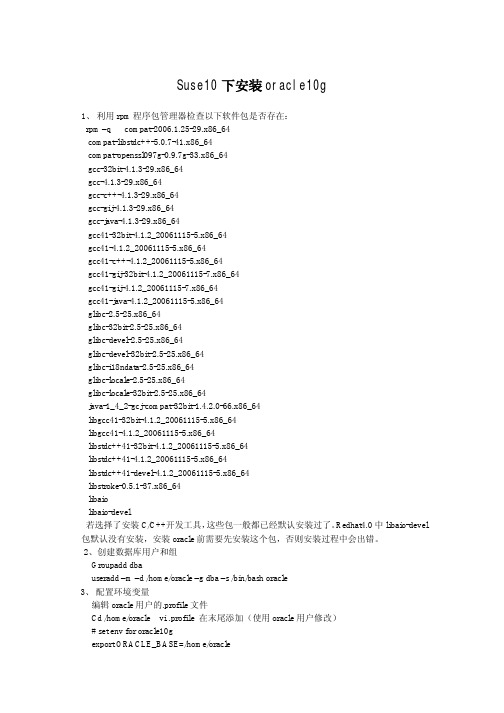
Suse10下安装oracle10g1、利用rpm程序包管理器检查以下软件包是否存在:rpm –q compat-2006.1.25-29.x86_64compat-libstdc++-5.0.7-41.x86_64compat-openssl097g-0.9.7g-33.x86_64gcc-32bit-4.1.3-29.x86_64gcc-4.1.3-29.x86_64gcc-c++-4.1.3-29.x86_64gcc-gij-4.1.3-29.x86_64gcc-java-4.1.3-29.x86_64gcc41-32bit-4.1.2_20061115-5.x86_64gcc41-4.1.2_20061115-5.x86_64gcc41-c++-4.1.2_20061115-5.x86_64gcc41-gij-32bit-4.1.2_20061115-7.x86_64gcc41-gij-4.1.2_20061115-7.x86_64gcc41-java-4.1.2_20061115-5.x86_64glibc-2.5-25.x86_64glibc-32bit-2.5-25.x86_64glibc-devel-2.5-25.x86_64glibc-devel-32bit-2.5-25.x86_64glibc-i18ndata-2.5-25.x86_64glibc-locale-2.5-25.x86_64glibc-locale-32bit-2.5-25.x86_64java-1_4_2-gcj-compat-32bit-1.4.2.0-66.x86_64libgcc41-32bit-4.1.2_20061115-5.x86_64libgcc41-4.1.2_20061115-5.x86_64libstdc++41-32bit-4.1.2_20061115-5.x86_64libstdc++41-4.1.2_20061115-5.x86_64libstdc++41-devel-4.1.2_20061115-5.x86_64libstroke-0.5.1-37.x86_64libaiolibaio-devel若选择了安装C/C++开发工具,这些包一般都已经默认安装过了。

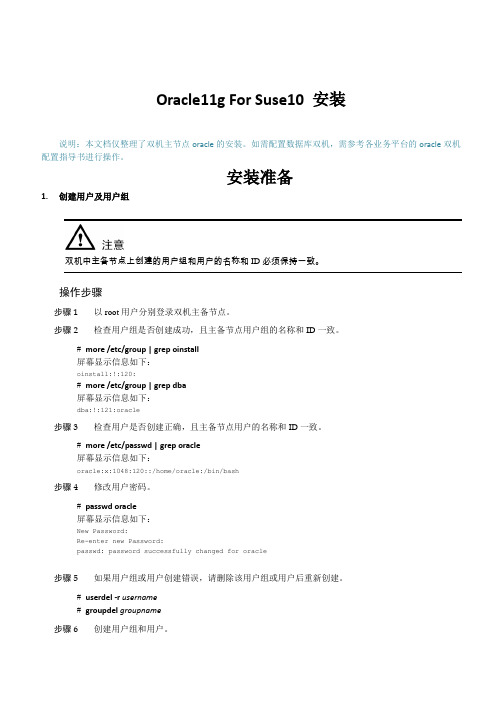
Oracle11g For Suse10 安装说明:本文档仅整理了双机主节点oracle的安装。
如需配置数据库双机,需参考各业务平台的oracle双机配置指导书进行操作。
安装准备1.创建用户及用户组双机中主备节点上创建的用户组和用户的名称和ID必须保持一致。
操作步骤步骤 1以root用户分别登录双机主备节点。
步骤 2检查用户组是否创建成功,且主备节点用户组的名称和ID一致。
# more /etc/group | grep oinstall屏幕显示信息如下:oinstall:!:120:# more /etc/group | grep dba屏幕显示信息如下:dba:!:121:oracle步骤 3检查用户是否创建正确,且主备节点用户的名称和ID一致。
# more /etc/passwd | grep oracle屏幕显示信息如下:oracle:x:1048:120::/home/oracle:/bin/bash步骤 4修改用户密码。
# passwd oracle屏幕显示信息如下:New Password:Re-enter new Password:passwd: password successfully changed for oracle步骤 5如果用户组或用户创建错误,请删除该用户组或用户后重新创建。
# userdel -r username# groupdel groupname步骤 6创建用户组和用户。
# groupadd -g groupid groupname# useradd -u 103-d /opt/oracle -s /bin/bash -g oinstall -G dba -m oracle2.修改系统参数【请重点关注】2.1)在/etc/sysctl.conf文件中添加如下内容fs.file-max = 65536kernel.shmall = 2097152kernel.shmmax = 4294967295kernel.shmmni = 4096kernel.sem = 250 32000 100 128net.ipv4.ip_local_port_range = 9000 65500net.core.rmem_default = 262144net.core.rmem_max = 4194304net.core.wmem_default = 262144net.core.wmem_max = 1048576kernel.shmmax需要根据机器内存进行设置,计算公式如下:kernel.shmmax = 内存×1024×1024×1024/2-1,公式中内存单位为GB。
Oracle在linux系统安装教程版本:v1初稿亚信联创dragongolddjl@一、oralce10g安装环境必需条件查询*如果是使用远程终端登录系统,请使用$su-root命令将提示输入密码。
1、检查硬件要求2、a下面显示了物理内存和系统我swap交换空间之间的关系物理内存Swap交换空间小于1024M2倍于物理内存1025MB至2048MB 1.5倍于物理内存2049MB至8192MB等于物理内存大小大于8192MB0.75倍于物理内存b/tmp挂载点空间需求:>400Mc oracle安装目录空间需求:1.5~3.5Gd/opt挂载点空间需求:>1.2G3、硬件检查命令物理内存#grep MemTotal/proc/meminfo交换空间swap#grep SwapTotal/proc/meminfo/tmp挂载点#df-k/tmp硬盘使用情况查询#df-kCPU信息查询#grep"model name"/proc/cpuinfo4、检查系统软件要求支持的操作系统备注Red Hat Enterprise Linux AS/ES3.0或晚于该版本Red Hat Linux4.0SUSE Linux Enterprise Server9.0with SP2或晚于该版本Asianux1.0Asianux2.0系统名称内核Red Hat Enterprise Linux3.0and Asianux1.0 2.4.21-27.ELRed Hat Enterprise Linux4.0and Asianux2.0: 2.6.9-5.EL SUSE Linux Enterprise Server9.0: 2.6.5-7.201操作系统必须装的软件包Red Hat Enterprise Linux 3.0 and Asianux1.0:make-3.79.1gcc-3.2.3-34glibc-2.3.2-95.20compat-db-4.0.14-5compat-gcc-7.3-2.96.128compat-gcc-c++-7.3-2.96.128 compat-libstdc++-7.3-2.96.128 compat-libstdc++-devel-7.3-2.96.128 openmotif21-2.1.30-8setarch-1.3-1Red Hat Enterprise Linux 4.0 and Asianux2.0:binutils-2.15.92.0.2-13.EL4 compat-db-4.1.25-9compat-libstdc++-296-2.96-132.7.2 control-center-2.8.0-12gcc-3.4.3-22.1.EL4gcc-c++-3.4.3-22.1.EL44glibc-2.3.4-2.9glibc-common-2.3.4-2.9gnome-libs-1.4.1.2.90-44.1 libstdc++-3.4.3-22.1libstdc++-devel-3.4.3-22.1make-3.80-5pdksh-5.2.14-30sysstat-5.0.5-1xscreensaver-4.18-5.rhel4.2 setarch-1.6-1SUSE Linux Enterprise Server9binutils-2.15.90.0.1.1-32.5gcc-3.3.3-43.24gcc-c++-3.3.3-43.24glibc-2.3.3-98.28gnome-libs-1.4.1.7-671.1libstdc++-3.3.3-43.24libstdc++-devel-3.3.3-43.24make-3.80-184.1pdksh-5.2.14-780.1sysstat-5.0.1-35.1xscreensaver-4.16-2.65、软件信息查询命令操作系统版本#cat/etc/issue必需内核查询#uname-r安装包查询#rpm-q[package_name]二、添加用户及用户组1、检查系统中是否已经有以下用户及用户组The Oracle Inventory group(oinstall)#more/etc/oraInst.locThe OSDBA group(dba)#grep dba/etc/groupThe Oracle software owner(oracle)#id oracleAn unprivileged user(nobody)#id nobody*若已经存在以上用户及用户组请跳过步骤2.2、创建用户及用户组a、创建用户组#/usr/sbin/groupadd oinstall#/usr/sbin/groupadd dbab、创建用户及赋予密码#/usr/sbin/useradd-g oinstall-G dba oracle#/usr/sbin/useradd nobody#passwd oracle输入该命令后需要输入两次密码。
一·安装前的准备配置安装Oracle前的准备很重要,如果没有准备好,导致多次安装数据库不成功。
(一)查询所需安装包是否完整进入系统,终端命令:# rpm -q gcc make binutils openmotif setarch compat-db compat-gcc compat-gcc-34-c++ compat-libstdc++rpm -qa |grep compat-gccrpm -qa |grep compat-libstdc++第一条命令无法列出compat-gcc和compat-libstdc++两个包,所以只能用下面两个命令检查。
缺少的都需要安装相关的软件包,RHEL5一共有5张光盘,请参考下面:安装下面的包:# 从RedHat AS5 光盘1[root@dodata ~]#cd /media/cdrom/Server[root@dodata ~]# r pm -Uvh setarch-2*[root@dodata ~]# r pm -Uvh make-3*[root@dodata ~]# r pm -Uvh glibc-2*[root@dodata ~]# r pm -Uvh libaio-0*# 从RedHat AS5 光盘2[root@dodata ~]#cd /media/cdrom/Server[root@dodata ~]#rpm -Uvh compat-libstdc++-33-3*[root@dodata ~]#rpm -Uvh compat-gcc-34-3*[root@dodata ~]#rpm -Uvh compat-gcc-34-c++-3*[root@dodata ~]#rpm -Uvh gcc-4*[root@dodata ~]#rpm -Uvh libXp-1*# 从RedHat AS5 光盘3[root@dodata ~]#cd /media/cdrom/Server[root@dodata ~]#rpm -Uvh openmotif-2*[root@dodata ~]#rpm -Uvh compat-db-4*如果是DVD光盘,或已将所有CD盘上的内容复制到了一个目录,则可以使用下面的命令批量一次安装所有需要的包通过加载光驱中的光盘安装文件[root@dodata ~]#mount -t iso9660 /dev/cdrom /mnt[root@dodata ~]#cd /mnt/Server复制如下命令进行安装rpm -Uvh setarch-2.0-1.1.i386.rpmrpm -Uvh make-3.81-3.el5.i386.rpmrpm -Uvh glibc-2.5-34.i686.rpmrpm -Uvh libaio-0.3.106-3.2.i386.rpmrpm -Uvh compat-libstdc++-33-3.2.3-61.i386.rpmrpm -Uvh kernel-headers-2.6.18-128.el5.i386.rpmrpm -Uvh glibc-headers-2.5-34.i386.rpmrpm -Uvh glibc-devel-2.5-34.i386.rpmrpm -Uvh compat-gcc-34-3.4.6-4.i386.rpmrpm -Uvh compat-gcc-34-c++-3.4.6-4.i386.rpmrpm -Uvh libgomp-4.3.2-7.el5.i386.rpmrpm -Uvh gcc-4.1.2-44.el5.i386.rpmrpm -Uvh libXp-1.0.0-8.1.el5.i386.r pmrpm -Uvh openmotif-2.3.1-2.el5.i386.rpmrpm -Uvh compat-db-4.2.52-5.1.i386.rpmrpm -Uvh binutils-2.17.50.0.6-9.el5.i386.rpm然后再次检查需要的软件包是否都已安装成功。
这些软件包还是要检查下,不要少了。
rpm –q ,此文档以SUSE 10 SP1 64bit安装Oracle 11g R1 64bit为基础环境编写。
其它版本安装也可参考,但例如设置环境变量等地方可能会有所不同。
第1章创建用户和组1.1 创建名为dba的操作系统组【检查命令】# grep dba /etc/group无输出则表示dba组不存在。
如果dba组已存在,则使用以下命令删除dba组。
【删除命令】# /usr/sbin/groupdel dba【创建命令】# /usr/sbin/groupadd -g 200 dba1.2 创建名为oracle的操作系统用户【检查命令】# grep oracle /etc/passwd无输出则表示Oracle用户不存在。
如果Oracle用户已存在,则使用以下命令删除Oracle用户。
【删除命令】# /usr/sbin/userdel -f oracle【创建命令】# /usr/sbin/useradd -u 300 -g dba -d /home/oracle -s /bin/bash -m oracle【命令说明】用户名为oracle,隶属于dba组。
1.3 为oracle用户建立密码【创建命令】# passwd oracle第2章设置环境变量和赋权2.1 赋予目录正确的权限2.1.1 对文件系统/opt/oracle并赋权【命令】# chown oracle:dba /opt/oracle# chmod 770 /opt/oracle2.1.2 对文件系统/opt/orabak并赋权【命令】# chown oracle:dba /opt/orabak# chmod 770 /opt/orabak2.1.3 创建目录/usr/local/bin并赋权检查/usr/local/bin目录是否存在,如不存在则需创建该目录,并赋予777权限。
【命令】# mkdir /usr/local/bin# chmod 777 /usr/local/bin# ll /usr/local | grep bindrwxrwxrwx 2 root root 4096 2007-05-03 21:24 bin2.1.4 赋权/tmp目录权限检查/tmp是否具有777权限,如不具备则赋予/tmp目录777权限。
Oracle 10g R2 (10.2.0.1)onSUSE Linux Enterprise Server 10( How to Install )Arun SinghNovell Inc.IntroductionOracle 10g R2 is the latest release from Oracle and it's released on all supported SUSE Linux platforms. Oracle 10gR2 on SUSE Linux Enterprise Server 10 (SLES10) is certified, please check Oracle Metalink(/technology/support/metalink/index.html) for official Oracle Support/Certification. This document is not a replacement of Oracle Installation manual but help you to install Oracle 10g R2 on SLES10.In this paper, x86_64 version of both Oracle and SUSE Linux Server is used. Similar steps applies to other platforms (x86, ia64, etc.). If you encounter any problem, please post your question to suse-oracle@.Note: Information provided here will work for SUSE Linux Enterprise Desktop 10 and SUSE LINUX Professional 10.1 (not supported in production environment). Required Software and Reference DocumentsNovell•SUSE Linux Enterprise Server 10(/products/server/eval.html)•SUSE Linux Enterprise Server 10 Documentation(/documentation/sles10/)Oracle•Oracle Database 10g Release 2 (10.2.0.1) Enterprise/Standard Edition (/technology/software/products/database/oracle10g/index.html)•Oracle Database 10g Release 2 Documentation/technology/documentation/database10gr2.htmlHardware RequirementsThe system must meet the following minimum hardware requirements:Installation Steps1.Install SUSE Linux Operating SystemFollow the Installation instructions provided in the SLES10 install manual.SLES10 with default packages along with Oracle Server Base, and “C/C++ Compiler and Tools” is sufficient for Oracle 10g R2 (10.2.0.1) install. Oracle Server Base provides orarun package. Here is screen-shot from SLES10 (x86_64) server.Check whether C/C++ compiler is installed using“gcc --version”. If gcc is not installed, then use YaST setup tool to install “C/C++ Compiler and Tools”.2.Install SLES10 Service Pack (Future: When Service Pack is released)At this point no Service Pack for SLES10 is released. Use SPident or'cat /etc/SuSE-release' to verify.3./etc/hosts - Comment out 127.0.0.2 and put your server's IP address.4.Oracle Install prerequisitesSUSE provides orarun packages to automate most of the Oracle pre-install task. Refer to Oracle installation document for complete list of prerequisites. orarun :1.If you have selected “Oracle Server Base” option at install time, orarunpackage is already installed on your server.For SUSE Linux Enterprise Desktop 10 and SUSE Linux Professional10.1 products, you can download orarun package(/partners/oracle/sles-10/) and install manually.#rpm -ivh orarun-1.9-21.2.x86_64.rpm2.The account for oracle user is disabled. Please enable it by:1.Changing the shell for the "oracle" user from "/bin/false" to "/bin/bash",either by editing the "/etc/passwd" file.2.Set a new password for user “oracle” i.e. “/usr/bin/passwd oracle”.You can use SUSE setup tool YaST to accomplish above task./sbin/yast2 -> “security and Users” -> ”Edit and create groups”(Select users tab and set “System Users” filter to see oracle user.)Following are the screen shots of “oracle” user properties:3.Change Default Oracle environment set by orarun (If required)1.Change Oracle home directory by editing ORACLE_HOME variable in“/etc/profile.d/oracle.sh” file. ORACLE_HOME=$ORACLE_BASE/product/10.2/db_12.Default ORACLE_SID set by orarun install is “orcl”. Change it to yourpreferred name in “/etc/profile.d/oracle.sh” file.Note: Oracle Installer will ask this database name and it should matchto ORACLE_SID to avoid any problem.4.Run “/usr/sbin/rcoracle start “ to set kernel parameters. IgnoreORACLE_HOME not set message as this will get fixed once Oracle 10gis installed.5.Exit from current session and login as new “oracle” user. Following is asnap-shot verifying current user:5.Oracle 10g R2 InstallationGet Oracle 10g R2 (10.2.0.1) Software from oracle web site depending on your platform (10201_database_linux_x86_64.cpio.gz) and extract files: #gunzip 10201_database_linux_x86_64.cpio.gz#cpio -idmv < 10201_database_linux_x86_64.cpio1. Make sure you are logged in as “oracle” user.2.Run Oracle Universal installer : ./runInstallerYou will get error . Do any of the following to fix this:1.Modify “database/install/oraparam.ini” file to add support for SUSELinux 10. After modifying oraparam.ini file “[Certified Versions]” linewill look like:2.Install with option -ignoreSysPrereqsi.e. ./runInstaller -ignoreSysPrereqs3.You can modify /etc/SuSE-release file.Note: Don't forget to create back-up and restore once Oracleinstallation is done to avoid other problems.If you are installing from CD mounted as /media/cdrom then “cd /tmp && /media/cdrom/runInstaller” will be helpful.Installation will walk you through with self explanatory instructions. Here are screen-shots from simple Oracle 10g Installation:6.Un-Installing incomplete Installation : Clean-upOracle Installer will give you an option to remove installed product but sometimes your installation is not complete and you would like to restart the clean installation. Here are some quick and dirty steps to clean-up your system:1.Remove /usr/local/bin/{coraenv, dbhome, oraenv}2.Remove /etc/oratab, /etc/oraInst.loc, and /etc/oracle directory3.Remove all files created by Oracle installer in /opt/oracle (Install Directory)i.e. Directory /opt/oracle/{product, admin, oradata, oraInventory}7.Oracle Database Start at boot timeSet parameter START_ORACLE_DB="yes" in “/etc/sysconfig/oracle” file.You can edit file “/etc/sysconfig/oracle” manually or use YaST setup toolto change oracle specific parameters.“/sbin/yast2->System->/etc/sysconfig Editor ->Productivity->Databases”1.Edit /etc/oratab entry corresponding to your database to “Y”.2.Edit dbstart, dbshut and dbhome scripts to reflect correct location forORATAB entry. i.e ORATAB=/etc/oratab8.Oracle Enterprise Manager1.Start Enterprise Manager services, if is not running: "emctl start dbconsole"Note: If you want to start dbconsole services at boot-time, then set Listener (START_ORACLE_DB_LISTENER) and Enterprise Manager parameter(START_ORACLE_DB_EMANAGER) in /etc/sysconfig/oracle to yes.e Enterprise Manager web interface (http://localhost:1158/em) to performroutine database administration and performance tuning tasks.9.sqlplus: Startup and Shutdown of the Oracle10g Database (Manual)From diagnostic point of view it is very important to check sqlplus is functioning properly. If not then your installation is having problems.1.To startup the database:sles10$ sqlplus /nologSQL> connect / as sysdbaSQL> startup2.To shutdown the database:sles10$ sqlplus /nologSQL> connect / as sysdbaSQL> shutdownNote: “/” connects you to the schema owned by SYS with the privilege SYSDBA. 10. Async I/O : Enable by DefaultUnlike previous releases AIO is enable by default. You candisable/enable using init.ora parameter (filesystemio_options).11. Known Problem - Workaround1.dbstart: Set correct ORACLE_HOME_LISTNER path to avoid listenererror.2.Applying SLES10 SP1: There are reports that glibc-devel-32bit wasmissing after applying SP1. Please make sure glibc-devel-32bit package is installed to avoid linking errors during Oracle Software Installation. History:Enjoy!。