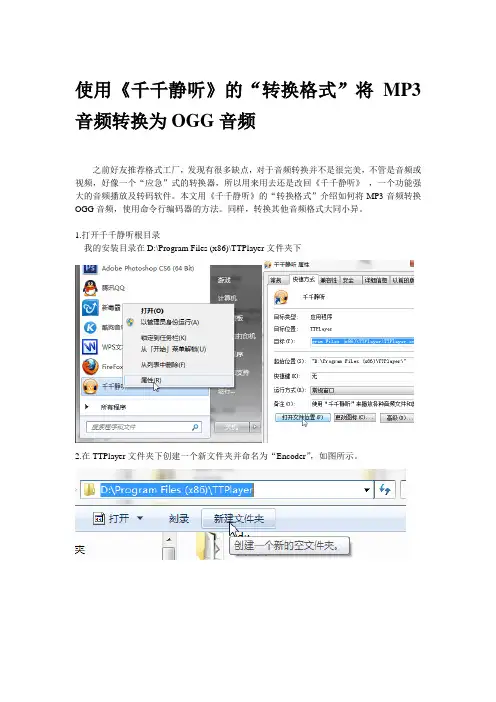
初步玩转无损播放器MX-ME----无损音频格式篇V2
- 格式:pdf
- 大小:2.91 MB
- 文档页数:8

MP3 Lame 转换参数设置(转)我们在对音频格式的转换中,打交道最多的就是MP3了。
如果你能彻底玩转MP3,那么对你的音频创作和对其他音频格式的掌握会有很大的帮助。
下面我们给大家介绍MP3制作软件:LAME要制作出高音质的MP3靠以前广为流传的MP3编码器是不行的。
LAME与一般MP3编码器与众不同,它支持几乎所有能够采用到MP3编码中的技术,LAME支持CBR(固定码率)和VBR(动态码率,还有一个效果不是很出众的ABR),LAME是MP3史上具有里程碑意义的软件,LAME是一个Command line程序,象Dos程序一样需要手工输入,而且参数及其复杂,但可很方便的供其他程序调用,LAME同时也提供了一个DLL版本,但我们认为不如EXE版本的好,所以忽略不提。
不要被LAME复杂的参数所吓倒,文章中我们会提示如何操作来达到一劳永逸的效果。
我们需要粗略的了解一下LAME的参数。
LAME其实真正要用到的参数就几个而已。
VBR压缩级别参数:[-V] 指定VBR的压缩品质,范围为0-9(数字越小品质越高),预设值为4。
码率参数:[-b] 指定流量变动的下限,预设为32Kbps。
[-B] 指定流量变动的上限,预设为320Kbps。
注意-b 和-B 的大小写差异。
如果使用在CBR编码模式中,[-b]所指定的码率就是固定码率大小,可供指定的码率大小可以为:16 24 32 40 48 56 64 80 96 112 128 160 192 224 256 320。
高品质编码模式参数:[-h] 高品质编码模式。
这个选项在VBR 压缩模式中是预设开启的。
CBR编码模式中是关闭的。
精度参数:[-q] 指定频率资料量化时的精确度,范围是为0-9(数字越小品质越高),预设值为2。
如果在使用-q 0参数是觉得编码速度慢得过份,请使用默认值。
如果编码的曲子是钢琴或者小提琴、古筝二胡这类细节很丰富的乐器独奏,我们推荐你就是耐着性子也要用-q 0参数,虽然慢点,但值得。
纽曼全能王– M2000MP4 播放器使用手册前言感谢您选用本公司生产的全能王MP4播放器!它将带您进入完美的便携影音播放世界。
它可以播放多种音频、视频文件,来满足您各方面的影音需求。
它还支持掌上游戏、PDA、TXT阅读、图片浏览等多种功能。
我们相信它会给您带来便携影音的完美体验。
在使用您的全能王MP4播放器之前,请仔细阅读我们随机提供的所有资料,本手册将为您介绍它的全部功能,使您在使用过程中更加轻松方便。
通过它您可以获取有关产品介绍、使用方法等方面的知识,以便您能更好地使用该产品。
在编写本手册时我们非常认真和严谨,希望能给您提供完备可靠的信息,然而难免有错误和疏漏之处,请您给予谅解并由衷地欢迎您批评和指正。
如果您在使用该产品的过程中发现什么问题,请及时拨打我们的服务热线,感谢您的支持和合作!本公司对于因软件、硬件的误操作、产品维修、电池更换或其它意外情况所引起的个人数据资料的丢失和损坏不负任何责任,也不对由此而造成的其它间接损失负责,请随时备份您的数据资料到您的计算机上。
同时我们无法控制用户对本手册可能造成的误解,因此,本公司将不对在使用本手册过程中可能出现的意外损失负责,并不对因使用该产品而引起的第三方索赔负责。
本手册的信息以当前产品情况为准。
我们将继续开发提供新的功能,相关信息的更新恕不另行通知。
本手册信息受到版权保护,任何部分未经本公司事先书面许可,不准以任何方式影印和复制。
●产品及产品颜色款式请以购买的实物为准。
●本公司保留对本手册、保修卡及其相关资料的最终解释权。
1使用注意事项★使用时不要让播放器摔落、或与硬物摩擦撞击,否则可能会导致播放器表面磨花、电池脱落、数据丢失或其它硬件损坏。
★请不要使用耳机大音量连续收听,这样为了避免耳朵听力受损。
★请不要试图分解或改造播放器。
★不要用化学试剂或清洁试剂清洁播放器,这样会损伤播放器表面和腐蚀喷漆。
★请将播放器远离强磁场,防止不正确使用会损伤播放器。
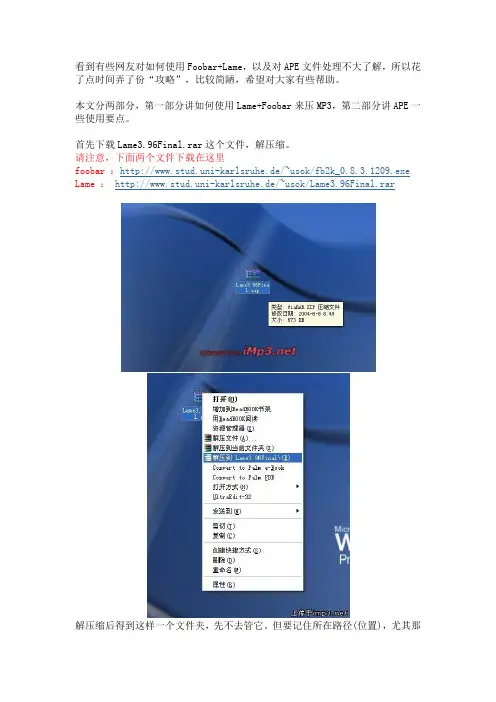
看到有些网友对如何使用Foobar+Lame,以及对APE文件处理不大了解,所以花了点时间弄了份“攻略”,比较简陋,希望对大家有些帮助。
本文分两部分,第一部分讲如何使用Lame+Foobar来压MP3,第二部分讲APE一些使用要点。
首先下载Lame3.96Final.rar这个文件,解压缩。
请注意,下面两个文件下载在这里foobar :http://www.stud.uni-karlsruhe.de/~usok/fb2k_0.8.3.1209.exe Lame :http://www.stud.uni-karlsruhe.de/~usok/Lame3.96Final.rar解压缩后得到这样一个文件夹,先不去管它。
但要记住所在路径(位置),尤其那个LAME.EXE文件,待会儿会有用。
接着下载fb2k_0.8.3.1209.exe文件,安装。
可以选择中文。
需要注意的是,为了和下面的介绍符合,请在安装过程中一切按照默认设置(但不包括安装路径,这个随意)安装结束后,打开Foobar,接着载入音乐。
载入音乐时,点击列表,可以选择打开,添加等等。
由于现在手头没有APE文件,所以我用了CD。
把CD放入光驱,这里我选择添加目录,然后再选取刚刚放进CD 的H盘OK,曲目全部载入现在就可以把CD上的歌转换成MP3了。
在想要转换的曲目上右击鼠标(如果想要转换全部,先用shift键和或crrl键选取全部曲目,再右击鼠标。
弹出对话框,选择“转换----转换器设置”。
在打开的对话框里,找到输出预置,在下拉框里随便选择一项关于LAME的编码器,比如下图的LAME-alt-preset-extreme,这样就可以选择下面那个编辑了(红线圈出来的),点击“编辑”选项。
在弹出的对话框里需要设置LAME编码器的位置,点击下图中用红线圈出来的那个按钮。
在这里也可以自定义编码时的参数(比特率等等),具体代码请看LAME解压缩后那个文件夹里的usage文档,很具体,这里我就不多讲了,因为对于一般来说,预置的4个编码已经足够了在对话框里找到刚刚解压缩后的LAME路径(就是lame.exe的位置),选中,按确定现在可以选择LAME预置的四种编码器了(等会在转换的时候也可以),其中insane就是320kbpsCBR。
flac格式的使用方法FLAC(Free Lossless Audio Codec)是一种无损音频压缩格式,它可以在压缩文件大小的同时保持音频的完整质量。
下面是关于FLAC格式的使用方法的一些相关参考内容:1. FLAC格式的特点:- 无损音频压缩:FLAC格式可以将音频文件压缩到原始大小的50%至70%,而且可以完全恢复原始音频的质量,不会有任何音频损失。
- 跨平台支持:FLAC格式在Windows、Mac和Linux等多个操作系统上都可以使用,而且可以与大多数音频播放器兼容。
- 音频标签支持:FLAC文件支持添加元数据标签,包括歌曲标题、艺术家、专辑等信息,方便整理和管理音频文件。
2. 如何创建FLAC文件:- 转码工具:可以使用专业的音频转码工具,如Audacity、Winamp或Foobar2000等,将其他音频格式的文件转换为FLAC格式。
- 命令行转码:在Windows命令提示符或Mac的终端窗口中输入命令,使用一些开源的FLAC转码工具,如ffmpeg,进行文件的转换。
3. 如何播放FLAC文件:- 使用音频播放器:有许多音频播放器可以播放FLAC文件,如VLC媒体播放器、Windows Media Player、Foobar2000等,只需要将FLAC文件拖放到播放器界面即可开始播放。
- 流媒体平台:许多流媒体平台(如Spotify、Apple Music)也支持FLAC格式的音频文件播放,可以在设置中选择FLAC 作为音频格式。
4. 如何编辑FLAC文件:- 剪辑和编辑:使用音频编辑软件,如Audacity等,可以打开FLAC文件并进行剪辑、混音或添加效果等编辑操作。
在编辑过程中,保留FLAC格式可以保证音频质量不受影响。
- 标签编辑:使用音频标签编辑器,如Mp3tag,可以更改FLAC文件的元数据标签,例如修改歌曲名称、艺术家、专辑封面等。
5. 如何转换FLAC文件:- 转换工具:有一些专业的音频转换器,可以将FLAC文件转换为其他音频格式,如MP3、WAV等。
龙源期刊网
两步把APE“变身”MP3/WMA
作者:SHELL
来源:《电脑爱好者》2008年第05期
虽然有一部分MP4已经支持APE格式的文件了,但MP3格式仍然是兼容性最佳的音频格式。
那么怎么把那些从网上下载的APE文件转换为MP3呢,需要几步呢?别人怎么转我不知道,反正我只需要两步,而且极为简单。
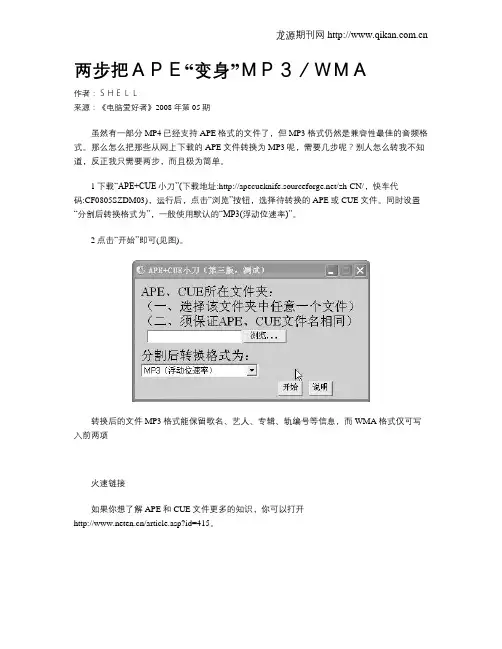
1下载“APE+CUE小刀”(下载地址:/zh-CN/,快车代
码:CF0805SZDM03),运行后,点击“浏览”按钮,选择待转换的APE或CUE文件。
同时设置“分割后转换格式为”,一般使用默认的“MP3(浮动位速率)”。
2点击“开始”即可(见图)。
转换后的文件MP3格式能保留歌名、艺人、专辑、轨编号等信息,而WMA格式仅可写入前两项
火速链接
如果你想了解APE和CUE文件更多的知识,你可以打开
/article.asp?id=415。
---------------------------------------------------------------最新资料推荐------------------------------------------------------ 把ape、wav无损音乐转换为flac等格式把 ape、 wav 无损音乐转换为 flac 等格式把 ape、 wav 无损音乐转换为 flac 等格式 M3、 M6 播放器支持的无损音乐格式有 wav、 flac、 wma lossless,据说即将支持 ape。
四种格式的体积从大到小依次是:wav, flac, ape, wma lossless。
就体积而言 wav 是明显很大(是后面几种的两倍左右),而后面三种相差并不是很明显。
wav 未经压缩, flac 压缩时采用整数运算, ape 采用浮点运算,所以播放起来最省电的是 wav,其次是 flac,最后是 ape、wma lossless,这几种的关系是体积越小越费电,体积越大越省电。
在体积和省电性上 flac 无疑是个较好的平衡点。
flac 比 ape 有开源优势,在抗损伤方面比 ape 强(具体可参考 flac 的介绍文章),所以转换 flac 有非常实用的现实意义。
之前写了一个用 Advanced WMA Workshop 转换格式的帖子,但是考虑到此软件不能导入cue,导致在转换时不能把整轨的 ape 文件分段,使用价值不高,所以在这里重新编写一个用 foobar 来转换格式的教程,本教程更加通俗易懂,易于操作,大家慢慢看。
本教程的优势:通俗易懂,软件也操作简便,功能丰富,可以载入 cue,在1 / 8转换格式的同时分段。
大名鼎鼎的 foobar 播放器的音质与功能有口皆碑,如果以前不是用这个软件的话不妨从此换用此播放软件,一定不会令你失望!1、下载 foobar 软件,推荐下载 Foobar2019 V0. 9. 4. 1 汉化增强版,推荐下载地址:天空软件园 Foobar2019 V0. 9. 4. 1 汉化增强版 2、下载完毕后,双击安装,如下图,点击下一步:3、接着点击我同意:4、选择安装路径,点击下一步:5、接着是非常重要的一步,组件安装类型一定要选择完全,这样软件安装后才有转换为 flac 功能:6、此后一直点击下一步,直至安装完成。
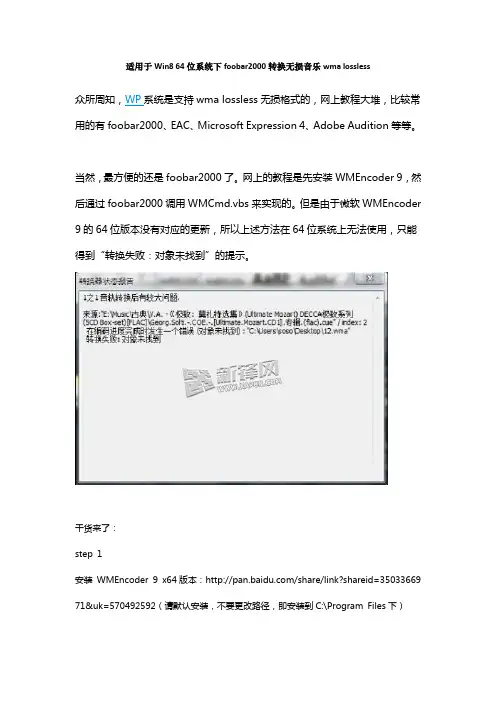
适用于Win8 64位系统下foobar2000转换无损音乐wma lossless众所周知,WP系统是支持wma lossless无损格式的,网上教程大堆,比较常用的有foobar2000、EAC、Microsoft Expression 4、Adobe Audition等等。
当然,最方便的还是foobar2000了。
网上的教程是先安装WMEncoder 9,然后通过foobar2000调用WMCmd.vbs来实现的。
但是由于微软WMEncoder 9的64位版本没有对应的更新,所以上述方法在64位系统上无法使用,只能得到“转换失败:对象未找到”的提示。
干货来了:step 1安装WMEncoder 9 x64版本:/share/link?shareid=35033669 71&uk=570492592(请默认安装,不要更改路径,即安装到C:\Program Files下)step 2下载,解压,覆盖到C:\Program Files\Windows Media Components\Encoder\WMC md.vbs/share/link?shareid=3509996125&uk=570492592step 3打开foobar2000,选中要转换的文件,右键-转换-...进入转换器设置界面step 4新建或编辑一个“输出文件格式”具体设置参数编码器文件:C:\Windows\Sysnative\cscript.exe(SysNative文件夹是不存在的,跟64位Windows系统的重定向机制有关,直接复制前面的地址,粘贴进去就可以了)扩展名:.wma参数:"C:\Program Files\Windows Media Components\Encoder\WMCmd.vbs" -in put %s -output %d -a_codec WMA9LSL -a_mode 2 -title "%t" -author "%a" -a lbum "%g" -genre "%m" -year %y -trackno %n格式:无损最高BPS:24编码器名称:WMA Lossless设置:VBR Quality 100BTW :转换的时候进度条走完之后,需要等一段时间,时间会一直走,转换速率显示为0。
mmdb格式介绍摘要:一、MMDB格式简介二、MMDB文件结构与组成三、MMDB格式应用场景四、MMDB格式优缺点五、MMDB格式与其他音频格式的比较六、如何将文件转换为MMDB格式七、如何使用MMDB格式播放器八、总结正文:【一、MMDB格式简介】MMDB(MPEG-4 Audio Lossless)是一种无损音频编码格式,由德国Fraunhofer IIS研发。
它主要用于存储和传输高品质音频,尤其在高清音频领域具有广泛的应用。
MMDB格式支持高比特率、多声道和环绕声,能够提供出色的音质。
【二、MMDB文件结构与组成】MMDB文件采用标准的MPEG-4文件结构,包含文件头和数据块。
文件头包含文件版本、编码器信息、容器格式等信息。
数据块包含音频数据和元数据,如采样率、比特深度、声道数等。
【三、MMDB格式应用场景】MMDB格式适用于各类音频录制、编辑和播放场景,尤其适合高清视频、数字广播和音乐制作等领域。
由于其无损特性,MMDB格式广泛应用于音频发烧友和专业音频工程师之间。
【四、MMDB格式优缺点】优点:1.无损压缩,音质损失小;2.高质量音频再现,适合专业应用;3.兼容多种设备和支持多声道;4.高效传输和存储。
缺点:1.文件较大,占用存储空间;2.编码和解码速度较其他格式慢;3.兼容性较差,部分设备和支持软件不支持。
【五、MMDB格式与其他音频格式的比较】1.与MP3格式相比,MMDB具有更高的音质和无损特性;2.与WAV格式相比,MMDB格式在提供相同音质的情况下,文件体积更小;3.与FLAC格式相比,MMDB格式具有更好的兼容性和更广泛的应用场景。
【六、如何将文件转换为MMDB格式】要将音频文件转换为MMDB格式,可以使用专业音频转换软件如Adobe Audition、Audacity等。
用户只需导入音频文件,选择MMDB格式输出,并根据需求设置采样率、比特深度等参数。
【七、如何使用MMDB格式播放器】要播放MMDB格式音频,需要使用支持MMDB格式的播放器。
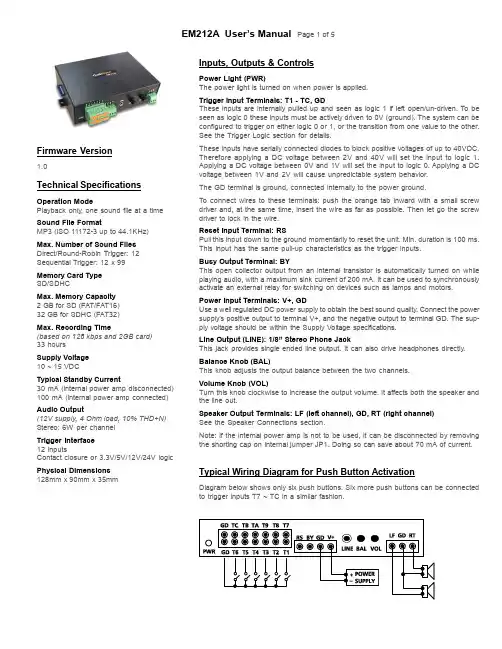
Firmware Version1.0Technical Specifications Operation ModePlayback only, one sound file at a time Sound File FormatMP3 (ISO 11172-3 up to 44.1KHz)Max. Number of Sound FilesDirect/Round-Robin Trigger: 12 Sequential Trigger: 12 x 99Memory Card TypeSD/SDHCMax. Memory Capacity2 GB for SD (FAT/FAT16)32 GB for SDHC (FAT32)Max. Recording Time(based on 128 kbps and 2GB card)33 hoursSupply Voltage10 ~ 15 VDCTypical Standby Current30 mA (internal power amp disconnected) 100 mA (internal power amp connected) Audio Output(12V supply, 4 Ohm load, 10% THD+N) Stereo: 6W per channelTrigger Interface12 inputsContact closure or 3.3V/5V/12V/24V logic Physical Dimensions128mm x 90mm x 35mm Inputs, Outputs & ControlsPower Light (PWR)The power light is turned on when power is applied.Trigger Input Terminals: T1 - TC, GDThese inputs are internally pulled up and seen as logic 1 if left open/un-driven. To be seen as logic 0 these inputs must be actively driven to 0V (ground). The system can be configured to trigger on either logic 0 or 1, or the transition from one value to the other. See the Trigger Logic section for details.These inputs have serially connected diodes to block positive voltages of up to 40VDC. Therefore applying a DC voltage between 2V and 40V will set the input to logic 1. Applying a DC voltage between 0V and 1V will set the input to logic 0. Applying a DC voltage between 1V and 2V will cause unpredictable system behavior.The GD terminal is ground, connected internally to the power ground.To connect wires to these terminals: push the orange tab inward with a small screw driver and, at the same time, insert the wire as far as possible. Then let go the screw driver to lock in the wire.Reset Input Terminal: RSPull this input down to the ground momentarily to reset the unit. Min. duration is 100 ms. This input has the same pull-up characteristics as the trigger inputs.Busy Output Terminal: BYThis open collector output from an internal transistor is automatically turned on while playing audio, with a maximum sink current of 200 mA. It can be used to synchronously activate an external relay for switching on devices such as lamps and motors.Power Input Terminals: V+, GDUse a well regulated DC power supply to obtain the best sound quality. Connect the power supply’s positive output to terminal V+, and the negative output to terminal GD. The sup-ply voltage should be within the Supply Voltage specifications.Line Output (LINE): 1/8” Stereo Phone JackThis jack provides single ended line output. It can also drive headphones directly. Balance Knob (BAL)This knob adjusts the output balance between the two channels.Volume Knob (VOL)Turn this knob clockwise to increase the output volume. It affects both the speaker and the line out.Speaker Output Terminals: LF (left channel), GD, RT (right channel)See the Speaker Connections section.Note: If the internal power amp is not to be used, it can be disconnected by removing the shorting cap on internal jumper JP1. Doing so can save about 70 mA of current. Typical Wiring Diagram for Push Button ActivationDiagram below shows only six push buttons. Six more push buttons can be connectedto trigger inputs T7 ~ TC in a similar fashion.Trigger ModeThe Trigger Mode defines how the playback is to be triggered. Direct Trigger (default)Each input always triggers a specific file: T1 = file 001, T2 = file 002, ......, TA = file 00A, TB = file 00B, TC = file 00C.The Direct Trigger is prioritized from T1 (the highest) to TC (the lowest). However, it does not mean a higher priority input can inter-rupt a lower one. It only means that if multiple triggers are applied at the same time, the highest priority wins.Sequential TriggerUse this mode to sequentially trigger up to 99 different files per input as described below.T1 triggers file 001 ~ 099T2 triggers file 201 ~ 299..........TA triggers file A01 ~ A99TB triggers file B01 ~ B99TC triggers file C01 ~ C99Each trigger on the same input activates the next file in the se-quence. The sequence automatically restarts when either the end of the sequence is reached or there is a break in the sequence. For example, if there are only three files on the flash card: 001, 002, and 004, the system will only sequence between 001 and 002. File 004 will never be played because file 003 is missing. The Sequential Trigger is prioritized from T1 (the highest) to TC (the lowest). However, it does not mean a higher priority input can interrupt a lower one. It only means that if multiple triggers are applied at the same time, the highest priority wins.Round-Robin TriggerThis mode is very similar to the Direct Trigger mode except that the inputs are not prioritized. So if multiple inputs are triggered at the same time the system will handle them one after another. The Round-Robin mode can only be used in conjunction with the Non-interruptible Playback mode.Playback ModeThe Playback Mode defines how the playback is to proceed.Non-interruptible Playback (default)The file is played once per trigger. The playback is not interruptible except by the system reset. Looping is possible by applying a con-stant trigger on the input.Interruptible PlaybackThe file is played once per trigger if not interrupted. Any input can interrupt the playback except that an input cannot interrupt itself if the Trigger Polarity is either Close or Open.Holdable PlaybackThe file is played for as long as the input is triggered, looping if necessary. It is not interruptible except by the system reset.Trigger LogicThe Trigger Logic defines how the trigger is to be applied.Close ContactThe input is continuously triggered when it’s at logic 0, e.g. when the push button is pressed down.Open ContactThe input is continuously triggered when it’s at logic 1, e.g. when the push button is not pressed down.Make ContactThe input is triggered one time as it goes from logic 1 to 0, e.g. when the push button is pressed down.Break ContactThe input is triggered one time as it goes from logic 0 to 1, e.g. when the push button is released.Speaker ConnectionsRegular StereoVirtual Surround StereoThe left channel signal is internally inverted and that’s why the left speaker has an inverted polarity for regular stereo output. If the left speaker is not inverted then the output is virtual surround stereo. By default the left channel is inverted internally. But if the Line Out-put is to be converted to mono with a stereo-to-mono patch cord then the inverted left channel will cancel out most, if not all, of the right channel. In this case, see the System Configuration section for how to prevent the left channel from inverting. Background MusicTo play background music automatically when the system is idle (not triggered), just assign M01 as the file number to the backgroun music file. When the M01 file is present on the SD card, the sys-tem will automatically play it as the background music.To play a list of background music files sequentially, just number them M01, M02 ... (up to M99).After interruption by input triggering, background music will resume from where it left off.Power Saving TipsIf the internal power amp is not to be used, it can be disconnected by removing the shorting cap on internal jumper JP1. Doing so can save about 70 mA of current.System ConfigurationBy default, the system works in the following mode without a configu ration file:Trigger Mode: DirectPlayback Mode: Non-InterruptibleTrigger Logic: Close ContactTo operate the system in any other modes, you need to create a plain text file called “MODE.TXT” containing up to four letters: First Letter: Trigger ModeD = DirectS = SequentialR = Round RobinSecond Letter: Playback ModeN = Non-interruptibleI = InterruptibleH = HoldableThird Letter: Trigger LogicC = Close ContactO = Open ContactM = Make ContactB = Break ContactFourth Letter: R or (none)By default the left channel is inverted internally. But if the Line Out-put is to be converted to mono with a stereo-to-mono patch cord then the inverted left channel will cancel out most, if not all, of the right channel. In this case, add this letter ‘R’ to prevent the left channel from being inverted internally.File Number AssignmentSound files on the flash card must be assigned a unique file num-ber for identification purpose. The file number must be a three digit number within the following range:For Direct Trigger: 001 ~ 00CFor Sequential Trigger: 001 ~ 099 (for T1), 201 ~ 299 (for T2), 301 ~ 399 (for T3), .... C01 ~ C99 (for TC)Simply add the file number to the beginning of the original filename, e.g. “001 mysound.mp3”. Note that if the flash card is formatted with FAT (FAT16) and you want to store the maximum number of files (511) on the card, you should keep the filenames (including the file number) within 8 characters and use only upper case let-ters and numbers. If the flash card is formatted with FAT32 then you may use any filename that Windows allows.Trouble Shooting Guide1. No sound.a.File numbers are not assigned properly.b.The system is in the wrong mode due to missing or incorrectconfiguration file.c.If the flash card is inserted when the power is on, the systemmay not work. To fix this problem, recycle the power or use the RS input to reset the system.d.The output volume may have been set too low. Try turning it up.2. Plays the wrong file.a.File numbers are not assigned properly.b.The system is in the wrong mode due to missing or incorrectconfiguration file.3. Noisy playback.The speed of the flash card is too slow. Use a faster flash card or convert the file to a lower bit rate.4. Very weak or no audio from Line Output when it’s converted to mono with a stereo-to-mono patch cord.Add the fourth letter ‘R’ in MODE.TXT. See the System Configura-tion section for details.Application ExampleTriggering with Normally Open Push Buttons1. Playback without interruption.Intended Operation-Press button #1 to play file #001 once.-Press button #2 to play file #002 once.-When playing, pressing any button has no effect.Required Text in MODE.TXTNone, this is the default mode (DNC).Notes-The button can be released or held down when playing.-If the button is held down when the playback finishes, the sound will play again.-If both buttons are pressed/held down at the same time, button #1 prevails.2. Allow interruption during playback.Intended Operation-Press button #1 to play file #001 once.-Press button #2 to play file #002 once.-Playback is interruptible by pressing any button other than itself. Required Text in MODE.TXTD ICNotes-When playing, pressing the same button again has no effect.3. Play the sound only once even if the button is held down. Intended Operation-Press button #1 to play file #001.-Press button #2 to play file #002.-Don’t repeat the sound even if the same button is held down. Required Text in MODE.TXTDNM- if playback is to be non-interruptibleDIM- if playback is to be interruptible4. Play only when the button is held down.Intended Operation-Press & hold button #1 to play file #001.-Press & hold button #2 to play file #002.Required Text in MODE.TXTDHCNotes-Playback stops as soon as the button is released. If the same button is pressed again later, playing re-starts from the begin-ning of the file instead of where it left off.-If both buttons are held down, button #1 prevails. To play both sounds alternately when both buttons are held down, use the RHC mode.5. Play a list of sounds sequentially, one per trigger, when the same button is pressed.Intended Operation-Press button #1 to play file #001 the first time, file #002 the second time, and etc.-Button #2 sequences through file #201, #202...-When playing, pressing any button has no effect.Required Text in MODE.TXTSNCNotes-Up to 99 files can be assigned to each button but file numbers must be consecutive.-To allow interruption from other inputs, use the SIC mode.-To play only when the button is held down, use the SHC mode. In the SHC mode, the same sound will repeat for as long as the button is held down. To advance to the next sound, the button must be released and pressed.Application ExampleAutomatic Playback on Power-up1. Repeat continuously on power-up.Intended Operation-Play file #001 on power-up if switch #1 is closed.-Play file #002 on power-up if switch #2 is closed. .........-Play file #006 on power-up if switch #6 is closed.-If more than one switch is closed, play all corresponding files sequentially.-Repeat the file(s) until power is turned off.Required Text in MODE.TXTRNCNotes-If priority is required, use DNC instead of RNC. In this case switch #1 has the highest priority, switch #2 has the second highest priority, and switch #C has the lowest priority. If more than one switch is turned on, only the file for the switch of the highest priority will be played.Application ExampleTriggering with Normally Closed Switches & Sensors1. Play when the switch/sensor opens, with no priorities. Intended Operation-Play file #001 when sensor #1 opens.-Play file #002 when sensor #2 opens.-Repeat the sound for as long as the sensor is open.-If multiple sensors are open at the same time, play all corre-sponding files sequentially.Required Text in MODE.TXTRNONotes-Unused inputs must be connected to the ground, as shown in the wiring diagram.2. Play when the switch/sensor opens, with priorities. Intended Operation-Same as the example above, but if multiple sensors are open at the same time, the sensor of the highest priority prevails. Required Text in MODE.TXTDNONotes-The sensor connected to T1 has the highest priority, and the sensor connected to TC has the lowest priority.3. Play when the switch/sensor opens, but don’t repeat. Intended Operation-Play file #001 when sensor #1 opens.-Play file #002 when sensor #2 opens.-Do not repeat the sound.Required Text in MODE.TXTDNB- if playback is to be non- interruptibleDIB- if playback is to be interruptible。

M1P无损数字音乐便携播放器使用手册细则非常感谢您选择使用我们aune的产品,为了让您更好的体验我们这款M1P便携无损数字音乐播放器带来的高音质享受,请结合包装里面快速指南说明文件上的按键操作功能和接口说明来连接相关设备,谨记并遵循以下各项使用细则。
您也可以根据快速指南上的官网地址登录我们的官网(官网地址)查看更多关于产品的使用功能。
产品简介:M1P是我们auneM1系列便携播放器的第三代产品,采用freescale TM600M主控芯片组,纯低层硬解码播放器框架。
M1P攻克32bit/768k和DSD512解码,采用FPGA算法和DAC时钟同步结束,支持高清蓝牙解码和高清蓝牙发射,是一款专注音质的母带级便携音频播放器。
1:您收到我们寄给您的包裹之后并拆开包装盒,会发现里面有主机、TYPE-C充电线、名片、快速指南说明文件,其中的快速指南请不要丢掉,方便往后的功能查看使用。
2:在M1P上插入使用TF卡之前请先检查TF卡的文件系统是否符合M1P所要求的exFAT 格式。
具体检查方法为:将TF卡用读卡器插到电脑上,在电脑上右键点击TF卡,选择最下面的属性进行查看。
本机对TF卡容量最大支持能力为1TB。
具体操作如下图所示:如果发现TF卡的属性不符合要求,就需要对TF卡重新进行完全的格式化(如TF卡里面有内容,需提前保存到其它地方),可以用电脑自带的快速格式化功能进行操作。
如下图:如果用电脑自带的快速格式化功能对TF卡重新格式化之后还不能被M1P识别,也可以用专用的格式化软件DiskGenius进行操作件(网上就有免费的下载,也可联系客服发软件或者是自行到我们的官网去找到M1P页面进行下载),下载之后并解压。
具体操作如下图:按照上面教程来进行操作之后一般都能正常识别播放,格式化完成之后先存入一两首歌曲再插到数播上看看能否正常播放,如能正常播放就代表格式化成功,可以继续存入歌曲。
3:蓝牙功能的使用---M1P具备双向蓝牙功能,也就是蓝牙接收和蓝牙发射。
无损音频格式基本认识无损音乐知识入门:/content/11/0706/06/1251324_131746282.shtml无损音频格式做为当前的热点,很多人并不是非常清楚无损格式的。
其实主要的区别在于要了解MP3中播放的音乐文件格式,目前音乐文件播放格式分为有损压缩和无损压缩两种。
使用不同的格式的音乐文件,在音质的表现上有差很大的差异。
我们常见到的MP3、WMA、OGG被称为有损压缩,有损压缩顾名思义就是降低音频采样频率与比特率,输出的音频文件会比原文件小。
另一种音频压缩被称为无损压缩,能够在100%保存原文件的所有数据的前提下,将音频文件的体积压缩的更小,而将压缩后的音频文件还原后,能够实现与源文件相同的大小、相同的码率。
目前无损压缩格式有APE、FLAC、WavPack、LPAC、WMALossless、AppleLossless、La、OptimFROG、Shorten,而常见的、主流的无损压缩格式目前只有APE、FLAC。
一、什么叫无损压缩音乐格式?所谓无损压缩音乐格式,就是毫无损失地将音频信号进行压缩的一种格式,能在不牺牲任何音频信号的前提下,减少文件体积的格式。
二、无损与有损压缩音乐格式的优缺点:无损压缩的优势:1、100%的保存、没有任何信号丢失2、音质高,不受信号源的影响3、转换方便无损压缩的不足:1、占用空间大,压缩比不高2、缺乏硬件支持三、无损压缩格式种类及介绍1、APE(Monkey'sAudio)APE无疑是目前最著名的无损压缩格式,APE是由Monkey's Audio出品的一种数字音乐文件格式。
与MP3、OGG这类有损压缩方式不同,APE是目前世界上惟一得到公认的音频无损压缩格式,也就是说当您将从音频CD上读取的音频数据文件压缩成APE格式后,还可以再将APE格式的文件还原,而还原后的音乐文件与压缩前一模一样,没有任何损失。
由于APE的编码率高达800kbps-1400kbps,接近于音乐CD的1411.2kbps,远远高于MP3的编码率,因此它在压缩后的音质和源文件音质几乎毫无差异,其音质之佳已经过了严格的盲听测试,得到了全世界发烧友的公认。
快速转换无损音频WMA作者:浪迹天涯来源:《电脑爱好者》2013年第24期从CD音轨获取WMA LosslessCD的音质很高,但是它携带不是很方便。
要想将CD音乐完美地复制到电脑中,转换成WMA Lossless格式是很不错的选择,使用系统自带的Windows Media Player即可完成转换。
启动媒体播放器后进入它的选项窗口,切换到“翻录音乐”选项卡,在“格式”列表中选择“Windows Media 音频无损”项,并设置翻录音乐的存放文件夹(图1)。
点击“确定”返回主界面,接下来播放CD光盘,在音乐列表中选择需要转换的音乐名称,最后点击工具栏中的“翻录CD”就可以转换了(图2)。
常用无损音频格式的转换其他的音频如何转换成WMA Lossless格式?通过Advanced WMA Workshop这款软件即可完成。
启动软件后,通过窗口左侧的文件夹列表找到要转换的音乐文件,右击,选择“转换为WMA”命令。
在弹出的转换设置窗口中,切换到“WMA设置”选项卡中,格式类型设置为“无损音质”(图3)。
另外按提示设置文件信息、文件名、保存路径等,最后点击“确定”,即可开始进行转换操作了(图4)。
X64系统的音频转换如果用户使用的是64位的Windows系统,上面的方法有可能无法凑效,这时可试试安装WMEncoder 9 x64编码器,并下载一个脚本覆盖到WMEncoder 9 x64的安装目录(http:///n4shflc)。
在Foobar 2000中右击相应的音乐文件,选择“转换”菜单中的“...”命令进入转换器设置窗口,点击“输出格式”并在弹出窗口中点击“新建”。
然后在编码器文件中输入C:\Windows\Sysnative\cscript.exe,扩展名中输入wma,参数中输入:"C:\Program Files\Windows Media Components\Encoder\WMCmd.vbs" -input %s -output %d -a_codec WMA9LSL -a_mode 2 -title "%t" -author "%a" -album "%g" -genre "%m" -year %y -trackno %n其他设置,格式选择“无损”(或混合),最高BPS模式支持选择24,编码器名称输入为WMA Lossless,“设置”参数为VBR Quality 100。
以下所有配图只做参考,具体以实物为准M9电子版说明书前言:感谢您购买了 FiiO 公司推出的便携高清无损音乐播放器M9。
为了让M9给您带来更好的赏音体验,这份电子说明书介绍了M9 的常用功能和操作方法,希望能帮助您更加全面的了解和使用 M9。
目录●产品介绍: (4)●按键与接口使用方法: (4)1、按键与接口图示 (4)2、按键与接口使用说明 (5)●主界面及下拉框展示 (6)●设置功能界面 (7)1、WiFi功能 (7)2、蓝牙功能 (8)蓝牙发射 (8)蓝牙接收 (9)3、音频 (10)输出选择 (11)SPDIF输出 (11)增益 (12)数字滤波器模式 (12)无线播放品质 (13)声道平衡 (13)线控 (14)平衡增压 (14)线路输出音量可调 (15)USB DAC (15)4、彩灯 (16)5、锁键设置 (16)6、通用 (17)关于本机 (17)定时关机 (17)应用 (18)亮度 (19)休眠 (19)语言设置 (19)恢复出厂设置 (21)●固件更新 (22)●状态栏 (24)●技术支持 (24)●飞傲音乐 (25)1、APP 首页 (25)2、全部歌曲快速定位 (27)3、全部歌曲界面手势操作 (27)4、功能菜单 (28)5、播放界面 (28)6、点击按键操作 (29)7、播放界面手势操作 (30)8、专业EQ (31)指示灯平衡输出Type C USB数据/充电口3.5mm耳机/线路/SPDIF输出TF卡槽下一曲上一曲播放/暂停键音量滚轮触摸显示屏(已贴钢化膜)电源/锁屏键●产品介绍:M9是一款消费类便携高清无损音乐播放器,采用三星14nm Exynos 7270主控,高性能音频Codec,拥有2GB本机内存,并支持外置TF卡存储(512GB),480*800高清显示屏,支持多点触控。
TYPE_C接口支持充电、文件传输、USB audio输出(TYPE_C数字耳机,配接数字解码,如:Q1ii,Q5);4.2蓝牙版本,支持SBC/aptX/aptX-HD/LDAC以及HWA多种编码方式。
了解电脑中常见的音频编码和解码方法电脑中常见的音频编码和解码方法在现代科技日益发达的时代,我们经常使用电脑来处理和播放音频文件。
然而,我们可能对电脑中的音频编码和解码方法了解得不够深入。
本文将介绍电脑中常见的音频编码和解码方法,以帮助读者更好地了解和使用电脑中的音频技术。
一、无损音频编码和解码无损音频编码和解码是一种保留音频原始质量的方法,从而实现无压缩或仅有很小程度压缩的目标。
这种方法主要用于存档和专业音乐制作等领域。
常见的无损音频编码和解码格式包括:1. WAV格式:WAV格式是Windows操作系统中最常见的无损音频编码和解码格式之一。
它使用PCM编码,可以保存高质量的音频,但文件大小相对较大。
2. AIFF格式:AIFF格式是苹果电脑上常用的无损音频编码和解码格式。
它同样使用PCM编码,并且兼容多种音频应用。
3. FLAC格式:FLAC格式是一种自由开源的无损音频编码和解码格式。
它能以更小的文件大小保存音频,同时保持高音质。
FLAC格式常用于音乐爱好者和音频专业人士之间的文件传输。
二、有损音频编码和解码有损音频编码和解码是一种在压缩音频文件时牺牲一定音质的方法,以减小文件大小。
这种方法广泛应用于网络传输和媒体播放等场景。
常见的有损音频编码和解码格式包括:1. MP3格式:MP3格式是最为广泛接受和使用的音频编码和解码格式之一。
它通过减少人耳难以感知的音频信号,从而压缩音频文件大小。
MP3格式适用于音乐、语音和播客等各种类型的音频文件。
2. AAC格式:AAC格式是一种优秀的音频编码和解码格式,常用于音频和视频文件中。
它相对于MP3格式具有更好的音质和压缩效率。
3. WMA格式:WMA格式是Windows媒体音频格式,常用于Windows系统中的媒体文件。
WMA格式通过改进音频编码算法,在减小文件大小的同时保持音质。
三、专业音频编码和解码方法除了以上常见的音频编码和解码方法,还有一些专业的音频编码和解码方法,主要应用于专业音频领域。
1000多首经典无损音乐打包下载(附无损音乐介绍)首先,我们来明确一下数字音频的概念,它是指一个用来表示声音强弱的数据序列,由模拟声音经抽样、量化和编码后得到的。
简单地说,数字音频的编码方式就是数字音频格式,我们所使用的不同的数字音频设备一般都对应着不同的音频文件格式。
下载地址:https:///lk/OcPaxZV2i9Xjrn提取码:关注“音频娱乐”微信公众号:yinpinyule,回复:无损(建议微信电脑版打开下载)手机扫一扫关注公众号音乐文件播放格式分为有损压缩和无损压缩两种。
但由于音频数字化过程中会有数据损失,事实上不可能做到真正的无损。
一.音频常识比特率、采样率、无损、MP3、FLAC、APE、320kb、192kb、128 kb、44.1khz、CBR、VBR。
这堆各种各样的名称是不是让你既熟悉又陌生?比特率越高,音质就越好。
而无损音乐,是最高音质,这是真的吗?那就让我们从声音的采集开始说起。
音频组成当前,我们所说的音频,都是数字音频。
数字音频由采样频率、采样精度、声音通道数三个部分组成。
采样频率:既采样率,指记录声音时每秒的采样个数,它用赫兹(Hz)来表示。
采样精度:指记录声音的动态范围,它以位(Bit)为单位。
声音通道:既声道数(1-8个)。
通俗点说,我们可以把声波看成是一条曲线,我们知道,曲线是由点组成的,采样率就是每秒长度(上图横轴)中点的个数。
而采样精度就是动态范围(上图竖轴)中点的个数。
这两个维度的定位越细,声音的真实还原度就越高,音质也就会更好,当然,音频文件也就会越大。
上面那个同事遇到的客户所说的,就是SONY公司最新发布的音频格式Hi-Res Audio,是192kHz / 24bit,6通道录制的音频文件,无损格式的大小当然就会在200多兆了。
采样率根据使用类型不同大概有以下几种(k既千位符号,1khz=1000hz):8khz:电话等使用,对于记录人声已经足够使用。
用Foobar玩转APE的切割与合并听惯了APE,耳朵也挑剔起来了,再是高码率的MP3也总觉得缺陷。
收来了许多的APE,但是新的问题出现了:很多APE中我喜欢的仅仅是其中的一两首,能否将它们单独RIP出来;有的歌曲在几张APE中有重复,能否去除冗余,腾出点硬盘空间;想做一张精选集的CD自己欣赏,或者送给朋友,但是面对着APE的大个子,却无从下手。
软件名称 Foobar2000软件版本 V0.9.4.3 Final软件大小 1.91MB软件分类文件管理软件语言简体中文应用平台 Windows 95/98/NT/2000/XP/2003软件作者 Foobar2000高速下载地址在我们眼中,做音乐似乎需要很专业的工具。
其实不然,就拿我们常用的播放软件foobar2000来说,其实就可以玩转APE的DIY工作。
不信?一起来看吧。
Foobar2000播放、转换APE需要安装插件及mac.exe。
或者安装增强版的Foobar2000插件已安装好。
如何设置APE-Monkey's Audio编码器:配置\转换器\添加\在编码器栏选自定义(添加命令行编码器)编码器:E:\Foobar2000\mac.exe扩展名:APE参数:%s %d-c2000格式:无损(混合)最高BPS:24编码器名称:APE-Monkey's Audio(Normal)比特率:不填设置:Normal1.合久必分——切割APE首先我们需要APE和对应的CUE文件。
APE是CD音轨的无损压缩格式,CUE则是每首歌曲的索引。
如果cue文件丢失,切割就比较麻烦,需要利用Adobe Audition 等专业工具观察波形图来手动处理。
这里不讨论。
用foobar2000打开cue文件,然后就可以在播放列表中看到APE中的全部歌曲。
使用CTRL+左键,选中所需要的几首,然后在右键菜单中单击“转换”-“转换到”。
(图1)图1 在打开的“转换器设置”中,选中“APE-monkey's Audio: Normal”作为编码预置。
1、音频基础知识玩过音频的人应该清楚,一般 常见的音频格式都有 采样率(sample rate)、位深度(Bit deepth)、声道数(Channels)、码率(Bitrate)等指标,无损波形wav码率可以根据前面3个指标乘积计算,但已经压缩(包含有损或无损)的音频则无法根据前面3个指标直接推算。
例如按照国际标准,CD是 44100Hz(采样率)、16bits(位深度)、2声道格式,则其无压缩的wav格式码率:wav码率 = 44100 * 16 *2 = 1411200bps = 1411kbps。
再例如现在热炒的24bit/32bit 192KHz 母带播放器,一般常规的hifi级都是2声道立体声格式的,大家也可以根据上述公式计算码率。
2、音频格式音频格式按压缩方式分为有损格式和无损格式两大类。
有损格式一般指mp3、wma、ogg、aac等格式,无损格式一般指ape、flac、wav等格式,无损格式之间可以无损转换,无损格式可以转为有损格式,但有损格式无法转为无损格式。
本文主要讨论无损格式。
根据中国大陆互联网无损音乐下载,ape和flac由于其体积小,占绝对主流,部分hifi级别音乐也提供wav无压缩格式。
3、压缩等级ape和flac除了具有 采样率、位深度、声道数指标外,还有压缩等级的区分,压缩等级不影响音质,只是影响文件大小及解码速度,文件越小,压缩等级越高,解码速度越慢,消耗cpu资源越高。
各无损格式之间不但可以相互转化,压缩等级之间也可以相互转化,并且理论上不影响音质。
3.1 ape格式压缩等级ape格式的压缩等级分为:1、fast(快,快速F)等级:C1000,兼容性好,建议采用2、Normal(中等N、常规、普通、正常)等级:C2000,兼容性好,建议采用3、High等级(较高H):C3000,兼容性一般,不建议采用4、Extra High(超高E)等级:C4000,兼容性差,不建议采用5、Insane(疯狂I)等级:C5000,兼容性差,不建议采用3.2 flac格式压缩等级flac格式一般有0-9级压缩等级,flac格式一旦压缩了,就不清楚压缩等级,一般建议使用兼容性最好的0级压缩。
flac格式按照国际标准,一般 在用工具打开二进制文件中,文件头以 fLaC 开始,个别QQ音乐、酷狗音乐下载的flac格式 可能以 Id3 开始,会导致大量 便携式播放器无法识别,显示格式出错。
4、播放器播放常见无损格式的出错信息4.1 只看见播放但 没声音 或者 沙沙声如果文件本身在计算端播放正常,而便携式播放器播放时只有沙沙声,一般可以认为不是标准的CD格式音频,可能是24bit超采样或DTS CD6声道格式。
可以用接下来介绍的Foobar2000播放工具检测或转换到CD标准格式(不过个人不是很感冒这种转换,因为降低位深度或声道已不符合无损要求了,看个人喜好)。
4.2 显示格式出错播放器可移动磁盘文件系统格式是否是FAT32。
NTFS/exfat也有可能导致 格式错误。
如果是ape,一般是压缩等级不兼容,可用接下来介绍的Foobar2000播放工具及APE官方工具Monkey's Audio检测及转换到支持的压缩等级。
如果是flac,一般是ID3前缀导致,可用Foobar2000播放工具重转flac即可。
如果镜像文件有cue列表,可能也会因为播放器cue解析程序bug,导致显示格式出错,一般可以删除cue测试,如果确系cue解析问题,请把 音频镜像和cue文件传给我们(QQ:66307757 那一剑的风情)5、如何使用Monkey's Audio 和Foobar2000无损工具5.1 下载地址Monkey's Audio 4.12 中文版:/share/link?shareid=1293962463&uk=622234359foobar2000 1.29 中文版:/share/link?shareid=3144173539&uk=622234359下载完成后,自行安装。
安装foobar2000时,建议把所有选项都选上。
5.2 使用Monkey's Audio 查询及转换压缩等级从开始->所有程序->Monkey's Audio-> 运行Monkey's Audio,出现如下窗口:除了可使用Monkey 's Audio 转换ape 格式压缩等级外,也可使用Foobar2000进行转换压缩等级(Foobar2000转换ape 压缩等级时,也需要先安装Monkey 's Audio ,下一节将描述)1、设置操作模式和压缩等级对于转换来说,只须设置左边两个图标内容。
左边第一个图标后面的向下箭头选择 操作模式为 Convert (中文:转换)左边第二个图标后面的向下箭头选择压缩等级为 Fast (中文:快或快速F )或Normal(中文:中等N )2、开始转换设置好 操作模式及压缩等级后,把所有 压缩等级不兼容待转换的文件拖进来,再按 左边第一个 Convert (中文:转换) 按钮! 等待 进度全部完成!强烈建议:不要在较低速度的可移动磁盘上执行转换!可以先在 计算机硬盘上转换好了,再复制到可移动磁盘!本转换是覆盖文件操作,转换后直接复制文件到可移动磁盘上就行了。
辅助功能-怎样查询文件压缩等级:鼠标右键指向 文件,选择 File Info(中文:文件信息 或文件属性)在弹出的窗口 中可以看到Monkey's Audio 3.99 (Normal) 类似字样的就是压缩等级,其他几行有 采样率,位深度,声道数等信息。
快速或中等 压缩模式一般是支持的,无须转换。
44.1Khz,16位,2声道是支持的,如果不是,请用foobar2000或其他工具转换到这个指标压缩等级:Normal采样率是44.1KHz ,位深度16bit ,2声道5.3 使用Foobar2000播放器查询及多格式互转在安装Foobar2000时,建议选择所有的解码器及编码器。
Foobar2000可能不会安装ape的编码器,所以建议也安装Monkey's Audio,Foobar2000可调用这个编码器。
为了使用方便,我们可以在打开foobar2000后,定制界面列显示,右键点中列表标题顶栏->分栏,选中以下几项:其中,编解码 可以方便查询ape压缩等级,以便于后续转换时快速列表排序定位。
5.3.1 使用foobar2000转换格式/压缩等级/多声道/位深度在 无损文件 在复制到播放器之前,最好先在计算机上把文件先检测一遍,处理不符合播放器压缩等级及采样指标要求的文件。
同时建议一般情况下不要在播放器可移动磁盘上转换格式,因为可移动磁盘速度相对计算机硬盘慢很多。
编解码在 foobar 中选择 文件->添加文件(或添加目录)导入 目标音乐文件,再点下 列表标题的 ,以排序方便浏览。
红色矩形框中 的Extra High、High、Insane 压缩等级可能会导致不兼容,是需要待转换的文件,可利用foobar2000或Monkey's Audio转换为 Normal或Fast压缩等级使用Monkey's Audio 转换压缩模式,前面已经叙述。
本节重点讨论利用Foobar2000转换ape 压缩等级。
两种方式所长,Monkey's Audio 可以覆盖原文件,转换速度快,少一次手动复制过程;Foobar2000 要重新生成转换后的文件,须重新复制,熟练后,可以结合两种工具使用。
下面开始用foobar2000转换ape 压缩等级,如下图所示:输出格式 中可设置转换后的文件格式、压缩等级、位深度(转换到播放器支持的16bit 位深度格式)。
目标 中可设置转换后文件存放的文件夹。
处理 中可设置 多声道转立体声选项(如果是dts 格式,须在该选项中设置 已激活的DSP)下面分节描述怎样设置 上述选项。
一直按住 shift 键,鼠标逐个点击选择 需要转换压缩等级的文件,鼠标右键->转换->...,左键确认转换后文件存放的文件夹主要是声道设置,如果需要转换DTS 多声道为支持的双声道,须在该项中设置DSP5.3.1.1 设置转换格式、压缩等级、位深度该功能可以完成 之间的转换。
各格式、各压缩等级、24/32bit->16bit 位深度一般情况下,foobar2000并没有标配Monkey's Audio(APE)编码转换器,所以需要用户安装 Monkey's Audio,以便Foobar2000外挂编码转换器,如果首次没有配置 APE 编码转换器,需要 点击 按钮,如图所示:新建 设置ok后,按 确定 ->返回 回到转换器设置窗口,用户可 再设置 目标文件夹或多声道转立体声项。
选择ape 格式及其压缩等级选择普遍支持的16bit设置外部ape 编码转换器mac .exe 位置按照本图设置即可,一般设置为兼容性最好的C1000(Fast )或C2000(Normal )压缩等级按照本图配置即可按照本图设置即可,该项仅供显示,不影响转换。
ape 转换设置选择兼容性最好的0级压缩部分QQ 音乐或搜狗音乐下载的flac 格式,如果播放器不识别的,也可以用这种方式转换5.3.1.2 设置转换后文件存放的文件夹5.3.1.3 设置DSP 处理完成DTS 多声道转到2声道立体声该项可以设置DTS 6声道格式到2声道立体声的格式文件的转换,以避免在两声道播放器上出现无法解码或者没有声音。
转换后的目标文件夹最好不要和待转换文件的文件夹相同。
其他设置按照本图配置即可。
设置转换后的目标文件夹3412设置成功后,在左边已显示。
该项可以 转换DTS 6声道到播放器支持的立体声双声道设置 转换格式(压缩等级)、目标文件夹、多声道处理设置后,就可以在 转换器->综览 窗口 按 转换开始正式转换了。
Foobar2000和Monkey's Audio 无法对采样率转换,这个要借助另外工具才能实现。
5.3.1.4 怎样利用Foobar2000查询格式详细信息foobar2000 有两种操作方式可以查询格式详细信息,两种方式必须结合才能准确判断格式信息。
一种是在foobar2000播放窗口鼠标右键->待查询文件->属性->属性,另一种是直接播放该文件,在窗口的右下侧显示实时播放信息。
不同格式显示信息稍有区别,不完全准确,要结合实时播放信息准确判断,特别是dts 格式ape 格式的压缩等级一般为Normal 或Fast 的无兼容问题5.4 使用cue列表信息解决不兼容问题MX/ME系列播放器可以自动解析ape/flac/wav整盘音频镜像所带的cue列表,从而实现分轨切换。