VBS连接EXCEL及其操作
- 格式:pdf
- 大小:78.81 KB
- 文档页数:19
VBS连接EXCEL及其操作VBS(Visual Basic Script)是一种Microsoft基于Visual Basic所开发的一种脚本编程语言。
通过VBS可以连接Excel,并对Excel进行各种操作,包括读取、修改、创建和删除Excel文件,读取和修改Excel中的数据,设置单元格样式和格式等。
要连接Excel文件,需要先创建一个Excel对象,然后通过Excel对象打开指定的Excel文件。
以下是一个连接Excel并读取数据的示例代码:```Set excelApp = CreateObject("Excel.Application")Set excelWorkbook =excelApp.Workbooks.Open("C:\Path\To\ExcelFile.xlsx")Set excelWorksheet = excelWorkbook.Worksheets("Sheet1")rowCount = edRange.Rows.CountcolumnCount = edRange.Columns.CountFor i = 1 To rowCountFor j = 1 To columnCountvalue = excelWorksheet.Cells(i, j).ValueMsgBox "Cell (" & i & ", " & j & "): " & valueNextNextexcelWorkbook.CloseexcelApp.Quit```上述代码首先创建了一个Excel应用程序对象excelApp,并调用Open方法打开指定的Excel文件。
然后,获取指定的工作表对象excelWorksheet,并通过UsedRange属性获取数据的有效范围。
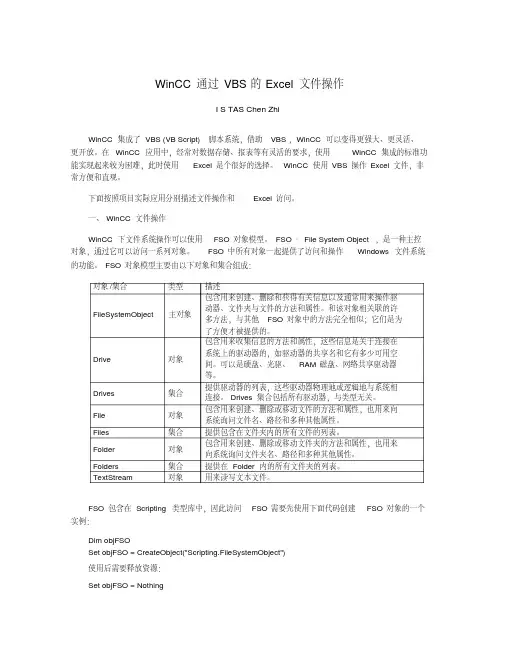
预备知识和操作在VB中要想调用Excel,需要打开VB编程环境“工程”菜单中的“引用”项目,并选取项目中的“Microsoft Excel 11.0 object library”项。
由于你的Excel版本不同,所以这个选项的版本号也是不同的。
因为EXCEL是以层次结构组织对象的,其对象模型中含有许多不同的对象元素。
第一层:Application对象,即Excel本身;第二层:workbooks对象集,指Excel的工作簿文件第三层:worksheets对象集,表示的是Excel的一个工作表;第四层:Cells和Range对象,指向Excel工作表中的单元格。
1从"工程"菜单中选择"引用"栏;选择Microsoft Excel 11.0 Object Library(EXCEL2003),然后选择" 确定"。
2关键代码Dim newxls As Excel.ApplicationDim newbook As Excel.WorkbookDim newsheet As Excel.WorksheetSet newxls=CreatObject("Excel.Application")Set newbook=newxls.Worksbooks.AddSet newsheet=newbook.Worksheets(1)newxls.Visible = True '这一句很关键,编程语言中show和visible应该还起初始化的作用。
newxls.Workbooks.Open FileName:=App.Path & "备件库存查询" + mydate + ".xls"3 newxls.Visible := True '显示当前窗口4 newxls.Caption := "应用程序调用Microsoft Excel" '更改Excel 标题栏5 newxls.Workbooks.Add '添加新工作簿6 newxls.Workbooks.Open("C:\Excel\Demo.xls") '打开已存在的工作簿newxls.Workbooks.Open FileName:=App.Path & "备件库存查询" + mydate + ".xls"7 newxls.WorkSheets[2].Activate '设置第2个工作表为活动工作表newxls.WorkSheets["Sheet2"].Activate8 newxls.Cells[1,4].Value := "第一行第四列" '给单元格赋值newsheet.Cells(1, 4) = "备件名称"9 newxls.ActiveSheet.Columns[1].ColumnsWidth := 5'设置指定列的宽度单位:字符个数以第一列为例10 newxls.ActiveSheet.Rows[2].RowHeight := 1/0.035; // 1厘米设置指定行的高度,单位为磅,1磅=0.035厘米,以第二行为例11 在第8行之前插入分页符newxls.WorkSheets[1].Rows[8].PageBreak := 1在第4列之前删除分页符newxls.ActiveSheet.Columns[4].PageBreak := 012 关键代码Visual Basic6.0在excel中的range方法Sub Random()Dim myRange As RangeSet myRange = Worksheets("Sheet1").Range("A1:D5") '注意区域Range为二四象限对角线区域myRange.Formula = "=RAND()"myRange.Font.Bold = TrueEnd Sub13 关键代码Row = ActiveSheet.Range("A1:A679").Find("1-101").Row如果找不到1-101会崩溃Dim c As RangeSet c=ActiveSheet.Range("A1:A679").Find("1-101")If Not c Is Nothing Then '找到Set Row=c.RowElse '找不到'加入自已要处理的语句End If14 newxls.ActiveSheet.Range["B3:D4"].Borders[2].Weight := 3 '指定边框线宽度1-左2-右3-顶4-底5-斜( \ ) 6-斜( / )15 newxls.ActiveSheet.Cells[1,4].ClearContents '清除第一行第四列单元格公式16 newxls.ActiveSheet.Rows[1] := '隶书' '设置第一行字体属性:newxls.ActiveSheet.Rows[1].Font.Color := clBluenewxls.ActiveSheet.Rows[1].Font.Bold := Truenewxls.ActiveSheet.Rows[1].Font.UnderLine := True17 进行页面设置a.页眉newxls.ActiveSheet.PageSetup.CenterHeader := "报表演示"b.页脚newxls.ActiveSheet.PageSetup.CenterFooter := "第&P页"c.页眉到顶端边距2cm:newxls.ActiveSheet.PageSetup.HeaderMargin := 2/0.035d.页脚到底端边距3cm:newxls.ActiveSheet.PageSetup.HeaderMargin := 3/0.035e.顶边距2cm:newxls.ActiveSheet.PageSetup.TopMargin := 2/0.035f.底边距2cm:newxls.ActiveSheet.PageSetup.BottomMargin := 2/0.035g.左边距2cm:newxls.ActiveSheet.PageSetup.LeftMargin := 2/0.035h.右边距2cm:newxls.ActiveSheet.PageSetup.RightMargin := 2/0.035i.页面水平居中:newxls.ActiveSheet.PageSetup.CenterHorizontally := 2/0.035j.页面垂直居中:newxls.ActiveSheet.PageSetup.CenterV ertically := 2/0.035k.打印单元格网线:newxls.ActiveSheet.PageSetup.PrintGridLines := True '这一条要注意使用18 拷贝操作a.拷贝整个工作表:ed.Range.Copyb.拷贝指定区域:newxls.ActiveSheet.Range["A1:E2"].Copyc.从A1位置开始粘贴:newxls.ActiveSheet.Range.["A1"].PasteSpeciald.从文件尾部开始粘贴:newxls.ActiveSheet.Range.PasteSpecial19 插入一行或一列a. newxls.ActiveSheet.Rows[2].Insertb. newxls.ActiveSheet.Columns[1].Insert20 删除一行或一列a. newxls.ActiveSheet.Rows[2].Deleteb. newxls.ActiveSheet.Columns[1].Delete21 打印预览工作表newxls.ActiveSheet.PrintPreview '这一条要注意使用22 打印输出工作表newxls.ActiveSheet.PrintOut '这一条要注意使用23 工作表保存If not newxls.ActiveWorkBook.Saved thennewxls.ActiveSheet.PrintPreviewEnd if24 工作表另存为newxls.SaveAs("C:\Excel\Demo1.xls")25 存盘ExcelID.ActiveWorkBook.Saved := True26 关闭工作簿ExcelID.WorkBooks.Close27 退出ExcelExcelID.Quit28 设置工作表密码ExcelID.ActiveSheet.Protect "123", DrawingObjects:=True, Contents:=True, Scenarios:=True29 EXCEL的显示方式为最大化ExcelID.Application.WindowState = xlMaximized30 工作薄显示方式为最大化ExcelID.ActiveWindow.WindowState = xlMaximized31 设置打开默认工作薄数量ExcelID.SheetsInNewWorkbook = 332 关闭时是否提示保存(true 保存;false 不保存)ExcelID.DisplayAlerts = False33 设置拆分窗口,及固定行位置ExcelID.ActiveWindow.SplitRow = 1ExcelID.ActiveWindow.FreezePanes = True34 设置打印时固定打印内容ExcelID.ActiveSheet.PageSetup.PrintTitleRows = "$1:$1"35 设置打印标题ExcelID.ActiveSheet.PageSetup.PrintTitleColumns = ""36 设置显示方式(分页方式显示)ExcelID.ActiveWindow.View = xlPageBreakPreview37 设置显示比例ExcelID.ActiveWindow.Zoom = 10038 让Excel 响应DDE 请求Ex.Application.IgnoreRemoteRequests = False编程例子用VB操作EXCELPrivate Sub Command3_Click()On Error GoTo err1Dim i As LongDim j As LongDim objExl As Excel.Application '声明对象变量Me.MousePointer = 11 '改变鼠标样式Set objExl = New Excel.Application '初始化对象变量objExl.SheetsInNewWorkbook = 1 '将新建的工作薄数量设为1objExl.Workbooks.Add '增加一个工作薄objExl.Sheets(1).Name = "book2" '修改工作薄名称objExl.Sheets("book2").Select '选中工作薄<book2>For i = 1 To 50 '循环写入数据For j = 1 To 5If i = 1 ThenobjExl.Selection.NumberFormatLocal = "@" '设置格式为文本objExl.Cells(i, j) = " E " & i & jElseobjExl.Cells(i, j) = i & jEnd IfNextNextobjExl.Rows("1:1").Select '选中第一行objExl.Selection.Font.Bold = True '设为粗体objExl.Selection.Font.Size = 24 '设置字体大小objExl.Cells.EntireColumn.AutoFit '自动调整列宽objExl.ActiveWindow.SplitRow = 1 '拆分第一行objExl.ActiveWindow.SplitColumn = 7 '拆分前七列objExl.ActiveWindow.FreezePanes = True '固定拆分objExl.ActiveSheet.PageSetup.PrintTitleRows = "$1:$1" '设置打印固定行objExl.ActiveSheet.PageSetup.PrintTitleColumns = "" '打印标题objExl.ActiveSheet.PageSetup.RightFooter = "打印时间: " & _Format(Now, "yyyy年mm月dd日hh:MM:ss")objExl.ActiveWindow.View = xlPageBreakPreview '设置显示方式objExl.ActiveWindow.Zoom = 100 '设置显示大小objExl.ActiveSheet.Protect "123", DrawingObjects:=True, _Contents:=True, Scenarios:=TrueobjExl.Application.IgnoreRemoteRequests = FalseobjExl.Visible = True '使EXCEL可见objExl.Application.WindowState = xlMaximized 'EXCEL的显示方式为最大化objExl.ActiveWindow.WindowState = xlMaximized '工作薄显示方式为最大化objExl.SheetsInNewWorkbook = 3 '将默认新工作薄数量改回3个Set objExl = Nothing '清除对象Me.MousePointer = 0 '修改鼠标Exit Suberr1:objExl.SheetsInNewWorkbook = 3objExl.DisplayAlerts = False '关闭时不提示保存objExl.Quit '关闭EXCELobjExl.DisplayAlerts = True '关闭时提示保存Set objExl = NothingMe.MousePointer = 0End Sub。
vbs之excel使⽤VBScript操作excel 打开excel及新建⼯作薄'' 2. Method'''''''''''''''''''''''''''''''''''''''''''''''''''''''''''' 2.1 CreateObject Method' 语法:CreateObject(appname.objectType, [servename])' 解释:appname, 必要, Variant(字符串)。
提供该对象的应⽤程序名。
' objecttype, 必要,Variant。
带创建对象的类型或是类。
' servename,可选,Variant。
要在其上创建对象的⽹络服务器名称。
'' 说明:要创建ActiveX对象,只需将CreateObject返回的对象赋给⼀个对象变量:' 例⼦:Set oExcel = CreateObject("Excel.Application")' 声明⼀个对象变量,并使⽤动态创建⽅法创建该对象Dim oExcelSet oExcel = CreateObject("Excel.Application")' 1) 使Excel可见oExcel.Visible = true' 2) 更改Excel标题栏oExcel.caption = "qyx's vbs"' 3) 添加⼀个新的⼯作薄oExcel.workBooks.add' 4) 打开已存在的⼯作薄' oExcel.workbooks.open("d:\temp.xlsx")' 5) 设置第2个⼯作页为活动⼯作表oExcel.worksheets(2).activate' 或者' oExcel.worksheets("Sheet2").activate单元格赋值及基本操作' 6) 给单元格赋值oExcel.cells(1,1).value = "This is column A, row 1"' 7) 设置指定⾏的⾼度(单位:磅, 0.035cm)oExcel.activeSheet.rows(2).rowHeight = 1/0.035' 1cm' 8) 设置指定列的宽度(单位:字符个数)oExcel.activeSheet.columns(1).columnWidth = 5' 9) 在第8⾏之前插⼊分页符oExcel.worksheets(1).rows(8).pagebreak = 1' 10) 在第8列之前删除分页符oExcel.worksheets(1).columns(8).pagebreak = 0' 11) 指定边框线宽度' 说明:1-左 2-右 3-顶 4-底 5-\ 6-/oExcel.activeSheet.range("B3:D4").borders(5).weight = 3' 12) 清除第1⾏第4列单元格公式oExcel.activeSheet.cells(1,4).clearcontents' oExcel.activeSheet.cells(1,4).value = ""' 13) 设置第⼀⾏字体属性oExcel.activeSheet.rows(1) = "⿊体"oExcel.activesheet.rows(1).font.color = vbRedoExcel.activeSheet.rows(1).font.bold = trueoExcel.activesheet.rows(1).font.underLine = true页⾯设置' 14) 页⾯设置' a) 页眉oExcel.activeSheet.pageSetup.centerHeader = "报表演⽰"' b) 页脚oExcel.activeSheet.pageSetup.centerFooter = "第&P页"' c) 页眉到顶端边距2cmoExcel.activeSheet.pageSetup.headerMargin = 2/0.035' d) 页脚到底端边距3cmoExcel.activeSheet.pageSetup.footerMargin = 3/0.035 ' e) 顶边距2cmoExcel.activeSheet.pageSetup.topMargin = 2/0.035' f) 底边距2cmoExcel.activeSheet.pageSetup.bottomMargin = 2/0.035 ' g) 左边距2cmoExcel.activeSheet.pageSetup.leftMargin = 2/0.035' h) 右边距2cmoExcel.activeSheet.pageSetup.rightMargin = 2/0.035' i) 页眉⽔平居中oExcel.activeSheet.pageSetup.centerVertically = 2/0.035 ' k) 打印单元格⽹线oExcel.activeSheet.pageSetup.printGridLines = true拷贝及粘贴操作' 15) 拷贝与粘贴操作' a) 拷贝整个⼯作表' oExcel.activeSheet.copy ' 未测试' b) 拷贝指定区域oExcel.activeSheet.range("A1:E2").copy' c) 从A1位置开始粘贴oExcel.activeSheet.range("A1").pasteSpecial' d) 从⽂件尾部开始粘贴' oExcel.activeSheet.range.pasteSpecial '未测试' 16) 插⼊⼀⾏或⼀列oExcel.activeSheet.rows(2).insertoExcel.activeSheet.columns(1).insert' 17) 删除⼀⾏或⼀列oExcel.activeSheet.rows(2).deleteoExcel.activeSheet.columns(1).delete打印及预览' 18) 打印预览⼯作表oExcel.activeSheet.printPreview' 19) 打印输出⼯作表oExcel.activeSheet.printOut保存及退出'oExcel.activeWorkBook.saveAs "d:\te.xls", 56' 21) 关闭退出' 关闭⼯作薄oExcel.activeWorkBook.close' 使⽤应⽤程序对象的quit⽅法关闭ExceloExcel.Quit' 释放该对象变量Set oExcel = Nothing。
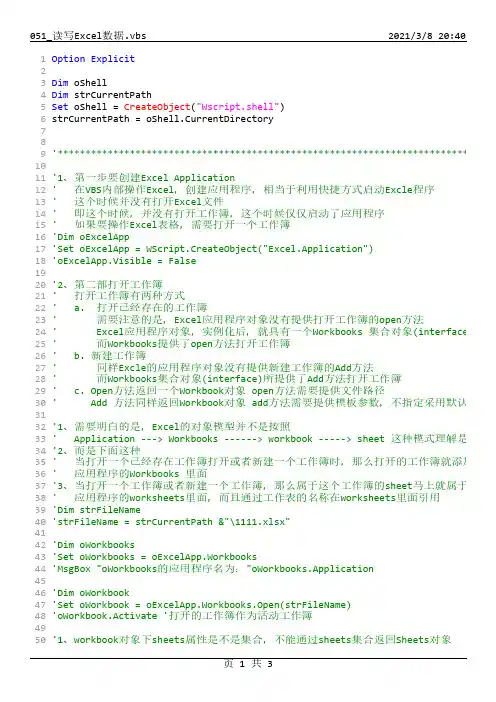
1 2 3 4 5 6 7 8 9 10 11 12 13 14 15 16 17 18 19 20 21 22 23 24 25 26 27 28 29 30 31 32 33 34 35 36 37 38 39 40 41 42 43 44 45 46 47 48 49 50Option ExplicitDim oShellDim strCurrentPathSet oShell = CreateObject("Wscript.shell")strCurrentPath = oShell.CurrentDirectory'************************************************************************** '1、第一步要创建Excel Application'在VBS内部操作Excel,创建应用程序,相当于利用快捷方式启动Excle程序'这个时候并没有打开Excel文件'即这个时候,并没有打开工作簿,这个时候仅仅启动了应用程序'如果要操作Excel表格,需要打开一个工作簿'Dim oExcelApp'Set oExcelApp = WScript.CreateObject("Excel.Application")'oExcelApp.Visible = False'2、第二部打开工作簿'打开工作簿有两种方式' a. 打开已经存在的工作簿'需要注意的是,Excel应用程序对象没有提供打开工作簿的open方法'Excel应用程序对象,实例化后,就具有一个Workbooks 集合对象(interface '而Workbooks提供了open方法打开工作簿' b. 新建工作簿'同样Excle的应用程序对象没有提供新建工作簿的Add方法'而Workbooks集合对象(interface)所提供了Add方法打开工作簿' c. Open方法返回一个Workbook对象 open方法需要提供文件路径' Add 方法同样返回Workbook对象add方法需要提供模板参数,不指定采用默认'1、需要明白的是,Excel的对象模型并不是按照'Application ‐‐‐> Workbooks ‐‐‐‐‐‐> workbook ‐‐‐‐‐> sheet 这种模式理解是'2、而是下面这种'当打开一个已经存在工作簿打开或者新建一个工作簿时,那么打开的工作簿就添加'应用程序的Workbooks 里面'3、当打开一个工作簿或者新建一个工作簿,那么属于这个工作簿的sheet马上就属于'应用程序的worksheets里面,而且通过工作表的名称在worksheets里面引用'Dim strFileName'strFileName = strCurrentPath &"\1111.xlsx"'Dim oWorkbooks'Set oWorkbooks = oExcelApp.Workbooks'MsgBox "oWorkbooks的应用程序名为:"oWorkbooks.Application'Dim oWorkbook'Set oWorkbook = oExcelApp.Workbooks.Open(strFileName)'oWorkbook.Activate '打开的工作簿作为活动工作簿'1、workbook对象下sheets属性是不是集合,不能通过sheets集合返回Sheets对象51 52 53 54 55 56 57 58 59 60 61 62 63 64 65 66 67 68 69 70 71 72 73 74 75 76 77 78 79 80 81 82 83 84 85 86 87 88 89 90 91 92 93 94 95 96 97 98 99 100' 因此也不能通过Workbook对象下的Sheets属性来对工作表里的单元个进行访问'wokkbook对象下的sheets属性只能用于Sheet的增加、复制、移动和删除'oWorkbook.Sheets.Add'MsgBox oExcelApp.Worksheets("sheet1").Activate'Dim oSheet'Set oSheet = oExcelApp.Worksheets("sheet1")'oSheet.'oWorkbook.Save'oExcelApp.Workbooks.Close'oExcelApp.Quit'Dim objExcel,objbook,objSheet'Set objExcel=CreateObject("excel.application")'Set objBook=objExcel.Workbooks.Open(strCurrentPath & "\1111.xlsx")'Set objSheet=objbook.Sheets("sheet2")'objSheet.cells(2,2) = "我是写入的数据"'objbook.Save'obj'Set objBook=Nothing'Set objSheet=Nothing'objExcel.QuitDim oExcelAppDim oWorkbooksDim oWorkbookDim oWorkSheetSet oExcelApp = CreateObject("Excel.Application")Set oWorkbooks = oExcelApp.WorkbooksSet oWorkbook =oWorkbooks.Open(strCurrentPath & "\1111.xlsx")Set oWorkSheet = oWorkbook.Sheets("sheet1")oWorkSheet.cells(1,1) = "我是写入的数据"MsgBox oWorkSheet.cells(2,2)oWorkbook.SaveoWorkbooks.CloseoExcelApp.Quit101。
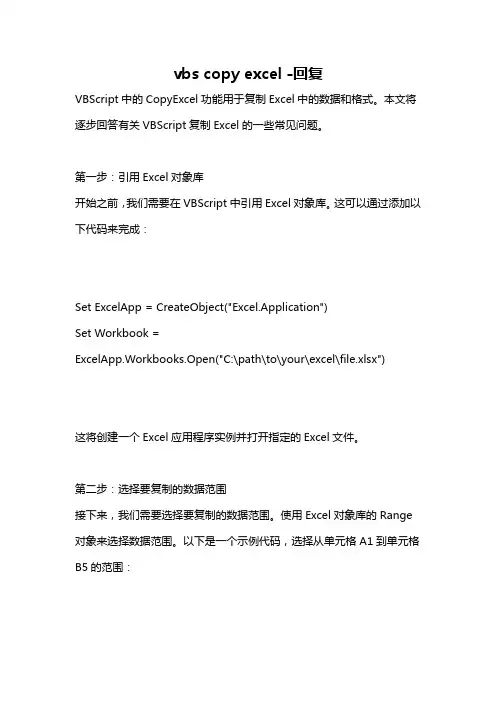
vbs copy excel -回复VBScript中的CopyExcel功能用于复制Excel中的数据和格式。
本文将逐步回答有关VBScript复制Excel的一些常见问题。
第一步:引用Excel对象库开始之前,我们需要在VBScript中引用Excel对象库。
这可以通过添加以下代码来完成:Set ExcelApp = CreateObject("Excel.Application")Set Workbook =ExcelApp.Workbooks.Open("C:\path\to\your\excel\file.xlsx")这将创建一个Excel应用程序实例并打开指定的Excel文件。
第二步:选择要复制的数据范围接下来,我们需要选择要复制的数据范围。
使用Excel对象库的Range 对象来选择数据范围。
以下是一个示例代码,选择从单元格A1到单元格B5的范围:Set SourceRange =Workbook.Worksheets("Sheet1").Range("A1:B5")请注意,Sheet1是Excel工作簿中的工作表名称。
您可以根据需要更改此值。
第三步:创建目标工作表并选择复制目标范围现在,我们需要创建一个新的工作表以保存复制的数据。
这可以通过以下代码来实现:Set DestinationSheet = Workbook.Worksheets.Add这将在现有工作簿中创建一个新的工作表,并将其分配给DestinationSheet变量。
接下来,我们需要选择复制的目标范围。
以下是一个示例代码,选择目标工作表的A1单元格作为目标范围:Set DestinationRange = DestinationSheet.Range("A1")请注意,您可以根据需要更改目标范围。
第四步:复制数据和格式现在,我们已经准备好将数据和格式从源范围复制到目标范围了。
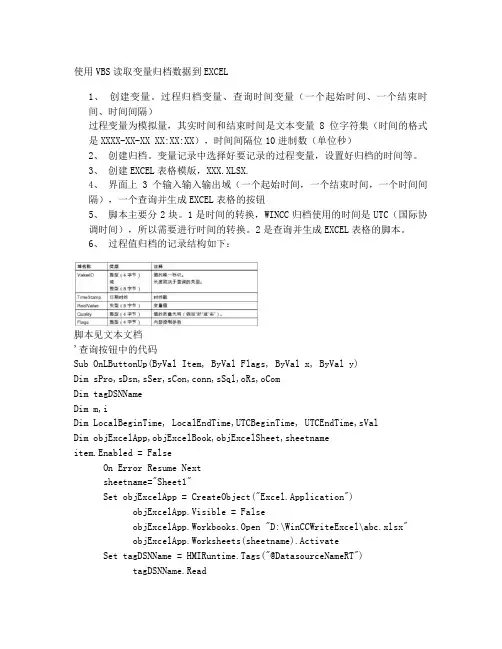
使用VBS读取变量归档数据到EXCEL1、创建变量。
过程归档变量、查询时间变量(一个起始时间、一个结束时间、时间间隔)过程变量为模拟量,其实时间和结束时间是文本变量8位字符集(时间的格式是XXXX-XX-XX XX:XX:XX),时间间隔位10进制数(单位秒)2、创建归档。
变量记录中选择好要记录的过程变量,设置好归档的时间等。
3、创建EXCEL表格模版,XXX.XLSX.4、界面上3个输入输入输出域(一个起始时间,一个结束时间,一个时间间隔),一个查询并生成EXCEL表格的按钮5、脚本主要分2块。
1是时间的转换,WINCC归档使用的时间是UTC(国际协调时间),所以需要进行时间的转换。
2是查询并生成EXCEL表格的脚本。
6、过程值归档的记录结构如下:脚本见文本文档'查询按钮中的代码Sub OnLButtonUp(ByVal Item, ByVal Flags, ByVal x, ByVal y)Dim sPro,sDsn,sSer,sCon,conn,sSql,oRs,oComDim tagDSNNameDim m,iDim LocalBeginTime, LocalEndTime,UTCBeginTime, UTCEndTime,sValDim objExcelApp,objExcelBook,objExcelSheet,sheetnameitem.Enabled = FalseOn Error Resume Nextsheetname="Sheet1"Set objExcelApp = CreateObject("Excel.Application")objExcelApp.Visible = FalseobjExcelApp.Workbooks.Open "D:\WinCCWriteExcel\abc.xlsx"objExcelApp.Worksheets(sheetname).ActivateSet tagDSNName = HMIRuntime.Tags("@DatasourceNameRT")tagDSNName.ReadSet LocalBeginTime = HMIRuntime.Tags("strBeginTime")LocalBeginTime.ReadSet LocalEndTime = HMIRuntime.Tags("strEndTime")LocalEndTime.ReadUTCBeginTime = DateAdd("h" ,-8,LocalBeginTime.Value)UTCEndTime= DateAdd("h" ,-8,LocalEndTime.Value)UTCBeginTime = Year(UTCBeginTime) & "-" & Month(UTCBeginTime) & "-" & Day(UTCBeginTime) & " " & Hour(UTCBeginTime) & ":" & Minute(UTCBeginTime) & ":" & Second(UTCBeginTime)UTCEndTime = Year(UTCEndTime) & "-" & Month(UTCEndTime) & "-" & Day(UTCEndTime) & " " & Hour(UTCEndTime) & ":" & Minute(UTCEndTime) & ":" & Second(UTCEndTime)HMIRuntime.Trace "UTC Begin Time: " & UTCBeginTime & vbCrLfHMIRuntime.Trace "UTC end Time: " & UTCEndTime & vbCrLf Set sVal = HMIRuntime.Tags("sVal")sVal.ReadsPro = "Provider=WinCCOLEDBProvider.1;"sDsn = "Catalog=" &tagDSNName.Value& ";"sSer = "Data Source=.\WinCC"sCon = sPro + sDsn + sSerSet conn = CreateObject("ADODB.Connection")conn.ConnectionString = sConconn.CursorLocation = 3conn.OpensSql = "Tag:R,('PVArchive\NewTag'),'" & UTCBeginTime & "','" & UTCEndTime & "',"sSql=sSql+"'order by Timestamp ASC','TimeStep=" & sVal.Value & ",1'"MsgBox sSqlSet oRs = CreateObject("ADODB.Recordset")Set oCom = CreateObject("mand")mandType = 1Set oCom.ActiveConnection = connmandText = sSqlSet oRs = oCom.Executem = oRs.RecordCountIf (m > 0) ThenobjExcelApp.Worksheets(sheetname).cells(2,1).value=oRs.Field s(0).NameobjExcelApp.Worksheets(sheetname).cells(2,2).value=oRs.Field s(1).NameobjExcelApp.Worksheets(sheetname).cells(2,3).value=oRs.Field s(2).NameobjExcelApp.Worksheets(sheetname).cells(2,4).value=oRs.Field s(3).NameobjExcelApp.Worksheets(sheetname).cells(2,5).value=oRs.Field s(4).NameoRs.MoveFirsti=3Do While Not oRs.EOFobjExcelApp.Worksheets(sheetname).cells(i,1).value= oRs.Fields(0).ValueobjExcelApp.Worksheets(sheetname).cells(i,2).value= GetLocalDate(oRs.Fields(1).Value)objExcelApp.Worksheets(sheetname).cells(i,3).value= oRs.Fields(2).ValueobjExcelApp.Worksheets(sheetname).cells(i,4).value= oRs.Fields(3).ValueobjExcelApp.Worksheets(sheetname).cells(i,5).value= oRs.Fields(4).ValueoRs.MoveNexti=i+1LoopoRs.CloseElseMsgBox "没有所需数据……"item.Enabled = TrueSet oRs = Nothingconn.CloseSet conn = NothingobjExcelApp.Workbooks.CloseobjExcelApp.QuitSet objExcelApp= NothingExit SubEnd IfSet oRs = Nothingconn.CloseSet conn = NothingDim patch,filenamefilename=CStr(Year(Now))&""&CStr(Month(Now))&""&CStr(Day(Now))&""& CStr(Hour(Now))&""&CStr(Minute(Now))&""&CStr(Second(Now))patch= "d:\"&filename&"demo.xlsx"objExcelApp.ActiveWorkbook.SaveAs patchobjExcelApp.Workbooks.CloseobjExcelApp.QuitSet objExcelApp= NothingMsgBox "成功生成数据文件!"item.Enabled = TrueEnd Sub'此为全局脚本中的时间转换代码Function GetLocalDate(vtDate)Dim DoYDim dsoDim dwiDim strComputer, objWMIService, colItems, objItemDim TimeZoneDim vtDateLocalDatestrComputer = "."Set objWMIService = GetObject("winmgmts:" & "{impersonationLevel=impersonate}!\\" & strComputer & "\root\cimv2")Set colItems = objWMIService.ExecQuery("Select * from Win32_TimeZone") For Each objItem In colItemsTimeZone = objItem.Bias / 60NextIf IsDate(vtDate) <> True ThenIS_GetLocalDate = FalseExit FunctionEnd IfDoY = DatePart("y", vtDate)dso = DatePart("y", "31.03") - DatePart("w", "31.03") + 1 dwi = DatePart("y", "31.10") - DatePart("w", "31.10") + 1 If DoY >= dso And DoY < dwi ThenTimeZone = TimeZone + 1End IfvtDateLocalDate = DateAdd("h", 1 * TimeZone, vtDate) GetLocalDate = vtDateLocalDateEnd Function。
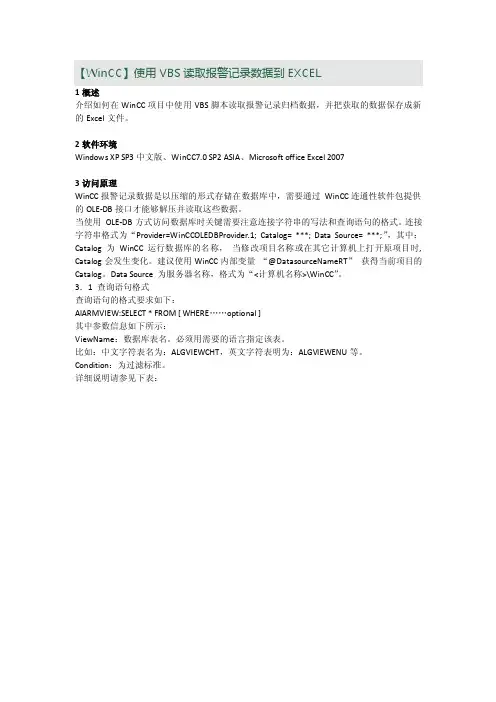
【WinCC】使用VBS读取报警记录数据到EXCEL1概述介绍如何在WinCC项目中使用VBS脚本读取报警记录归档数据,并把获取的数据保存成新的Excel文件。
2软件环境Windows XP SP3中文版、WinCC7.0 SP2 ASIA、Microsoft office Excel 20073访问原理WinCC报警记录数据是以压缩的形式存储在数据库中,需要通过WinCC连通性软件包提供的OLE-DB接口才能够解压并读取这些数据。
当使用OLE-DB方式访问数据库时关键需要注意连接字符串的写法和查询语句的格式。
连接字符串格式为“Provider=WinCCOLEDBProvider.1; Catalog= ***; Data Source= ***;”,其中:Catalog为WinCC运行数据库的名称,当修改项目名称或在其它计算机上打开原项目时, Catalog会发生变化。
建议使用WinCC内部变量“@DatasourceNameRT”获得当前项目的Catalog。
Data Source 为服务器名称,格式为“<计算机名称>\WinCC”。
3.1 查询语句格式查询语句的格式要求如下:AlARMVIEW:SELECT * FROM [ WHERE……optional ]其中参数信息如下所示:ViewName:数据库表名。
必须用需要的语言指定该表。
比如:中文字符表名为:ALGVIEWCHT,英文字符表明为:ALGVIEWENU等。
Condition:为过滤标准。
详细说明请参见下表:表1查询参数表3.2查询结果查询结果作为记录集返回。
可以根据需要有选择的返回特定的数据集。
例如:oRs.Fields(0).Value 返回的是消息的编号;oRs.Fields(2).Value 返回的是消息的时间戳;oRs.Fields(37).Value返回的是消息文本的内容。
记录集的结构如下表所示:表2记录集结构表3记录集结构(续表)注意:WinCC的归档数据是使用UTC(协调世界时)时间保存的。

自动化VBS操作EXCEL和WORD ****************************' Excel操作'****************************'****************************' 定义Excel对象' xlsApp Excel应用程序对象' xlsWork Excel工作簿对象'****************************Dim xlsApp,xlsWork'----------------------------------------------------------------------------------'示例:调用获取excel当前路径并获取表中的使用的行数和列数filepath = getpath() & "TestFramework.xls"MsgBox filepathxlsOpen(filepath)xlsWork.WorkSheets("example").ActivateMsgBox "表中总共有" & xlsWork.WorkSheets("example").usedrange.rows.count & "行" '获取excel表中的所有使用行MsgBox "表中总共有" &xlsWork.WorkSheets("example").usedrange.columns.count & "列" '获取excel表中的所有使用列xlsClose()'----------------------------------------------------------------------------------'获取当前应用程序路径,把excel放到这个路径下以后就可以不用管路径问题了function getpath()dim wsheelSet wsheel=wscript.createobject("wscript.shell")getpath=wsheel.currentdirectory & "\"End Function'****************************' 函数名称:xlsOpen' 函数功能:打开Excel工作簿' 参数1:fileName Excel文件名称(包括路径)' /*参数2:sheetName Excel工作表名称*/' 返回值:无'****************************Sub xlsOpen(fileName)On Error Resume Next '遇见错误继续运行程序Set xlsApp = CreateObject("Excel.Application") '创建应用程序对象Set xlsWork = xlsApp.WorkBooks.open(fileName) '设置打开文件的对象'xlsWork.WorkSheets(sheetName).Activate '设置当前活动的工作表'如果有错误则关闭Excel程序If ERR.Number<>0 ThenMsgBox "asdf"Call xlsClose()End IfOn error goto 0End Sub'****************************' 函数名称:xlsRead' 函数功能:读取Excel表格中指定单元格的数据' 参数1:sheetName 工作表名称' 参数2:row 单元格所在行' 参数3:col 单元格所在列' 返回值:当前单元格的数据'****************************Function xlsRead(sheetName,row,col)On Error Resume nextxlsRead = xlsWork.WorkSheets(sheetName).Cells(row,col).Value '如果有错误则关闭Excel程序If ERR.Number<>0 ThenCall xlsClose()'Err.Clear()End IfOn error goto 0End Function'****************************' 函数名称:xlsWrite' 函数功能:写入数据到指定的Excle单元格' 参数1:sheetName 工作表名称' 参数2:row 单元格所在行' 参数3:col 单元格所在列' 参数4:val 要写入到单元格的数据' 返回值:无'****************************Function xlsWrite(sheetName,row,col,val)On Error Resume nextxlsWork.WorkSheets(sheetName).Cells(row,col).Value = val'如果有错误则关闭Excel程序If ERR.Number<>0 ThenCall xlsClose()End IfOn error goto 0End Function'****************************' 函数名称:xlsSave' 函数功能:保存Excel工作簿数据' 参数:无' 返回值:无'****************************Sub xlsSave()On Error Resume nextxlsWork.Save'xlsWork.SaveAs "C:\aa.xls" '另存为一个新文件'如果有错误则关闭Excel程序If ERR.Number<>0 ThenCall xlsClose()End IfOn error goto 0End Sub'****************************' 函数名称:xlsClose' 函数功能:关闭Excel工作簿' 参数:无' 返回值:无'****************************Sub xlsClose()'关闭对象xlsWork.ClosexlsApp.WorkBooks.Close'清空对象Set xlsWork = NothingSet xlsApp = NothingEnd Sub'****************************' word操作'****************************'****************************' 定义word对象' docApp word应用程序对象' docWork word文档对象'****************************Dim docApp,docWord'****************************' 函数名称:docCreate' 函数功能:创建word文档' 参数:无' 返回值:无'****************************Function docCreate()On Error Resume NextSet docApp = CreateObject("Word.Application")Set docWord = docApp.Documents.Add()'如果有错误则关闭Word程序If ERR.Number<>0 ThenCall docClose()End IfOn error goto 0End Function'****************************' 函数名称:docWrite' 函数功能:向word文档中写入数据' 参数1:val 要写入的数据' 参数2:dataType 写入数据的类型,text代表文本,bmp代表图像' 返回值:无'****************************Function docWrite(val,dataType)On Error Resume NextSelect Case dataTypeCase "text"docApp.Selection.TypeText valCase "bmp"docApp.Selection.InlineShapes.AddPicture val,false,trueEnd Select'如果有错误则关闭Word程序If ERR.Number<>0 ThenCall docClose()End IfOn error goto 0End Function'****************************' 函数名称:docSave' 函数功能:保存word文档' 参数:fileName 保存的文件路径以及名称' 返回值:无'****************************Function docSave(fileName)On Error Resume NextdocWord.SaveAs fileName'如果有错误则关闭Word程序If ERR.Number<>0 ThenCall docClose()End IfOn error goto 0End Function'****************************' 函数名称:docClose' 函数功能:关闭word文档' 参数:无' 返回值:无'****************************Function docClose()'关闭工作文档并退出Word应用程序docWord.closedocApp.Quit'清空对象Set docWord=nothingSet docApp=nothingEnd Function'****************************' QTP对象操作'****************************。
VBS与excel一、使用步骤1、使用动态创建的方法首先创建 Excel 对象oExcel = CreateObject( "Excel.Application" )打开文件objWorkbooks = oExcel.Workbooks.Open ("D:\test.xls",3,false)二、使用方法1、显示当前窗口oExcel.Visible = True2、 更改 Excel 标题栏oExcel.Caption = "应用程序调用 Microsoft Excel"3、添加新工作簿oExcel.WorkBooks.Add4、打开已存在的工作簿Set f=oExcel.WorkBooks.Open( "C:\Excel\Demo.xls" )5、设置第2个工作表为活动工作表oExcel.WorkSheets(2).ActivateoExcel.WorksSheets( "Sheet2" ).Activate6、给单元格赋值oExcel.Cells(1,4).Value = "第一行第四列"7、 设置指定列的宽度(单位:字符个数),以第一列为例oExcel.ActiveSheet.Columns(1).ColumnsWidth = 58、 设置指定行的高度(单位:磅)(1磅=0.035厘米),以第二行为例 oExcel.ActiveSheet.Rows(2).RowHeight = 1/0.035 ' 1厘米9、在第8行之前插入分页符oExcel.WorkSheets(1).Rows(8).PageBreak = 110、 在第8列之前删除分页符:oExcel.ActiveSheet.Columns(4).PageBreak = 011、指定边框线宽度:oExcel.ActiveSheet.Range( "B3:D4" ).Borders(2).Weight = 31-左 2-右 3-顶 4-底 5-斜( \ ) 6-斜( / )12、 清除第一行第四列单元格公式:oExcel.ActiveSheet.Cells(1,4).ClearContents13、 设置第一行字体属性:oExcel.ActiveSheet.Rows(1) = "隶书"oExcel.ActiveSheet.Rows(1).Font.Color = clBlueoExcel.ActiveSheet.Rows(1).Font.Bold = TrueoExcel.ActiveSheet.Rows(1).Font.UnderLine = True14、进行页面设置:a.页眉:oExcel.ActiveSheet.PageSetup.CenterHeader = "报表演示"b.页脚:oExcel.ActiveSheet.PageSetup.CenterFooter = "第&P页" c.页眉到顶端边距2cm:oExcel.ActiveSheet.PageSetup.HeaderMargin = 2/0.035 d.页脚到底端边距3cm:oExcel.ActiveSheet.PageSetup.HeaderMargin = 3/0.035 e.顶边距2cm:oExcel.ActiveSheet.PageSetup.TopMargin = 2/0.035f.底边距2cm:oExcel.ActiveSheet.PageSetup.BottomMargin = 2/0.035 g.左边距2cm:oExcel.ActiveSheet.PageSetup.LeftMargin = 2/0.035h.右边距2cm:oExcel.ActiveSheet.PageSetup.RightMargin = 2/0.035i.页面水平居中:oExcel.ActiveSheet.PageSetup.CenterHorizontally = 2/0.035 j.页面垂直居中:oExcel.ActiveSheet.PageSetup.CenterVertically = 2/0.035 k.打印单元格网线:oExcel.ActiveSheet.PageSetup.PrintGridLines = True15) 拷贝操作:a.拷贝整个工作表:ed.Range.Copyb.拷贝指定区域:oExcel.ActiveSheet.Range( "A1:E2" ).Copyc.从A1位置开始粘贴:oExcel.ActiveSheet.Range.( "A1" ).PasteSpeciald.从文件尾部开始粘贴:oExcel.ActiveSheet.Range.PasteSpecial16、 插入一行或一列:a. oExcel.ActiveSheet.Rows(2).Insertb. oExcel.ActiveSheet.Columns(1).Insert17、删除一行或一列:a. oExcel.ActiveSheet.Rows(2).Deleteb. oExcel.ActiveSheet.Columns(1).Delete18、打印预览工作表:oExcel.ActiveSheet.PrintPreview19、 打印输出工作表:oExcel.ActiveSheet.PrintOut20、 工作表保存:if not oExcel.ActiveWorkBook.Saved thenoExcel.ActiveSheet.PrintPreview21、工作表另存为:oExcel.SaveAs( "C:\Excel\Demo1.xls" )22、 放弃存盘:oExcel.ActiveWorkBook.Saved = True23、关闭工作簿:oExcel.WorkBooks.Close24、 退出 Excel:oExcel.Quit(二) 使用VBS 控制Excle二维图1)选择当第一个工作薄第一个工作表set oSheet=oExcel.Workbooks(1).Worksheets(1)2)增加一个二维图achart=oSheet.chartobjects.add(100,100,200,200) 3)选择二维图的形态achart.chart.charttype=44)给二维图赋值set series=achart.chart.seriescollectionrange="sheet1!r2c3:r3c9"series.add range,true5)加上二维图的标题achart.Chart.HasTitle=Trueachart.Chart.ChartTitle.Characters.Text=" Excle二维图" 6)改变二维图的标题字体大小achart.Chart.ChartTitle.Font.size=187)给二维图加下标说明achart.Chart.Axes(xlCategory, xlPrimary).HasTitle = Trueachart.Chart.Axes(xlCategory, xlPrimary).AxisTitle.Characters.Text = "下标说明" 8)给二维图加左标说明achart.Chart.Axes(xlValue, xlPrimary).HasTitle = Trueachart.Chart.Axes(xlValue, xlPrimary).AxisTitle.Characters.Text = "左标说明" 9)给二维图加右标说明achart.Chart.Axes(xlValue, xlSecondary).HasTitle = Trueachart.Chart.Axes(xlValue, xlSecondary).AxisTitle.Characters.Text = "右标说明" 10)改变二维图的显示区大小achart.Chart.PlotArea.Left = 5achart.Chart.PlotArea.Width = 223achart.Chart.PlotArea.Height = 108三、参数1、Open描述:打开一个工作簿。
VBS操作Excel常见方法dim oExcel,oWb,oSheetSet oExcel= CreateObject("Excel.Application")Set oWb = oExcel.Workbooks.Open("E:\其他\新装电话表.xls")Set oSheet = oWb.Sheets("Sheet1")MsgBox oSheet.Range("B2").Value '#提取单元格B2内容'.....3、如果是XP系统,可以使用如下代码Dim objFileDlgSet objFileDlg = CreateObject("monDialog") objFileDlg.Filter = "Excel File (*.xls) |*.xls"If objFileDlg.ShowOpen Thenmsgbox "您选择的文件是:" & objFileDlg.FileName & vbCrLfEnd IfVBS控制Excel的一些常见方法:(一) 使用动态创建的方法首先创建 Excel 对象,使用ComObj:oExcel = CreateObject( "Excel.Application" )1) 显示当前窗口:oExcel.Visible = True2) 更改 Excel 标题栏:oExcel.Caption = "应用程序调用 Microsoft Excel"3) 添加新工作簿:oExcel.WorkBooks.Add4) 打开已存在的工作簿:oExcel.WorkBooks.Open( "C:\Excel\Demo.xls" )5) 设置第2个工作表为活动工作表:oExcel.WorkSheets(2).Activate或oExcel.WorksSheets( "Sheet2" ).Activate6) 给单元格赋值:oExcel.Cells(1,4).Value = "第一行第四列"7) 设置指定列的宽度(单位:字符个数),以第一列为例:oExcel.ActiveSheet.Columns(1).ColumnsWidth = 58) 设置指定行的高度(单位:磅)(1磅=0.035厘米),以第二行为例:oExcel.ActiveSheet.Rows(2).RowHeight = 1/0.035 ' 1厘米9) 在第8行之前插入分页符:oExcel.WorkSheets(1).Rows(8).PageBreak = 110) 在第8列之前删除分页符:oExcel.ActiveSheet.Columns(4).PageBreak = 011) 指定边框线宽度:oExcel.ActiveSheet.Range( "B3:D4" ).Borders(2).Weight = 31-左 2-右 3-顶 4-底 5-斜( \ ) 6-斜( / )12) 清除第一行第四列单元格公式:oExcel.ActiveSheet.Cells(1,4).ClearContents13) 设置第一行字体属性:oExcel.ActiveSheet.Rows(1) = "隶书"oExcel.ActiveSheet.Rows(1).Font.Color = clBlueoExcel.ActiveSheet.Rows(1).Font.Bold = TrueoExcel.ActiveSheet.Rows(1).Font.UnderLine = True14) 进行页面设置:a.页眉:oExcel.ActiveSheet.PageSetup.CenterHeader = "报表演示"b.页脚:oExcel.ActiveSheet.PageSetup.CenterFooter = "第&P页"c.页眉到顶端边距2cm:oExcel.ActiveSheet.PageSetup.HeaderMargin = 2/0.035d.页脚到底端边距3cm:oExcel.ActiveSheet.PageSetup.HeaderMargin = 3/0.035e.顶边距2cm:oExcel.ActiveSheet.PageSetup.TopMargin = 2/0.035f.底边距2cm:oExcel.ActiveSheet.PageSetup.BottomMargin = 2/0.035g.左边距2cm:oExcel.ActiveSheet.PageSetup.LeftMargin = 2/0.035h.右边距2cm:oExcel.ActiveSheet.PageSetup.RightMargin = 2/0.035i.页面水平居中:oExcel.ActiveSheet.PageSetup.CenterHorizontally = 2/0.035 j.页面垂直居中:oExcel.ActiveSheet.PageSetup.CenterVertically = 2/0.035 k.打印单元格网线:oExcel.ActiveSheet.PageSetup.PrintGridLines = True15) 拷贝操作:a.拷贝整个工作表:ed.Range.Copyb.拷贝指定区域:oExcel.ActiveSheet.Range( "A1:E2" ).Copyc.从A1位置开始粘贴:oExcel.ActiveSheet.Range.( "A1" ).PasteSpeciald.从文件尾部开始粘贴:oExcel.ActiveSheet.Range.PasteSpecial16) 插入一行或一列:a. oExcel.ActiveSheet.Rows(2).Insertb. oExcel.ActiveSheet.Columns(1).Insert17) 删除一行或一列:a. oExcel.ActiveSheet.Rows(2).Deleteb. oExcel.ActiveSheet.Columns(1).Delete18) 打印预览工作表:oExcel.ActiveSheet.PrintPreview19) 打印输出工作表:oExcel.ActiveSheet.PrintOut20) 工作表保存:if not oExcel.ActiveWorkBook.Saved thenoExcel.ActiveSheet.PrintPreview21) 工作表另存为:oExcel.SaveAs( "C:\Excel\Demo1.xls" )22) 放弃存盘:oExcel.ActiveWorkBook.Saved = True23) 关闭工作簿:oExcel.WorkBooks.Close24) 退出 Excel:oExcel.Quit(二) 使用VBS 控制Excle二维图1)选择当第一个工作薄第一个工作表set oSheet=oExcel.Workbooks(1).Worksheets(1)2)增加一个二维图achart=oSheet.chartobjects.add(100,100,200,200)3)选择二维图的形态achart.chart.charttype=44)给二维图赋值set series=achart.chart.seriescollectionrange="sheet1!r2c3:r3c9"series.add range,true5)加上二维图的标题achart.Chart.HasTitle=Trueachart.Chart.ChartTitle.Characters.Text=" Excle二维图"6)改变二维图的标题字体大小achart.Chart.ChartTitle.Font.size=187)给二维图加下标说明achart.Chart.Axes(xlCategory, xlPrimary).HasTitle = Trueachart.Chart.Axes(xlCategory, xlPrimary).AxisTitle.Characters.Text = "下标8)给二维图加左标说明achart.Chart.Axes(xlValue, xlPrimary).HasTitle = Trueachart.Chart.Axes(xlValue, xlPrimary).AxisTitle.Characters.Text = "左标说明9)给二维图加右标说明achart.Chart.Axes(xlValue, xlSecondary).HasTitle = Trueachart.Chart.Axes(xlValue, xlSecondary).AxisTitle.Characters.Text = "右标说10)改变二维图的显示区大小achart.Chart.PlotArea.Left = 5achart.Chart.PlotArea.Width = 223achart.Chart.PlotArea.Height = 108如何用vbs把excel的单元格数据写到txt复制代码代码如下:If WScript.Arguments.Count > 0 Then Filename = WScript.Arguments(0)Set a = CreateObject("Excel.Application")If Filename = "" ThenFilename = a.GetOpenFilename("Excel Files (*.xls), *.xls")If VarType(Filename) = vbBoolean ThenMsgBox "Excel2Txt用于将Excel文件的每个Sheet保存为一个文本文件。
You are here: > ActiveXperts Network Monitor > WindowsManagement > Scripts > Microsoft Office > ExcelMonitor servers, workstations, devices and applications in your networkQuicklinks●Download ActiveXperts Network Monitor 7.2 (13219 KB)●Download Manual (919 KB)Microsoft Excel ScriptsAdd Data to a Spreadsheet CellAdd Formatted Data to a SpreadsheetCreate User Accounts Based on Information in a SpreadsheetFormat a Range of CellsList Active Directory Data in a SpreadsheetList Excel Color ValuesList Service Data in a SpreadsheetOpen an Excel SpreadsheetRead an Excel SpreadsheetYou can use any of the VBScript programs below in ActiveXperts Network Monitor. Click here for an explanation about how to include scripts in ActiveXperts Network Monitor.Add Data to a Spreadsheet CellDemonstration script that adds the words "Test Value" to cell 1,1 in a new spreadsheet. Set objExcel = CreateObject("Excel.Application")objExcel.Visible = TrueobjExcel.Workbooks.AddobjExcel.Cells(1, 1).Value = "Test value"Add Formatted Data to a Spreadsheetthe cell containing the value.Set objExcel = CreateObject("Excel.Application") objExcel.Visible = TrueobjExcel.Workbooks.AddobjExcel.Cells(1, 1).Value = "Test value" objExcel.Cells(1, 1).Font.Bold = TRUE objExcel.Cells(1, 1).Font.Size = 24 objExcel.Cells(1, 1).Font.ColorIndex = 3Create User Accounts Based on Information in a SpreadsheetDemonstration script that creates new Active Directory user accounts based on information stored in an Excel spreadsheet.Set objExcel = CreateObject("Excel.Application") Set objWorkbook = objExcel.Workbooks.Open _ ("C:\Scripts\New_users.xls")intRow = 2Do Until objExcel.Cells(intRow,1).Value = "" Set objOU = GetObject("ou=Finance, dc=fabrikam, dc=com") Set objUser = objOU.Create _("User", "cn=" & objExcel.Cells(intRow, 1).Value) objUser.sAMAccountName = objExcel.Cells(intRow, 2).Value objUser.GivenName = objExcel.Cells(intRow, 3).Value objUser.SN = objExcel.Cells(intRow, 4).Value objUser.AccountDisabled = FALSEobjUser.SetInfointRow = intRow + 1LoopobjExcel.QuitFormat a Range of CellsDemonstration script that adds data to four different cells in a spreadsheet, then uses the Range object to format multiple cells at the same time. Set objExcel = CreateObject("Excel.Application")objExcel.Visible = TrueobjExcel.Workbooks.AddobjExcel.Cells(1, 1).Value = "Name" objExcel.Cells(1, 1).Font.Bold = TRUE objExcel.Cells(1, 1).Interior.ColorIndex = 30 objExcel.Cells(1, 1).Font.ColorIndex = 2 objExcel.Cells(2, 1).Value = "Test value 1" objExcel.Cells(3, 1).Value = "Test value 2" objExcel.Cells(4, 1).Value = "Tets value 3" objExcel.Cells(5, 1).Value = "Test value 4"Set objRange = objExcel.Range("A1","A5") objRange.Font.Size = 14Set objRange = objExcel.Range("A2","A5") objRange.Interior.ColorIndex = 36Set objRange = objExcel.ActiveCell.EntireColumn objRange.AutoFit() List Active Directory Data in a Spreadsheet Demonstration script that retrieves data from Active Directory and then displays that data in an Excel spreadsheet. Const ADS_SCOPE_SUBTREE = 2 Set objExcel = CreateObject("Excel.Application") objExcel.Visible = True objExcel.Workbooks.Add objExcel.Cells(1, 1).Value = "Last name" objExcel.Cells(1, 2).Value = "First name" objExcel.Cells(1, 3).Value = "Department" objExcel.Cells(1, 4).Value = "Phone number" Set objConnection = CreateObject("ADODB.Connection") Set objCommand = CreateObject("mand") objConnection.Provider = "ADsDSOObject" objConnection.Open "Active Directory Provider" Set objCommand.ActiveConnection = objConnection objCommand.Properties("Page Size") = 100 objCommand.Properties("Searchscope") = ADS_SCOPE_SUBTREE mandText = _ "SELECT givenName, SN, department, telephoneNumber FROM " _ & "'LDAP://dc=fabrikam,dc=microsoft,dc=com' WHERE " _ & "objectCategory='user'" Set objRecordSet = objCommand.Execute objRecordSet.MoveFirst x = 2Do Until objRecordSet.EOF objExcel.Cells(x, 1).Value = _ objRecordSet.Fields("SN").Value objExcel.Cells(x, 2).Value = _ objRecordSet.Fields("givenName").Value objExcel.Cells(x, 3).Value = _ objRecordSet.Fields("department").Value objExcel.Cells(x, 4).Value = _ objRecordSet.Fields("telephoneNumber").Value x = x + 1objRecordSet.MoveNext LoopSet objRange = objExcel.Range("A1") objRange.ActivateSet objRange = objExcel.ActiveCell.EntireColumn objRange.Autofit()Set objRange = objExcel.Range("B1") objRange.ActivateSet objRange = objExcel.ActiveCell.EntireColumn objRange.Autofit()Set objRange = objExcel.Range("C1") objRange.ActivateSet objRange = objExcel.ActiveCell.EntireColumn objRange.Autofit()Set objRange = objExcel.Range("D1") objRange.ActivateSet objRange = objExcel.ActiveCell.EntireColumn objRange.Autofit()Set objRange = objExcel.Range("A1").SpecialCells(11) Set objRange2 = objExcel.Range("C1") Set objRange3 = objExcel.Range("A1")List Excel Color ValuesDemonstration script that displays the various colors -- and their related color index -- available when programmatically controlling Microsoft Excel. Set objExcel = CreateObject("Excel.Application")objExcel.Visible = TrueobjExcel.Workbooks.AddFor i = 1 to 56objExcel.Cells(i, 1).Value = i objExcel.Cells(i, 1).Interior.ColorIndex = i NextList Service Data in a Spreadsheet Demonstration script that retrieves information about each service running on a computer, and then displays that data in an Excel spreadsheet. Set objExcel = CreateObject("Excel.Application") objExcel.Visible = TrueobjExcel.Workbooks.Addx = 1strComputer = "."Set objWMIService = GetObject _("winmgmts:\\" & strComputer & "\root\cimv2") Set colServices = objWMIService.ExecQuery _ ("Select * From Win32_Service")For Each objService in colServices objExcel.Cells(x, 1) = objExcel.Cells(x, 2) = objService.State x = x + 1 NextOpen an Excel SpreadsheetDemonstration script that opens an existing Excel spreadsheet named C:\Scripts\New_users.xls. Set objExcel = CreateObject("Excel.Application") Set objWorkbook = objExcel.Workbooks.Open("C:\Scripts\New_users.xls")Read an Excel SpreadsheetDemonstration script that reads the values stored in a spreadsheet named C:\Scripts\New_users.xls. Set objExcel = CreateObject("Excel.Application") Set objWorkbook = objExcel.Workbooks.Open _ ("C:\Scripts\New_users.xls")intRow = 2Do Until objExcel.Cells(intRow,1).Value = "" Wscript.Echo "CN: " & objExcel.Cells(intRow, 1).Value Wscript.Echo "sAMAccountName: " & objExcel.Cells(intRow, 2).Value Wscript.Echo "GivenName: " & objExcel.Cells(intRow, 3).Value Wscript.Echo "LastName: " & objExcel.Cells(intRow, 4).Value intRow = intRow + 1 LoopobjExcel.Quit。
操作及其操作VBS连接EXCEL及其(一) 使用动态创建的方法首先创建Excel 对象,使用ComObj:oExcel = CreateObject( "Excel.Application" )1) 显示当前窗口:oExcel.Visible = True2) 更改Excel 标题栏:oExcel.Caption = "应用程序调用Microsoft Excel"3) 添加新工作簿:oExcel.WorkBooks.Add4) 打开已存在的工作簿:oExcel.WorkBooks.Open( "C:\Excel\Demo.xls" )5) 设置第2个工作表为活动工作表:oExcel.WorkSheets(2).Activate或oExcel.WorksSheets( "Sheet2" ).Activate6) 给单元格赋值:oExcel.Cells(1,4).Value = "第一行第四列"7) 设置指定列的宽度(单位:字符个数),以第一列为例:oExcel.ActiveSheet.Columns(1).ColumnsWidth = 58) 设置指定行的高度(单位:磅)(1磅=0.035厘米),以第二行为例:oExcel.ActiveSheet.Rows(2).RowHeight = 1/0.035 ' 1厘米9) 在第8行之前插入分页符:oExcel.WorkSheets(1).Rows(8).PageBreak = 110) 在第8列之前删除分页符:oExcel.ActiveSheet.Columns(4).PageBreak = 011) 指定边框线宽度:oExcel.ActiveSheet.Range( "B3:D4" ).Borders(2).Weight = 31-左2-右3-顶4-底5-斜( \ ) 6-斜( / )12) 清除第一行第四列单元格公式:oExcel.ActiveSheet.Cells(1,4).ClearContents13) 设置第一行字体属性:oExcel.ActiveSheet.Rows(1) = "隶书"oExcel.ActiveSheet.Rows(1).Font.Color = clBlueoExcel.ActiveSheet.Rows(1).Font.Bold = TrueoExcel.ActiveSheet.Rows(1).Font.UnderLine = True14) 进行页面设置:a.页眉:oExcel.ActiveSheet.PageSetup.CenterHeader = "报表演示"b.页脚:oExcel.ActiveSheet.PageSetup.CenterFooter = "第&P页"c.页眉到顶端边距2cm:oExcel.ActiveSheet.PageSetup.HeaderMargin = 2/0.035d.页脚到底端边距3cm:oExcel.ActiveSheet.PageSetup.HeaderMargin = 3/0.035e.顶边距2cm:oExcel.ActiveSheet.PageSetup.TopMargin = 2/0.035f.底边距2cm:oExcel.ActiveSheet.PageSetup.BottomMargin = 2/0.035 g.左边距2cm:oExcel.ActiveSheet.PageSetup.LeftMargin = 2/0.035h.右边距2cm:oExcel.ActiveSheet.PageSetup.RightMargin = 2/0.035i.页面水平居中:oExcel.ActiveSheet.PageSetup.CenterHorizontally = 2/0.035 j.页面垂直居中:oExcel.ActiveSheet.PageSetup.CenterVertically = 2/0.035 k.打印单元格网线:oExcel.ActiveSheet.PageSetup.PrintGridLines = True15) 拷贝操作:a.拷贝整个工作表:ed.Range.Copyb.拷贝指定区域:oExcel.ActiveSheet.Range( "A1:E2" ).Copy c.从A1位置开始粘贴:oExcel.ActiveSheet.Range.( "A1" ).PasteSpecial d.从文件尾部开始粘贴:oExcel.ActiveSheet.Range.PasteSpecial16) 插入一行或一列:a. oExcel.ActiveSheet.Rows(2).Insertb. oExcel.ActiveSheet.Columns(1).Insert17) 删除一行或一列:a. oExcel.ActiveSheet.Rows(2).Deleteb. oExcel.ActiveSheet.Columns(1).Delete18) 打印预览工作表:oExcel.ActiveSheet.PrintPreview19) 打印输出工作表:oExcel.ActiveSheet.PrintOut20) 工作表保存:if not oExcel.ActiveWorkBook.Saved then oExcel.ActiveSheet.PrintPreview21) 工作表另存为:oExcel.SaveAs( "C:\Excel\Demo1.xls" )22) 放弃存盘:oExcel.ActiveWorkBook.Saved = True23) 关闭工作簿:oExcel.WorkBooks.Close24) 退出Excel:oExcel.Quit(二) 使用VBS 控制Excle二维图1)选择当第一个工作薄第一个工作表set oSheet=oExcel.Workbooks(1).Worksheets(1)2)增加一个二维图achart=oSheet.chartobjects.add(100,100,200,200)3)选择二维图的形态achart.chart.charttype=44)给二维图赋值set series=achart.chart.seriescollectionrange="sheet1!r2c3:r3c9"series.add range,true5)加上二维图的标题achart.Chart.HasTitle=Trueachart.Chart.ChartTitle.Characters.Text=" Excle二维图"6)改变二维图的标题字体大小achart.Chart.ChartTitle.Font.size=187)给二维图加下标说明achart.Chart.Axes(xlCategory, xlPrimary).HasTitle = Trueachart.Chart.Axes(xlCategory, xlPrimary).AxisTitle.Characters.Text = "下标说明"8)给二维图加左标说明achart.Chart.Axes(xlValue, xlPrimary).HasTitle = Trueachart.Chart.Axes(xlValue, xlPrimary).AxisTitle.Characters.Text = "左标说明"9)给二维图加右标说明achart.Chart.Axes(xlValue, xlSecondary).HasTitle = Trueachart.Chart.Axes(xlValue, xlSecondary).AxisTitle.Characters.Text = "右标说明"10)改变二维图的显示区大小achart.Chart.PlotArea.Left = 5 achart.Chart.PlotArea.Width = 223 achart.Chart.PlotArea.Height = 108最近有不少人在问QTP操作Excel的问题,其实QTP安装目录中的CodePlusSample里面就有一个名为“UsingExcel.vbs”的文件,里面有很多操作Excel的函数:Dim ExcellApp 'As Excel.ApplicationDim excelSheet1 'As Excel.worksheetDim excelSheet2 'As Excel.worksheetSet ExcelApp = CreateExcel()'Create a workbook with two worksheetsret = RenameWorksheet(ExcelApp, "Book1", "Sheet1", "Example1 Sheet Name")ret = RenameWorksheet(ExcelApp, "Book1", "Sheet2", "Example2 Sheet Name")ret = RemoveWorksheet(ExcelApp, "Book1", "Sheet3")'SaveAs the work bookret = SaveWorkbook(ExcelApp, "Book1", "D:\Example1.xls")'Fill worksheetsSet excelSheet1 = GetSheet(ExcelApp, "Example1 Sheet Name")Set excelSheet2 = GetSheet(ExcelApp, "Example2 Sheet Name")For column = 1 to 10For row = 1 to 10SetCellValue excelSheet1, row, column, row + columnSetCellValue excelSheet2, row, column, row + columnNextNext'Compare the two worksheetsret = CompareSheets(excelSheet1, excelSheet2, 1, 10, 1, 10, False)If ret ThenMsgBox "The two worksheets are identical"End If'Change the values in one sheetSetCellValue excelSheet1, 1, 1, "Yellow"SetCellValue excelSheet2, 2, 2, "Hello"'Compare the worksheets againret = CompareSheets(excelSheet1, excelSheet2, 1, 10, 1, 10, True)If Not ret ThenMsgBox "The two worksheets are not identical"End If'save the workbook by index identifierSaveWorkbook ExcelApp, 1, ""'Close the Excel applicationCloseExcel ExcelApp' ****************************************** Function Library ***********************************************************Dim ExcelApp 'As Excel.ApplicationDim excelSheet 'As Excel.worksheetDim excelBook 'As Excel.workbookDim fso 'As Scripting.FileSystemObject' This function will return a new Excel Object with a default new WorkbookFunction CreateExcel() 'As Excel.ApplicationDim excelSheet 'As Excel.worksheetSet ExcelApp = CreateObject("Excel.Application") 'Create a new excel ObjectExcelApp.Workbooks.AddExcelApp.Visible = TrueSet CreateExcel = ExcelAppEnd Function'This function will close the given Excel Object'excelApp - an Excel application object to be closedSub CloseExcel(ExcelApp)Set excelSheet = ExcelApp.ActiveSheetSet excelBook = ExcelApp.ActiveWorkbookSet fso = CreateObject("Scripting.FileSystemObject")On Error Resume Nextfso.CreateFolder "C:\Temp"fso.DeleteFile "C:\Temp\ExcelExamples.xls"excelBook.SaveAs "C:\Temp\ExcelExamples.xls"ExcelApp.QuitSet ExcelApp = NothingSet fso = NothingErr = 0On Error GoTo 0End Sub'The SaveWorkbook method will save a workbook according to the workbookIdentifier'The method will overwrite the previously saved file under the given path'excelApp - a reference to the Excel Application'workbookIdentifier - The name or number of the requested workbook'path - the location to which the workbook should be saved'Return "OK" on success and "Bad Workbook Identifier" on failureFunction SaveWorkbook(ExcelApp, workbookIdentifier, path) 'As String Dim workbook 'As Excel.workbookOn Error Resume NextSet workbook = ExcelApp.Workbooks(workbookIdentifier)On Error GoTo 0If Not workbook Is Nothing ThenIf path = "" Or path = workbook.FullName Or path = Then workbook.SaveElseSet fso = CreateObject("Scripting.FileSystemObject")'if the path has no file extension then add the 'xls' extensionIf InStr(path, ".") = 0 Thenpath = path & ".xls"End IfOn Error Resume Nextfso.DeleteFile pathSet fso = NothingErr = 0On Error GoTo 0workbook.SaveAs pathEnd IfSaveWorkbook = "OK"ElseSaveWorkbook = "Bad Workbook Identifier"End IfEnd Function'The SetCellValue method sets the given 'value' in the cell which is identified by'its row column and parent Excel sheet'excelSheet - the excel sheet that is the parent of the requested cell'row - the cell's row in the excelSheet'column - the cell's column in the excelSheet'value - the value to be set in the cellSub SetCellValue(excelSheet, row, column, value)On Error Resume NextexcelSheet.Cells(row, column) = valueOn Error GoTo 0End Sub'The GetCellValue returns the cell's value according to its row column and sheet'excelSheet - the Excel Sheet in which the cell exists'row - the cell's row'column - the cell's column'return 0 if the cell could not be foundFunction GetCellValue(excelSheet, row, column)value = 0Err = 0On Error Resume NexttempValue = excelSheet.Cells(row, column)If Err = 0 Thenvalue = tempValueErr = 0End IfOn Error GoTo 0GetCellValue = valueEnd Function'The GetSheet method returns an Excel Sheet according to the sheetIdentifier'ExcelApp - the Excel application which is the parent of the requested sheet'sheetIdentifier - the name or the number of the requested Excel sheet'return Nothing on failureFunction GetSheet(ExcelApp, sheetIdentifier) 'As Excel.worksheetOn Error Resume NextSet GetSheet = ExcelApp.Worksheets.Item(sheetIdentifier)On Error GoTo 0End Function'The InsertNewWorksheet method inserts an new worksheet into the active workbook or'the workbook identified by the workbookIdentifier, the new worksheet will get a default'name if the sheetName parameter is empty, otherwise the sheet will have the sheetName'as a name.'Return - the new sheet as an Object'ExcelApp - the excel application object into which the new worksheet should be added'workbookIdentifier - an optional identifier of the worksheet into which the new worksheet should be added'sheetName - the optional name of the new worksheet.Function InsertNewWorksheet(ExcelApp, workbookIdentifier, sheetName) 'As Excel.worksheet Dim workbook 'As Excel.workbookDim worksheet 'As Excel.worksheet'In case that the workbookIdentifier is empty we will work on the active workbookIf workbookIdentifier = "" ThenSet workbook = ExcelApp.ActiveWorkbookElseOn Error Resume NextErr = 0Set workbook = ExcelApp.Workbooks(workbookIdentifier)If Err <> 0 ThenSet InsertNewWorksheet = NothingErr = 0Exit FunctionEnd IfOn Error GoTo 0End IfsheetCount = workbook.Sheets.Countworkbook.Sheets.Add , sheetCountSet worksheet = workbook.Sheets(sheetCount + 1)'In case that the sheetName is not empty set the new sheet's name to sheetNameIf sheetName <> "" Then = sheetNameEnd IfSet InsertNewWorksheet = worksheetEnd Function'The RenameWorksheet method renames a worksheet's name'ExcelApp - the excel application which is the worksheet's parent'workbookIdentifier - the worksheet's parent workbook identifier'worksheetIdentifier - the worksheet's identifier'sheetName - the new name for the worksheetFunction RenameWorksheet(ExcelApp, workbookIdentifier, worksheetIdentifier, sheetName) 'As StringDim workbook 'As Excel.workbookDim worksheet 'As Excel.worksheetOn Error Resume NextErr = 0Set workbook = ExcelApp.Workbooks(workbookIdentifier)If Err <> 0 ThenRenameWorksheet = "Bad Workbook Identifier"Err = 0Exit FunctionEnd IfSet worksheet = workbook.Sheets(worksheetIdentifier)If Err <> 0 ThenRenameWorksheet = "Bad Worksheet Identifier"Err = 0Exit FunctionEnd If = sheetNameRenameWorksheet = "OK"End Function'The RemoveWorksheet method removes a worksheet from a workbook'ExcelApp - the excel application which is the worksheet's parent'workbookIdentifier - the worksheet's parent workbook identifier'worksheetIdentifier - the worksheet's identifierFunction RemoveWorksheet(ExcelApp, workbookIdentifier, worksheetIdentifier) 'As String Dim workbook 'As Excel.workbookDim worksheet 'As Excel.worksheetOn Error Resume NextErr = 0Set workbook = ExcelApp.Workbooks(workbookIdentifier)If Err <> 0 ThenRemoveWorksheet = "Bad Workbook Identifier"Exit FunctionEnd IfSet worksheet = workbook.Sheets(worksheetIdentifier)If Err <> 0 ThenRemoveWorksheet = "Bad Worksheet Identifier"Exit FunctionEnd Ifworksheet.DeleteRemoveWorksheet = "OK"End Function'The CreateNewWorkbook method creates a new workbook in the excel application'ExcelApp - the Excel application to which an new Excel workbook will be addedFunction CreateNewWorkbook(ExcelApp)Set NewWorkbook = ExcelApp.Workbooks.Add()Set CreateNewWorkbook = NewWorkbookEnd Function'The OpenWorkbook method opens a previously saved Excel workbook and adds it to the Application'excelApp - the Excel Application the workbook will be added to'path - the path of the workbook that will be opened'return Nothing on failureFunction OpenWorkbook(ExcelApp, path)On Error Resume NextSet NewWorkbook = ExcelApp.Workbooks.Open(path)Set OpenWorkbook = NewWorkbookOn Error GoTo 0End Function'The ActivateWorkbook method sets one of the workbooks in the application as Active workbook 'ExcelApp - the workbook's parent excel Application'workbookIdentifier - the name or the number of the workbookSub ActivateWorkbook(ExcelApp, workbookIdentifier)On Error Resume NextExcelApp.Workbooks(workbookIdentifier).ActivateOn Error GoTo 0End Sub'The CloseWorkbook method closes an open workbook'ExcelApp - the parent Excel application of the workbook'workbookIdentifier - the name or the number of the workbookSub CloseWorkbook(ExcelApp, workbookIdentifier)On Error Resume NextExcelApp.Workbooks(workbookIdentifier).CloseOn Error GoTo 0End Sub'The CompareSheets method compares between two sheets.'if there is a difference between the two sheets then the value in the second sheet'will be changed to red and contain the string:'"Compare conflict - Value was 'Value2', Expected value is 'value2'"'sheet1, sheet2 - the excel sheets to be compared'startColumn - the column to start comparing in the two sheets'numberOfColumns - the number of columns to be compared'startRow - the row to start comparing in the two sheets'numberOfRows - the number of rows to be comparedFunction CompareSheets(sheet1, sheet2, startColumn, numberOfColumns, startRow, numberOfRows, trimed) 'As BooleanDim returnVal 'As BooleanreturnVal = True'In case that one of the sheets doesn't exists, don't continue the processIf sheet1 Is Nothing Or sheet2 Is Nothing ThenCompareSheets = FalseExit FunctionEnd If'loop through the table and fill values into the two worksheetsFor r = startRow to (startRow + (numberOfRows - 1))For c = startColumn to (startColumn + (numberOfColumns - 1))Value1 = sheet1.Cells(r, c)Value2 = sheet2.Cells(r, c)'if 'trimed' equels True then used would like to ignore blank spacesIf trimed ThenValue1 = Trim(Value1)Value2 = Trim(Value2)End If'in case that the values of a cell are not equel in the two worksheets'create an indicator that the values are not equel and set return value'to FalseIf Value1 <> Value2 ThenDim cell 'As Excel.Rangesheet2.Cells(r, c) = "Compare conflict - Value was '" & Value2 & "', Expected value is '" & Value1 & "'."Set cell = sheet2.Cells(r, c)cell.Font.Color = vbRedreturnVal = FalseEnd IfNextNextCompareSheets = returnValEnd Function本文来自CSDN博客,转载请标明出处:/Testing_is_believing/archive/2008/07/04/2612221.aspx用VBS操控EXCEL命令首先创建Excel 对象,使用ComObj:oExcel = CreateObject( "Excel.Application" )1) 显示当前窗口:oExcel.Visible = True2) 更改Excel 标题栏:oExcel.Caption = "应用程序调用Microsoft Excel"3) 添加新工作簿:oExcel.WorkBooks.Add4) 打开已存在的工作簿:oExcel.WorkBooks.Open( "C:\Excel\Demo.xls" )5) 设置第2个工作表为活动工作表:oExcel.WorkSheets(2).Activate或oExcel.WorksSheets( "Sheet2" ).Activate6) 给单元格赋值:oExcel.Cells(1,4).Value = "第一行第四列"7) 设置指定列的宽度(单位:字符个数),以第一列为例:oExcel.ActiveSheet.Columns(1).ColumnsWidth = 58) 设置指定行的高度(单位:磅)(1磅=0.035厘米),以第二行为例:oExcel.ActiveSheet.Rows(2).RowHeight = 1/0.035 ' 1厘米9) 在第8行之前插入分页符:oExcel.WorkSheets(1).Rows(8).PageBreak = 110) 在第8列之前删除分页符:oExcel.ActiveSheet.Columns(4).PageBreak = 011) 指定边框线宽度:oExcel.ActiveSheet.Range( "B3:D4" ).Borders(2).Weight = 31-左2-右3-顶4-底5-斜( \ ) 6-斜( / )12) 清除第一行第四列单元格公式:oExcel.ActiveSheet.Cells(1,4).ClearContents13) 设置第一行字体属性:oExcel.ActiveSheet.Rows(1) = "隶书" oExcel.ActiveSheet.Rows(1).Font.Color = clBlue oExcel.ActiveSheet.Rows(1).Font.Bold = TrueoExcel.ActiveSheet.Rows(1).Font.UnderLine = True14) 进行页面设置:a.页眉:oExcel.ActiveSheet.PageSetup.CenterHeader = "报表演示"b.页脚:oExcel.ActiveSheet.PageSetup.CenterFooter = "第&P页"c.页眉到顶端边距2cm:oExcel.ActiveSheet.PageSetup.HeaderMargin = 2/0.035d.页脚到底端边距3cm:oExcel.ActiveSheet.PageSetup.HeaderMargin = 3/0.035e.顶边距2cm:oExcel.ActiveSheet.PageSetup.TopMargin = 2/0.035f.底边距2cm:oExcel.ActiveSheet.PageSetup.BottomMargin = 2/0.035 g.左边距2cm:oExcel.ActiveSheet.PageSetup.LeftMargin = 2/0.035h.右边距2cm:oExcel.ActiveSheet.PageSetup.RightMargin = 2/0.035i.页面水平居中:oExcel.ActiveSheet.PageSetup.CenterHorizontally = 2/0.035 j.页面垂直居中:oExcel.ActiveSheet.PageSetup.CenterVertically = 2/0.035 k.打印单元格网线:oExcel.ActiveSheet.PageSetup.PrintGridLines = True15) 拷贝操作:a.拷贝整个工作表:ed.Range.Copyb.拷贝指定区域:oExcel.ActiveSheet.Range( "A1:E2" ).Copyc.从A1位置开始粘贴:oExcel.ActiveSheet.Range.( "A1" ).PasteSpeciald.从文件尾部开始粘贴:oExcel.ActiveSheet.Range.PasteSpecial16) 插入一行或一列:a. oExcel.ActiveSheet.Rows(2).Insertb. oExcel.ActiveSheet.Columns(1).Insert17) 删除一行或一列:a. oExcel.ActiveSheet.Rows(2).Deleteb. oExcel.ActiveSheet.Columns(1).Delete18) 打印预览工作表:oExcel.ActiveSheet.PrintPreview19) 打印输出工作表:oExcel.ActiveSheet.PrintOut20) 工作表保存:if not oExcel.ActiveWorkBook.Saved then oExcel.ActiveSheet.PrintPreview21) 工作表另存为:oExcel.SaveAs( "C:\Excel\Demo1.xls" )22) 放弃存盘:oExcel.ActiveWorkBook.Saved = True23) 关闭工作簿:oExcel.WorkBooks.Close24) 退出Excel:oExcel.QuitSet oExcel = CreateObject("Excel.Application")with oExcel.Visible = True.Workbooks.Open "C:\temp\text.xls".DisplayAlerts = False.ActiveWorkbook.SaveAs "C:\temp\text.csv", 6, False end with。
操作及其操作VBS连接EXCEL及其(一) 使用动态创建的方法首先创建Excel 对象,使用ComObj:oExcel = CreateObject( "Excel.Application" )1) 显示当前窗口:oExcel.Visible = True2) 更改Excel 标题栏:oExcel.Caption = "应用程序调用Microsoft Excel"3) 添加新工作簿:oExcel.WorkBooks.Add4) 打开已存在的工作簿:oExcel.WorkBooks.Open( "C:\Excel\Demo.xls" )5) 设置第2个工作表为活动工作表:oExcel.WorkSheets(2).Activate或oExcel.WorksSheets( "Sheet2" ).Activate6) 给单元格赋值:oExcel.Cells(1,4).Value = "第一行第四列"7) 设置指定列的宽度(单位:字符个数),以第一列为例:oExcel.ActiveSheet.Columns(1).ColumnsWidth = 58) 设置指定行的高度(单位:磅)(1磅=0.035厘米),以第二行为例:oExcel.ActiveSheet.Rows(2).RowHeight = 1/0.035 ' 1厘米9) 在第8行之前插入分页符:oExcel.WorkSheets(1).Rows(8).PageBreak = 110) 在第8列之前删除分页符:oExcel.ActiveSheet.Columns(4).PageBreak = 011) 指定边框线宽度:oExcel.ActiveSheet.Range( "B3:D4" ).Borders(2).Weight = 31-左2-右3-顶4-底5-斜( \ ) 6-斜( / )12) 清除第一行第四列单元格公式:oExcel.ActiveSheet.Cells(1,4).ClearContents13) 设置第一行字体属性:oExcel.ActiveSheet.Rows(1) = "隶书"oExcel.ActiveSheet.Rows(1).Font.Color = clBlueoExcel.ActiveSheet.Rows(1).Font.Bold = TrueoExcel.ActiveSheet.Rows(1).Font.UnderLine = True14) 进行页面设置:a.页眉:oExcel.ActiveSheet.PageSetup.CenterHeader = "报表演示"b.页脚:oExcel.ActiveSheet.PageSetup.CenterFooter = "第&P页"c.页眉到顶端边距2cm:oExcel.ActiveSheet.PageSetup.HeaderMargin = 2/0.035d.页脚到底端边距3cm:oExcel.ActiveSheet.PageSetup.HeaderMargin = 3/0.035e.顶边距2cm:oExcel.ActiveSheet.PageSetup.TopMargin = 2/0.035f.底边距2cm:oExcel.ActiveSheet.PageSetup.BottomMargin = 2/0.035 g.左边距2cm:oExcel.ActiveSheet.PageSetup.LeftMargin = 2/0.035h.右边距2cm:oExcel.ActiveSheet.PageSetup.RightMargin = 2/0.035i.页面水平居中:oExcel.ActiveSheet.PageSetup.CenterHorizontally = 2/0.035 j.页面垂直居中:oExcel.ActiveSheet.PageSetup.CenterVertically = 2/0.035 k.打印单元格网线:oExcel.ActiveSheet.PageSetup.PrintGridLines = True15) 拷贝操作:a.拷贝整个工作表:ed.Range.Copyb.拷贝指定区域:oExcel.ActiveSheet.Range( "A1:E2" ).Copy c.从A1位置开始粘贴:oExcel.ActiveSheet.Range.( "A1" ).PasteSpecial d.从文件尾部开始粘贴:oExcel.ActiveSheet.Range.PasteSpecial16) 插入一行或一列:a. oExcel.ActiveSheet.Rows(2).Insertb. oExcel.ActiveSheet.Columns(1).Insert17) 删除一行或一列:a. oExcel.ActiveSheet.Rows(2).Deleteb. oExcel.ActiveSheet.Columns(1).Delete18) 打印预览工作表:oExcel.ActiveSheet.PrintPreview19) 打印输出工作表:oExcel.ActiveSheet.PrintOut20) 工作表保存:if not oExcel.ActiveWorkBook.Saved then oExcel.ActiveSheet.PrintPreview21) 工作表另存为:oExcel.SaveAs( "C:\Excel\Demo1.xls" )22) 放弃存盘:oExcel.ActiveWorkBook.Saved = True23) 关闭工作簿:oExcel.WorkBooks.Close24) 退出Excel:oExcel.Quit(二) 使用VBS 控制Excle二维图1)选择当第一个工作薄第一个工作表set oSheet=oExcel.Workbooks(1).Worksheets(1)2)增加一个二维图achart=oSheet.chartobjects.add(100,100,200,200)3)选择二维图的形态achart.chart.charttype=44)给二维图赋值set series=achart.chart.seriescollectionrange="sheet1!r2c3:r3c9"series.add range,true5)加上二维图的标题achart.Chart.HasTitle=Trueachart.Chart.ChartTitle.Characters.Text=" Excle二维图"6)改变二维图的标题字体大小achart.Chart.ChartTitle.Font.size=187)给二维图加下标说明achart.Chart.Axes(xlCategory, xlPrimary).HasTitle = Trueachart.Chart.Axes(xlCategory, xlPrimary).AxisTitle.Characters.Text = "下标说明"8)给二维图加左标说明achart.Chart.Axes(xlValue, xlPrimary).HasTitle = Trueachart.Chart.Axes(xlValue, xlPrimary).AxisTitle.Characters.Text = "左标说明"9)给二维图加右标说明achart.Chart.Axes(xlValue, xlSecondary).HasTitle = Trueachart.Chart.Axes(xlValue, xlSecondary).AxisTitle.Characters.Text = "右标说明"10)改变二维图的显示区大小achart.Chart.PlotArea.Left = 5 achart.Chart.PlotArea.Width = 223 achart.Chart.PlotArea.Height = 108最近有不少人在问QTP操作Excel的问题,其实QTP安装目录中的CodePlusSample里面就有一个名为“UsingExcel.vbs”的文件,里面有很多操作Excel的函数:Dim ExcellApp 'As Excel.ApplicationDim excelSheet1 'As Excel.worksheetDim excelSheet2 'As Excel.worksheetSet ExcelApp = CreateExcel()'Create a workbook with two worksheetsret = RenameWorksheet(ExcelApp, "Book1", "Sheet1", "Example1 Sheet Name")ret = RenameWorksheet(ExcelApp, "Book1", "Sheet2", "Example2 Sheet Name")ret = RemoveWorksheet(ExcelApp, "Book1", "Sheet3")'SaveAs the work bookret = SaveWorkbook(ExcelApp, "Book1", "D:\Example1.xls")'Fill worksheetsSet excelSheet1 = GetSheet(ExcelApp, "Example1 Sheet Name")Set excelSheet2 = GetSheet(ExcelApp, "Example2 Sheet Name")For column = 1 to 10For row = 1 to 10SetCellValue excelSheet1, row, column, row + columnSetCellValue excelSheet2, row, column, row + columnNextNext'Compare the two worksheetsret = CompareSheets(excelSheet1, excelSheet2, 1, 10, 1, 10, False)If ret ThenMsgBox "The two worksheets are identical"End If'Change the values in one sheetSetCellValue excelSheet1, 1, 1, "Yellow"SetCellValue excelSheet2, 2, 2, "Hello"'Compare the worksheets againret = CompareSheets(excelSheet1, excelSheet2, 1, 10, 1, 10, True)If Not ret ThenMsgBox "The two worksheets are not identical"End If'save the workbook by index identifierSaveWorkbook ExcelApp, 1, ""'Close the Excel applicationCloseExcel ExcelApp' ****************************************** Function Library ***********************************************************Dim ExcelApp 'As Excel.ApplicationDim excelSheet 'As Excel.worksheetDim excelBook 'As Excel.workbookDim fso 'As Scripting.FileSystemObject' This function will return a new Excel Object with a default new WorkbookFunction CreateExcel() 'As Excel.ApplicationDim excelSheet 'As Excel.worksheetSet ExcelApp = CreateObject("Excel.Application") 'Create a new excel ObjectExcelApp.Workbooks.AddExcelApp.Visible = TrueSet CreateExcel = ExcelAppEnd Function'This function will close the given Excel Object'excelApp - an Excel application object to be closedSub CloseExcel(ExcelApp)Set excelSheet = ExcelApp.ActiveSheetSet excelBook = ExcelApp.ActiveWorkbookSet fso = CreateObject("Scripting.FileSystemObject")On Error Resume Nextfso.CreateFolder "C:\Temp"fso.DeleteFile "C:\Temp\ExcelExamples.xls"excelBook.SaveAs "C:\Temp\ExcelExamples.xls"ExcelApp.QuitSet ExcelApp = NothingSet fso = NothingErr = 0On Error GoTo 0End Sub'The SaveWorkbook method will save a workbook according to the workbookIdentifier'The method will overwrite the previously saved file under the given path'excelApp - a reference to the Excel Application'workbookIdentifier - The name or number of the requested workbook'path - the location to which the workbook should be saved'Return "OK" on success and "Bad Workbook Identifier" on failureFunction SaveWorkbook(ExcelApp, workbookIdentifier, path) 'As String Dim workbook 'As Excel.workbookOn Error Resume NextSet workbook = ExcelApp.Workbooks(workbookIdentifier)On Error GoTo 0If Not workbook Is Nothing ThenIf path = "" Or path = workbook.FullName Or path = Then workbook.SaveElseSet fso = CreateObject("Scripting.FileSystemObject")'if the path has no file extension then add the 'xls' extensionIf InStr(path, ".") = 0 Thenpath = path & ".xls"End IfOn Error Resume Nextfso.DeleteFile pathSet fso = NothingErr = 0On Error GoTo 0workbook.SaveAs pathEnd IfSaveWorkbook = "OK"ElseSaveWorkbook = "Bad Workbook Identifier"End IfEnd Function'The SetCellValue method sets the given 'value' in the cell which is identified by'its row column and parent Excel sheet'excelSheet - the excel sheet that is the parent of the requested cell'row - the cell's row in the excelSheet'column - the cell's column in the excelSheet'value - the value to be set in the cellSub SetCellValue(excelSheet, row, column, value)On Error Resume NextexcelSheet.Cells(row, column) = valueOn Error GoTo 0End Sub'The GetCellValue returns the cell's value according to its row column and sheet'excelSheet - the Excel Sheet in which the cell exists'row - the cell's row'column - the cell's column'return 0 if the cell could not be foundFunction GetCellValue(excelSheet, row, column)value = 0Err = 0On Error Resume NexttempValue = excelSheet.Cells(row, column)If Err = 0 Thenvalue = tempValueErr = 0End IfOn Error GoTo 0GetCellValue = valueEnd Function'The GetSheet method returns an Excel Sheet according to the sheetIdentifier'ExcelApp - the Excel application which is the parent of the requested sheet'sheetIdentifier - the name or the number of the requested Excel sheet'return Nothing on failureFunction GetSheet(ExcelApp, sheetIdentifier) 'As Excel.worksheetOn Error Resume NextSet GetSheet = ExcelApp.Worksheets.Item(sheetIdentifier)On Error GoTo 0End Function'The InsertNewWorksheet method inserts an new worksheet into the active workbook or'the workbook identified by the workbookIdentifier, the new worksheet will get a default'name if the sheetName parameter is empty, otherwise the sheet will have the sheetName'as a name.'Return - the new sheet as an Object'ExcelApp - the excel application object into which the new worksheet should be added'workbookIdentifier - an optional identifier of the worksheet into which the new worksheet should be added'sheetName - the optional name of the new worksheet.Function InsertNewWorksheet(ExcelApp, workbookIdentifier, sheetName) 'As Excel.worksheet Dim workbook 'As Excel.workbookDim worksheet 'As Excel.worksheet'In case that the workbookIdentifier is empty we will work on the active workbookIf workbookIdentifier = "" ThenSet workbook = ExcelApp.ActiveWorkbookElseOn Error Resume NextErr = 0Set workbook = ExcelApp.Workbooks(workbookIdentifier)If Err <> 0 ThenSet InsertNewWorksheet = NothingErr = 0Exit FunctionEnd IfOn Error GoTo 0End IfsheetCount = workbook.Sheets.Countworkbook.Sheets.Add , sheetCountSet worksheet = workbook.Sheets(sheetCount + 1)'In case that the sheetName is not empty set the new sheet's name to sheetNameIf sheetName <> "" Then = sheetNameEnd IfSet InsertNewWorksheet = worksheetEnd Function'The RenameWorksheet method renames a worksheet's name'ExcelApp - the excel application which is the worksheet's parent'workbookIdentifier - the worksheet's parent workbook identifier'worksheetIdentifier - the worksheet's identifier'sheetName - the new name for the worksheetFunction RenameWorksheet(ExcelApp, workbookIdentifier, worksheetIdentifier, sheetName) 'As StringDim workbook 'As Excel.workbookDim worksheet 'As Excel.worksheetOn Error Resume NextErr = 0Set workbook = ExcelApp.Workbooks(workbookIdentifier)If Err <> 0 ThenRenameWorksheet = "Bad Workbook Identifier"Err = 0Exit FunctionEnd IfSet worksheet = workbook.Sheets(worksheetIdentifier)If Err <> 0 ThenRenameWorksheet = "Bad Worksheet Identifier"Err = 0Exit FunctionEnd If = sheetNameRenameWorksheet = "OK"End Function'The RemoveWorksheet method removes a worksheet from a workbook'ExcelApp - the excel application which is the worksheet's parent'workbookIdentifier - the worksheet's parent workbook identifier'worksheetIdentifier - the worksheet's identifierFunction RemoveWorksheet(ExcelApp, workbookIdentifier, worksheetIdentifier) 'As String Dim workbook 'As Excel.workbookDim worksheet 'As Excel.worksheetOn Error Resume NextErr = 0Set workbook = ExcelApp.Workbooks(workbookIdentifier)If Err <> 0 ThenRemoveWorksheet = "Bad Workbook Identifier"Exit FunctionEnd IfSet worksheet = workbook.Sheets(worksheetIdentifier)If Err <> 0 ThenRemoveWorksheet = "Bad Worksheet Identifier"Exit FunctionEnd Ifworksheet.DeleteRemoveWorksheet = "OK"End Function'The CreateNewWorkbook method creates a new workbook in the excel application'ExcelApp - the Excel application to which an new Excel workbook will be addedFunction CreateNewWorkbook(ExcelApp)Set NewWorkbook = ExcelApp.Workbooks.Add()Set CreateNewWorkbook = NewWorkbookEnd Function'The OpenWorkbook method opens a previously saved Excel workbook and adds it to the Application'excelApp - the Excel Application the workbook will be added to'path - the path of the workbook that will be opened'return Nothing on failureFunction OpenWorkbook(ExcelApp, path)On Error Resume NextSet NewWorkbook = ExcelApp.Workbooks.Open(path)Set OpenWorkbook = NewWorkbookOn Error GoTo 0End Function'The ActivateWorkbook method sets one of the workbooks in the application as Active workbook 'ExcelApp - the workbook's parent excel Application'workbookIdentifier - the name or the number of the workbookSub ActivateWorkbook(ExcelApp, workbookIdentifier)On Error Resume NextExcelApp.Workbooks(workbookIdentifier).ActivateOn Error GoTo 0End Sub'The CloseWorkbook method closes an open workbook'ExcelApp - the parent Excel application of the workbook'workbookIdentifier - the name or the number of the workbookSub CloseWorkbook(ExcelApp, workbookIdentifier)On Error Resume NextExcelApp.Workbooks(workbookIdentifier).CloseOn Error GoTo 0End Sub'The CompareSheets method compares between two sheets.'if there is a difference between the two sheets then the value in the second sheet'will be changed to red and contain the string:'"Compare conflict - Value was 'Value2', Expected value is 'value2'"'sheet1, sheet2 - the excel sheets to be compared'startColumn - the column to start comparing in the two sheets'numberOfColumns - the number of columns to be compared'startRow - the row to start comparing in the two sheets'numberOfRows - the number of rows to be comparedFunction CompareSheets(sheet1, sheet2, startColumn, numberOfColumns, startRow, numberOfRows, trimed) 'As BooleanDim returnVal 'As BooleanreturnVal = True'In case that one of the sheets doesn't exists, don't continue the processIf sheet1 Is Nothing Or sheet2 Is Nothing ThenCompareSheets = FalseExit FunctionEnd If'loop through the table and fill values into the two worksheetsFor r = startRow to (startRow + (numberOfRows - 1))For c = startColumn to (startColumn + (numberOfColumns - 1))Value1 = sheet1.Cells(r, c)Value2 = sheet2.Cells(r, c)'if 'trimed' equels True then used would like to ignore blank spacesIf trimed ThenValue1 = Trim(Value1)Value2 = Trim(Value2)End If'in case that the values of a cell are not equel in the two worksheets'create an indicator that the values are not equel and set return value'to FalseIf Value1 <> Value2 ThenDim cell 'As Excel.Rangesheet2.Cells(r, c) = "Compare conflict - Value was '" & Value2 & "', Expected value is '" & Value1 & "'."Set cell = sheet2.Cells(r, c)cell.Font.Color = vbRedreturnVal = FalseEnd IfNextNextCompareSheets = returnValEnd Function本文来自CSDN博客,转载请标明出处:/Testing_is_believing/archive/2008/07/04/2612221.aspx用VBS操控EXCEL命令首先创建Excel 对象,使用ComObj:oExcel = CreateObject( "Excel.Application" )1) 显示当前窗口:oExcel.Visible = True2) 更改Excel 标题栏:oExcel.Caption = "应用程序调用Microsoft Excel"3) 添加新工作簿:oExcel.WorkBooks.Add4) 打开已存在的工作簿:oExcel.WorkBooks.Open( "C:\Excel\Demo.xls" )5) 设置第2个工作表为活动工作表:oExcel.WorkSheets(2).Activate或oExcel.WorksSheets( "Sheet2" ).Activate6) 给单元格赋值:oExcel.Cells(1,4).Value = "第一行第四列"7) 设置指定列的宽度(单位:字符个数),以第一列为例:oExcel.ActiveSheet.Columns(1).ColumnsWidth = 58) 设置指定行的高度(单位:磅)(1磅=0.035厘米),以第二行为例:oExcel.ActiveSheet.Rows(2).RowHeight = 1/0.035 ' 1厘米9) 在第8行之前插入分页符:oExcel.WorkSheets(1).Rows(8).PageBreak = 110) 在第8列之前删除分页符:oExcel.ActiveSheet.Columns(4).PageBreak = 011) 指定边框线宽度:oExcel.ActiveSheet.Range( "B3:D4" ).Borders(2).Weight = 31-左2-右3-顶4-底5-斜( \ ) 6-斜( / )12) 清除第一行第四列单元格公式:oExcel.ActiveSheet.Cells(1,4).ClearContents13) 设置第一行字体属性:oExcel.ActiveSheet.Rows(1) = "隶书" oExcel.ActiveSheet.Rows(1).Font.Color = clBlue oExcel.ActiveSheet.Rows(1).Font.Bold = TrueoExcel.ActiveSheet.Rows(1).Font.UnderLine = True14) 进行页面设置:a.页眉:oExcel.ActiveSheet.PageSetup.CenterHeader = "报表演示"b.页脚:oExcel.ActiveSheet.PageSetup.CenterFooter = "第&P页"c.页眉到顶端边距2cm:oExcel.ActiveSheet.PageSetup.HeaderMargin = 2/0.035d.页脚到底端边距3cm:oExcel.ActiveSheet.PageSetup.HeaderMargin = 3/0.035e.顶边距2cm:oExcel.ActiveSheet.PageSetup.TopMargin = 2/0.035f.底边距2cm:oExcel.ActiveSheet.PageSetup.BottomMargin = 2/0.035 g.左边距2cm:oExcel.ActiveSheet.PageSetup.LeftMargin = 2/0.035h.右边距2cm:oExcel.ActiveSheet.PageSetup.RightMargin = 2/0.035i.页面水平居中:oExcel.ActiveSheet.PageSetup.CenterHorizontally = 2/0.035 j.页面垂直居中:oExcel.ActiveSheet.PageSetup.CenterVertically = 2/0.035 k.打印单元格网线:oExcel.ActiveSheet.PageSetup.PrintGridLines = True15) 拷贝操作:a.拷贝整个工作表:ed.Range.Copyb.拷贝指定区域:oExcel.ActiveSheet.Range( "A1:E2" ).Copyc.从A1位置开始粘贴:oExcel.ActiveSheet.Range.( "A1" ).PasteSpeciald.从文件尾部开始粘贴:oExcel.ActiveSheet.Range.PasteSpecial16) 插入一行或一列:a. oExcel.ActiveSheet.Rows(2).Insertb. oExcel.ActiveSheet.Columns(1).Insert17) 删除一行或一列:a. oExcel.ActiveSheet.Rows(2).Deleteb. oExcel.ActiveSheet.Columns(1).Delete18) 打印预览工作表:oExcel.ActiveSheet.PrintPreview19) 打印输出工作表:oExcel.ActiveSheet.PrintOut20) 工作表保存:if not oExcel.ActiveWorkBook.Saved then oExcel.ActiveSheet.PrintPreview21) 工作表另存为:oExcel.SaveAs( "C:\Excel\Demo1.xls" )22) 放弃存盘:oExcel.ActiveWorkBook.Saved = True23) 关闭工作簿:oExcel.WorkBooks.Close24) 退出Excel:oExcel.QuitSet oExcel = CreateObject("Excel.Application")with oExcel.Visible = True.Workbooks.Open "C:\temp\text.xls".DisplayAlerts = False.ActiveWorkbook.SaveAs "C:\temp\text.csv", 6, False end with。