机器人奶茶店说明书.pptx
- 格式:pptx
- 大小:2.06 MB
- 文档页数:6


NiuRobot餐饮服务机器人技术说明书西安奎霖机电有限公司目录1 产品简介 (3)1.1产品概述 (3)1.2产品功能及特点 (3)1.3主要技术参数 (4)2产品安装 (5)2.1包装内容 (5)2.2 外形尺寸 (5)2.3产品安装 (5)3产品使用 (6)3.1 界面指南 (6)3.2运行操作 (7)3.3开始充电 (7)3.4更换歌曲 (7)3产品维护 (9)4充电注意事项 (9)4.1充电特点 (9)4.2电池技术参数 (9)4.3充电注意事项 (10)4.4故障分析 (10)5保修说明 (11)尊敬的客户您好!感谢您使用西安奎霖机电有限公司出品的餐饮机器人。
机器人使用说明书是以机器人的机构内容为中心的技术资料。
为确保本系统的正常应用和妥善保养及检修,其中包括一些使用注意事项、详细的规格说明、售后服务项目等内容。
请务必在认真阅读并充分理解和掌握的基础上使用。
1 产品简介1.1产品概述本公司的送餐机器人采用了先进的无线通信技术、嵌入式单片机技术和工程控制技术,稳定性强,可靠性高,实用性好,应用性广,功能强大。
1.2产品功能及特点•采用传输控制一体化,提高了系统可靠性;•采用超低功耗高性能的嵌入式处理器;•内嵌看门狗,不死机;•高精度16位磁导航传感器,辨识可靠;•高性能驱动电机,转向灵活;•优质玻璃钢机身,结实牢靠;•优质充气橡胶轮胎,防打滑,无噪音;•先进的同步带传动机制,高效稳定;•灵敏的光电避障传感器,时刻保护顾客的安全。
1.3主要技术参数尺寸(mm)L600*W600*H1650重量(kg)60承重(kg)18速度(m/min)<48充电时间(h)4使用时间(h)8-10电池24V20AH安全措施光电传感器*8设计寿命》10年2产品安装2.1包装内容开箱后请详细核对产品清单,如有差错,请及时联系本公司客服,以便我们更好地为您服务。
(如有选项请确认其他内容)产品清单应包含:•机器人外壳•机器人底盘•M10螺丝6颗•充电器2.2 外形尺寸机器人底部直径640mm,身高1660mm。
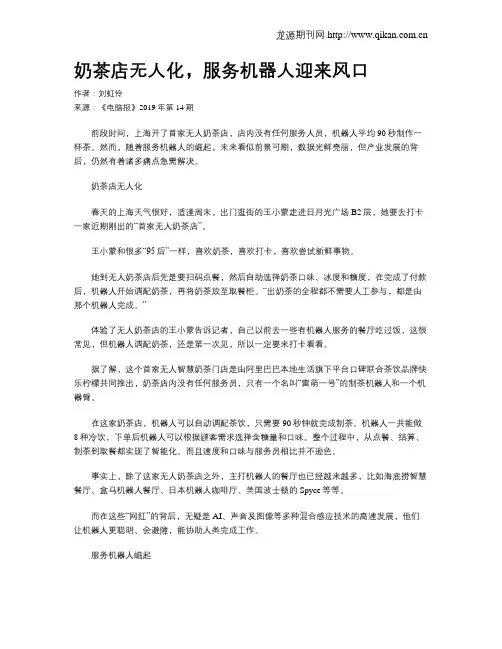
奶茶店无人化,服务机器人迎来风口作者:刘虹伶来源:《电脑报》2019年第14期前段时间,上海开了首家无人奶茶店,店内没有任何服务人员,机器人平均90秒制作一杯茶。
然而,随着服务机器人的崛起,未来看似前景可期,数据光鲜亮丽,但产业发展的背后,仍然有着诸多痛点急需解决。
奶茶店无人化春天的上海天气很好,适逢周末,出门逛街的王小蒙走进日月光广场B2层,她要去打卡一家近期刚出的“首家无人奶茶店”。
王小蒙和很多“95后”一样,喜欢奶茶,喜欢打卡,喜欢尝试新鲜事物。
她到无人奶茶店后先是要扫码点餐,然后自助选择奶茶口味、冰度和糖度,在完成了付款后,机器人开始调配奶茶,再将奶茶放至取餐柜。
“出奶茶的全程都不需要人工参与,都是由那个机器人完成。
”体验了无人奶茶店的王小蒙告诉记者,自己以前去一些有机器人服务的餐厅吃过饭,这很常见,但机器人调配奶茶,还是第一次见,所以一定要来打卡看看。
据了解,这个首家无人智慧奶茶门店是由阿里巴巴本地生活旗下平台口碑联合茶饮品牌快乐柠檬共同推出,奶茶店内没有任何服务员,只有一个名叫“雷萌一号”的制茶机器人和一个机器臂。
在这家奶茶店,机器人可以自动调配茶饮,只需要90秒钟就完成制茶。
机器人一共能做8种冷饮,下单后机器人可以根据顾客需求选择含糖量和口味。
整个过程中,从点餐、结算、制茶到取餐都实现了智能化。
而且速度和口味与服务员相比并不逊色。
事实上,除了这家无人奶茶店之外,主打机器人的餐厅也已经越来越多,比如海底捞智慧餐厅、盒马机器人餐厅、日本机器人咖啡厅、美国波士顿的Spyce等等。
而在这些“网红”的背后,无疑是AI、声音及图像等多种混合感应技术的高速发展,他们让机器人更聪明、会避障,能协助人类完成工作。
服务机器人崛起根据不同用途划分,目前市面上的机器人可分为保洁机器人、教育机器人、医疗机器人、家用机器人、服务机器人及娱乐机器人,应用范围非常广泛。
而在这样庞大的机器人家族中,服务机器人是非常年轻的一员。
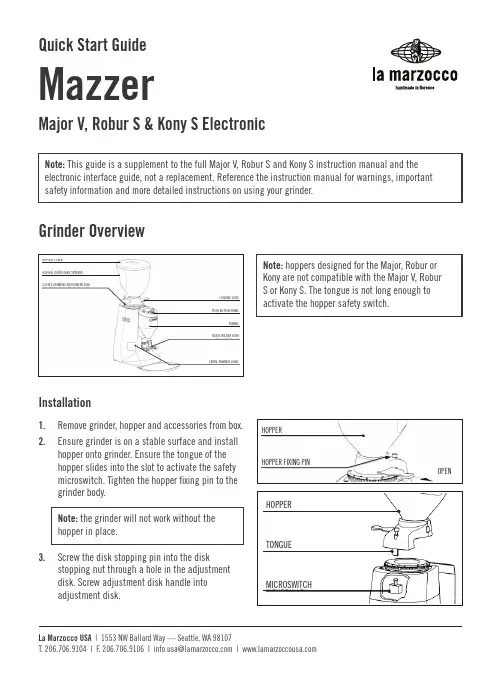
Quick Start GuideMazzerMajor V, Robur S & Kony S ElectronicNote: This guide is a supplement to the full Major V, Robur S and Kony S instruction manual and the electronic interface guide, not a replacement. Reference the instruction manual for warnings, important safety information and more detailed instructions on using your grinder.Grinder OverviewNote: hoppers designed for the Major, Robur or Kony are not compatible with the Major V, Robur S or Kony S. The tongue is not long enough to activate the hopper safety switch.Installation1. Remove grinder, hopper and accessories from box.2. Ensure grinder is on a stable surface and installhopper onto grinder. Ensure the tongue of the hopper slides into the slot to activate the safety microswitch. Tighten the hopper fixing pin to the grinder body.Note: the grinder will not work without the hopper in place.3. Screw the disk stopping pin into the diskstopping nut through a hole in the adjustment disk. Screw adjustment disk handle into adjustment disk.HOPPER COVERCOFFEE GRINDING ADJUSTMENT DISKLOCKING SLIDE PUSH BUTTON PANELFUNNELFILTER HOLDER FORKSERIAL NUMBER LABELHOPPER (coffee bean container)HOPPERHOPPER FIXING PINOPENHOPPERTONGUEMICROSWITCH4. If desired, install drip tray by sliding under frontof grinder until it pops into place.5. Adjust the fork assembly to properly fit yourportafilter. (View Video Tutorial)a. Place your portafilter into the forks bypositioning the portafilter at a slightincline until the portafilter touches thestop/activation pin then straighten theportafilter out.b. Adjust the side tongues of the fork assemblyuntil the portafilter is level with the ground.6. Plug in grinder to acceptable grounded wall outlet7. Turn the grinder on by moving the power switchfrom O to I. The grinder will light up.8. Press the manual grind button, , and confirmthe grinder motor turns on.9. Add coffee to the hopper ensuring the hoppergate is pulled to the open position allowing coffee to flow into the grinder.10. With the portafilter on the forks, press and holdthe manual grind button, , until coffee exitsthe chute.a. Coffee should fall into the center of theportafilter basket. If it does not, or youhad other adjustment issues, referencefull instructional manual for additionaladjustment options.Adjusting the Grind1. Loosen the disk stopping pin.2. Begin grinding coffee.a. When changing the grind, ensure the grinderis running while moving the adjustmentdisk. This prevents jamming the burrs.3. Rotate adjustment disk either couterclockwise, tofine the grind, or clockwise, to coarsen the grind.a. In some cases it may be necessary to completely remove the disk stopping pin to adjust the grind either coarser or finer. This is due to the disk stopping nut halting the travel of the adjustment disk. If this is the case, do the following.i. Loosen and remove disk stopping pin. ii. Adjust grind as needed.iii. Realign the disk stopping nut withTONGUEACTIVATION PIN OR STOP PINLEFT SIDE TONGUESIDE SET SCREWTONGUEDISK STOPPING PINCOFFEE GRINDING ADJUSTMENT DISKDISK STOPPING NUTADJUSTMENT DISK NOTCHADJUSTMENT INDEXan adjustment disk hole for the diskstopping pin.iv. Install and tighten the disk stoppingpin.4. Stop grinding5. Tighten the disk stopping pin.a. Purge at least two doses of coffee aftermaking an adjustment before pulling anespresso shot. This ensures the espressobeing brewed is using the new grind setting.Ring ZeroingYour Major V, Robur S, and/or Kony S comes with an adjustable numbered ring on the adjustment disk. This numbered ring may be used to indicate where the burrs touch, or for an initial grind adjustment setting. From the factory the numbered ring is set such that 0 (zero) corresponds to the burrs touching. To change the adjustment of the numbered ring, do the following:1. Turn off grinder using main power switch.2. Close hopper gate and remove hopper.3. Loosen and remove disk stopping pin.4. Loosen, but do not remove, the two Phillips headring setscrews using a Phillips screwdriver. 5. Rotate the numbered rind to the desired positionand tighten ring setscrews.6. Reassemble in reverse order.Electronic Grinder InterfaceDisplay OverviewChanging the Operating Mode (Major V, Kony S only)There is an activation pin switch on the body ofthe grinder that may be used to activate grinding. To change the operating mode from Keyboard, the default, to Portafilter, and vice versa, press the menu button, , then press the activation pin switch. The display will show the new operating mode and, after a few moments, return to the standby screen. In Portafilter mode the user will select the dose on the keypad first. To grind, press the portafilter into the activation pin switch. The dose does not need to be selected after each activation. The selected dose will remain until the user changes it.NUMBERED RINGRING SET SCREWDISPLAYMENU/SELECTION BUTTON CANCEL BUTTONPUSH BUTTON FOR MANUAL GRINDING DOSE BUTTONS (1, 2, 3) NAVIGATION BUTTONSDATE AND TIMEALERTSINCREMENTAL COUNTERDECREMENTAL COUNTERPRESET TIMES FOR DOSES 1, 2, 3MANUAL BUTTON STATE ICON (ON/OFF) DISPLAY IN STANDBYAdjusting the Dose Time1. Press and hold themenu button, .2. Press the dose buttonyou would like tochange the time of.Either, 1, 2 or 3Then release both buttons. The display willchange to showing the symbol of the dose youare changing and the time the dose is currentlyset to.3. Adjust the dose time using the navigationbuttons. to increase the dose time and to decrease the dose time.4. Press and release the menu button, , to savethe dose time and exit the menu.Grind Flow Control WiresYour Major V, Robur S, and/or Kony S allows different wire inserts to be used in the outlet insert to control the flow of grounds out of the grinder. The Hybrid grind flow control (GFC) wire, installed by default, is the best choice in almost all cases. If excessive clumping is occurring, you may want to try the Anti-Clumping GFC wire, Anti-Dust GFC wire and instructions on how to install them are found in a small plastic box that came with your grinder. The Kony S and Robur S use the same GFC wires. (View Video Tutorial on Changing Kony S/Robur S GFC Wire) The Major V uses different GFC wires. (View Video Tutorial on Changing Major V GFC Wire).Cleaning the Grind ChamberNote: you are able to clean the inside of your Major V, Robur S, and/or Kony S grind chamber without disrupting your grind adjustment setting.Tools Needed• 5 mm Allen key, to remove ring support screws • Dry nylon bristled brush, to clean burrs• Clean, dry, lint-free soft cloth, to wipe surfacesclean on ring support and grinder body• Shop vacuum, to remove coffee from grind chamber • Platic spudger (optional), to remove screw caps1 Dose timeRING SUPPORT ASSEMBLYROUND OUTLET INSERTCOFFEE OUTLET GUARDOUTLET INSERT RING SUPPORT ASSEMBLYOUTLET INSERT LOCK PINSQUARE OUTLET INSERTCOFFEE OUTLET GUARDOUTLET INSERT1. Turn off and unplug the grinder.2. Close hopper gate and remove hopper. Scoop asmany whole beans out of the grinder inlet andplace them in hopper.3. Remove the four screw caps using your fingernailor a spudger.4. Remove the four screws using a 5 mm Allen key.5. Lift up on the ring support assembly and removeit from the grinder.6. Rotate push button display outward so you canview the inside of the funnel.7. Remove the coffee ourlet guard by removing thetwo Phillips crews using a Phillips screwdriver.Then lift the coffee outlet guard out of the funnel.8. Remove outlet insert.Note: when completing this step, be carefulnot to damage the grind control wire inside theoutlet insert.a. Square Outlet Insert (Robur S and Kony S):push outlet insert toward burrs and pullup on outlet insert lock pin. Remove outletinsert by pulling it into the funnel andremoving it from the grinder.b. Round Outlet Insert (Major V): pushoutlet insert toward burrs and rotatecounterclockwise a few degrees. Pull outletinsert into funnel and remove from grinder.9. Vacuum out grind chamber, funnel and chute.10. Using the brush, brush off the burrs to removeany built-up coffee grounds.11. If needed, use vacuum to remove any coffeegrounds that have been knocked loose.12. Wipe all mating surfaces clean using a soft cloth.If the mating surfaces are not free of coffeegrinds and/or other debris, you will have difficulty reassembling your grinder and may possiblydamage components.13. Reassemble in reverse order.。
智能咖啡机器人的说明书欢迎使用智能咖啡机器人,本说明书将为您提供对该设备的全面介绍和操作指南,以便您能够充分了解并正确操作该机器人。
请仔细阅读本说明书,并按照指导进行操作。
一、产品概述智能咖啡机器人是一款集咖啡研磨、萃取、冲泡等功能于一体的全自动咖啡制作设备。
它采用先进的人工智能技术,能够根据用户的喜好制作出完美的咖啡,满足不同口味的需求。
二、产品特点1.自动化制作:智能咖啡机器人能够自动完成从咖啡豆研磨到咖啡冲泡的全过程,无需人工干预,操作简便。
2.个性化定制:通过智能控制系统,用户可以根据自己的口味偏好自定义调整咖啡的浓度、温度、甜度等参数。
3.智能提醒:机器人会根据不同的使用情况智能提醒用户及时清洁和维护设备,确保制作的咖啡始终保持最佳口感。
4.远程控制:通过手机App,用户可以随时随地远程操控咖啡机器人的工作状态,提前预约制作咖啡的时间。
三、产品配置智能咖啡机器人包含以下部件:1.咖啡研磨机:负责将咖啡豆研磨成适合冲泡的粉末状。
2.水箱:用于存放水,供咖啡冲泡使用。
3.控制面板:提供设备的各项操作功能,用户可以通过触摸屏幕选择自己喜欢的咖啡类型和参数设置。
4.咖啡出口管:将冲泡好的咖啡导出到杯子中。
5.废渣收集盒:用于收集咖啡渣,方便清理。
6.咖啡杯:用户可自备或根据需要选择使用。
四、使用方法1.将咖啡豆放入咖啡研磨机并调整研磨程度,然后重新安装到设备上。
2.填充水箱,确保水量充足。
3.打开机器,通过控制面板选择喜欢的咖啡类型和参数设置。
4.等待咖啡制作完成,机器人会自动完成研磨、冲泡等过程。
5.将制作好的咖啡倒入杯中,根据个人口味可加入牛奶、糖等调味品。
6.享用美味的咖啡。
请注意:1. 使用前请确保机器电源已插好,并接通电源。
2. 在清洁和维护机器时,请务必按照说明书中的操作指导进行,以免损坏设备。
3. 在长时间不使用咖啡机器人时,请将电源拔出,避免长时间待机损耗电能。
五、常见问题及解决方法1. 机器无法启动:请检查电源是否接通,是否已插好。
