路由重分布实验
- 格式:doc
- 大小:64.50 KB
- 文档页数:2


实验报告课程名称网络工程综合实践实验日期实验项目名称配置RIP与OSPF路由重分发实验地点实验类型√验证型□设计型□综合型学时 2一、实验目的及要求(本实验所涉及并要求掌握的知识点)配置RIP与OSPF路由重分发,通过路由重分发实验,实现在不同路由协议之间发布路由的要点。
二、实验环境(本实验所使用的硬件设备和相关软件)硬件:微型计算机、网络工程实验机柜软件:RCMS管理平台三、实验内容及步骤拓扑图1、在路由器上配置IP路由选择和IP地址2、配置RIP和OSPF路由协议3、配置重分发4、验证测试四、实验结果(本实验源程序清单及运行结果或实验结论、实验设计图)1、在路由器上配置IP路由选择和IP地址1-RSR20-1>en 14Password:1-RSR20-1#configure terminalEnter configuration commands, one per line. End with CNTL/Z.1-RSR20-1(config)#hostname RouterARouterA(config)#interface fastethernet0/0RouterA(config-if-FastEthernet 0/0)#ip address 172.16.1.5 255.255.255.252 RouterA(config-if-FastEthernet 0/0)#no shutdownRouterA(config-if-FastEthernet 0/0)#exitRouterA(config)#interface loopback 10RouterA(config-if-Loopback 10)#ip address 192.168.2.1 255.255.255.0 RouterA(config-if-Loopback 10)#no shutdownRouterA(config-if-Loopback 10)#exitRouterA(config)#interface fastethernet0/1RouterA(config-if-FastEthernet 0/1)#ip address 192.168.1.1 255.255.255.252 RouterA(config-if-FastEthernet 0/1)#no shutdownRouterA(config-if-FastEthernet 0/1)#exitRouterA(config)#1-RSR20-2>en 14Password:1-RSR20-2#configure terminalEnter configuration commands, one per line. End with CNTL/Z.1-RSR20-2(config)#hostname RouterBRouterB(config)#interface fastethernet0/0RouterB(config-if-FastEthernet 0/0)#ip address 172.16.1.6 255.255.255.252 RouterB(config-if-FastEthernet 0/0)#no shutdownRouterB(config-if-FastEthernet 0/0)#exitRouterB(config)#interface fastethernet0/1RouterB(config-if-FastEthernet 0/1)#ip address 172.16.1.1 255.255.255.252 RouterB(config-if-FastEthernet 0/1)#no shutdownRouterB(config-if-FastEthernet 0/1)#exitRouterB(config)#1-RSR20-3>en 14Password:1-RSR20-3#configure terminalEnter configuration commands, one per line. End with CNTL/Z.1-RSR20-3(config)#hostname RouterCRouterC(config)#interface fastethernet0/0RouterC(config-if-FastEthernet 0/0)#ip address 172.16.1.2 255.255.255.252 RouterC(config-if-FastEthernet 0/0)#no shutdownRouterC(config-if-FastEthernet 0/0)#exitRouterC(config)#interface loopback 30RouterC(config-if-Loopback 30)#ip address 172.16.3.1 255.255.255.0 RouterC(config-if-Loopback 30)#no shutdownRouterC(config-if-Loopback 30)#exitRouterC(config)#interface fastethernet0/1RouterC(config-if-FastEthernet 0/1)#ip address 172.16.1.9 255.255.255.252 RouterC(config-if-FastEthernet 0/1)#no shutdownRouterC(config-if-FastEthernet 0/1)#exitRouterC(config)#1-RSR20-4>en 14Password:1-RSR20-4#configure terminalEnter configuration commands, one per line. End with CNTL/Z.1-RSR20-4(config)#hostname RouterDRouterD(config)#interface fastethernet0/0RouterD(config-if-FastEthernet 0/0)#ip address 172.16.1.10 255.255.255.252 RouterD(config-if-FastEthernet 0/0)#no shutdownRouterD(config-if-FastEthernet 0/0)#exitRouterD(config)#interface loopback 40RouterD(config-if-Loopback 40)#ip address 10.1.1.1 255.255.255.0RouterD(config-if-Loopback 40)#no shutdownRouterD(config-if-Loopback 40)#exitRouterD(config)#interface loopback 50RouterD(config-if-Loopback 50)#ip address 10.1.2.1 255.255.255.0RouterD(config-if-Loopback 50)#no shutdownRouterD(config-if-Loopback 50)#exitRouterD(config)#interface loopback 60RouterD(config-if-Loopback 60)#ip address 20.1.1.1 255.255.255.0RouterD(config-if-Loopback 60)#no shutdownRouterD(config-if-Loopback 60)#exitRouterD(config)#2、配置RIP和OSPF路由协议RouterA(config)#router ripRouterA(config-router)#version 2RouterA(config-router)#network 172.16.1.4 0.0.0.3RouterA(config-router)#network 192.168.1.0 0.0.0.3 RouterA(config-router)#network 192.168.2.0 0.0.0.255 RouterA(config-router)#no auto-summaryRouterA(config-router)#RouterB(config)#router ripRouterB(config-router)#version 2RouterB(config-router)#network 172.16.1.4 0.0.0.3RouterB(config-router)#exitRouterB(config)#router ospf 10RouterB(config-router)#network 172.16.1.0 0.0.0.3 area 0 RouterB(config-router)#RouterC(config)#router ospf 10RouterC(config-router)#network 172.16.1.0 0.0.0.3 area 0 RouterC(config-router)#network 172.16.3.0 0.0.0.255 area 0 RouterC(config-router)#network 172.16.1.8 0.0.0.3 area 1 RouterC(config-router)#RouterD(config)#router ospf 10RouterD(config-router)#network 172.16.1.8 0.0.0.3 area 1 RouterD(config-router)#network 10.1.1.0 0.0.0.255 area 1 RouterD(config-router)#network 10.1.2.0 0.0.0.255 area 1 RouterD(config-router)#network 20.1.1.0 0.0.0.255 area 1 RouterD(config-router)#exitRouterD(config)#3、配置重分发RouterA(config)#router ripRouterA(config-router)#default-information originate RouterA(config-router)#RouterB(config)#router ospf 10RouterB(config-router)#redistribute rip metric 50 subnetsRouterB(config-router)#default-information originateRouterB(config-router)#exitRouterB(config)#router ripRouterB(config-router)#redistribute ospf 10 metric 1RouterB(config-router)#RouterD(config)#router ospf 10RouterD(config-router)#redistribute static subnetsRouterD(config-router)#4、验证测试查看RouterA的路由信息查看RouterB的路由信息查看RouterC的路由信息查看RouterD的路由信息测试RouterA测试RouterD五、实验总结(对本实验结果进行分析,实验心得体会及改进意见)本次试验的内容是配置RIP与OSPF路由重分发,通过路由重分发实验,实现在不同路由协议之间发布路由的要点。
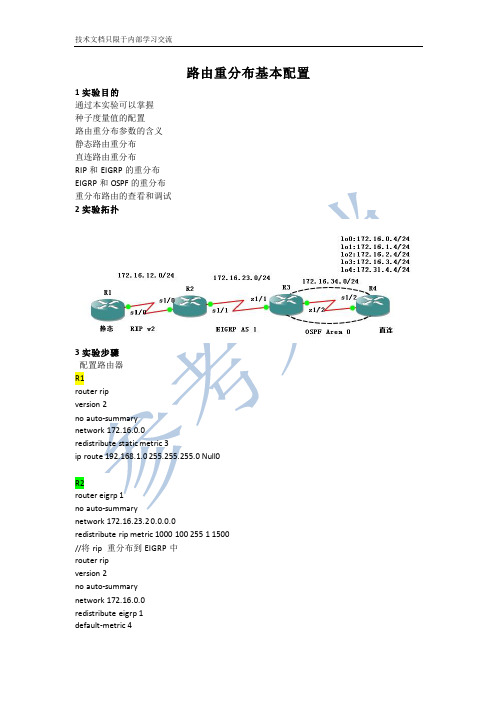
路由重分布基本配置1实验目的通过本实验可以掌握种子度量值的配置路由重分布参数的含义静态路由重分布直连路由重分布RIP和EIGRP的重分布EIGRP和OSPF的重分布重分布路由的查看和调试2实验拓扑3实验步骤配置路由器R1router ripversion 2no auto-summarynetwork 172.16.0.0redistribute static metric 3ip route 192.168.1.0 255.255.255.0 Null0R2router eigrp 1no auto-summarynetwork 172.16.23.2 0.0.0.0redistribute rip metric 1000 100 255 1 1500//将rip 重分布到EIGRP 中router ripversion 2no auto-summarynetwork 172.16.0.0redistribute eigrp 1default-metric 4//配置重分布进行RIP协议所有的默认种子度量值R3router eigrp 1no auto-summarynetwork 172.16.23.3 0.0.0.0redistribute ospf 1 metric 1000 100 255 1 1500distance eigrp 90 150//将ospf 重分布到EIGRP中router ospf 1router-id 3.3.3.3network 172.16.34.3 0.0.0.0 area 0redistribute eigrp 1 metric 30 metric-type 1 subnetsredistribute maximum-prefix 100 50R4access-list 1 permit 172.16.0.0 0.0.254.0//该ACL用于匹配172.16.X.0 X代表偶数access-list 2 permit 172.16.1.0 0.0.254.0//该ACL用于匹配172.16.X.0 X代表奇数route-map CONN permit 10 //配置路由映射表match ip address 1 //匹配ACL 1set metric 200 //匹配度量值route-map CONN permit 20match ip address 2set metric 100set metric-type type-1//设置ospf 路由类型为OE1 默认为OE2route-map CONN permit 30//以上路由映射表CONN是为在OSPF 重分布直连路由器时调用的其含义是:对于172.16开头的第三位是偶数的路由条目设置度量值为100 路由类型为OE2 (默认不用配置)对于172.16 开头的第三位是奇数的路由条目,设置度量值为200 路由类型为OE1 ,而其他路由条目采用默认即度量值为20 路由类型为OE2router ospf 1router-id 4.4.4.4network 172.16.34.4 0.0.0.0 area 0redistribute connected subnets route-map CONN//重分布时调用路由映射表4实验调试R1:前缀列表和路由映射表控制路由更新1实验目的通过本实验可以掌握前缀列表的使用和含义在路由映射表中用前缀列表匹配用路由映射表控制路由更新2实验拓扑3实验步骤R1ip prefix-list CONN1 seq 5 permit 172.16.0.0/16 ge 24 le 28ip prefix-list CONN2 seq 5 permit 172.16.0.0/16 ge 29route-map CONN permit 10match ip address prefix-list CONN1set metric 100set metric-type type-1route-map CONN permit 20match ip address prefix-list CONN2set metric 200set tag 200route-map CONN permit 30router ospf 1router-id 1.1.1.1network 172.16.12.1 0.0.0.0 area 0redistribute connected subnets route-map CONNR2router ospf 1router-id 2.2.2.2network 172.16.12.2 0.0.0.0 area 0network 172.16.23.2 0.0.0.0 area 1R3route-map TAG permit 10match tag 200router ospf 1router-id 3.3.3.3network 172.16.3.3 0.0.0.0 area 1network 172.16.23.3 0.0.0.0 area 1distribute-list route-map TAG in//R3通过分布列表在入向过滤,只把TAG为200 的路由从数据库中提取道路由表中4实验调试以上3条E1 路由条目匹配前缀列表CONN1以上2条E2 路由条目匹配前缀列表CONN2以上2条路由条目的tag 值为200从R3 的链路状态数据库中可以看出,从R1重分布直接进入ospf的5条条目都有,但是由于针对R3的seria1/1 接口的入方向的分布列表要求匹配tag值为200的路由条目所以OSPF 只把tag 值为200 的放入路由表中试验总结:首先需要依照拓扑图划分好区域,不同的区域类型配置。

多点双向重分布后次优路径的解决方法多点双向重分布后次优路径的解决方法概念预习:什么是多点双向路由重发布?不同路由协议相互之间通过重发布相互传递各自的路由信息,承担重发布工作ASBR路由器数量多于一台.ASBR在每个路由协议内都能够收到相互间重发布通告的路由信息。
一:实验拓扑:二:实验目的:双点:为了路由条目的冗余,Down掉任何一台ASBR路由器都不影响两个AS的通信;双向:不同AS的路由能够相互学习。
三:实验描述:R1,R2,R3运行OSPF,并将1.1.1.1重分布进OSPF[redistribute connected subnet] R2,R3,R4运行EIGRP,并将4.4.4.4重分布进EIGRP[redistribute connected subnet] 四:实验要求:R1能够学到EIGRP的路由,并且到4.4.4.4是负载均衡R4能够学到OSPF的路由,并且到1.1.1.1是负载均衡五:实验过程:1:基本接口的配置:R1(config)#int s0/1R1(config-if)#ip add 12.0.0.1 255.255.255.0R1(config-if)#no shR1(config-if)#int s0/2R1(config-if)#ip add 13.0.0.1 255.255.255.0R1(config-if)#no shR1(config-if)#int lo 0R1(config-if)#ip add 1.1.1.1 255.255.255.0R2(config)#int s0/1R2(config-if)#ip add 12.0.0.2 255.255.255.0R2(config-if)#no shR2(config-if)#int e1/0R2(config-if)#ip add 10.0.234.2 255.255.255.0R2(config-if)#no shR2(config-if)#int lo 0R2(config-if)#ip add 2.2.2.2 255.255.255.0R2(config-if)#^ZR3(config)#int s0/2R3(config-if)#ip add 13.0.0.3 255.255.255.0 R3(config-if)#no shR3(config-if)#int e1/0R3(config-if)#ip add 10.0.234.3 255.255.255.0 R3(config-if)#no shR3(config-if)#int lo 0R3(config-if)#ip add 3.3.3.3 255.255.255.0R4(config)#int e0/0R4(config-if)#ip add 10.0.234.4 255.255.255.0 R4(config-if)#no shR4(config-if)#int lo 0R4(config-if)#ip add 4.4.4.4 255.255.255.0R4(config-if)#no sh2:路由的配置:R1(config)#router os 1R1(config-router)#net 12.0.0.0 0.0.0.255 a 0R1(config-router)#net 13.0.0.0 0.0.0.255 a 0R1(config-router)#redistribute connected subnets R2(config)#router os 1R2(config-router)#net 12.0.0.0 0.0.0.255 a 0R2(config-router)#net 2.2.2.0 0.0.0.255 a 0R2(config-router)#exitR2(config)#router eigrp 1R2(config-router)#net 10.0.234.0 0.0.0.255R2(config-router)#no auR3(config)#router os 1R3(config-router)#net 13.0.0.0 0.0.0.255 a 0R3(config-router)#net 3.3.3.0 0.0.0.255 a 0R3(config-router)#exitR3(config)#router eigrp 1R3(config-router)#net 10.0.234.0 0.0.0.255R3(config-router)#no auR4(config)#router eigrp 1R4(config-router)#net 10.0.234.0 0.0.0.255R4(config-router)#redistribute connectedR1#sho ip route1.0.0.0/24 is subnetted, 1 subnetsC 1.1.1.0 is directly connected, Loopback02.0.0.0/32 is subnetted, 1 subnetsO 2.2.2.2 [110/65] via 12.0.0.2, 00:01:58, Serial0/13.0.0.0/32 is subnetted, 1 subnetsO 3.3.3.3 [110/65] via 13.0.0.3, 00:01:58, Serial0/212.0.0.0/24 is subnetted, 1 subnetsC 12.0.0.0 is directly connected, Serial0/113.0.0.0/24 is subnetted, 1 subnetsC 13.0.0.0 is directly connected, Serial0/2R4#sho ip route4.0.0.0/24 is subnetted, 1 subnetsC 4.4.4.0 is directly connected, Loopback010.0.0.0/24 is subnetted, 1 subnetsC 10.0.234.0 is directly connected, Ethernet0/0//发现R1和R4不能相互学习路由,下来我们在E2和R3上实现双向重分布。

一、实验拓扑图:AucklandSanJose3Singapore 192.168.224.1/30S1/2192.168.240.2/30S1/2 S1/0192.168.224.2/30S1/1192.168.240.1/30 Engineers Lo0 192.168.232.1/24T1 1.544Mbps19.2Kpbs RIP v2Managers Lo1 192.168.236.1/24Lo0 192.168.5.1/24二、实验目的1、在实验中应用到高级路由功能来操作路由更新,这些特性包括分发列表,默认路由,被动接口和路由重分布。
2、掌握高级路由特性来控制路由更新。
三、实验要求1、公司的SanJose3和Singapore 之间的网络使用的RIPV2动态路由协议。
2、在SanJose3上面连接了一个stub network 192.168.5.1/24,为了减少流量,过滤RIPv2更新流量在整个192.168.5.1/24网络发送。
3、在Singapore 有Engineers 和Managers 部门,Managers 网络并不想被SanJose3所学习到。
4、有一条非常慢的19.2Kpbs 的链路连接Singapore 和Auckland ,为了减少这条链路的 流量,我们要禁止动态路由更新通过这条链路5、在满足上述条件的情况下,实现全网互通。
四、实验步骤1、按照拓扑图中IP ,配置好路由器接口的 IP 地址,但是不要配置RIPv2协议,使用CDP 协议检测相邻设备的连通性。
配置如下:Router(config)#hostname SanJose3SanJose3(config)#line c 0SanJose3(config-line)#exec-timeout 0 0SanJose3(config-line)#logging synchronousSanJose3(config)#no ip domain-lookupSanJose3(config)#interface s1/2SanJose3(config-if)#ip address 192.168.224.1 255.255.255.252SanJose3(config-if)#no shutdownSanJose3(config)#interface loopback 0SanJose3(config-if)#ip address 192.168.5.1 255.255.255.0Router(config)#hostname AucklandAuckland (config)#interface s1/2Auckland (config-if)#ip address 192.168.240.2 255.255.255.252Auckland (config-if)#no shutdownAuckland (config)#interface loopback 0Auckland (config-if)#ip address 192.168.248.1 255.255.255.0Router(config)#hostname SingaporeSingapore(config)#interface loopback 0Singapore(config-if)#ip address 192.168.232.1 255.255.255.0Singapore(config-if)#description EngineersSingapore(config)#interface loopback 1Singapore(config-if)#ip address 192.168.236.1 255.255.255.0Singapore(config-if)#description ManagerSingapore(config)#interface s1/0Singapore(config-if)#ip address 192.168.224.2 255.255.255.252Singapore(config-if)#no shutdownSingapore(config)#interface s1/1Singapore(config-if)#ip address 192.168.240.1 255.255.255.252Singapore(config-if)#no shutdown配置完成后使用CDP 协议检查相邻设备的连通性,如下2、在SanJose3上,配置RIPv2协议通告物理直连的网络,配置如下:SanJose3(config)#router ripSanJose3(config-router)#version 2SanJose3(config-router)#network 192.168.224.0SanJose3(config-router)#network 192.168.5.0因为192.158.5.0是一个stub network,这个网络里没有路由器或者主机需要RIPv2协议的更新。

OSPF多进程之间的路由重发布1、实验拓扑如下图:R1R4R3 R2Area 00spf 10Area 0Ospf 1002、实验目的:1、实现R2与R3之间互相访问时的数据分流。
R2访问R3的3.3.3.3/32时走R1,R2访问R3的30.30.30.30/32时走R4。
R3访问R2的2.2.2.2/32时走R1,R3访问R2的20.20.20.20/32时走R1。
2、实现线路的冗余备份。
当R1链路故障时数据可以走R4,当R4链路故障时数据可以走R1。
实现链路的冗余备份。
3、理解并掌握route-map在控制路由方面的应用。
3、实验配置文档R1配置:config terint f0/0ip add 10.0.0.1 255.255.255.252no shutint f1/0ip add 10.0.0.5 255.255.255.252no shutint lo 0ip add 1.1.1.1 255.255.255.255endwriteconfig terrouter ospf 10router-id 1.1.1.1network 10.0.0.0 0.0.0.3 area 0redistribute ospf 100 metric-type 1 subnets route-map ospf100_to_ospf10 distribute-list deny_ospf100 inendconfig terrouter ospf 100router-id 1.1.1.1network 10.0.0.4 0.0.0.3 area 0redistribute ospf 10 metric-type 1 subnets route-map ospf10_to_ospf100 distribute-list deny_ospf10 inendwriteip access-list standard deny_ospf10deny 2.2.2.2 0.0.0.0deny 20.20.20.20 0.0.0.0permit anyip access-list standard deny_ospf100deny 3.3.3.3 0.0.0.0deny 30.30.30.30 0.0.0.0permit anyaccess-list 10 permit 2.2.2.2 0.0.0.0access-list 11 permit 3.3.3.3 0.0.0.0access-list 20 permit 20.20.20.20 0.0.0.0access-list 21 permit 30.30.30.30 0.0.0.0route-map ospf100_to_ospf10 permit 10match ip address 11set metric 100route-map ospf100_to_ospf10 permit 20match ip address 21set metric 200route-map ospf10_to_ospf100 permit 10match ip address 10set metric 100route-map ospf10_to_ospf100 permit 20match ip address 20set metric 200R4配置:config terint f0/0ip add 172.16.0.1 255.255.255.252no shutint f1/0ip add 172.16.0.5 255.255.255.252no shutint lo 0ip add 4.4.4.4 255.255.255.255endwriteconfig terrouter ospf 10router-id 4.4.4.4network 172.16.0.4 0.0.0.3 area 0redistribute ospf 100 metric-type 1 subnets route-map ospf100_to_ospf10 distribute-list deny_ospf100 inendconfig terrouter ospf 100router-id 4.4.4.4network 172.16.0.0 0.0.0.3 area 0redistribute ospf 10 metric-type 1 subnets route-map ospf10_to_ospf100 distribute-list deny_ospf10 inendwriteip access-list standard deny_ospf10deny 2.2.2.2 0.0.0.0deny 20.20.20.20 0.0.0.0permit anyip access-list standard deny_ospf100deny 3.3.3.3 0.0.0.0deny 30.30.30.30 0.0.0.0permit anyaccess-list 10 permit 2.2.2.2 0.0.0.0access-list 11 permit 3.3.3.3 0.0.0.0access-list 20 permit 20.20.20.20 0.0.0.0access-list 21 permit 30.30.30.30 0.0.0.0route-map ospf100_to_ospf10 permit 10 match ip address 11set metric 200route-map ospf100_to_ospf10 permit 20 match ip address 21set metric 100route-map ospf10_to_ospf100 permit 10 match ip address 10set metric 200route-map ospf10_to_ospf100 permit 20 match ip address 20set metric 100R2的配置:config terint f0/0ip add 10.0.0.2 255.255.255.252no shutint f1/0ip add 172.16.0.6 255.255.255.252no shutint lo 0ip add 2.2.2.2 255.255.255.255int lo 1ip add 20.20.20.20 255.255.255.255 endwriteconfig terrouter ospf 10router-id 2.2.2.2network 172.16.0.4 0.0.0.3 area 0 network 10.0.0.0 0.0.0.3 area 0 network 2.2.2.2 0.0.0.0 area 0network 20.20.20.20 0.0.0.0 area 0endwriteR3的配置:config terint f0/0ip add 10.0.0.6 255.255.255.252no shutint f1/0ip add 172.16.0.2 255.255.255.252no shutint lo 0ip add 3.3.3.3 255.255.255.255int lo 1ip add 30.30.30.30 255.255.255.255endwriteconfig termrouter ospf 100router-id 3.3.3.3network 172.16.0.0 0.0.0.3 area 0network 10.0.0.4 0.0.0.3 area 0network 3.3.3.3 0.0.0.0 area 0network 30.30.30.30 0.0.0.0 area 0endwrite4、实验测试1、在R2上show ip route查看结果,可以看出实现了数据分流。
7 OSPF和路由重分发故障检测与排除本章将回顾OSPF(Open Shortest Path First,开放最短路径优先)的主要特性,包括OSPF数据结构、路由器类型、LSA(Link-State Advertisement,链路状态宣告)类型以及网络类型等内容。
此外,还说明如何建立OSPF邻接关系,并给出一系列用于检测和排除OSPF网络故障的常用命令。
本章提供了两份故障工单,第一份讨论的是OSPF故障问题。
提供了故障工单信息以及与之相应的拓扑结构、一系列show命令输出结果,请尝试解决故障工单中提出的OSPF 网络故障(也可能是多个故障)。
接下来回顾了路由重分发的概念,这里所说的路由重分发指的是将学习自某个路由进程的路由注入到其他路由进程中。
随后给出了路由重分发的故障检测与排除策略。
最后,本章给出了另一份故障工单,讨论的是路由重分发的故障问题。
7.1 “我已经知道了吗?”测验“我已经知道了吗”测验的目的是帮助读者确定是否需要完整地学习本章知识。
表71列出了本章的主要内容以及与这些内容相关联的“我已经知道了吗?”测验题。
150第7章OSPF表7-1 “我已经知道了吗?”基本主题章节与所对应的测验题1.下面哪种OSPF数据结构中包含了OSPF路由器所加入的所有区域的拓扑结构信息?a.OSPF路由信息库b.OSPF链路状态数据库c.OSPF接口表d.OSPF邻居表2.所有的OSPF路由器都能发出哪种OSPF LSA?a.类型1 LSAb.类型2 LSAc.类型3 LSAd.类型4 LSAe.类型5 LSA3.下面哪种OSPF路由器所拥有的网络中至少有一个加入了OSPF area 0?a.内部路由器b.ABRc.主干路由器7.1 151d.ASBR4.LAN接口上的默认OSPF网络类型是什么?a.点对点型b.非广播型c.点对多点型d.广播型5.当两台OSPF路由器均接收到来自对方的Hello消息,并且每台路由器都发现自己的OSPF路由器ID位于所接收到的Hello包时,那么此时处于OSPF邻接状态中的哪个状态?a.Exchange(交换状态)b.ExStart(预启动状态)c.2-Way(双向状态)d.Loading(加载状态)6.下面哪个命令可以显示路由器OSPF链路状态数据库中的LSA头部?a.show ip ospf neighborb.show ip ospf databasec.show ip ospf statisticsd.show ip ospf interface7.在执行路由重分发时,目的路由协议需要为重分发进本路由协议的路由分配一个度量,该度量被称为什么?a.外部度量152第7章OSPFb.内部度量c.种子度量d.源度量8.下面哪个命令可以启用Cisco IOS的IP路由简档(route profiling)功能?a.Router(config)#ip route profileb.Router(config-if)#ip route profilec.Router(config)#route profiling ipd.Router(config-if)#route profiling ip基本主题7.2 OSPF故障检测与排除第6章首先从常规角度讨论了路由协议的故障检测与排除技术,复习了路由器的数据结构以及CEF的数据结构,并探讨了EIGRP及其数据结构,最后还给出了一系列用于收集EIGRP数据结构信息的常用命令。
参考命令:switch0:switch>enswitch#conf tswitch(config)#hostname switch0 switch0(config)#exitswitch0#vlan databaseswitch0(vlan)#vtp clientswitch0(vlan)#vtp domain network switch0(vlan)#vtp password 123 switch0(vlan)#exitswitch0#conf tswitch0(config)#interface f0/3switch0(config-if)#switchport mode trunkswitch0(config-if)#switchport trunk allowed vlan allswitch1:switch>enswitch#conf tswitch(config)#hostname switch1switch1(config)#exitswitch1#vlan databaseswitch1(vlan)#vtp clientswitch1(vlan)#vtp domain networkswitch1(vlan)#vtp password 123switch1(vlan)#exitswitch1#conf tswitch1(config)#interface f0/3switch1(config-if)#switchport mode trunkswitch1(config-if)#switchport trunk allowed vlan allmultilayer switch0:switch>enswitch#vlan databaseswitch(vlan)#vtp serverswitch(vlan)#vtp domain networkswitch(vlan)#vtp password 123switch(vlan)#vlan 2 name salesswitch(vlan)#vlan 3 name marketingswitch(vlan)#vlan 4 name ToRouterswitch(vlan)#exitswitch#conf tswitch(config)#interface f0/11switch(config-if)#switchport mode trunkswitch(config-if)#switchport trunk allowed vlan all switch(config)#interface f0/12switch(config-if)#switchport mode trunkswitch(config-if)#switchport trunk allowed vlan allswitch0:switch0#sh vlanswitch0#conf tswitch0(config)#interface f0/1switch0(config-if)#switchport access vlan 2switch0(config-if)#exitswitch0(config)#interface f0/2switch0(config-if)#switchport access vlan 3switch1:switch1#sh vlanswitch1#conf tswitch1(config)#interface f0/1switch1(config-if)#switchport access vlan 2switch1(config-if)#exitswitch1(config)#interface f0/2switch1(config-if)#switchport access vlan 3multilayer switch0:switch>enswitch#conf tswitch(config)#interface vlan 2Switch(config-if)#ip add 192.168.10.1 255.255.255.0 switch(config)#interface vlan 3Switch(config-if)#ip add 192.168.20.1 255.255.255.0 switch(config)#interface vlan 4Switch(config-if)#ip add 192.168.30.1 255.255.255.0 switch(config)#interface f0/4switch(config-if)#switchport access vlan 4router0:router>enrouter#conf trouter(config)#hostname router0router0(config)#int fa0/0router0(config-if)#ip add 192.168.30.2 255.255.255.0 router0(config-if)#no shrouter0(config)#int fa0/1router0(config-if)#ip add 172.168.10.1 255.255.255.0 router0(config-if)#no shrouter1:router>enrouter#conf trouter(config)#hostname router1router1(config)#int fa0/0router1(config-if)#ip add 10.168.40.1 255.255.255.0 router1(config-if)#no shrouter1(config)#int fa0/1router1(config-if)#ip add 172.168.10.2 255.255.255.0 router1(config-if)#no shrouter1(config)#int s0/2router1(config-if)#ip add 222.168.10.1 255.255.255.0 router1(config-if)#clock rate 19200router1(config-if)#no shrouter2:router>enrouter#conf trouter(config)#hostname router2router2(config)#int fa0/0router2(config-if)#ip add 192.168.50.1 255.255.255.0 router2(config-if)#no shrouter1(config)#int s0/2router1(config-if)#ip add 222.168.10.2 255.255.255.0 router1(config-if)#no sh。
实验3-路由器配置实验报告实验 3 路由器配置实验报告一、实验目的本次实验的主要目的是让我们熟悉和掌握路由器的基本配置方法,包括网络地址的分配、路由协议的设置、访问控制列表的配置等,从而能够搭建和管理一个简单的网络环境,提高我们对网络原理和技术的理解和应用能力。
二、实验环境1、硬件环境若干台计算机路由器设备(型号:_____)2、软件环境操作系统:Windows 10终端模拟软件:SecureCRT三、实验原理1、路由器的作用路由器是网络中的核心设备,负责连接不同的网络,并根据网络地址和路由协议选择最佳的路径来转发数据包,实现不同网络之间的通信。
2、 IP 地址分配为了使网络中的设备能够相互通信,需要为每个设备分配唯一的 IP 地址。
IP 地址分为网络地址和主机地址两部分,通过子网掩码来划分。
3、路由协议常见的路由协议有静态路由和动态路由。
静态路由需要手动配置每一条路由信息,适用于小型网络;动态路由协议如 RIP、OSPF 等可以自动学习和更新路由信息,适用于大型复杂网络。
4、访问控制列表访问控制列表(ACL)用于控制网络中的数据包流量,根据源地址、目的地址、端口号等条件对数据包进行过滤和允许或拒绝操作。
四、实验步骤1、连接设备将计算机通过串口线或网线连接到路由器的相应接口,并打开终端模拟软件建立连接。
2、进入特权模式在终端中输入用户名和密码登录路由器,然后输入“enable”命令进入特权模式。
3、配置接口 IP 地址进入接口配置模式,例如“interface ethernet 0/0”。
配置 IP 地址和子网掩码,如“ip address 19216811 2552552550”。
4、配置静态路由使用“ip route”命令配置静态路由,例如“ip route 19216820 2552552550 19216812”,表示目标网络为 19216820/24,下一跳地址为19216812。
5、配置动态路由协议(以 RIP 为例)启用 RIP 协议,输入“router rip”。
实验六路由重分布实验
一、实验目的
1.掌握多种路由协议的重分布的配置;
2.了解路由重分布的使用背景。
二、实验设备
1.路由器;
2.V35电缆;
3.直通线、交叉线。
三、相关准备知识
图一
图二
四、实验步骤
步骤一基础的配置
网络拓扑图如图一所示,在模拟器下搭建如图二所示拓扑图。
按要求配置各个路由器的接口IP地址和相关协议。
步骤二路由协议重分布的配置
1.在R1上进行静态重分布:
Router rip
Redistribute static metric 3
2.在R2上将RIP重分布到EIGRP中:
Router eigrp 1
Redistribute rip metric 1000 100 255 1 1500
3.在R2上将EIGRP重分布到RIP中:
Router rip
Redistribute eigrp 1
Metric 4
4.在R3上将OSPF重分布到EIGRP中:
Router eigrp 1
Redistribute ospf 1 metric 1000 100 255 1 1500
Distance eigrp 90 150
5.在R3上将EIGRP重分布到OSPF中:
Router ospf 1
Redistribute eigrp 1 metric 30 metric-type 1 subnets
附加题:
完成书上97页图4-15的配置。
五、实验要求
1.学生必须认真阅读实验指导书,了解实验的目的和原理,明确本次实验中所用实验方法、使用的软件、需要注意的问题等。
2.学生必须认真听取老师对本实训的指导讲授,掌握路由重分布的基本概念。
3.熟悉掌握种子度量值的配置,路由重分布参数的配置,静态路由重分布,RIP和EIGRP的重分布,EIGRP和OSPF的重分布,重分布路由的查看和调试。
4.写出实验报告,内容包括:实验目的、基本原理、实验步骤等内容。
六、拓展分析及思考
1、EIGRP负载均衡的实现方法有哪些?
2、BGP的任务是什么?。