netapp模拟器安装使用手册
- 格式:doc
- 大小:279.00 KB
- 文档页数:20
NETAPP FAS系列安装配置手册赞融电子上海分公司2003年11月修订控制1简介1.1说明本文简要说明了Network Appliance公司FAS系列存储产品配置过程。
本手册基于DataOntap 6.4.2P6操作系统1.2适用对象和前提本文是针对赞融电子的内部人员。
要求阅读者具有以下方面的专业能力:熟悉Unix操作系统;熟悉Windows操作系统;具有NETAPP FAS系统的基本知识.1.3参考资料Data ONTAP™ System Administrator’s GuideData ONTAP™ Software Setup Guide1.4术语表NFS:Network File System 网络文件系统CIFS:Common Internet File System 通用 Internet文件系统NAS:Network Attached Storage 网络附加存储WAFL:Write Anywhere File Layout 随地写入文件格式2配置过程2.1检查Filer硬件安装2.2设置Filer使用计算机串口连接Filer背板上的Console口使用Windows附件中的超级终端建立连接,参数如下:每秒位数 9600,数据位 8,奇偶校验无,停止位 1,数据流控制无建立连接依次打开Disk Shelf和Filer电源使用setup命令配置Filerfas940> setupPlease enter the new hostname []: fas940Do you want to configure virtual network interfaces? [n]: yNumber of virtual interfaces to configure? [0] 3Name of virtual interface #1 []: vif1Is vif1 a single [s] or multi [m] virtual interface? [m] sNumber of links for vif1? [0] 2Name of link #1 for vif1 []: e5aName of link #2 for vif1 []: e5bName of virtual interface #2 []: vif2Is vif2 a single [s] or multi [m] virtual interface? [m] sNumber of links for vif2? [0] 2Name of link #1 for vif2 []: e9aName of link #2 for vif2 []: e9bName of virtual interface #3 []: vif3Is vif3 a single [s] or multi [m] virtual interface? [m] sNumber of links for vif3? [0] 2Name of link #1 for vif3 []: e11aName of link #2 for vif3 []: e11bPlease enter the IP address for Network Interface vif1 []: 165.204.224.173 Please enter the netmask for Network Interface vif1 [255.255.0.0]: 255.255.254.0Please enter media type for vif1 {100tx-fd, tp-fd, 100tx, tp, auto (10/100/1000)} [auto]: EnterPlease enter the IP address for Network Interface vif2 []: 165.204.224.174 Please enter the netmask for Network Interface vif2 [255.255.0.0]: 255.255.254.0Please enter media type for vif2 {100tx-fd, tp-fd, 100tx, tp, auto (10/100/1000)} [auto]:Please enter the IP address for Network Interface vif3 []: 165.204.224.175Please enter the netmask for Network Interface vif3 [255.255.0.0]: 255.255.254.0Please enter media type for vif3 {100tx-fd, tp-fd, 100tx, tp, auto (10/100/1000)} [auto]:Please enter the IP address for Network Interface e0 []: 165.204.224.172 Please enter the netmask for Network Interface e0 [255.255.0.0]: 255.255.254.0Please enter media type for e0 {100tx-fd, tp-fd, 100tx, tp, auto} [auto]: Would you like to continue setup through the web interface? [n]:Please enter the name or IP address of the default gateway: 165.204.224.254 T he administration host is given root access to the filer's/etc files for system administration. To allow /etc root accesst o all NFS clients enter RETURN below.Please enter the name or IP address of the administration host:Please enter timezone [GMT]: Asia/ShanghaiWhere is the filer located? []: Suzhou ChinaWhat language will be used for multi-protocol files (Type ? for list)?:zh.GBK Setting language on volume vol0The new language mappings will be available after rebootMon Sep 29 03:45:14 GMT [rc:ALERT]: Language on volume vol0 changed to zh.GBK Language set on volume vol0Do you want to run DNS resolver? [n]: yPlease enter DNS domain name []: You may enter up to 3 nameserversPlease enter the IP address for first nameserver []: 165.204.224.2Do you want another nameserver? [n]: yPlease enter the IP address for alternate nameserver []: 139.95.33.235Do you want another nameserver? [n]: EnterDo you want to run NIS client? [n]: EnterT his system will send event messages and weekly reportst o Network Appliance Technical Support. To disable this feature,e nter "options autosupport.support.enable off" within 24 hours.E nabling Autosupport can significantly speed problem determinationa nd resolution should a problem occur on your system.F or further information on Autosupport, please see:.h ttp:///autosupport/P ress the return key to continue.Now type 'reboot' for changes to take effect.fas940> Reboot重新启动Filer 之后,进行 cifs setup 安装fas940> cifs setupEnable CIFS access to the filer by a Windows(tm) PCY our filer is currently only visible to PCs on the same net.Do you wish to make the system visible via WINS? [no]: yPlease enter next WINS IP address (or return to end list) []: 165.204.224.225 Please enter next WINS IP address (or return to end list) []: 163.181.3.225 Please enter next WINS IP address (or return to end list) []:C IFS requires local /etc/passwd and /etc/group files for multiprotocol.D efault passwd file will be created containing 'root', 'pcuser',a nd 'nobody'.Enter the password for root []:Retype the password:T his filer is currently licensed for CIFS only.T he filer will be configured as a NTFS_only filer. It canb e changed to a Multiprotocol filer by reissuing the CIFS setup command.T he default name of this filer will be 'FAS940'.Do you want to modify this name? [no]: EnterC IFS supports three types of user authentication:1. Windows Domain authentication.2. Windows Workgroup authentication using the filer's user accounts.3. /etc/passwd and/or NIS based authentication.What type of authentication will this filer use? [1]: 1T he filer will use Windows Domain authentication.Enter the Windows Domain for the filer []:I t is highly recommended that you create the local administratora ccount (FAS940\administrator) for this filer. This account enablesa ccess to the filer from Windows when domain controllers are nota ccessible.Create the FAS940\administrator account? [yes]: yesSet the password for FAS940\administrator:Retype the password:Mon Sep 29 11:53:46 CST [rc:info]: User <administrator> addedMon Sep 29 11:53:46 CST [rc:notice]: security style for /vol/vol0/ changed from unix to ntfsA is a Windows 2000(tm) domain.I n order to create this filer's domain account, you must supply then ame and password of an administrator account with sufficient privileget o add the filer to the domain.Please enter the Windows 2000 user [Administrator@]: admin_mweizhi@Password for admin_mweizhi@:CIFS - Logged in as admin_mweizhi@.B y default, setup creates the filer account in the ActiveD irectory container named 'Computers'. Alternatively, you cani nstall the filer in an organizational unit (OU) by specifyingt he domain relative distinguished name of the OU, as in'ou=innerOU,ou=outerOU'.Active Directory container for filer account? [cn=computers]: EnterCIFS - Connecting to domain controller.Mon Sep 29 11:57:22 CST [rc:info]: Connection with DC \\SSUZDC2 established Mon Sep 29 11:57:22 CST [nbns_timer:info]: All CIFS name registrations complete for local serverWelcome to the AMD () Windows 2000(tm) domain.CIFS local server is running.2.3创建volume通过Telnet或串口,用命令行方式创建卷vol create <volume name, such as ‘/vol/vol1’> [ -r <RAID Size> ] [ disks]例,创建名为vol1的卷,RAID组最大为8,包含2块盘vol create /vol/vol1 –r 8 2使用vol status –r 命令观察初始化进程通过Web界面创建卷在浏览器中输入http://IP_Address/na_admin点击FilerView,根据提示输入用户名密码从右侧窗口Volume Add在New Volume Name栏中填写新建卷名vol1在Raid Group Size中填写RAID组的大小8在Language中选择Simplified Chinese(GBK)选择Automatic Disk Selection在Number of Disks中填写Volume的磁盘数2点击Add2.4通过CIFS共享通过命令行cifs shares -add <share name> <path>e.g. cifs shares add vol1 /vol/vol1通过Web界面设置Filerview CIFS Shares AddShare Name 填写 vol1Mount Point 填写 /vol/vol1点击Add2.5通过NFS共享通过命令行exportfs -o anon=0 /vol/vol1或者通过Web界面配置Filerview NFS Manage Exports Insert Line 在Path中输入/vol/vol1Permission选择rwAnonymous UID填写0点击OK3FilerView 使用介绍3.1Filer菜单3.1.1Show Status 显示Filer的整体状态,包括Filername, Model,System ID,Version, Disks, Status 等信息3.1.2Manage Licenses 管理Filer 的license 如常用的CIFS, NFS,FCP, iSCSI,SnapRestore, SnapMirror, SnapVault, SyncMirror, MultiStore 等,详情可参见/products/filer/或/products/filer/(中文网页)3.1.3Report 显示Filer目前配置及使用情况,如 Uptime, Network Interfaces, Disk Usage, System Configuration 等信息3.1.4Syslog Messages 这里是系统的syslog messages 信息,里面会记录系统运行时产生的一些信息,特别是一些系统的报错信息,这些信息非常重要,对于发现各种问题有很大帮助,Netapp Technical Support 也需要这些信息,最好每天都查看一下这里的信息3.1.5Use Command Line 在这里可以使用FilerView自带的telnet工具,方便你管理时使用Data Ontap系统的命令。
NetApp磁盘阵列安装手册目录一、磁盘阵列的系统安装 (3)1.1初始化磁盘阵列 (3)1.2输入license序列号 (7)二、 NetApp存储管理系统System Manager 安装及连接 (8)2.1System Manger 安装 (8)2.2控制器状态信息页面 (13)三、磁盘阵列的空间配置和分配 (14)3.1在aggr0中添加新的磁盘 (14)3.2 网络设置 (16)3.3 CIFS /AD 设置 (20)3.4创建新的Volume (23)3.5配置卷 (26)3.6消除Volume的快照预留空间 (28)3.7CIFS协议共享管理(针对虚拟桌面平台有效) (30)3.8创建NFS共享 (32)3.9Qtrees的管理 (33)3.10 Quotas的创建与管理 (34)3.11 磁盘的管理 (36)3.12创建LUN存储单元 (37)3.12.1开启FCP功能 (37)3.12.2创建一个Lun存储单元 (38)3.13 AutoSupport设置 (43)3.14 用户和用户组的管理 (45)3.15 控制器log日志 (46)3.16 cf状态检查 (47)四、NetApp日常运维知识 (47)4.1 开机顺序 (48)4.2 关机顺序 (48)4.3 性能检测 (48)4.3.1 目测 (48)4.3.2 硬件状态检查 (48)4.3.3 检查网络是否正常 (48)4.3.4. 检查CLUSTER 状态是否正常 (48)4.3.5 检查卷容量是否正常 (48)4.3.6 性能检查 (49)4.3.7 日志文件检查 (49)五日常操作示例 (49)5.1 vShpere平台增加新DataStore (49)5.1.1创建VOL (49)5.1.2创建Qtrees (50)5.1.3 创建LUN (50)5.1.4 VSC识别新增LUN (51)5.2备份及恢复 (54)5.2.1创建新备份策略 (54)5.2.2修改备份策略 (58)5.2.3 数据恢复 (59)六、 NetApp Support网站及Open Case (60)6.1NetApp Support网站 (60)6.2 Open Case (61)6.3 RMA (66)一、磁盘阵列的系统安装1.1初始化磁盘阵列NetApp FAS是NetApp产品中一款有双机头的磁盘阵列,在出厂时预先会安装好Data OnTap 操作系统,需要先在每个机头中配置好操作系统,才能正常使用。
NETAPP FAS系列安装配置手册赞融电子上海分公司2003年11月修订控制1简介1.1说明本文简要说明了Network Appliance公司FAS系列存储产品配置过程。
本手册基于DataOntap 6.4.2P6操作系统1.2适用对象和前提本文是针对赞融电子的内部人员。
要求阅读者具有以下方面的专业能力:熟悉Unix操作系统;熟悉Windows操作系统;具有NETAPP FAS系统的基本知识.1.3参考资料Data ONTAP™ System Administrator’s GuideData ONTAP™ Software Setup Guide1.4术语表NFS:Network 网络文件系统CIFS:Common Internet 通用Internet文件系统NAS:Network Attached Storage 网络附加存储WAFL:Write Anywhere 随地写入文件格式2配置过程2.1检查Filer硬件安装2.2设置Filer使用计算机串口连接Filer背板上的Console口使用Windows附件中的超级终端建立连接,参数如下:每秒位数 9600,数据位 8,奇偶校验无,停止位 1,数据流控制无建立连接依次打开Disk Shelf和Filer电源使用setup命令配置Filerfas940> setupPlease enter the new hostname []: fas940Do you want to configure virtual network interfaces? [n]: yNumber of virtual interfaces to configure? [0] 3Name of virtual interface #1 []: vif1Is vif1 a single [s] or multi [m] virtual interface? [m] sNumber of links for vif1? [0] 2Name of link #1 for vif1 []: e5aName of link #2 for vif1 []: e5bName of virtual interface #2 []: vif2Is vif2 a single [s] or multi [m] virtual interface? [m] sNumber of links for vif2? [0] 2Name of link #1 for vif2 []: e9aName of link #2 for vif2 []: e9bName of virtual interface #3 []: vif3Is vif3 a single [s] or multi [m] virtual interface? [m] sNumber of links for vif3? [0] 2Name of link #1 for vif3 []: e11aName of link #2 for vif3 []: e11bPlease enter the IP address for Network Interface vif1 []: 165.204.224.173Please enter the netmask for Network Interface vif1 [255.255.0.0]: 255.255.254.0Please enter media type for vif1 {100tx-fd, tp-fd, 100tx, tp, auto (10/100/1000)} [auto]: Enter Please enter the IP address for Network Interface vif2 []: 165.204.224.174Please enter the netmask for Network Interface vif2 [255.255.0.0]: 255.255.254.0Please enter media type for vif2 {100tx-fd, tp-fd, 100tx, tp, auto (10/100/1000)} [auto]: Please enter the IP address for Network Interface vif3 []: 165.204.224.175Please enter the netmask for Network Interface vif3 [255.255.0.0]: 255.255.254.0Please enter media type for vif3 {100tx-fd, tp-fd, 100tx, tp, auto (10/100/1000)} [auto]: Please enter the IP address for Network Interface e0 []: 165.204.224.172Please enter the netmask for Network Interface e0 [255.255.0.0]: 255.255.254.0Please enter media type for e0 {100tx-fd, tp-fd, 100tx, tp, auto} [auto]:Would you like to continue setup through the web interface? [n]:Please enter the name or IP address of the default gateway: 165.204.224.254 The administration host is given root access to the filer's/etc files for system administration. To allow /etc root accessto all NFS clients enter RETURN below.Please enter the name or IP address of the administration host:Please enter timezone [GMT]: Asia/ShanghaiWhere is the filer located? []: Suzhou ChinaWhat language will be used for multi-protocol files (Type ? for list)?:zh.GBKSetting language on volume vol0The new language mappings will be available after rebootMon Sep 29 03:45:14 GMT [rc:ALERT]: Language on volume vol0 changed to zh.GBK Language set on volume vol0Do you want to run DNS resolver? [n]: yPlease enter DNS domain name []: You may enter up to 3 nameserversPlease enter the IP address for first nameserver []: 165.204.224.2Do you want another nameserver? [n]: yPlease enter the IP address for alternate nameserver []: 139.95.33.235Do you want another nameserver? [n]: EnterDo you want to run NIS client? [n]: EnterThis system will send event messages and weekly reportsto Network Appliance Technical Support. To disable this feature,enter "options autosupport.support.enable off" within 24 hours.Enabling Autosupport can significantly speed problem determinationand resolution should a problem occur on your system.For further information on Autosupport, please see:.Press the return key to continue.Now type 'reboot' for changes to take effect.fas940> Reboot重新启动Filer 之后,进行cifs setup 安装fas940> cifs setupEnable CIFS access to the filer by a Windows(tm) PCYour filer is currently only visible to PCs on the same net.Do you wish to make the system visible via WINS? [no]: yPlease enter next WINS IP address (or return to end list) []: 165.204.224.225Please enter next WINS IP address (or return to end list) []: 163.181.3.225Please enter next WINS IP address (or return to end list) []:CIFS requires local /etc/passwd and /etc/group files for multiprotocol.Default passwd be created containing 'root', 'pcuser',and 'nobody'.Enter the password for root []:Retype the password:This filer is currently licensed for CIFS only.The filer will be configured as a NTFS_only filer. It canbe changed to a Multiprotocol filer by reissuing the CIFS setup command.The default name of this filer will be 'FAS940'.Do you want to modify this name? [no]: EnterCIFS supports three types of user authentication:1. Windows Domain authentication.2. Windows Workgroup authentication using the filer's user accounts.3. /etc/passwd and/or NIS based authentication.What type of authentication will this filer use? [1]: 1The filer will use Windows Domain authentication.Enter the Windows Domain for the filer []:It is highly recommended that you create the local administratoraccount (FAS940\administrator) for this filer. This account enablesaccess to the filer from Windows when domain controllers are notaccessible.Create the FAS940\administrator account? [yes]: yesSet the password for FAS940\administrator:Retype the password:Mon Sep 29 11:53:46 CST [rc:info]: User <administrator> addedMon Sep 29 11:53:46 CST [rc:notice]: security style for /vol/vol0/ changed from unix to ntfs is a Windows 2000(tm) domain.In order to create this filer's domain account, you must supply thename and password of an administrator account with sufficient privilegeto add the filer to the domain.Please enter the Windows 2000 user []:Password for :CIFS - Logged in as .By default, setup creates the filer account in the ActiveDirectory container named 'Computers'. Alternatively, you caninstall the filer in an organizational unit (OU) by specifyingthe domain relative distinguished name of the OU, as in'ou=innerOU,ou=outerOU'.Active Directory container for filer account? [cn=computers]: EnterCIFS - Connecting to domain controller.Mon Sep 29 11:57:22 CST [rc:info]: Connection with DC \\SSUZDC2 establishedMon Sep 29 11:57:22 CST [nbns_timer:info]: All CIFS name registrations complete for local serverWelcome to the AMD () Windows 2000(tm) domain.CIFS local server is running.2.3创建volume通过Telnet或串口,用命令行方式创建卷vol create <volume name, such as ‘/vol/vol1’> [ -r <RAID Size> ] [ disks] 例,创建名为vol1的卷,RAID组最大为8,包含2块盘vol create /vol/vol1 –r 8 2使用vol status –r 命令观察初始化进程通过Web界面创建卷在浏览器中输入点击,根据提示输入用户名密码从右侧窗口Volume Add在New Volume Name栏中填写新建卷名vol1在Raid Group Size中填写RAID组的大小8 在Language中选择Simplified Chinese(GBK)选择Automatic Disk Selection在Number of Disks中填写Volume的磁盘数2点击Add2.4通过CIFS共享通过命令行cifs shares -add <share name> <path> e.g. cifs shares add vol1 /vol/vol1通过Web界面设置→CIFS→Shares→AddShare Name 填写 vol1Mount Point 填写 /vol/vol1点击Add2.5通过NFS共享通过命令行exportfs -o anon=0 /vol/vol1或者通过Web界面配置→NFS→Manage Exports→Insert Line 在Path中输入/vol/vol1Permission选择rwAnonymous UID填写0点击OK3使用介绍3.1Filer菜单3.1.1Show Status 显示Filer的整体状态,包括, Model, System ID,Version, Disks,Status 等信息3.1.2Manage Licenses 管理Filer 的license 如常用的CIFS, NFS, FCP,iSCSI,SnapRestore, SnapMirror, SnapVault, SyncMirror, MultiStore等,详情可参见或(中文网页)3.1.3Report 显示Filer目前配置及使用情况,如Uptime, Network Interfaces, DiskUsage, System Configuration 等信息3.1.4Syslog Messages 这里是系统的syslog messages 信息,里面会记录系统运行时产生的一些信息,特别是一些系统的报错信息,这些信息非常重要,对于发现各种问题有很大帮助,Netapp Technical Support 也需要这些信息,最好每天都查看一下这里的信息3.1.5Use Command Line 在这里可以使用自带的telnet 工具,方便你管理时使用Data Ontap系统的命令。
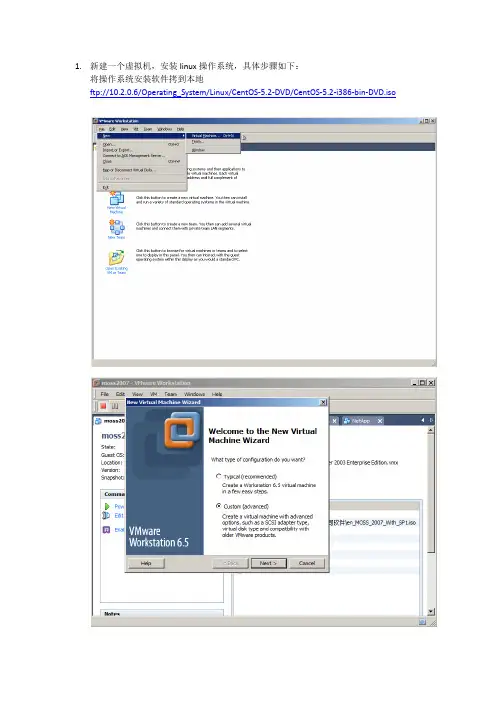
1.新建一个虚拟机,安装linux操作系统,具体步骤如下:将操作系统安装软件拷到本地ftp://10.2.0.6/Operating_System/Linux/CentOS-5.2-DVD/CentOS-5.2-i386-bin-DVD.iso下面的图是给虚拟机起一个名字,注意不要起netapp这样简单的名字,以免大家的机器重名Location:是将虚拟机的安装文件放在哪里,这个自己决定,默认安装在原来的c盘默认路径下也可以,自定义一个路径也可以点OK.点Finish,开始安装以下安装步骤,没有特殊指明的地方,直接按Enter将desktop前面的勾挑掉,只选择server并勾选customize now,点Next,请看图示Server tab里只选择和network相关的两个,其他的都不选点Next开始安装2.配置IP,网关输入用户名和密码登录用户名是root,密码是之前安装的时候设置的那个密码IP地址、子网掩码的设置:vim /etc/sysconfig/network-scripts/ifcfg-eth0按insert键进入里面进行编辑DEVICE=eth0BOOTPROTO=static---静态还是动态,static为静态,dhcp为动态BROADCAST=10.2.1.255 //广播,可不写IPADDR=10.2.1.35---IP地址(自己给虚拟机设置的ip,不要写10.2.1.35,这个只是一个例子)NETMASK=255.255.252.0---子网掩码NETWORK=10.2.1.0---网络ID,可不写ONBOOT=yesHWADDR=00:AA:BB:CC:DD:EE //mac地址可以修改or删除按Esc退出编辑,按键盘’:wq’进行保存并退出(注意wq是小写的,不是大写) 然后同样步骤修改网关及DNS网关:vim /etc/sysconfig/networkNETWORKING=yesHOSTNAME=vmlinux---主机名GATEWAY=10.2.16.10---网关DNS:vim /etc/resolv.confnameserver 10.2.0.147(域控机器的ip) 然后重启网络服务或者重启网卡ifdown eth0ifup eth03.安装vm tool。

NETAPP环境搭建(Windows Server 2003x64.x86) 一.基础环境搭建.[简要介绍,注意事项以红色标出]1. 安装Windows Server 2003 Enterprise or Standard Edition2. 声卡显卡网卡主板驱动(dell安装盘755)声卡驱动R166753主板驱动R162291网卡驱动R162323声卡驱动R1593853. 配置IP*加入域后,prefered DNS server 应改为10.2.0.1474. 配置域(此处一定要配置成dalian域!)因为只有大连域内的主机才能与netapp硬件相连。
而且涉及到sharepoint爬网也要求是大连域用户。
所以以后凡无特殊说明,用户都应是大连域内的,用户名应为dalian\administrator。
登录时也应选择域用户登录。
5. 安装windows组件()此安装一定在安装.Net之前,如果顺序颠倒,则系统会找不到ASP.NET的服务,需要在命令行中重新注册ASP.NET服务,并在administrator tools 中的server中,重启ASP.NET服务。
可能遇到的问题:A.中文不识别,乱码解决办法将系统盘装入,在control panel regional and language language下勾选install file for East Asian language 并装载,重启后在advanced下选择Chinese(PRC)即可。
二.Sharepoint安装1.SQL Server 2005 setup wizard相关问题:A.实例问题在SQL安装过程中,会有两种实例:Default Instance :默认实例Named Instance :命名实例如果同时需要两个,需要装载两遍SQL.B.server account 选择use a domain user account 用域用户。

NETAPP基本操作文档2012年3月版本控制文档状态:目录目录................................................................................................... 错误!未定义书签。
一,NETAPP硬件及管理方式 ......................................................................... 错误!未定义书签。
1,硬件概述:............................................................................................ 错误!未定义书签。
2,基本管理............................................................................................. 错误!未定义书签。
3,日常管理........................................................................................... 错误!未定义书签。
二,NETAPP常用概念和命令......................................................................... 错误!未定义书签。
1,Volume 和qtree .............................................................................. 错误!未定义书签。
2,NFS exports ....................................................................................... 错误!未定义书签。
NetApp FAS系列存储器操作手册目录App存储系统 (3)2.系统基本维护指南 (5)2.1.进入管理界面 (5)2.2.系统基本信息 (6)2.3.系统LOG信息 (7)2.4.配置Autosupport (8)2.5.设置时区、时间和日期 (8)2.6.杂项设置 (9)2.7.停机及重新启动 (10)2.8.管理及创建卷 (11)2.9.管理及创建Qtree (12)2.10.磁盘配额 (13)2.11.SnapShot的配置和管理 (15)2.12.CIFS的相关信息 (17)2.13.CIFS共享 (19)2.14.启用home directory功能 (20)2.15.ISCSI连接Windows (21)2.16.网络端口的管理 (33)2.16.1.VIF Multiple方式绑定,对应Cisco 交换机端配置命令 (34)2.17.其他网络参数 (35)2.18.更改root用户密码 (36)2.19.系统实时状态监控 (37)附录一:磁盘更换步骤 (39)附录二:时间同步服务器的设置 (40)App存储系统NetApp 系统为各种不同平台上的用户提供了对全部企业数据的无缝访问。
NetApp全系列光纤网络存储系统在文件访问方面支持NFS 和CIFS,在块存储访问方面支持FCP 和iSCSI,确保您可以非常方便地将NetApp 存储系统集成到NAS 或SAN 环境中,并且保护原来的信息。
NetApp 的设计为专用访问环境中的应用程序服务器和服务器集群以及多用户环境中的用户提供了经过优化和整合的高性能数据访问方式。
NetApp 存储系统提供了经过实践考验的、超过99.998% 的数据可用性,减少了代价高昂的停机时间(无论是计划内的还是计划外的),最大限度地保障了对关键数据的访问。
它们在一个简单、易用的环境中实现了数据的可管理性、可扩展性、互操作性和可用性,从而降低了您的总拥有成本,加强了竞争优势。

N e t A p p存储系统配置手册2011NetAppAll rights reserved本文档包含NetApp公司的商业及技术机密。
未经NetApp公司许可,不得向第三方泄漏或使用。
目录1配置指南 (2)1.1NetApp Filer快速入门 (2)1.2开关机 (2)1.2.1开机顺序: (2)1.2.2关机顺序: (2)2NetApp FAS3050/F3050C 系列 (3)2.1机架指示灯 (4)3设备管理 (7)3.1FILERVIEW 图形管理接口 (7)3.2命令行管理接口(CLI) (10)3.3空间管理:Aggr, V olume和qtree的介绍 (10)3.3.1命令行 (11)3.3.2图形界面 (11)3.3.3Qtree security styles的意义 (13)3.4NFS exports (13)3.4.1命令行 (14)3.4.2图形界面 (14)3.5CIFS Shares (15)3.5.1命令行 (15)3.5.2图形界面 (16)3.5.3用windows 2003或windows 2008管理 (17)3.6Snapshot 管理 (17)3.7Lun create (18)3.7.1命令行 (18)3.7.2图形界面 (19)3.8NetApp Filer常用命令 (21)1 配置指南1.1 NetApp Filer快速入门本指南是为初次使用NetApp存储系统的人员编写的,详细的系统描述和管理命令参见随机手册,在线帮助及/. 特别请您访问NOW (NetApp On the Web) site (), 您可从上面获得几乎所有得产品支持信息,如:电子版手册,知识库,软件下载,等等。
1.2 开关机1.2.1 开机顺序:1、先按照磁盘架编号顺序加电磁盘架的双电源;2、10秒钟后加电控制器。
1.2.2 关机顺序:1、确认所有连接的应用程序已经关闭;2、通过串口或TELNET登陆到系统。
文档信息本安装和维护手册为##X定制,为NetApp标准文档之补充.1作业规划步骤12配置步骤32.1设置磁盘归属,创建ROOT卷32.2检查并更新各部件的firmware系统版本152.3检查并更新存储操作系统版本192.4输入软件许可232.5执行SETUP进行初始化设置232.6调整ROOT卷的大小282.7配置VLAN292.8修改HOSTS文件302.9修改/etc/rc文件312.10配置AutoSupport服务332.11配置SSH342.12配置SNMP352.13配置NTP352.14配置MTA362.15配置IPspace362.16配置MultiStore362.17配置CIFS412.18配置ISCSI432.19配置FCP442.20配置NFS452.21配置重复数据删除462.22配置Snaprestore472.23容灾实现Snapmirror513日常维护543.1正常开关机54Page I3.2维护手段543.2.1Filerview 图形管理接口543.2.2命令行<CLI>543.3空间管理:Aggr, Volume和lun的介绍553.4常用命令基本应用553.5日常系统检查553.5.1目测553.5.2例行系统检查553.6autosupport功能简介和配置564故障处理流程584.1支持方式584.1.1NetApp on the web <NOW> site和服务584.1.2GSC< Global Support Center 全球支持中心>58 4.2案例开立流程584.3损坏部件更换流程591 作业规划步骤Page 12 配置步骤配置参数表2.1 设置磁盘归属,创建ROOT卷2.2 检查并更新各部件的firmware系统版本2.3 检查并更新存储操作系统版本2.4 输入软件许可使用license add ######X命令添加许可,全部输入后,使用license命令进行检查.鉴于许可的##性,此处不截屏日志.2.5 执行SETUP进行初始化设置2.6 调整ROOT卷的大小2.7 配置VLAN2.8 修改HOSTS文件2.9 修改/etc/rc文件2.10 配置AutoSupport服务2.11 配置SSH2.12 配置SNMP2.13 配置NTP2.14 配置MTA2.15 配置IPspace2.16 配置MultiStore2.17 配置CIFS2.18 配置ISCSI2.19 配置FCP2.20 配置NFS2.21 配置重复数据删除2.22 配置Snaprestore。
Simulate ONTAP™ 8.0Installation and Setup Guide forMicrosoft® Windows® and Mac® Systems NetApp, Inc.495 East Java DriveSunnyvale, CA 94089 U.S.A.Telephone: +1 (408) 822-6000Fax: +1 (408) 822-4501Support telephone: +1 (888) 4-NETAPPDocumentation comments: doccomments@Information Web: Copyright and trademark informationCopyright information Copyright © 1994–2009 NetApp, Inc. All rights reserved. Printed in the U.S.A.No part of this document covered by copyright may be reproduced in any form or by any means—graphic, electronic, or mechanical, including photocopying, recording, taping, or storage in an electronic retrieval system—without prior written permission of the copyright owner.Portions of this product are derived from the Berkeley Net2 release and the 4.4-Lite-2 release, which are copyrighted and publicly distributed by The Regents of the University of California. Copyright © 1980–1995 The Regents of the University of California. All rights reserved.Portions of this product are derived from NetBSD, copyright © Carnegie Mellon University. Copyright © 1994, 1995 Carnegie Mellon University. All rights reserved. Author Chris G. Demetriou.Permission to use, copy, modify, and distribute this software and its documentation is hereby granted, provided that both the copyright notice and its permission notice appear in all copies of the software, derivative works or modified versions, and any portions thereof, and that both notices appear in supporting documentation.CARNEGIE MELLON ALLOWS FREE USE OF THIS SOFTWARE IN ITS “AS IS” CONDITION. CARNEGIE MELLON DISCLAIMS ANY LIABILITY OF ANY KIND FOR ANY DAMAGES WHATSOEVER RESULTING FROM THE USE OF THIS SOFTWARE.Software derived from copyrighted material of The Regents of the University of California and Carnegie Mellon University is subject to the following license and disclaimer:Redistribution and use in source and binary forms, with or without modification, are permitted provided that the following conditions are met:1.Redistributions of source code must retain the above copyright notices, this list of conditions,and the following disclaimer.2.Redistributions in binary form must reproduce the above copyright notices, this list ofconditions, and the following disclaimer in the documentation and/or other materials provided with the distribution.3.All advertising materials mentioning features or use of this software must display this text:This product includes software developed by the University of California, Berkeley and its contributors.4.Neither the name of the University nor the names of its contributors may be used to endorse orpromote products derived from this software without specific prior written permission.THIS SOFTWARE IS PROVIDED BY THE REGENTS AND CONTRIBUTORS “AS IS” AND ANY EXPRESS OR IMPLIED WARRANTIES, INCLUDING, BUT NOT LIMITED TO, THE IMPLIED WARRANTIES OF MERCHANTABILITY AND FITNESS FOR A PARTICULAR PURPOSE ARE DISCLAIMED. IN NO EVENT SHALL THE REGENTS OR CONTRIBUTORS BE LIABLE FOR ANY DIRECT, INDIRECT, INCIDENTAL, SPECIAL, EXEMPLARY, OR CONSEQUENTIAL DAMAGES (INCLUDING, BUT NOT LIMITED TO, PROCUREMENT OF SUBSTITUTE GOODS OR SERVICES; LOSS OF USE, DATA, OR PROFITS; OR BUSINESS INTERRUPTION) HOWEVER CAUSED AND ON ANY THEORY OF LIABILITY, WHETHERIN CONTRACT, STRICT LIABILITY, OR TORT (INCLUDING NEGLIGENCE OR OTHERWISE) ARISING IN ANY WAY OUT OF THE USE OF THIS SOFTWARE, EVEN IF ADVISED OF THE POSSIBILITY OF SUCH DAMAGE.This software contains materials from third parties licensed to NetApp, Inc. which is sublicensed, and not sold, and title to such material is not passed to the end user. All rights reserved by the licensors. You shall not sublicense or permit timesharing, rental, facility management or service bureau usage of the Software.Portions developed by the Apache Software Foundation (/). Copyright © 1999 The Apache Software Foundation.Portions Copyright © 1995–1998, Jean-loup Gailly and Mark AdlerPortions Copyright © 2001, Sitraka Inc.Portions Copyright © 2001, iAnywhere SolutionsPortions Copyright © 2001, i-net software GmbHPortions Copyright © 1995 University of Southern California. All rights reserved.Redistribution and use in source and binary forms are permitted provided that the above copyright notice and this paragraph are duplicated in all such forms and that any documentation, advertising materials, and other materials related to such distribution and use acknowledge that the software was developed by the University of Southern California, Information Sciences Institute. The name of the University may not be used to endorse or promote products derived from this software without specific prior written permission.Portions of this product are derived from version 2.4.11 of the libxml2 library, which is copyrighted by the World Wide Web Consortium. NetApp modified the libxml2 software on December 6, 2001, to enable it to compile cleanly on Windows, Solaris, and Linux. The changes have been sent to the maintainers of libxml2. The unmodified libxml2 software can be downloaded from/.Copyright © 1994–2002 World Wide Web Consortium, (Massachusetts Institute of Technology, Institut National de Recherche en Informatique et en Automatique, Keio University). All Rights Reserved. /Consortium/Legal/Software derived from copyrighted material of the World Wide Web Consortium is subject to the following license and disclaimer:Permission to use, copy, modify, and distribute this software and its documentation, with or without modification, for any purpose and without fee or royalty is hereby granted, provided that you include the following on ALL copies of the software and documentation or portions thereof, including modifications, that you make:1.The full text of this NOTICE in a location viewable to users of the redistributed or derivativework.2.Any pre-existing intellectual property disclaimers, notices, or terms and conditions. If noneexist, a short notice of the following form (hypertext is preferred, text is permitted) should be used within the body of any redistributed or derivative code: “Copyright © [$date-of-software] World Wide Web Consortium, (Massachusetts Institute of Technology, Institut National de Recherche en Informatique et en Automatique, Keio University). All Rights Reserved./Consortium/Legal/”3.Notice of any changes or modifications to the W3C files, including the date changes were made. THIS SOFTWARE AND DOCUMENTATION IS PROVIDED “AS IS,” AND COPYRIGHT HOLDERS MAKE NO REPRESENTATIONS OR WARRANTIES, EXPRESS OR IMPLIED, INCLUDING BUT NOT LIMITED TO, WARRANTIES OF MERCHANTABILITY OR FITNESSFOR ANY PARTICULAR PURPOSE OR THAT THE USE OF THE SOFTWARE OR DOCUMENTATION WILL NOT INFRINGE ANY THIRD PARTY PATENTS, COPYRIGHTS, TRADEMARKS OR OTHER RIGHTS.COPYRIGHT HOLDERS WILL NOT BE LIABLE FOR ANY DIRECT, INDIRECT, SPECIAL OR CONSEQUENTIAL DAMAGES ARISING OUT OF ANY USE OF THE SOFTWARE OR DOCUMENTATION.The name and trademarks of copyright holders may NOT be used in advertising or publicity pertaining to the software without specific, written prior permission. Title to copyright in this software and any associated documentation will at all times remain with copyright holders.Project Athena, Athena, Athena MUSE, Discuss, Hesiod, Kerberos, Moira, and Zephyr are trademarks of the Massachusetts Institute of Technology (M.I.T.).This product includes Kerboros software that was developed by M.I.T. and that was modified under the terms of the M.I.T. license.This product includes software developed by the University of California, Berkeley and its contributors.Portions copyright © 2007-2008 LSI Corporation and QLogic Corporation. All rights reserved. Portions copyright © 1995-1998 WIDE Project. All rights reserved.Redistribution and use in source and binary forms, with or without modification, are permitted provided that the following conditions are met:1.Redistributions of source code must retain the above copyright notice, this list of conditions andthe following disclaimer.2.Redistributions in binary form must reproduce the above copyright notice, this list of conditionsand the following disclaimer in the documentation and/or other materials provided with the distribution.3.Neither the name of the project nor the names of its contributors may be used to endorse orpromote products derived from this software without specific prior written permission.THIS SOFTWARE IS PROVIDED BY THE PROJECT AND CONTRIBUTORS “AS IS” AND ANY EXPRESS OR IMPLIED WARRANTIES, INCLUDING, BUT NOT LIMITED TO, THE IMPLIED WARRANTIES OF MERCHANTABILITY AND FITNESS FOR A PARTICULAR PURPOSE ARE DISCLAIMED. IN NO EVENT SHALL THE PROJECT OR CONTRIBUTORS BE LIABLE FOR ANY DIRECT, INDIRECT, INCIDENTAL, SPECIAL, EXEMPLARY, OR CONSEQUENTIAL DAMAGES (INCLUDING, BUT NOT LIMITED TO, PROCUREMENT OF SUBSTITUTE GOODS OR SERVICES; LOSS OF USE, DATA, OR PROFITS; OR BUSINESS INTERRUPTION).Software derived from copyrighted material of NetApp, Inc. is subject to the following license and disclaimer:NetApp reserves the right to change any products described herein at any time, and without notice. NetApp assumes no responsibility or liability arising from the use of products described herein, except as expressly agreed to in writing by NetApp. The use or purchase of this product does not convey a license under any patent rights, trademark rights, or any other intellectual property rights of NetApp.The product described in this manual may be protected by one or more U.S.A. patents, foreign patents, or pending applications.RESTRICTED RIGHTS LEGEND: Use, duplication, or disclosure by the government is subject to restrictions as set forth in subparagraph (c)(1)(ii) of the Rights in Technical Data and Computer Software clause at DFARS 252.277-7103 (October 1988) and FAR 52-227-19 (June 1987).Trademark information NetApp, the Network Appliance logo, the bolt design, NetApp—the Network Appliance Company, Cryptainer, Cryptoshred, DataFabric, DataFort, Data ONTAP, Decru, FAServer, FilerView, FlexClone, FlexVol, Manage ONTAP, MultiStore, NearStore, NetCache, NOW NetApp on the Web, SANscreen, SecureShare, SnapDrive, SnapLock, SnapManager, SnapMirror, SnapMover, SnapRestore, SnapValidator, SnapVault, Spinnaker Networks, SpinCluster, SpinFS, SpinHA, SpinMove, SpinServer, StoreVault, SyncMirror, Topio, VFM, VFM (Virtual File Manager), and WAFL are registered trademarks of NetApp, Inc. in the U.S.A. and/or other countries. gFiler, Network Appliance, SnapCopy, Snapshot, and The evolution of storage are trademarks of NetApp, Inc. in the U.S.A. and/or other countries and registered trademarks in some other countries. The NetApp arch logo;the StoreVault logo; ApplianceWatch; BareMetal; Camera-to-Viewer; ComplianceClock; ComplianceJournal; ContentDirector; ContentFabric; EdgeFiler; FlexShare; FPolicy; Go Further, Faster;HyperSAN; InfoFabric; Lifetime Key Management, LockVault; NOW; ONTAPI; OpenKey, RAID-DP; ReplicatorX; RoboCache; RoboFiler; SecureAdmin; Serving Data by Design; Shadow Tape; SharedStorage; Simplicore; Simulate ONTAP; Smart SAN; SnapCache; SnapDirector; SnapFilter; SnapMigrator; SnapSuite; SohoFiler; SpinMirror; SpinRestore; SpinShot; SpinStor; vFiler; Virtual File Manager; VPolicy; and Web Filer are trademarks of NetApp, Inc. in the U.S.A. and other countries. NetApp Availability Assurance and NetApp ProTech Expert are service marks of NetApp, Inc. in the U.S.A.IBM, the IBM logo, and are trademarks or registered trademarks of International Business Machines Corporation in the United States, other countries, or both. A complete and current list of other IBM trademarks is available on the Web at /legal/copytrade.shtml.Apple is a registered trademark and QuickTime is a trademark of Apple, Inc. in the U.S.A. and/or other countries. Microsoft is a registered trademark and Windows Media is a trademark of Microsoft Corporation in the U.S.A. and/or other countries. RealAudio, RealNetworks, RealPlayer, RealSystem, RealText, and RealVideo are registered trademarks and RealMedia, RealProxy, and SureStream are trademarks of RealNetworks, Inc. in the U.S.A. and/or other countries.All other brands or products are trademarks or registered trademarks of their respective holders and should be treated as such.NetApp, Inc. is a licensee of the CompactFlash and CF Logo trademarks. NetApp, Inc. NetCache is certified RealSystem compatible.Table of ContentsPreface . . . . . . . . . . . . . . . . . . . . . . . . . . . . . . . . . . . . . iiiChapter 1Introduction to Simulate ONTAP 8.0 . . . . . . . . . . . . . . . . . . . . . 1Installation prerequisites for a Windows system . . . . . . . . . . . . . . . . . 2About Simulate ONTAP 8.0 binaries. . . . . . . . . . . . . . . . . . . . . . . 4Downloading Simulate ONTAP binaries . . . . . . . . . . . . . . . . . 5Chapter 2Simulate ONTAP 8.0 on VMware Server . . . . . . . . . . . . . . . . . . . 7Installing VMware Server . . . . . . . . . . . . . . . . . . . . . . . . . . . . 8Adding Simulate ONTAP Guest OS on VMware Server . . . . . . . . . . . . 9Configuring VMware Server to run Simulate ONTAP. . . . . . . . . . . . . 12Starting Simulate ONTAP on VMware Server. . . . . . . . . . . . . . . . . 17Chapter 3Simulate ONTAP 8.0 on VMware Workstation. . . . . . . . . . . . . . . 21Installing VMware Workstation . . . . . . . . . . . . . . . . . . . . . . . . 22Configuring VMware Workstation for Simulate ONTAP . . . . . . . . . . . 23Starting Simulate ONTAP Guest OS on VMware Workstation . . . . . . . . 25Configuring network adapters on VMware Workstation. . . . . . . . . . . . 27Chapter 4Simulate ONTAP 8.0 on VMware Player . . . . . . . . . . . . . . . . . . 29Installing VMware Player . . . . . . . . . . . . . . . . . . . . . . . . . . . 30Starting Simulate ONTAP on VMware Player. . . . . . . . . . . . . . . . . 31Setting preferences for the Simulate ONTAP virtual machine. . . . . . . . . 33Configuring network adapters on VMware Player. . . . . . . . . . . . . . . 34Chapter 5Simulate ONTAP 8.0 on VMware Fusion . . . . . . . . . . . . . . . . . . 35Installation prerequisites for a Mac system. . . . . . . . . . . . . . . . . . . 36Installing VMware Fusion on a Mac system . . . . . . . . . . . . . . . . . . 37Configuring VMware Fusion to run Simulate ONTAP 8.0 . . . . . . . . . . 38Adding Simulate ONTAP Guest OS on VMware Fusion . . . . . . . . . . . 39Starting Simulate ONTAP on VMware Fusion. . . . . . . . . . . . . . . . . 41Configuring network adapters on VMware Fusion. . . . . . . . . . . . . . . 43Chapter 6Configuring Simulate ONTAP 8.0 . . . . . . . . . . . . . . . . . . . . . . 47Data ONTAP 7-Mode setup . . . . . . . . . . . . . . . . . . . . . . . . . . 48Data ONTAP Cluster-Mode setup . . . . . . . . . . . . . . . . . . . . . . . 54PrefaceAbout this guide This document provides details about installing all VMware® softwareapplications supported to run Simulate ONTAP™ 8.0, and provides details aboutinstalling, starting, and configuring the Simulate ONTAP software.Audience This guide is for NetApp customers who are using Data ONTAP and want to testthe new features of Data ONTAP 8.0.TypographicconventionsThe following table describes the typographic conventions used in this guide.Keyboard conventions The following table lists the character formats used in this guide to set off special information.Convention Type of informationItalic font Words or characters that require special attention.Placeholders for information you must supply. Forexample, if the guide says to enter the arp -d hostnamecommand, you enter the characters “arp -d” followed bythe actual name of the host.Book titles in cross-references.Monospaced font Command names, option names, keywords, and daemonnames.Information displayed on the system console or othercomputer monitors.The contents of files.Bold monospacedfontWords or characters you type. What you type is alwaysshown in lowercase letters, unless you must type it inuppercase letters.What is in thisguide…What it means…hyphen (-)Used to separate individual keys. For example, Ctrl-Dmeans holding down the Ctrl key while pressing the Dkey.Enter Used to refer to the key that generates a carriagereturn; the key is named Return on some keyboards. type Used to mean pressing one or more keys on thekeyboard.enter Used to mean pressing one or more keys and thenpressing the Enter key.Notices in this guide This document might contain the following types of messages to alert you to conditions you need to be aware of. Danger notices and caution notices only appear in hardware documentation, where applicable.NoteA note contains important information that helps you install or operate the system efficiently.AttentionAn attention notice contains instructions that you must follow to avoid a system crash, loss of data, or damage to the equipment.DangerA danger notice warns you of conditions or procedures that can result in death or severe personal injury.CautionA caution notice warns you of conditions or procedures that can cause personal injury that is neither lethal nor extremely hazardous.1 Introduction to Simulate ONTAP 8.0About this chapter This chapter provides a brief introduction about Simulate ONTAP™ 8.0 andprerequisites for installing Simulate ONTAP 8.0 on a Windows® and Mac®system.Topics in this chapter The following topics are discussed in this chapter:◆“Overview” on page1◆“Hardware requirements” on page2◆“In an Intel based laptop or desktop the VT support is turned off by default.You must enable the VT in the system BIOS to use Simulate ONTAP 8.0.”on page2◆“About Simulate ONTAP 8.0 binaries” on page4◆“Downloading Simulate ONTAP binaries” on page5Overview Simulate ONTAP 8.0 is a virtual simulator of the Data ONTAP® 8.0 software.You can run the virtual simulator on a Windows or Mac system. SimulateONTAP 8.0 is a VMware virtual machine that runs in a hypervisor.You need to install one of the following VMware applications on the host systemto use the Simulate ONTAP 8.0:◆VMware® Server 2.01 or later◆VMware® Workstation 6.5 or 7.0◆VMware® Player 2.5.3◆VMware Fusion™ 2.03 or laterYou can configure Simulate ONTAP 8.0 as a 7-Mode system or cluster-Modesystem.Simulate ONTAP 8.0 enables you to test many of the Data ONTAP 7-Mode andCluster- Mode features without buying any new hardware or disturbing yourproduction environment. You can also provide the Simulate ONTAP simulator toyour storage administrators to have hands-on experience.This document provides details about installing all VMware softwareapplications supported to run Simulate ONTAP, provides details about installing,starting, and configuring the Simulate ONTAP 8.0 software.Installation prerequisites for a Windows systemHardware requirements The following are the hardware prerequisites for a Windows system:◆Dual core 64-bit Intel® or AMD architecture laptop or desktop ◆ 2 GB RAM for one instance of simulator◆ 3 GB RAM for two instances of simulator (4 GB recommended)◆20 GB free disk space per instance of simulator◆VT support for Intel® based systemsHardware configuration In an Intel based laptop or desktop the VT support is turned off by default. You must enable the VT in the system BIOS to use Simulate ONTAP 8.0.To enable VT in the system BIOS, complete the following steps:1.Access the system BIOS while booting your laptop or desktop.NoteThe feature might be named as VT, Vanderpool Technology, Virtualization Technology, VMX, or Virtual Machine Extensions. You might find this setting under a Security/CPU screen in the BIOS.2.In the BIOS, check the VT setting is either on or off at power on. Enable theVT if it is not already enabled in the system BIOS.3.Save the changes to the BIOS settings.4.Turn off power to the system.5.Turn on the system again; the changes made in the BIOS will take effect. NoteIf you simply reboot the system without turning it off, VT will not be enabled.Software requirements The following are the software prerequisites for a Windows system:◆Microsoft Windows® XP◆VMware Server or VMware Workstation or VMware PlayerFor Mac system prerequisites, see the “Installation prerequisites for a Mac system” on page36Features not supported and limitations The following are the limitations and features not supported on Simulate ONTAP8.0:◆High availability (CFO/SFO)◆NVRAM (nonvolatile RAM) is simulated and is not persistent. Data lossmay occur after power cycles. You should shut down the simulator properly in order to avoid the data loss◆RLM (Remote LAN Module)◆Multipathing is not supported as multiple physical interfaces are notavailable in the Simulate ONTAP hardware◆Fibre channel and SAN◆Simulate ONTAP 8.0 simulates Data ONTAP only. It does not simulateCFE, BIOS, shelf FW and so on◆Simulate ONTAP 8 is not well suited to any tests or applications requiringhigh performance or heavy I/O◆You can have a maximum of four simulated disk shelves with 14 disk drivesper shelf, for a total of 56 drives per simulator◆You can only create a maximum 1 GB 64-bit aggregate per simulated diskdrive◆If you are running multiple instances of Simulate ONTAP 8.0 on yoursystem, you must boot up the simulators one after anotherAbout Simulate ONTAP 8.0 binariesThe Simulate ONTAP 8.0 binaries are set of VMware files. The binaries areavailable for Data ONTAP 8.0 7-mode and Cluster-Mode in 64-bit. You need todownload the appropriate binary from the NOW site. The binaries are availablein a zip file.Downloading Simulate ONTAP binariesTo download the Simulate ONTAP 8.0 binaries from the NOW site, complete thefollowing steps:Step Action1Log in to /.2Type your user name and password.3Click Login.4In the NOW site Service & Support page, under SoftwareDownload section, click ToolChest.5In the ToolChest page, select Simulate ONTAP.6If you are downloading on to.. Then..a Windows system. Save it in the C:\VirtualMachines folder.a Mac system.Save it to the downloadfolder.7Extract the zip file at C:\Virtual Machines folder.NoteA Mac system automatically detects the zip file and unzips it.NoteYou should not copy the VMware files of an already booted Simulate ONTAP8.0 simulator to create a second instance of simulator. If you want to run multipleinstances of Simulate ONTAP 8.0, you should first create copy of the binarybefore setting up simulator. If simulator is already setup, then you shoulddownload a new copy from the NOW site.2 Simulate ONTAP 8.0 on VMware ServerAbout this chapter This chapter provides information about installing and configuring VMwareserver on a windows laptop or desktop.Topics in this chapter The following topics are discussed in this chapter:◆“Downloading VMware Server” on page7◆“Installing VMware Server” on page8◆“Adding Simulate ONTAP Guest OS on VMware Server” on page9◆“Configuring VMware Server to run Simulate ONTAP” on page12◆“Starting Simulate ONTAP on VMware Server” on page17Downloading VMware Server You can download the VMware Server software from the VMware web site. For downloading, click this link /d/.You need to log in to the web site. If do not have an existing account on VMware web site, you need to register and create one.After downloading the VMware Server software, you will receive an e-mail from the VMware team to the registered e-mail ID. The e-mail provides a link for activating your downloaded VMware Server.For information about downloading Simulate ONTAP 8.0, see “Downloading Simulate ONTAP binaries” on page5.Installing VMware ServerFor installation procedure of VMware Server on your laptop or desktop, see theVMware Server documentation at following location:/pdf/vmserver2.pdf.NoteYou cannot have VMware Server installed on the same host machine withanother VMware product, such as VMware workstation, VMware GSX Server,or VMware ESX. You cannot have multiple versions of VMware Server installedon the same host.Chapter 2: Simulate ONTAP 8.0 on VMware Server 9Adding Simulate ONTAP Guest OS on VMware ServerTo add Simulate ONTAP 8.0 on VMware Server, complete the following steps:StepAction 1Click Start> All Programs > VMware > VMware WebAccess>Web Access .10Adding Simulate ONTAP Guest OS on VMware Server2In the VMware Infrastructure Web Access window, type your Login name and password. 3Click Log in .Step ActionChapter 2: Simulate ONTAP 8.0 on VMware Server114In the VMware Infrastructure Web Access window, click VirtualMachine>Add Virtual Machine to Inventory.5In the Inventory pane, click standard icon and select SimulateONTAP from the list.6In the Contents pane, select the Data ONTAP.vmx file.In the lower pane of the VMware Infrastructure Web Access windowyou can see the register virtual machine status as success.7Click OK .Now the Simulate ONTAP 8.0 is registered with VMware Server.NoteIf you want to set up additional ONTAP simulators, repeat the abovesteps from 4 to 7.StepActionConfiguring VMware Server to run Simulate ONTAPSetting up managed virtual networks You need to change the VMware virtual network setting to support the Simulate ONTAP on your laptop or desktop.To configure VMware Server on your windows laptop or desktop, complete the following steps:Step Action1Click Start> All Programs > VMware > VMware Server > Manage Virtual Network s.12Configuring VMware Server to run Simulate ONTAPChapter 2: Simulate ONTAP 8.0 on VMware Server 132In the Virtual Network Editor window, select the Host VirtualAdapters tab.Under Host virtual Adapters tab, you can see all the virtualnetworks configured during VMware Server installation.a.Remove all virtual network adapters configured duringVMware Server installation, to remove, select each networkadapter and click Remove .b.Click the Add button in the Host Virtual Adapters window.c.In the Add Network Adapter window, select VMnet2adapter and click OK .StepActionStep ActionSelect the DHCP tab.3a.Remove all virtual network adapters under DHCP tab, toremove, select each network adapter and click Remove.b.After removing all virtual network adapters, click Apply.14Configuring VMware Server to run Simulate ONTAPStep ActionSelect the NAT tab.4a.In the NAT section, click the VMnet drop-down list andselect Disable.b.Click Apply.5Select the Host Virtual Networking Mapping tab.a.Click the arrow button next to the VMnet2 drop-down listbox and select Subnet.b.In the Subnet window, modify the IP address and SubnetMask, and click OK.Chapter 2: Simulate ONTAP 8.0 on VMware Server1516Configuring VMware Server to run Simulate ONTAP6Select theSummary tab to see the summary of the all the modifications.7Click Apply and OK to close the Virtual Network Editor window.Step ActionStarting Simulate ONTAP on VMware ServerAccessing a Simulate ONTAP console To start Simulate ONTAP on VMware Server, complete the following steps: Step Action1Click Start> All Programs > VMware > VMware Web Access>Web Access.2Click the Console tab.Chapter 2: Simulate ONTAP 8.0 on VMware Server17。
NetApp磁盘阵列安装手册目录一、磁盘阵列的系统安装 (3)1.1初始化磁盘阵列 (3)1.2输入license序列号 (7)二、 NetApp存储管理系统System Manager 安装及连接 (8)2.1System Manger 安装 (8)2.2控制器状态信息页面 (14)三、磁盘阵列的空间配置和分配 (15)3.1在aggr0中添加新的磁盘 (15)3.2 网络设置 (17)3.3 CIFS /AD 设置 (21)3.4创建新的Volume (24)3.5配置卷 (27)3.6消除Volume的快照预留空间 (29)3.7CIFS协议共享管理(针对虚拟桌面平台有效) (31)3.8创建NFS共享 (33)3.9Qtrees的管理 (34)3.10 Quotas的创建与管理 (35)3.11 磁盘的管理 (37)3.12创建LUN存储单元 (38)3.12.1开启FCP功能 (38)3.12.2创建一个Lun存储单元 (39)3.13 AutoSupport设置 (43)3.14 用户和用户组的管理 (45)3.15 控制器log日志 (46)3.16 cf状态检查 (47)四、NetApp日常运维知识 (47)4.1 开机顺序 (48)4.2 关机顺序 (48)4.3 性能检测 (48)4.3.1 目测 (48)4.3.2 硬件状态检查 (48)4.3.3 检查网络是否正常 (48)4.3.4. 检查CLUSTER 状态是否正常 (48)4.3.5 检查卷容量是否正常 (48)4.3.6 性能检查 (49)4.3.7 日志文件检查 (49)五日常操作示例 (49)5.1 vShpere平台增加新DataStore (49)5.1.1创建VOL (49)5.1.2创建Qtrees (50)5.1.3 创建LUN (51)5.1.4 VSC识别新增LUN (52)5.2备份及恢复 (55)5.2.1创建新备份策略 (55)5.2.2修改备份策略 (58)5.2.3 数据恢复 (60)六、 NetApp Support网站及Open Case (61)6.1NetApp Support网站 (61)6.2 Open Case (62)6.3 RMA (67)一、磁盘阵列的系统安装1.1初始化磁盘阵列NetApp FAS是NetApp产品中一款有双机头的磁盘阵列,在出厂时预先会安装好Data OnTap 操作系统,需要先在每个机头中配置好操作系统,才能正常使用。
目录一、安装客户管理软件 (2)二、磁盘阵列配置 (2)三、Volumes的规划配置 (4)四、luns的规划配置 (5)五、配置重删时间 (8)六、Snapmirror配置 (8)七、Netapp v3220的licenses (11)八、Netapp fas2240的licenses (12)九、网络接口配置 (12)一、硬件介绍二、安装客户管理软件1、先安装jdk1.6或以上版本。
2、安装netapp提供的客户端管理软件(sysmgr-setup-2-1-win),按提示下一步安装即可。
sysmgr-setup-2-1-win.exe三、磁盘阵列配置1、通过管户端管理软件,添加需要管理的netapp设备,只需输入被管理端的ip地址。
2、进入客户端管理界面,进行磁盘阵列划分,由于netapp v3220 使用sata磁盘,划分阵列时有最大的磁盘个数限制(每个阵列不超过20个磁盘),所以规划阵列时,将24块磁盘划分如下:12个划分为aggr0,11个划分为aggr1,另一个作为全局的热备盘。
3、创建阵列4、修改阵列的名称以及阵列的类型,先raid-dp,这是netapp独有的阵列,相当于RAID6,便读写的性能更好。
5、根椐提示进入下一步,按规划选择要做阵列aggr0数量为12个硬盘,并进入下一步配置完阵列,另一个阵列选aggr1需要11个硬盘配置完成阵列,还剩下一个硬盘,netapp 会自动配置作为全局热备盘。
四、Volumes的规划配置根椐规划,会划分四个volume,aggr0会划分三个volume,aggr1会划分为一个volume,每个volume都会开启活动volume功能,最大限度的利用volume的容易,每个volume划分的大小为每个阵列的最大容量的95%,另个5%作为netapp的快照功能,这是netapp公司建议的容量分配方式,虽有小许的容量损失,但能发挥netapp最佳的优能。
NetApp-FAS系列安装配置说明NETAPP FAS系列安装配置⼿册赞融电⼦上海分公司2003年11⽉修订控制1简介1.1说明本⽂简要说明了Network Appliance公司FAS系列存储产品配置过程。
本⼿册基于DataOntap 6.4.2P6操作系统1.2适⽤对象和前提本⽂是针对赞融电⼦的内部⼈员。
要求阅读者具有以下⽅⾯的专业能⼒:熟悉Unix操作系统;熟悉Windows操作系统;具有NETAPP FAS系统的基本知识.1.3参考资料Data ONTAP? System Administrator’s GuideData ONTAP? Software Setup Guide1.4术语表NFS:Network ⽹络⽂件系统CIFS:Common Internet 通⽤Internet⽂件系统NAS:Network Attached Storage ⽹络附加存储WAFL:Write Anywhere 随地写⼊⽂件格式2配置过程2.1检查Filer硬件安装2.2设置Filer使⽤计算机串⼝连接Filer背板上的Console⼝使⽤Windows附件中的超级终端建⽴连接,参数如下:每秒位数 9600,数据位 8,奇偶校验⽆,停⽌位 1,数据流控制⽆建⽴连接依次打开Disk Shelf和Filer电源使⽤setup命令配置Filerfas940> setupPlease enter the new hostname []: fas940Do you want to configure virtual network interfaces? [n]: yNumber of virtual interfaces to configure? [0] 3Name of virtual interface #1 []: vif1Is vif1 a single [s] or multi [m] virtual interface? [m] sNumber of links for vif1? [0] 2Name of link #1 for vif1 []: e5aName of link #2 for vif1 []: e5bName of virtual interface #2 []: vif2Is vif2 a single [s] or multi [m] virtual interface? [m] sNumber of links for vif2? [0] 2Name of link #1 for vif2 []: e9aName of link #2 for vif2 []: e9bName of virtual interface #3 []: vif3Is vif3 a single [s] or multi [m] virtual interface? [m] sNumber of links for vif3? [0] 2Name of link #1 for vif3 []: e11aName of link #2 for vif3 []: e11bPlease enter the IP address for Network Interface vif1 []: 165.204.224.173Please enter the netmask for Network Interface vif1 [255.255.0.0]: 255.255.254.0Please enter media type for vif1 {100tx-fd, tp-fd, 100tx, tp, auto (10/100/1000)} [auto]: Enter Please enter the IP address for Network Interface vif2 []: 165.204.224.174Please enter the netmask for Network Interface vif2 [255.255.0.0]: 255.255.254.0Please enter media type for vif2 {100tx-fd, tp-fd, 100tx, tp, auto (10/100/1000)} [auto]: Please enter the IP address for Network Interface vif3 []: 165.204.224.175Please enter the netmask for Network Interface vif3 [255.255.0.0]: 255.255.254.0Please enter media type for vif3 {100tx-fd, tp-fd, 100tx, tp, auto (10/100/1000)} [auto]: Please enter the IP address for Network Interface e0 []: 165.204.224.172Please enter the netmask for Network Interface e0 [255.255.0.0]: 255.255.254.0Please enter media type for e0 {100tx-fd, tp-fd, 100tx, tp, auto} [auto]:Would you like to continue setup through the web interface? [n]:Please enter the name or IP address of the default gateway: 165.204.224.254 The administration host is given root access to the filer's/etc files for system administration. To allow /etc root accessto all NFS clients enter RETURN below.Please enter the name or IP address of the administration host:Please enter timezone [GMT]: Asia/ShanghaiWhere is the filer located? []: Suzhou ChinaWhat language will be used for multi-protocol files (Type ? for list)?:zh.GBKSetting language on volume vol0The new language mappings will be available after rebootMon Sep 29 03:45:14 GMT [rc:ALERT]: Language on volume vol0 changed to zh.GBK Language set on volume vol0 Do you want to run DNS resolver? [n]: yPlease enter DNS domain name []: /doc/13ed3844f58a6529647d27284b73f242336c3134.html You may enter up to 3 nameserversPlease enter the IP address for first nameserver []: 165.204.224.2Do you want another nameserver? [n]: yPlease enter the IP address for alternate nameserver []: 139.95.33.235Do you want another nameserver? [n]: EnterDo you want to run NIS client? [n]: EnterThis system will send event messages and weekly reportsto Network Appliance Technical Support. To disable this feature,enter "options autosupport.support.enable off" within 24 hours.Enabling Autosupport can significantly speed problem determinationand resolution should a problem occur on your system.For further information on Autosupport, please see:.Press the return key to continue.Now type 'reboot' for changes to take effect.fas940> Reboot重新启动Filer 之后,进⾏cifs setup 安装fas940> cifs setupEnable CIFS access to the filer by a Windows(tm) PCYour filer is currently only visible to PCs on the same net.Do you wish to make the system visible via WINS? [no]: yPlease enter next WINS IP address (or return to end list) []: 165.204.224.225Please enter next WINS IP address (or return to end list) []: 163.181.3.225Please enter next WINS IP address (or return to end list) []:CIFS requires local /etc/passwd and /etc/group files for multiprotocol.Default passwd be created containing 'root', 'pcuser',and 'nobody'.Enter the password for root []:Retype the password:This filer is currently licensed for CIFS only.The filer will be configured as a NTFS_only filer. It canbe changed to a Multiprotocol filer by reissuing the CIFS setup command.The default name of this filer will be 'FAS940'.Do you want to modify this name? [no]: EnterCIFS supports three types of user authentication:1. Windows Domain authentication.2. Windows Workgroup authentication using the filer's user accounts.3. /etc/passwd and/or NIS based authentication.What type of authentication will this filer use? [1]: 1The filer will use Windows Domain authentication.Enter the Windows Domain for the filer []:/doc/13ed3844f58a6529647d27284b73f242336c3134.html It is highly recommended that you create the local administratoraccount (FAS940\administrator) for this filer. This account enablesaccess to the filer from Windows when domain controllers are notaccessible.Create the FAS940\administrator account? [yes]: yesSet the password for FAS940\administrator:Retype the password:Mon Sep 29 11:53:46 CST [rc:info]: User addedMon Sep 29 11:53:46 CST [rc:notice]: security style for /vol/vol0/ changed from unix to ntfs/doc/13ed3844f58a6529647d27284b73f242336c3134.html is a Windows 2000(tm) domain.In order to create this filer's domain account, you must supply thename and password of an administrator account with sufficient privilegeto add the filer to the /doc/13ed3844f58a6529647d27284b73f242336c3134.html domain.Please enter the Windows 2000 user []:Password for :CIFS - Logged in as .By default, setup creates the filer account in the ActiveDirectory container named 'Computers'. Alternatively, you caninstall the filer in an organizational unit (OU) by specifyingthe domain relative distinguished name of the OU, as in'ou=innerOU,ou=outerOU'.Active Directory container for filer account? [cn=computers]: EnterCIFS - Connecting to domain controller.Mon Sep 29 11:57:22 CST [rc:info]: Connection with DC \\SSUZDC2 establishedMon Sep 29 11:57:22 CST [nbns_timer:info]: All CIFS name registrations complete for local serverWelcome to the AMD (/doc/13ed3844f58a6529647d27284b73f242336c3134.html ) Windows 2000(tm) domain.CIFS local server is running.2.3创建volume通过Telnet或串⼝,⽤命令⾏⽅式创建卷vol create [ -r ] [ disks] 例,创建名为vol1的卷,RAID组最⼤为8,包含2块盘vol create /vol/vol1 –r 8 2使⽤vol status –r 命令观察初始化进程通过Web界⾯创建卷在浏览器中输⼊点击,根据提⽰输⼊⽤户名密码从右侧窗⼝Volume Add在New Volume Name栏中填写新建卷名vol1在Raid Group Size中填写RAID组的⼤⼩8 在Language中选择Simplified Chinese(GBK)选择Automatic Disk Selection在Number of Disks中填写Volume的磁盘数2点击Add2.4通过CIFS共享通过命令⾏cifs shares -add e.g. cifs shares add vol1 /vol/vol1通过Web界⾯设置→CIFS→Shares→AddShare Name 填写 vol1Mount Point 填写 /vol/vol1点击Add2.5通过NFS共享通过命令⾏exportfs -o anon=0 /vol/vol1或者通过Web界⾯配置→NFS→Manage Exports→Insert Line 在Path中输⼊/vol/vol1 Permission选择rwAnonymous UID填写0点击OK3使⽤介绍3.1Filer菜单3.1.1Show Status 显⽰Filer的整体状态,包括, Model, System ID,Version, Disks, Status 等信息3.1.2Manage Licenses 管理Filer 的license 如常⽤的CIFS, NFS, FCP,iSCSI,SnapRestore, SnapMirror, SnapVault, SyncMirror, MultiStore等,详情可参见或(中⽂⽹页)3.1.3Report 显⽰Filer⽬前配置及使⽤情况,如Uptime, Network Interfaces, DiskUsage, System Configuration 等信息3.1.4Syslog Messages 这⾥是系统的syslog messages 信息,⾥⾯会记录系统运⾏时产⽣的⼀些信息,特别是⼀些系统的报错信息,这些信息⾮常重要,对于发现各种问题有很⼤帮助,Netapp Technical Support 也需要这些信息,最好每天都查看⼀下这⾥的信息3.1.5Use Command Line 在这⾥可以使⽤⾃带的telnet ⼯具,⽅便你管理时使⽤Data Ontap系统的命令。
NetApp操作手册2010—4-8目录一、概述: (3)1、如何使用本手册 (3)2、概念简述 (3)二、配置NetApp Filer (4)一、加电及初始化配置 (4)1、加电过程 (4)2、初始化配置 (4)二、配置存储 (4)1、配置aggregate (4)2、配置volume (5)3、划分qtree (6)4、建立Lun(仅用于SAN安装) (6)三、配置基于IP的SAN存储系统 (6)1、配置Initiator (6)1。
1 Linux平台 (6)1。
1。
1下载ISCSI for Linux驱动: (6)1.1。
2安装iscsi驱动 (7)1.1。
3修改ISCSI配置文件: (7)1.1。
4创建Initiator Group (7)1。
1。
5进行LUN Map (7)1。
1。
6启动iscsi服务 (8)1.2 Windows2003平台 (8)1。
2。
1安装和配置Iscsi驱动 (8)1。
2.4连接存储 (9)四、NAS配置(cifs部分) (9)1、开启cifs服务,配置aggr,建立vol和qtree (9)2、添加share目录 (11)3、在windows上连接和使用cifs (12)五、NAS配置(NFS部分) (14)1、NFS简介: (14)2、开启NFS服务,配置aggr,建立vol和qtree (14)3、进行nfs服务端export (14)4、在客户端上面建立路径作为mount点 (15)5、客户端mounting NFS文件系统 (15)6、立即Mount存储的文件系统 (16)7、与NFS有关的一些命令介绍 (16)一、概述:1、如何使用本手册目的:在进行NetApp filer初次安装时可参考本手册,按照对应部分的说明进行配置和安装。
注意:当存储设备已经配置完毕后,且有效容量已经使用完毕后,非必要情况,请不要随意更改存储系统配置,不恰当的操作可能造成存储系统无法正常工作或造成数据丢失。
华为数据中心N E T A P P存储基本安装配置指导书©2005 Network ApplianceAll rights reserved本文档介绍NetApp公司存储在华为数据中心安装,配置,测试功能的相关步骤及方法。
一、前言Network Appliance公司1992年成立于美国的Sunnyvale, 是一家跨国性高科技公司,专业从事网络存储设备和CDN设备的生产、开发及销售业务,现今在全球拥有超过100家分支机构,员工超过3,900余人。
公司是网络数据存储解决方案的市场领导者,其统一网络存储设备及网络缓存解决方案(NetCache)提供高效、简捷、可靠的数据存取。
自1992年成立至今,全球已安装了超过60000台,连续8年以每年营业额和利润翻番的速度高速增长,其销售和利润增长率均位居全美高科技企业前列。
1999及2000年度,网域存储技术公司连续两年被美国财富杂志(Fortune)评为美国100家增长速度最快公司中的第4位, 是有史以来纳斯达克(NASDAQ)100强和S&P500强中最年轻的公司,而我们的首席执行官Dan Warmenhoven先生也以其杰出的管理才能被美国商业周刊(Business Week)评为2000年度全球25名管理精英之一。
在2005年, 被全美评为最适合人工作的IT公司第5位。
NetApp的存储产品在维护管理上的简便性是世界公认的,其管理成本非常低,真正体现了Appliance的设计理念。
著名的研究机构INPUT的调查结果表明,NetApp的整体拥有成本在数据库的应用环境下,是众多厂商中最低的。
大约只有EMC的Symmetrics的25%。
而管理维护成本只有主机厂商的存储产品的管理维护成本的不到十分之一。
二、 NetApp存储安装如果安装一个全新的NetApp存储,首先将Console线连接到存储上,加电存储并进入存储console, 具体步骤如下所示:CFE version 1.2.0 based on Broadcom CFE: 1.0.35Copyright (C) 2000,2001,2002,2003 Broadcom Corporation.Portions Copyright (C) 2002,2003 Network Appliance Corporation.CPU type 0x1040102: 650MHzTotal memory: 0x40000000 bytes (1024MB)Starting AUTOBOOT press any key to abort...Loading: 0xffffffff80001000/21632 0xffffffff80006480/9820318 Entry at 0xffffffff80001000Starting program at 0xffffffff80001000Press CTRL-C for special boot menu ....................................................................................................................................... ....................................................................................................................................... ................Interconnect based upon M-VIA ERing SupportCopyright (c) 1998-2001 Berkeley Lab/research/FTG/viaThu Sep 1 02:09:51 GMT [cf.nm.nicTransitionUp:info]: Interconnect link 0 is UPThu Sep 1 02:09:51 GMT [cf.nm.nicTransitionDown:warning]: Interconnect link 0 is DOWNSpecial boot options menu will be available.ispfc: Fibre Channel adapter 0c appears to be unattached/disconnected.If adapter is in use, check cabling and if connected to diskshelves, also check seating of LRC cards.Thu Sep 1 02:10:16 GMT [fci.initialization.failed:error]: Initialization failed on Fibre Channel adapter 0c.NetApp Release 7.0.1R1: Wed May 18 23:02:49 PDT 2005Copyright (c) 1992-2005 Network Appliance, Inc.Starting boot on Thu Sep 1 02:09:50 GMT 2005Thu Sep 1 02:10:19 GMT [diskown.isEnabled:info]: software ownership has been enabled for this system(1) Normal boot.(2) Boot without /etc/rc.(3) Change password.(4) Assign ownership and initialize disks for root volume.(4a) Same as option 4, but create a flexible root volume.(5)Maintenance mode boot.Selection (1-5)? 4aZero disks and install a new file system? yThis will erase all the data on the disks, are you sure? yZeroing disks takes about 23 minutes..........................................................................................................................................................................................................................................................................................对于启动的菜单提示(1) Normal boot. ---- 正常启动, 效果如启动时候不输入“Ctrl+C”一样。
安装过程分为三个步骤:1、安装Linux,NetApp Simulator这个只能在Linux下运行,安装文本模式即可在Netapp simulator英文文档中,有说明:该模拟器软件是在Ubuntu6.06环境下开发完成的。
为了减少不必要的麻烦,我们也安装Ubuntu 6.06环境。
安装完Linux还要将Netapp simulator软件考贝到系统下,通过U盘考贝,过程简述如下:插入U盘,系统会在命令行界面中提示U盘的设备名称,比如我的U盘就是/dev/sdb;也可以使用fdisk -l命令查看;建立一个子目录,作为U盘的挂接点,如:mkdir /Udisk挂接U盘,mount /dev/sdb1 /Udisk如果系统没有任何提示返回了,就可以cd /Udisk 考贝文件了。
2、安装Netapp simulator软件[root@localhost tmp]# tar xvf 7.2-tarfile-v19.tgz simulator/simulator/disks2.tgzsimulator/disks.tgzsimulator/doc/simulator/doc/3rdpartycopyright.htmsimulator/doc/automation_guide.htmsimulator/doc/download_guide.htmsimulator/doc/faq/simulator/doc/faq/cdrom_problems.htmsimulator/doc/faq/cluster_between_different_versions.htmsimulator/doc/faq/core_file_generation.htmsimulator/doc/faq/disk_simpull.htmsimulator/doc/faq/disk_sizes.htmsimulator/doc/faq/improve_performance.htmsimulator/doc/faq/known_limitations.htmsimulator/doc/faq/memory_advisor_wrong.htmsimulator/doc/faq/multiple_simulators_at_same_time.htm simulator/doc/faq/multiple_versions.htmsimulator/doc/faq/network_interfaces_missing.htm simulator/doc/faq/network_ports.htmsimulator/doc/faq/noparity_volumes.htmsimulator/doc/faq/power_failure.htmsimulator/doc/faq/recent_versions.htmsimulator/doc/faq/remove_disks.htmsimulator/doc/faq/running_in_background.htmsimulator/doc/faq/simulator_access_from_same_host.htm simulator/doc/faq/simulator_files.htmsimulator/doc/faq/single_to_cluster_upgrade.htm simulator/doc/faq/snapmirror_to_real_filer.htmsimulator/doc/faq/supported_linux.htmsimulator/doc/faq/system_requirements.htmsimulator/doc/faq/upgrade_simulator.htmsimulator/doc/faq/who_do_i_call_for_support.htm simulator/doc/faq/recover_the_admin_password.htm simulator/doc/faq/syncmirror.htmsimulator/doc/faq/snaplock.htmsimulator/doc/images/simulator/doc/images/burning_computer.gif simulator/doc/images/corner_logo_fade.gif simulator/doc/images/faq.gifsimulator/doc/images/floppy_disks.gifsimulator/doc/images/gears.gifsimulator/doc/images/keys.gifsimulator/doc/images/manageontap.jpgsimulator/doc/images/motumbrella.jpgsimulator/doc/images/top_tile.gifsimulator/doc/images/hitz.jpgsimulator/doc/installation.htmsimulator/doc/license_keys.htmsimulator/doc/sdk.style.csssimulator/doc/davehitzforeword.htmsimulator/doc/faq.htmsimulator/doc/troubleshooting.htmsimulator/license.htmsimulator/readme.htmsimulator/runsim.shsimulator/setup.shsimulator/sim.tgz[root@localhost tmp]#3、配置Netapp Simulator系统[root@localhost tmp]# cd simulator/配置NetApp基本设置[root@localhost simulator]# ./setup.shScript version 19 (24/Nov/2005)Where to install to? [/sim]:Would you like to install as a cluster? [no]: noWould you like full HTML/PDF FilerView documentation to be installed [yes]: yes Continue with installation? [no]: yesCreating /simUnpacking sim.tgz to /simConfigured the simulators mac address to be [00:50:56:1:58:31]Please ensure the simulator is not running.Use DHCP on first boot? [yes]: noAsk for floppy boot? [no]: noChecking the default route...You have a single network interface called eth0 (default route) . You will not be able to access the simulator from this Linux host. If this interface is marked DOWN in ifconfig then your simulator will crash.Which network interface should the simulator use? [default]:Your system has 190MB of free memory. The smallest simulator memory you should choose is 58MB. The maximum simulator memory is 150MB.The recommended memory is 128MB.How much memory would you like the simulator to use? [128]: 256 (这是设置内存netapp机器的内存大小,根据自己实际情况修改)Create a new log for each session? [no]: yesYour simulator has 3 disk(s). How many more would you like to add? [0]: 20The following disk types are available in MB:Real (Usable)a - 43 ( 14)b - 62 ( 30)c - 78 ( 45)d - 129 ( 90)e - 535 (450)f - 1024 (900)If you are unsure choose the default option aWhat disk size would you like to use? [a]: fDisk adapter to put disks on? [0]: 0Adding 20 additional disk(s)../makedisks: Doing for id in 16 17 18 ...\nCreating ,disks/v0.19:NETAPP__:VD-1000MB-FZ-520:44641603:2102400 Creating ,disks/v0.20:NETAPP__:VD-1000MB-FZ-520:44641604:2102400 Creating ,disks/v0.21:NETAPP__:VD-1000MB-FZ-520:44641605:2102400 Creating ,disks/v0.22:NETAPP__:VD-1000MB-FZ-520:44641606:2102400 Creating ,disks/v0.23:NETAPP__:VD-1000MB-FZ-520:44641607:2102400 Creating ,disks/v0.24:NETAPP__:VD-1000MB-FZ-520:44641608:2102400 Creating ,disks/v0.25:NETAPP__:VD-1000MB-FZ-520:44641609:2102400 Creating ,disks/v0.26:NETAPP__:VD-1000MB-FZ-520:44641610:2102400 Creating ,disks/v0.27:NETAPP__:VD-1000MB-FZ-520:44641711:2102400 Creating ,disks/v0.28:NETAPP__:VD-1000MB-FZ-520:44641712:2102400 Creating ,disks/v0.29:NETAPP__:VD-1000MB-FZ-520:44641713:2102400 Creating ,disks/v0.32:NETAPP__:VD-1000MB-FZ-520:44641714:2102400 Creating ,disks/v0.33:NETAPP__:VD-1000MB-FZ-520:44641715:2102400 Creating ,disks/v0.34:NETAPP__:VD-1000MB-FZ-520:44641716:2102400 Creating ,disks/v0.35:NETAPP__:VD-1000MB-FZ-520:44641717:2102400 Creating ,disks/v0.36:NETAPP__:VD-1000MB-FZ-520:44641718:2102400 Creating ,disks/v0.37:NETAPP__:VD-1000MB-FZ-520:44641719:2102400 Creating ,disks/v0.38:NETAPP__:VD-1000MB-FZ-520:44641720:2102400 Creating ,disks/v0.39:NETAPP__:VD-1000MB-FZ-520:44641721:2102400 Creating ,disks/v0.40:NETAPP__:VD-1000MB-FZ-520:44641722:2102400Shelf file Shelf iskShelf14 updatedComplete. Run /sim/runsim.sh to start the simulator.[root@localhost simulator]#4、第一次启动NetApp,还需要配置一些基本配置。