OpenLDAP for Windows 安装手册(2.4.26版)
- 格式:docx
- 大小:253.12 KB
- 文档页数:9

部署OPENLDAP手册编写:贺承玮日期:2007年9月20日星期四操作系统:LINUX AS3.01)查看已经安装的OPENLDAPrpm –aq | grep openldap显示结果:openldap-2.0.27-17openldap-devel-2.0.27-172)下载并安装openldap-servers-2.0.27-17.i386.rpmrpm –ivh openldap-servers-2.0.27-17.i386.rpm - -force3)上传格尔提供的koalca.schema文件cp koalca.schema /etc/openldap/schema2.1设置配置文件在配置文件/etc/openldap/slapd.conf中进行如下修改:1、引入schemainclude /etc/openldap/schema/koalca.schema 2、增加根节点suffix "o=koalca"3、设置dnrootdn "cn=Manager,dc=koal,dc=com"4、设置登陆密码rootpw 123456785、其他设置suffix "dc=koal,dc=com"(如果有就设置,按你之前做的应该不用)2.2建库[root@testCA-01 openldap]# pwd/etc/openldap(即在openldap在安装目录下执行以下内容)[root@testCA-01 openldap]# slapadd -l initdata2.ldif -f /etc/openldap/slapd.conf(你需要把initdata2.ldif中的o项改成你需要的根节点名称)[root@testCA-01 openldap]# chown ldap.ldap /var/lib/ldap/*重启生效[root@testCA-01 openldap]# /etc/init.d/ldap restart停止slapd:[ 确定] 启动slapd:[ 确定]3.1搭建从机从机的安装过程同主机,不用作slapd.conf的设置和建库。

OpenLdap简易教程总述:LDAP(轻量级目录访问协议,Lightweight Directory Access Protocol)是实现提供被称为目录服务的信息服务。
目录服务是一种特殊的数据库系统,其专门针对读取,浏览和搜索操作进行了特定的优化。
目录一般用来包含描述性的,基于属性的信息并支持精细复杂的过滤能力。
目录一般不支持通用数据库针对大量更新操作操作需要的复杂的事务管理或回卷策略。
而目录服务的更新则一般都非常简单。
这种目录可以存储包括个人信息、web链结、jpeg图像等各种信息。
为了访问存储在目录中的信息,就需要使用运行在TCP/IP 之上的访问协议—LDAP。
LDAP目录中的信息是是按照树型结构组织,具体信息存储在条目(entry)的数据结构中。
条目相当于关系数据库中表的记录;条目是具有区别名DN (Distinguished Name)的属性(Attribute),DN是用来引用条目的,DN相当于关系数据库表中的关键字(Primary Key)。
属性由类型(Type)和一个或多个值(Values)组成,相当于关系数据库中的字段(Field)由字段名和数据类型组成,只是为了方便检索的需要,LDAP中的Type可以有多个Value,而不是关系数据库中为降低数据的冗余性要求实现的各个域必须是不相关的。
LDAP 中条目的组织一般按照地理位置和组织关系进行组织,非常的直观。
LDAP把数据存放在文件中,为提高效率可以使用基于索引的文件数据库,而不是关系数据库。
类型的一个例子就是mail,其值将是一个电子邮件地址。
LDAP的信息是以树型结构存储的,在树根一般定义国家(c=CN)或域名(dc=com),在其下则往往定义一个或多个组织(organization)(o=Acme)或组织单元(organizational units) (ou=People)。
一个组织单元可能包含诸如所有雇员、大楼内的所有打印机等信息。

OpenLDAP安装及配置OpenLDAP安装及配置折腾了好多天总算是折腾出些眉⽬来了,openldap在linux下的安装与⽂件的配置估计令好多⼈都⽐较头疼吧?我就遇到了这样的问题。
下⾯我就⼤致说⼀下openldap的安装过程以及所遇到的⼀些问题的处理办法。
1.安装BerkeleyDB我选⽤的数据库是BerkeleyDB-4.8.26,在安装openldap之前需要把BDB先装好。
安装步骤如下:1)⾸先把下载好的⽂件db-4.8.26.tar解压,⽣成⽂件夹db-4.8.26,# cd db-4.8.26/build_unix# ../dist/configure# make# make install这个过程⼀般没什么问题,默认安装到了/usr/local下,⽬录名,BerkeleyDB.4.8,2) 接下来应该把BerkeleyDB.4.8下include和lib⽂件夹下的⽂件都考到usr⽂件夹下相应的include和lib⽂件下。
也可以通过以下命令来实现#cp /usr/local/ BerkeleyDB.4.8/include/* /usr/include#cp /usr/local/ BerkeleyDB.4.8/lib/* /usr/lib注意:*后边要有空格,这是cp命令的格式2.安装openldap同样,先解压,我⽤的是openldap-2.4.13,安装步骤如下#cd openldap-2.4.13#env CPPFLAGS=”-I/usr/local/ BerkeleyDB.4.8/include” LDFLAGS=”-L/usr/local/ BerkeleyDB.4.8/lib”./configure --prefix=/usr/local/openldap出现Making servers/slapd/backends.cAdd config…Add ldif…Add monitor…Add bdb…Add hdb…Add relay…Make servers/slapd/overlays/statover.cAdd syncprov…Please run “make depend” to build dependencies就可以进⾏下⼀步了,# make depend#make#make test# make install这样openldap就基本上安装完成了,但在这⼀步容易出现⼀些问题。

在windows下安装open的发法一般在Windows系统上使用Open作为服务器的应该不是很多,相反,在Windows下用Open作为客户端接入的应该非常多,尤其是XP这种桌面系统或者Windows 2003 Server作为客户端。
应用也是非常多的。
这里我仅仅做了在Windows 2003 Server上的Open客户端,其实要做成Server的话,也差不多。
系统环境:Windows 2003 Server。
双路网卡,一路接192.168.0.0/24网段,此网段出局,网关为192.168.0.101。
另一路接192.168.1.0/24网段。
让此台Win2k3作为Client段接入之前交代过的Open Server。
Open Server的IP地址为123.123.123.233。
在Windows下使用的是基于NT系统的安装包open-2.0.9-gui-1.0.3-install.exe 下载地址:/softs/120505.html安装:双击+下一步+完成(这里我使用的默认安装路径C:\Program Files\Open )1.首先通过找到安装的路径,并且查看下面有些什么东西。
可以通过资源浏览器或者Cmd,个人认为Cmd可能看的比较清楚。
(另外下面dir出来的东西当中很多其实是默认没有的,是我后来加进去的,比如一些Client的证书密钥以及ta密钥等等,要添加什么东西,放在什么位置,之后我都会详细讲。
)---------------------------------------------------------------Microsoft Windows [Version 5.2.3790](C) Copyright 1985-2003 Microsoft Corp.切换工作目录到Open的默认安装路径下C:\Documents and Settings\Administrator>cd C:\Program Files\Open通过dir命令看看安装路径下面有些什么内容C:\Program Files\Open>dirVolume in drive C is systemVolume Serial Number is 785C-92D5Directory of C:\Program Files\Open2007-08-28 16:48 .2007-08-28 16:48 ..2007-08-28 16:34 bin2007-08-27 14:09 1,233 ca.crt (这个是CA根证书文件,是从Server端拿过来的。
1.避免重复的数据,从而无需在不同地点同时保存数据。
2.通过使用单一系统代替不同的数据管理系统和技术,简化数据的管理。
3.通过单点访问数据和实施一致的访问控制方法,提高数据安全性。
4.通过消除多种存储格式和系统,降低成本。
1、Directory Services(目录服务)能做什么?当局域网的规模变的越来越大时,为了方便主机管理,我们使用DHCP来实现IP地址、以太网地址、主机名和拓扑结构等的集中管理和统一分配。
同样,如果一个局域网内有许多的其它资源时,如打印机、共享文件夹等等,为了方便的定位及查找它们,一种集中定位管理的方式或许是较好的选择,DNS和NIS都是用来实现类似管理的方法。
对于局域网内的一个用户来讲,工作等其它应用需要,我们必须凭帐号登录主机、用帐号收发E-mail,甚至为了管理需要公司还需要维护一个电子号码簿来存储员工的姓名、地址、电话号码等信息。
随着时间的增长,我们会为这些越来越多的帐号和密码弄的头晕脑胀。
同时,如果一个员工离开,管理员就不得不翻遍所有的记录帐号信息的文件把离职员工的信息删除。
这些将是一个繁琐而效率低下的工作。
那么,如果能将此些帐号信息等统一到一个文件中进行管理,无疑会大大提高员工及管理员的工作效率。
目录服务(LDAP是其实现的一种)正是基于这些应用实现的。
2、什么是LDAP?LDAP是Lightweight Directory Access Protocol的缩写,顾名思义,它是指轻量级目录访问协议(这个主要是相对另一目录访问协议X.500而言的;LDAP略去了x.500中许多不太常用的功能,且以TCP/IP协议为基础)。
目录服务和数据库很类似,但又有着很大的不同之处。
数据库设计为方便读写,但目录服务专门进行了读优化的设计,因此不太适合于经常有写操作的数据存储。
同时,LDAP只是一个协议,它没有涉及到如何存储这些信息,因此还需要一个后端数据库组件来实现。
这些后端可以是bdb(BerkeleyDB)、ldbm、shell和passwd等。
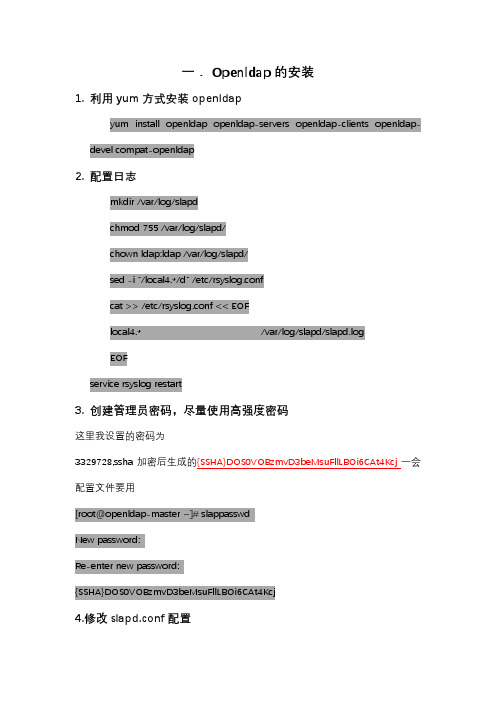
一.Openldap的安装1.利用yum方式安装openldapyum install openldapopenldap-servers openldap-clients openldap-develcompat-openldap2.配置日志mkdir /var/log/slapdchmod 755 /var/log/slapd/chownldap:ldap /var/log/slapd/sed -i "/local4.*/d" /etc/rsyslog.confcat >> /etc/rsyslog.conf<< EOFlocal4.* /var/log/slapd/slapd.logEOFservice rsyslog restart3. 创建管理员密码,尽量使用高强度密码这里我设置的密码为3329728,ssha加密后生成的{SSHA}DOS0VOBzmvD3beMsuFllLBOi6CAt4Kcj 一会配置文件要用[root@openldap-master~]#slappasswdNew password:Re-enter new password:{SSHA}DOS0VOBzmvD3beMsuFllLBOi6CAt4Kcj4.修改slapd.conf配置为了使用默认的slapd.conf这种配置方式,我们移除slapd.d这个目录,并复制默认的slapd.conf文件。
命令如下Cp/usr/share/openldap-servers/slapd.conf.obsolete/etc/openldap/slapd.confmv /etc/openldap/slapd.d{,.bak}(备份slapd.d为slapd.bak)然后我们用vi修改/etc/openldap/spapd.conf这个文件修改suffix和rootdn,rootpw这几个的值其中rootpw后面是上面生成的sha密码!.Suffix后面可以是一级域名也可以是二级域名,这里我们用的是一级域名。
OpenLdap使用手册一、文档概述 (2)二、LDAP简介 (2)2.1 LDAP介绍 (2)2.2 LDAP优劣 (3)2.3 LDAP协议 (3)2.4 LDAP服务器 (4)2.5 LDAP使用权限 (4)2.6 LDAP目标 (4)三、安装配置 (5)3.1 软件安装 (5)3.2 软件配置 (5)3.3 软件运行 (5)3.4 初始数据 (6)四、LDAP应用 (8)4.1 LDAP常用属性 (8)4.2LDAP Schema语法 (9)五、LDAP客户端 (9)5.1 增加目录属性 (10)5.2 删除目录属性 (11)5.3 修改目录属性 (11)5.4 增加目录 (11)5.5 修改目录 (12)5.6 删除目录 (13)六、应用举例 (14)附录: (15)X.500 (15)一、文档概述本文从介绍ldap入手,讲述了ldap的使用场合,并进一步的指导用户进行openldap安装与配置。
是新手入门的一个教程。
二、LDAP简介2.1 LDAP介绍LDAP的英文全称是Lightweight Directory Access Protocol,它是基于X.500标准的,但是简单多了并且可以根据需要定制。
与X.500不同,LDAP支持TCP/IP,这对访问Internet是必须的。
LDAP的核心规范在RFC中都有定义,所有与LDAP相关的RFC都可以在LDAPman RFC网页中找到。
LDAP目录中可以存储各种类型的数据:电子邮件地址、邮件路由信息、人力资源数据、公用密匙、联系人列表,等等。
通过把LDAP目录作为系统集成中的一个重要环节,可以简化员工在企业内部查询信息的步骤,甚至连主要的数据源都可以放在任何地方。
2.2 LDAP优劣目录服务的数据类型主要是字符型,为了检索的需要添加了BIN(二进制数据)、CIS(忽略大小写)、CES(大小写敏感)、TEL(电话型)等语法(Syntax),而不是关系数据库提供的整数、浮点数、日期、货币等类型,同样也不提供象关系数据库中普遍包含的大量的函数,它主要面向数据的查询服务(查询和修改操作比一般是大于10:1),不提供事务的回滚(rollback)机制,它的数据修改使用简单的锁定机制实现All-or-Nothing,它的目标是快速响应和大容量查询并且提供多目录服务器的信息复制功能。
openLdap安装教程环境操作系统:centOS 7.0 OpenLDAP:2.4.X安装从yum源安装yum install openldap openldap-servers openldap-clients -y配置执⾏如下命令来初始化OpenLdap的配置cp /usr/share/openldap-servers/DB_CONFIG.example /var/lib/ldap/DB_CONFIG在/etc/openldap⽬录下新建openLdap配置⽂件cd /etc/openldaptouch slapd.confslapd.conf的⽂件内容为include /etc/openldap/schema/corba.schemainclude /etc/openldap/schema/core.schemainclude /etc/openldap/schema/cosine.schemainclude /etc/openldap/schema/duaconf.schemainclude /etc/openldap/schema/dyngroup.schemainclude /etc/openldap/schema/inetorgperson.schemainclude /etc/openldap/schema/java.schemainclude /etc/openldap/schema/misc.schemainclude /etc/openldap/schema/nis.schemainclude /etc/openldap/schema/openldap.schemainclude /etc/openldap/schema/ppolicy.schemainclude /etc/openldap/schema/collective.schema# OpenLDAP 服务允许连接的客户端版本。
OpenTracker 2.4Quick Start Guide1. Insert the SIM CardOpenTracker has one Micro SIM slot. Larger SIM cards can be cut into micro SIM format in any shop that sells SIM Cards or Mobile phones.1. Unlock slot2. Open cover3. Insert SIM4. Close slot and lock it2. Connect the antennasTake the antenna cable ends, plug them one after another into the antenna connector on the OpenTracker. Turn the antenna cable connector clockwise . Ensure to connect the antennas tightly.Make sure to plug the GPS/GLONASS antenna (here shown orange) into the connector labeled GPS on the board and the GSM antenna (here shown in blue) into the connector labeled GSM.3. Connect MOLEX CableEnsure the latch on the connector is facing up as shown in the picture. Push the connector until it clicks.4. Connect Power source and ignition cable of your vehicleOpenTracker supports 12V/24V nominal power supplies (the full range is 8 – 32 Volts DC).Please connect first the battery negative (B –) terminal to pin 6 (black wire), then the positive (B+) terminal to pin 1 (red wire) through a 2A fuse, as in the picture below.OpenTracker is preconfigured to go to a low-power mode if the car engine is turned off. The VDET Signal (white wire) should be connected to the ignition cable of your vehicle. Any Car Stereo uses the same line to determine if the ignition is switched on.If you like to disable this feature or ignition output is not available, you can simply connect it to the positive power source (Pin 1) or change it manually in software.5. Start up the trackerPlease ensure to insert the correct data. Wrong information can cause higher data costs and be a source ofconnection problems.Setup APNSend SMS message to the inserted SIM card number to configure APN for your GSM provider (WAP APN are not supported):Example:The module will reply with the following response:V D E T (I G N ) G N D (B -)V I N (B +)Send 2 separate SMS messages to the inserted SIM card number to configure APN username and password (optional for some GSM providers – default username and password are empty):Example:The module will reply with the following responses:Change SMS passwordOptionally, change SMS password by sending following SMS command:Example:After changing the SMS password, the SMS commands should begin with your new password, like:6. SMS CommandsSummary of the SMS commands for the initial configuration. The unit will accept only one command at a time and send a reply on successful command execution (this may take a while).7. Web InterfaceTo use the Geolink web interface (www.geolink.io) you need to register your OpenTracker device.Please follow this guide: https://geolink.io/guide.php© Geolink all right reserved.Geolink assumes no responsibility for any errors, which may appear in this manual. Furthermore, Geolink reserves the right to alter the hardware, software, and/or specifications detailed herein at any time without notice, and does not make any commitment to update the information contained herein. Geolink products are not authorized for use as critical components in life support devices or systems. OpenTracker is an open source development board for vehicle tracking applications and any kind of certification/homologation for a final product based on this board is responsibility of the final developer/manufacturer.OpenTracker contains open source software subject to the GNU General Public License (“GPL”), the GNU Lesser General Public License (“LGPL”), the MIT License and the SAM Software Package License. Each portion of the software is copyright of their respective owners and contributors.All the source code used in the OpenTracker, with its accompanying licenses, is available from Geolink’s Git repos itories at: https:///geolink/opentracker and https:///geolink/opentracker-arduino-board。
LDAP完全配置管理用户组服务器端一:安装相关软件yum -y install openldap* db4*二:安装配置1 创建复制BDB数据库配置文件LDAP服务器默认采用BDB(伯克利)数据库作为后台,CentOS中已经默认安装,需要先将/etc/openldap/目录下的DB-CONFIG.example文件复制到/var/lib/ldap/目录下并更名为DB-CONFIG并更改权限为ldap所有。
#cp /etc/openldap/DB_CONFIG.example /var/lib/ldap/DB_CONFIG#useradd -s /sbin/nologin ldap#chown ldap:ldap /var/lib/ldap/DB_CONFIG2 LDAP服务器的主配置文件为/etc/openldap/slapd.conf,找到suffix “dc=my-domain,dc=com”rootdn “cn=Manager,dc=my-domain,dc=com” 两行。
根据实际情况修改为:suffix “dc=langtaojin,dc=com” 设定域名后缀rootdn “cn=Manager,dc= langtaojin,dc=com ” 超级管理员密码设为简单的明码,把rootpw secret这行前面的注释去掉,注意此行前面一定不要留空格。
(或者用slappasswd -h{SSHA} -s password生成你的密码)找到access配置部分,添加如下语句:access to attrs=shadowLastChange,Userpasswordby self writeby * authaccess to *by * readLDAP服务器需要手动添加日志功能。
/etc/openldap/slapd.conf中末行添加directory /var/lib/ldaploglevel 296cachesize 1000checkpoint 2048 10local4.* /var/log/ldap.log (說明:local0-7为syslog的facilities,具体的程序应用的facility不一样,每一个facility都有它的数字代码,由这些代码加上错误信息的程度syslog 可以判断出信息的优先权。
The next screen is the End-User License Agreement for OpenLDAP for Windows, which allows you to use the software for free under Common Public License (CPL). You must accept the terms of the agreement to get to the next screen.
The Destination Folder screen enables you to select the location the software will be installed to.
The next screen, Custom Setup, allows you to exclude some features of OpenLDAP for Windows if you do not need them.
The below table contains the features and prerequisites and their descriptions.
The Additional Settings screen can be helpful if you need to change the default settings: your servername or IP address and the open and SSL ports of the OpenLDAP server. You can also turn on or off the option for activating the statistics for the OpenLDAP instance. You can manage the server properties remotely without restarting the the service by checking the dynamic configuration backend option.
Die Seite Backend Configuration ermöglicht die Auswahl zwischen vier unterschiedlichen Backend Modulen.
The page BDB Backend Settings configures the password for the root-user. Optionally you can enable the statistics.
The page LDAP Backend Settings configures a so called Proxy-Server, which redirects the requests to the real LDAP server. Please refer to the documentation of the producer for all available options.
The page LDIF Backend Settings configures the Backend module saving the results in LDIF files. Please refer to the documentation of the producer for all available options.
The page SQL-Server Backend Settings configures a relational database for saving the objects. The SQL server Microsoft SQL-Server 2005/2008 will be supported. An installed version of the product is necessary to use this option. Please refer to the documentation of the producer for all available options.
The last screen, Ready to install OpenLDAP for Windows, allows you to start the installation process or return back and make any changes to the settings on the previous screens.
After the installation is complete, you can open the folder to where OpenLDAP was installed and start using the package to your your best advantage. The following credentials are valid by using the default settings.
User: cn=Manager,dc=maxcrc,dc=com
Password: secret。