扫描仪维修手册
- 格式:docx
- 大小:37.46 KB
- 文档页数:3


打印机/扫描仪选件机器代码 (D381)机器代码:D009/D011/D012/D013复印机维修手册阅读前言安全性和符号本手册的习惯用法本手册使用了几种符号。
:参考或参阅:螺丝:接头:开口环:E形环=:夹子警告、注意等H U标题 :不遵从警告信息可能会导致严重伤亡。
遵从这些指南可确保安全操作并可防止细微伤害。
遵从这些指南,避免类似送纸不良、原稿损坏、有价数据丢失及机器损坏等问题。
本信息给出如何提供最佳服务的提示和忠告。
目录安全性和符号 (1)本手册的习惯用法 (1)警告、注意等 (1)1. 安装....................................................................................................................................概述 (5)打印机/扫描仪选件 (5)其他选件 (5)板子、SD卡插槽 (6)打印机和 P/S 选件 (9)概述 (9)套件内容 (10)打印机/扫描仪安装 (12)打印机增强性、扫描仪增强性选件 (14)应用程序合并 (16)其他选件 (18)概述 (18)PostScript 3 (19)文件格式转换器 (20)IEEE1284 (21)IEEE 802.11a/g, g (无线局域网) (21)蓝牙 (25)Gigabit以太网和 USB2.0 (25)检查全部的连接 (26)2. 维修表................................................................................................................................打印机维修表 (27)SP 表 (27)扫描仪维修表 (28)SP 表 (28)3. 详细部分说明.....................................................................................................................概述 (31)打印机功能 (31)扫描仪功能 (32)4. 规格....................................................................................................................................打印机控制器规格 (35)打印机控制器 (35)USB 规格 (36)IEEE 802.11a/g, g (36)蓝牙规格 (36)扫描仪规格 (37)软件附件 (38)打印机 (38)打印机驱动程序 (38)实用程序 (38)扫描仪 (39)1. 安装概述本节描述了打印机、扫描仪和D009/D012系列机器其他选件的安装程序。

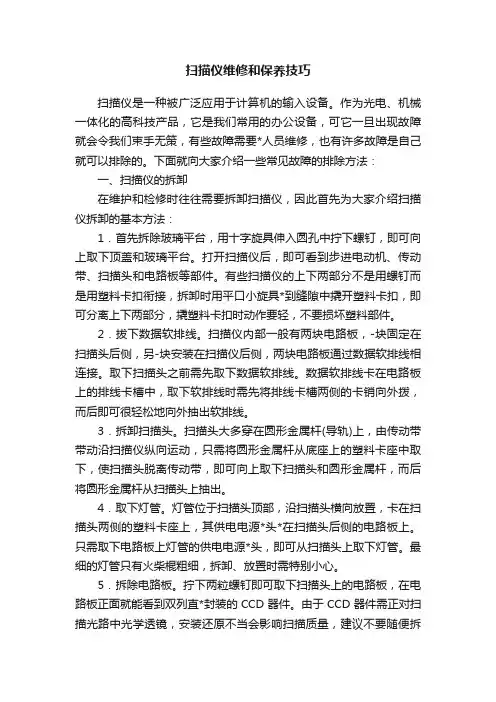
扫描仪维修和保养技巧扫描仪是一种被广泛应用于计算机的输入设备。
作为光电、机械一体化的高科技产品,它是我们常用的办公设备,可它一旦出现故障就会令我们束手无策,有些故障需要*人员维修,也有许多故障是自己就可以排除的。
下面就向大家介绍一些常见故障的排除方法:一、扫描仪的拆卸在维护和检修时往往需要拆卸扫描仪,因此首先为大家介绍扫描仪拆卸的基本方法:1.首先拆除玻璃平台,用十字旋具伸入圆孔中拧下螺钉,即可向上取下顶盖和玻璃平台。
打开扫描仪后,即可看到步进电动机、传动带、扫描头和电路板等部件。
有些扫描仪的上下两部分不是用螺钉而是用塑料卡扣衔接,拆卸时用平口小旋具*到缝隙中撬开塑料卡扣,即可分离上下两部分,撬塑料卡扣时动作要轻,不要损坏塑料部件。
2.拔下数据软排线。
扫描仪内部一般有两块电路板,-块固定在扫描头后侧,另-块安装在扫描仪后侧,两块电路板通过数据软排线相连接。
取下扫描头之前需先取下数据软排线。
数据软排线卡在电路板上的排线卡槽中,取下软排线时需先将排线卡槽两侧的卡销向外拨,而后即可很轻松地向外抽出软排线。
3.拆卸扫描头。
扫描头大多穿在圆形金属杆(导轨)上,由传动带带动沿扫描仪纵向运动,只需将圆形金属杆从底座上的塑料卡座中取下,使扫描头脱离传动带,即可向上取下扫描头和圆形金属杆,而后将圆形金属杆从扫描头上抽出。
4.取下灯管。
灯管位于扫描头顶部,沿扫描头横向放置,卡在扫描头两侧的塑料卡座上,其供电电源*头*在扫描头后侧的电路板上。
只需取下电路板上灯管的供电电源*头,即可从扫描头上取下灯管。
最细的灯管只有火柴棍粗细,拆卸、放置时需特别小心。
5.拆除电路板。
拧下两粒螺钉即可取下扫描头上的电路板,在电路板正面就能看到双列直*封装的CCD器件。
由于CCD器件需正对扫描光路中光学透镜,安装还原不当会影响扫描质量,建议不要随便拆下扫描头上的电路板。
二、常见故障原因与排除1.整幅图像只有一小部分被获取故障原因与排除:聚焦矩形框仍然停留在预览图像上;只有矩形框内的区域被获取。
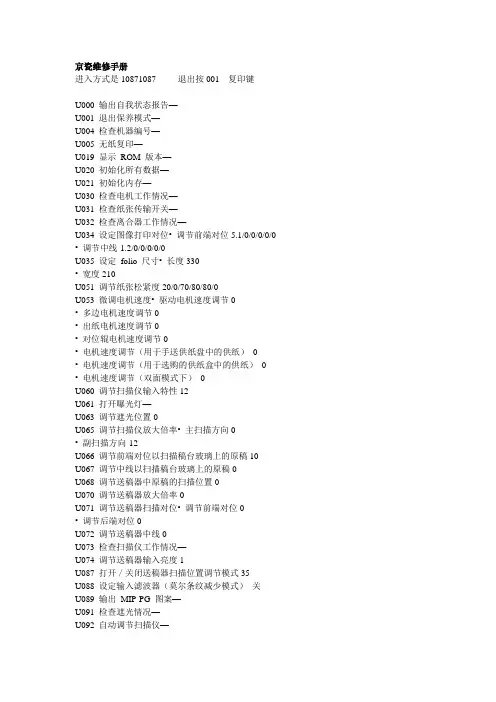
京瓷维修手册进入方式是10871087 退出按001 复印键U000 输出自我状态报告—U001 退出保养模式—U004 检查机器编号—U005 无纸复印—U019 显示ROM 版本—U020 初始化所有数据—U021 初始化内存—U030 检查电机工作情况—U031 检查纸张传输开关—U032 检查离合器工作情况—U034 设定图像打印对位• 调节前端对位5.1/0/0/0/0/0 • 调节中线-1.2/0/0/0/0/0U035 设定folio 尺寸• 长度330• 宽度210U051 调节纸张松紧度20/0/70/80/80/0U053 微调电机速度• 驱动电机速度调节0• 多边电机速度调节0• 出纸电机速度调节0• 对位辊电机速度调节0• 电机速度调节(用于手送供纸盘中的供纸)0 • 电机速度调节(用于选购的供纸盒中的供纸)0 • 电机速度调节(双面模式下)0U060 调节扫描仪输入特性12U061 打开曝光灯—U063 调节遮光位置0U065 调节扫描仪放大倍率• 主扫描方向0• 副扫描方向-12U066 调节前端对位以扫描稿台玻璃上的原稿10U067 调节中线以扫描稿台玻璃上的原稿0U068 调节送稿器中原稿的扫描位置0U070 调节送稿器放大倍率0U071 调节送稿器扫描对位• 调节前端对位0• 调节后端对位0U072 调节送稿器中线0U073 检查扫描仪工作情况—U074 调节送稿器输入亮度1U087 打开/关闭送稿器扫描位置调节模式35U088 设定输入滤波器(莫尔条纹减少模式)关U089 输出MIP-PG 图案—U091 检查遮光情况—U092 自动调节扫描仪—U093 设定曝光浓度等级• 文字/文字和图片/图片模式0/0/0 U099 检查原稿尺寸检测—U100 设定主充电高压• 栅极控制电压135• 复印间隔60• 复印数量50• 校正数量10U101 设定其它高压• 显影偏压时钟频率27• 显影偏压时钟占空45• 转印控制电压(较大尺寸)168• 转印控制电压(较小尺寸)179• 转印充电输出关闭定时38• 转印充电输出开启定时34• 分离控制电压1• 分离充电输出开启定时33• 分离充电输出关闭定时43U110 检查/清除感光鼓计数—U130 墨粉装入模式—U144 设定墨粉装入操作0U158 检查/清除显影计数—U161 设定定影控制温度• 初级稳定的定影温度140• 二次稳定的定影温度160• 复印操作温度1 170• 复印操作温度2 180• 用于定影控制的纸张数5• 用于定影控制的纸张数(厚纸)20U162 强制稳定定影—U163 重设定影故障的数据—U167 检查/清除定影计数—U199 检查定影温度—U200 打开所有LED —U202 设定KMAS 主监视系统—U203 单独操作送稿器—U204 设定是否有钥匙计数卡或钥匙计数器关U207 检查操作面板键—U243 检查送稿器电机和电磁铁的工作情况—U244 检查送稿器各开关—U250 设定保养周期150000U251 检查/清除保养计数0U252 设定地域日本U253 在单、双计数之间进行切换A3U254 开/关自动启动功能开U255 设定自动清除时间90U258 检测到墨粉用尽时,切换复印操作单张模式U260 改变复印计数定时出纸后U265 设定地域规格0U332 设定尺寸转换系数1.0U342 设定出纸限制开U345 设定保养到期指示值—U402 调节图像打印的预留装订边—U403 调节稿台玻璃上的原稿扫描预留装订边—U404 调节送稿器中的原稿扫描预留装订边—U407 调节内存图像打印前端对位—U901 检查/清除各供纸位置的复印计数—U903 检查/清除卡纸计数—U904 检查/清除故障显示计数—U905 检查/清除送稿器计数—U908 检查总计数—U910 清除覆盖率数据—U911 检查/清除各种纸张尺寸的复印计数—U927 清除计数器—U928 检查/清除机器运转计数—U990 检查/清除曝光灯亮起时间—U991 检查扫描仪计数—U993 输出VTC-PG 图案—KM-1620自诊断功能KM-1620配备自诊断功能。

Ca non佳能外设产品常见问题问与答Frequently Asked QuestionsFrequently Asked Questions外设客户支持中心2001年5月扫描仪型号FB-630ui/630u FB-330P/630PFB-320P/620PFB-1200S FB-1210U FS-2710 N650U/656U N1220UN640PD1230UF D646UD660UD2400UFFB-320P/620P1. 如果我的驱动程序遗失了怎么办?答:您可以在佳能公司的中文主页上下载,网址是:2. 我的扫描仪可以在DOS环境下工作吗?答:现在的扫描仪随机一般只附带windows环境下的驱动程序,并不附带DOS 的驱动程序,在DOS环境下无法直接使用。
3. 随机附带的OCR软件有什么用处?答:OCR软件是文字识别软件,可以通过软件方式对所扫描的文字进行识别并将其转换为文本格式,从而达到可编辑的目的。
4. 随机附带的OmniPage软件,有什么用处?答:OmniPage是一个西文的OCR软件。
如果您使用中文的OCR软件,您可以不安装或不使用此软件。
5. 随机附带的OCR软件,文字识别率不高,怎么办?答:OCR软件的识别率,与原始稿件的内容有直接的联系,一般对印刷品的纯文字稿件的识别率比较高。
扫描仪捆绑的OCR软件,一般是基础版本的。
如果您对OCR的识别,有更高的要求(例如表格,手写体或更高的识别率),可以向软件公司购买专业级的OCR 软件。
6. 扫描仪已经联到计算机并口上,打印机怎么联?答:打印机可以连接到扫描仪的输出口上。
7. 电脑找不到扫描仪该怎么办?答:确定扫描仪的电源是否打开,电缆线是否正确连接,扫描仪的驱动程序是否安装正确。
8. 为什么扫描的速度很慢?答:扫描的速度慢,可能有下面几个原因:1)有其他程序在同时运行2)扫描时,选择的精度过高。
3)您的计算机的性能过低4)打印端口的设置不当9. 怎么设置打印端口,能使扫描速度更快?答:在计算机的CMOS和Windows中,打印端口的设置,直接影响扫描的速度。

扫描仪基础原理解析及故障维修扫描仪是除键盘和鼠标之外被广泛应用于计算机的输入设备。
你可以利用扫描仪输入照片建立自己的电子影集;输入各种图片建立自己的网站;扫描手写信函再用E-mail发送出去以代替传真机;还可以利用扫描仪配合OCR软件输入报纸或书籍的内容,免除键盘输入汉字的辛苦。
所有这些为我们展示了扫描仪不凡功能,它使我们在办公、学习和娱乐等各个方面提高效率并增进乐趣。
在选购扫描仪时,我们常常遇到许多难懂的专业技术名词,如光学分辨率(光学解析度)、最大分辨率(最大解析度)、色彩分辨率(色彩深度)、扫描模式、接口方式(连接界面)等等。
在使用扫描仪当中,又会遇到到扫描速度慢,占用硬盘空间多,以及一些不知所云的设置等诸多困扰。
然而说明书提供给我们的操作指导并不能让所有的人成为应用专家,即使照着说明书去进行某些设置,也不知道为什么要这样做,这无疑给我们用好用巧机器带来了障碍。
本文针对这些问题,从扫描仪的基本结构入手,阐述它的工作原理,使我们对每一项设置或操作都道原因,在应用水平上有一个提高。
一、扫描仪的工作原理扫描仪是图像信号输入设备。
它对原稿进行光学扫描,然后将光学图像传送到光电转换器中变为模拟电信号,又将模拟电信号变换成为数字电信号,最后通过计算机接口送至计算机中。
扫描仪扫描图像的步骤是:首先将欲扫描的原稿正面朝下铺在扫描仪的玻璃板上,原稿可以是文字稿件或者图纸照片;然后启动扫描仪驱动程序后,安装在扫描仪内部的可移动光源开始扫描原稿。
为了均匀照亮稿件,扫描仪光源为长条形,并沿y方向扫过整个原稿;照射到原稿上的光线经反射后穿过一个很窄的缝隙,形成沿x方向的光带,又经过一组反光镜,由光学透镜聚焦并进入分光镜,经过棱镜和红绿蓝三色滤色镜得到的RGB三条彩色光带分别照到各自的CCD 上,CCD将RGB光带转变为模拟电子信号,此信号又被A/D 变换器转变为数字电子信号。
至此,反映原稿图像的光信号转变为计算机能够接受的二进制数字电子信号,最后通过串行或者并行等接口送至计算机。
京瓷维修手册进入方式是10871087 退出按001 复印键U000 输出自我状态报告—U001 退出保养模式—U004 检查机器编号—U005 无纸复印—U019 显示 ROM 版本—U020 初始化所有数据—U021 初始化内存—U030 检查电机工作情况—U031 检查纸张传输开关—U032 检查离合器工作情况—U034 设定图像打印对位• 调节前端对位5.1/0/0/0/0/0• 调节中线-1.2/0/0/0/0/0 U035 设定 folio 尺寸• 长度330• 宽度210U051 调节纸张松紧度20/0/70/80/80/0 U053 微调电机速度• 驱动电机速度调节0 多边电机速度调节0 •• 出纸电机速度调节0• 对位辊电机速度调节0• 电机速度调节(用于手送供纸盘中的供纸) 0 • 电机速度调节(用于选购的供纸盒中的供纸) 0 • 电机速度调节(双面模式下) 0U060 调节扫描仪输入特性12U061 打开曝光灯—U063 调节遮光位置0U065 调节扫描仪放大倍率• 主扫描方向0 • 副扫描方向-12U066 调节前端对位以扫描稿台玻璃上的原稿10 U067 调节中线以扫描稿台玻璃上的原稿0 U068 调节送稿器中原稿的扫描位置0 U070 调节送稿器放大倍率0 U071 调节送稿器扫描对位• 调节前端对位0 • 调节后端对位0U072 调节送稿器中线0U073 检查扫描仪工作情况—U074 调节送稿器输入亮度1U087 打开,关闭送稿器扫描位置调节模式35 U088 设定输入滤波器(莫尔条纹减少模式) 关 U089 输出 MIP-PG 图案—U091 检查遮光情况—U092 自动调节扫描仪—U093 设定曝光浓度等级• 文字,文字和图片,图片模式0/0/0U099 检查原稿尺寸检测—U100 设定主充电高压• 栅极控制电压135 • 复印间隔60• 复印数量50• 校正数量10U101 设定其它高压• 显影偏压时钟频率27 • 显影偏压时钟占空45• 转印控制电压(较大尺寸) 168 • 转印控制电压(较小尺寸) 179 • 转印充电输出关闭定时38• 转印充电输出开启定时34• 分离控制电压1• 分离充电输出开启定时33• 分离充电输出关闭定时43U110 检查,清除感光鼓计数—U130 墨粉装入模式—U144 设定墨粉装入操作0U158 检查,清除显影计数—U161 设定定影控制温度• 初级稳定的定影温度140• 二次稳定的定影温度160• 复印操作温度 1 170• 复印操作温度 2 180• 用于定影控制的纸张数5• 用于定影控制的纸张数(厚纸) 20 U162 强制稳定定影—U163 重设定影故障的数据—U167 检查,清除定影计数—U199 检查定影温度—U200 打开所有 LED —U202 设定 KMAS 主监视系统—U203 单独操作送稿器—U204 设定是否有钥匙计数卡或钥匙计数器关U207 检查操作面板键—U243 检查送稿器电机和电磁铁的工作情况— U244 检查送稿器各开关—U250 设定保养周期150000U251 检查,清除保养计数0U252 设定地域日本U253 在单、双计数之间进行切换A3 U254 开,关自动启动功能开U255 设定自动清除时间90U258 检测到墨粉用尽时,切换复印操作单张模式U260 改变复印计数定时出纸后U265 设定地域规格0U332 设定尺寸转换系数1.0U342 设定出纸限制开U345 设定保养到期指示值—U402 调节图像打印的预留装订边—U403 调节稿台玻璃上的原稿扫描预留装订边—U404 调节送稿器中的原稿扫描预留装订边—U407 调节内存图像打印前端对位—U901 检查,清除各供纸位置的复印计数—U903 检查,清除卡纸计数—U904 检查,清除故障显示计数—U905 检查,清除送稿器计数—U908 检查总计数—U910 清除覆盖率数据—U911 检查,清除各种纸张尺寸的复印计数—U927 清除计数器—U928 检查,清除机器运转计数—U990 检查,清除曝光灯亮起时间—U991 检查扫描仪计数—U993 输出 VTC-PG 图案—KM-1620自诊断功能KM-1620配备自诊断功能。
维修手册1、模拟代码(诊断,设定,调整值输入,数据显示)1.1 概要和目的概要的功能:获取机器运行状态,尽早发现机器故障位置及起因、并快速进行各项设定和调整以提高机器的服务性能。
1) 各项调整2) 各规定值和功能的设定3) 故障排除4) 动作检查5) 各计数器检查、设定和清除6) 机器运行状态(运行履历)数据检查、清除7) 各项数据的传送(调整值、设定、动作、计数器)操作方法和操作面板显示在机型的操作面板形式不同而不同。
A.操作方法和动作*进入模拟模式1) [#/P]键→[*]键→[C]键→[*]键→进入模拟主代码2) 用数字键输入模拟主代码→[开始]键3) 用数字键输入模拟子代码→[开始]键4) 用上下键和项目选择键选择一个项目。
5) 根据所选项目机器进入相应的模式。
按[开始]键开始模拟操作。
如要取消当前模拟模式或改变主代码和子代码,按[用户设定]键。
* 取消模拟模式回到正常模式1,按[CA]键。
B.在调整值输入菜单中如何通过触控面板更改模拟调整值(1) 目标SIM清单03-07,08-01,08-02,08-03,08-10,08-11,08-12,09-05,43-01,44-34,46-02,46-07,46-09,46-10,46-11,46-18,46-20,46-30,46-31,48-01,48-02,50-01,05-05,05-06,50-12,51-01,51-02,51-90,53-07(2) 触控面板操作方法·在调整值设定菜单中,所选项目被高亮显示。
调整值更新为高亮显示的模拟调整值。
·如果一页显示页面没有列出所有调整项目,触摸[↑]和[↓]按键切换页面。
·如果改变调整值,触摸相应的项目进行调整值修改。
(所选的项目被高亮显示。
)输入调整值并执行以下程序,所选项目的调整值及其显示被更新。
1) 触摸[OK]按键。
2) 触摸下一个选择项目进行调整。
Revisions, DisclaimersRevisionsFCC declaration: This equipment has been tested and found to comply with thelimits for a Class B digital device, pursuant to Part 15 of the FCC Rules. These limitsare designed to provide reasonable protection against harmful interference in aresidential installation. This equipment generates, uses, and can radiate radiofrequency energy and, if not installed and used in accordance with the instructionmanual, may cause harmful interference to radio communications. However, thereis no guarantee that interference will not occur in a particular installation. If thisequipment does cause harmful interference to radio or television reception, whichcan be determined by turning the equipment off and on, the user is encouraged totry to correct the interference by one or more of the following measures:•Reorient or relocate the receiving antenna.•Increase the separation between the equipment and receiver.•Connect the equipment into an outlet on a circuit different from that to which thereceiver is connected.•Consult the dealer or an experienced radio/TV technician for help.FCC warning: Changes or modifications not expressly approved by the partyresponsible for compliance could void the user's authority to operate the equip-ment.iiiprohibited. The length of the parallel interface cable must be 3 meters (10 feet) or less. The length of the serial interface cable must be 15 meters (50 feet) or less.•The length of the power cord must be 3 meters (10 feet) or less.This Class B digital apparatus complies with Canadian ICES-003.Cet appareil numérique de la classe B est conforme à la norme NMB-003 du Canada.As an ENERGYSTAR ® Partner, Fujitsu Limited declares that this scanner meets the ENERGYSTAR ® guidelines for energy efficiency. ENERGYSTAR ® is a U. S. registered mark.ChangesThe contents of this manual may be revised without prior notice.FUJITSU reserves the right to make changes to any products herein, to improve reliability, function, or design, without further notice and without obligation. CopyrightsAll Rights Reserved, Copyright © 2000, FUJITSU LIMITED.Printed in Japan.No part of this manual may be reproduced in any form without permission.Fujitsu OfficesPlease send your comments on this manual or on Fujitsu products to the followingaddresses:FUJITSU COMPUTER PRODUCTS OF AMERICA,INC.2904 Orchard Parkway,San Jose. California 95134-2022,U.S.A.TEL:1-408-432-6333FAX:1-408-432-3908/FUJITSU AUSTRALIA LIMITEDFujitsu Hause 2 Julius Avenue North Ryde N.S.W 2113 AUSTRALIATEL:61-2-9776-4555FAX:61-2-9776-4019.au/FUJITSU CANADA,INC.2800 Matheson Blvd.East,Mississauga. Ontario L4W 4X5,CANADATEL:1-905-602-5454FAX:1-905-602-5457http://www.fujitsu.ca/FUJITSU DEUTSCHLAND GmbH. Frankfurter Ring 211,8000 München 40,F.R,GERMANYTEL:49-89-32378-0FAX:49-89-32378-100http://www.fujitsu.de/FUJITSU ESPAÑA,S.AEdificio torre Europa 5aPaseo de la Castellana 95Madrid 28046,SPAINTEL:34-1-581-8000FAX:34-1-581-8300/home/ FUJITSU EUROPE LTD.2,Longwalk Road,Stockey Park,Uxbridge Middlesex,UB11 1AB,U.KTEL:44-81-573-4444FAX:44-81-573-2643/home FUJITSU FRANCE S.A.I, Place des Etats-Unis, SILIC 310,94588 Rungis cedex, FRANCETEL:33-1-4180-3880FAX:33-1-4180-3866/home/FUJITSU COMPUTERS (SINGAPORE) PTE, LTD.20 Science Park Road #03-01, Tele Teck Park Singapore Science Park II, Singapore 117674 Republic of SingaporeTEL:65-777-6577FAX:65-771-5669.sg/FUJITSU HONG KONG Limited10/F, Lincoln House, Taikoo Place,979 King’s Road, Island East, Hong KongTEL:852-827-5780FAX:852-827-4724TLX:62667/FUJITSU ITALIA S.p.A.Via Nazario Sauro, 3820099 Sestos, Giovanni (MI), ITALYTEL:39-2-26294-1FAX:39-2-26294-201/homeFUJITSU NORDIC ABKung Hans väg,S-192 68 Sollentuna, SWEDENTEL:46-8-626-4500FAX:46-8-626-4588/homeFUJITSU LIMITEDInternational OperationsMarunouchi 1-6-1, Chiyoda-ku,Tokyo 100 JAPANTEL:(81-3)3216-3211FAX:(81-3)3213-7174TLX:J2283Cable:”FUJITSU LIMITED TOKYO”http://www.fujitsu.co.jp/iiiNote, LiabilityREAD ALL OF THIS MANUAL CAREFULLY BEFORE USING THIS PRODUCT.IF NOT USED CORRECTLY, UNEXPECTED INJURY MAY BE CAUSED TOUSERS OR BYSTANDERS.While all efforts have been made to ensure the accuracy of all information in thismanual, FUJITSU assumes no liability to any party for any damage caused byerrors or omissions or by statements of any kind in this manual, its updates orsupplements, whether such errors are omissions or statements resulting fromnegligence, accidents, or any other cause. FUJITSU further assumes no liabilityarising from the application or use of any product or system described herein; norany liability for incidental or consequential damages arising from the use of thismanual. FUJITSU disclaims all warranties regarding the information containedherein, whether expressed, implied, or statutory.ivPrefaceThis manual explains how to clean and maintain the M4097D image scanner.The M4097D is a highly functional image scanner developed for volume filing,using charge-coupled device (CCD) image sensors. This scanner features duplexscanning and high quality image processing with an automatic document feeder(ADF).Refer to the Operator’s Guide for basic information about the M4097D.vConventionsImportant information that requires special attention is indicated as follows:WARNINGWARNING indicates that personal injury like pinching of fingers or hands mayresult if you do not follow a procedure correctly.CAUTIONCAUTION indicates that damage to the scanner may result if you do not follow aprocedure correctly.Official Fujitsu part names are indicated with an initial capital letter, as in the partname “Pick roller”.NOTE“how-to” tips or suggestions to help you perform a procedure correctly.viviiCONTENTSCHAPTER 1DESCRIPTION...............................................................1-1Units ...............................................................................1-2Assemblies .....................................................................1-4Operator panel................................................................1-5Panel Display..................................................................1-6D E S C R I P D E S C R I C L E A N I N G R E P L A C E M E N T O F P A R T ST R O UB L E S HO O T I NGDESCRIPTIONCLEANINGREPLACEMENT OF PARTSTROUBLESHOOTINGDESCRIPTIONThis chapter describes units, assemblies, indicators and LED functions.UnitsAssembliesOperator PanelPanel DisplayUnits69Third party slot1211D E S C R I P T IAssembliesThumb screwStackerPick roller 2I IOperator PanelThe Operator panel is located on the upper right hand side of the scanner.The panel consists of an LCD (16characters x 2 lines), LEDs, and buttons.ArrangementPanel DisplayButton/LED FunctionI I Counter DisplayThe scanner is provided with acounter display.When the counter value is 0, no number is displayed.Operation statusThe operation status is indicated by the following messages:<Power-on><Reading><Low Power Mode>When the Scanner Display turns Off and the powerremains “On”, the scanner is in the Low Power Mode.One of the following will wake up the scanner:•Pressing any button.•Setting the paper on the ADF.•Sending a command from the host computer.<Waiting for Start>The scanner displays the following screen when waiting for theStart button to be pressed:(Only When the Video InterfaceOption is installed.)<Cleaning request>When the Pick roller cleaning is necessary, the scanner displaysthe following on the upper line:When the ADF glass cleaning is necessary, the scanner displaysthe following on the LCD:Clean the Pick roller or the ADF glass in accordance with theinstructions given in chapter 2, Cleaning the ADF, and chapter 3,Pick Roller.D E S C I I Temporary error<Hopper empty>This message is displayed if there is no more paper on the ADF paper chute during a read operation in ADF mode. Fill the ADF paper chute with paper. To enable the read operation, press the stop button.<Jam>This message is displayed if a document is jammed in the ADF.See “Cleaning and Maintenance ” for removing jammed ducuments.<ADF cover open>This message is displayed if the ADF is not closed completely.Close the ADF completely, and enable the read operation.<Double feed error>This message is displayed when the ADF detects a Double feed error. Check the document and re-scan it.AlarmOne of the following messages is displayed if an error occurs in the scanner. If one of the following error messages is displayed, turn the power Off and then On again. If the same message is displayed, contact your service representative.<Optical alarm front><Optical alarm back><FB mechanism alarm>When the total number of sheets scanned by the ADF is less than 100, the message above and the message below are displayed alternately. Remove the bracket (Shipping Lock) that holds the carrier in place.<Motor fuse alarm><Lamp fuse alarm>D E S C R I P T I <Image transfer alarm><Memory alarm><EEPROM alarm><FAN alarm><SCSI fuse alarm>When this message is displayed, turn Off system power and then turn it On again. Alternatively,replace the current cable with one recommended by the manufacturer of the SCSI board. When the cause of the alarm has been corrected, the scanner automatically resumes operation once power is turned On again.CLEANINGThis chapter describes cleaning supplies, areas that require cleaning, and procedures for cleaning the ADF and the flatbed. Cleaning Supplies and Areas RequiringCleaningSuppliesAreas Requiring CleaningCleaning the ADFCleaning the Flatbed2-12-2Cleaning Supplies and Areas Requiring Cleaning*1 If the display on the operator panel shows “Please clean Pick-roller ”, then clean it regardless of the frequencies recommended here.CAUTIONNOTE• Paper with a smooth surface, such as coated paper.• Paper almost entirely covered with printing.• Paper with special chemical coatings, such as carbonless paper.*3 Refer to the Abrasion counter on the Operator panel to estimate when the next cleaning is necessary.C L E A N I NG2-4Cleaning the ADF1Pull the ADF lever to open the ADF.2Apply cleaner F1 to a new piece of cleaning paper.3Place the cleaning paper on the ADF so that the edge of the short side touches the Plastic roller.4Close the ADF and turn the power on to start the cleaning.5Turn the power off.6Repeat steps 1 through 5.C L E A N I NGGlassCleaning the ADF with a Dry cloth or a Cloth with Cleaner F11Pull the ADF lever to open the ADF.2Use a dry cloth or a cloth moistened with Cleaner F1 to softly remove dirt and dust as follows.Pad assembly :Wipe the pad in a downwarddirection (as indicated by the arrow).Be careful not to catch the Pick spring when wiping.Glass:Wipe the glass lightly.NOTEIf the glass is dirty, the image may include black vertical stripes.Pick roller:Wipe the roller.Be careful not to damage the surface of the roller and the mylar strip above the Pick roller.Feed rollersand Plastic rollers:Wipe the rollers.Be careful not to damage the surface of the rollers.Pick roller2-6C L E A N I N GSheet guide (white part)Sheet guide (white part):Wipe the sheet guide.NOTEIf the Sheet guide is dirty, the front image may show vertical stripes.3Close the ADF to lock the ADF lever.2-8Cleaning the Pick Arm Rollers1Pull the ADF lever to open the ADF.2Moisten a cotton swab or Dry cloth with F1 or F2 Cleaner.3Wipe the small Plastic rollers at the tip of the Pick Arm.4Wipe the small Plastic rollers and the Pick Arm with a clean,dry cloth to dry them.NOTEF2 to remove the contamination.CAUTION1. Don ’t wipe the pad rubbers with the F2 cleaner.2. Don ’t apply the F2 cleaner to the pad rubber.C L E A N I NGCleaning the Plastic rollers with Cleaner F21Pull the ADF lever to open the ADF.2Moisten a cotton swab with Cleaner F2.3Wipe the Plastic roller surfaces.CAUTIONDon ’t wipe the Pick Rollers with a cotton swab using cleaner F2.4Wipe the Plastic roller surface with a clean, dry cloth. Allow itto dry.2-10Cleaning the FlatbedCleaning the Flatbed with a Cloth and Cleaner F11Open the Document cover.2Apply Cleaner F1 to a clean cloth.3Wipe the Document holding pad and the Document bed.4Allow them to dry.NOTEBe sure to prevent liquid from seeping through the opening between the Document bed and the plastic cover.REPLACEMENT OF PARTSThis chapter describes how to replace the pad assembly and thepick roller.Pad AssemblyPick RollerPad AssemblyNOTE100,000 sheets or one year. Use the Abrasion counter on the Operator panel to estimate when the Pad assembly needs replacement. The life span may be decreased by as much as halfwhen carbonless paper is read frequently.WARNINGTurn off the power before replacing the Pad Assembly.1Pull the ADF lever to open the ADF.2Push the Pick Arm carefully.Pick RollerNOTEUse the Abrasion counter on the operator panel to estimate when the Pick roller needs replacement.The life span may be decreased by as much as half when carbonless sheets are frequently read.WARNINGTurn off the power before replacing the Pick Rollers.1Pull the ADF lever to open the ADF.2Remove the two Thumbscrews.Use a Phillips screwdriver if they are tight.R E P L A C E M E N T O F P A R T SPosition for ReplacementPick roller 1Pick roller 2Stopper3With both hands, lift up Guide A and disengage its tip from the right hole. Then lift the right side of the cover and remove it.4To remove the Pick rollers,turn the stopper counter-clockwise.5To remove the Pick roller 1,move it to the left and then liftit.6Immediately after removing the Pick roller 1, remove thePick roller 2 in the same way.R E P L A C E M E N T O F P A R TS7To attach the new Pick rollers,place Pick roller 1 from the right side above the bearingfor Pick roller 1.Put the shaft of Pick roller 1into the bearing. Then, slideside.8Attach Pick roller 2, in thesame way as Pick roller 1 asshown in step 7.Then slide the Pick roller 2toward right side.R E P L A C E M E N T O F P A R T SOperating Position9Turn the stopper clockwise to secure the Pick rollers.Thumb screws10Attach Guide A in the reverse sequence of step 3 and align the screw hole. See the graphic on page 1-4.11Tighten the thumb screws.12Close the ADF unit.TROUBLESHOOTINGThis chapter describes how to clear paper jams and run initialchecks. It also contains a Problem Checklist that should becompleted before you call a service representative.Clearing Paper JamsInitial ChecksProblem ChecklistClearing Paper Jams1Remove all the documents from the ADF paper chute.2Pull the ADF lever to open the ADF.3Remove the jammed document(s).All staples and paper clips should be removed from all documents bofore scanning.-Be careful not to pull the pad spring while removing a jammed document.4Close the ADF so that theADF lever locks.T R O U B L E S H O O T I N GInitial ChecksIf a problem occurs, check the following items before contacting the manufacturer ’s authorized service center.T R O U B L E S H O O T I N GT R O U B L E S H O O T I N GT R O U B L E S H O O T I N G。
扫描仪维修手册
第一章:介绍
扫描仪是一种常用的办公设备,用于将纸质文件转换为电子文件。
然而,由于长时间使用或错误操作,扫描仪可能会出现一些故障。
本手册旨在帮助用户了解扫描仪的常见问题,并提供相应的维修方法。
第二章:常见故障及解决方法
1. 扫描仪无法供电
当扫描仪无法供电时,首先检查电源插头是否插紧,电源线是否连接正常。
如插头插紧但仍无法供电,可尝试更换电源线或将扫描仪连接到其他电源插座,以确认是否为电源问题。
如果问题仍未解决,建议联系专业维修人员进行检修。
2. 扫描仪扫描效果差
若扫描结果出现模糊、颜色失真或线条不清晰等情况,可能是扫描仪镜头脏污造成的。
建议使用专业的镜头清洁纸进行清洁,注意避免使用刻度或酒精等有腐蚀性的物质。
3. 扫描仪卡纸
扫描仪卡纸是很常见的问题,原因可能是纸张堆积不整齐或者使用了损坏的纸张。
解决方法是将扫描仪上的纸张整理好,确保纸张摆放平整,使用质量可靠的纸张。
4. 扫描速度过慢
如果扫描速度较慢,首先检查扫描仪设置是否正确。
有些扫描仪具有不同的扫描模式,选择适合的模式可以提高扫描速度。
同时,也可以尝试清理扫描仪内部的灰尘和杂物,以提高扫描效率。
如果问题持续存在,可能需要更新或升级扫描仪的驱动程序。
第三章:维护保养
1. 清洁扫描仪外壳
定期清洁扫描仪外壳可以保持其外观整洁,并防止灰尘进入内部影响扫描效果。
使用干净柔软的布擦拭外壳即可,避免使用带酒精或酸碱性溶液的清洁剂。
2. 定期清理扫描仪内部
扫描仪内部的灰尘和杂物会影响其正常运行,因此定期清理扫描仪内部非常重要。
可以使用专业的气体清洁罐或者吹气筒进行清理,注意不要直接用手触摸内部零部件,避免造成损坏。
第四章:注意事项
1. 避免过度使用
长时间连续使用扫描仪可能会导致其过热,从而影响扫描效果或损坏设备。
建议在大量扫描任务中适时休息,以免给设备造成不必要的负担。
2. 避免扫描液体或湿纸
扫描仪是电子设备,不能与液体直接接触。
扫描湿纸可能会导致设
备损坏并对用户安全造成威胁。
因此,务必保持扫描区域干燥清洁,
避免液体的溅入。
结论
本手册提供了扫描仪常见故障的解决方法以及维护保养的注意事项。
希望用户能根据手册中的指导,正确使用和保养扫描仪,以提高工作
效率并延长设备的使用寿命。
如果问题无法解决,建议联系相关厂家
或专业维修人员寻求帮助。
扫描仪是办公自动化的重要工具,正确的
维护和保养能够为用户提供更好的使用体验。