瓦里安最新工作站说明书
- 格式:pdf
- 大小:6.15 MB
- 文档页数:44

瓦里安VGA-77氢化物发生器中文版说明书1. 前言1.1 关于VGA-77 1.2 关于这本使用手册 1.3 规格1.3.1 环境1.3.2 电源1.3.3 气体1.3.4 重量尺寸2. 安装2.1 未打包2.1.1 软管的命名2.2 安装2.2.1 安装清单2.2.2 气体要求2.2.3 电源要求2.2.4 安装泵单元2.2.5 安装反应模块 2.2.6 安装排水管2.2.7 安装VGA-77泵管 2.2.8 安装燃烧器夹钳 2.2.9 安装石英管2.2.10 连接气-液分离器输出端口2.2.11 连接汞捕集器 2.2.12 连接SPS-53. 操作3.1 设置3.1.1 设置概述3.1.2 泵的调节3.1.3 原子吸收仪器的调节 3.1.4 等离子体发射光谱的调节3.2 操作3.3 自动操作3.4 关闭3.5 更换模块4. 分析因素4.1 背景4.2 影响氢化物形式的因素 4.2.1 酸的浓度4.2.2 化学价态4.2.3 干扰4.2.4 污染4.2.5 记忆效应4.2.6 背景吸收(仅原子吸收光谱仪)4.3 实验室操作程序14.3.1 概述4.3.2 标准4.3.3 还原剂-硼氢化钠 4.3.4 泵管4.3.5 光源4.4 基本方法4.4.1 锑4.4.2 砷4.4.3 铋4.4.4 汞4.4.5 硒4.4.6 碲4.4.7 锡4.4.8 其他的注意 4.4.9 参考4.4.10 其他的参考5. 日常维护和备件 5.1 清洁程序5.1.1 概述5.1.2 吸收池5.1.3 气-液分离器 5.1.4 软管5.2 更换程序5.2.1 泵管5.2.2 反应模块 5.2.3 吸液毛细管 5.2.4 保险丝5.3 备件6. 附录——使用日志21(前言1(1关于VGA-77气体发生附件(VGA-77)是新一代用于原子吸收(AA)、等离子体发射光谱(ICP-AES)和等离子质谱(ICP-MS)的氢化物发生器。

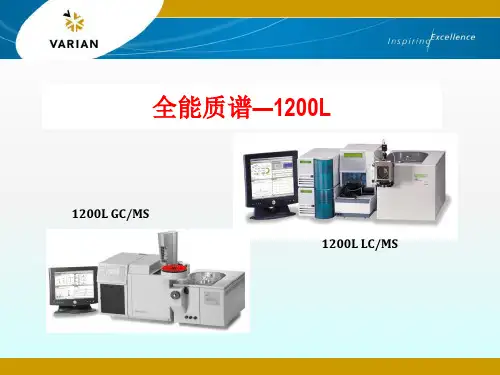
Varian 4000 GC/MS 质谱仪中文操作流程Step By Step美国瓦里安技术中国有限公司By Fengshuang on Nov. 14, 05目录第一部分开机 (2)第二部分调机 (7)一. Manual Control (7)二. Auto Tune (13)第三部分建立样品分析方法 (15)第四部分运行方法,检测样品 (22)第五部分定性分析 (27)第六部分定量分析 (32)一. 建立化合物表 (32)二. 校正曲线设定 (36)三. 分析数据运算 (46)第七部分关机 (49)第一部分开机1.首先打开连接气相的载气,若更换氦气钢瓶,需将分压阀中的残余气体全部放空,才能连接到仪器的气路中;调节He气压力为80psi,即5.5kg/cm2。
2.打开电脑,双击桌面上的Workstation Toolbar 图标,激活工作站工具栏。
双击工具栏上的system control图标进入仪器控制界面,然后依次打开MS和GC部分的电源。
System ControlWorkstationToolbar3. Instrument 1 statures 显示4000 和 3800 图标字体由白色变为黑色,表示联机成功。
4.联机成功以后,进入到4000 的Startup/Shutdown窗口,Vacuum System的Pump Spin Speed达到35%后,点击Start Up开启分子涡轮泵。
5.观察泵速每10%的逐级上升,大概在半小时内达到100%。
如果系统有泄漏,需关掉MS部分,检查后再启动。
电流Current在泵速达到100%后开始下降,降至 300mA以下。
6.如果仪器配有自动进样器,需进入Instrumnet—Configuration窗口,将3800图标拖入AutoStar Module的窗口。
7.如仪器安装的是Rapid-MS色谱柱,需进入3800的View Setup 界面,点击Rapid MS Module Setup,选择色谱柱所安装的进样口。
安捷伦和瓦里安工作站操作手册安捷伦1激活安捷伦工作站的导出功能以安捷伦主目录安装在C盘根目录为例:第一步:备份win.ini(c:\windows)或者/chemstation.ine(c:\windows)第二步:XML功能的启用需要按照下面的设置修改初始化文件:对于A版化学工作站,需要修改win.ini(C:\WINDOWS)对于B版化学工作站,需要修改Chemstation.ini(C:\WINDOWS)需要在以上两个文件中的[PCS]部分添加以下内容:[PCS]XMLEnableImport=1XMLEnableExport=1添加完成后,重新进入化学工作站中将会看到“识别峰,计算结果并将结果文件上载到远程服务器”该功能被激活。
第三步:与导入相关的录入项与导入相关的录入项是仪器专用的,并且设置在chemstation.ini/win.ini文件的[PCS,n] 部分(其中n 为仪器编号)。
指定缺省导入目录以下录入项指定要导入的文件所在的缺省目录。
[PCS,n]XMLImportPath$=d:\xml\wrkl\【注:在D盘建立xml文件夹,并在其中建立wrkl文件夹】第四步:与导出相关的录入项与导出相关的录入项可以是系统级的(设置在chemstation.ini文件的[PCS]部分),也可以是仪器专用的(设置在chemstation.ini文件的[PCS,n]部分,其中n为仪器编号)。
启用自动模式在自动模式下,系统会在序列运行时自动将XML 结果文件从本地原始数据文件目录复制到的远程位置。
[PCS]XMLAutomation=1第五步:设置超时条件以下录入项指定复制结果文件至远程位置的尝试次数以及每次尝试之间的等待时间(以秒为单位)。
[PCS]XMLExportCopyWaitTime=3XMLExportCopyTries=10第六步:指定恢复路径如果复制过程在尝试指定的次数(请参阅上文)之后失败,以下录入项会指定保存XML 文件的恢复目录。

ICP-700ES 系列电感耦合等离子光谱仪操作手册瓦里安中国有限公司前言: (4)(一)、开机 (5)1.1 冷开机(从仪器关闭状态开机) (5)1.2 热开机 (5)(二)、运行软件 (7)2.1创建数据库: (7)2.2 在操作系统下,运行 ICPExpert (9)如下图所示: (9)2.3 进入 ICPExpert II 仪器控制软件。
(10)(三)、新建或打开工作表格 (11)3.1 打开工作表格 (11)3.2 新建一个工作表格 (13)3.2.1 建立新工作表格文件名 (13)3.2.2 打开方法编辑器编辑方法 (14)3.2.3 设置顺序参数 (22)(四)、分析前的仪器优化和检查 (26)4.1 检查炬管安装正确。
(26)4.2关闭炬室门,确认锁紧杆完全到位。
(炬室门已关好) (26)4.3 检查进样管路安装正确 (26)4.4 点燃等离子体 (26)4.5 点燃等离子体 (27)4.6 ICP观测位置优化 (27)(五)、分析 (29)5.1进入或切换到分析页面。
(29)5.2 调节蠕动泵管压力 (29)5.3 选择分析标签 (29)5.4 分析 (30)(六)、打印分析结果 (31)(七)、关机 (32)7.1 冷关机 (32)7.2 待机 (32)(八)、软件结构及图标含义 (34)8.1 软件结构 (34)8.2 按钮功能 (35)8.2.1 工作表格窗口工具栏按钮功能 (35)8.2.2 仪器设置窗口工具栏按钮功能 (36)8.2.3 方法编辑窗口工具栏按钮功能 (37)8.2.4主窗口| 分析下的图形按钮功能 (38)8.2.5 方法编辑器| 条件下的图形按钮功能 (39)(九) 术语 (40)9.1 内标(Internal Standards) (40)9.2 IEC Inter-Element Corrections(干扰元素矫正) (41)9.3 FACT Fast Automated Curve-Fitting Technique快速自动曲线拟合技术 (43)9.4 SRS... Stability Reference Standardization(稳定性参考标准化) (44)9.5 TRS Time Resolved Scan时间扫描 (45)9.6 QC Test 质量控制测试项目 (46)9.6.1 概述 (46)9.6.2 QC测试项目 (46)9.7 其它术语: (49)(十)、VSDAdministrator 数据管理 (51)10.1 软件安装过程中注意事项: (51)10.2 VSDAdministrator 软件操作: (53)10.2.1 原因说明 (53)10.2.2 登录服务器(即连接) (53)10.2.3 创建数据库 (54)10.2.4 备份数据库 (56)10.2.5 恢复数据库 (56)10.2.6 分遣数据库 (57)10.2.7附贴数据库(文件) (58)10.2.8 信息(数据库中) (59)10.2.9 查看器 (59)10.2.10 复制文件夹 (60)10.2.11 参数选择 (61)10.2.12 服务器帐户 (61)10.2.13 数据库帐户 (62)10.2.14 日志 (63)前言:该手册是针对Varian 公司ICP-700ES 系列电感偶合等离子光谱仪所编写的一个快速参考操作手册。
OPERATOR’S MANUALFORVarian 356-LCControl Software Polymer Laboratories Ltd, Now a part of Varian, Inc., Essex Road, Church Stretton,Shropshire SY6 6AX, UKTel +44 (0)1694 723581, Fax +44 (0)1694 722171, Service Tel +44 (0)1694 724333Polymer Laboratories, Varian, Inc., Amherst Fields Research Park, 160 Old FarmRoad,Amherst, MA 01002, USA Tel +1 413 253 9554, Fax +1 413 253 2476Polymer Laboratories, Varian B.V., Herculesweg 8, 4339 PL Middelburg,The Netherlands Tel +31 (0) 118 671500, Fax +31 (0)118 671502Polymer Laboratories, Varian Belgium NV SA, Mechelsesteenweg 362,2860 St.-Katelijne-Waver, Belgium Tel +32 (0) 15 556460, Fax +32 (0) 15 556186Polymer Laboratories, Varian Deutschland GmbH, Alsfelder Stra€e 6,D-64289 Darmstadt, Germany Tel: +49 (0) 6151 7030 Fax: +49 (0)6151 703237Varian S.A.,7 Avenue des Tropiques, Z.A. Courtaboeuf, B.P. 12F-91941 Les Ulis Cedex, France Tel +33 1.6986.3838 Fax: +33 1.6928.2308Please note that Varian, Inc. is now part of Agilent Technologies. For more information, go to /chem.CONTENTS1GENERAL INFORMATION3 1.1I NTRODUCTION (3)1.2S PECIFICATIONS (4)1.3C ONNECTING THE V ARIAN 356-LC TO A PC (5)1.3.1Use a Universal Serial Bus Interface (USB)51.3.2Adding an Extra Serial Card to your PC -Using Multiple Serial Ports5 1.4U SING S TAR W ORKSTATION WITH I NSTRUMENT C ONTROL S OFTWARE (5)1.5I NSTALLATION P ROCEDURES-S OFTWARE (7)1.5.1Installation of the PL Instrument Control Software from CD71.5.2Installation of the PL Instrument Control On-line Help from CD71.5.3Configuring the PL Instrument Control Software8 2THE GRAPHICAL USER INTERFACE10 2.1O VERVIEW (10)2.2S UMMARY V IEW (11)2.3C OMPONENT V IEW (11)2.4A UTOMATING THE V ARIAN 356-LC (12)3TROUBLESHOOTING14 3.1E RRORS (14)3.2V ARIAN 356-LC E RRORS (15)1General Information1.1IntroductionThe Varian 356-LC differential refractometer is a universal detector designed for high-performance analyses where the refractive index of a flowing liquid with respect to a reference is required. Its small cell volume, high sensitivity, and accurate temperature control make it well-suited for use as a detector in automated and manual high performance liquid chromatography.The Varian 356-LC RI detector can be operated as an integrated module within a Liquid Chromatography System using Galaxie™ Chromatography software. Alternatively, the detector can be used as a stand-alone HPLC detector through serial communications.This manual instructs the user how to install the PL Instrument Control software for operation of the Varian 356-LC RI as a stand-alone detector. For information on operating the detector please refer to the Operation manual.1.2SpecificationsRI range 1.0~1.75 RIURange 150-600x10-6/FS RIULinearity 600 ‚RIUSensitivity LOW (2), MED (4), HIGH (8) mV/‚RIUShort-term noise 1<5.0x10⁻⁹RIUDrift <2.5x10⁻⁷RIU/hourResponse time 0.1-5.0 secTemperature control OFF, 30-50 ƒC (1 ƒC increments)Cell volume 6 ‚LLight source LED 880 nmAnalogue output 1 V FSDDigital output24 bit (10 Hz) via serial portPolarity Positive/NegativeExternal communication RS232Autozero YESPurge YESFlow rate range0.1-10 mL/minPressure rating100 kPa (15 psi)Internal volume-inlet15 ‚LInternal volume-outlet459 ‚LTotal internal volume Normal operation 474 ‚LPurge mode 491 ‚LWetted material 316 SST, Quartz Glass, PTFE, PerfluoroelastomerPower requirements AC 100~240 V 50/60 HzPower consumption150 W (max)Dimensions (wxdxh)(unpacked)296 x 475 x 212 mmDimensions (packed)460 x 775 x 385 mmWeight (unpacked)11 kgWeight (packed)13.5 kgPC Requirements Windows…2000 & XPproRemote operation Remote purge & autozeroSafety features Error and leak detectionTable 1.Performance Specification of the Varian 356-LC RI Detector1According to ASTM method E-1303-95 “Practice for Refractive Index Detectors used in Liquid Chromatography”. Detector conditions; temperature 35 ƒ C, response time 4 sec.1.3Connecting the Varian 356-LC to a PC1.3.1PC RequirementsTo operate the Varian 356-LC detector using the Instrument Control Software, a free Serial (RS-232) communications port (1 to 255) is required on your PC. Mostcomputers are supplied with at least one serial port as standard, but if your PC does not provide a serial port, please see section 1.3.1.1& 1.3.1.2The Varian 356-LC Instrument Control Software is only compatible with Windows…2000 & XP Pro.1.3.1.1Use a Universal Serial Bus (USB)to Serial InterfaceIf your PC has one or more Universal Serial Bus (USB) connectors then you can use a “USB –Serial Port Adaptor” (part # 0860-0620), which provides a Serial Port connection to your PC. The Universal Serial Bus interface is supported on:④ Windows 98④ Windows ME④ Windows 2000④ Windows XPUSB is NOT Supported on NT 4.0. You may require extra software to use USB on Windows1.3.1.2Adding an Extra Serial Card to your PC -Using Multiple Serial Ports Multiple Port Serial cards are available, which allow 4, 8 and 16 extra serial ports to be added to your PC using a single PCI card.1.3.2Serial ConnectionEnsure that the Varian 356-LC detector is switched on and operating normally. Make sure you have one free and valid RS-232 communications port (1 to 255).Connect the serial port on your PC to the port labelled "RS232" on the rear of the detector, using the serial cable provided. Ensure that the flash upgrade switch, (see figure 1) is located in the RUN position (i.e. downwards).1.4Instrument Control for non-Galaxie UsersThe Varian 356-LC was designed to integrate fully into Galaxie Chromatography software, allowing the user to control the instrument,remotely for unattendedoperation.However, for non-Galaxie users (e.g. Star or MS workstation)the Varian 356-LC Control software (v2.2), provides a standalone control of the Varian 356-LC NOTE !The 356-LC Instrument Control software provides direct control of the Varian 356-LC, via the RS232 port, in much the same way as front panel control. It does not provide data acquisition.For data acquisition and control, the Control software must be used in conjunction with a chromatographic data acquisition package,such as Star or MS Workstation. The Varian 356-LC’s analogue data can be collected by connecting the supplied analogue output cable (Part No. PL0880-0310) from the rear of the detector (see figure 1) to an A/D interface (e.g.Star MIB 800 module). Please refer to the Star or MS workstation user manual for more information on how to configure the Star 800 modules.Figure 1. Rear view of the Varian 356-LC RI Detector1.Serial RS232 connector –24 bit digital output2.Control firmware flash upgrade switch3.Connector control I/O –15 pin D type female4.Analogue output -‰1 V5.Mains switch6.Mains input1235461.5Installation Procedures-Software1.5.1Installation of the PL Instrument Control Software from CDPlace the CD-ROM containing the Varian 356-LC Control software into the CD drive. In most cases the CD browser window will automatically open. However if the window does not appear then select the Run option in the Start menu, and type in D:\launch.exe (where D: denotes the CD drive).From the CD browser window select the Install the Software option and follow the on-screen instructions, it is recommended that the default settings are selected.Ensure that when you log on to the PCyou have full administration rights.You may need to restart your computer at the end of installation; if this is required you will be prompted to do so.After successful installation of the Control software, the program is simply run by clicking on the application named PL Instrument Control (PLInstControl.exe) installed in the PL Instrument Control group of the Programs option in the Start menu.The default location for the program files will be C:\Program Files\Polymer Laboratories\PL Instrument Control, which contains the following files:-Before running the program thesoftware must be first configured,see section 1.5.3.1.5.2Installation of the Instrument Control On-line Help from CDFrom the CD browser window select the Install Online Help option and follow the on-screen instructions, it is recommended that the default settings are selected. Thetwo help files (one for the PL Instrument Control software and the other for the PL Instrument Configuration Editor program) will be installed and the default location will be C:\Program Files\Polymer Laboratories\PL Instrument Control\Docs.1.5.3Configuring the Instrument Control SoftwareThe Control Software needs to be closed down before startingthis program.The configuration of the Varian 356-LC should normally be doneby a qualified Varian representative.To configure the Control software for the Varian 356-LC, you need to run the PL Instrument Configuration Editor to define the components that make up the instrument. The PL Instrument Configuration Editor is simply run by clicking on the application named PL Instrument Configuration Editor (PLInstConfigEd.exe) installed in the Service group of the PL Instrument Control group of the Programs option in the Start menu.The first time the PL Configuration Editor program is run, theprogram displays all the components that are available forcontrol.For the initial configuration of the system select the Varian 356-LC from the list by left clicking on the name of the component so that the configuration matches the instrument.Once the Varian 356-LC configuration has been completed the correct Com port needs to be assigned. To set the Com port, double click on the component name. The Configure Component dialog will open, where the correct Com port can be entered.Once the Com ports is set correctly, close the configuration editor and wait while the new configuration is saved. While the new configuration is being saved the following message will be displayed: -Updating the instrument configuration cantake up to a minute so please bepatience.For further information on configuring a system then please see the on-line help within the PL Configuration Editor program.Chapter 2-The Graphical User Interface2The Graphical User InterfaceTotal instrument control of the Varian 356-LC is provided by a Windows-based Graphical User Interface (GUI). This intuitive interface provides simplistic control as well as a comprehensive monitoring system.For further information on the PL Instrument Controlsoftware please see the on-line help within theprogram.To start the 356-LC Control software, select the PL Instrument Control item in the PL Instrument Control program group of the Programs option in the Start menu. 2.1OverviewThe Control screen is effectively divided into two main Views, these are:1.The Summary View2.The Component View2.2Summary ViewThe summary view displays the status of the Varian356-LC and a quick way of accessing the various parameters and options available within the PL Instrument Control software.A green LED next to the Varian 356-LC name indicates the module is being controlled and running whereas a red LED would indicate the module is either not running or not controlled.For further information on the Summary View please see the on-line help within the PL Instrument Control software.2.3Component ViewThe component view provides direct access to the Varian 356-LC control parameters. In general each component view contains a number of common items and options. The actual items available in a view are dependent on the component selected.The general component view for all components except for autosamplers/carousels is shown below.Status Bar–This displays Varian 356-LC description and current status.On-line Help Button–This is a direct link to the on-line help for that component view. Parameter Grid–This displays the current set parameter(s) for the 356-LC. To set and update the parameter(s) enter the required value(s) in the Set Value column and press the UPDATE button.To undo any parameter(s) prior to pressing the Update button press the Undo button,.To reset the parameter(s) back to the default value(s) press the Factory Reset button, .Help Output Window–This displays a simple summary help for each parameter and action. To view this information, select the parameter or action. The information displayed in the Help Window will be a short description about the action or parameter, the Factory Default Value and the Minimum and Maximum Values for the parameter.Action Button(s)–The Varian 356-LC can be Purged or Autozeroed using the Action Buttons, as well as from the Action List. To run an action, press the required Action button.Press the STOP button, to stop all the procedures currently running on the selected component.For information on the Toolbar menus please see the on-line help within the PL Instrument Control software.2.4Automating the Varian 356-LCThe Instrument Control software provides the ability to automate the control of the Varian 356-LC using the Events Schedule Editor. To open the Events Schedule Editor and create a schedule, select the Edit Schedule option from the Automation menu on the toolbar. The editor will initially display a default Events Schedule consisting of a single Process and Sequence entry. This ensures you only have to add a Procedure entry for the schedule to be valid.To add a Procedure right click on the Sequence entry in the schedule, the Procedure Details window will open where the required action can be selected.Once the Events Schedule is completed press the Start button, to start the schedule.The schedule can be used to equilibrate the detector by automatically purging a autozeroing the detector.Message boxes can be displayed at key stages during an Event Schedule. These message boxes require user input before the rest of the schedule can be run. The text displayed in the message box is customisable allowing simple status information or more detailed instructions to be displayed to the operator. Two examples of this are: -∙ Providing a simple guide path to an operator for the manual operation of the system.∙ Providing feedback / key information to an operator at key stages of a more automated system.For further information on the Event Schedule Editor please see the on-line help within the Instrument Control software.3Troubleshooting3.1ErrorsAny error(s) that occur with communications or operations (running component actions, updating parameters etc.) with the instrument, the Diagnostic Output Window will automatically open with the error(s) displayed in the Component Error Status Tab of the Diagnostic Output Window as shown below. Each error is uniquely identified with a number that can be referenced back to the control code.Figure 2.Diagnostic Output WindowNote:The information displayed in last two Tabs is primarily for service diagnostics and the Window does not need to be open for normal operation of the instrument.If an error is displayed it needs to be cleared in order for the diagnostic window to be closed, allowing access back to the PL Instrument Control software. To clear an error press the Select button to highlight the row and press the Clear button. Multiple errors can be selected at a time. Once all errors have been cleared the diagnostic window can be closed.Clearing an error will stop all procedures that are running and attempting to communicate with the component. To re-establish communications with the component either select the Reconnect option from the Instrument menu or return to the component view and resend the parameters or repeat the required action.The errors that can be displayed from the software are listed on the following pages.3.2Varian 356-LC ErrorsGeneral System ErrorsError Cause(s)ActionCould not initialise specified comms port Incorrect Com portassigned to thecomponent, the PL-GPC50 Plus is not poweredon or the USB cable isnot connected.Ensure the correct Com port has beenassigned within the PL InstrumentConfiguration Editor program. Ensurethe PL-GPC 50 Plus is powered on andthe USB cable is connected.No response received from the device Incorrect Com portassigned to thecomponent orcommunications lost withthe component, e.g.power failure.Ensure the correct Com port has beenassigned within the PL InstrumentConfiguration Editor program. Ensurethe PL-GPC 50 Plus and/or componentis powered on. If assigned Com port iscorrect and the system is powered onthen contact Polymer Laboratories oryour local agent.Unrecognised response from the device Turn the PL-GPC 50 Plus off and then on again (ensure the control software has been closed before turning the instrument off). If this error persists then contact Polymer Laboratories or your local agent.The device rejected the last command Incorrect componentassigned to the Comport.Ensure the correct component hasbeen assigned to the correct Com portwithin the PL Instrument ConfigurationEditor program.The device returned an error The component failed tocomplete an action.Reinitialise the component from the PLInstrument Control software and ensurethe initialisation is completedsuccessfully. Otherwise turn the PL-GPC 50 Plus off and then on again(ensure the control software has beenclosed before turning the instrumentoff). If unsuccessful and no obviouscause for the error then contactPolymer Laboratories or your localagent.Instrument ErrorsError Cause(s)Action01Fan stopped/failed Fault with the circuitry/wires/fan. Callyour Varian customer supportrepresentative if this happens regularly.02Upper leak detectorthermistor failure.Liquid sensor needs replacing. Call your Varian customer supportrepresentative.03Lower leak detectorthermistor failure.Liquid sensor needs replacing. Call your Varian customer supportrepresentative.04Internal vapour sensorfailure.Vapour sensor needs replacing. Call your Varian customer supportrepresentative.05External vapour sensorfailure.Vapour sensor needs replacing. Call your Varian customer supportrepresentative.06Liquid leak sensor hasdetected liquid in driptray.Liquid in the base of the unit -Stop pump and investigate.07High concentration ofvapour detected outsideof unit.Ensure sufficient ventilation around themodule.Check for a solvent leak.08Heated block thermistorbelow minimumthreshold.Call your Varian customer supportrepresentative.09Heated block thermistorabove maximumthreshold.Call your Varian customer supportrepresentative.0A Light source error Replace the light source assembly. Callyour Varian customer supportrepresentative.Auto-Zero (01)Autozero timeout Re-autozero the detector.。
气相色谱仪操作规程GC9790气相色谱仪操作规程(一) (1)SP1000气相色谱仪操作规程 (1)Agilent4890D气相色谱仪操作规程 (2)HP—5890A气相色谱仪操作规程 (3)GC-9790气相色谱仪操作规程(二) (4)SP2100气相色谱仪操作规程 (5)GC—920色谱操作规程 (5)Agilent6890气相色谱仪操作规程 (6)GC9800TT型气相色谱仪操作步骤 (7)GC9800FF型气相色谱仪操作步骤 (8)9001型气相色谱仪操作规程 (10)SP6800A气相色谱仪的操作说明 (12)GC—930色谱操作规程 (13)GC112A气相色谱操作规程 (14)GC122气相色谱操作规程 (14)GC1690气相色谱仪说明书 (15)惠普4890D型气相色谱仪标准操作程序 (16)HP6890气相色谱仪操作规程 (19)SP—6890气相色谱仪操作规程 (20)HP—5890A气相色谱仪操作规程 (21)GC—14A气相色谱仪操作规程 (23)HP4890D气相色谱仪操作说明(二) (24)GC9890气相色谱仪操作步骤 (25)岛津气相色谱GC—2010操作规程 (26)岛津GC-14CPFID气相色操作规程 (27)GC—14C气相色谱简易操作规程 (27)Agilent6820-GC(ForCerityNDS) (29)瓦里安CP3800气相色谱操作规程 (33)安捷伦GC-6820使用规程 (35)GC9790气相色谱仪操作规程(一)1。
检查仪器电源线连接是否正常、气路管线连接是否正常。
2.打开载气(N2)钢瓶总阀,并调节减压阀开关,使得输出的载气压力在0。
3~0。
5Mpa 之间。
3。
调节仪器上的载气调压阀,使得柱前压处在分析工作所需要的压力(一般来说,柱前压在0.05~0。
1Mpa之间)。
4.打开电源开关,根据分析要求设置柱温、汽化温度、检测温度等参数,按确定键后仪器升温。
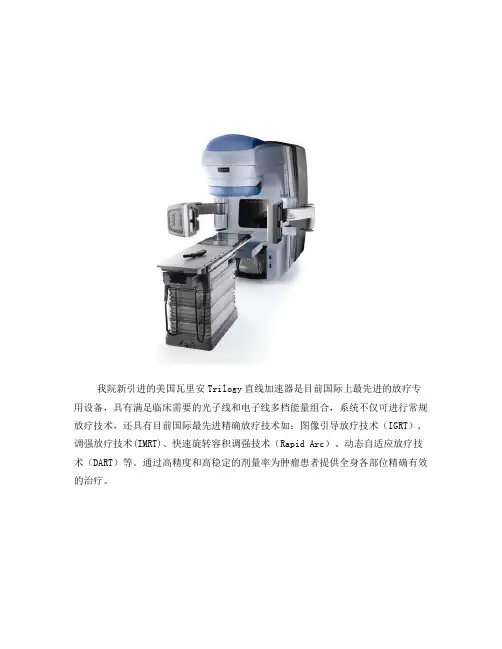
我院新引进的美国瓦里安Trilogy直线加速器是目前国际上最先进的放疗专用设备,具有满足临床需要的光子线和电子线多档能量组合,系统不仅可进行常规放疗技术,还具有目前国际最先进精确放疗技术如:图像引导放疗技术(IGRT),调强放疗技术(IMRT)、快速旋转容积调强技术(Rapid Arc)、动态自适应放疗技术(DART)等。
通过高精度和高稳定的剂量率为肿瘤患者提供全身各部位精确有效的治疗。
容积调强(Rapid Arc):放射治疗领域的新革命快速旋转容积调强技术是近年放疗领域的一项重大突破,该技术得益于新直线加速器设备的革新性能设计,为放疗的速度,精确度和病人舒适性提供了新的标杆。
自09年进入中国以来,目前国内仅4家医疗中心能开展此项技术,我院为华南地区第一家。
特点:●通过高速动态多叶光栅、可变剂量率、可变机架旋转速度,以优化的单次弧形调强照射完成治疗。
●治疗速度快,2分钟完成病人摆位,2分钟完成治疗。
剂量分布更理想,包括凹面形状的肿瘤和各种复杂形状的肿瘤都能做到剂量高度适形。
●更少的漏射线、散射线,使周围正常组织得到更好的保护。
●与传统的调强放疗相比照射时间减半,病人舒适度更高。
常规放疗模式如电子线治疗、非共面治疗、自主呼吸门控治疗仍然可以继续使用图像引导系统(IGRT):治疗位置准确的可靠保证IGRT (Image-guided radiation therapy)为近年开展起来的新技术,是解决摆位误差、呼吸运动、组织结构形变、位移等多种因素引起的照射误差最为有效的方法。
它通过将高分辨率成像设备集成于直线加速器上,在治疗前后即时采集图像,确定靶区和敏感组织的位置、位移、形变等情况。
精确引导摆位治疗,最大限度减少照射野的偏离,尤其适合临近敏感器官如椎旁肿瘤、鼻咽癌等定位精度要求高的肿瘤。
对于受呼吸运动影响较大的胸腹部肿瘤,结合呼吸门控系统将会得到更好的治疗效果。
特点:●创新性地将拍片、透视和锥形束CT技术结合,高分辨率数字即时图像和3D的CT图像,可为医生提供准确的肿瘤位置及其活动情况。
瓦里安原子吸收光谱仪AA DUO技术指标1、工作条件:1.1环境条件:温度 10-35℃湿度:8-80%相对湿度1.2电源:220V 50Hz2、技术说明:2.1 原子吸收光谱仪包括:光学系统、火焰原子化系统、石墨炉原子化系统、软件系统及附件。
用于环境污水样品中多种微量金属元素的定量分析,要求火焰原子化系统主机与石墨炉原子化主机是分体的,能够独立同时分析样品,一套工作站可同时控制原子化系统与石墨炉原子化系统。
2.2仪器性能及参数2.2.1 双光束,全自动快速序列式多元素分析2.2.2 采用氘灯背景校正,校正周期≤2ms,最大校正≥2.3Abs。
2.2.3光学系统Czerny-Turner型单色器;计算机控制自动选择波长2.2.3.1波长范围185一900nm2.2.3.2焦距:≥250mm2.2.3.3狭缝:0.2、0.5、1.0nm,自动选择狭缝宽度。
2.2.3.4刻线密度:≥1200条/mm2.2.3.5闪耀彼长:240nm2.2.3.6灯的位置:自动快速选择灯的位置,8灯座,灯插接无需连接线,固定基座,无需转塔。
在快速序列操作模式下同时操作。
2.3 原子化系统2.3.1火焰部分2.3.1.1燃烧头:适合有机物和无机物分析2.3.1.2雾化器:可调雾化器,耐腐蚀PEEK材质2.3.1.3火焰灵敏度:5ppm cu,吸光度≥0.9 Abs,≤0.5% RSD2.3.1.4扰流器:双头扰流器,提高雾化均匀度2.3.1.5撞击球:外部可调2.3.1.6气体控制:计算机控制的全自动可编程气体选择及气流控制,有自动保护功能2.4 软件:中文,英文工作站软件各一套,在WIN98,95,2000,NT, XP条件下工作。
石墨炉原子吸收光谱仪1、工作条件:1. 1环境条件:温度 10-35℃湿度:8-80%相对湿度1. 2电源:220V 50Hz2、技术说明:2.1 石墨炉原子吸收光谱仪包括:2.2仪器性能及参数2.2.1 双光束2.2.2 采用交流电磁场塞曼背景校正,从0.2-1.0磁场强度可调,多项式插入法拟合数据背景响应时间≤5ms,最大校正≥2.5Abs。
Bond Elut® Plexa™ Sorbents –Simply High PerformanceBond Elut® Plexa™ and Plexa™ PCX comprise a new generation of poly meric SPE products designed for simple method development, ease of use and improved analytical performance. Key to the unique capabiliti es of the Plexa™ range of sorbents is the novel amide-free hydroxylated particle exterior, advanced polymeric architecture, and selectivity of the ion-exchange functionality. Simple methods can be used that deliver cleaner extracts and higher recoveries from a wide range of analytes. Optimized polymeric design, in combination with a narrow particle size distribution, ensures consistent flow rates and reproducible, high analy te recoveries. The advanced polymeric design and particle surface modification minimize the common matrix interferences that are the major source of ion suppression, thus improving analytical sensitivity and data quality.Bond Elut® Plexa™ is the best choice for a wide range of acid, neutral and basic analy tes. Plexa™ PCX, a polymer cati on exchange resin, is designed specifically to provide a single generic method for basic compounds.Note: This user guide i s a convenient starting point for any SPE method development. Further opti m i z ati o n may be required to adjust the method to your appli c ati o n needs.Table 1. Recommended volumes for generic methods with Bond Elut® Plexa™ SPE products.Cartridge 96 Well platesorbent mass30/60mg 30/60mg 200mg 500mgCondition (mL) 1 1 2 3 0.5 11 123 0.5 1 Elution (mL)Bond Elut® Plexa™Bond Elut Plexa –the ‘polar functionalized’ polymer foracidic, basic and neutral compoundsStandard protocol for biofluids, 5” Hg vacuumBond Elut® Plexa™ –the ‘polar functionalized' poly mer -isdesigned for ease-of-use and high efficiency SPE. Employingthe two generic protocols above covers a wide range ofcompounds. Additional details for method development toincrease recoveries or improve cleanliness are included in thisuser guide.Bond Elut® Plexa™ PCXPlexa PCX - a mixed-mode ion exchange polymer withhydrophobic and cation exchange capabilitiesStand ard protocol for biofluids, 5” Hg vacuumBond Elut® Plexa™PCX is a mixed-mode ion exchangerwith hydrophobic and strong cation exchange sites thatremove neutral and acidic interferences from the matrix,concentrate basic analy tes and therefore improve analy ticalperformance. You can easily start using Plexa™ PCX with thegeneric method above. For further optimization use the tipsgiven in this guide.Acidification is necessary to disrupt drug–protein interactionand to adjust the pH of ionizable basic compounds to at least 2pH units above the pK a of the functional group. Therefore,prepare acidified aqueous diluents: add 20 μL of concentratedphosphoric acid to 1 mL of water. Dilute the sample 1:3 withthe aqueous diluent.To avoid blockages it may be necessaryto centrifuge, dilute, and/or filter the sample prior to the SPE.Add 10 to 50 μL of a suitable internal standard.Necessary Pre-treatment - pH adjustmentIonization of a compound changes its solubility and lipophilicity. For ionizable analytes, SPE must be performed at a pH that is at least 2 pH units from the pK a of the functional group in order to ensure that 99.5%of the molecules will be in the desired form. For example with BondElut Plexa, adjust the pH of weak acids 2 pH units below the pK a.Weak bases are adjusted at least two pH units above the pK a. This will effectively neutralize the compound enhancing retention in the hydrophobic pore.Note: This does not apply to Plexa PCX, ionized analytes are desiredfor the PCX ion exchange extractionAqueous Formic (1%)Prepare acidified water diluents by adding 10 μL of concentrated formic acid to 1mL of waterAqueous Ammonia (2%)Prepare basifie d water diluents by adding 20 μL of concentrated ammonia (28-30%) to 1 mL of waterAqueous H3PO4 (2%)Prepare basified water diluents by adding 20 μL of concentrated H3PO4 (85%) to 1 mL of water.Ordering informationBond Elut® Plexa™Item Number Description Quantity A4969010 Bond Elut96 Plexa, 10 mg 1 PlateA4969030 Bond Elut96 Plexa, 30 mg 1 Plate12109301 Bond Elut Plexa, 30 mg, 1 mL 100 tubes/pk12109601 Bond Elut Plexa, 60 mg, 1 mL 100 tubes/pk12109303 Bond Elut Plexa, 30 mg, 3 mL 50 tubes/pk12109603 Bond Elut Plexa, 60 mg, 3 mL 50 tubes/pk12109206 Bond Elut Plexa, 200 mg, 6 mL 30 tubes/pk12259506 Bond Elut Plexa, 500 mg, 6 mL 30 tubes/pk12221305 Bond Elut Plexa Prospekt Cartridge 96/pk12281305 Bond Elut Plexa 800 series Cartridge 96/pkBond Elut® Plexa™ PCXItem Number Description Quantity A4968030 Bond Elut96 Plexa PCX, 30 mg 1 Plate12108301 Bond Elut Plexa PCX, 30 mg, 1 mL 100 tubes/pk12108601 Bond Elut Plexa PCX, 60 mg, 1 mL 100 tubes/pk12108303 Bond Elut Plexa PCX, 30 mg, 3 mL 50 tubes/pk12108603 Bond Elut Plexa PCX, 60 mg, 3 mL 50 tubes/pk12108206 Bond Elut Plexa PCX, 200 mg, 6 mL 30 tubes/pk12258506 Bond Elut Plexa PCX, 500 mg, 6 mL 30 tubes/pk12221306 Bond Elut Plexa PCX Prospekt Cartridge 96/pk12281306 Bond Elut Plexa PCX 800 series Cartridge 96/pkand are registered at the U.S. Trademark Office. ©Varian 200704034-09/07SI-0994/A/9.07 Method Optimization Tipsa™ products, visit our Web site at , or contact your local sales representative or technical help desk fo r additional information.Varian, Inc. North America: 800.926.3000, 925.939.2400Europe The Netherlands: 31.118.67.1000Asia Pacific Australia: 613.9560.7133Latin America Brazil: 55.11.3845.0444Other sales offices and dealers throughout the world - check our Web site.GC • LC • MS • GPC/SEC • AA • ICP • UV-Vis-NIR • FT-IR • Fluorescence • Dissolution • NMR • MRI •FTMS • Consumables • Data Systems。
瓦里安VK7000/VK7010 溶出度测试仪操作手册P/N 70-90032006年1月修订版J有限担保本手册的信息如有更新不再另行通知。
瓦里安不对材料提供任何相关的担保,包括,但不限于暗于的但保或其它的某种目的。
瓦里安公司不对在装备、操作或使用本材料时出错误包括偶然的损害担保。
保留所有权利。
在未经批准的复制、修改或翻译是被禁止的,除非被版权法规许可。
初版(2006年1月)VK 7000 / 7010溶出度测试仪操作手册部件号码70-9003修订版J在美国印刷。
以下商标属于瓦里安公司• Benchsaver TM• Practical Solutions®• BIO-DIS III®• QA and QAII TM• Enhancer Cell®• TruCenter TM• Full Flow Filters TM• VanKel®• Peak Vessel TM• VK®所有其它的商标为各自所拥有。
瓦里安公司美国北罗莱纳州卡瑞市威斯顿27513-2250800.229.1108919.677.1108Fax: 919.677.1138版权为瓦里安公司所有1996-2006.目录章节 1 安全操作及危害7电子危害7其它7综述9电子电器废弃物指令9章节2 简介11使用本手册的规则13USP适应性测试13USP物理参数13Varian,Inc.章节3安装14撤卸溶出仪装置14驱动单元安装14快速按键指引16隐藏按键功能17水溶及加热/循环器安装176或8溶出杯系统安装1712或16溶出杯系统安装19安装及置中溶出杯20安装及置中Trucenter溶出杯20安装VK7000/7010桨/篮组件21安装VK7000/7010E桨/篮组件22用标准组件设置桨/篮的高度22置中确认24安装药剂传送模块管(VK7000选件) 25安装取样管路(VK7000选件) 26安装AutoTemp组件(VK7000选件) 26设置波特率26为水溶注水27设置起始水溶温度27章节 4 操作及程序化29主菜单29主菜单选项3设置温度30主菜单选项4文件31主菜单选项5写程序31主菜单选项6开始程序35主菜单选项7警报/计时器36章节5维护及故障排除37定期维护37日常维护37桨/篮轴保护38篮保护38水溶保护39视觉检查40内置报告中心打印机41安装色带41更换打印纸42触发在线打印机43打印机自检43打印机配置43水溶温度探针准确度测试44保险丝更换45故障解决46章节6服务及担保48例外及限制48获得及担保服务48有限担保48独占赔偿48索引50告诉我们如何做52图表清单图表1. VK7000溶出度测试仪12图表2.系统监视器及系统控制面板15图表3.上升及下降按钮16图表4. VK750D加热/循环背面面板加连接18 图表5.倒钓角管件转换接口19图表6.EaseAlign 置中环20图表7.TruCenter 溶出杯适配器21图表8.轴组件22图表9.深度定位件23图表10.VK7000/7010左支座23图表11. EaseAlign 置中确认计24图表12.DDM扩充25图表13.背面面板26章节 1 安全操作及危害VK7000/7010是经过精良的设计,如正确的使用,将会是个准确、快速、灵活及安全的仪器。
Cary50 中文操作手册美国瓦里安中国有限公司分析仪器服务部一九九九年八月目录开机及基本操作步骤……………………………… 3-3 软件功能简解……………………………………… 4-4 简单读数固定波长测定软件……………………… 5-7 高级读数定波长测定软件………………………… 8-14 浓度测定软件……………………………………… 15-24 波长扫描软件……………………………………… 25-34 仪器检定软件……………………………………… 35-36 仪器调整软件……………………………………… 37-39 仪器调整软件……………………………………… 40-42开机及基本操作步骤1.开电脑进入Win98系统。
2.保证样品室内是空的。
3.双击Cary—WinUV象标。
4.在Win—UV主显示窗下,双击所选图标(Concentration为例)。
进入浓度主菜单(详见后面浓度软件中文说明)。
5.新编一个方法步骤。
1).单击Setup功能键,进入参数设置页面。
2).按Cary Control→Standards→Options→Samples→Reports→Auto store 顺序,设置好每页的参数。
然后按OK回到浓度主菜单。
3).单击View菜单,选择好需要显示的内容。
基本选顷 Toolber;buttons;Graphics;Report。
4).单击Zero放空白到样品室内→按OK。
提示:Load blank press ok to read(放空白按ok读)。
5).单击Start.出现标准/样品选择页。
Solutions Available(溶液有效)。
此左框中的标准或样品为不需要重新测量的内容。
Selected for Analysis(选择分析的标准和样品)。
此右框的内容为准备分析的标准和样品。
6).按OK进入分析测试。
Present std1(1.0 g/l)提示:放标准1然后按OK键进行读数。
软件操作说明书目录目录 -------------------------------------------------2 第一章功能简介 ----------------------------------------3 第二章操作流程 ----------------------------------------4 第三章个性化及设置 ------------------------------------6一、系统设置----------------------------------------------6二、项目内容设置------------------------------------------6三、模板/词库管理-----------------------------------------7四、报告样式的设计----------------------------------------7五、视频相关设置------------------------------------------8六、采集图像相关设置--------------------------------------9 第四章病历管理----------------------------------------10一、病历报告的修改---------------------------------------10二、病历查询---------------------------------------------10三、调整病历表格的样式-----------------------------------11四、病历统计与报表打印-----------------------------------11五、病历的删除及恢复-------------------------------------11六、病历浏览器-------------------------------------------12 第五章图像处理与管理 ----------------------------------13一、图像处理---------------------------------------------13二、图库管理---------------------------------------------13 敬告 -----------------------------------------------14第一章功能简介本工作站软件集影像采集、录制、批量图像的预采集、灵活多样的报告打印,强大的数据管理等诸多功能与一体,有些功能为本软件独有。