Silvaco_TCAD_2012_安装说明
- 格式:doc
- 大小:477.50 KB
- 文档页数:4
安装及激活操作说明1.启动安装Autodesk AutoCAD 20122.输入安装序列号:666-69696969, 667-98989898, 400-454545453.输入密匙:001D14.完成安装,重启CAD。
5.点击激活按钮之前你有2个选择:a)禁用您的网络或拔掉网线;b)点击激活后它会告诉您,您的序列号是错误的,这时点击上一步等一会再点击激活即可。
选择了a或b后看下一步。
6.在激活界面中选择我拥有一个Autodesk激活码7.一旦到了激活屏幕:启动注册机如果你是32位的请启用32位的注册机如果是64位的请启动64位的注册机。
8.先粘贴激活界面的申请号至注册机中的Request中,9.首先点一下“Mem Patch"按钮,再点一下“Generate”按钮。
这时在下面的文本框中就会出现激活码了。
复制激活码。
10.最后复制Activation中的激活码至“输入激活码”栏中,并点击下一步。
你有一个完全注册autodesk产品!cad2011自带的CMControl.exe在我的机器上似乎无法设置。
所以又添加了cad2009版的CMControl.exe。
在我的电脑上,2009版的CMControl.exe可以设置06-2011的各版cad。
此目录内的CMControl.exe可以关闭cad的通信控制中心、联机设计中心,建议全部禁用。
速博应用中心建议设置为不允许访问。
如此设置是因为欧特克会通过信息控制中心取得盗版用户的一些资料。
已经有网友向我说过接到了欧特克的律师函。
删除了DirectX、Framework3.5SP1、VCRedist三个必须的系统组件,和一些其它系统组件。
CADtianchong目录内为填充文件,默认目录是C:\Program Files\Autodesk\AutoCAD 2012 - Simplified Chinese\UserDataCache\SupportCADquanping 目录内为一个04年就出来的全屏软件。

silvaco TCAD 仿真速成手册排行榜收藏打印发给朋友举报发布者:kongfuzi热度4票浏览33次时间:2010年2月26日09:01 silvaco TCAD 仿真速成手册第1章: 简介该指南手册针对首次应用SILVACO TCAD软件的新用户。
它旨在帮助新用户在几分钟时间内快速并成功安装和运行该软件。
该指南也演示如何快速有效查看手册,查找仿真器中使用的所有参数的解释和定义。
它也参照相应章节,来理解等式以及其使用的根本规则。
关于进一步的阅读和参考,用户可参照SILVACO网站的技术支持部分,那里有丰富的技术材料和发表文献。
第2章: 快速入门2.1: DeckBuild运行时间环境窗口"DeckBuild"是富含多样特征的运行时间环境,它是快速熟悉SILVACO的TCAD软件的关键。
Deckbuild 主要特征包括:自动创建输入文件、编辑现有输入文件,创建DOE,强大的参数提取程序和使得输入文件中的参数变量化。
更重要的是,DeckBuild包含好几百个范例,涵盖多种电学、光学、磁力工艺类型,便于首次使用该工具的用户。
使用入门用户可打开一个控制窗口,创建一个目录,用于保存该指南范例将创建的临时文件。
例如,要创建或重新部署一个名为"tutorial," 的目录,在控制窗口键入:mkdir tutorial cd tutorial然后键入下列命令开启deckbuild运行环境:deckbuild屏幕上将出现类似于图2.1的DeckBuild运行时间环境。
GUI界面包括两部分:上部窗口显示当前输入文件,而下部显示运行输入文件时创建的输出。
图2.1 DeckBuild 运行时间界面GUI2.2: 载入和运行范例输入文件可以由用户创建或者从范例库中加载。
为了熟悉软件语法,最好载入第一个实例中范例。
要从deckbuild运行时间环境的GUI载入范例,可点击:Main Control... Examples(范例)...屏幕将弹出一个窗口显示一列47个类别的范例。
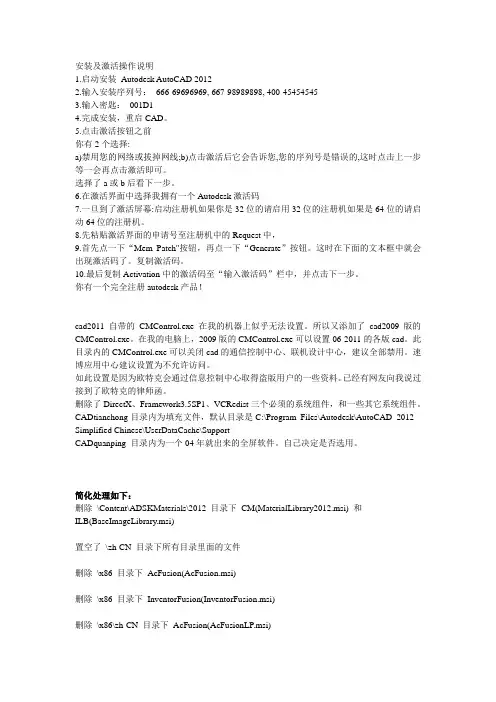
TCAD安装指南1、大家注意到安装目录先把文件夹打开,进入,打开里面的,双击,出现如下安装界面:本例中选择安装路径为D:\Program Files\sedatools,如果作为LICENSE服务器,请选择安装SFLM server,即勾选安装界面如下:、然后开->运行->cmd->msconfig,界面如下:在系统服务里停止:Standard Floating License Manager (SFLMSERVERD),一般都在最后一行,把勾取消掉,应用,确定,注意退出而不从新启动,同时在任务管理器里面把SFLMSERVERD这一系统任务取消掉。
2、破解把rpc.sflmserverd.exe拷贝到下面的路径:sedatools\lib\rpc.sflmserverd\8.0.6.R\x86-nt 替换原来的文件,双击rpc.sflmserverd.exe运行就可以启动Standard Floating License Manager 了3、开始->程序->S.EDA tools->SFLM->Start Server,一定要注意确保下面的系统服务启动:Standard Floating License Manager (SFLMSERVERD),即从新勾选,然后重启电脑,SFLMSERVERD服务会再次启动的。
会要你设密码,随便写一个就行了,比如123456.4、通过IE 登陆http://127.0.0.1:3162进入SFLM设置,通过SFLM在线获取该电脑的SFLM_ID。
可能得到的格式如下:0SSMID12345678,也可能是比这个复杂多的形式(注意,必须用IE,其他浏览器不支持)。
出现界面如下:输入你刚才设定的密码,出现界面如下:点击,出现如下界面:填写好自己的信息,界面弹出如下:,继续Next则SFLM_ID:0SSMID120443305、修改Silvaco.lic中下面的一行,替换为4中你申请到的SFLM_ID.本教程中:LM_HOSTIDS 0SSMID120443306、拷贝修改后的Silvaco.lic到下面路径:sedatools\etc\license注意,改路径下没有license文件夹,需要新建,然后将Silvaco.lic拷贝到里面。

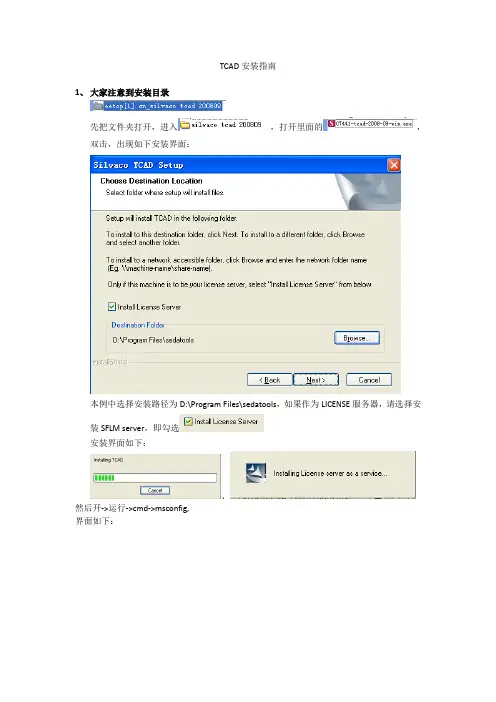
Silvaco之windows版安装教程1、执行12110-tcad-2010-00-win文件,选择Install License Server2、点击Next,Silvaco开始安装3、如果安装过程中出现如下情况,一定要选择允许4、之后会出现设置服务器密码窗口,设置一个能记住的密码例如1234565、之后出现如下窗口点击确定继续安装6、最后出现如下窗口,点击Finish完成安装Silvaco破解方法1、双击打开桌面上S. EDA Tools快捷方式,双击Stop Server图标2、会弹出一个DOS窗口3、窗口自动关闭后,服务器关闭,此时将Key文件夹中的rpc.sflmserverd文件拷贝至C:\sedatools\lib\rpc.sflmserverd\8.2.1.R\x86-nt替换原有文件4、替换完成后双击打开桌面上S. EDA Tools快捷方式,双击StartServer图标5、弹出的DOS窗口会自动关闭,表示服务已经启动,此时双击6、打开服务器管理程序7、输入安装步骤4中设定的密码,点击Login,之后出现以下界面8、点击Register Online,出现以下界面9、随便填上一些信息,注意要符合要求,点击Next,随后出现以下界面10、点击Next,就会出现,Server Code Name如下图所示11、记下该Code,用记事本打开Key文件夹下的all.lic文件12、把LM_HOSTIDS后面的字符串替换成刚才记下的Code,保存,关闭记事本。
13、此时在点击第11步中的OK按钮,出现以下界面14、点击Install New License,选择Install Saved File15、在之后的窗口中点击浏览选择,刚才更改的all.lic文件,点击agree,如果显示SFLMhas installed the specified license file则表示破解成功,点击Done完成安装16、deckbuild启动时需要设置工作目录,点击deckbuild的edit菜单,选择preferences,在working directory中指定一个工作目录即可。
[原创]Silvaco在linux下的安装方法——提供给要学习silvaco软件的各位首先声明:要安装此版本需要有windows版本的支持,因为linux版本无破解文件,所以我并没有像网上安装一样安装服务在linux版本下,我安装服务在windows,linux从windows 获得服务,从而开启linux下的silvaco。
(本教程及软件是给那些想要学习silvaco软件的,请勿用于任何其他商业用途)本教程从安装windows的silvaco开始到虚拟机一直教到大家将silvaco安装完成为止。
首先告诉大家此教程是在windows xp下操作的,如果是vista用户,操作有些不同,我会慢慢提出来。
安装windows xp版本的silvaco ,这个网上都有:1、安装TCAD 2007.04,如果作为LICENSE服务器,请选择安装SFLM server。
然后在系统服务里停止:Standard Floating License Manager (SFLMSERVERD),如果有这个服务的话。
2、把rpc.sflmserverd.exe拷贝到下面的路径:sedatools\lib\rpc.sflmserverd\8.0.3.R\x86-nt替换原来的文件。
3、在快捷方式中运行Start Server确保下面的系统服务启动:Standard Floating License Manager (SFLMSERVERD)会要你设密码,随便写一个就行。
4、通过IE http://127.0.0.1:3162进入SFLM设置,通过SFLM在线获取该电脑的SFLM_ID。
可能得到的格式如下:0SSMID12345678,也可能是比这个复杂多的形式5、修改Silvaco.lic中下面的一行,替换为4中你申请到的SFLM_ID。
LM_HOSTIDS XXX6、拷贝修改后的Silvaco.lic到下面路径:sedatools\etc\license7、通过SFLM Access,正常选择安装Silvaco.lic。
第二篇半导体工艺及器件仿真软件Silvaco操作指南主要介绍了半导体器件及工艺仿真软件Silvaco的基本使用。
书中通过例程引导学习工艺仿真模块Athena和器件仿真模块Atlas,通过这两部分的学习可以使学习人员深入了解半导体物理的基本知识,半导体工艺的流程,以及晶体管原理的基本原理,设计过程,器件的特性。
对于学习集成电路的制备及后道工序有一定的帮助。
第一章 SILVACO软件介绍 (3)1.1程序启动 (3)1.2选择一个应用程序例子 (4)1.3工艺模拟 (5)1.3.1 运行一次模拟 (5)1.3.2 渐进学习模拟 (5)1.3.3 绘制结构 (5)1.3.4 使用Tonyplot进行绘图 (6)1.3.5 修正绘图的外观 (6)1.3.6 缩放及在图上进行平移 (7)1.3.7 打印图形 (8)1.4使用H ISTORY功能 (8)1.5明确存贮状态 (9)1.6创建用于比较的两个结构文件 (9)1.6.1 存贮文件创建 (9)1.6.2 文件交叠 (10)1.7运行MOS工艺程序的第二部分 (12)1.7.1 `Stop At' 功能 (12)1.7.2 使用Tonyplot用于2-D结构 (13)1.7.3 使用Tonyplot来制备一轮廓图 (13)1.7.4 产生交互式图例 (15)1.8工艺参数的抽取 (16)1.8.1 源漏结深 (17)1.8.2 器件阈值电压 (17)1.8.3 电导及偏压曲线 (17)1.8.4 一些薄层电阻 (19)1.8.5 沟道表面掺杂浓度 (19)1.9器件模拟 (20)1.9.1 器件模拟界面工艺 (20)1.9.2 建立器件模拟 (20)1.9.3 执行器件模拟 (21)1.9.4 抽取器件参数 (21)第二章电阻仿真及阻值抽取 (22)第三章扩散二极管仿真 (32)2.1硼扩散 (32)2.2进行MESH的实验 (37)2.3绘制杂质掺杂轮廓曲线 (38)2.4查看抽取结果 (39)第四章 NMOS电学特性仿真 (41)3.1NMOS例子加载 (41)3.2T ONYPLOT操作 (42)3.3查看电学仿真结果 (46)第五章工艺流程的横断面观察 (49)4.1初始化衬底 (49)4.2氧化层屏蔽 (49)4.3NWELL注入 (50)4.4PWELL注入 (50)4.5场氧化层生长 (51)4.6 阱推进51第一章 Silvaco软件介绍本章将介绍下面两个VWF(虚拟wafer制备)交互工具的基本使用:•Deckbuild:VWF运行时控制应用程序。


Silvaco TCAD 2012版本安装说明1、运行安装文件:12110-tcad-2012-00-win.exe,在“Install License Server”前打上勾。
点击 Next.2、安装完毕后,会提示输入服务器密码,此时随便设置一个密码并记住就可以了。
此时可能会在浏览器中打开一个网页,不用管它,后面会用到。
3、先停止Standard Floating License Manager (SFLMSERVERD)这个服务。
如果不停止,后面的拷贝覆盖操作将无法完成。
停止服务的办法:运行桌面上快键方式“S. EDA Tools”,选择“Stop Server”来完成服务停止的操作,同样,开启服务则选择“Start Server”;如果杀毒软件或者360提示操作,一律选择“允许”。
4、把_key 文件夹中的rpc.sflmserverd.exe文件复制,然后找到您的安装目录,将该文件拷贝到下面的路径:sedatools\lib\rpc.sflmserverd\8.2.7.R\x86-nt替换原来的文件。
5、在快捷方式中运行“Start Server”,确保下面的系统服务启动:Standard Floating License Manager (SFLMSERVERD)6、服务器的网页在安装结束后会打开,或者运行快捷方式中的“SFLM Admin”打开服务器页面:输入刚才设置的密码,点击login.并复制记下方框中的“Machine IDs”,每个电脑的Machine ID都不一样,比如在这个例子中是:“Shane-PC-dcd135d6-50b4108d”。
DELL-ae750aa0-139be0787、修改_key 文件夹中Silvaco.lic中下面的一行(可用记事本打开),替换为您刚才复制的Machine IDs:LM_HOSTIDS xxxxxxxxxNL_HOSTIDS (如图所示)。
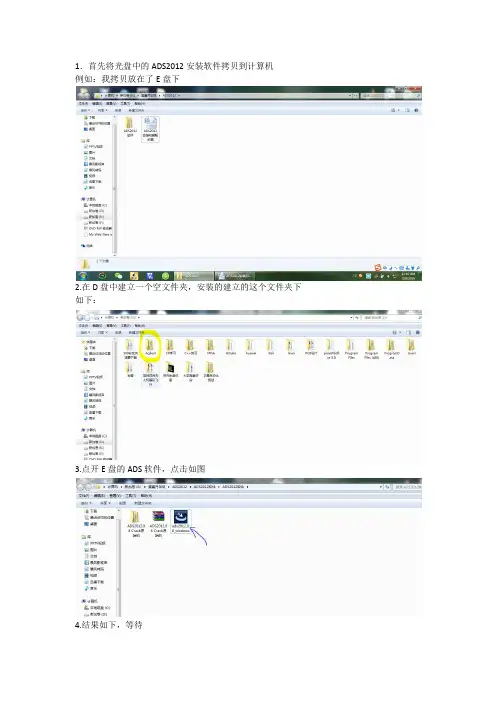
1.首先将光盘中的ADS2012安装软件拷贝到计算机例如:我拷贝放在了E盘下2.在D盘中建立一个空文件夹,安装的建立的这个文件夹下如下:3.点开E盘的ADS软件,点击如图4.结果如下,等待5.等待准备至100%,会自动跳转到如下界面6.点击next进入如下界面7.进入如下界面8.点击next,进入如下界面9.进入如下界面注意:1步骤目的是装在同一硬盘盘下。
不然破解会出错!10.进入如下界面11.进入如下界面12:进入如下界面等待直道安装完成。
大约20分钟,电脑差的话将近半个小时出现这个证明快要结束了!出现这个证明快要结束了!会出现如下。
安装到此结束!接下来是破解!!!首先将自己的时间改成英文显示!!!步骤如下:点击“控制面板”进入如下界面进入如下界面进入如下界面然后回到拷贝的文件夹下,点击“ADS2012.08 Crack”文件夹,出现如下:进入该文件夹下,如下图:结果如下:把解压出来的文件替换掉ADS安装目录下的文件,直接粘贴覆盖。
安装目录如下图片既是D:\Agilent\ADS2012_08进行下一步:将解压出来的文件全部复制到D:\Agilent\ADS2012_08\bin安装目录下。
然后重启电脑. 重新启动电脑之后进行如下操作:下面进行改写license 用记事本打开license注意:要去掉冒号如果有两串代码可以试着先试前面一组后面一组或所有当成一组保存关闭license。
把license复制到自己可以找到的路径。
建议D:\Agilent\ADS2012_08\bin 这个安装目录下。
然后找到D:\Agilent\ADS2012_08\bin路径下的然后进行如下操作注意圈着的变化,破解不成功不是如图的样子。
到此硬解完成,点击运行吧。
solidworks 2012 图解安装破解说明全过程
多谢c211950提供的solidworks2012下载地址
/thread-1852-1-1.html,今天刚刚装上,和大
家分享。
本人机器上安装有solidworks2011,以下安装过程在没有卸载2011的情况
下进行。
在win7 64位环境安装,网络断开。
用虚拟光驱打开SW2012_SP0.0_Win64_Full_Multilanguage_SSQ.iso或者用RAR工具解压出来。
运行setup.exe
接着如下图:
0001 0001 0736 0361 JK3Q HDJ3
可以更改安装位置:
点击完成后弹出一个网站,弹出whatsnew.pdf。
整个过程20多分钟。
装完后第一次运行:
没crack前只能试用30天,点完成后打开solidworks,然后关掉。
接下来打开SW2012_SP0.0_Win64_Full_Multilanguage_SSQ.iso里边的crack文件夹
运行SW2010-2012.Activator.SSQ.exe
接着按几次是就ok了。
再次开启solidworks
这次没有提示30天试用
新建个零件:
完成。
Silvac o TCA D 半导体仿真工具培训教程_资料手册S ilvac o TCA D 2014.00Win32 1DVD半导体仿真工具Sy nopsy s.Tca d.Sen tauru s.vH-2013.03.Li nux64 3CDSilva co的TC AD 建模服务提供解决方案给那些有特别半导体器件建模需求而内部又没有时间和资源运行TCAD软件的客户。
使用TC AD建模服务,可运用Silva co在半导体物理和T CAD软件操作方面的专长,提供完全、快速和精确的即可使用的解决方案。
Silva co AM S v2010.00 Win32 1CDSil vacoAMS 2008.09 Lin ux3264S ilvac o AMS 2008.09 S olari s 1CDSil vacoAMS 2008.09 Man ual 1CDS ilvac o Icc ad 2008.09 1CDSilv aco I ccad2008.09 Li nux32 64Silva co Ic cad 2008.09 Sol aris1CDSilva co Ic cad 2008.09 Man ual 1CDS ilvac o Log ic 2008.09 1CDSilv aco L ogic2008.09 Li nux32 64Silva co Lo gic 2008.09 Sol aris1CDSilva co Lo gic 2008.09 Man ual 1CDS ilvac o TCA D 2012.00Win32_64 1DVDSilva co TC AD 2010.00 Linu x 1CDSil vacoTCAD2012Linux64 1D VDS ilvac o TCA D 2008.09Solar is 1C DSi lvaco TCAD 2008.09 M anual 1CDSilv aco C ataly st 2008.09 Linu x32 64Si lvaco Cata lyst2008.09 So laris 1CDSilv aco C har 2008.09 Lin ux3264S ilvac o Cha r 2008.09Solar is 1C DSi lvaco Fire bird2008.09 Li nux32 64Silva co Fi rebir d 2008.09Solar is 1C DSi lvaco Mode 2008.09 L inux32 64Silv aco M ode 2008.09 Sol aris1CDSilva co Pa rasit ic 2008.09 Linu x32 64Si lvaco Para sitic 2008.09 S olari s 1CDSil vacoUT 2007.04 Linu x32 64S ilvac o UT2007.04 So laris 1CDSilv aco V WF 2007.04 Linu x32 64S ilvac o VWF 2007.04 S olari s 1CDPar allel Smar tSpic e 1.9.3.E1CD■□■□■□■□■□■□■□■□■□■□■□■□■□■□■□■□■□■□+ 诚信合作,保证质量!!!长期有效: +电话TE L:18980583122 客服 QQ:1140988741■□■□■□■□■□■□■□■□■□■□■□■□■□■□■□■□■□■□Pin nacle产品:Fracp roPT.2007.v10.4.52 1CD(石油工业界的先进压裂软件工具,它提供支撑剂和酸液压裂处理的设计、模拟、分析、执行和优化功能。
SolidWorks ® Education Edition 2012Installation InstructionsPreparation• Verify that your system meets the criteria specified in /System_Requirements .• Back up all SolidWorks files (parts, assemblies, and drawings, document templates, sheet formats, libraryfeatures, and form tools) before upgrading to SolidWorks 2012. Files you open and saved in SolidWorks 2012 cannot be opened in earlier versions.• To minimize disk space consumed, please consider uninstalling your older Education Edition and using anew installation of the new Education Edition product. If you uninstall the older version please be sure to also uninstall Simulation products, along with older versions of eDrawings, DWGeditor, etc.• Locate your Serial Number (S/N). The number typically begins with 9710 (Network) or 9700 (StandAlone). NEW Customer – S/N is located on the front of the box on a sticker. CURRENT Customer - S/N is located inside SolidWorks under HELP then ABOUT SOLIDWORKS. If you cannot find or you have misplaced your number, contact your local educational reseller to obtain one.• Before you uninstall a previous version of SolidWorks please make sure to transfer your license by going tohelp/transfer licenses.• Uninstall any alpha, beta, or pre-release versions of the SolidWorks software.Installation and Licensing ProcessYou are ready to begin your installation of theSolidWorks ® Education Edition!Network Users OnlySection 2Section 1Ver. 1STEPS FOR SECTION 1: NETWORK INSALLATION:1.Remove previous SolidNetWork License Managers2.Remove previous SolidWorks software3.Install 2012 SolidNetWork License Manager4.Activate 2012 Network License5.Install SolidWorks software on individual clientsSection 1 | SolidWorks® Education Edition Installation (Network)Note:If you are installing SolidWorks on a Network with Restricted Rights, please go to the Customer Portal for additional documentation or contact your local reseller for assistance.This step is only for users who are on NETWORK. If you purchased a Stand Alone, proceed to Section 2 in the installation process.Note:•All previous SolidWorks License Managers must be removed from your computer before beginning the installation of the new SolidWorks License Manager (i.e. 2011 must be removed before installing 2012).•The SolidWorks License Manager must be installed on the machine that will be used to distribute SolidWorks licenses on your network.•The SolidWorks License Manager for 2012 will license all SolidWorks EDU applications., including SolidWorks Simulaton, SolidWorks Sustainability, eDrawings and PhotoView 360.Remove previous SolidNetWork License Managers1.Stop the Licensing Service onthe host machine.For Window XP, open the TaskManager from the Control Paneland select the Processes tab andclick the Image Name header tosort in alphabetical order. LocateImgrd.exe process and selectEnd Process.unch Add/Removeprograms and uninstall theprevious version of theinstallation Manager.Access Add/Removeprograms from Start >Control Panel >Add/Remove Programs.Locate the SolidWorksSolidNetWork LicenseManager and selectRemove.-Once the remove option is selected you will beprompted to confirm theproducts to uninstall.-The product will thenuninstall itself. A progressonly box will appear.-After the product uninstall iscomplete, close theAdd/Remove program swindow and launchWindows Explorer. Locatethe folder in which thelicense manager waspreviously installed to anddelete it. By default thelicense manager is installedto: C:\ProgramFiles\SolidWorksSolidNetWork LicenseManager.Remove previous SolidWorks Software1.If required, uninstall SolidWorks using Add/Remove Programs.2.If required, Delete SolidWorks folders located in C:\ Program Files\SolidWorks CorpBegin 2012 SolidNetWork License Manager Installation1.Insert your 2012 SolidWorks DVD in your local DVD Drive to begin the softwareinstallation process. If SolidWorks Master Setup does not come up automatically, select My Computer and double click the DVD drive, this is generally your D: drive. You may alsolaunch the Installation Manager downloaded from the SolidWorks Customer Portal.Note: Once DVD is placed in your local DVD Drive, the SolidWorks 2012 SP2.0 Installation Manager will appear. Select Server products and then select “Install SolidNetWork License Manager (distributed licensing) on this computer.”Click Next.2.The next screen will prompt you for your SolidWorks and associated products serial number.Enter your product serial number. Click Next.3.Confirm the Summary page and click “Install Now”.Note: Server Installation Progress will appear. Once done checking for Updates, the SolidWorks SolidNetWork License Manager Setup will appear. Click Next.4.After the installation is complete there will be a confirmation of the successful install. Oncecompleted the Installation Manager confirms the product(s) are installed correctly.5.Select Finish and close the installation manager. This completes the installation of theSolidWorks SolidNetWork License Manager. If you choose to tell us your installation experience, the following Survey will be displayed in your Internet Browser. Thank you for your feedback.Activate 2012 SolidNetWork LicenseStarting with SolidWorks 2010 release, a new licensing method has been introduced for network licenses. The new process will require internet connectivity to ‘activate’ the license on the SolidWorks server.What does this mean for the user? The end user will no longer need a license file or existing dongle. The dongle must be returned to your value added reseller.1.To activate the newly installed software go to Start > All programs > SolidWorks 2012 >SolidWorks License Manager > SolidNetWork License Manger.A server information dialog will appear that will allow you to choose the license server port(s)and apply an options file if desired. It is recommended that you select the option for firewall in use on this server. Select Next to continue.Note: You will need to add exceptions in your firewall software, example shown in Windows XP andWindows 7 Firewall settings on the next page. For Windows 7, skip the Windows XP firewall section and go to Windows 7 settings.For Windows XP Firewall1.Select Security Center from the Control Panel.2.Click Windows Firewall and then selectExceptions Tab. Select the Add Programbutton.For Windows XP Firewall3.Browse to the folder where you installedthe SolidWorks SolidNetwork LicenseManager and select both Lmgrd.exe andsw_d.exe.If lmgrd.exe is added successfully,lmgrd.exe will appear in the list of programs.If sw_d.exe is added successfully, sw_d.exe willappear in the list of programs.Continue with SolidnetWork License Installation go to Page 171.Add program exceptions to the Windows 7 Firewall. In SNL Server setup, change image toshow that the windows firewall option is selected.2.Bring up the Control Panel and Select System and Security3.Allow programs through the firewall.4.Click “allow another program”And Browse to the folder where you installed theSolidWorks SolidNetwork License Manager. Add both executables. Lmgrde.exe and sw_d.exeWhen lmgrd.exe is added successful to the exceptions list, it will appear as Accresso Software Inc in the list of Allowed programsWhen sw_d is allowed successfully, it will as sw_dn in the allowed programs list.Continue with SolidnetWork License InstallationThe SolidWorks Product Activation window will appear and you will be required to fill out an email to associate to the activation. Enter an email address and select Next. Note: If you do not have internet access, please contact your Value Added Reseller.The product will now activate via internet.After a successful activation there will be a succeeded message which will show all the products associated with your serial number.Select Finish, completing activation. The license manager will appear and you can close it out to complete the activation process.NOTE:You have now finished installing the SolidWorks License Manager. You must now go to your client computers and proceed as follows on steps.Before beginning the installation process, please be sure to close out of all SolidWorks programs currently open on your computer.You can also install SolidWorks on your server machine. Follow the instructions in the next section.Section 2 | SolidWorks® Education Edition Installation (Stand Alone) Note:For SolidWorks Network install, the software does not get installed on the network machine (Server) by default. Normally SolidWorks should be installed on the user machines (Client).Before beginning the installation process, please be sure to close out of all SolidWorks programs currently open on your computer.1.On the CLIENT Machine Insert DVD or launch the Installation Manager downloaded fromthe SolidWorks Customer Portal. Select Individual (on this computer). Click Next in lower right corner.2.For new installation enter your serial number below (24 digits). Click Next.Note: The message in the center of the window under the green bar, “Connecting to SolidWorks”will appear. You may see a screen stating that a newer version is available, ALWAYS selectcontinue installing from DVD and click Next.3.After you have clicked Next, the SolidWorks 2012 SP2.0 Installation Manager will guide youthrough the installation. Accept Defaults on the screen (DO NOT change anything) Click Install Now to continue installation.Note: For the client installation of a network license, you will be asked for your license server name as below. Please enter your license server and the port number that you specified in the server ***************************************************************************“OK”4. Installation is Complete! Confirm if you would like to tell us your installation experience in a survey or participate in the Customer Experience program, then click Finish.Note: Depending upon your computer configuration you may or may not need to restart your computer. Installing SolidWorks will also install Simulation and Sustainability products automatically. You do not have to re-install Simulation after the SolidWorks installation is complete.For client installation of a network license, your SolidWorks is ready now since your network license server has been activated in Section 1 and your client SolidWorks is connected with your license server.For standalone license installation, when you start SolidWorks Education Edition for the first time, the SolidWorks Product Activation dialog will appear to guide you through the activation process. Click Next, to continue with activation.To activate you SolidWorks product you must enter a serial number from SolidWorks. The SolidWorks Product Activation will help you collect the information necessary to activate your product. Choose which method for how you would like to activate. Type in email address and then click Next.Now you are done registering your SolidWorks Education Edition. Click Finish.YOU CAN NOW RUNSOLIDWORKS EDUCATION EDITION!。
silvaco安装教程详细图解[原创]Silvaco在linux下的安装⽅法——提供给要学习silvaco软件的各位⾸先声明:本教程借鉴了前⼈的安装成果,在此表⽰感谢。
要安装此版本需要有windows版本的⽀持(必须先在Windows下安装⼀次silvaco!),因为linux版本⽆破解档,所以我并没有像⽹上安装⼀样安装服务在linux版本下,我安装服务在windows,linux从windows获得服务,从⽽开启linux下的silvaco。
(本教程及软件是给那些想要学习silvaco软件的,请勿⽤于任何其它商业⽤途)第⼀部分、安装Windows版本silvaco收藏该⽹页后,请把该⽹页关闭!但是在上⼀步操作之前,要先进⾏下⾯的⼀步操作,否则会出错。
第⼆部分、安装linux版本silvaco1.要将silvaco档复制到虚拟机,要建⽴共享,通过此档夹进⾏windows与虚拟机之间的档传输,共享⽅法如下Vm→settings→options→shared folder→add选择silvaco所在档夹及⾃⼰设置的共享的名称2.共享后可在/mnt/hgfs/⽬录下找到此⽂件夹,复制silvaco linux版本安装档⾄虚拟机我新建了个活页夹/eda(linux4在guest’s home⾥创建)3.直接选择silvaco压缩⽂件后右键点击“Extract here”解压档4.查看虚拟机与windows的ip地址右击⽹上计算机→可以看到虚拟了两个⽹络,vmnet8vmnet1,查看vmnet8的ip地址右击属性→双极tcp/ip协议可以看到ip地址(是在windows与虚拟机之间使⽤的ip地址,并⾮上⽹的ip地址),记住此地址5.进⼊虚拟机,打开终端,查看⽹络是否通畅ping刚才看的vmnet8的ip地址,如果能有数据接收(若不通请关闭防⽕墙,vista⽤户注意,由于vmware 6.5不能与redhat⽹络兼容,好像刚刚装好⽹络不通,请按照此⽅法设置打开终端gedit/etc/sysconfig/network-scripts/ifcfg-eth0在最后加⼊check_link_down(){return1;}保存退出ifdown eth0ifup eth0这样的话⽹络应当通了吧)建⽴环境变量gedit/etc/csh.cshrc在最后⼀⾏加⼊set path=($path:q/eda/bin)后⾯的⽬录就是silvaco 解压后bin⽂件夹所在⽬录setenv SFLM_SERVERS刚才查看的vmnet8的ip地址注意:这⾥可能会出现⼀个问题!详细过程如下:。
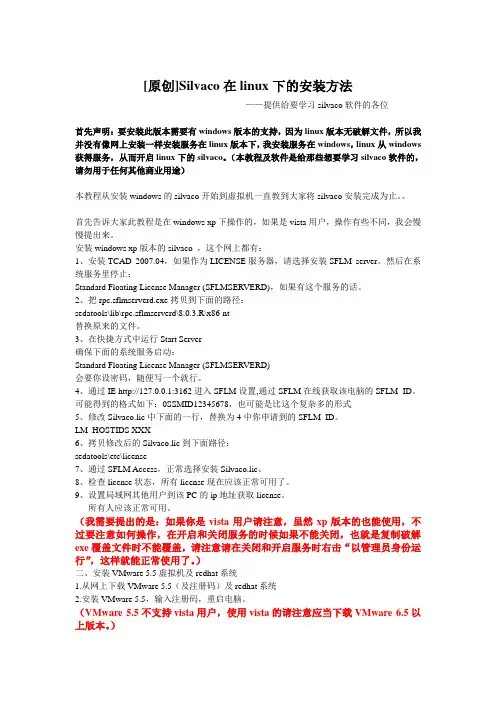
Silvaco TCAD 2012版本安装说明
1、运行安装文件:12110-tcad-2012-00-win.exe,在“Install License Server”前打上勾。
点击 Next.
2、安装完毕后,会提示输入服务器密码,此时随便设置一个密码并记住就可以了。
此时可能会在浏览器中打开一个网页,不用管它,后面会用到。
3、先停止Standard Floating License Manager (SFLMSERVERD)这个服务。
如果不停止,后面的拷贝覆盖操作将无法完成。
停止服务的办法:运行桌面上快键方式“S. EDA Tools”,选择“Stop Server”来完成服务停止的操作,同样,开启服务则选择“Start Server”;如果杀毒软件或者360提示操作,一律选择“允许”。
4、把_key 文件夹中的rpc.sflmserverd.exe文件复制,然后找到您的安装目录,将该文件拷贝到下面的路径:
sedatools\lib\rpc.sflmserverd\8.2.7.R\x86-nt
替换原来的文件。
5、在快捷方式中运行“Start Server”,确保下面的系统服务启动:
Standard Floating License Manager (SFLMSERVERD)
6、服务器的网页在安装结束后会打开,或者运行快捷方式中的“SFLM Admin”打开服务器页面:
输入刚才设置的密码,点击login.并复制记下方框中的“Machine IDs”,
每个电脑的Machine ID都不一样,比如在这个例子中是:
“Shane-PC-dcd135d6-50b4108d”。
7、修改_key 文件夹中Silvaco.lic中下面的一行(可用记事本打开),
替换为您刚才复制的Machine IDs:
LM_HOSTIDS xxxxxxxxxNL_HOSTIDS (如图所示)。
只将“xxxxxxxx”替换为您的Machine IDs即可(后面不用加空格),然后复制粘贴在目录sedatools\etc下。
8、在刚才的网页上,选择左边的“Install new license”,选择“Install Saved File”,如图所示,
在目录sedatools\etc下选择刚才修改过的license文件,并点击“Agree”
然后出现下方的提示,选择Done就完成了。
一定要保证方框中的文本和下方的Machine IDs保持一致!在有些情况下,上面的方框中ID的后面会加上NL_HOSTIDS,此时需要重新修改Silvaco.lic文件,并删除Machine IDs文本后面的“NL_HOSTIDS”,一般情况下是不用删除“NL_HOSTIDS”的。
10、运行快捷方式中DeckBuild,如果没有弹出错误提示框,说明安装成功。
但会弹出小对话框提示work目录无效,在根目录下建立一个work文件夹就好。
在
DeckBuild中的Edit目录下,选择“Preferences”就可以看到当前的工作目录。
11、安装结束,在DeckBuild中编写代码运行软件。