实验:Trunk配置
- 格式:doc
- 大小:66.00 KB
- 文档页数:3
实验二VLAN以及Trunk配置(第2 次课 1 学时)一、【实验目的】1.了解交换机的工作原理,掌握交换机的基本配置命令。
1、掌握VLAN基本配置。
2、掌握静态接口VLAN划分。
二、【实验器材】1.思科3400交换机2台、PC机每组个2台。
2.连接console电缆线两条、标准网线若干。
三、【实验重点和难点】1.熟练使用交换机的常用配置命令。
2. 验证VLAN实现两个PC之间的连通性。
四、【实现功能】通过VLAN实现两个PC之间的连通性。
五、【思考题】不同VLAN间的PC是否可以相互访问,相同VLAN间的PC是否可以相互访问。
实验内容一、基本VLAN实验实验拓扑:实验需求:在交换机switch上面创建两个VLAN,vlan2和vlan3,vlan 名称分别为HR、ENG ,将主机PC1、PC2分别划入两个VLAN中步骤一:创建VLAN2与VLAN3Switch#config terminalSwitch(config)#vlan 2Switch(config-vlan)name HRSwitch(config-vlan) exitSwitch(config)#vlan 3Switch(config-vlan) name ENG步骤二:将与两台PC连接的两个接口分别划入相同的VLAN2中Switch(config)#int f0/1Switch(config-if) switch access vlan 2Switch(config-if)port nni//将接口划入指定VLAN中Switch(config-if)int f0/2Switch(config-if) switch access vlan 2Switch(config-if)port nni//将接口划入指定VLAN中Switch(config-if)exit验证结果:使用show vlan 2查看试验结果,在PC1以及PC2上使用ping 命令查看连通性。
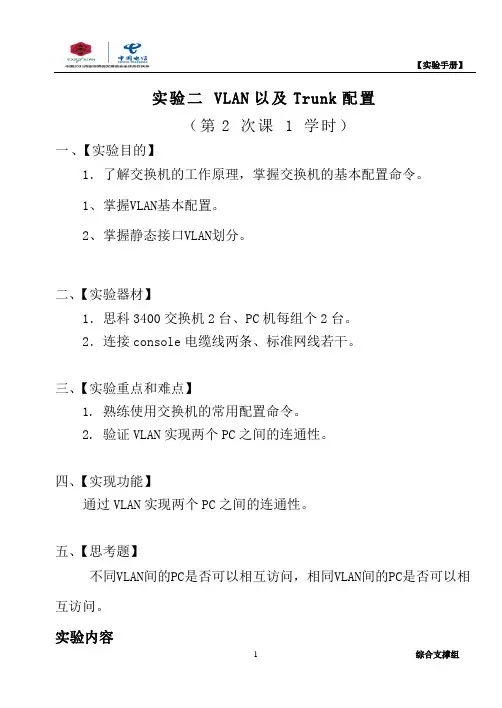
交换机Trunk端口配置一组网需求:1.SwitchA与SwitchB用trunk互连,相同VLAN的PC之间可以互访,不同VLAN的PC之间禁止互访;二组网图:1.VLAN内互访,VLAN间禁访三配置步骤(H3C):1 实现VLAN内互访VLAN间禁访配置过程SwitchA相关配置:1.创建(进入)VLAN10,将E0/1加入到VLAN10[SwitchA]vlan 10[SwitchA-vlan10]port Ethernet 0/12.创建(进入)VLAN20,将E0/2加入到VLAN20[SwitchA]vlan 20[SwitchA-vlan20]port Ethernet 0/23.将端口G1/1配置为Trunk端口,并允许VLAN10和VLAN20通过[SwitchA]interface GigabitEthernet 1/1[SwitchA-GigabitEthernet1/1]port link-type trunk[SwitchA-GigabitEthernet1/1]port trunk permit vlan 10 20SwitchB相关配置:1.创建(进入)VLAN10,将E0/10加入到VLAN10[SwitchB]vlan 10[SwitchB-vlan10]port Ethernet 0/102.创建(进入)VLAN20,将E0/20加入到VLAN20[SwitchB]vlan 20[SwitchB-vlan20]port Ethernet 0/203.将端口G1/1配置为Trunk端口,并允许VLAN10和VLAN20通过[SwitchB]interface GigabitEthernet 1/1[SwitchB-GigabitEthernet1/1]port link-type trunk[SwitchB-GigabitEthernet1/1]port trunk permit vlan 10 20Cisco:ASwitch>Switch>Switch>enSwitch#conf tEnter configuration commands, one per line. End with CNTL/Z. Switch(config)#hoswa(config)#hostname SwaSwa(config)#vlan 10Swa(config-vlan)#vlan 20Swa(config-vlan)#exitSwa(config)#interface fSwa(config)#interface fastEthernet 0/1Swa(config-if)#swSwa(config-if)#switchport aSwa(config-if)#switchport access vlan 10Swa(config-if)#exitSwa(config)#intSwa(config)#interface faSwa(config)#interface fastEthernet 0/2Swa(config-if)#swSwa(config-if)#switchport aSwa(config-if)#switchport access vlan 20Swa(config-if)#Swa con0 is now availablePress RETURN to get started.Swa>enSwa#conf tEnter configuration commands, one per line. End with CNTL/Z. Swa(config)#Swa(config)#interface fSwa(config)#interface fastEthernet 0/24Swa(config-if)#swSwa(config-if)#switchport ?access Set access mode characteristics of the interface mode Set trunking mode of the interfacenative Set trunking native characteristics when interface is intrunking modenonegotiate Device will not engage in negotiation protocol on thisinterfaceport-security Security related commandpriority Set appliance 802.1p prioritytrunk Set trunking characteristics of the interfacevoice V oice appliance attributesSwa(config-if)#switchport mSwa(config-if)#switchport mode ?access Set trunking mode to ACCESS unconditionallydynamic Set trunking mode to dynamically negotiate access or trunk modetrunk Set trunking mode to TRUNK unconditionallySwa(config-if)#switchport mode tSwa(config-if)#switchport mode trunk将端口24设置为trunk%LINEPROTO-5-UPDOWN: Line protocol on Interface FastEthernet0/24, changed state to down%LINEPROTO-5-UPDOWN: Line protocol on Interface FastEthernet0/24, changed state to upSwa(config-if)#BSwitch>enSwitch#conf tEnter configuration commands, one per line. End with CNTL/Z. Switch(config)#hoSwitch(config)#hostname SwbSwb(config)#vlan 10Swb(config-vlan)#vlan 20Swb(config-vlan)#exitSwb(config)#intSwb(config)#interface fSwb(config)#interface fastEthernet 0/1Swb(config-if)#swSwb(config-if)#switchport aSwb(config-if)#switchport access vlan 10Swb(config-if)#exitSwb(config)#intSwb(config)#intSwb(config)#interface faSwb(config)#interface fastEthernet 0/2Swb(config-if)#swSwb(config-if)#switchport aSwb(config-if)#switchport access vlan 20Swb(config-if)#Swb con0 is now availablePress RETURN to get started.%LINEPROTO-5-UPDOWN: Line protocol on InterfaceFastEthernet0/24, changed state to down%LINEPROTO-5-UPDOWN: Line protocol on Interface FastEthernet0/24, changed state to upSwb>Swb>Swb>enSwb#confSwb#configure tSwb#configure terminalEnter configuration commands, one per line. End with CNTL/Z.Swb(config)#intSwb(config)#interface fSwb(config)#interface fastEthernet 0/24Swb(config-if)#swSwb(config-if)#switchport moSwb(config-if)#switchport mode tSwb(config-if)#switchport mode trunk。
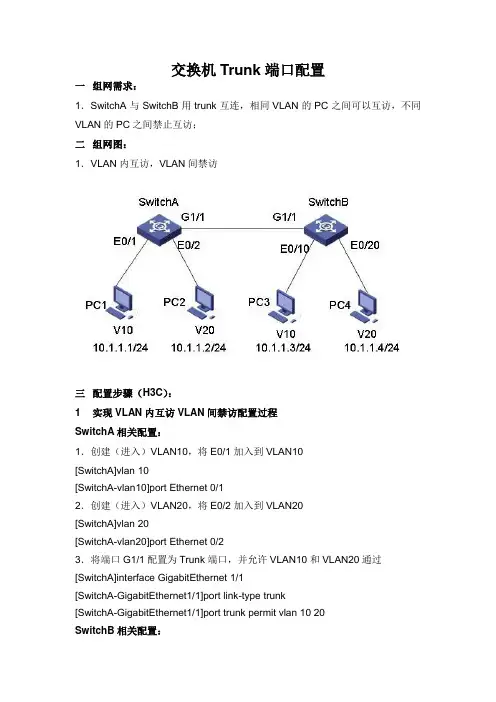
实验:Trunk配置1.实验目的通过本实验,读者可以掌握如下技能:①配置交换机接口的Trunk;②理解DTP的协商规律2.实验拓扑实验拓扑图如图所示。
图拓扑图3.实验步骤在前一实验的基础上继续本实验①根据前一实验的步骤在S2上创建VLAN,并把接口划分在如图所示的VLAN中。
②配置Trunk:S1(config)#int f0/13S1(config-if)#switchport trunk encanpsulation dot1q//以上是配置Trunk链路的封装类型,同一链路的两端封装要相同。
有的交换机,例如2950只能封装dot1q,因此无须执行该命令S1(config-if)#switch mode trunk//以上是把接口配置为TrunkS2(config)#int f0/13S2(config-if)#switchport trunk encanpsulation dot1qS2(config-if)#switch mode trunk③检查Trunk链路的状态,测试跨交换机、同一VLAN主机间的通信。
使用”show interface f0/13 trunk”可以查看交换机端口的trunk状态,如下:Port Mode Encapsulation Status Native vlanFa0/13 on 802.1q trunking 1//f0/13接口已经为Trunk链路了,封装为802.1qPort Vlans allowed on trunkFa0/13 1-4094Port Vlans allowed and active in management domainFa0/13 1-3Port Vlans in spanning tree forwarding state and not prunedFa0/13 2-3需要在链路的两端都确认Trunk的形成。
测试R1和R3以及R2和R4之间的通信。

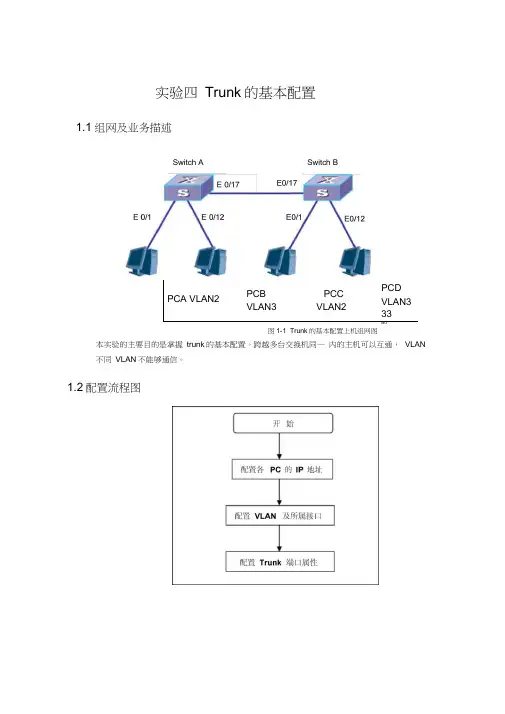
实验四Trunk的基本配置1.1组网及业务描述PCA VLAN2PCBVLAN3PCCVLAN2PCDVLAN333图1-1 Trunk的基本配置上机组网图MO本实验的主要目的是掌握trunk的基本配置。
跨越多台交换机同一内的主机可以互通,不同VLAN不能够通信。
1.2配置流程图VLANSwitch A Switch B1.3 配置步骤(1) 配置各PC 的IP 地址首先按照上图连接各实验设备,然后配置PCA :10.1.1.1/24 ,PCB :10.1.1.2/24PCC :10.1.1.3/24 ,PCD :10.1.1.4/24(2) 配置VLAN 及所属端口创建两个VLAN :VLAN 2 和VLAN 3,配置端口Ethernet 0/1 到Ethernet0/8 属于VLAN2 ,端口Ethernet0/9 到Ethernet0/16 属于VLAN3 。
(3) 配置交换机之间的端口为Trunk 端口,并且允许所能通过的VLAN指定端口Ethernet0/17 为Trunk 端口,并允许所有VLAN 可以通过。
1.4配置参考1.4.1 配置VLAN 及所属端口1. 配置RTA[Switch A]vlan 2[Switch A-vlan2]port ethernet 0/1 to ethernet 0/8 [Switch A]vlan 3[Switch A-vlan3]port Ethernet 0/9 to Ethernet 0/162. 配置RTB[Switch B]vlan 2[Switch B-vlan2]port Ethernet 0/1 to Ethernet 0/8 [Switch B]vlan 3[Switch B-vlan3]port Ethernet 0/9 to Ethernet 0/161.4.2 配置Trunk 端口1. 配置RTA [Switch A] interface Ethernet 0/17[Switch A-Ethernet0/17] port link-type trunk[Switch A-Ethernet0/17] port trunk permit vlan all允许所有VLAN通过2. 配置RTB [Switch B] interface Ethernet 0/17[Switch B-Ethernet0/17] port link-type trunk[Switch B-Ethernet0/17] port trunk permit vlan all。
实验四:Trunk和VTP配置⏹实验目的1、掌握Trunk和VTP工作原理2、学习配置Trunk的命令和步骤3、学习配置VTP命令和步骤⏹实验要求1、拓扑与地址规划;2、Trunk基本配置和VTP配置3、验证Trunk和VTP配置并给出配置清单⏹实验拓扑(可选)⏹实验设备(环境、软件)交换机4台,交叉线4条,直通线2条,Pc机2台。
⏹实验设计到的基本概念和理论给出Trunk和VTP基本概念,VTP的三种模式Trunk:是两个交换机之间网络信息传递的物理和逻辑的连接;一个Trunk就是支持传递多个VLAN信息的点到点的链路;Trunk的目的是保留端口:Trunk将在一个物理链路上绑定多个虚链路,从而在两台交换机之间允许在单一物理链路上传输多个VLAN的信息VTP:是一个通告VLAN信息的信息系统;VTP维护整个管理域VLAN信息的一致性;VTP仅在Trunk端口上发送通告VTP的三种模式:VTP Server、VTP Client 和 VTP Transparent 实验过程和主要步骤1、绘制网络拓扑2、交换机之间接口配置TrunkSwitch3:Switch(config)#int f0/1Switch(config-if)#switchport mode accessSwitch(config-if)#switchport access vlan 10Switch(config-if)#int f1/1Switch(config-if)#switchport mode trunk%LINEPROTO-5-UPDOWN: Line protocol on Interface FastEthernet1/1, changed state to down%LINEPROTO-5-UPDOWN: Line protocol on Interface FastEthernet1/1, changed state to upSwitch(config-if)#int f2/1Switch(config-if)#switchport mode trunk%LINEPROTO-5-UPDOWN: Line protocol on Interface FastEthernet2/1, changed state to down%LINEPROTO-5-UPDOWN: Line protocol on Interface FastEthernet2/1, changed state to upSwitch(config-if)#Switch0:Switch1:Switch2:3、VTP的配置。
实验四交换机Trunk配置一、实验课时:2学时二、实验目的巩固虚拟局域网的原理。
巩固交换机划分虚拟局域网的方法。
掌握思科交换机trunk配置的相关命令。
巩固使用ping方法测试实验的正确与否。
三、实验环境四台用于测试的计算机二层交换机、三层交换机网线若干四、实验过程用网线连接两台交换机与四台计算机。
在计算机上配置交换机的命令,划分虚拟局域网,设置trunk口。
使用ping命令测试用于实验的四台计算机的连通性。
五、实验内容配置交换机的主机名。
划分VLAN,VLAN的配置与拓扑图相同。
配置交换机的trunk口。
在主机上ping,相同VLAN的主机能通,不同VLAN之间的主机不能通。
撰写实验报告。
六、实验步骤:1、用网线连接两台交换机与四台计算机2、交换机的配置:SW1的配置Switch>Switch>enSwitch#conf tSwitch(config)#host SW1SW1(config)#vlan 2 (创建vlan2)SW1(config-vlan)#exitSW1(config)#vlan 3(创建vlan 3)SW1(config-vlan)#exitSW1(config)#int f0/2SW1(config-if)#switchport access vlan 2 (将端口f0/2添加到vlan 2中)SW1(config-if)#exitSW1(config)#int f0/3SW1(config-if)#switchport access vlan 3 (将端口f0/3添加到vlan3中)SW1(config-if)#exitSW1(config)#int f0/10SW1(config-if)#switchport mode trunk (将端口f0/10指定为trunk口)SW1(config-if)#switchport trunk encapsulation dot1q (将端口f0/10封装为802.1q,此命令为可选,对于某些交换机需要配置此命令,对于某些交换机不适用,如2960型号的交换机就不需要这个命令)验证:SW1#sh vlan brief(查看交换机vlan的配置情况)VLAN Name Status Ports---- -------------------------------- --------- -------------------------------1 default active Fa0/1, Fa0/4, Fa0/5, Fa0/6Fa0/7, Fa0/8, Fa0/9, Fa0/10Fa0/11, Fa0/12, Fa0/13, Fa0/142 VLAN0002 active Fa0/23 VLAN0003 active Fa0/31002 fddi-default active1003 token-ring-default active1004 fddinet-default active1005 trnet-default activeSW1#show int trunk(查看交换机trunk的配置情况)Port Mode Encapsulation Status Native vlan Fa0/10 on 802.1q trunking 1Port Vlans allowed on trunkFa0/10 1-4094Port Vlans allowed and active in management domainFa0/10 2,3Port Vlans in spanning tree forwarding state and not prunedFa0/10 2,3SW2的配置Switch>Switch>enSwitch#conf tSwitch(config)#host SW2SW2(config)#vlan 2SW2(config-vlan)#exitSW2(config)#vlan 3SW2(config-vlan)#exitSW2(config)#int f0/2SW2(config-if)#switchport access vlan 2 (将端口f0/2添加到vlan 2中) SW2(config-if)#exitSW2(config)#int f0/3SW2(config-if)#switchport access vlan 3 (将端口f0/3添加到vlan 3中) SW2(config-if)#exitSW2(config)#SW2(config)#int f0/10SW2(config-if)#switchport trunk encapsulation dot1q (将端口f0/10封装为802.1q)(将端口f0/10封装为802.1q,此命令为可选,对于某些交换机需要配置此命令,对于某些交换机不适用,如2960型号的交换机就不需要这个命令) SW2(config-if)#switchport mode trunk (将端口f0/10指定为trunk口)switchport nonnegotiate (关闭dtp协议)验证:SW2#show vlan brief (查看交换机vlan的配置情况)VLAN Name Status Ports---- -------------------------------- --------- -------------------------------1 default active Fa0/1, Fa0/4, Fa0/5, Fa0/6Fa0/7, Fa0/8, Fa0/9, Fa0/10Fa0/11, Fa0/12, Fa0/13, Fa0/142 VLAN0002 active Fa0/23 VLAN0003 active Fa0/31002 fddi-default active1003 token-ring-default active1004 fddinet-default active1005 trnet-default activeSW2#show int trunk (查看交换机trunk的配置情况)Port Mode Encapsulation Status Native vlanFa0/10 on 802.1q trunking 1 Port Vlans allowed on trunkFa0/10 1-4094Port Vlans allowed and active in management domainFa0/10 2,3Port Vlans in spanning tree forwarding state and not pruned Fa0/10 2,33、在主机上使用ping命令测试计算机的连通性相同VLAN的主机能通,不同VLAN之间的主机不能通。
实验四端口的trunk属性配置以太网端口链路类型介绍:以太网端口有三种链路类型:Access、Hybrid和Trunk。
Access类型的端口只能属于1个VLAN,一般用于连接计算机的端口;Trunk类型的端口可以属于多个VLAN,可以接收和发送多个VLAN的报文,一般用于交换机之间连接的端口;Hybrid类型的端口可以属于多个VLAN,可以接收和发送多个VLAN的报文,可以用于交换机之间连接,也可以用于连接用户的计算机。
Hybrid端口和Trunk端口的不同之处在于Hybrid端口可以允许多个VLAN的报文发送时不打标签,而Trunk端口只允许缺省VLAN的报文发送时不打标签。
这里的trunk并不是端口干路的概念,即端口汇聚或者链路聚合,而是允许vlan透传的一个概念。
如果想使用端口汇聚请参见相关《端口汇聚》章节。
需要注意的是:●在一台以太网交换机上,Trunk端口和Hybrid端口不能同时被设置。
●如果某端口被指定为镜像端口,则不能再被设置为Trunk端口,反之亦然。
缺省情况下,端口为Access端口。
Access端口只属于1个VLAN,所以它的缺省VLAN就是它所在的VLAN,不用设置;Hybrid 端口和Trunk端口属于多个VLAN,所以需要设置缺省VLAN ID。
如果设置了端口的缺省VLAN ID,当端口接收到不带VLAN Tag的报文后,则将报文转发到属于缺省VLAN的端口;当端口发送带有VLAN Tag的报文时,如果该报文的VLAN ID与端口缺省的VLAN ID 相同,则系统将去掉报文的VLAN Tag,然后再发送该报文。
需要注意的是:●Trunk端口不能和isolate-user-vlan同时配置;Hybrid端口可以和isolate-user-vlan同时配置。
但如果缺省VLAN是在isolate-user-vlan中建立了映射的VLAN,则不允许修改缺省VLAN ID,只有在解除映射后才能进行修改。
实验2.3 Trunk配置1.实验目的通过本实验可以掌握:(1)交换机接口Trunk的配置方法(2)Native VLAN的含义和配置2.实验拓扑Trunk配置实验拓扑如图2-1所示。
3.实验步骤(1)在S1和S2上创建VLAN,并把接口划分在图2-1所示的VLAN中要先关闭不必要的接口,因为在交换机S1和S2之间还有别的链路存在,以免影响实验,相关信息如下所示:Switch>enSwitch#conf tEnter configuration commands, one per line. End with CNTL/Z.Switch(config)#host S1S1(config)#int f0/15S1(config-if)#shutS1(config-if)#00:32:01: %LINK-5-CHANGED: Interface FastEthernet0/15, changed state to administrativelydownS1(config-if)#//以上禁用不必要的端口S1(config-if)#exitS1(config)#vlan 2S1(config-vlan)#name vlan2S1(config-vlan)#vlan 3S1(config-vlan)#name vlan3S1(config-vlan)#exitS1(config)#int f0/1S1(config-if)#swS1(config-if)#switchport accS1(config-if)#switchport mode accessS1(config-if)#swS1(config-if)#switchport accS1(config-if)#switchport access vlan 2S1(config-if)#int f0/2S1(config-if)#swS1(config-if)#switchport modS1(config-if)#switchport mode acS1(config-if)#switchport mode accessS1(config-if)#swS1(config-if)#switchport accS1(config-if)#switchport access vlan 3划分vlan并将端口应用到所属的vlan(2)配置trunkS1(config)#int f0/24S1(config-if)#swS1(config-if)#switchport trS1(config-if)#switchport trunk enS1(config-if)#switchport trunk encapsulation dotS1(config-if)#switchport trunk encapsulation dot1q//配置trunk链路的封装类型,同一链路的两端封装要相同。
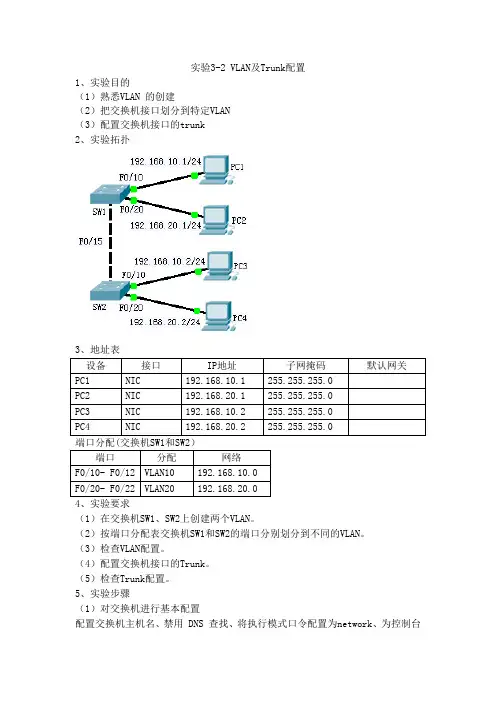
实验3-2 VLAN及Trunk配置1、实验目的(1)熟悉VLAN 的创建(2)把交换机接口划分到特定VLAN(3)配置交换机接口的trunk2、实验拓扑3、地址表端口分配(交换机SW1和SW2)4、实验要求(1)在交换机SW1、SW2上创建两个VLAN。
(2)按端口分配表交换机SW1和SW2的端口分别划分到不同的VLAN。
(3)检查VLAN配置。
(4)配置交换机接口的Trunk。
(5)检查Trunk配置。
5、实验步骤(1)对交换机进行基本配置配置交换机主机名、禁用 DNS 查找、将执行模式口令配置为network、为控制台连接配置口令network、为 vty 连接配置口令network。
(2)在划分VLAN 前,配置PC1、PC2、PC3、PC4的以太接口,从PC1 ping PC3、PC2 ping PC4应该ping通。
因为默认时,交换机的全部接口都在VLAN1 上(3)在SW1、SW2上创建VLANSW1(config)#vlan 10SW1(config-vlan)#name teacherSW1(config)#vlan 20SW1(config-vlan)#name student在 SW2 上重复相同的命令(4)把端口划分在VLAN 中SW1(config)#interface f0/10SW1(config-if)#switch mode access//把交换机端口的模式改为access 模式,说明该端口是用于连接计算机的,而不是用于trunkSW1(config-if)#switch access vlan 10 //把端口f0/10 划分到VLAN 10中SW1(config)#interface f0/20SW1(config-if)#switch mode accessSW1(config-if)#switch access vlan 20重复以上命令,把f0/11、f0/12划分到VLAN 10中,把f0/21、f0/22划分到VLAN 20中在 SW2 上重复相同的命令(5)确定已添加的端口SW1#show vlanVLAN Name Status Ports---- -------------------------------- --------- ------------------------------- 1 default active Fa0/1, Fa0/2, Fa0/3, Fa0/4Fa0/5, Fa0/6, Fa0/7, Fa0/8Fa0/9, Fa0/11, Fa0/12, Fa0/13 Fa0/14, Fa0/16, Fa0/17, Fa0/18 Fa0/19, Fa0/21, Fa0/22, Fa0/23 Fa0/2410 teacher active Fa0/1020 student active Fa0/201002 fddi-default active1003 token-ring-default active1004 fddinet-default active1005 trnet-default active【问题1】:在 SW1 上,哪些端口已分配给 VLAN 10?哪些端口已分配给 VLAN 20?SW1#show vlan brief在 SW2 上重复相同的命令(6)为交换机上的中继端口配置中继SW1(config)#int f0/15SW1(config-if)#switchport trunk encanpsulation dot1q//配置trunk 链路的封装类型,同一链路的两端封装要相同。
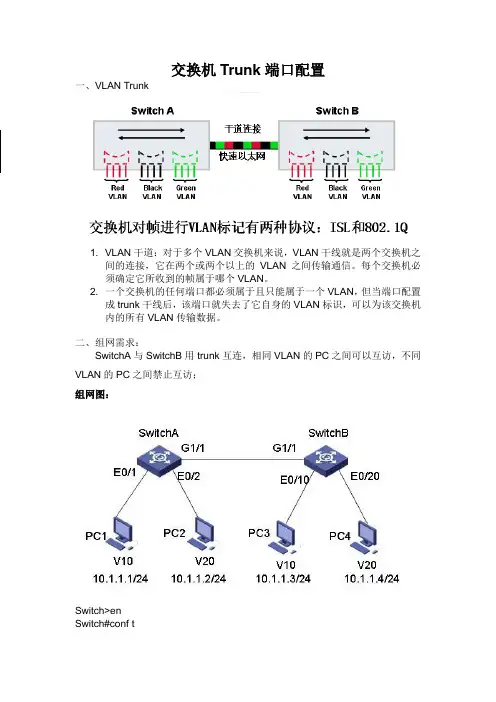
交换机Trunk端口配置一、VLAN Trunk1. VLAN干道:对于多个VLAN交换机来说,VLAN干线就是两个交换机之间的连接,它在两个或两个以上的VLAN之间传输通信。
每个交换机必须确定它所收到的帧属于哪个VLAN。
2. 一个交换机的任何端口都必须属于且只能属于一个VLAN,但当端口配置成trunk干线后,该端口就失去了它自身的VLAN标识,可以为该交换机内的所有VLAN传输数据。
二、组网需求:SwitchA与SwitchB用trunk互连,相同VLAN的PC之间可以互访,不同VLAN的PC之间禁止互访;组网图:Switch>enSwitch#conf tSwa(config)#vlan 10Swa(config-vlan)#vlan 20Swa(config-vlan)#exitSwa(config)#interface fastEthernet 0/1Swa(config-if)#switchport access vlan 10Swa(config-if)#exitSwa(config)#interface fastEthernet 0/2Swa(config-if)#switchport access vlan 20Swa(config-if)# exitSwa(config)#interface fastEthernet 0/24Swa(config-if)#switchport ?access Set access mode characteristics of the interfacemode Set trunking mode of the interfacenative Set trunking native characteristics when interface is intrunking modenonegotiate Device will not engage in negotiation protocol on thisinterfaceport-security Security related commandpriority Set appliance 802.1p prioritytrunk Set trunking characteristics of the interfacevoice Voice appliance attributesSwa(config-if)#switchport mode ?access Set trunking mode to ACCESS unconditionallydynamic Set trunking mode to dynamically negotiate access or trunk mode trunk Set trunking mode to TRUNK unconditionallySwa(config-if)#switchport mode trunk 将端口24设置为trunk扩展:缺省情况下trunk允许所有的VLAN通过,可以使用switchport trunk allowed vlan remove(要去掉的VLAN号)要求:Pc0与pc3属于vlan 10,pc1与pc4属于vlan 20, pc2与pc5属于vlan 30, Switch0与Switch1用trunk互连,但只允许vlan 10和vlan 20通过,vlan 30不能通过,也就是说Pc0与pc3能互通,pc1与pc4能互通,但pc2与pc5不能互通。
Trunk配置1、实验目的(1)掌握交换机端口Trunk的配置。
(2)学习Trunk端口的两种封装方式2、实验内容使用Catalyst2918设备,进行端口Trunk配置。
给出交换机间相同VLAN的通信测试。
3、实验原理如果是不同交换机相同ID的VLAN要相互通信,即一个VLAN跨过不同的交换机时,就需要使用Trunk。
Trunk是“干线、主干、端口汇聚”的意思,就是通过配置软件的设置将两个或多个物理端口组合在一起成为一条逻辑路径,从而增加在交换机和网络结点之间的带宽。
将属于这几个端口的带宽合并,在端口提供一个几倍于独立端口的独享的高带宽。
Trunk是一种封装技术,它是一条点到点的联路,链路的两端可是都是交换机,也可以是交换机和路由器,还可以是主机和交换机或路由器。
基于端口汇聚功能,允许交换机和交换机、交换机和路由器、主机和交换机或路由器之间通过两个或多个端口并行连接,同时传输,以提供更高带宽,更大的吞吐量。
Trunk技术使得一条物理线路可以传送多个VLan数据。
如交换机从VLAN3的端口接收到的数据,在Trunk链路上进行传输前会加上一个标记,表明该数据是VLAN3的;到了接收方交换机,交换机会把该标记去掉,只发送属于VLAN3的端口上。
Trunk承载的VLAN范围默认值是1~1005,可以修改,但必须有一个Trunk协议,使用Trunk 的端口并阻碍任何VLAN中。
要传输多个VLAN的通信,需要用专门的协议封装或者加上标记,其中最重要的是使用以VLAN ID来区分不同的VLAN,以便接收设备能区分数据所属的VLAN。
最常用到的事基于IEEE 802.1q和CISCO专用的协议ISL。
(1)交换机间路由(ISL)是一种CISCO专用的协议,这是一种以太网帧上显示地标识VLAN信息的方法。
通过运行ISL,可以将多台交换机互联起来,并且当数据流在交换机之间的中继链路上传送时,仍然维持VLAN信息。
实验九VLAN划分与VLAN TRUNK的配置一、VLAN划分实验实验目的:掌握在交换机上进行VLAN划分的基本方法实验步骤:1.设计拓扑图,如下所示:PC和交换机之间用直通线相连2.对三台PC机配置IP地址和子网掩码3.划分VLAN之前,三个PC机都能彼此ping通4.创建VLANSwitch>enableSwitch#configure terminalEnter configuration commands, one per line. End with CNTL/Z.Switch(config)#vlan 10 //创建vlan 10Switch(config-vlan)#name test1 //将vlan10 命名为test1Switch(config-vlan)#exitSwitch(config)#vlan 20Switch(config-vlan)#name test2Switch(config-vlan)#endSwitch#show vlan //查看VLAN划分情况VLAN Name Status Ports---- -------------------------------- --------- -------------------------------1 default active Fa0/1, Fa1/1, Fa2/1, Fa3/1Fa4/1, Fa5/110 test1 active20 test2 active1002 fddi-default act/unsup1003 token-ring-default act/unsup1004 fddinet-default act/unsup1005 trnet-default act/unsupSwitch#configure terminalEnter configuration commands, one per line. End with CNTL/Z.Switch(config)#interface fastEthernet 0/1 //进入fastEthernet 0/1的端口配置模式Switch(config-if)#switchport mode access // 将fastEthernet 0/1端口设置为接入模式Switch(config-if)#switchport access vlan 10 // 将fastEthernet 0/1端口加入vlan10中Switch(config-if)#exitSwitch(config)#interface fastEthernet 1/1Switch(config-if)#switchport mode accessSwitch(config-if)#switchport access vlan 20Switch(config-if)#endSwitch#configure terminalEnter configuration commands, one per line. End with CNTL/Z.Switch(config)#interface fastEthernet 2/1Switch(config-if)#switchport mode accessSwitch(config-if)#switchport access vlan 10Switch(config-if)#endSwitch#show vlanVLAN Name Status Ports---- -------------------------------- --------- -------------------------------1 default active Fa3/1, Fa4/1, Fa5/110 test1 active Fa0/1, Fa2/120 test2 active Fa1/11002 fddi-default act/unsup1003 token-ring-default act/unsup1004 fddinet-default act/unsup1005 trnet-default act/unsup5.实验调试:三个PC机互相ping一下,查看能否ping通。
Trunk基本配置Trunk和Native VLAN举例:1、如果Vlan 2的数据帧要通过Trunk链路发送,并且Trunk又允许Vlan 2通过,那么Trunk在发送该帧前将打上Vlan 2的标记;当对端Trunk链路收到带Vlan 2标记的该数据帧时会剥掉标记,并把该帧交付给Vlan 2。
2、如果Vlan 2是这个Trunk接口的Native Vlan,那么Vlan2的数据帧在进入Trunk链路时,不打标签直接转发。
3、当对端Trunk链路收到一个不带标签的数据帧时(如2中的Native Vlan 2、BPDU帧等),它将会把这个数据帧交付给本地的Native Vlan。
为了可以正确的转发,Trunk链路两端的交换机接口必须配置一致的Native Vlan。
说明:1.在一个交换网络中,帧有两种格式:标记帧(被Trunk打标签)和未标记帧(没被Trunk打标签)。
2.Native VLAN是802.1Q Trunk接口上的概念,在Access口没有Native VLAN 的概念,.默认情况下,Cisco交换机在802.1Q的VLAN封装类型下不对Native VLAN打标签,可以通过“show vlan dot1q tag native”命令查看。
3.Native VLAN的主要的目是不丢弃非标记帧,接收方交换机把所有接收到的未标记的数据帧交付到Native VLAN中,而不是丢弃。
4.默认Native VLAN是Vlan 1,可以通过“show interface trunk”命令来查看;也可以进入Trunk接口,通过“swithport trunk native vlan 2”命令来修改Native Vlan。
5.Trunk链路的两端指定的本征VLAN要一致,否则将导致数据帧从一个VLAN传播到另一个VLAN上。
6.CDP版本2在Cisco交换机之间传送Native VLAN的信息,CDP协议每分钟发送一次数据包。
实验4 交换机Turnk接口配置实验一、实验目的1. 理解干道链路的应用场景2. 掌握Trunk的基础配置3. 掌握Trunk端口允许所有VLAN通过的配置方法4. 掌握Trunk端口允许特定VLAN通过的配置方法二、实验仪器局域网运行环境、PC、eNSP软件三、实验拓扑四、实验步骤1. 基本配置根据拓扑结构进行基本IP地址配置, 并使用ping命令检测各直连链路的连通性. 在没有完全完成划分VLAN之前各PC之间都应能互通( 属于默认VLAN 1 ).用ping命令试验PC-1与PC-3 的连通性; 试验PC-2与PC-4 的连通性2. 创建VLAN, 配置Access接口按拓扑结构所示需要用VLAN的划分来隔离不同的部门, 需要在3台交换机S1、S2、S3上分别创建VLAN 10和VLAN 20, A部员工属于VLAN 10, B部员工属于VLAN 20. 创建步骤参考实验三相关内容.命令行格式:[S1]vlan 10[S1-vlan10]description R$D[S1-vlan10]vlan 20[S1-vlan20] description Market按照拓扑配置完成后, 使用display vlan命令查看所配置的VLAN信息, 以S3为例.截图操作结果:可以观察到相关的VLAN都已经配置好. 也可以使用display vlan summary命令查看所配置VLAN的简要信息.截图操作结果:在S1上配置E0/0/1和E0/0/2为Access接口,并按拓扑要求划分到相应的VLAN,命令参看实验三截图操作结果:VLAN 2的创建纯属意外不要在意在S2上配置E0/0/2和E0/0/3为Access 接口, 并划分到相应的VLAN. 截图操作结果:配置完成后, 使用display port vlan 命令分别查看S1、S2上的VLAN 和接口配置情况. 截图操作S1结果:截图操作S2结果:可以观察到PC 所连接的交换机接口都已经被配置成Access 模式,并且已经加入到了正确的VLAN 中.3. 配置Trunk 接口将PC 所连入的交换机接口划入到相应的部门VLAN 后, 测试相同部门中PC 是否能够通信. 测试PC -1与PC -3 之间的连通性; 测试PC -2与PC -4 之间的连通性. 截图操作结果:为了让交换机间能够识别和发送跨越交换机的VLAN 报文, 需要将交换机间相连的接口配置成为Trunk 接口. 配置时要明确被允许通过的VLAN10和VLAN20通过.在S1上配置E0/0/1为Trunk 接口, 允许VLAN10和VLAN20通过.这里接口设置和原始实验报告不同测试PC -1与PC -3的连通性测试PC -2与PC -4 的连通性命令行格式:[S1]interface ethernet0/0/1[S1-Ethernet0/0/1]port link-type trunk[S1-Ethernet0/0/1]port trunk allow-pass vlan 10 20在S2上配置E0/0/2为Trunk接口, 允许VLAN10和VLAN20通过.截图操作结果:在S3上使用port trunk allow-pass vlan all命令配置GE0/0/1和GE0/0/2为Trunk接口, 允许所有VLAN通过.命令行格式:[S3]interface gigabitethernet0/0/1[S3- Gigabitethernet0/0/1]port link-type trunk[S3- Gigabitethernet0/0/1]port trunk allow-pass vlan all配置完成后可以使用display port vlan命令来检查Trunk的配置情况, 这里已S3为例.截图操作结果:可以观察到S3的GE0/0/1和GE0/0/2已被成功配置为Trunk接口, 并且允许所有VLAN流量通过( VLAN 1~4096 ).再次验证不同交换机上的相同部门的PC间的连通性.测试PC-1与PC-3 之间的连通性; 测试PC-2与PC-4 之间的连通性.截图操作结果:五、实验结果分析六、实验心得。
Trunk〔端口会聚〕的概念与设置在二层交换机的性能参数中,常常提到一个重要的指标:TRUNK,许多的二层交换机产品在介绍其性能时,都会提到可以支持TRUNK功能,从而可以为互连的交换机之间提供更好的传输性能。
那到底什么是TRUNK呢?使用 TRUNK 功能到底能给我们带来哪些应用方面的优势?还有在详细的交换机产品中怎样来配置TRUNK。
下面我们来理解一下这些方面的知识。
一、什么是TRUNK?>TRUNK是端口会聚的意思,就是通过配置软件的设置,将2个或多个物理端口组合在一起成为一条逻辑的途径从而增加在交换机和网络节点之间的带宽,将属于这几个端口的带宽合并,给端口提供一个几倍于独立端口的独享的高带宽。
Trunk是一种封装技术,它是一条点到点的链路,链路的两端可以都是交换机,也可以是交换机和路由器,还可以是主机和交换机或路由器。
基于端口会聚〔Trunk〕功能,允许交换机与交换机、交换机与路由器、主机与交换机或路由器之间通过两个或多个端口并行连接同时传输以提供更高带宽、更大吞吐量,大幅度提供整个网络才能。
一般情况下,在没有使用TRUNK时,大家都知道,百兆以太网的双绞线的这种传输介质特性决定在两个互连的普通10/100交换机的带宽仅为100M,如果是采用的全双工形式的话,那么传输的最大带宽可以到达最大200M,这样就形成了网络主干和效劳器瓶颈。
要到达更高的数据传输率,那么需要更换传输媒介,使用千兆光纤或晋级成为千兆以太网,这样虽能在带宽上可以到达千兆,但本钱却非常昂贵〔可能连交换机也需要一块换掉〕,更本不合适低本钱的中小企业和学校使用。
假如使用TRUNK技术,把四个端口通过捆绑在一起来到达800M 带宽,这样可较好的解决了本钱和性能的矛盾。
二、TRUNK的详细应用TRUNK〔端口会聚〕是在交换机和网络设备之间比拟经济的增加带宽的方法,如效劳器、路由器、工作站或其他交换机。
这中增加带宽的方法在当单一交换机和节点之间连接不能满足负荷时是比拟有效的。
基本实验2:Trunk配置实验指导【实验内容】VLAN跨交换机时的通信。
【实验目的】理解VLAN跨交换机之间的通信方式与配置。
【实现功能】使在同一VLAN里的计算机能跨交换机进行相互通信。
【实验设备】S2126G (2台)、PC机(2台)、直通线(2条)、交叉线(1根)【实验拓扑】实验时,按照拓扑进行网络的连接,注意主机和交换机连接的端口。
【实验步骤】步骤1. 交换机Switch A上的基本配置:Switch A# configure terminal //进入全局模式Switch A(config)#vlan 10 //创建VLAN 10Switch A(config-vlan)#exit //返回到全局模式Switch A(config)#int f0/1 //进入到f0/1接口模式Switch A(config-if)#switchport access vlan 10 //将f0/1划入到VLAN 10中步骤2. 交换机Switch B上的基本配置:Switch B# configure terminalSwitch B (config)#vlan 10Switch B (config-vlan)#exitSwitch B (config)#int f0/1Switch B (config-if)#switchport access vlan 10步骤3. 在交换机上做好如上配置后,在PC上用ping命令来测试PC1和PC2的连通性。
步骤4. 交换机Switch A上的Trunk配置:Switch A#show interface f0/2 switchport //查看f0/2接口状态信息Switch A# configure terminal //进入全局模式Switch A(config) # int f0/2 //进入到f0/2接口模式Switch A(config-if)#switchport mode trunk //将接口f0/2定义为trunk模式Switch A(config-if)#end //返回到用户模式Switch A#show interface f0/2 switchport //查看f0/2接口状态信息,比较与之前的差别步骤5. 交换机Switch B上的Trunk配置:Switch B#show interface f0/2 switchportSwitch B# configure terminalSwitch B (config) # int f0/2Switch B (config-if)#switchport mode trunkSwitch B (config-if)#endSwitch B#show interface f0/2 switchport步骤6. 测试:做好上述配置后,再测试PC1与PC2之间的连通性,能够ping通,实验成功。
实验:Trunk配置
1.实验目的
通过本实验,读者可以掌握如下技能:
①配置交换机接口的Trunk;
②理解DTP的协商规律
2.实验拓扑
实验拓扑图如图所示。
图拓扑图
3.实验步骤
在前一实验的基础上继续本实验
①根据前一实验的步骤在S2上创建VLAN,并把接口划分在如图所示的VLAN中。
②配置Trunk:
S1(config)#int f0/13
S1(config-if)#switchport trunk encanpsulation dot1q
//以上是配置Trunk链路的封装类型,同一链路的两端封装要相同。
有的交换机,例如2950只能封装dot1q,因此无须执行该命令
S1(config-if)#switch mode trunk
//以上是把接口配置为Trunk
S2(config)#int f0/13
S2(config-if)#switchport trunk encanpsulation dot1q
S2(config-if)#switch mode trunk
③检查Trunk链路的状态,测试跨交换机、同一VLAN主机间的通信。
使用”show interface f0/13 trunk”可以查看交换机端口的trunk状态,如下:
Port Mode Encapsulation Status Native vlan
Fa0/13 on 802.1q trunking 1
//f0/13接口已经为Trunk链路了,封装为802.1q
Port Vlans allowed on trunk
Fa0/13 1-4094
Port Vlans allowed and active in management domain
Fa0/13 1-3
Port Vlans in spanning tree forwarding state and not pruned
Fa0/13 2-3
需要在链路的两端都确认Trunk的形成。
测试R1和R3以及R2和R4之间的通信。
由于R1和R3在同一VLAN上,所以R1应该能ping 通R3 。
R2和R4之间也应该能相互ping 通。
④配置Native VLAN:
S1(config)#int f0/13
S1(config-if)#switchport trunk native vlan 2
//以上是在Trunk链路上配置Native VLAN,我们把它改为VLAN 2了,默认是VLAN 1
S2(config)#int f0/13
S2(config-if)#switchport trunk native vlan 2
S1#show interface f0/13 trunk
Port Mode Encapsulation Status Native vlan
Fa0/13 on 802.1q trunking 2
【技术要点】
之前介绍说在Trunk链路上,数据帧会根据ISL或者802.1Q被重新封装,然而如果是Native VLAN的数据,是不会被重新封装而就在Trunk链路上传输。
很显然链路两端Native VLAN 是要一样的。
如果不一样,交换机会提示出错。
⑤DTP配置
【技术要点】
和DTP配置有关的命令如下所述,这些命令不能任意组合。
“switchport trunk encapsulation{negotiate|isl|dot1q}”:配置Trunk链路上的封装类型,可以是双方协商确定,也可以是指定的isl或者dot1q。
“switchport nonegotiate”:Trunk链路上不发送协商包,默认是发送的。
“switch mode {trunk|dynamic desirable|dynamic auto}”:
●Turnk——该设置将端口置为永久trunk模式,封装类型由”switchport trunk
encapsulation”命令决定;
●Dynamic desirable——端口主动变为trunk,如果另一端为negotiate,dynamic
desirable和dynamic auto,将成功协商;
●Dynamic auto——被动协商,如果另一端为negotiate和dynamic desirable,将成功
协商。
如果想把接口配置为negotiate,使用:
S1(config-if)#switchport trunk encapsulation {isl|dot1q}
S1(config-if)#switchport mode trunk
S1(config-if)#no switchport negotiate
如果想把接口配置为nonegotiate,使用:
S1(config-if)#switchport trunk encapsulation {isl|dot1q}
S1(config-if)#switchport mode trunk
S1(config-if)#no switchport nonegotiate
如果想把接口配置为desirable,使用:
S1(config-if)#switchport mode dynamic desirable
S1(config-if)#switch trunk encapsulation{negotiate|isl|dot1q}
如果想把接口配置为auto,使用:
S1(config-if)#switchport mode dynamic auto
S1(config-if)#switch trunk encapsulation{negotiate|isl|dot1q}
在这里,进行如下配置:
S1(config-if)#switchport mode dynamic desirable
S1(config-if)#switch trunk encapsulation negotiate
S2(config-if)#switchport mode dynamic auto
S2(config-if)#switch trunk encapsulation negotiate
S1#show interfaces f0/13 trunk
Port Mode Encapsulation Status Native vlan
Fa0/13 desirable n-isl trunking 1
//可以看到Trunk已经形成,封装为n-isl,这里的”n”表示封装类型也是自动协商的。
需要在两端都进行检查,确认两端都形成Trunk才行
Port Vlans allowed on trunk
Fa0/13 1-4094
Port Vlans allowed and active in management domain
Fa0/13 1-3
Port Vlans in spanning tree forwarding state and not pruned
Fa0/13 2-3
【提示】
由于交换机有默认配置,进行以上配置后,使用”show running”可能看不到我们配置的命令。
默认时,catalyst2950和3550的配置是desirable模式;而catalyst 3560是auto 模式,所以,两台3560交换机之间不会自动形成Trunk,3560交换机和2950交换机之间却可以形成Trunk。