影音室设备方案 - 音频 美国JBL7.1-影院
- 格式:xls
- 大小:1.42 MB
- 文档页数:6
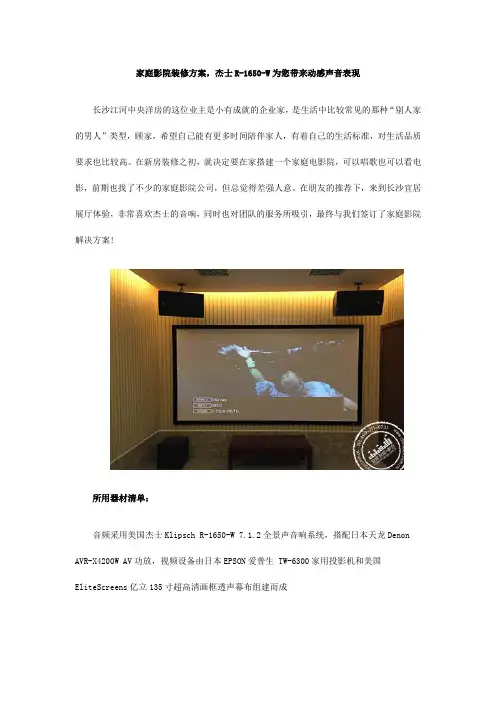
家庭影院装修方案,杰士R-1650-W为您带来动感声音表现长沙江河中央洋房的这位业主是小有成就的企业家,是生活中比较常见的那种“别人家的男人”类型,顾家,希望自己能有更多时间陪伴家人,有着自己的生活标准,对生活品质要求也比较高。
在新房装修之初,就决定要在家搭建一个家庭电影院,可以唱歌也可以看电影,前期也找了不少的家庭影院公司,但总觉得差强人意。
在朋友的推荐下,来到长沙宜居展厅体验,非常喜欢杰士的音响,同时也对团队的服务所吸引,最终与我们签订了家庭影院解决方案!所用器材清单:音频采用美国杰士Klipsch R-1650-W 7.1.2全景声音响系统,搭配日本天龙Denon AVR-X4200W AV功放,视频设备由日本EPSON爱普生 TW-6300家用投影机和美国EliteScreens亿立135寸超高清画框透声幕布组建而成方案详情:音响设备选用的是美国杰士Klipsch嵌入式系列R-1650-W嵌墙式音箱与那些想要在可接受的价位获得可靠耐用且表现出色音箱的顾客完美匹配,无论是使用在家庭中、还是商业环境,R-1650-W都能带来具有动感的声音表现。
高灵敏度、大功率、与天花板匹配的油漆涂层使观影效果更加出众。
视频设备选用的是EPSON爱普生 TW-6300家用投影机,1080P的全高清分辨率,提供消费者所喜爱的高清大屏娱乐享受。
采用3LCD技术,让您享受到明亮生动的3D影像,并且通过3D眼镜可以实现和投影机顺利的连接,传输顺畅不受房间内其他物体的干扰。
爱普生画质增强技术,有效提升片源的清晰度;动态插帧技术,让游戏等动作画面更加平滑顺畅。
同时具备镜头位移、梯形校正、快速四角调节功能,令安装摆放更轻松。
爱普生在家庭影院投影仪中占有无可比拟的优势,足不出户就能感受影院的氛围。
设计风格:整体也现代简约风格为主,暖黄色灯光设计搭配棕色沙发使得整个家庭电影院充满温馨质感。
所选择的美国杰士klipsch嵌入式音箱,让整个家庭电影院聆听空间更足,也便于打理,音质表现不俗,音场包围感十足,身处房间任一处,都能感受到大片氛围。

JBL家庭影院方案引言在现代家庭中,追求优质的娱乐体验已经成为了家庭成员的共同关注点。
家庭影院系统作为一种高品质的娱乐设备,不仅可以提供震撼的视听体验,还能让家庭成员在舒适的家庭环境中享受电影、音乐等多媒体娱乐。
JBL作为全球知名的音响品牌,提供了多款高品质的家庭影院方案,旨在为用户打造极致的家庭娱乐体验。
本文将介绍JBL家庭影院方案的特点和优势,帮助读者了解如何选择和布置JBL家庭影院系统。
JBL家庭影院方案的特点1. 高品质音响设备JBL家庭影院方案的核心是一套高品质的音响设备,包括多声道音箱、低音炮、功放等组成。
这些设备采用了JBL独有的技术和材料,能够提供清晰、动态、逼真的音效,让用户身临其境地感受影院级别的音响体验。
2. 先进的音频处理技术JBL家庭影院方案还配备了先进的音频处理技术,如Dolby Atmos、DTS:X等,可以实现全方位的环绕声效果。
这些技术通过精确定位声音的来源和方向,将声音立体化呈现,让用户沉浸在真实的音效场景中。
3. 个性化的系统配置JBL家庭影院方案提供了多种配置选择,以满足不同用户的需求。
用户可以根据自己的房间大小、预算和个人喜好,选择合适的音响设备和配置方案。
无论是小型客厅还是宽敞的影音室,JBL都能为用户提供最佳的家庭影院解决方案。
4. 简单易用的控制方式JBL家庭影院方案的控制方式非常简单易用,用户可以通过遥控器、智能手机等设备轻松控制音响设备的开关、音量、输入源等。
此外,JBL还提供了专门的手机应用程序,让用户能够更加方便地进行音频设置和个性化调整。
选择和布置JBL家庭影院系统的指南1. 确定房间的大小和用途在选择JBL家庭影院系统之前,首先需要确定房间的大小和用途。
小房间适合选择小型的方案,而大房间可以考虑选择大功率的音响设备。
此外,不同的用途也需要考虑不同的配置,如观影、游戏、音乐等。
2. 考虑预算和性能需求在选择JBL家庭影院系统时,还需要考虑预算和性能需求。
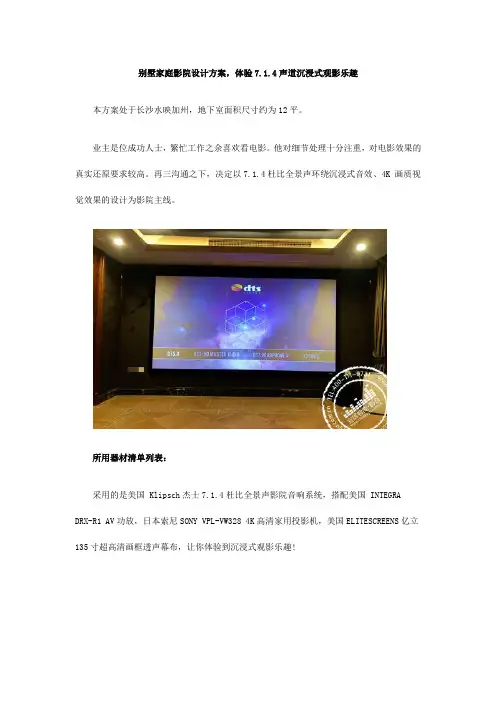
别墅家庭影院设计方案,体验7.1.4声道沉浸式观影乐趣本方案处于长沙水映加州,地下室面积尺寸约为12平。
业主是位成功人士,繁忙工作之余喜欢看电影。
他对细节处理十分注重,对电影效果的真实还原要求较高。
再三沟通之下,决定以7.1.4杜比全景声环绕沉浸式音效、4K 画质视觉效果的设计为影院主线。
所用器材清单列表:采用的是美国 Klipsch杰士7.1.4杜比全景声影院音响系统,搭配美国 INTEGRA DRX-R1 AV功放,日本索尼SONY VPL-VW328 4K高清家用投影机,美国ELITESCREENS亿立135寸超高清画框透声幕布,让你体验到沉浸式观影乐趣!音频设备选用的是颇有传奇色彩,有将近70余年品牌沉淀的美国老牌音响——klipsch杰士,主音箱用的是KL-7800THX,THX的认证对电影院声音的声压、声频响应、声道平衡度、房间有混响时间、隔音都有着严格的要求,这款音箱拥有这个认可,可见品质的优秀。
KL-7800-THX 最为醒目的便是它的8英寸铝制低音单元、1英寸钛圆顶状压缩单元和与之相匹配的四方形Tractrix号角,表面的金属拉丝工艺一看就质感十足,做工精致而简洁。
在接线口的设计上,采用的是弹簧卡扣式设计,非常人性化。
声音效果上也表现不凡,带有清晰的空间感,对每种音色的层次把握的非常好。
视频设备选用的是日本索尼SONY 4K家用投影仪VPL-VW328,采用先进的 SXRD 面板技术提供4K 图像,是分辨率的四倍。
您将体验到 4K 原始分辨率的丰富的色彩、细腻的图像,即使白天在客厅也清晰、明亮。
SXRD 面板技术是其投影机的特色,提供4K (4096 x 2160) 原始分辨率图像,没有人工像素增强。
每一个细节都清晰和自然,无锯齿边缘或可见像素。
兼容新4K标准,您的投影机不会过时,因此,不管是现在还是未来,您将始终获得出色内容。
小巧的 VPL-VW328 可以融入任何家庭影院或客厅。
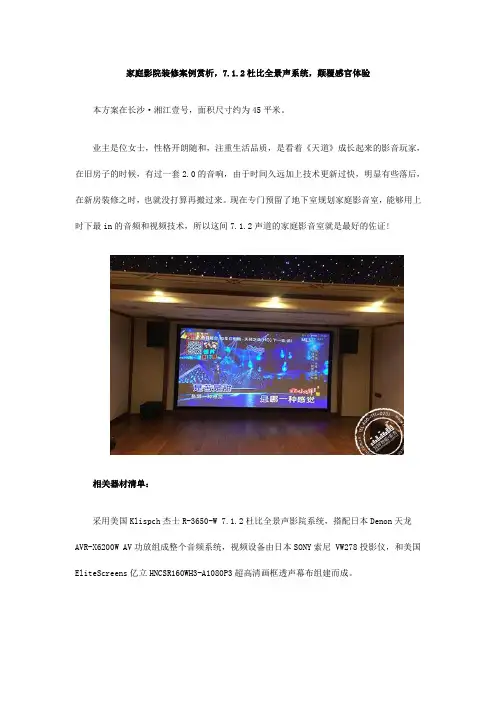
家庭影院装修案例赏析,7.1.2杜比全景声系统,颠覆感官体验本方案在长沙·湘江壹号,面积尺寸约为45平米。
业主是位女士,性格开朗随和,注重生活品质,是看着《天道》成长起来的影音玩家,在旧房子的时候,有过一套2.0的音响,由于时间久远加上技术更新过快,明显有些落后,在新房装修之时,也就没打算再搬过来。
现在专门预留了地下室规划家庭影音室,能够用上时下最in的音频和视频技术,所以这间7.1.2声道的家庭影音室就是最好的佐证!相关器材清单:采用美国Klispch杰士R-3650-W 7.1.2杜比全景声影院系统,搭配日本Denon天龙AVR-X6200W AV功放组成整个音频系统,视频设备由日本SONY索尼 VW278投影仪,和美国EliteScreens亿立HNCSR160WH3-A1080P3超高清画框透声幕布组建而成。
设备详情:音频设备采用的是美国Klispch 杰士R-3650-W7.1.2 杜比全景声影院系统,获得号角皇专利的家庭影院音响品牌,以1寸铝合金单元发声的号角高音,采用Klipsch独家开发的Tractrix号角设计,拥有90度×60度的扩散角度,效率极高,能将声波以宽广的范围传导出去。
号角处理技术增加了输出音量同时大大降低了失真,旋转Tractrix® 号角高音单元可在任意位置提供清晰的声音,高音衰减开关以及 IR 接收器令人印象深刻,设计典雅的全新矮版 SlimTrim™磁性网罩,可提供丰富但不复杂的听觉体验。
同时搭配日本Denon天龙AVR-X6200W AV功放,不论是用于家庭影院还是立体声音乐应用,这个表现出色且安装便捷的机型将永远改变您生活的方式。
视频设备采用的是日本SONY索尼的VW278家用高清投影仪,其配备了索尼原装4K(4096 x2160)SXRD面板,可产生画质高达全高清面板四倍以上的真正4K分辨率图像。
VW278专为家庭影院影音室设计,可产生细节丰富、色彩逼真、令人惊叹的生动画质,颠覆感官体验。

影院音响配置方案1. 引言影院音响是影院体验中不可或缺的重要组成部分,它能够为观众呈现出更加逼真、沉浸式的音效效果。
在设计影院音响配置方案时,需要考虑到影院的大小、观众数量、声音分布等因素,并根据这些因素选择合适的音响设备以及配置方案。
本文将介绍一种基于多声道音效系统的影院音响配置方案,以满足观众对音效的高质量需求。
2. 多声道音效系统概述多声道音效系统是一种通过多个音箱和扬声器来实现音效空间分布的技术。
目前常用的多声道音效系统有5.1声道、7.1声道和9.1声道等。
• 5.1声道:包括5个主音箱和1个低音炮,分别布置在观众前方的左、中、右位置以及左后方和右后方位置。
低音炮通常放置在中央位置,用于增强低频效果。
•7.1声道:在5.1声道的基础上增加了两个环绕音箱,分别布置在观众左后方和右后方位置。
这样可以让音效更加立体和环绕。
•9.1声道:在7.1声道的基础上增加了两个顶部音箱,用于实现更加真实的上方声音效果。
3. 影院音响配置方案在影院音响配置方案中,需要考虑到影院的大小、观众数量以及声音分布等因素。
以下是一套适用于中等大小影院的影院音响配置方案:3.1 主音箱主音箱是影院音响系统中最重要的组成部分,负责播放影片的对话声音和音乐等主要内容。
在该配置方案中,建议使用高保真的主音箱,以保证音质的清晰度和还原度。
主音箱的数量根据影院的大小和形状而定,一般建议至少使用三个主音箱,分别布置在观众前方的左、中、右位置。
3.2 低音炮低音炮是影院音响系统中的重要组成部分,用于增强低频效果。
在该配置方案中,建议使用功率适中的低音炮,并将其放置在观众前方的中央位置,以实现更好的低频效果。
3.3 环绕音箱环绕音箱是用于实现音效环绕感的组成部分。
在该配置方案中,建议使用环绕音箱,将其放置在观众左后方和右后方位置,以实现音效的立体和环绕感。
3.4 顶部音箱顶部音箱是用于实现上方声音效果的组成部分。
在该配置方案中,建议使用顶部音箱,将其放置在观众头顶以上的位置,以实现更加真实的上方声音效果。
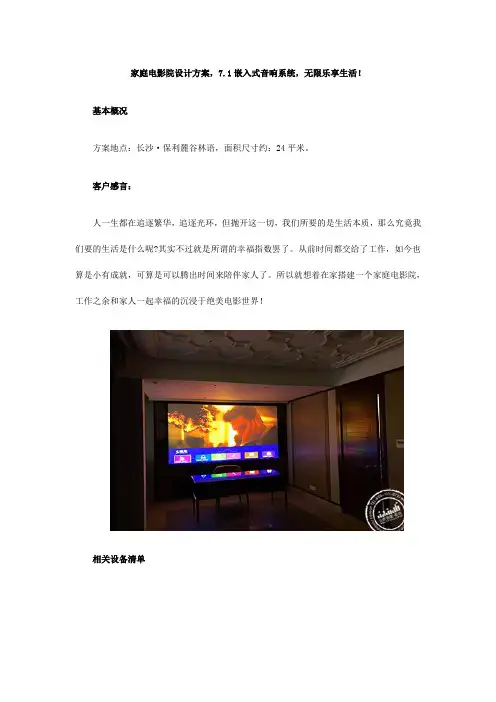
家庭电影院设计方案,7.1嵌入式音响系统,无限乐享生活!基本概况方案地点:长沙·保利麓谷林语,面积尺寸约:24平米。
客户感言:人一生都在追逐繁华,追逐光环,但抛开这一切,我们所要的是生活本质,那么究竟我们要的生活是什么呢?其实不过就是所谓的幸福指数罢了。
从前时间都交给了工作,如今也算是小有成就,可算是可以腾出时间来陪伴家人了。
所以就想着在家搭建一个家庭电影院,工作之余和家人一起幸福的沉浸于绝美电影世界!相关设备清单采用美国klipsch杰士7.1嵌入式家庭音响系统、搭配日本DENON天龙1300家庭影院功放,视频系统由日本EPSON爱普生TW6300全高清晰家用投影仪、和美国ELITESCREENS亿立 120寸家庭影院幕布组成。
设备详情音频设备采用的是美国klipsch杰士7.1嵌入式家庭音响系统,其中的号角皇专利技术,被大多数影音发烧友奉为经典。
此次所选择的音响系统是美国klipsch杰士R3650 7.1家庭影院系统,这款R3650嵌入式音响,具有油漆框架和网罩设计,身材小巧却表现出众,能带给您丰富纯粹的听觉享受。
不论是用于家庭影院还是立体声音乐应用,这个安装便捷的机型将彻底走进您品质的生活!视频设备采用的是3D高清投影仪为EPSON爱普生 TW-6300家用3D高清投影仪,亮度高达2600流明,1920 x 1080 (1080p)高画质分辨率,60000:1高对比度,可以展现出清晰、生动且锐利的画面,细节表现与绝佳的色彩饱和度带来令人惊叹的全高清影像。
该款投影机反射成像,蓝光能量及闪烁频率较低,能有效减少长期观看对人眼的损伤和疲劳感。
这样,家长们就不用担心小孩观看影片会损害视力了。
设计风格本方案以现代简约风格为主,清新淡雅又不失温暖,柔和的灯光搭配米黄色影院沙发,或多或少让人流连忘返,嵌入式音箱设计,不仅让原本并不富足的空间变得宽容多了,而且与家居装潢完美融合,毫无违和感。
声音清澈通透,高保真低失真,配合3d全高清晰投影仪清晰生动的画面,堪称宜居家庭影院设计的又一典范之作!——责任编辑:宜居智能影音。

电影院音响设计方案随着科技的不断发展和电影产业的快速增长,电影院的音响体验变得越来越重要。
一部好的电影不仅要有精彩的画面效果,还需要有出色的音效来增强观众的观影体验。
电影院音响设计方案的目标就是提供清晰、逼真而又震撼的音效效果。
本文将为您介绍一种电影院音响设计方案。
设计概述:本方案旨在提供极佳的音效体验,使观众沉浸其中,身临其境。
为了实现这一目标,我们将采用一套多声道音响系统,结合适当的声音处理和音频技术。
1. 多声道音响系统:我们将采用5.1声道或7.1声道的音响系统。
其中,“5.1”代表左前、中央、右前、左后、右后五个主要声音通道,而低音炮则是0.1通道。
如果预算允许,我们还可以考虑采用更高级别的7.1声道音响系统,以提供更加逼真的环绕声效果。
2. 音效定位:为了使观众听到来自正确位置的声音,我们将在合适的位置安装音响设备。
前置声音设备安装在屏幕后方,分别设置在左、中、右三个位置。
后置声音设备安装在观众区域后方,分别设置在左后和右后两个位置。
低音炮设备通常被安装在观众区域的前方或两侧,以提供更加震撼的低音效果。
3. 声音处理技术:为了获得清晰、平衡和逼真的声音效果,我们将使用一些声音处理技术,如均衡器、混响器和压缩器。
均衡器可以调整不同频率的音量,以确保各声道之间的平衡。
混响器可以模拟不同环境下的音响效果,增强声音的立体感。
压缩器可以平衡音量差异,防止过高的音量对听觉系统造成损伤。
4. 音频技术:除了基本的音响设备和声音处理技术外,我们还可以考虑使用一些先进的音频技术来提升观众的听觉体验。
例如,杜比全景声(Dolby Atmos)技术可以在三维空间内精确定位声音源,使观众感受到更加真实的环绕声效果。
此外,DTS:X技术也可以提供类似的空间音效体验。
5. 声音调试和优化:为了确保音响系统的最佳表现,我们将进行声音调试和优化。
通过精确调整每个声音通道的音量平衡和定位,我们可以确保所有观众都能够在任何位置获得相同的音效体验。
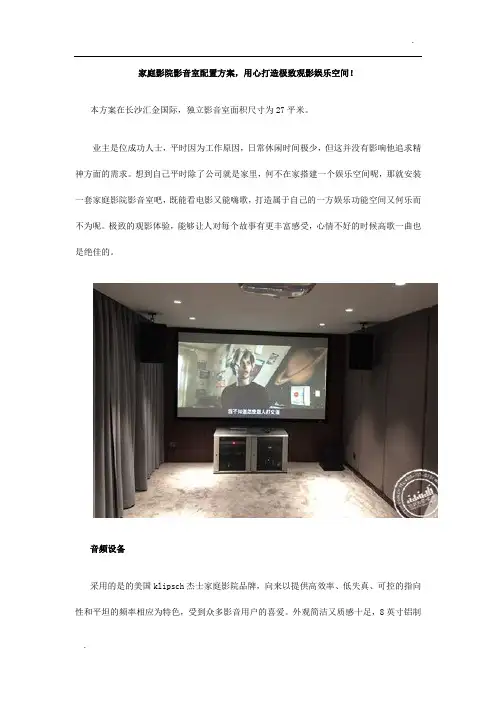
家庭影院影音室配置方案,用心打造极致观影娱乐空间!本方案在长沙汇金国际,独立影音室面积尺寸为27平米。
业主是位成功人士,平时因为工作原因,日常休闲时间极少,但这并没有影响他追求精神方面的需求。
想到自己平时除了公司就是家里,何不在家搭建一个娱乐空间呢,那就安装一套家庭影院影音室吧,既能看电影又能嗨歌,打造属于自己的一方娱乐功能空间又何乐而不为呢。
极致的观影体验,能够让人对每个故事有更丰富感受,心情不好的时候高歌一曲也是绝佳的。
音频设备采用的是的美国klipsch杰士家庭影院品牌,向来以提供高效率、低失真、可控的指向性和平坦的频率相应为特色,受到众多影音用户的喜爱。
外观简洁又质感十足,8英寸铝制低音单元,1英寸钛圆顶状压缩单元和与之相匹配的四方形Tractrix®号角,表面的金属拉丝工艺,质感十足,做工精致。
音响的边缘部分10颗螺丝,这些螺丝的侧面拥有特殊设计的卡榫,将卡榫旋转卡稳,再将螺丝拧紧后,音箱与墙面就会自然压紧。
这样的设计让安装更简便,同时对墙壁的负担也相对小,减少传统大型入墙喇叭在安装一段时间后出现的面板走位、墙壁开裂的现象,让安装稳定性更好。
视频设备采用的是3D高清家用投影仪为EPSON 爱普生TW-6300,亮度高达2600流明,1920 x 1080 (1080p)高画质分辨率,60000:1高对比度,可以展现出清晰、生动且锐利的画面,细节表现与绝佳的色彩饱和度带来令人惊叹的全高清影像。
该款投影机反射成像,蓝光能量及闪烁频率较低,能有效减少长期观看对人眼的损伤和疲劳感。
这样,家长们就不用担心小孩观看影片会损害视力了。
设计风格本方案以现代简约风格为主,浅灰色墙面声学装饰,能有效的防止声音外泄,不用担忧电影高潮时,邻居上门来“找茬”,柔和温暖的灯光下,让人感觉很温馨,选择的杰士嵌入式家庭影院音响系统,高保真低失真,表现不俗,尤其是能够精准还原电影创作者的情感和人物对白,声场包围感强,在播放好莱坞巨制动作片时,来自头顶声音的轰炸,随时让您感觉就在电影拍摄现场,犹如身临其境一般,搭配的1080p投影仪,画面层次感十足,足不出户,在家就能享受高清大屏视听盛宴!设备清单:信号源:美国OPPO UDP-203蓝光播放器视频设备:日本爱普生EPSON TW6300全高清晰家用投影仪、美国elitescreens亿立120寸家庭影院幕布音响设备:美国klipsch杰士7.1.2全景声家庭音响系统、日本Marantz马兰士SR6012家庭影院功放娱乐设备:中国雷石家庭卡拉OK系统智能系统:无其他设备:中国SHUO U600 无线高质话筒——责任编辑:宜居智能影音。
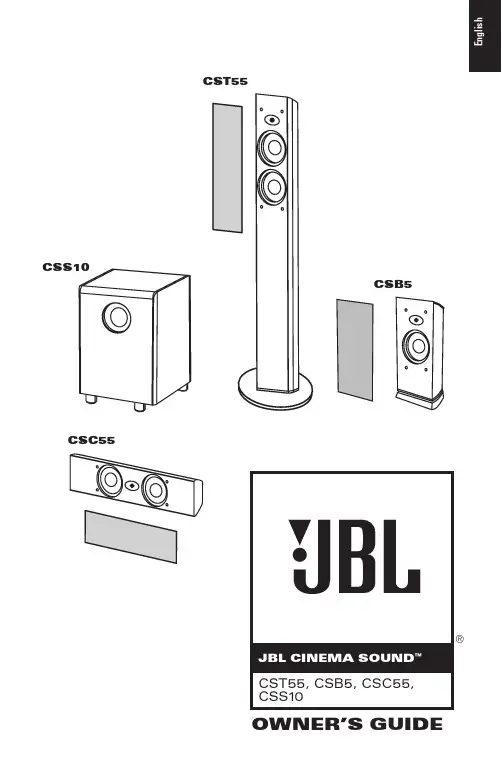
2READ FIRST! Important Safety Precautions!1.Read these instructions.2.Keep these instructions.3.Heed all warnings.4.Follow all instructions.5.Do not use this apparatus near water.6.Clean only with a dry cloth.7.Do not block any ventilation openings. Install in accordance with the manufacturer’s instructions.8.Do not install near any heat sources such as radiators, heat registers, stoves or other apparatus (including amplifiers) that produce heat.9.Do not defeat the safety purpose of the polarized or grounding-type plug.A polarized plug has two blades with one wider than the other.A grounding-type plug has two blades and a third grounding prong. The wide blade or the third prong are provided for your safety. If the provided plug does not fit into your outlet, consult an electrician for replacement of the obsolete outlet.10.Protect the power cord from being walked on or pinched, particularly at plugs, convenience receptacles and the point where they exit from the apparatus.11.Only use attachments/accessories specified by the e only with the cart, stand,tripod, bracket or table specified by the manufacturer or sold with thecaution when moving the cart/ apparatus combination to avoid injury from tip-over.13.Unplug this apparatus during lightning storms or when unused for long periods of time.14.Refer all servicing to qualified service personnel. Servicing is required when the apparatus has been damaged in any way, such as power-supply cord or plug isdamaged, liquid has been spilled or objects have fallen into theapparatus, the apparatus has been exposed to rain or moisture, does not operate normally, or has been dropped.15.Do not use attachments not recommended by the product manufacturer, as they may cause hazards.16.This product should be operated only from the type of power source indicated on the marking label. If you are not sure of the type of power supply to your home, consult your product dealer or local power company. For products intended to operate from battery power or other sources, refer to the operating instructions.17.If an outside antenna or cable system is connected to the product, be sure the antenna or cable system is grounded so as to provide some protection against voltage surges and built-up static charges. Article 810 of the National Electrical Code,ANSI/NFPA 70, provides information with regard to proper grounding of the mast and supporting structure,grounding of the lead-in wire to an antenna discharge unit, size of grounding conductors, location of antennadischarge unit, connection to grounding electrodes, and requirements for the grounding electrode. See Figure A.18.An outside antenna system should not be located in the vicinity of overhead power lines or other electric light or power circuits, or where it can fall into such power lines or circuits. When installing an outside antenna system, extreme care should be taken to keep from touching such power lines or circuits,as contact with them might be fatal.19.Do not overload wall outlets,extension cords, or integralconvenience receptacles, as this can result in a risk of fire or electric shock.20.Never push objects of any kind into this product through openings, as they may touch dangerous voltage points or short-out parts, which could result in a fire or electric shock.Never spill liquid of any kind on the product.21.The apparatus shall not be exposed to dripping or splashing, and no objects filled with liquids,such as vases, shall be placed on the apparatus.22.Do not attempt to service this product yourself, as opening or removing covers may expose you to dangerous voltage or other hazards.Refer all servicing to qualified service personnel.23.When replacement parts are required, be sure the service technician has used replacement parts specified by the manufacturer or that have the same characteristics as the original part. Unauthorized substitutions may result in fire,electric shock or other hazards.24.Upon completion of any service or repairs to this product, ask the service technician to perform safety checks to determine that the product is in proper operating condition.25.The product should be mounted to a wall or ceiling only asrecommended by the manufacturer.THANK YOU FOR CHOOSING JBLFor more than 60years, JBL has been involved in every aspect of music and film recording and reproduction, from live performances to the provide every note ofenjoyment that you expect –and that when you think aboutpurchasing additional audioequipment for your home, carWeb site at .It enables us to keep youposted on our latest advance-ments, and helps us to betterunderstand our customers4SPEAKER PLACEMENTSUBWOOFERSURROUND SPEAKERSFRONTSPEAKERSThe front speakers should be placed the same distance from each other as they are from the listening position.The CSB5 speakers should be placed at about the same height from the floor as the listeners’ ears will be, or they may be angled toward the listeners.The center channel speaker should be placed slightly behind the front left and right speakers, and no more than 2 feet (0.6m) above or below the tweeters of the left and right speakers. It is often convenient to set the center speaker on top of thetelevision set, as shown in the drawing.The JBL Cinema Soundspeaker system may be used in 5.1-, 6.1- or 7.1-channel applications. In 5.1-channel applications, two of thesurround speakers should be placed slightly behind the listening position and, ideally,should face each other and be at a level higher than the listeners’ ears. If that is not possible, they may be placed against a wall behind the listening position, facingforward. In 6.1-channel appli-cations, two of the surround speakers should be placed in the side positions, and asingle surround back speaker should be placed against the wall behind the listening position. In 7.1-channelapplications, place two of the surround speakers in the side positions, and place the two surround back speakers against the rear wall.In Dolby ®Digital and DTS ®systems, it is best to aim all of the speakers (except the subwoofer) toward thelistening position at or slightly above about ear-level height.In systems where only analog surround processing (such as Dolby Pro Logic ®II) isavailable, it may be preferable to aim the speakers straight out from the wall to obtain a more diffuse sound.The low-frequency material reproduced by the subwoofer is mostly omnidirectional, and this speaker may be placed in a convenient location in the room. However, bass reproduction will be maximized when the subwoofer is placed in acorner along the same wall as the front speakers.Experiment with subwoofer placement by temporarily placing the subwoofer in the listening position and moving around the room until the bass reproduction is best. Place the subwoofer in that location.CENTER CHANNEL SPEAKER† Single surround back speaker may be used with 6.1 receivers and processors.Alternate placement for surround speakers when only 5.1 channels are used; required placement for surround back speakers in 7.1-channel systems.5The CSC55 center channel and the CSB5 are designed to be mounted on the wall. There are two (2) fixed-mount wall brackets provided for the CSC55, and one for the CSB5.Each speaker bracket will require up to three 1-1/2" #10wood screws; each screw should be fastened to a wall stud.If a wall stud is unavailable,install an anchor appropriate for a 1-1/2" #10 screw.NOTE: The customer is responsible for the correct selection and use of mounting hardware (available through hardware stores) to ensure the proper and safe wall-mounting of the speakers.Step ing the included mounting template (CSC55only) or the bracket back plate (CSB5 only), mark thepositions on the wall where you would like to place the mounting screws.Step 2.Attach the back plate(s) of the bracket to the wall using three screws (not included).Step 3.Attach the frontplate(s) (with the two holes) of the bracket(s) to the CSC55 or CSB5, using the provided screws.Step 4.Slide the CSC55 or CSB5 speaker with attached bracket front plate(s) onto the back plate(s) of the bracket(s).Once positioned properly, the speaker should slide down slightly and become secure.To remove the speaker from the wall, simply slide the speaker up.WALL-MOUNTING THE CSC55AND CSB56CONNECTION TIPSSPEAKER CONNECTIONSSeparate and strip the ends of the speaker wire as shown.Speakers and electronics terminals have corresponding (+) and (–) terminals. Most manufacturers of speakers and electronics, including JBL, use red to denote the (+)terminal and black to denote the (–) terminal.The (+) lead of the speaker wire is noted with a stripe. It is important to connect both speakers identically:(+) on the speaker to (+) on the amplifier and (–) on the speaker to (–) on the amplifier.Wiring “out of phase” results in thin sound, weak bass and a poor stereo image.With the advent of multichan-nel surround sound systems,connecting all of the speakers in your system with the correct polarity remains equally important in order to preserve the proper ambience and directionality of theprogram material.insert each wire into its corresponding hole in the base. Then tighten down the terminals.CSB5,CSC55To use the binding-post speaker terminals, unscrew the colored collar until the pass-through hole in the center post is visible under the collar. Insert the bare end of the wire through this hole;then screw the collar down until the connection is tight.The hole in the center of each collar is intended for use with banana-type connectors. To comply with European CE certification,these holes are blocked with plastic inserts at the point of manufacture.To use banana-type connectors requires the removal of the inserts.The hole in the center of each collar is intended for use with banana-type connectors. To comply with European CE certification,these holes are blocked with plastic inserts at the point of manufacture.To use banana-type connectors requires the removal of the inserts.DOLBY PRO LOGIC®(NON-DIGITAL) – LINE LEVELUse this installation method for Dolby Pro Logic applications (not Dolby Digital, DTS or other digital processing), where the receiver/processor is equipped with a subwoofer output, or a volumecontrolled preamp (line-) level output:Use RCA-type interconnectsto connect the line-levelsubwoofer outputs on yourreceiver or amplifier to theline-level inputs on thesubwoofer. IMPORTANT: Donot use the LFE input on thesubwoofer with DolbyPro Logic processors.NOTE: If your receiver oramplifier has only onesubwoofer output jack, thenyou will need to use aY-connector (not included).Plug the male end of theY-connector into your receiveror amplifier’s subwooferoutput jack, and connect eachof the two female ends toseparate RCA-typeinterconnects. Finally, plug theRCA-type interconnects intothe line-level inputs on thesubwoofer.Connect each speaker tothe corresponding speakerterminals on your receiveror amplifier.Make sure your receiver orprocessor is correctlyconfigured to indicate that thesubwoofer is “On.”Use this installation method for Dolby Digital, DTS or other digital surround processors: Use the line-level input jack marked “LFE” for the Low-Frequency Effects channel.Connect this jack to the LFEoutput or subwoofer outputon your receiver or amplifier.Connect each speaker tothe corresponding speakerterminals on your receiveror amplifier.Make sure that you haveconfigured your surroundsound processor for “Sub-woofer On.” Also configureyour receiver for 5.1-, 6.1-or 7.1-channel operation asappropriate. The front left,front right, center and rearspeakers should all be setto “Small.” If your receiverallows you to set the cross-over frequency between thesubwoofer and the mainspeakers, select 100Hz orthe setting that is the closestfrequency below it.DOLBY®DIGITAL OR DTS®(OR OTHER DIGITAL SURROUND MODE) CONNECTION7SUBWOOFER OPERATIONPress the Master Power switch (marked “Power” a) to the On position to use the subwoofer. The CSS10 subwoofer will automatically turn on or go into standby (sleep) mode as described below. When your receiver or amplifier is off, or is not sending program materialto the subwoofer, the subwoofer will be in standby mode (the LED on the front of the CSS10 will be red). When the subwoofer senses an audio signal, it will automatically turn on (the LED will be green). If the subwoofer does not sense a signal after approximately 20 minutes, it will automatically go into standby mode.If you will be away from home for an extended period of time,or if the subwoofer will not beused, switch the MasterPower switch a to the Offposition by pressing it until itpops out.VOLUMEVolume may be adjusted using the Subwoofer Level control b, as shown.The Phase control determineswhether the subwoofer’spistonlike action moves in andout in phase with the mainspeakers or opposite the mainspeakers. There is no corrector incorrect setting. Properphase adjustment depends onseveral variables, such assubwoofer placement andlistener position. Adjust thePhase switch c to maximizebass output at the listeningposition.Remember, every system,room and listener is different.There are no right or wrongsettings; this switch offers theadded flexibility to adjust yoursubwoofer for optimumperformance for your specificlistening conditions withouthaving to move your speakers.If at some time in the futureyou happen to rearrange yourlistening room and move yourspeakers, you shouldexperiment with the phaseswitch in both positions, andleave it in the position thatmaximizes bass performance.8If there is no sound from any of the speakers:• Check that receiver/amplifier is on and a source is playing.• Check that the powered subwoofer is plugged in and is turned on (Power switch a pushed in).• Check all wires and connections between receiver/ amplifier and speakers. Make sure all wires are connected. Make sure none of the speaker wires are frayed, cut or punctured, or touching each other.• Review proper operation of your receiver/amplifier.If there is no sound coming from one speaker:• Check the “Balance” control on your receiver/amplifier.• Check all wires and connections between receiver/ amplifier and speakers. Make sure all wires are connected. Make sure none of the speaker wires are frayed, cut or punctured, or touching each other.• In Dolby Digital or DTS modes, make sure that the receiver/ amplifier is configured so that the speaker in question is enabled.• Turn off all electronics and switch the speaker in question with one of the other speakers that is working correctly. Turn everything back on, and determine whether the problem has followed the speaker or has remained in the same channel. If the problem is in the same channel, the source of the problem is most likely with your receiver or amplifier, and you should consult the owner’s manual for that product for further information. If the problem has followed the speaker, consult your dealer for further assistance or, if that is not possible, visit .If there is no sound from thecenter speaker:• Check all wires andconnections between receiver/amplifier and speaker. Makesure all wires are connected.Make sure none of the speakerwires are frayed, cut orpunctured, or touching eachother.• If your receiver/processor isset in Dolby Pro Logic mode,make sure the center speaker isnot in phantom mode.• If your receiver/processor isset in one of the Dolby Digital orDTS modes, make sure thereceiver/processor isconfigured so that the centerspeaker is enabled.If the system plays at lowvolumes but shuts off asvolume is increased:• Check all wires andconnections between receiver/processor and speakers. Makesure all wires are connected.Make sure none of the speakerwires are frayed, cut orpunctured, or touching eachother.• If more than one pair of mainspeakers is being used, checkthe minimum impedancerequirements of your receiver/amplifier.If there is low (or no) bassoutput:• Make sure the connections tothe left and right “SpeakerInputs” have the correctpolarity (+ and –).• Make sure the subwoofer isplugged into an active electricaloutlet and is turned on (Powerswitch a pushed in).• In Dolby Digital or DTS modes,make sure your receiver/processor is configured so thatthe subwoofer and LFE outputare enabled.• Switch the Phase switch c tothe opposite position, and selectthe position that results in themost pleasing bass response.If there is no sound fromthe surround speakers:• Check all wires andconnections between receiver/processor and speakers. Makesure all wires are connected.Make sure none of the speakerwires are frayed, cut orpunctured, or touching eachother.• Review proper operation ofyour receiver/amplifier and itssurround sound features.• Make sure the movie orTV show you are watchingis recorded in a surround soundmode. If it is not, check to seewhether your receiver/processor has other surroundmodes you may use.• In Dolby Digital or DTS modes,make sure your receiver/processor is configured so thatthe surround speakers areenabled. When five satellitesare in use, remember toconfigure your receiver orprocessor for 6.1-channeloperation, and when sixsatellites are in use, configureyour receiver or processor for7.1 channels.• Review the operation of yourDVD player and the jacket ofyour DVD to make sure that theDVD features the desired DolbyDigital or DTS mode, and thatyou have properly selected thatmode using both the DVDplayer’s menu and the DVDdisc‘s menu.TROUBLESHOOTING9SYSTEMFrequency Response 27Hz – 30kHz (–6dB)CST55Maximum Recommended Amplifier Power150 Watts*Power Handling50W Continuous/300W Peak Frequency Response55Hz – 30kHz (–6dB) Nominal Impedance8 OhmsSensitivity90dB @ 1 Watt/1 meterTweeter One 3/4" (19mm) titanium-laminate dome, video-shieldedWoofers Dual 130mm (5")transducers with PolyPlas™ cones, neodymium magnets and HeatScape™ motor structure, video-shielded Dimensions (H x W x D)(including wall-mount bracket and grille)1168 x 286 x 286mm (46" x 11-1/4" x 11-1/4") Weight7.7kg (17 lb)CSB5Maximum Recommended Amplifier Power125 Watts*Power Handling40W continuous/300W peak Frequency Response60Hz – 30kHz (–6dB) Nominal Impedance8 OhmsSensitivity88dB @ 1 watt/1 meterTweeter 3/4" (19mm) Titanium-laminate dome, video-shieldedWoofer5" (130mm)Transducer with PolyPlas™cone, neodymium magnet and HeatScape™ motor structure, video-shieldedDimensions (H x W x D) (including base and grille) 363 x 155 x 116mm (14-5/16" x 6-1/8" x 4-9/16") Weight2.3kg (5 lb)Dimensions (H x W x D)(without base and with wall-mount bracket and grille)338 x 155 x 130mm (13-5/16" x 6-1/8" x 5-1/8") Weight2kg (4.5 lb) CSC55Maximum Recommended Amplifier Power150 Watts*Power Handling50W Continuous/300W Peak Frequency Response55Hz – 30kHz (–6dB) Nominal Impedance8 OhmsSensitivity90dB @ 1 watt/1 meterTweeter One 19mm (3/4")titanium-laminate dome, video-shieldedWoofers Dual 130mm (5")transducers with PolyPlas™ cones, neodymium magnets and HeatScape™ motor structure, video-shielded Dimensions (H x W x D)(including wall-mount bracket and grille)159 x 667 x 108mm (6-1/4" x 26-1/4" x 4-1/4") Weight4.5kg (10 lb)CSS10Amplifier Power150 Watts RMSFrequency Response27Hz – Low-pass crossover setting at signal sourceLow-Frequency Driver250mm (10")cone and HeatScape™motor structure, video-shieldedInput LFE preamp levelDimensions (H x W x D)(including feet)464 x 337 x 406mm (18-1/4" x 13-1/4" x 16") Weight19.5kg (43 lb)SPECIFICATIONSAll features and specifications are subject to changewithout notice.Dolby and Pro Logic are registered trademarks of DolbyLaboratories.DTS is a registered trademark of DTS, Inc.*The maximum recommended amplifier power ratingwill ensure proper system headroom to allow foroccasional peaks.We do not recommend sustained operation at thesemaximum power levels.CSB5, CSC55 and CST55CSS10 (230V only)。
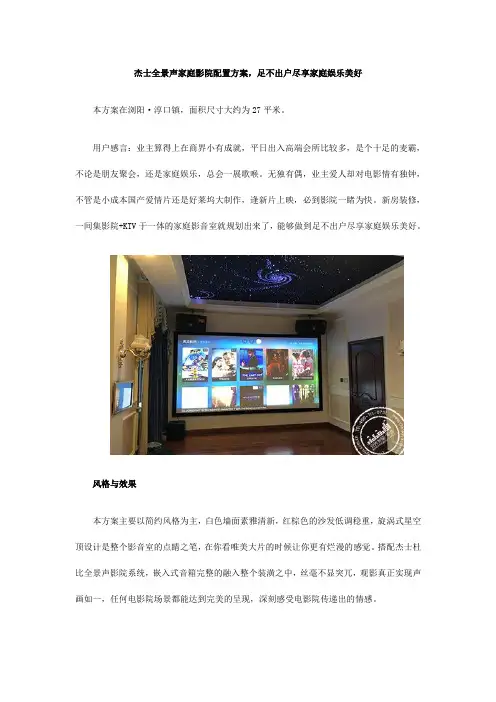
杰士全景声家庭影院配置方案,足不出户尽享家庭娱乐美好本方案在浏阳·淳口镇,面积尺寸大约为27平米。
用户感言:业主算得上在商界小有成就,平日出入高端会所比较多,是个十足的麦霸,不论是朋友聚会,还是家庭娱乐,总会一展歌喉。
无独有偶,业主爱人却对电影情有独钟,不管是小成本国产爱情片还是好莱坞大制作,逢新片上映,必到影院一睹为快。
新房装修,一间集影院+KTV于一体的家庭影音室就规划出来了,能够做到足不出户尽享家庭娱乐美好。
风格与效果本方案主要以简约风格为主,白色墙面素雅清新,红棕色的沙发低调稳重,旋涡式星空顶设计是整个影音室的点睛之笔,在你看唯美大片的时候让你更有烂漫的感觉。
搭配杰士杜比全景声影院系统,嵌入式音箱完整的融入整个装潢之中,丝毫不显突兀,观影真正实现声画如一,任何电影院场景都能达到完美的呈现,深刻感受电影院传递出的情感。
方案解析音频设备选用了Klispch杰士THX-502-L 影院系统,Tractrix曲率可最有效地从号角中释放声波,以创造最自然的声音;90x90的几何体无论水平还是垂直安装,都能提供宽且平坦的扩散。
TRACTRIX号角提供了:更宽、更恒定的扩散,更平坦的频响,更大的聆听区域,且可控的方向,对于能量更精确的声音。
拥有CERAMETALLIC 陶瓷铝低音、CERAMETALLIC 锥盆,专利的低音材质,非常轻以获得最大效率和功率传输,非常坚硬,意味着它的形状可获得最小的低频失真。
冲压而成的钢制盆架,设计得异常坚固。
半球顶防尘帽设计增加低频单元的坚固性,帮助维持形状,避免低音运动时的变形。
能非常合适的融入你的视听空间!视频设备选用了EPSON爱普生CH-TW6300 3D高清家用投影机亮度高达2600流明,可以享受生动、美丽的画面。
采用3LCD技术的投影机可以让您享受到明亮生动的3D影像。
3D 眼镜可以通过蓝牙实现和投影机顺利的连接,传输顺畅不受房间内其他物体的干扰。
影院音响配置方案第1篇影院音响配置方案一、项目背景随着我国经济社会的快速发展,人民群众对文化娱乐的需求日益增长,影院作为重要的文化娱乐场所,其音响设备配置的合理性、专业性和先进性对于提升观众观影体验具有重要意义。
本方案旨在为某影院提供一套合法合规、专业先进的音响配置方案,以满足影院高品质放映需求。
二、方案目标1. 满足影院放映各类影片的音响效果需求,为观众提供优质的观影体验。
2. 确保音响设备配置的合法性、合规性,遵循国家相关标准和规定。
3. 提高影院的硬件设施水平,提升影院的市场竞争力。
三、设备选型1. 扬声器系统扬声器系统是影院音响系统的核心部分,本方案选用国际知名品牌的专业影院扬声器。
具体选型如下:(1)主声道扬声器:选用三分频同轴扬声器,具有高灵敏度、低失真、宽频带等特点,确保声音的清晰度和还原度。
(2)环绕声道扬声器:选用全频段扬声器,实现声场包围感,增强观众的沉浸式体验。
(3)低音扬声器:选用大功率、长冲程的低音扬声器,提供强劲的低音效果,提升观影体验。
2. 功放系统功放系统为扬声器提供稳定的功率输出,确保音响效果的稳定性。
本方案选用数字功放,具有以下特点:(1)高效率:数字功放转换效率高,降低能源消耗。
(2)高稳定性:采用模块化设计,保证长时间稳定运行。
(3)高兼容性:支持多种音源输入,方便影院后期升级改造。
3. 前级处理器前级处理器是音响系统的核心控制部分,本方案选用具备以下功能的前级处理器:(1)多路输入输出:满足各类音源和扬声器系统的连接需求。
(2)音频处理功能:实现音频信号的放大、衰减、延迟等处理,优化音响效果。
(3)智能控制:支持远程控制,方便影院管理人员操作。
四、音响系统布局1. 主声道扬声器布局:按照影院放映厅的尺寸和形状,合理布置主声道扬声器,确保声场均匀,无死角。
2. 环绕声道扬声器布局:在观众席两侧及后部布置环绕声道扬声器,形成环绕声场,增强观众的沉浸感。
3. 低音扬声器布局:在放映厅中央位置布置低音扬声器,使低音效果均匀分布,避免共振现象。
别墅家庭影院影音室搭建方案,沉浸式体验,更具豪宅气质随着国民经济的发展,越来越多的人们会在购置家业时选择别墅,那么在选择了之后,如何让你的别墅更具有豪宅气质呢,这时候,在装修时规划一个家庭影院影音室就非常有必要了,可以随时沉浸式体验影片超高清4K画质,身临其境般感受电影创作者的情感源泉,让一家人的生活过得更加的有滋有味。
本方案在长沙卓越麓山别墅区,地下室面积尺寸约为32平米。
风格效果柔和的灯光,暖色系风格装修,说不上浪漫,但也不失家庭温馨,没有对视觉做过多的装饰,也没有对气氛做过多的渲染。
崇尚简单即完美的设计理念,嵌入式音响设计迎合时下的杜比全景声音效,感受电影创作者来自头顶的声音共鸣,能深入感受电影的情感。
安装调试完当天,老头老太请来一帮子老姐们,老哥们一展歌喉,也许这就是因为爱!所用器材列表音频系统采用的是美国Klipsch 杰士R-1650W 7.1.2杜比全景声影院音响系统、搭配美国 Integra DRX-3 家庭影院AV功放,视频系统由美国爱普生EPSON TW5210 3D高清家用投影仪、和美国亿立ELITESCREENS 135寸高清画框透声幕布组成,配置中国雷石家庭卡拉OK系统。
音响设备采用的是美国Klipsch 杰士R-1650W 7.1.2杜比全景声影院音响系统,嵌入式箱体设计,功率大,灵敏度高,表面可以上漆与墙面匹配,可与那些在可接受的价位获得可靠耐用且表现出色音箱的顾客匹配,无论是使用在家庭中、还是商业环境,R-1650-W都能带来具有动感的声音表现。
并在头顶安装了2个吸顶式全景声音响,让您能感受创作者来自头顶的声音共鸣,搭配美国Elitescreens 亿立135寸高清透声幕布,让您足不出户就能享受高清大屏的影院氛围和视觉!视频设备采用的是日本EPSON爱普生TW5210高清晰家用投影仪,小巧、紧凑的机身设计,节省空间, 时尚的外观适合各种环境使用, 1920×1080 的高清分辨率 , 提供您所喜爱的高清大屏娱乐享受。
JBL® HDI 系列扬声器用户手册1感谢您选择 JBL ® 产品60 年来,JBL ® 工程师一直参与到音乐和电影录制和重现的各个制作环节中,包括现场表演以及在路上、家里、车辆中或办公室播放您录制的音频等等。
我们相信,您所选择的这款 JBL 扬声器能为您提供所期望的每一个娱乐细节,并且当您考虑为您的家庭、汽车或办公室购买其他音频设备时,您一定会再次选择 JBL 。
请花费少许时间,访问我们的网站 并注册您的产品。
这将帮助我们更好地了解您的需求,为您提供最新的资讯,从而提供能够满足您需求的产品和服务。
包装内容HDI-3600HDI-3800HDI-1600HDI-4500地毯支脚 HDI-3600/3800橡胶垫脚 HDI-4500 (预安装)垫脚 HDI-16002摆放HDI-3600/3800 落地式扬声器,HDI-1600 书架式扬声器为获得最佳音效,请确保扬声器之间保持 1.8 米到 3 米的距离。
调整扬声器角度以朝向收听位置,可提升立体声声场成像。
听众和扬声器之间的角度保持在 40 至 60度之间时,扬声器才能够产生出最准确的立体声声场。
一般情况下,扬声器越贴近墙壁或角落,低音输出越强劲。
为达到最佳效果,我们建议在扬声器和侧面墙壁之间至少保留 51 厘米的距离。
HDI-4500 中置声道扬声器请将 HDI-4500 中置扬声器摆放在电视机屏幕正上方或正下方, 此扬声器喇叭的中心与左前及右前扬声器的喇叭的中心之间的高度差不应超过 61 厘米。
如果您的电视机摆放位置较低,您可以将中置扬声器摆放在电视机顶部,让扬声器的正面边缘与电视机的正面边缘平行。
HDI-3600/3800 左前扬声器HDI-3600/3800 右前扬声器注意:您可以将 HDI-4500 摆放在电视机上方或下方。
注意:为了获得更好的聆听体验,请将中置扬声器摆放在与您的头部位置齐平的地方。
JBL HDI 系列扬声器 - 5.1 声道家庭影院扬声器摆放布局图如果将 HDI-1600/3600/3800/4500 扬声器用作 5.1 声道系统中的环绕声扬声器,请将它们放在收听位置后方不远处,互相朝向对方。
JBL方案简介JBL方案是一种音频解决方案,由美国著名音频设备制造商JBL开发和推出。
该方案旨在提供高质量的音频体验,适用于各种场景和用途。
JBL方案在音乐产业、影视制作和娱乐等领域得到广泛应用。
本文将介绍JBL方案的主要特点、应用场景和具体实施步骤。
主要特点JBL方案的主要特点如下:1.高品质音频:JBL方案提供卓越的音质和声场表现,通过精心设计的音箱、调音技术和声音处理算法,实现高保真、清晰、动态的音频播放效果。
2.多样化的产品线:JBL方案涵盖了多个音频设备产品系列,包括专业音箱、无线音箱、耳机、声卡等,以满足不同场景和需求下的音频需求。
3.灵活可扩展:JBL方案支持可扩展性,用户可以根据需要选择不同的组合和配置,以满足特定音频要求。
例如,可以使用多个音箱进行立体声或环绕声播放,或者使用不同型号的耳机以适应不同的使用场景。
4.简单易用的操作界面:JBL方案提供直观友好的操作界面,用户可以轻松地进行音量调节、声场设置、音频输入切换等操作,提供良好的用户体验。
应用场景JBL方案适用于各种音频应用场景,以下是一些常见的应用场景:音乐产业JBL方案在音乐产业中得到广泛应用,包括音乐制作、音乐演出和音频后期处理等环节。
音乐制作人和音乐家可以使用JBL的专业音箱和耳机来监听和调整音频表现,以确保音乐的质量和可听性。
同时,JBL方案也提供了各种音频处理插件,用于音频后期处理和混音。
影视制作在影视制作中,JBL方案可用于电影、电视剧、广告和纪录片的音频制作和后期处理。
剧组可以使用JBL专业音箱和监听系统来监控电影配乐、对话和音效,以确保音频的准确传达和观众的良好体验。
此外,JBL方案还提供了智能音频处理算法,可帮助音频编辑师进行音效处理和混音。
娱乐场所JBL方案也适用于各种娱乐场所,例如酒吧、夜总会、KTV等。
这些场所可以使用JBL的专业音箱和声音调控系统来提供高质量的音乐演奏和声场效果。
JBL方案的可扩展性和便捷性使其成为娱乐场所的理想选择。
杰士7.1家庭影院系统设计,家庭娱乐生活更丰富,想唱就唱本方案在长沙·保利麓谷林语,面积尺寸约为20平米。
业主算的上是家庭影音娱乐系统的早期使用者,以前玩过一套某牌箱子,老觉得2.0的差点火候,留在老房子里好多年也不曾打开过了。
成家之后更多的是为了生计奔波,早已把电影和音乐抛之脑后了,所以在拿到房子之后,除了开始购置家居之外,也在酝酿是否重新购置一套家庭影音系统,在家里地下室布置家庭影院房,重拾和家人一起观影和唱歌的快乐亲子时光!所用器材清单采用美国Klipsch杰士 R-3650 7.1家庭影院系统,搭配日本天龙DENON AVR-X1300 AV 功放,视频设备由日本爱普生Epson CH-TW6300高清投影仪,和美国亿立Elitescreens 120寸高清画框透声幕布组成。
方案解析音响设备选择的是Klipsch杰士 R-3650,搭载了该厂出名的6.5吋古铜色IMG中低音单元,还有以1吋铝合金单元发声的号角高音,旋转Tractrix® 号角高音单元可在任意位置提供清晰的声音。
采用Klipsch开发的Tractrix号角设计,加大输出音量的同时大大降低了失真,拥有90度×60度的扩散角度,效率极高,能将声波以宽广的范围传导出去。
视频设备选用的是爱普生CH-TW6300,其亮度高达2600流明,1920 x 1080 (1080p)高画质分辨率,60000:1高对比度,可以展现出清晰、生动且锐利的画面,细节表现与绝佳的色彩饱和度带来令人惊叹的全高清影像。
采用了一颗1.6倍变焦镜头,旋动镜头外圈便可手动变焦和聚焦,其较短可在2.95m的距离上投射100英寸16:9画面,而在3.54m的距离上可以投射120英寸16:9画面。
CH-TW6300的外形设计的,因为其流线型圆润的机身非常家居化,再加上其白色的机身色调,基本上能够融入到任何一种家居风格中。
设计风格本方案以现代简约风格为主,墙面为白色装潢色系,简单纯净,又略带小清新,满天繁星的星空吊顶搭配暖黄色的筒灯,让整个视听室增添了不少的浪漫气息,杰士嵌入式音响,与墙面装潢融为一体,二者合二为一。
手机:135********E-mail:bjyutian 序号品名品牌型号国别单位数量单价金额1H系列音箱JBL JBL3677 左 中 右美国只39800.0029400.00
2H系列外摆式音箱JBL JBL8320 环绕美国只41950.007800.00
3低音炮JBL JBL4641美国只18900.008900.00
4解码器Tripath 710台湾台15610.005610.00
音响重放系统产品特点: 1.HS-215是专为小型影厅设计的二分频扬声器。
2.此音箱采用单15“低音单元和单1.75
”高音单元组成。
3.仅30CM的超溥箱体设计中采用了直接辐射技术的低音箱体,这样不仅可以给影
厅留出更多的空间,还不会影响影片音质效果。
4.适用小型电影院。
产品参数: 型号 HS-215频率
响应 45Hz-20KHz阻抗 8Ω额定功率 300W灵敏度 99dB覆盖角度 水平90×垂直40°分频点 1.5HZ单
元系统组成 15"×1+1.75"×1谐波失真≤ 2%体积 LF:650×300×1125mm 重量 32kg
产品特点: 1、具有功率大,灵敏度高,动态范围大,失真小的特点 2、能真实还原影片声音,其
近乎完美的声音的特性 3、非常适用于影院环绕声的还音 ,产品参数: 频率响应 50Hz~18KHz 额
定阻抗 8Ω 功率 150W 灵敏度 93dB 尺寸 330x227x430 重量
7Kg
产品特点: HS-S18是一款单18"的影院超低频音箱。
它充分体现出高性能单元与合理箱体结构的完
美组合特性,为发出高声压深沉有力的低频提供安全保障。
产品参数: 型号 HS-S18 频率响应 35Hz-400Hz 阻抗 8Ω 额定功率 800W 灵敏度
103dB 覆盖角度 水平90×垂直40° 单元系统组成 18“×1 谐波失真 ≤
2% 体积 LF:650×450×1000mm 重量 32kg
北京雨田创盛科技有限公司
电影音响系统解决方案
电话:010-********
工程部:刘工地址:北京市朝阳区博大路3号院2号楼708室
展厅:
▼4英吋 65.5K像素彩色液晶显示,菜单界面全触控操作,中英文可选,简洁直观;▼4进1出HDMI音
视频接口,支持光纤、同轴两种音频数字输入;▼全面支持DOBLY AC3,DTS影院解码功能,8通道
HDMI音频解码输入接口,7.1声道平衡输出;▼输入通道音乐和麦克风分别有13段独立参量均衡;▼
专业级KTV混响效果,效果独立3段均衡调节,麦克风4级反馈抑制控制,防啸叫无忧;▼主输出通道
设7段参量均衡(PEQ),中置,低音,环绕,后置通道分别设5段参量均衡(PEQ),电子分频,输入选
择及混合比例,极性,延时,限幅,增益功能;▼音频处理采用双DSP芯片设计,解码芯片采用专业
级ADI第四代DSP芯片,400MHz主频,96KHz采样频率32-bit浮点运算;▼KTV处理采用德州TI公司最
5双通道功率放大器TPA YT600 2*600W美国台24600.009200.00
输出功率8Ω/1khz 600W;输出功率 4Ω/1khz 850W;信噪比 102dB;输入灵敏度 0.775V 1KHz;
总谐波失真 <0.05%;阻尼系数 >300;输入阻抗 20KΩ(平衡)/10KΩ(非平衡);尺寸(宽深高)
483×468×90mm;重量 15.5Kg;
6双通道功率放大器TPA YT2350 2*350W中国台23150.006300.00产品特性(PRODUCT FEATURES): YT系列数字功率放大器为1U外观设计,classD拓扑结构并集成开关
电源,超轻巧机身,强大功率输出。
YT2350采用两通道和四通道的设计,具有专业的保护功能和先
进的散热系统,前面板带有精确的控制旋钮,LED指示灯可显示系统的运行状态;后面板采用平衡的
XLR输入和SPEAKON输出,并带有模式转换开关,可以切换不同的工作模式。
严格的质量控制体系和
高质量的元器件的选择,保证了高品质的产品生产;轻巧的机器以及强大的功率输出非常易于产品
的运输和更多领域的应用。
> Class D拓扑架构并集成开关电源设计,重量超轻。
> 拥有高效率功
率转换电路、功率输出强劲,电源消耗低,绿色环保。
> 前面板精准增益(音量)控制,有电源、
7电源时序器ABL1089中国台1980.00980.00
最大输入电流60A ;单路最大输出电流30A ;工作电压 220V/50-60Hz ;每一路功率 峰值可达
3000W ,建议可带3~4台1000W~1500W功放 ;输入与输出电压 AC输入电压=AC输出电压 (下订单前
请说明,可选配电压:110V输入=110V输出,220V输入=220V输出);输出电源插座 万用插座,符
合欧美标准,前面板带一路直通式万用插座,后面板8个受控万用插座;插座材质 每个插座材质均
为磷铜,均通过检验才安装。
符合欧盟环保标准。
每一路开关间隔时间 1秒 ,每一路带指示灯 ;
继电器 宁波松乐牌(原厂正品) ;电路板线路工艺标准 采用65%高纯度锡,高端分流技术,经强化
加粗处理 ;变压器 A&C原厂正品 (专供定制变压器);内置电源线 内置线材每路2.5平方,
8专业音箱璧架ANXIN F500中国对4100.00400.00
产品性能:
1.可左右调节角度。
2.可上下调节角度。
3.中间连接杆可伸缩调节。
4.用料扎实,稳定性强。
5. 单只可承重40kg.是一般的产品所不能及的
9信号接插线定制音响系统配套辅料中国批11000.001000.00
音箱线、信号线、过机线及配套插头等
合计:69,590.00
税金:6,959.00
合计:76,549.00
图示。