三洋s808说明书
- 格式:pdf
- 大小:1.88 MB
- 文档页数:8
※正確的使用,將幫助您更省電!使用說明書安全注意事項在使用本機之前,應仔細閱讀下列事項及使用說明,閱後並請妥為收存,以備將來參考。
1. 應依照使用說明書操作本機,並遵守說明書內之所有警告。
2. 本機不能置於潮濕及可能被水濺濕的地方使用,例如:浴缸、臉盆、廚房洗滌水槽、 洗衣機附近、地下室或游泳池旁等。
3. 本機不能置於灰塵太多的地方。
4. 本機應避免陽光直射,並遠離散熱器、調溫器、火爐或其他會產生熱量之裝置(包括擴大器)。
5. 本機放置位置請勿太靠近電視、電腦、錄影機及行動電話,以免遭受干擾。
6. 本機只可與使用說明書內或機身上所示之電源類型接連。
7. 不可擺放重物於本機上。
8. 使用本機的溫度範圍是5~35℃9. 請以說明書內所推薦之方法清潔本機。
10. 長期不使用本機時,應將其電源線插頭從電插座上拔出。
11. 慎防雜物或液體從機身開口處進入機身內部。
12. 當本機出現下列情況時,應請專業的維修人員進行維修。
A. 故障或插頭受損。
B. 雜物或液體落入本機內。
C. 受到雨淋。
D. 無法正常操作或性能出現明顯變化。
E. 不慎跌落或外殼受損。
13. 用戶請採用說明書內所述之方法維修本機,其他方面之維修請由專業之維修人員處理。
56CD/MP3CD電台電台指針匣匣7電池盒提把耳機插座A. 安裝電池(未隨機附)的方法:1. 打開電池盒,依照盒內的正負極極性標示,放入6枚2號電池。
2. 將音量調小使用可延長電池使用壽命。
音量越大,電池的壽命越短。
3. 舊電池會漏液腐蝕機器,故請勿將舊電池留在機器內。
4. 以電池為電源時,AC 交流電源線必須拔離機體。
5. 當音量變小或幾乎聽不到聲音時,請更換所有的電池。
放入6枚2號的電池B. AC交流電源的使用:1. 將隨機附之交流電電源線尾端插入本機背面的交流電 (AC)插座,另一端則插入室內供交流電 (AC 110V) 插座中。
不使用本機時,應將交流電電源線自供電的電源線插座中拔除。
三洋投影机说明书三洋PLC-XU300C投影机说明书产品简介:主要参数产品类型商务投影机显示技术 DLPTI DLP微反射数字投影技术,0.7" 前投/背投、桌面/技术类型及规格投影方式x 12? DDR DMD 芯片吊顶,正投/背投支持的色彩投影距离(米) 1.4-12.7,1,13 1677万,1677万数目标准显示分辨率(dpi) 标称对比度 2200:1 1024*768投影画面尺40-300英寸,标称光亮度 3200流明,3000流明寸 23.4-350英寸225,OSRAM VIP投影灯泡功屏幕宽高比例 4:3/16:9,4:3 & 16:9 E20.5长寿命冷光率(W)源灯泡,230VGA模拟信号接口(15-pin D-Sub,支持分量视频)1个,DVI-D 数字信号接口(24-pin,支持HDCP协议)1个,复合视频接投影灯泡寿命(小时) 3000(标准模式),4500(节能模式) 输入接口口1个 (RCAjack,含左右声道接口2个),S-Video(Mini-DIN4 pin) 接口 1个,Audio(mini jack)接口1个,Audio、RGB、S-Video 输出接口 VGA信号同步输出接口 (D-sub 安全认证 CCCfemale terminal )1个,Audio接口(mini jack)1个,Audio、RCA、USB、RS-232C、RJ-45电源性能标准模式下290+/-10%; 待节能模式下30,标准模式下33,整机功率机模式下5,噪音(dB)300(正常模29 (W)式)/237(ECO模式) 电源性能 100V-240 V AC 其他特点产品尺寸产品重量 300*244*88mm(L*W*H)mm 3.5kg随机附件用户使用手册、电缆线、保修卡投影机接线1 电源线2 vga电缆3 复合视频电缆4 s-视频电缆(可选附件)5 供ypbpr使用的d-15至rca转接器(选件)为确保投影机与计算机正常工作,请对您的图形卡进行配置,使其分辨率小于或者等于1024×768。
SQ-808型液晶显示高级语音抢答器使用说明书一、概述SQ-808型系列新款高级语音抢答器为本公司积十年抢答器设计生产经验,应用当今电子界最新的技术,精工设计的新一代产品,具有众多优点:1、采用高级MCU主控,功能强大,使用简单,高可靠性。
2、采用中文液晶显示屏,配合计算机式数字小键盘,操作特别简单、直观。
3、采用三位大屏幕超亮数码管,前后双面显示分数,亮度高,显示美观。
4、抢答开关采用高级彩色壳,带红、绿双色LED灯的智能开关,该智能按键在抢答成功时会自动点亮绿灯,抢答违规时自动点亮红灯。
电源由主机提供,不用装电池。
5、参赛组话筒集中控制功能。
该组必答题或抢答成功时,自动打开该组的麦克风,操作结束自动关闭。
6、带计算机串行接口和计算机应用软件,抢答器可以和电脑同步操作。
7、统一标配大屏幕4英寸主显示牌。
8、积木式结构,1-6,1-8,1-10,1-12组分数屏可任意连接。
9、四套高保真语音提示方式用户可自选。
10、四种抢答方式(任意抢答模式、3秒预备抢答模式、倒计时可续模式、主持人语音提示模式)可选。
11、基本分、每组、次的加减分步进值用户可任设。
12、具抢答分数记忆功能,停电等突发事件不影响活动进程。
13、抢答、答题两种数显倒计时功能,倒计时在1-999秒内可任设。
倒计时时间到最后10秒自动发短提示音,最后3秒后有读秒和语音提示;可中途提前退出倒计时。
14、每组、次抢答成功有声光显示,可自动判别偷答情况,并有不同的声音、灯光提示,抢答开关可自动亮红灯或绿灯。
15、仿液晶显示器豪华塑壳,主机采用19英寸豪华铝拉丝面板工程机箱。
16、系列机型为目前国内销量最大的带分数显示型智力竞赛抢答器,被全国各地众多电视台选用。
二、主要技术参数:电源电压:220V±10% 功耗:30W抢答模式:四种可选,长按“DEL”键3秒钟可在各种抢答模式间循环切换。
主机上LCD屏直接显示中文抢答模式名称,主LED显示屏上的抢答模式代号说明如下:“”――任意抢答模式(助记符取“r”的像形):“3 333”――3秒预备抢答模式:“”――倒计时可续模式(助记符取“J”的像形)“L LLL”――主持人语音提示立即抢答模式。


SA808 INSTRUCTION MANUAL We’ll Make It Stress-FreeIf you have any questions along the way, just give us a call.1-800-359-5520. We’re ready to help!Scan for easy install video/4472Before getting started, let’s make sure this product is perfect for you!WARNING:This product contains small items that could be a choking hazard if swallowed.Before starting assembly, verify all parts are included and undamaged. If any parts are missing or damaged, do not return the damaged itemto your dealer; contact Customer Service. Never use damaged parts!353. Use a drywall saw or similar tool to cut the drywall where marked. Remove cut section of drywall.1. Break out the sections of the housing 02 that are required to install the power and cable outlets that are needed.2. Thread the elastic-velcro strap into the housing 02.681.To use the ECO-Mini (purchased separately) in the SA808, first remove feet.2. Fit the ECO-Mini into the ECO-Mini bracket 05 supplied with the SA808.3. Use two of the screws from the feet to secure the ECO-Mini in the bracket 05.4. Slide the ECO-Mini and bracket 05 into the top of the housing 02. Lock the bracket 05 into the housing 02 by sliding it towards thecorner until you feel it catch.5. Use the elastic-velcro strap 03 to attach components to the housing 02.6. Power the ECO-Mini with the power cord supplied with the ECO-Mini.The SA808 can be installed behind most large wall plates of wall mounts or underneath or above most small wall plates. To access the SA808 after installation, disconnect all cables and wires from the TV, then either slide or remove the arm or TV mount from the wall plate. IMPORTANT: Check your TV owner’s manual to see if there are any special requirements for mounting or removing your TV.12 5.83 in.[148.0 mm]7.80 in.[198.1 mm]13.80 in.[350.5 mm]11.80 in.[299.8 mm]4.00 in.[101.6 mm] 125°13Before getting started, let’s make sure this product is perfect for you!- see page 21. Will your accessories weigh more than 50 lb (22.7 kg)?No — Perfect!Yes — This product is NOT compatible. Visit or call 1-800-359-5520 [UK: 0800 056 2853] to fi nd a compatible product.2. What is your wall made of?3. Do you have all of the tools needed?4. Ready to begin?Please read through these instructions completely to be sure you’re comfortable with this easy install process.If you do not understand these instructions or have doubts about the safety of the installation, assembly or use of this product, contact Customer Service at 1-800-359-5520 [UK: 0800 056 2853].CAUTION: Avoid potential personal injuries and property damage!●Do not use this product for any purpose not explicitly specifi ed by manufacturer.●Manufacturer is not responsible for damage or injury caused by incorrect assembly or use.Supplied Parts- see page 3WARNING:This product contains small items that could be a choking hazard if swallowed.Before starting assembly, verify all parts are included and undamaged. If any parts are missing or damaged, do not return the damaged item to your dealer; contact Customer Service. Never use damaged parts!STEP 1 Cut Hole for Housing- see page 4CAUTION:Avoid potential personal injuries and property damage!●Minimum drywall thickness 1/2 in. (13 mm).●Box must be mounted between studs that are at least 16 in. (406 mm) apart.141. Locate the studs using an edge-to-edge stud finder. Verify the edges of the studs using an awl or thin nail. Mark the inner edges of thestuds with pencil.2. The open area on the left of the template 01 should line up the the inner edge of the left stud. This will allow space for the placement ofa power box on the right side of the housing 02. Level the template 01 and use a pencil to mark the open area of the template 01.3. Use a drywall saw or similar tool to cut the drywall where marked. Remove cut section of drywall.WARNING!Electric Shock Hazard! Avoid potential serious injuries or death. Ensure there are no electrical wires behind the wall before cutting or drilling into the surface.WARNING!Explosion and Fire Hazard! Avoid potential serious injuries or death. Ensure there are no gas lines behind the wall before cutting or drilling into the surface.4. Install wires and cables.2. Thread the elastic-velcro strap into the housing 02.3. Mount a power outlet (if needed) to the housing 02. Slide cables and additional wires through the hole in the bottom of the housing 02and the rubber cable grommet 04. Fit the cable grommet 04 into the hole.4. Using a screwdriver, turn the screws in the corners of the housing 02 . These will raise the locking tabs in the rear of the housing 02 tosecure it to the wall. Tighten only until secure. Do not over-tighten screws.STEP 3 Install Components- see page 8ECO-Mini (purchased separately) with the SA808 - Optional1. To use the ECO-Mini (purchased separately) in the SA808, first remove feet.2. Fit the ECO-Mini into the ECO-Mini bracket 05 supplied with the SA808.153. Use two of the screws from the feet to secure the ECO-Mini in the bracket 05.4. Slide the ECO-Mini and bracket 05 into the top of the housing 02. Lock the bracket 05 into the housing 02 by sliding it towards thecorner until you feel it catch.5. Use the elastic-velcro strap 03 to attach components to the housing 02.6. Power the ECO-Mini with the power cord supplied with the ECO-Mini.Positioning- see page 11The SA808 can be installed behind most large wall plates of wall mounts or underneath or above most small wall plates. To access the SA808 after installation, disconnect all cables and wires from the TV, then either slide or remove the arm or TV mount from the wall plate.IMPORTANT: Check your TV owner’s manual to see if there are any special requirements for mounting or removing your TV. Dimensions- see page 12161718Milestone AV Technologies and its affi liated corporations and subsidiaries (collectively, “Milestone”), intend to make this manual accurate and complete. However, Milestone makes no claim that the information contained herein covers all details, conditions, or variations. Nor does it provide for every possible contingency in connection with the installation or use of this product. The information contained in this document is subject to change without notice or obligation of any kind. Milestone makes no representation of warranty, expressed or implied, regarding the information contained herein. Milestone assumes no responsibility for accuracy, completeness or suffi ciency of the information contained in this document.©2013 Milestone AV Technologies, a Duchossois Group Company. All rights reserved. Sanus is a division of Milestone.All other brand names or marks are used for identifi cation purposes and are trademarks of their respective owners.Thank you for choosing Sanus!Please take a moment to let us know how we did:SANUS• 6436 City West Parkway • Eden Prairie, MN 55344 USACall us: 800-359-5520UK: 0800 056 28536901-002209 00Emailus:**************Find us on the web: 。

Electronics R elated Products GuideAs the need for automation and labor saving increases, the number of small motors, which are key to theirimplementation, is also expected to increase. For the cases that requires high reliability, such as for robots, we can make proposals that are optimized for the operating environment.Electronics SectorDC Motor & Induction MotorMotors consume 50% of the world’s electricity and increased miniaturization, rotation speed, and e ciency are progressing in response to demand for further increases in functionality. With these changes, the adhesives used require heat resistance and high strength.Electronics SectorBrushless-DC MotorSmart phones that are now essential goods for daily living are composed of alot of electronic components and modules and lots of glue.Attachment of a cover panel to a display panel with a UV-curable sheet-likeadhesive enables a screen to be easily watched, and use of a low-temperaturecurable/UV-curable sealant for a case can produce “waterproof and drip-proof”devices.In addition, ThreeBond's sealants and adhesives contribute to making smart phonesand their electronic components and modules thinner and more sophisticated. Electronics SectorSmartphoneby little due to downsizing.ThreeBond's sealants and adhesives can meet all needs.adhesives that cure fast at low temperature are needed to shorten theA lot of adhesives are used for the mechanical components of cameras including a single lens re ex camera. As the design of a camera has been smaller and thinner, UV-LED light source-curable adhesives are needed in order to bond a di erent type of material to another, to reduce the amount of heat applied to materials, and to reduce power consumption in camera manufacturing processes.ThreeBond develops and manufactures adhesives that are the most appropriate to a customer's manufacturing processes and provide such products on a global basis.Electronics SectorDigital CameraDigital CameraPentaprismGlass and resin lensStrobeAF sensorApplication Pentaprism xing Product ThreeBond 3030 SeriesCure conditionUV curingCharacteristics1. High adhesion to resin materials (PC, PPS, etc.)2. Flexible3. Adhesion to di erent materials Application Bonding of lenses Product ThreeBond 3017 Series ThreeBond 3020BCure conditionUV curingCharacteristics1. High strength of adhesion to materials di cult to bond (ole n-based)2. Good surface curability3. Less distortion (TB 3017 Series)Application AF sensor xing Product ThreeBond 1535 Series ThreeBond 3017 SeriesCure conditionMoisture curing / UV curingCharacteristics1. Good impact resistance2. Adhesion to di erent materials3. Shadow-zone curing possible (TB 1535 Series)Application Strobe periphery xing Product ThreeBond 1535 Series ThreeBond 3164DCure conditionMoisture curing / UV curingCharacteristics1. Good impact resistance2. Adhesion to di erent materials3. Shadow-zone curing possible Image sensorApplication Image sensor xing Product ThreeBond 3036 Series ThreeBond 3114 SeriesCure condition UV curing Characteristics1. Low cure shrinkage2. Low linear expansion coe cient3. High adhesive strength Case / Lens mountApplication Waterproof / Dustproof Product ThreeBond 3081 Series ThreeBond 3166Cure condition* CIPG (Cured In Place Gasket)UV curing (CIPG)Characteristics1. Low compression permanent distortion2. Flexibility3. Reworkable Application Heat dissipation Product ThreeBond 1225 Series ThreeBond 2955 SeriesCure conditionMoisture curingCharacteristics1. High thermal conductivity (1.59 to 4.8W/m•K)2. Low outgassing (TB 2955 Series)3. Low molecular weight cyclic siloxane reduced product Image stabilizer unitApplication Vibration absorption Product ThreeBond 3168ECure conditionUV curingCharacteristics1. High and low temperature resistance2. Soft gel3. Vibration absorbability * ThreeBond is abbreviated to TB.In recent years, increasing awareness of global security has been accompanied by spreading adoption of surveillance cameras as a deterrent to crime and terrorism.For many years, our UV-curable resin has contributed to security cameras, mainly to the adhesive application for optical parts.Increasing numbers of pixels in recent years have brought an increasing need for “thermal conductivity” as protection against overheating, and for “Sealants” as waterproo ng and protection from insects.Electronics SectorSurveillance Cameraconferences as telework becomes more prevalent, so production levels areincreasing signi cantly. Furthermore, as earphones become more expensive,consumers expect them to last longer, so adhesives must improve productivitythrough “fast curing” and high reliability with a focus on “impact resistance”.Wireless Earphone As automation advances as a substitute for the ve senses of humanbeings, adoption of these devices is expected to further increase. AtThreeBond, we propose the optimal products for sensors and MEMSdevices that require high reliability.Sensor / MEMS DeviceStations for 5G communication are starting to be set up everywhere, evenoutdoors, so adhesives must be incredibly reliable to ensure operationcontinues despite weather conditions. Our lineup includes case sealants,thermally conductive materials used to protect electronic substrates fromheat and more.Electronics Sector5G Base Station The spread of 5G communications has greatly increased the amountof data ying around the world. As for optical transceivers needed forhigh-speed communications, we have a wide range of products,mainly UV resins and heat-conducting materials for parts requiringprecision xation.Electronics SectorOptical TransceiverViscosity comparison[Cyanoacrylate Adhesives]Viscosity comparison[UV Curing Resins]Viscosity comparison[Epoxy resin] Electronics SectorProduct map by viscosity / hardnessWatch our video to see viscosity imagesElectronics SectorAdhesive selection table by materialApplication Equipmentas the equipment to apply and pressure feed them to maximize their performance.As a manufacturer with full knowledge of sealants and adhesives, ThreeBond enables to reduce cost and improve developing such equipment.To provide further added value for customers, ThreeBond has been making e orts to develop and sell the equipment that incorporates new application and pressure feeding technologies.Tank for 250g/1kg bottle or can (TG1-T)Dispense valve (HPNV-50)Pressure feed controller (coater S4)Small capacity precision type ofManual application cartridge pump (ACB-20)Pump for pails (PBIII)+Constant-velocity discharge head ( xed-quantity booster)Air gun for sealant- Lineup of products for improvement of productivity and workability - The RTM and RTM-H Series enable products that meet customer requirements to be designed and manufactured.- A lineup of devices that can handle small-amount and large-amount sealants and adhesives is available.- They are suitable for the bead application of solvent-volatilization-type and moisture-curable-type liquid gaskets.- Dispensers that can apply a xed quantity of a sealant and an adhesive without waste are available.- A unit that can reduce the amount of a remaining liquid agent in a pail is available as an option. (Some conditions must be met.)* ACB...Automatic Cartridge Booster * PCB...Power Cartridge Booster * RTM...Rotary Transfer Motor* RTA-H...Rotary Transfer Air-motor by HandApplicationTB1100, TB1300 seriesSingle-component xed-quantity booster ( xed-quantity booster) Application Equipment Sector- Lineup of products for improvement of productivity and workability - Applicators suitable to a wide range of adhesives, such as solvent-volatilization type, moisture-curable type, and aqueous pressure-sensitive type, can be selected.- Application of an instantaneous adhesive that is di cult to handle is automated, which enables a work environmentand application quality to be improved.* LVCT-AC...Low Viscosity Cartridge Tank - Automatic Connection * HPNV-50...Pressure Needle Valve - Type 50* DPB-40...Diaphragm Power Booster* TDV...Triple Diaphragm ValveApplicationTB1500 seriesCartridge-type tank (TC2)Dispensing valve (HPNV-50)Controller for pressure (coater S4)Desktop robot (RT7 Series) Application Equipment Sector- Lineup of products for improvement of productivity and workability - Applicators are available for each of the single-component type and the two-component type.- The two-component type can be set, according to a mixing ratio.* CIPG...Cured in Place GasketSingle-acting pump for pails (PBIII-45)This is a high-pressure feeding pump for automatic application. When it isApplication Equipment Sector- UV-curing type, anaerobic-curing type, and moisture-curing type Applicators for each of the above types are available.- Auxiliary equipment needed for the process from application to curing is available.- Equipment suitable for CIPG application (design of a special-purpose machine)Cartridge-type tank (TC2)Dispensing valve (HPNV-50)Controller for pressure (coater S4)Desktop robot (RT7 Series)Application Equipment SectorAK2022035 22 • 11 • SK。
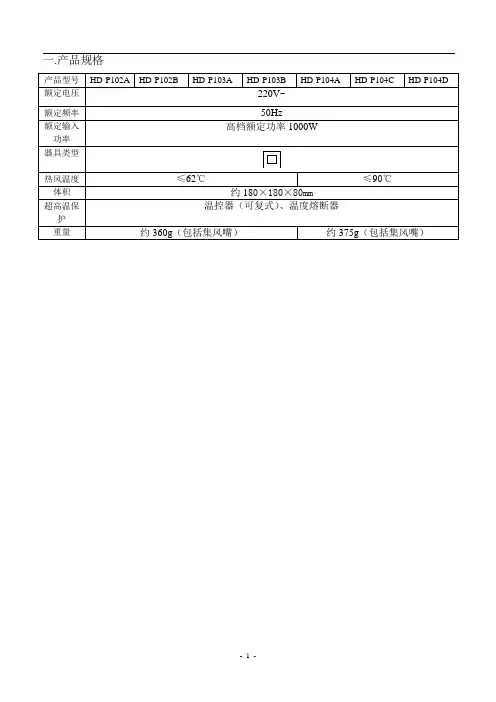
一.产品规格
二.爆炸图
HD-P102\103
HD-P104
三.部品表HD-P102A
HD-P102B
HD-P103A
HD-P103B
HD-P104A
HD-P104C
HD-P104D
四.电路图
HD-P104A
HD-P104C\D
五.维修指导
备注:1)需要常备的配件每个维修站必须要有一定的库存;
2)日常备件按需要情况实际申请,但做好相应计划性,网点配置合理库存,提高我司发件效率及网点日常维修效率;
3)申请备件时严格按照爆炸图规范名称及备件编码填写,以免发错,价格表另附。
六.维修中注意事项及责任承担
1)请各网点严格遵循国家三包规定执行维修操作;
2) 人为造成产品损坏,例:陶瓷面板裂碎、外观塑件明火烧毁、机内进入异物等一律按保外操作维修;
3)工业使用或用于商业产品保修期为6个月;
4)没有按照说明书的各项要求进行使用产生的故障进行有偿维修;
5)维护厂家信誉,不得使用与产品技术要求不符的元器件和零配件,认真记录故障及修理后产品质量状况;6)承担因自身修理失误造成的责任和损失;
7)接受消费者有关产品修理质量的查询。
三洋投影机说明书三洋PLC-XU300C投影机说明书产品简介:主要参数产品类型商务投影机显示技术 DLPTI DLP微反射数字投影技术,0.7" 前投/背投、桌面/技术类型及规格投影方式x 12? DDR DMD 芯片吊顶,正投/背投支持的色彩投影距离(米) 1.4-12.7,1,13 1677万,1677万数目标准显示分辨率(dpi) 标称对比度 2200:1 1024*768投影画面尺40-300英寸,标称光亮度 3200流明,3000流明寸 23.4-350英寸225,OSRAM VIP投影灯泡功屏幕宽高比例 4:3/16:9,4:3 & 16:9 E20.5长寿命冷光率(W)源灯泡,230VGA模拟信号接口(15-pin D-Sub,支持分量视频)1个,DVI-D 数字信号接口(24-pin,支持HDCP协议)1个,复合视频接投影灯泡寿命(小时) 3000(标准模式),4500(节能模式) 输入接口口1个 (RCAjack,含左右声道接口2个),S-Video(Mini-DIN4 pin) 接口 1个,Audio(mini jack)接口1个,Audio、RGB、S-Video 输出接口 VGA信号同步输出接口 (D-sub 安全认证 CCCfemale terminal )1个,Audio接口(mini jack)1个,Audio、RCA、USB、RS-232C、RJ-45电源性能标准模式下290+/-10%; 待节能模式下30,标准模式下33,整机功率机模式下5,噪音(dB)300(正常模29 (W)式)/237(ECO模式) 电源性能 100V-240 V AC 其他特点产品尺寸产品重量 300*244*88mm(L*W*H)mm 3.5kg随机附件用户使用手册、电缆线、保修卡投影机接线1 电源线2 vga电缆3 复合视频电缆4 s-视频电缆(可选附件)5 供ypbpr使用的d-15至rca转接器(选件)为确保投影机与计算机正常工作,请对您的图形卡进行配置,使其分辨率小于或者等于1024×768。
三洋传真机说明书篇一:三洋传真操作说明三洋普通纸传真机传真机简单操作说明书面板说明キャツチ/消去消去键ストツブ停止键スタ一ト传真键コビ一复印键免提键重拔键:按发信着信番号1次,再按免提复印把文稿(发送面向上)放入自动进纸器中,机器会发出“嘟”的提示音并自动把原稿吸入,再按复印键一次,按传真键一次。
发传真把文稿(发送面向上)放入自动进纸器中,机器会发出“嘟”的提示音并自动把原稿吸入,再拿起话筒或按免提键拔号,听到对方的信号声好,再按传真键。
收传真当有传真进来时,按传真键,再挂上听筒即可无纸接收如有传真,液晶频里会显示有多少个传真,再把记录纸放好,按传真键,就可以把内存的传真打印出来。
录音按デツタル留守录大约3秒,对准麦克风即可录音,录好后按停止键,再把留守灯按亮即可。
消去录音再次录音时,便可把上次录音消去。
听取留言如“用件”灯一闪一闪,按用件键一次,便可听取留言。
消去留言在听取留言的同时,按消去键2次即可。
三洋SFX-P3传真机简单操作说明书三洋SFX-P3CL传真机(sfx-p90cl)三洋P10传真机简单操作说明书一.面板说明キャツチ/消去消去键ストツブ停止键スタ一ト传真键コビ一复印键免提键重拔键:按发信着信番号1次,再按免提二.日期、时间设置按机能键一次,旋转电话盘一次,机能键一次,输入正确的年月日,时间,再按机能键一次,按停止键返回。
三.复印把文稿(发送面向上)放入自动进纸器中,机器会发出“嘟”的提示音并自动把原稿吸入,再按复印键一次,按传真键一次。
四.发传真把文稿(发送面向上)放入自动进纸器中,机器会发出“嘟”的提示音并自动把原稿吸入,再拿起话筒或按免提键拔号,听到对方的信号声好,再按传真键。
五.收传真当有传真进来时,按传真键,再挂上听筒即可六.无纸接收如有传真,液晶频里会显示有多少个传真,再把记录纸放好,按传真键,就可以把内存的传真打印出来。
七.手动、自动接收传真设置按机能旋转电话盘3次,机能键一次,旋转电话盘フマクス自动接收传真デフヮ手动接收传真(拿起话筒,按传真键一次,再挂上话筒即可)八.录音按デツタル留守录大约3秒,对准麦克风即可录音,录好后按停止键,再把留守灯按亮即可。
绪言第一章控制系统的功能1.1基本功能1.2特殊功能1.3安全保护功能1.4可选功能第二章控制系统的组成与安装2.1 控制系统的组成2.2 控制系统的安装第三章液晶界面操作及参数说明3.1 概述3.2 键操作说明3.3 液晶显示流程图及参数说明3.4 窗口及操作说明3.5 机房选层操作第四章系统的调试与运行4.1 通电前的检查4.2 通电和检查4.3 系统参数设定4.4 慢车试运行4.5 井道自学习运行4.6 快车试运行4.7 电梯舒适感调试4.8 平层精度的调整4.9 端站安装位置的确定第五章LED显示说明5.1 LED显示定义5.2 LED故障说明附件一异步电机控制柜安川616G5、676GL5-JJ变频器参数附件二异步电机控制柜安川G7A变频器参数设置表附件三异步电机控制柜科比(KEB)变频器参数设置表3.0版附件四异步电机控制柜富士G11UD变频器参数设置表附件五故障代码及说明附录六微机板LED故障显示说明BN5000-2007电梯控制系统是我公司推出的智能化更高、功能更强、调试与维护更方便的高技术产品。
它除了具有一般电梯控制系统的基本功能外,在系统参数设置、电梯功能选择、电梯调试与维护、现场适应能力等各方面有独到之处。
本系统的基本控制方式为串行通讯(CAN总线)与变频调速;可满足电梯楼层64层以下,电梯速度小于4米/秒,包括永磁同步电机在内的各种电梯电机的控制要求。
BN5000-2007型电梯电脑控制器的主板、操纵盘板、呼梯板的核心芯片是国际著名主控制器采用性能稳定的PHICIPS公司的32位高速CPU,系统更可靠的高端产品,集成度、可靠性堪称世界一流;软件设计充分体现了功能齐备,参数设置界面层次分明,调试及故障诊断信息充分,抗干扰能力强及干扰强度评价独具匠心的技术特点。
对电梯控制系统以外的电气元件设计了诊断与检测界面。
使电梯故障判断有的放矢,真正使该电梯控制系统做到了高性能与可靠性的完美统一,高水平与实用性的完美统一,高科技与应用简便的完美统一。
三洋SANYO SFX-50/55CL传真机说明书一,面板说明:メニコ—(功能)セシト(设置)二,传真1,发传真:液晶显示屏正常显示日期时间后,根椐原稿宽度调节好导纸卡板位置,把文稿(发送面向下)放入自动进纸器内,机器公自动把原稿吸入到合适位置并发出“嘟”的完成提示音,液晶显示屏显示内容会改变。
按〖画质选择〗键选择发送分辨率(ヒョゥジコン普通、コマカィ精细、セィサィ超精细),按〖原稿种类〗键选择原稿种类(フシゥ标准、ゥスィ薄、シセシン图片),然后使用无线听筒或按〖免提〗键,听到电话拔号音后拔打对方传真号码。
当有人接听时,叫对方给传真信号:如果对方的传真机是自动接收,就可以直接听到对方传真机给过来的传真信号。
在听到“嘀…”的传真信号音后按〖传真〗键就可以把原稿传送到对方的传真机上了。
SANYO SFX-55CL传真机具有自动分页发送功能。
如果有多张文稿发送出去,免去要每次放入一张文稿的麻烦。
2,收传真:首先根据实际情况选择好传真机接收传真的接收模式。
有手动接收、自动接收、数码录音三种模式。
手动接收:机器左侧第三个开关拔到“电话”位置,面板〖留守〗键灯不亮。
当接听到电话时,如果对方告知要发送传真过来,则首先按下〖传真〗键,放下话筒可以接收传真了。
自动接收:机器左侧第三个开关拔到“フアクス”位置,面板〖留守〗键不亮。
自动接收模式会自动给对方传真信号音接收传真不需要人工操作。
数码录音:机器面板〖留守〗键灯亮。
数码录音模式可以录下来电人的留言信息(请行录制好中文提示语)并接收传真。
三,复印:液晶显示屏正常显示日期时间后,根据原稿宽度调节好导纸卡板位置,把文稿(有字面向下)放入自动进纸器内,机器会自动把原稿吸入到合适位置并发出“嘟”的完成提示音。
按〖画质选择〗键选择复印分辨率(ヒョウジュン普通、コマカィ精细、セィサィ超精细),按〖原稿种类〗键选择原稿种类(フシゥ标准、ゥスィ薄、シセシン图片),按〖复印〗键选择复印放大缩小方式,按〖复印〗键1次为标准方式、按〖复印〗键2次为放大方式、按〖复印〗键3次为缩小方式,然后按〖传真〗键开始复印。
MEMO2LCD 顯示幕圖示A.尋找顯示B.定時顯示C.文件夾編號顯示D.FM 立體聲顯示E.防震顯示F.音量高/低顯示G.曲目/編號/時間顯示產品規格電源 AC~110V-60HZ 輸出功率 主機:5WX2 超低音:30W 主機尺寸 207(W)X80(D)X205.5(H)MM 喇叭尺寸 139(W)X85(D)X203(H)MM 超低音喇叭尺寸 131(W)X242.5(D)X170(H)MM 淨重 6.6kg收音頻率範圍 FM 87.5~108MHZ CD 雷射頭 3-BEAMLASER 頻率響應 100HZ~16000HZ製造年份:西元2006年製進口商:鑫正宇實業有限公司地址:台北縣中和市民樂路71號電話:(02)3234-1804製造商:Nelson Electronics Ltd 生產國別:中國本產品如有更改恕不另行通知防水警告:*本產品不能放置於雨水等液體能夠淋到的地方。
*不能把裝有液體的器皿擺放在本產品上。
通風警告不能阻塞本機箱的通風口。
1531.請使用有以下標誌的CD 光碟。
2.操作光碟片應注意:*不要接觸光碟片表面。
*不要在光碟片表面寫任文字或圖案或貼紙。
*不要使光碟片變形。
3.光碟片存放:*將光碟片收藏在光碟盒中。
*不要將光碟片直接曝曬於陽光下或高溫處,以及潮濕和骯髒的地方。
4.清洗光碟片:*如果光碟片變髒,用一片軟布擦去光碟片上的灰塵,手印及髒物。
*不用苯,稀釋劑,錄音清洗液及反靜電的噴霧劑。
*關好CD 門使灰塵不至於污染CD 讀取頭。
*不要用手或其他工具觸摸CD讀取頭。
144F22F234. 按SKIP9或:鍵,改變曲目編號。
5. 按記憶/編輯/時鐘鍵確定曲目編號。
=播放編輯的曲目在編輯完成後,按播放/暫停鍵可播放你編輯的曲目。
=取消編輯的方法1.在停止狀態,按記憶/編輯/時鐘鍵,然後按停止<鍵。
2.關機。
3.打開CD門。
注意 : 記憶新的編程輯曲目後,之前記憶的曲目將被清除。
熟练使用 有利节约感谢您选用三洋全自动洗衣机。
使用前请仔细阅读本使用说明书。
全自动洗衣机XQB60-S808如果电源线损坏,为避免危险,必须由制造厂或其维修部或类似的专职人员来更换售后服务额定用水量额定洗涤用水量洗涤方式额定脱水容量脱水噪音水 压31kg6.0kg(干布状态)58dB 宽520mm 深530mm 高930mm 120L 50L 新水流62dB 0.03~1.0MPa GB/T4288-2003、GB4706.1-1998、GB4706.24-2000、GB4706.26-2000、GB19606-2004、GB12021.4-2004、GB4343.1-2003、GB17625.1-20031.本机自售出之日起,凭保修凭证及购机发票整机保修。
2.在保修期内,因本机质量引起的故障和损坏,本公司免费修理。
如有下列情况:①用户因搬运、使用保管不当;②自行拆卸产品,更换零部件;③异常电压,火灾等外 部因素;④不按说明书及操作说明违规使用;⑤充当公用机、经营性用机(如宾馆、 洗衣房的用品或备用品)而引起的故障,由用户自行承担责任,本公司负责收费修 理。
3.过滤网的更新,进、排水管的延长,本公司备有配件,费用由用户自理。
4.保修期满后,本公司将继续根据用户的要求进行有偿服务。
5.有关具体维修事宜,请拨打本公司客户服务电话。
6.本产品今后如有结构、性能参数变化,恕不另行通知。
330W耗电量:0.10kWh/cycle洗净比:0.84合肥荣事达三洋电器股份有限公司地址:合肥高新技术产业开发区L-2号服务电话:95105958 (全国统一使用,免加区号,市话费用)投诉电话:0551-*******传真:0551-*******邮编:230088网址:合肥三洋被允许使用日本三洋电机株式会社的注册商标 及 三洋 。
220V~50Hz 6.0kg(干布状态)No.3016411S79140-外形尺寸净 重额定洗涤容量额定电压洗涤噪音额定输入功率能效等级:2级执行标准规格注意事项·保养须知注意事项·保养须知…………………………………………装箱说明………………………………………………………部件名称………………………………………………………安装介绍………………………………………………………功能介绍………………………………………………………一般的使用方法………………………………………………选择“程序”、“过程”的使用方法………………………洗衣要领………………………………………………………多种多样的功能……………………………………………… ·预约洗涤………………………………………………… ·洗涤毛毯………………………………………………… · 洗涤液的二次使用……………………………………… ·变速洗功能……………………………………………… ·二步净功能……………………………………………… ·记忆功能………………………………………………… ·喷淋漂洗………………………………………………… ·水位设置功能…………………………………………… ·儿童锁功能……………………………………………… ·其它功能…………………………………………………故障排除指南…………………………………………………并非故障的情况………………………………………………规格……………………………………………………………售后服务………………………………………………………2334~67~8910~111112121212121313131313131414封底封底目 录注意:1.在洗衣机安装时,请务必拿掉洗衣机底部运输用的台座及支架,否则将无法使用。
2.在安装或初次使用时,排水管内会有少量的水流出,这是在工厂进行性能试验时留下的残水。
3.洗衣机使用完时,请拔下电源插头,关闭水龙头,以防意外的火灾、漏水等事故发生。
装箱说明部件名称屏蔽板的安装1.拿出洗衣机面架保护上的屏蔽板和部件袋中的螺钉。
3.将屏蔽板沿底托卡槽笔直推入,直至其安装到位。
4.用螺钉将屏蔽板与底托固定。
5.将洗衣机轻轻扶起,放稳。
安装介绍洗衣机的放置1.选择干燥、无阳光直射的地方放置洗衣机。
2.将洗衣机安放在坚实、平稳的地面上。
3.洗衣机安放处应有地漏,且流水通畅,同时地漏口应与洗衣机安放面平齐或略低,以防洗衣机漏水造成危害。
4.尽量使洗衣机平稳,如有必要,可通过调节洗衣机的可调脚来将洗衣机调平。
按图示顺序操作。
·支撑面最大允许倾斜度为2°。
注意:·如洗衣机安放在铺有地毯的地板或弹性较大的支撑台上时,可能会造成洗衣机的振动。
·不要让地毯等铺垫物碰及洗衣机内部运动部件。
倾斜的地面不平稳的地面A型: 最为合适。
B型: 水龙头长度须大于16mm,否则无法安装万能接头。
C型: 如图所示部位可能会出现漏水现象。
注意:·不要使用50℃以上的热水。
·如果您使用的水龙头不合适,请更换为宜。
水龙头类型:(水龙头口部要平整)水龙头的选用锁紧螺母调节脚旋紧低松开高安装介绍万能接头的安装1.松开万能接头上的4枚螺钉,将万能接头垂直套到水龙头上,使万能接头的密封垫紧贴在水 龙头的口部。
2.使水龙头位于万能接头中心的位置,用螺丝刀拧紧4枚螺钉。
(如下图所示)3.撕下万能接头上的封条,按图示方向旋紧万能接头。
图示间隙旋紧前约有4mm,旋紧后2mm以下。
注意:·如果水龙头的直径大于接头环垫的内径,请先松开万能接头上的 4 枚螺钉,并将接头环垫从 万能接头内取出。
进水软管的安装1.按下图所示,将进水软管口对准进水阀口,顺时针旋转进水软管上的旋紧螺母,直至旋 不动为止。
2.将进水软管另一端连接到指向下按压进水管的锁紧杆和套管, 同时向上推进水管,直到将万能接头的凸出连接部插入进水管凹进连接轴孔内。
3.松开套管,然后将套管向上推入万能接头,直到听见“咔嗒”声为止。
5.打开水龙头,检查是否漏水。
注意:·进水软管长度不够长时,可以向销售商或本公司购买加长管。
安装介绍1. 关闭水龙头。
2. 接通电源,按下“电源开/关”键,然后按“启动/暂停”键。
(已经使用过的洗衣机)3. 15秒钟后,切断电源。
4. 用手指按压锁紧杆及套管,向下拉,取下进水软管。
如下图所示:根据使用场所的需要,可以将排水管从右边更换到左边。
·更换之前,要拔掉电源线插头。
·为防止手划伤,请戴上手套。
1.拿掉底托左侧连接口处的排水口盖。
2.将洗衣机向后放倒在软垫子上。
3.松开软管卡簧,将排水内管从排水阀处拔下。
4.推压排水口的接头,将排水内管从右侧排水口处拉出 洗衣机。
5.将排水内管从左侧的排水口处插入,并将接头卡紧。
6.将排水内管与排水阀相连接,同时用软管卡簧固定。
7.将左侧的排水口盖安装在右侧相应的位置上。
8.将洗衣机轻轻扶起,放稳。
如您在使用过程中需要延长排水软管,请遵循下表的长度和高度。
排水软管的延长延长高度延长长度中间有台阶中间无台阶15cm 以内1m 以内3m 以内1.将排水软管连接到排水口上,然后用软管卡簧将其固定。
如下图所示:进水软管的取下排水软管的连接排水软管的延长排水软管方向的改变距离约8mm排水软管插入之前软管卡簧的位置排水软管装好之后软管卡簧的位置功能介绍电源开/关一般的使用方法选择“程序”、“过程”的使用方法1.准备①接好并放倒排水软管。
②将进水软管接到水龙头上,并打开水龙头。
·拧开水龙头之前,需确认万能接头的螺钉已拧紧。
如果螺钉松动,可能会造成漏水。
③将电源插头插入电源插座。
④放入洗涤物。
2.按一下“电源开/关”键。
3.按一下“启动/暂停”键。
·传感器自动检测布量。
·自动选择水流、水位、洗涤、脱水的时间,漂洗的方式及次数。
(最低两档水位无法 自动选择,需要时请手动设定。
)4.参照下表将洗涤剂放入洗涤/脱水桶内。
5.盖好洗涤上盖。
·如洗涤上盖没有关闭,洗衣机将会在脱水运行之前自动停止运转并伴有报警声。
·洗涤剂用量过多可能会漂洗不彻底,而过少则洗涤不干净,上表用量仅供参考。
·水位模糊判断时,因洗涤剂物的质地、大小等不同会有一定差异,这是正常现象。
1.准备:放倒排水管,打开水龙头,将电源插头插入电源插座,放入洗涤物。
2.按一下“电源开/关”键。
3.根据所洗衣物的种类,按“程序”键设定您想要的程序。
·各程序的选用参照下表。
4.按“过程”键,选择您想要进行的项目,每按一次灯光按以下顺序循环移动。
5.按“设置”键,您可自由设定浸泡、洗涤、脱水的时间,漂洗的方式和次数。
各程序的选用指导洗涤水流 衣 物 的 种 类 洗涤容量程序标准强洗羊毛毛毯自编标准 强轻柔毛毯标准一般的洗涤物(适用于日常洗涤)脏污严重的衣物(如工作服等)女性内衣、饰有花边和刺绣的衣物毛毯或大物各种衣物(根据自己的喜好)6.0kg以下6.0kg以下1.5kg以下3.0kg以下6.0kg以下·浸泡时间设定显示:·洗涤时间设定显示:·漂洗次数设定显示:·脱水时间设定显示:20→25→30……40→0→5→10→1510→11→12……20→0→1……913→14→20→0→1……11→126→7→8……20→0→1……512→13……20→0→1……10→118→9→0→1……6→75→6→7……9→0……3→4分钟(“羊毛”、“毛毯”程序时无此功能)分钟(“标准”、“自编”程序)分钟(“强洗”程序)分钟(“毛毯”程序)分钟(“羊毛”程序)2→3→0→1分钟(“羊毛”程序)分钟(“标准”、“自编”程序)分钟(“强洗”、“毛毯”程序)“ ”表 示注水)(“强洗”、“羊毛”、“毛毯”程序,数字表示次数,“ ”表 示注水)多种多样的功能预约洗涤洗涤毛毯1.接通电源,放倒排水管。
2.拧开水龙头,按“程序”键直至“毛毯”灯点亮。
3.将粉末洗涤剂用5L的温水(约30℃)充分的溶解后,倒入洗涤/脱水桶内。
4.将毛毯按以下方法卷好后,放入洗涤桶内。
将毛毯沿长度方向对折再在同一方向折成4层将毛毯卷起将有边的一方朝下放入洗涤/脱水桶内5.按“启动/暂停”键。
6.盖好洗涤上盖。
洗涤液的二次使用1.放入第一批衣物和洗涤剂,然后选择单“洗涤”过程。
·第一次洗涤时,不要洗特别脏的衣物。
2.当洗涤过程完成后,取出第一批衣物。
3.放入第二批衣物,选择所需水位以及程序。
·必要时添加洗涤剂。
·轻轻地将衣物按入水中。