3M OCA 文档
- 格式:pdf
- 大小:1.26 MB
- 文档页数:40
3M胶带型号分类1、3M双面光学透明胶带OCA:8142A、8212、8141、8161、8185、8187、9483、8172、8195、81972、3M导电胶带/3M导电纯胶膜9712、9713、9719、9703、9705、9708、9709;异方性导电胶膜:9719,9713、9703、9705、9708、9709、9709SL、7303、5303、7393、7379、7371、7376、7378、8794、5363、7313、7396、5552R等最新型号3MACF导电胶膜、异方性导电胶膜、异方性导电胶带、ACF胶带3、3M热熔胶膜:3M615,3M615S,3M615ST,3M406,3M583,3M688,3M690,3 M690T,3MAF-111,3MAF-434、3M导热胶膜:3M8805;3M8810;3M8815;3M8820;5、3M导热垫片:3M9889FR,3M9894FR,3M9879Fr6、3M导热接口垫片:3M5516,3M5591,3M5591S,3M5592S,3M5595S,3M5589H, 3M5590H7、3M硅胶和亚克力双面胶带:9731,9731B,9731RW一面是硅胶,一面是亚克力胶8、3M遇水指示标签\质保和安全胶带:3M5557,3M5557NP,3M5558,3M55599、3M遮光胶带,3M黑白双面胶带55200H、55201H、6006H、6008H、9582H、9583H、4012-30、4012-50、4012-60、4019-50、4019-60、4019-85、4003C、4003T、4040、4007、4037,用于液晶显示器及背光模组3M遮光胶带,3M黑色双面胶带9004、9622、9632、936BK、9313B、9005、4362S、4363S、4364S10、3MVHB胶带:此系列产品可以广泛用于金属,塑料,玻璃,陶瓷等多种材料的架构粘结,如电子产品塑料部件的固定,夹层玻璃等。

以下表格内容检查项目外包装内包装尺寸回卷偏移量(平整度)回卷偏移量(a)在3mm以下卷曲松紧偏差卷曲松紧量(A-B)在5mm以下方向/数量标签LOT NO 出荷数据外观数量2个/PCS2个/PCS0正弯曲H<2mm —负弯曲不可有—正弯曲H<2mm —负弯曲不可有—原材料—30cm目视检查分切材料—原材料—30cm目视检查分切材料—原材料30cm目视检查分切材料30cm目视检查原材料—30cm目视检查分切材料—30cm目视检查原材料—30cm目视检查分切材料——胶———胶——原材料—分切材料——目视检查数据确认注意事项B/1B/0A/0版本明细内容规格及参考基准检 查 规 格 书文件编号版本/状态B/1外型无破损/影响材料的压印与纳入仕样书一致外型无破损/影响材料的压印与纳入仕样书一致页数1/1材料卷曲方向确认/数量正确与纳入仕样书一致位置/内容是否正确清晰与纳入仕样书一致尺寸测定与纳入仕样书一致a A B材料宽度724mm+2mm/-0mm 材料长度100M+10M/-0M 清晰/加工日期与纳入仕样书一致有无添付出荷检查报告/内容确认与纳入仕样书一致明细内容规格及参考基准检查区域备注面积A≤0.02mm 2面积A≤0.02mm 2材料厚度(剥离材除外)175μm±18um无法判定该欠点是否在PET离型膜上时,其将作不良判定.参考限度样本(点状划伤按异物规格判定)料头2M内无法判定该欠点是否在PET离型膜上时,其将作不良判定.参考限度样本(点状划伤按异物规格判定)全部区域料头2M内30cm目视检查,需明确区分是否由分条引起不可有(不可擦脏污按划伤规格)料头2M内不可有(不可擦脏污按划伤规格)全部区域30cm目视检查,需明确区分是否由分条引起全部区域30cm目视检查,需明确区分是否由分条引起轻剥离PET轻微可(必要时参照限度样品进行判定)不可有、必要的情况作成限度样品进行判定.(参照本次100K的试作状况,作成该不良项目的限度样品并参照其进行检查判定.)全部区域料头2M内不可有重剥离PET不可有将材料裁成70mm×100mm放于桌面,撕75μm轻剥离的离型膜,确认胶是否有带起现象。
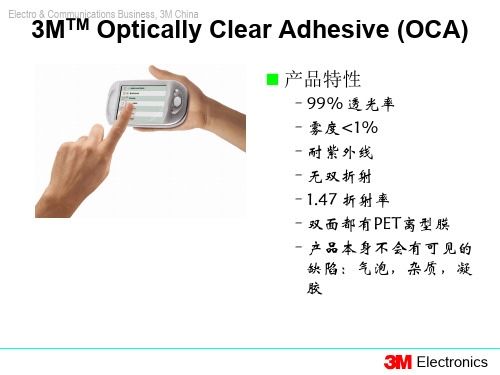

3MOCA测试报告摘要:本报告旨在对3M OCA(Optically Clear Adhesive)进行测试,并分析其在不同环境条件下的性能表现。
测试结果显示,3M OCA具有优异的光学性能、耐黄变性能以及较好的机械强度。
然而,在高湿环境下,3M OCA的粘接性能略有下降。
此外,热膨胀系数的差异可能对长期稳定性产生影响。
因此,在设计和应用过程中应注意3M OCA的环境适应性。
1.引言2.实验方法2.1光学性能测试:通过光透过率仪测量3MOCA的透过率和反射率,评估其光学性能。
2.2耐黄变性能测试:将3MOCA样品暴露在高温高湿环境下,周期性测量其颜色变化,并定量评估耐黄变性能。
2.3粘接性能测试:使用万能试验机测试3MOCA在不同材料(如玻璃、金属)上的粘接强度和剥离强度。
2.4机械强度测试:通过拉伸试验评估3MOCA的抗拉强度和弹性模量。
3.实验结果与分析3.1光学性能实验结果显示,3MOCA具有优异的光透过率和低反射率,适用于高要求的光学器件。
其透过率达到95%以上,在光学传输中影响较小。
3.2耐黄变性能经过长时间高温高湿环境暴露后,3MOCA出现轻微的黄变。
然而,颜色变化幅度较小,且对其功能影响不大。
仍需注意在特殊环境条件下使用。
3.3粘接性能3.4机械强度拉伸试验结果显示3MOCA具有一定的抗拉强度和较高的弹性模量,满足一般应用的要求。
4.讨论与建议4.1环境适应性在高湿环境下,3MOCA的粘接性能稍有下降,可能会影响其在一些应用中的稳定性。
因此,在设计和使用过程中需考虑材料的湿度条件。
4.2热膨胀系数在因热膨胀差异引起的应力情况下,3MOCA的长期稳定性可能会受到影响。
因此,针对特定的应用,应注意使用与其基材热膨胀系数相匹配的3MOCA。
5.结论通过本次测试,3MOCA表现出优异的光学性能、耐黄变性能和良好的机械强度。
然而,在高湿环境下,其粘接性能会略有下降。
此外,热膨胀系数的差异可能对长期稳定性产生影响。


L2 Product Name (variable)Doc Type Product # (opt.)Revision F, June 20193M™ FASARA™ & 3M™ DI-NOC™ Glass FinishesInstallation Guide Product Description3M™ FASARA™ Glass Finishes (the “Products”) are decorative glass and window films available inover 100 designs. These decorative Products can be used in vertical applications in commercialbuildings to control both light and privacy through a building’s interior glass, including the interior ofan outside glass wall (the “Interior Applications”). 3M FASARA Whiteboard Finish WH-111-G has awritable and erasable surface that can be used to convert interior glass surfaces into creative,collaborative environments. 3M™ DI-NOC™ Glass Finishes are decorative films for applicationdirectly behind glass. Additional information on the current Product line can be found in therespective technical data sheets for each Product line and the 3M™ Glass Finishes Product Catalog(the “Catalog”).Application SurfacesBased on available test data, the following application surfaces are recommended:•Interior glass•Interior of an outside glass wall (except 3M DI-NOC Glass Finishes)Mat Crystal 2 (SH2MACRX2) and Milky Crystal (SH2MLCRX) are designated for use on the exteriorof an outside glass wall (the “Exterior Applications”). However, due to the variability of local climatesusers must proceed on a test and approve basis, and user assumes all risk related to the installation.Exterior Applications are not warranted.Plastic application surfaces can be used on user test and approve basis, but are not warranted.NOTE: Some plastic application surfaces can outgas. Outgassing is the release of a gas as certainplastics or coated surfaces dry and cure. This occurs over a period of time, but not indefi-nitely. Product that is applied to a surface that is still outgassing will develop air bubbles inthe Product that may appear some time after the installation.3M assumes no liability for bubbles that appear in the applied Product due to outgassing.Suggested Test for Outgassing of Plastic Application Surfaces1.Apply a 5 in. x 5 in. (135mm x 135mm) piece of the Product to the plastic application surface inquestion.2.If possible, oven bake the sample for 2 hours at 150°F (65°C) or bake for 5 minutes at 350°F(176°C). If oven baking is not an option, allow the sample to sit at room temperature for 24hours.3.Examine the sample. Bubbles under the Product indicate that the plastic application surface isoutgassing. If no bubbles occur, the application surface is not outgassing.4.To estimate how long outgassing may continue, repeat the test daily, using a new sample, untilbubbles no longer appear under the Product.5.If outgassing continues for a long period of time, consult the plastic manufacturer for assistance.The user is solely responsible for evaluating and determining whether these 3M Products aresuitable and appropriate for any particular use or manufacturing process in which they may be used.High Humidity ConditionsDo not install FASARA Glass Finishes in locations in which the film may frequently come into contactwith water or where condensation often occurs.Seams in WH-111-GSeams in FASARA Whiteboard Finish WH-111-G tend to accumulate marker residue. Make seamsas tight as possible.2Installtion Guide - Revision F, June 2019Installation Tools and Supplies•Rubber application squeegee, 4 in., rubber hardness 80, 6mm or greaterthickness, nick free•3M™ Hand Applicator PA-1 (Blue or Gold) with 3M™ 5491 PTFE tape appliedto the edges of the hand applicator• 4 in. Window scraper with stainless steel replacement blades•8 in. Window cleaning squeegee with replacement rubbers•Razor blade knife with stainless steel replacement break-away blades•Ruler with nick-free edges•Scotch™ Masking Tape•Clean, lint-free paper towels•Drop cloths (absorbent) or plastic sheeting•Spray bottle (garden style 1 - 2 gallon, low pressure sprayer works well)•Water•Mild, non-lotion containing liquid detergent; no soaps, waxes, oils, orenzymes•Isopropyl alcohol (70% or industrial strength)Surface and Work Area PreparationUse the following steps to prepare the application surface for Productapplication. An experienced installer’s techniques may vary.Prepare the Application SolutionPrepare a water and liquid detergent solution to use for applying the finish. It should have a concentration of approximately 0.1% to 0.2% detergent. A solution of about 1 teaspoon of mild detergent to 1 gallon of water is sufficient for about 36 square yards of application surface. Pour this solution into your sprayer.•High detergent concentration causes the applicator and finish to slip, resulting in insufficient application pressure.•Low detergent concentration causes the finish to stick or prevents the squeegee from traveling smoothly across the finish, which results in an inconsistent application and leaves excess water behind.Prepare the Installation Area•Protect the areas surrounding the installation from the application solution over spray and drips, using masking tape and/or drop cloths as appropriate.•If possible, turn off or cover the heating or air conditioning units and ventilation ducts in the application area prior to starting the installation.•For the best bonding conditions, the recommended application temperature is 54°F 100°F (12°C 38°C) and the application surface should be at room temperature or higher. In the lower end of this range, additional application pressure on the Product can encourage better adhesive bonding. Attempting to install the Product at temperatures below the recommended range can cause the adhesive to become so firm that it will not develop maximum contact with the application surface.Check the Application Surface for CoatingsMany application surfaces have wax or other invisible coatings on them that interfere with adhesion. Use the following procedure to identify and eliminate such coatings. Be sure your customer understands and agrees with this procedure.•Place drops of water on several areas of the application surface. Water beads indicate that the glass or plastic has a coating that must be removed for good Product adhesion.•Saturate a lint-free paper towel with 70% isopropyl alcohol (IPA) and wipe clean the application surface. Wipe the application surface clean before the IPA evaporates with a lint-free paper towel.•Check again for water beading. If there is no beading, proceed with application surface preparation.Clean the Application Surface1.Place drop cloths and/or plastic sheeting to protect the application area below the application surface.2.Spray the application solution on the application surface.Standard Squeegee (for 3M™ FASARA™)Figure 1. Felt-wrapped and rubber squeegees for 3M™ FASARA installationInstalltion Guide - Revision F, June 201933.Scrape glass to remove dirt and other contaminants on the surface of the glass.NOTE: Do not scrape plastic surfaces as this will cause scratches that may show through the Product.4.Thoroughly rinse the application surface using the sprayer, then squeegee the entire application surface, wiping the squeegee after each stroke.5.Dry the application surface edge and frame thoroughly.6.Apply the Product per the installation procedure immediately after cleaning the application surface. Any dirt or contaminates whichsettle on the application surface after cleaning will inhibit adhesion and may be visible after application.Installation ProcedureNOTE: Bring the Product to room temperature before installation.Measure and Cut the Panels•If panels are installed adjacent to each other, ensure that the panels are from the same lot. Different lots of the Product can have slight color variations that may be noticeable at seams.•If film panels are installed adjacent to each other, the panels should be alternated up and down in order to accommodate slight color variations.Product panels may be cut to size by hand. If cut by hand, any nicks or burrs on the edge of the ruler used to mark and cut the finish could scratch it. Apply masking tape to the side of the ruler that contacts the finish to help prevent damage. Use a very sharp cutting blade to ensure clean, smooth edges.4Installtion Guide - Revision F, June 2019Installation ProcedureRecommended application temperature: 54ºF 100ºF (16ºC 38ºC)These are the general Product application steps. An experienced Product applicator’s techniques may vary.NOTE: Always handle the finish with care. It is relatively thin and can fold upon itself easily.Remove the Liner and Wet the Adhesive1.Generously spray the application surface with the applicationsolution.NOTE: the film. The pattern side contacts the glass application surface.2.the liner is facing you.NOTE: It is recommended to leave at least 1/4 in. of film overlapping theedges of the application surface to be trimmed after squeegeeing the film. This improves the adhesion of the film edges to the appli-cation surface.3.Peel back a few inches of the liner. Be sure you pull the liner away from the Product, not the Product from the liner, to avoid stretching the Product.4.Generously spray the exposed adhesive with the application solution.5.Continue peeling back the liner and spraying the adhesive with the application solution until the liner is completely removed.NOTE: If the Product panel is large, you may need assistance for the next steps.6.Flip the Product and position it on the wetted application surface so the adhesive contacts the application surface.Apply Product1.Recheck the alignment, spray the surface of the Product with application solution to reduce friction.NOTE: For 3M™ DI-NOC™ Glass Finish, check the non-application side of the glass for alignment.2.Apply the Product using a hand applicator.3.Starting at the top in the center of the finish, use firm and consistent pressure, making overlapping strokes from center to edges with the applicator. The goal is to push the water out to the edges so the adhesive makes good contact with the application surface.4.For the rest of the panel, move the applicator down to overlap the previous strokes by about 50%, and stroke from center to edge, center to edge again, until the panel is fully applied.5.Trim the film edges overlapping the application surface if needed.6.Wipe the edges of the Product with a clean, lint-free towel to remove any drips.NOTE: The surfaces of some 3M™ FASARA™ patterns are not smooth. A small amount of application solution remains on the surface ofthe finish after squeegeeing, potentially causing an uneven visual appearance until it dries.NOTE: For FASARA Silky, when using masking tape, use low adhesion masking tape and remove tape as soon as possible after ing Finishes from Different Product CategoriesIf combining finishes, for example to compliment a gradation pattern using a different finish of the same color, check the color between the panels before installation. Although different Product categories may have the same color, the differences in the product construction and lot may be apparent when used side by side.Cleaning and MaintenanceAfter the application is complete, some application solution may remain between the glass and the finish. This causes small water bubbles or clouding that disappears as the water evaporates. This can take up to several days, depending on environmental conditions.•Do NOT touch the finish during this time.•Protect the finish from abuse.NOTE: The Product may be cleaned beginning 30 days after installation.LinerFigure 2. Peel back some liner and spray the adhesive.© 3M 2019. All rights reserved. 3M, FASARA, SCOTCH and DI-NOC are trademarks of 3M. Used under license in Canada. All other trademarks are property of their respective owners.Revision F, June 2019 Please recycle. Commercial Solutions3M Center, Building 220-12E-04St. Paul, MN 551441-888-650-3497/AMD Cleaning Applied ProductRegular cleaning will help maintain the Product's appearance. Use only clean, nickfree tools and wipe gently only in one direction. Do not use ammonia, chlorine, or organicbased cleaning products, polishing or cleaning compound, sponges, brushes or electric polishing equipment:•If there is dust and grit, wipe it off with a soft, damp cloth.•If it is soiled, but not gritty, use water and squeegee.•If there is heavier soil, use a mild liquid detergent and water solution, then clear water, and wipe gently with a cloth wipe.NOTE: Additional caution is recommended when cleaning spliced areas. Always clean in the direction of the splice.NOTE: For 3M™ DI-NOC™ Glass Finishes, the front glass surface can be cleaned by standard glass cleaning methods.RemovalThe Product can be removed with low heat or the use of 3M™ Adhesive Remover Citrus Base and a scraper with a stainless steel blade.Transportation and Storage•40° to 90°F (4° to 32°C)•Away from direct sunlight •Clean dry area •Original containerHealth and Safetyhealth, safety and environmental information. To obtain SDS sheets for 3M products go to /SDS , or by mail or in case of an emergency, call 1-800-364-3577 or 1-651-737-6501.When using any equipment, always follow the manufacturers' instructions for safe operation.A glass surface covered by a film with areas of high opacity or dark-colored ink will absorb more heat than other glass surfaces when exposed to sunlight. Heat absorption can create thermal expansion that could result in glass breakage or cracking. Do not use a film with areas of high opacity or dark-colored ink on glass surfaces with significant exposure to sunlight.Technical InformationTechnical information and data, recommendations, and other statements provided by 3M are based on information, tests, or experience which 3M believes to be reliable, but the accuracy or completeness of such information is not guaranteed. Such technical information and data are intended for persons with knowledge and technical skills sufficient to assess and apply their own informed judgment to theinformation. The typical values shown should not be used for the purpose of specification limits. If you have questions about this Product, contact the Technical Service helpline at 18886503497.WarrantyPlease refer to the applicable product’s technical data sheet for warranty information.。
#3MScienceOfSafetyFall Protection for Tools Awareness Resources.Any tool, Pocket Reference GuideFall Protection for Tools Pocket Reference Guideincluded reference guide.Hard Hat StickersMake safety awareness efforts stick with these Stop the Drop hard hat stickers.Looping Awareness VideosGet immediate access to high definition videos that can be used in training and awareness materials at your work location.http://bit.ly/2C9vsqY150000315000451500045150000315000051500007 15000011500003DescriptionLoad rating 1500003D-ring 0.5" x 2.25"0.9 kg (2 lbs)1500005D-ring 0.5" x 2.25" non-conductive 0.9 kg (2 lbs)3M ™ DBI-SALA ® D-ringshttp://bit.ly/2C9vsqY•D -rings can be attached to virtually any tool under 2.3 kg (5 lbs) or0.9 kg (2 lbs) using our Quick-Wrap Tape (see page 5).•C reates an attachment point in less than a minute.•D ual D-rings allow for 100% tool tie-off during tool transfers.500 800 999 55500 | /FallProtection150016815001741500171Quick-Wrap Tape IIhttp://bit.ly/2C9vsqY •L onger 3 year shelf life.•H eavy duty 2.54 cm (1") wide tape with high-elongation properties resulting in more wraps with the same length of tape.•U sed with our D-rings (see page 4) and Tool Cinch Attachments (see page 6) to create instant tethering points on virtually any tool.•C onforms to shape of tool handles, adheres on contract to most clean tools and can be repositioned during installation.•P roprietary 3M material and adhesive provide good tear resistance.1500012150001415000151500018150001415000151500045150004515000186#3MScienceOfSafety |00 800 999 555003M ™ DBI-SALA ®Tool Cinch Attachmentshttp://bit.ly/2C9vsqY•T ool Cinch Attachments feature a cinch design that allows users to quickly secure equipment up to 15.9 kg (35 lbs) or 36.3 kg (80 lbs.).•S tabilisation wings can be used to keep Tool Cinch Attachments in place using our Quick-Wrap Tape (see page 5).•V isit our website to see real-world examples of our Tool Cinch Attachments in use.Patent pending Patent pendingPatent pending Patent pending700 800 999 55500 | /FallProtection Heat Shrinkhttp://bit.ly/2C9vsqYD-ring Cordhttp://bit.ly/2C9vsqY•E asily cinches to tools weighing up to 2.3 kg (5 lbs).•S imply pass the loop end of a D-ring Cord through a pre-drilled hole or closed handle to create an attachment point.•E xtremely durable and reusable.•P rotect your investment and connection point! Heat Shrink protects our Quick-Wrap Tape (see page 5) from abrasives and harsh work environments.•Heat Shrink links reduce in size by 200% when heat is applied.Patentpending150003015000288#3MScienceOfSafety | 00 800 999 555003M ™ DBI-SALA ® Quick Spinshttp://bit.ly/2C9vsqY• S imply slides onto the handle of a tool in seconds.• S wivel spin top makes them tangle resistant.•R eusable and suitable for non-conductive use.PatentedMicro D-ring Cordhttp://bit.ly/2C9vsqY•D esigned to allow for easy tethering of small devices such as cell phones, cameras and radios.• A dheres to most surfaces creating an attachment point in seconds.• L oad rated for 0.9 kg (2 lbs) when used with 1500060.•U ses 3M very high bond adhesive.150002615000251500024900 800 999 55500 | /FallProtection Quick Ringshttp://bit.ly/2C9vsqYHarness Adapter•Q uick Rings are an economical solution for tethering tools quickly.•A llow many tools up to 0.9 kg (2 lbs) to be made tether-ready.•R ing pliers can be used to simplify quick ring installation.• P rovides an attachment point for tools on harness webbing • F ast and easy installation—anywhere on your harness webbing •A brasion-resistant and durable •C an be used on products with black & gold carabiner 1500161Tool Lanyards 3M™ DBI-SALA® Bungee Tethers15000471500049Competitor non-locking carabiners35.6 cm (14"))1500059Clip2Clip Coil Tether• N on-conductive.•I deal for use from Wristband.Coil TethersAn industry-first innovation.Easy to clean and out of the way-exactly what a tether should be. The lightweight vinyl construction and ultra-compact design of our Coil Tethers makes them an ideal alternative to classic bungee tethers. Since we first introduced them to the marketplace, we’ve continued to refine and improve our line of coil lanyards with feedback from actual workers in the field.1500060Clip2Loop Coil Tether•S ecure cameras, cell phones, radios and other small objects.•W orks well with our Micro D-ring.1500068Trigger2Trigger Coil Tether•I deal for use from Wristband.1500160Hook2Hook Coil Tether with Swivel1500066Hook2QuickRing Coil Tether with Tail•U se with hammers and other long-handled tools.•A vailable as a combo with our Hammer Holster.1500178Hard Hat TetherTool Lanyards10.2 cm AB A4.4 cm (1.75")7.6 cm (3")4.4 cm (1.75")A17.8 cm (7")3M ™ DBI-SALA ® Retractor3M ™ DBI-SALA ® Retractor• H igh-strength Dyneema ® retractor line Secure tools up to 2,5 kg (5 lbs).• L ine stays taut while reaching, retracts when not in use.• H ousing connection point swivels with workers motions.•P revent accidental disconnections or carabiner rollout with dual-action self-locking carabiners on each end.•C ompatible with a number of our Tool Holsters (see page 14), Wristbands (see page 26), and Tool Pouches (see page 20).•I nner 132 cm (52") steel coil allows automatic retraction when not in use.Trigger2Trigger LanyardsTop to bottom:1500058, 1500056, 1500054•T humb-controlled trigger snaps on both sides of these lanyards are easy to operate, even while wearing gloves.•Trigger snaps swivel, making them tangle-resistant.15001561500069Heavy-Duty Hook2Loop Lanyard•F eatures an aluminium double-action twist-lock carabiner to prevent accidental opens.•W orks well with heavy-duty tool cinch (see page 6).Heavy-Duty Hook2Rail Lanyard•F eatures an aluminium double-action twist-lock carabiner to prevent accidental opens.• L arge double-action twist-lock rail carabiner.•W orks well with heavy-duty tool cinch (see page 6).Beacon high-visibility ReflectorsProducts equipped with our high-visibility reflectors are always easy to identifyand locate, even when left in dark spaces. The highly reflective material stitched into the front and back of the holster makes it easily detectable with a flashlight even in low-light conditions.The faster, smarter way to holsterOur Quick-Mag Technology speeds up your workflow and reduces how often your tools need to be holstered. This powerful magnetic tool staging system allows tools to simply stick to the holster, ensuring the tool you need is always at the ready.Bottom drain ventYou’re at your best when your tools are too. The integrated drain vent in our Smart Holsters protects your tools from rusting and your holster from dry rot. Even in rainy weather conditions, the drain vent helps keep the holster dry by allowing water to pass through at all times.3M ™ DBI-SALA ® Smart HolstersYour tools, at the ready.Safer. Easier. It’s not often that your job can be both, but 3M DBI-SALA Smart Holsters are engineered for exactly that. These next generation tool pouches feature intelligent productivity features that are designed to keep your tool right where you want it at all times.15001051500107150010915001021500104Patent pending Patent pending Patent pending Patent pending Patent pendingSingle and Dual Tool Holsters[1] Hook2Loop Bungee Tether sold separately.• S ingle and Dual Tool Holsters are equipped with D-rings that are load rated for 2.3 kg (5 lbs).•S everal variants of these holsters come with Retractors (indicated below) (see page 12). Retractors are load rated for 0.7 kg (1.5 lbs).•S ingle and dual tool holsters feature Beacon High-Visibility Reflectors and the Quick-Mag Magnetic Tool Staging System.•A bottom drain vent allows the holster to perform even in wet conditions.150009915000961500097Back of holster features pouch for SafetyRetractor (see page 12). Rear feed system allows retractor to tie off a scaffold wrench while staying out of the way.•T he tape measure sleeve conforms to the size of nearly every tape measure.• F eatures Beacon ™ High-Visibility Reflectors.Patent pendingDescription1500095Pouch Holster with RetractorPouch Holster with Retractor• H olster for tape measures and other small tools.•I ncludes a retractor (see page 12).Patent pendingScaffold Wrench Holster with Retractor•Q uickly holster scaffold wrenches while working at height.•F eatures Beacon High-Visibility Reflectors.Patent pendingHammer Holster•T he Hammer Holster allows for the safe holstering of virtually any hammer under 2.3 kg (5 lbs).•D -ring on the side of the holster is load rated for 2.3 kg (5 lbs).•T he 1500094 combo comes with a 1500066 Hook2Quick Ring Coil Tether (see page 11) that is specially designed for use with the Hammer Patent pendingPatent pending15000601500088Can be worn from a belt or harness.3M™ DBI-SALA®Battery Holster/Sleeve• U nique sleeve design conforms to the size of virtually any drill battery.• S leeve is cinched to the drill, allowing the drill to be tethered off while being used at height.Comfort Tool Belt• E xtra padding provides superior comfort compared to many other tool belts.15001191500122150012015001211500123Patented3M ™ DBI-SALA ®Small Parts Pouches•I nnovative self-closure system traps objects inside, making it nearly impossible for objects to fall out once placed in the bag.• E asy to retrieve objects since no opening or closing is necessary.•C ompatible with most tool belts.Tool PouchesThe Small Parts Pouch is designed for small parts such as nuts, bolts, screws and nails.Even when the pouch is flippedvertically, the pouch traps objects inside, making it nearly impossible Belt loops located on back of pouch.Utility Pouch• F eatures two outside pockets for storing spud wrenches and two innerpockets for storing additional tools.• T ools can be tethered to D-rings on the inside and outside of the pouch.• A djustable side-release closure system helps prevent objects fromfalling out when the pouch isn’t being used.Hands-free workstationfrom belt or shoulder.ultiple inner pockets accommodate a number of tools while an integrated D-ring makeshe standard pouch uses a hook and loop closure system that can be locked open during use.he extra-deep Tool Pouch features a magnetic closure system as well as a side-release buckle.1500134150014022#3MScienceOfSafety | 00 800 999 555003M ™ DBI-SALA ® Safe BucketsWith an integrated closure system that helps prevent dropped objects, our Safe Buckets are designed to be the perfect companion for workers at height carrying heavy loads.Closure systemsEvery Safe Bucket features either a unique, patent-pending drawstring or a locking hook and loop closure system that acts as an extra layer of spill-protection during transport and lifting. Colourful indicator tabs provide quick visual cues to indicate whether the bucket is in lockdown mode or easy-access mode.Built-in connection pointsThe Safe Bucket was engineered for use with tools at height, and includes multiple connection points for tethering.High-quality canvas and vinylSafe Buckets are available in both heavy-duty canvas and vinyl variants that are load rated for 45.4 kg (100 lbs) and 113.4 kg (250 lbs) respectively.2300 800 999 55500 | /FallProtection Standard Safe Bucket modelshttp://bit.ly/2C9vsqYPuncture resistanceWhere you work, durability is non-negotiable.That’s why every Safe Bucket features hard composite plating at the bottom to protect it from accidental punctures. A leather sleeve also covers the inserts, protecting them from the elements and harsh work environments.Integrated carabiner and hoisting strapInstead of rope, which is susceptible to fraying,a heavy-duty hoisting/shoulder strap is built into everySafe Bucket. Each bucket is also equipped with a high-quality and lightweight aluminium twist-lock carabiner load rated for 30 kN (6,700 lbs). There is no need to worry about a knot failing, or a non-locking carabiner which may slip off ata connection point.24#3MScienceOfSafety | 00 800 999 555003M ™ DBI-SALA ®Hard-Body Safe Bucket Insert• C onverts a standard soft-body Safe Bucket into a hard-body Safe Bucket.•O ur reusable hard-body Safe Bucket insert keeps your Safe Bucket standing upright, making it easier to stage tools and stay productive.•I ntegrated inner pockets allow tools to be holstered and organised quickly.5 Gallon Safe Bucket• U sed to transport standard 5 gallon buckets.•5 gallon plastic buckets clip into the Safe Bucket with a unique hook system.•W hen not being used, the Safe Bucket can be flattened for easy storage.•U nique patent pending locking hook and loop closure system helps ensure that there are no accidental spills during lifting and transportation.Plastic bucket not included.Description1500141Hard-Body Safe Bucket InsertLoad rating150013545.4 kg (100 lbs)00 800 999 55500 | /FallProtection15000831500068150003626#3MScienceOfSafety | 00 800 999 55500Pullaway Wristband Slim Pullaway WristbandPullaway wristbands are designed for those who work around rotating or moving equipment. They feature an elastic strap to conform to the wearer’s wrist size automatically and come in standard and slim variants.3M ™ DBI-SALA ® Pullaway WristbandsAdjustable WristbandsAdjustable WristbandOur adjustable wristband uses a hook and loop system to adjust to any wrist size. An elastic band helps ensure a comfortable fit.Adjustable Wristband with Cord Adjusts to any wrist size using a hook and loop system. A built-in cord is used to quickly attach and stage tools directly to the wristband.Adjustable Wristband with Retractor Adjusts to any wrist size. A built-in retractor with an attached trigger can be used to quickly work with many hand tools.WristbandsThe sky’s the limit.3M is a trademark of 3M Company. DBI-SALA is a trademark of D B Industries, LLC.3M Fall Protection Business Capital Safety Group (NE) Ltd5a Merse Road, North Moons Moat Redditch, B98 9HL, UKCapital Safety Group (EMEA)Le Broc Center, Bâtiment A, Z.1. 1re Avenue – BP15 06511 Carros Le Broc, Cedex, FRANCE*************************************************************.com/FallProtection #3MScienceOfSafetyRegistered address: 3M Centre, Cain Road, Bracknell, Berkshire, RG12 8HT. Registered in England and Wales No. 1918922.Please recycle.©3M 2018. All rights reserved.Ref: 9701415 Rev E。
#204PurposeThe purpose of this technical data bulletin is to provide information about the suitability of 3M ™ Protective Coverall products for use in environments where low-linting properties are an important consideration.IntroductionWhen materials shed particles it is known as “linting.” A garment witha high linting propensity sheds more particles than one with low linting propensity. Linting can be an important factor to consider during garment selection, particularly for particle controlled environments. Environments that are typically concerned with linting levels include cleanrooms; microelectronics manufacturing; pharmaceutical applications; and industries such as food, beverage and biotechnology. In some industries, garments may be used for personal protection but can also be used to protect the cleanroom environment from particlesgenerated by the operators. Those involved in product selection should be aware that current American National Standards Institute (ANSI), European Conformity (CE) or International Standards Organization (ISO) standards for protective clothing performance requirements do not call up any test methods to test this aspect of the protection. For example, an ANSI 103-2010 American National Standard for Classification and Performance Requirements for Chemical Protective Clothing Category 5 coverall must pass the whole suit total inward leakage test but there is no testing done to see how the suit performs as a barrier against outward leakage.In addition, the linting test described in this technical data bulletin is not an in-use test so it only looks at the particles shed from the garment itself. Product suitability should always be based on a risk assessment by a competent person. Linting test data may be useful during this process for certain applications.3M ™ Protective Coverall Linting DataRevision 1: Initial IssueDefinitionsFor the purpose of this technical data bulletin the following definitions taken from ISO 14644-1 Cleanroom and associated controlled environments – Part 1: Classification of air cleanliness 1 will be used.Cleanroom – room in which the concentration of airborne particles is controlled, and which is constructed and used in a manner to minimizethe introduction, generation, and retention of particles inside theroom, and in which the other relevant parameters, e.g. temperatures, humidity, and pressure, are controlled as necessary.Particle – solid or liquid object which, for purposes of classification or air cleanliness, falls within a cumulative distribution that is based upona threshold (lower limit) size in the range from 0.1 micron to 5 micron.Particle size – diameter of a sphere that produces a response, by a given particle-sizing instrument, which is equivalent to the responseproduced by the particle being measured.Classification of CleanroomsMany operations that are sensitive to airborne particles are conducted in controlled environments such as cleanrooms, which have various levels of cleanliness. These cleanrooms are typically classified according to ISO 14644-1. This ISO standard classifies cleanrooms in terms of airborne particle concentrations of particles in the size range of 0.1 to 5 micrometers (µm). Table 11 shows the ISO cleanroom classifications and maximum airborne particle concentration limits. An ISO Class 1 cleanroom is the cleanest environment while a Class 9 cleanroom is the least clean of the ISO cleanroom classes. 3M has consulted with experts from Holdstock Technical Services who have experience in testing and evaluating materials intended for use in cleanrooms and other particle controlled environments. In their report, Holdstock Technical Services notes that: “…standards that specify the construction and design of cleanrooms only refer to apparel in qualitative terms…”2 ISO cleanroom standards (ISO 14644-11) define 9 classes of cleanroom. However, there is no formal documentation relating the ISO cleanroom classes to the apparel cleanliness classification.The Holdstock report goes on to explain that “...in principle it is possible to wear any garment in a cleanroom, the requirement being that the design of the cleanroom shall be such that any particles generated by the garment shall be removed or diverted away from sensitive areas within the cleanroom…nevertheless it is good practice to use ‘low-linting’ garments in order to reduce the burden on particle filtration or removal systems.”2On that basis, it is not possible to define a garment as sufficiently “low-linting” to be suitable for a particular application or recommend its suitability for a particular class of cleanroom. However, Holdstock Technical Services aims to provide an expert opinion as to whether the garments in question “can reasonably be described as ‘low-linting’”2 and give “some indication of possible acceptance for different applications” based on the test data provided by 3M. In some cases, only Institute of Environmental Sciences and Technology (IEST) Category I garments may be acceptable in cleanrooms. The Holdstock report suggests that “it is reasonable to say that Category II or III garments are unlikely to be accepted for ISO Class 1, 2 and 3 cleanrooms, but they may be acceptable in cleanrooms of ISO Class 4 to 9”2. Further definitions of IEST cleanliness categories follow.Test MethodsTo assess linting propensity, garment manufacturers typically use the “Helmke Drum Test.” This method aims to quantify the number of particles “dislodged from a garment through the application of mechanical energy under dry conditions as a means of simulating particle shedding from the surface of the garment.”3The procedure involves “placing the test material into a stainless steel drum”3 which is rotated at a rate of 10 rpm, connected to a sampling tube which is connected to an automatic laser particle counter. Particle counts are recorded at one minute intervals for a period of 10 minutes. The number of counts per minute for each particle channel (0.3, 0.5, 1.0 and 5.0 µm) is reported (after the subtraction of the background counts), and these results are used to determine average particle emission rates the test procedures described in IEST Recommended Practice RP-CC003.3: Garment System Considerations for Cleanrooms and Other Controlled Environments (Appendix B2.3)4.with no more than three significant figures be used in determining the classification level.Table 1 — Selected airborne particulate cleanliness classes forTable 23Summary References:1. E N ISO 14644-1:1999: Cleanrooms and associated controlledenvironments. Classification of air cleanliness.2. P . Holdstock, “Report R0065: Interpretation and statementof opinion on a test report,” Holdstock Technical Services, (04/08/2010).3. P rocedure Number: STP0008 REV 03, Nelson Laboratories.4. I EST-RP-CC003.3, Institute of Environmental Sciences andTechnology Recommended Practice.As with all laboratory tests, the data obtained may not be representative of real usage situations, and do not account for wearer and workplace factors. As such, it should only be used as an indicative guide. It should also be noted that IEST-RP-CC003.3 guidelines have been the subject of disagreement among some committees.Cleanliness Classification of GarmentsIEST-RP-CC003.3 defines a cleanliness classification system which is summarized in Table 2 below. The classification system is based on the Helmke Drum Test. The table lists acceptable particle emission rates (particles/min) for each category based on a medium size coverall (average area for both sides of 5.99 m 2). Category I garments have the lowest particle shed requirements and are the “cleanest.” 3M Product DataThe 3M ™ Protective Coveralls 4510, 4540+ and 4565 have been tested according to the Helmke Drum Test. A summary of the data is provided in Table 3. Please note that these test results relate to the tested sample set only. While test data may be used as an indicator of relative product performance, they may not be representative across a wider sample range or of real usage situations. The data do not form part of a formal ANSI or CE approved product claim. 3M ™ Protective Coveralls not discussed have not been tested and should not be considered for cleanroom applications.3M ™ Protective Coverall 4565Results for the five 3M ™ Protective Coveralls 4565 fell well within IEST Category II, with two of the samples achieving Category I. Based on these results, 3M protective coveralls 4565 are likely to be acceptable for use in ISO Class 4 – 9 cleanrooms, and may just be considered for ISO Class 1 – 3 cleanrooms depending on requirements. The Holdstock Technical Services report supports this conclusion.3M ™ Protective Coverall 4510 & 3M ™ Protective Coverall 4545Results for both of these protective coveralls fell within IEST Category II. So both products are likely to be considered acceptable for use in ISO Class 4 – 9 cleanrooms. The Holdstock Technical Services reports support this conclusion and confirm that it is reasonable to describe the 3M ™ Protective Coverall 4510 and 3M ™ Protective Coverall 4545 as low-linting, but not necessarily for all applications.3M ™ Protective Coverall 4540+In the ≥0.3 µm size range, all the results for the 3M ™ Protective Coverall 4540+ fall into Category II. For particles ≥0.5 µm, the results are mostly Category III. Average particle count results are generally higher for 3M protective coverall 4540+ than the fully laminated products, but this is to be expected because the material from which the breathable panel is constructed typically has a higher linting propensity than a laminated material. The Holdstock Technical Services report concludes that the 3M protective coverall 4540+ may still reasonably be described as low-linting in the context of some applications, and may be suitable for use in ISO Class 4 – 9 cleanrooms. This product should not be considered for use in cleanrooms ISO Class 1 – 3.Occupational Health and Environmental Safety Division 3M CenterBuilding 235-2NW-70St. Paul, MN 55144-10003M Canada Company OH&ESD P.O. Box 5757London, Ontario N6A 4T1 CanadaIn the U.S., Contact:Customer Service: 1-800-328-1667 Technical Assistance: 1-800-243-4630 Internet/OccSafetyFor other 3M Products1-800-3M Helps In Canada, Contact:3M Canada Company, OH&ESDPO Box 5757London, Ontario N6A4T1Customer Service: 1-800-265-1840Technical Assistance(Canada only): 1-800-267-4414Internet:/CA/OccSafetyIn Mexico, Contact:Technical Assistance: 1-800-712-06465270-2255, 5270-2119 (Mexico City only)In Brazil, Contact:Technical Assistance: 0800-132333For more information please contact:3M Occupational Health and Environmental Safety Division (OH&ESD)。
Empower portals of freedom.3M Display Materials & Systems DivisionDisplay Solutions for Notebook ComputersImprove visual quality.Wide viewing angle and increased brightness Improved sunlight readabilityEnables use of higher resolution and higher color gamut systemsMore robust.Constructed to withstand various environments and use modes Reduce thicknessand weight.Thinner brightness enhancement films Smaller battery than a similarly performing unit without 3M filmsMaximize power efficiency. Adds ‘virtual battery’ by reducing power consumptionLonger batter life for optimal user experienceCreate amazing displays.Make your notebook’s performanceas impressive as its design.Enhanced Visual Quality0.00Weight Reduction Thickness ReductionThicknessReductionPower E ciencyPower Efficiency Environmentally StableEnvironmentallyStable3M Display Enhancement FilmsTop 3M BEF3M BEF2-DT-155155 µm, durable high gain 3M BEF4-DT-145145 µm, durable high gain 3M BEF4-DT-9090 µm, durable high gain 3M BEF4-DMH-LS-9595 um, durable high gain, matte3M BEF4-DME-105 (21) v4102 um, durable high gain, matteBottom 3M BEF3M BEF2-DT-155155 µm, durable high gain 3M BEF4-DT-145145 µm, durable high gain 3M BEF4-DT-9090 µm, durable high gaintechnology 3M APF-V416.5 µm, on-glass 3M APF-V326 µm, on-glass 3M APF-T3535 µm, on-glass 3M DBEF5125 µm, backlight 3M DBEF6160 µm, backlightAnatomy of aBack Reflector3M SESR-8082 µm, diffuse 3M ESR-80v2 82 µm, specular 3M ESR-100100 um, specular 3M EDR-95v295 um, diffuse 3M LBR-160W160 um, specularImproved brightness and power efficiency.Backlight Solution +43% Brighter-30% Backlight Power On-Glass Solution+53% Brighter-35% Backlight PowerConventional3M BEF2-DT-1553M BEF2-DT-155Bottom Di user Top Di userWhite Re ectorLight Guide Plate3M BEF2-DT-1553M BEF2-DT-1553M DBEF63M ESR-100Light Guide PlateBottom Di userTop Di user3M BEF2-DT-1553M BEF2-DT-1553M APF-QWP-HCSLight Guide PlateBottom Di user3M™ Advanced Polarizer Film-Quarter Wave Plate (APF-QWP)3M™ Dual Brightness Enhancement Film (DBEF)3M™ Brightness Enhancement Film (BEF)3M™ Enhanced Diffuser Reflector (EDR)3M™ Enhanced Specular Reflector (ESR)3M™ Structured Enhanced Specular Reflector (SESR)Reduce thickness.TypicalThin & Bright288 um thickness reductionEquivalent brightness3M BEF2-DT-1553M BEF2-DT-1553M DBEF63M ESR-100Light Guide PlateBottom Di user3M BEF4-DMH-LS-953M BEF4-DT-903M APF-V43M SESR-80Light Guide PlateBottom Di user3M is a trademark of 3M company. © 3M 2018. All rights reserved. Please recycle. Printed in U.S.A. dz238343M Display Materials & Systems Division 3M Center, Building 235-1E-54 St. Paul, MN 55144-1000 U.S.A.1-800-3M HELPS /displayfilmsReflective Polarizer Films(increase in-module brightness 35% to 40% & widen viewing angles)Product Description StructureThickness (µm)Features3M APF-QWP-HCSOn-glass reflective polarizer 29 ± 3.5• Reflective polarizer for lamination to the rear absorbing polarizer with brightness boosting quarter wave plate and hardcoat 3M APF-V4 HCOn-glass reflective polarizer 19 +3/-2• Thinner reflective polarizer for lamination to the rear absorbing polarizer with hardcoat 3M APF-V4On-glass reflective polarizer 16.5 ± 2• Thinner reflective polarizer for lamination to the rear absorbing polarizer 3M APF-V3On-glass reflective polarizer 26 ± 3• Reflective polarizer for lamination to the rear absorbing polarizer with imprint resistant surface 3M APF-T35On-glass reflective polarizer35 ± 3• Reflective polarizer for lamination to the rear absorbing polarizer 3M DBEF6Backlight matte coated reflective polarizerwith anti-static property160 ± 15• Thinner high performance RP available through backlight channel • Matte coating provides defect hiding performance for low haze systems• Anti-static properties for improved handling and debris control 3M DBEF5Backlight matte coated reflective polarizerwith anti-static property125 ± 12• Thinner high performance RP available through backlight channel • Matte coating provides defect hiding performance for low haze systems• Anti-static properties for improved handling and debris controlBrightness Enhancement Films(on-axis light management)Product DescriptionStructureThickness (µm)Pitches (µm)Features3M BEF2-DT-155Durable, high brightness transparent prismfilm155 ± 1050• Durable high refractive index prisms with improved impact resistance• Provides similar brightness performance to BEF2-G2-MR23M BEF4-DT-145Durable, high brightness transparent prismfilm145 ± 1024• Durable high refractive index prisms with improve impact resistance. 24 micron pitch features on 5 mil substrate provides similar moire reduction as 3M™ BEF4-GT3M BEF4-DT-90Durable, high brightness transparent prismfilm90 ± 724• Durable high refractive index prisms with improved impact resistance. 3 mil substrate designed to enable thin backlights for use in small size notebooks and 2-in-1s.3M BEF4-DMH-LS-95Durable, high brightness matte prism film 95 ±- 724• Durable high refractive index prisms in combination with a higher haze designed matte for superior defect hiding.• Designed to enable removal of a top diffuser for thinner design.3M BEF4-DME-105 (21) v4Durable matte prism film, reduces sparkle,graininess and mura102 ±- 821• Durable high refractive index prisms designed with matte for mura/moire reductionReflector Films(increase in-module brightness 5% to 15%)Product DescriptionStructure Thickness (µm)Features3M SESR-80Structured Enhanced Specular mid-sizedMOF reflector82 ± 7• Improves the light recycling efficiency of a backlight across the visible spectrum• More robust surface structure when used with Polycarbonate light guide3M ESR-80v2Specular mid-sized MOF reflector 82 ± 7• Improves the light recycling efficiency of a backlight across the visible spectrum• Surface designed for reduced wet out3M ESR-100Specular mid-sized MOF reflector 100 ± 43M EDR-95v2Diffuse mid-sized MOF reflector95 ± 8• Improves the light recycling efficiency of a backlight across the visible spectrum• Diffuse coating for reduced wet-out and warp hiding3M LBR-160WMOF specular reflector laminated to whitePET3M LBR160 ± 16• Improves the light recycling efficiency of a backlight across the visible spectrum• Laminated structure provides extra stability in no tray or partial tray systems。
3Dual Lock ™Reclosable Fasteners with Acrylic Foam Tape Summary Most substrates are best prepared by cleaning with a 50:50 mixture of isopropyl alcohol (IPA)and water *prior to applying 3M™Dual Lock™Reclosable Fasteners.Exceptions to this general procedure that may require additional surface preparation include:•Heavy Oils: A degreaser or solvent-based cleaner may be required to remove heavy oil or grease from a surface and should be followed by cleaning with IPA/water.•Abrasion: Abrading a surface, followed by cleaning with IPA/water, can remove heavy dirt or oxidation and can increase surface area to improve adhesion.•Adhesion Promoters: Priming a surface can significantly improve initial and ultimate adhesion to many materials such as plastics and paints.•Porous Surfaces: Most porous and fibered materials such as wood, particleboard, concrete,etc. need to be sealed to provide a unified surface.•Unique Materials: Special surface preparation may be needed for glass and glass-like materials, copper and copper containing metals and plastics or rubber that contain components that migrate (e.g. plasticizers).*Note: These cleaner solutions contain greater than 250 g/l of volatile organic compounds (VOC). Please consult your local Air Quality Regulations to be sure the cleaner is compliant. When using solvents, extinguish all ignition sources,including pilot lights, and follow the manufacturer’s precautions and directions for use. Be sure to follow all government regulations and the manufacturer’s precautions and directions for use when using solvents or other cleaning methods.GeneralProcedure •The Dual Lock reclosable fasteners and substrates should have equilibrated for a minimum of one hour at temperatures of 68°to 80°F (20°to 27°C) before application.•To obtain optimum adhesion, thebonding surfaces must be well unified(see porous surfaces above), clean anddry. Typical surface cleaning solventsare IPA/water mixture (rubbing alcohol)or heptane.*(Steps A and B.)•Application Procedure: Bond strengthis dependent upon the amount ofadhesive-to-surface contact developed.Firm application pressure develops betteradhesive contact and helps improve bondstrength. (Steps C and D.)Application Guide3M™Dual Lock™Reclosable Fasteners with Acrylic Foam TapeGeneral Procedure (continued)•3M™Dual Lock™Reclosable Fastener Application Procedure:°For small pieces: The liner is removed from the Dual Lock reclosable fastener adhesive. Without touching the adhesive, the Dual Lock reclosable fastener is applied to the surface using light finger pressure. The Dual Lock reclosablefastener must then be rolled down with a rubber-covered hand roller, beingcareful not to crush the Dual Lock reclosable fastener stems. It is suggested to roll down the Dual Lock reclosable fastener at least once in each direction witha 4.5 lb. to 10 lb. roller to insure 100% adhesive contact, especially around theperimeter of the part.°For long strips: The liner is removed from the Dual Lock reclosable fastener adhesive. Without touching the adhesive, the Dual Lock reclosable fastener is aligned on the substrate surface. One end of the Dual Lock reclosable fastener strip is pressed down (tabbed) to the substrate while holding the other end of the strip under light tension. The Dual Lock reclosable fastener strip is thenslowly rolled down the entire length of the strip from the tabbed end with arubber covered hand roller, taking care not to trap air bubbles under theadhesive and not to crush the Dual Lock reclosable fastener stems. It issuggested to roll down the reclosable fastener at least once in each direction with a 4.5 lb. to 10 lb. roller to insure 100% adhesive contact, especially around the perimeter of the part.•Evaluate Application Procedure: A Clear Test Panel (Glass, Acrylic, or Polycarbonate) can be used to evaluate and improve application procedure. Using the above procedure, apply the Dual Lock reclosable fastener to a Clear Test Panel. After Dual Lock reclosable fastener has been applied, examine the back side of the panel for adhesive wet out (contact area). It is important to adjust application procedure and roll down to insure almost 100% contact, especially around the perimeter of the parts.•The pressure-sensitive adhesive bonds to the substrate on contact and parts can be handled immediately. Adhesive bond strength increases with time, pressure and temperature. A minimum of twenty four hours dwell time is recommended before applying a load or disengaging assembled parts.°After application, the bondstrength will increase as theadhesive flows onto thesurface. At room temperature,approximately 50% of theultimate strength will beachieved after 20 minutes,90% after 24 hours and 100%after 72 hours. In some cases,bond strength can beincreased and ultimate bondstrength can be achieved more quickly by exposure of the bond to elevatedtemperatures (e.g. 150°F [66°C] for 1 hour).Application Guide3M™Dual Lock™Reclosable Fasteners with Acrylic Foam TapeHeavy Oils On surfaces with a light oily film, or other light contamination, the 50:50 IPA/water solution is usually adequate. Where heavy oils or grease are present, a “degreasing” solvent such as 3M™Prep Solvent 70,3M™Citrus Base Cleaner, mineral spirits, naphtha or similar solvents are suggested to cut the oil. Thisshould always be followed with an IPA/water cleaning to help ensure that any residue or film is removed.*Abrasion Abrading a surface can serve several functions:•Remove heavy levels of dirt or oxide from metals or paints (e.g. galvanized steel).•Create additional surface area that can increase adhesion.•Smooth a surface to obtain more flatness, allowing improved contact area.Abrasion often helps adhesion to paints and plastics. When abrading, it is important for tapes to have afinely abraded surface. Very small scratches in the surface, generated with circular motion rather thanstraight-line motion, are most desirable. A surface with many micro-scratches in it can have up to 40%additional available surface area, translating to higher ultimate strength and greater initial adhesion.Scotch-Brite®Hand Pads (such as 7447 Maroon or Heavy Duty Green) are good for achieving the rightlevel of abrasion. Tools such as a power palm sander will assist on large jobs. Avoid grinding a surfacewith coarse abrasive materials, since they may create too rough of a texture for the adhesive toadequately flow into the surface. Always clean the surface with the IPA/water solution or additionalmethods previously described, and be certain that all loose particles are removed prior to bonding.Adhesion Promoters Priming a surface can significantly improve initial and ultimate adhesion to many materials such as plastics and paints because of their low surface energy or the additives they may contain. A primer creates a new surface for 3M™Dual Lock™Reclosable Fasteners to adhere to and can also create a layer that may impede the migration of additives that may be present in a material. If needed for LSE and difficult to bond to substrates, lightly abrading a surface with Scotch-Brite®Hand Pad prior to applying the adhesion promoter can sometimes improve its bond performance to the substrate. It is important for the user to determine the suitability of the Dual Lock reclosable fastener, the adhesion promoter and the application process. Consult Technical Data Sheet on individual promoters for suggested application procedure.Porous Surfaces Rough, porous or fibered materials such as wood, particleboard, cement, etc., have an open surface and require sealing to provide a unified surface for tape bonding. Common sealing materials would include paint, varnish or other hard surface coatings. Fast drying 3M™Rubber & Vinyl 80 Spray Adhesive can also be used to unify the surface and improve the tape bond.Unique Surfaces Glass, stone, ceramic or other siliceous materials are hydrophilic (water-loving) by nature. Normally, the hydrophilic nature makes pressure sensitive adhesive bond durability susceptible to change under high humidity or exposure to moisture. In basic terms, water vapor can undercut the tape bond and interfere with the normal adhesion forces. Silane coupling agents, added to the IPA/water cleaning solution, can help reduce the “water-loving” tendency of these surfaces and enhance the tape bond in high moisture environments.Copper, brass, and bronze are prone to oxidation even after the Dual Lock reclosable fastener is applied. To prevent a weakening of the bond, a lacquer or varnish should be applied to these surfaces. Be sure to test the tape bond to the sealer on a metal surface to verify good adhesion.Flexible PVC (vinyl) contains plasticizers that can migrate into the tape and affect adhesion. The Dual Lock reclosable fasteners with Multi-Purpose 1 or 2 Acrylic Adhesives are formulated to be resistant to plasticizer migration, or 3M™Adhesive Promoter 2262AT can serve as a barrier to migration. Rubber materials (e.g. EPDM, neoprene) can have low surface energy and may also contain plasticizers and oils. These require the use of an adhesion promoter for stable bond strength. Test for compatibility with flexible PVC and rubber materials by aging bonded samples for a week at 150°F (66°C) and check for softening of the adhesive, discoloration or reduction in bond strength.*Note: These cleaner solutions contain greater than 250 g/l of volatile organic compounds (VOC). Please consult your local Air Quality Regulations to be sure the cleaner is compliant. When using solvents, extinguish all ignition sources, including pilot lights, and follow the manufacturer’s precautions and directions for use. Be sure to follow all government regulations and the manufacturer’s precautions and directions for use when using solvents or other cleaning methods.Application Guide3M™Dual Lock™Reclosable Fasteners with Acrylic Foam TapeSuggested Primers The table below offers suggested primers and alternative methods that commonly require primers, adhesion promoters or other surface treatments for successful use with 3M™DualLock™Reclosable Fasteners. This list is not intended to be fully comprehensive, but maybe useful for many applications.It is very important for the user to determine the suitabilityof the Dual Lock reclosable fasteners, primer and application process and compliance withlocal Air Quality Regulations.P - Primary ChoiceX - Other Possibilities3M™Adhesion Promoter 2262AT is not a preferred OEM recommendation for exterior applications.Solvent-based adhesion promoter use limited in California as required by Air Quality Management Directive.4298UV and K520UV are premixed with UV dye.*Note:These primers contain greater than 250 g/l of volatile organic compounds (VOC). Solvent based adhesion promoter use limited in California as required by Air Quality Management Directive. Please consult your local Air Quality Regulations to be sure these primers are compliant.(a)3M™Adhesion Promoter 2262AT contains 57 g/l VOC less water and less exempt solvent.(b)See supplier information.Application Guide3M ™Dual Lock ™Reclosable Fasteners with Acrylic Foam Tape Sources Hand held J-Roller:Rockler Woodworking and HardwarePhone: (800) 279-4441Specify #Run an Evaluation Because 3M cannot anticipate all of the different possible surfaces and contaminantsthat may exist, it is imperative that the user conduct an evaluation to determine the suitability of 3M™Dual Lock™Reclosable Fasteners, surface preparationsprocedures, and any other processes that may have an influence on the tape or the bonded parts. Likewise, where there are any changes in plastic or paint formulation,or suppliers of these materials, it is advisable to run evaluations to ensure that the change has not influenced the compatibility of the surface with Dual Lock reclosable fasteners.Primer Sourceand Description •3M™Primer 94,3M™Adhesion Promoter 111 and 3M™Silane Glass Treatment AP 115 are available through distributors that carry 3M™DualLock™Reclosable Fasteners.•3M™Adhesion Promoter 2262AT is ready-to-use, pre-diluted (ten partsAcetone/one part 2262) version of 3M™Scotch-Grip™Plastic Adhesive 1099.•3M™Adhesion Promoters are available from Customer Service at (317) 290-1600.•Silane Coupling Agent is also available premixed in a 91:9 IPA/water solution or as a concentrate. A 0.5 wt. % level of silane *adhesion promoter diluted in a 91:9 IPA/water cleaning solution has been found to be sufficient.Suggested Sources for Silane Coupling Agents:Custom-Pak Products, Inc.(262) 251-6180available premixed in IPA/water Lancaster Synthesis, Inc.(603) 889-3306available 100% concentrated *Note: Be sure to read and follow silane and solvent manufacturer’s precautionsand directions for use for proper handling and storage information.Application Guide3M ™Dual Lock ™Reclosable Fasteners with Acrylic Foam Tape 3M warrants for 24months from the date of manufacture that 3M ™Dual Lock ™Reclosable Fastenerswith Acrylic Foam Tape will be free of defects in material and manufacture. 3M MAKES NO OTHER WARRANTIES, EXPRESS OR IMPLIED, INCLUDING BUT NOT LIMITED TO, ANY IMPLIEDWARRANTY OF MERCHANTABILITY OR FITNESS FOR A PARTICULAR PURPOSE. This limited warranty does not cover damage resulting from the use or inability to use 3M ™Dual Lock ™Reclosable Fasteners with Acrylic Foam Tape due to misuse, workmanship in application, or application or storage not in accordance with 3M recommended procedures.Limited Warranty If the 3M ™Dual Lock ™Reclosable Fasteners with Acrylic Foam Tape is proved to be defective within the warranty period stated above. THE EXCLUSIVE REMEDY , A T 3M ’S OPTION, SHALL BE TO REFUND THE PURCHASE PRICE OF OR TO REPAIR OR REPLACE THE DEFECTIVE 3M ™DUALLOCK ™RECLOSABLE FASTENERS WITH ACRYLIC FOAM TAPE. 3M shall not otherwise be liable for loss or damages, whether direct, indirect, special, incidental, or consequential, regardless of the legal theory asserted, including negligence, warranty, or strict liability.Limitation of Remedies and Liability All statements, technical information and recommendations contained in this document are based upontests or experience that 3M believes are reliable. However, many factors beyond 3M ’s control can affect the use and performance of a 3M product in a particular application, including the conditions underwhich the product is used and the time and environmental conditions in which the product is expected to perform. Since these factors are uniquely within the user ’s knowledge and control, it is essential that the user evaluate the 3M product to determine whether it is fit for a particular purpose and suitable for the user ’s method of application.Product Use This Industrial Adhesives and T apes Division product was manufactured under a 3M quality system registered to ISO9001:2000 standards.Scotch-Brite is a registered trademark of 3M Company.3M, Dual Lock and Scotch-Grip are trademarks of 3M Company.Santoprene is a trademark of Monsanto Corporation.Printed in U.S.A.©3M 200870-0709-4029-4(2/08)Recycled Paper 40% pre-consumer10% post-consumer 3Industrial Adhesives and Tapes Division3M Center, Building 21-1W-10, 900 Bush Avenue St. Paul, MN 55144-1000800-362-3550 • 877-369-2923 (fax)/industrial。