思科云服务路由器1000v
- 格式:pdf
- 大小:809.33 KB
- 文档页数:11

产品手册思科软件定义广域网路由器产品手册简介思科软件定义广域网路由器为传统路由和软件定义广域网部署提供全面的广域网网关和网络服务功能。
思科软件定义广域网路由器是位于远程办公室、分支机构办公室、园区或数据中心等站点边界的硬件、软件、云或虚拟化解决方案。
它们通过混合任何广域网传输,参与建立安全的虚拟覆盖网络。
软件定义广域网路由器提供基本的路由、转发、安全、加密、服务质量 (QoS)、策略和管理功能。
产品组合软件定义广域网路由器提供以下型号:1. vEdge-100:100 Mbps AES-256 吞吐量,配有 5 个非模块化 10/100/1000 Mbps 端口。
有三种不同的类型:●vEdge 100b:仅以太网●vEdge 100m:以太网和集成式 2G/3G/4G 调制解调器●vEdge 100wm:以太网、集成式 2G/3G/4G 调制解调器和无线局域网2. vEdge-1000:1 Gbps AES-256 吞吐量,配有 8 个非模块化 GE SFP 端口3. vEdge-2000:10 Gbps AES-256 吞吐量,配有 2 个可插拔接口模块4. vEdge-5000:20 Gbps AES-256 吞吐量,配有 4 个网络接口模块5. ISR 和 ASR 系列:通过 IOS XE 软件定义广域网软件映像,可在特定 ISR 1000 系列、ISR 4000 系列和 ASR1000 系列路由器上实现软件定义广域网功能。
有关详细信息,请参阅各自的产品手册。
6. ENCS:通过 IOS XE 软件定义广域网软件映像,可在特定 ENCS 5000 系列平台上实现软件定义广域网功能。
有关详细信息,请参阅各自的产品手册。
vEdge 路由器:vEdge 路由器可提供相同的软件功能。
平台之间的主要区别在于吞吐量、硬件组件冗余和端口密度。
部分 vEdge-100 路由器型号通过以太网供电集成式 GPS 和集成式 WiFi 的形式提供其他功能。

产品手册Cisco ASR 1000 系列聚合服务路由器思科正在凭借Cisco®ASR 1000 系列聚合服务路由器重塑边缘路由技术。
该系列路由器是中端路由器产品组合,打造出全新的性价比产品等级,令服务提供商和企业均从中受益:●对于服务提供商,Cisco ASR 1000 系列路由器帮助其更灵活、高效和经济地为消费者和企业提供综合服务。
●对于企业,Cisco ASR 1000 系列路由器提供高可靠性和高性能的广域网边缘解决方案,将信息、通信、协作和商务融合在一起。
Cisco ASR 1000 系列路由器:●通过优化的智能服务提供出色的性能和高度可用性,从而提升服务。
●在企业高级路由、服务提供商边缘和宽带汇聚领域设立了全新的性价比产品基准。
●促进安全广域网聚合、托管客户端 (CPE) 服务和服务提供商边缘服务等领域中网络架构的重大创新。
●通过在相同的架构或运营环境下实现管理或托管服务来降低运营费用 (OpEx) 和资本支出 (CapEx)产品概述Cisco ASR 1000 系列分为以下不同版本(图 1):Cisco ASR 1001 路由器、Cisco ASR 1002 固定式路由器、Cisco ASR 1002 路由器、Cisco ASR 1002 路由器、Cisco ASR 1004 路由器和 Cisco ASR 1006 路由器所有型号全部采用功能强大的创新 Cisco QuantumFlow 处理器,该处理器在网络处理器性能和恢复能力方面实现了巨大飞跃。
图 1. Cisco ASR 1000 系列聚合服务路由器与前几代的思科中端路由解决方案相比,Cisco ASR 1000 系列将服务运行性能提高了10 倍以上,从而显著提升了价值此外,该系列路由器具有硬件和软件冗余功能,并采用行业领先的低间断设计。
Cisco ASR 1000 系列提供多种嵌入在Cisco QuantumFlow 处理器中的服务,性能从2.5 Gbps 直至100 Gbps Cisco QuantumFlow 处理器支持的服务包括安全服务(例如,加密和防火墙)、服务质量(QoS)、网络应用识别(NBAR)、Cisco IOS®Flexible Packet Matching (FPM)、宽带聚合和思科统一边界要素(Cisco Unified Border Element)(SP 版)(之前称为会话边界控制或 SBC)等等。
Americas Headquarters:Cisco Systems, Inc., 170 West Tasman Drive, San Jose, CA 95134-1706USACisco Nexus 1000V Installation and Upgrade VideoGuide, Release 4.2(1) SV1(4)A set of brief screencast videos is available to assist in the installation and upgrade of the Cisco Nexus1000V to Release 4.2(1) SV1(4). This document describes the screencasts.Cisco Nexus 1000V Installation and Upgrade DocumentationThe screencast videos described in this document are intended to supplement the Cisco Nexus 1000Vinstallation and upgrade guides. For more comprehensive and detailed information, see the followingdocuments:Cisco Nexus 1000V Getting Started Guide, Release 4.2(1)SV1(4)Cisco Nexus 1000V Software Installation Guide, Release 4.2(1) SV1(4)Cisco Nexus 1000V Software Upgrade Guide, Release 4.2(1) SV1(4)Cisco Nexus 1000V VEM Software Installation and Upgrade Guide, Release 4.2(1) SV1(4)Note We strongly recommend that you read the prerequisites listed in these documents before performing anyof the procedures described in the screencasts.Other Cisco Nexus 1000V documentation can be found at this URL:/go/nexus1000v/docsYou should also read the Cisco release notes for this release and the VMware release notes for anyassociated VMware software releases, upgrades, or patches.Cisco Nexus 1000V and VMware Compatibility InformationCisco Nexus 1000V and VMware Compatibility InformationThe Cisco Nexus 1000V system comprises several Cisco and VMware software components. Tomaintain compatible versions of these components, and to know which components must be upgradedwhen others are upgraded, see the Cisco Nexus 1000V Compatibility Information, Release 4.2(1)SV1(4),at this URL:/en/US/docs/switches/datacenter/nexus1000/sw/4_2_1_s_v_1_4/compatibility/information/n1000v_compatibility.htmlThe links on the Compatibility Information page provide compatibility matrices for release levels ofCisco Nexus 1000V and VMware software components and configurations that have been tested andvalidated by Cisco, by Cisco partners, or both. Use this information as a reference when installing orupgrading software components.Cisco Nexus 1000V Installation VideosThe following screencast videos are available to assist you in the installation of Release 4.2(1) SV1(4)of the Cisco Nexus 1000V. We recommend that you view these videos and perform the procedures in theorder shownUnderstanding Cisco Nexus 1000V and VMware Software Version CompatibilityView This video introduces and explains the use of the Host Software Version Compatibilitytable in the Cisco Nexus 1000V and VMware Compatibility Information documentprovided for each release. Given the VMware host ESX or ESXi software version, thecompatibility table shows the appropriate Virtual Ethernet Module (VEM) installationfiles and the minimum required software versions of the VMware vCenter Server, thevCenter Update Manager, and the vSphere CLI. The video also shows how to determinethe software version of various components and how to download update software.Installing a Redundant Pair of VSMs from an OVA file Using the Installer ApplicationView This video shows how to install a redundant pair of VSMs in an HA configuration froman OVA file using the Installer Application.Installing the VEM using the VUM [two parts]View View Part 1 of the video shows you how to install the VEM on an ESX host using the VUM. Part 2 of the video shows you how to troubleshoot and verify the installation.Installing the VEM using the vSphere CLIView This video shows how to install the VEM on an ESX host using the VMware vSphere CLI.Cisco Nexus 1000V Installation and Upgrade Video Guide, Release 4.2(1) SV1(4)Cisco Nexus 1000V Upgrade VideosCisco Nexus 1000V Upgrade VideosThe following videos are available to assist you in upgrading the Cisco Nexus 1000V to Release 4.2(1)SV1(4). We recommend that you view these videos and perform the procedures in the order shown.Understanding Cisco Nexus 1000V and VMware Software Version CompatibilityView This video introduces and explains the use of the Host Software Version Compatibilitytable in the Cisco Nexus 1000V and VMware Compatibility Information documentprovided for each release. Given the VMware host ESX or ESXi software version, thecompatibility table shows the appropriate Virtual Ethernet Module (VEM) installationfiles and the minimum required software versions of the VMware vCenter Server, thevCenter Update Manager, and the vSphere CLI. The video also shows how to determinethe software version of various components and how to download update software.Understanding the Upgrade Process for the Cisco Nexus 1000V Release 4.2(1) SV1(4)View This video provides an overview of the steps required to update your VMwareinfrastructure for a non-disruptive upgrade, and to update your VEMs and VSMs to CiscoNexus 1000V Release 4.2(1) SV1(4).Upgrading the VMware vCenter Update Manager to Release 4.0 Update 1 Patch 2View This video shows how to upgrade the VMware vCenter Update Manager (VUM) to theminimum required version for the upgrade to Cisco Nexus 1000V Release 4.2(1) SV1(4).Upgrading the Cisco Nexus 1000V from 4.0(4) SV1(3, 3a, or 3b) to 4.2(1) SV1(4) [three parts]This three-part video shows you how to upgrade your Virtual Ethernet Modules (VEMs)and Virtual Supervisor Modules (VSMs) to Cisco Nexus 1000V Release 4.2(1)SV1(4).View Part 1 of the video describes the process, lists the prerequisites, and shows how todownload the required software.View Part 2 of the video shows you how to upgrade the VEMs.View Part 3 of the video shows you how to upgrade the Virtual Supervisor Modules (VSMs).Upgrading the Cisco Nexus 1000V from VMware Release 4.0 to 4.1 [three parts]This video shows how to upgrade your vCenter Server, vCenter Update Manager, andvSphere CLI from VMware Release 4.0 to Release 4.1.View Part 1 describes how to check software compatibility and how to upgrade the vCenterServer.View Part 2 describes how to upgrade the VUM.View Part 3 describes how to upgrade the hosts.Obtaining Documentation and Submitting a Service Request For information on obtaining documentation, submitting a service request, and gathering additionalinformation, see the monthly What’s New in Cisco Product Documentation, which also lists all new andrevised Cisco technical documentation, at:/en/US/docs/general/whatsnew/whatsnew.htmlSubscribe to the What’s New in Cisco Product Documentation as an RSS feed and set content to bedelivered directly to your desktop using a reader application. The RSS feeds are a free service. Cisco currentlysupports RSS Version2.0.Cisco Nexus 1000V Installation and Upgrade Video Guide, Release 4.2(1) SV1(4)Cisco Nexus 1000V Upgrade Videos© 2011 Cisco Systems, Inc. All rights reserved.Cisco and the Cisco Logo are trademarks of Cisco Systems, Inc. and/or its affiliates in the U.S. and other countries. A listing of Cisco's trademarkscan be found at /go/trademarks. Third party trademarks mentioned are the property of their respective owners. The use of the wordpartner does not imply a partnership relationship between Cisco and any other company. (1005R)Cisco Nexus 1000V Installation and Upgrade Video Guide, Release 4.2(1) SV1(4)。
C H A P T E R6-1Cisco Nexus 1000V Quality of Service Configuration Guide, Release 4.2(1)SV1(5.1)OL-25383 -016Configuring Class Based Weighted Fair QueueingThis chapter describes how to configure Class Based Weighted Fair Queueing policies on the Cisco Nexus 1000V to prioritize network traffic.Information About Class Based Weighted Fair QueueingWith this feature the following goals have been addressed:•Queueing can ensure that any traffic class does not starve other traffic types.•Respect the bandwidth guarantees for each traffic class.•Optimize the utilization of the uplink bandwidth.Class-based weighted fair queueing (CBWFQ) extends the standard weighted fair queueing (WFQ) functionality to provide support for user-defined traffic classes. For CBWFQ, you define traffic classes based on match criteria including protocols, and cos values. Packets satisfying the match criteria for a class constitute the traffic for that class. A queue is reserved for each class, and traffic belonging to a class is directed to the queue for that class.Once a class has been defined according to its match criteria, you can assign its characteristics. To characterize a class, you assign it bandwidth, and maximum queue limit. The bandwidth assigned to a class is the guaranteed bandwidth delivered to the class during congestion.To characterize a class, you also specify the queue limit for that class, which is the maximum number of packets allowed to accumulate in the queue for the class. Packets belonging to a class are subject to the bandwidth and queue limits that characterize the class.After a queue has reached its configured queue limit, enqueueing of additional packets to the class causes tail drop.The traffic that does not match any of the configured classes is given best-effort treatment. Once a packet is classified, all of the standard mechanisms that can also be used to differentiate service among the classes apply.For CBWFQ, the weight specified for the class becomes the weight of each packet that meets the match criteria of the class. Packets that arrive at the egress interface are classified according to the match criteria filters you define, then each one is assigned the appropriate weight. The weight for a packet belonging to a specific class is derived from the bandwidth you assigned to the class when you configured it; in this sense the weight for a class is user-configurable.Chapter6 Configuring Class Based Weighted Fair Queueing Information About Class Based Weighted Fair QueueingAfter the weight for a packet is assigned, the packet is enqueued in the appropriate class queue. CBWFQuses the weights assigned to the queued packets to ensure that the class queue is serviced fairly.Configuring a class policy—thus, configuring CBWFQ—entails these three processes:•Defining traffic classes to specify the classification policy (class maps).This process determines how many types of packets are to be differentiated from one another.•Associating policies—that is, class characteristics—with each traffic class (policy maps).This process entails configuration of policies to be applied to packets belonging to one of the classespreviously defined through a class map. For this process, you configure a policy map that specifiesthe policy for each traffic class.•Attaching policies to interfaces (service policies).Note A queueing policy map can only be applied on an uplink in the egress (outbound) direction.This process requires that you associate an existing policy map, or service policy, with an interfaceto apply the particular set of policies for the map to that interface.Policy maps prioritize network traffic by class. You create policy maps to define how to treat each classof traffic so that it is prioritized for the best quality of service.Information About Class Maps for QueuingThe match {cos_id} {protocol_name} command defines whether you want packets for this class map tomatch protocol, class of service, or both.•CoS is specified as a number from 0 to 7.This matches traffic based on the class of service (CoS) in the IEEE 802.1Q header, defined in IEEE802.1p. CoS is encoded in the high order 3 bits of the VLAN ID Tag field and is referred to asuser_priority.•The following are pre-defined protocol matches:–n1k_control–n1k_mgmt–n1k_packet–vmw_ft–vmw_iscsi–vmw_mgmt–vmw_nfs–vmw_vmotion•The following are the default COS values associated with the protocols:–n1k_control: 6–n1k_mgmt: No default value–n1k_packet: 6For VMware protocols such as vmw_ft, vmw_iscsi, vmw_mgmt, vmw_nfs, and vmw_vmotion, CiscoNexus 1000V does not set any default COS value. See the VMware documentation for more information.Cisco Nexus 1000V Quality of Service Configuration Guide, Release 4.2(1)SV1(5.1)OL-25383 -01Chapter6 Configuring Class Based Weighted Fair QueueingLicensing Requirements for Class Based Weighted Fair Queueing Licensing Requirements for Class Based Weighted Fair QueueingThere are no licensing requirements for this feature.Prerequisites for Class Based Weighted Fair QueueingClass Based Weighted Fair Queueing has the following prerequisites:•You are already logged in to the CLI in EXEC mode.Guidelines and LimitationsUse the following guidelines and limitations when configuring Class Based Weighted Fair Queueing(CBWFQ).• A queueing policy can only be applied on an uplink interface in the egress (outbound) direction.•Queueing is supported on ESX/ESXi 4.1.0 and later hosts.•For port-channel interfaces, queueing bandwidth applies on the member ports. The overallperformance will depend on how the vethernets are pinned to member ports and the traffic patternon the individual ports.•We recommend that you reserve 10% bandwidth of the uplink for the control traffic.Default SettingsClass Based Weighted Fair Queueing is disabled by default.Configuring Class Based Weighted Fair Queueing PoliciesThis section describes how to create QoS queueing class policies for the Cisco Nexus 1000V:Creating the policy consists of the following steps:1.Create a class map2.Create a policy map3.Apply the policy map on an interfaceConfiguring Class Based Weighted Fair QueueingThis feature allows the user to differentiate traffic classes and provide appropriate bandwidth guarantees.You can use this procedure to configure class-based weighted fair queueing as follows:•Create a queueing class map with protocol or CoS matching criteria.•Create a queueing policy map and assign the class map to it.Cisco Nexus 1000V Quality of Service Configuration Guide, Release 4.2(1)SV1(5.1) OL-25383 -01Cisco Nexus 1000V Quality of Service Configuration Guide, Release 4.2(1)SV1(5.1)OL-25383 -01Chapter 6 Configuring Class Based Weighted Fair QueueingConfiguring Class Based Weighted Fair Queueing PoliciesBEFORE YOU BEGINBefore beginning this procedure, you must know or do the following:•You are logged in to the CLI in EXEC mode.•You know whether you want the queueing class map to match protocol or CoS.•You know whether you want to designate a minimum guaranteed bandwidth for the traffic class.•You know whether you want to designate a maximum queue size for the traffic class.SUMMARY STEPS1.configure terminal2.class-map type queuing {match-all | match-any} map-name3.match {cos id | protocol name }4.exit5.policy-map type queuing name6.class type queuing name7.bandwidth percent percentage8.(Optional) show policy-map [{[type qos] [pmap-name-qos ]} | {type queuing [pmap-name-que ]}] 9.port-profile type ethernet name10.service-policy type queuing output name 11.show policy-map interface 12.copy running-config startup-configDETAILED STEPSCommandPurposeStep 1configure terminal Example:n1000v# config t n1000v(config)#Places you into global configuration mode.Step 2class-map type queuing {match-any | match-all } map-nameExample:n1000v(config)# class-map type queuing match-all class_fin1n1000v(config-cmap-que)Creates a CBWFQ class map and enters class map queueing mode for configuring the new class map.match-any : Use this option to apply this class map to a packet if it matches any of the matching criteria.match-all : Use this option to apply this class map to a packet if it matches all of the matching criteria.map-name : up to 40 alphanumeric characters in length and can include the hyphen and underscore characters.Cisco Nexus 1000V Quality of Service Configuration Guide, Release 4.2(1)SV1(5.1)OL-25383 -01Chapter 6 Configuring Class Based Weighted Fair QueueingConfiguring Class Based Weighted Fair Queueing PoliciesStep 3match {cos id } | {protocol name } Example:n1000v(config-cmap-que)# match protocol vmw_vmotionn1000v(config-cmap-que)#Defines whether you want packets for this class map to match protocol, class of service, or both.•CoS is specified as a number from 0 to 7. This matches traffic based on the class of service (CoS) in the IEEE 802.1Q header, defined in IEEE 802.1p. CoS is encoded in the high order 3 bits of the VLAN ID Tag field and is referred to as user_priority.•The following are pre-defined protocol matches:–n1k_control –n1k_mgmt –n1k_packet –vmw_ft –vmw_iscsi –vmw_mgmt –vmw_nfs –vmw_vmotion•The following are the default COS values associated with the protocols:–n1k_control: 6–n1k_mgmt: No default value –n1k_packet: 6–For VMware protocols such as vmw_ft,vmw_iscsi, vmw_mgmt, vmw_nfs, andvmw_vmotion, Cisco Nexus 1000V does not set any default COS value. See the VMware documentation for more information.Step 4exitExample:n1000v(config-cmap-que)# exit n1000v(config)#Exits class-map queueing configuration mode and returns you to global configuration mode.Step 5policy-map type queuing nameExample:n1000v(config)# policy-map type queuing Policy-vmotionn1000v(config-pmap-que)Creates a CBWFQ policy map and enters policy map queueing mode for configuring the new policy map.Step 6class type queuing nameExample :n1000v(config-pmap-que)# class type queuing class_fin1n1000v(config-pmap-c-que)#Assigns a CBWFQ class to this policy map and enters policy map class queueing configuration mode.CommandPurposeCisco Nexus 1000V Quality of Service Configuration Guide, Release 4.2(1)SV1(5.1)OL-25383 -01Chapter 6 Configuring Class Based Weighted Fair QueueingConfiguring Class Based Weighted Fair Queueing PoliciesStep 7bandwidth percent percentageExample :n1000v(config-pmap-c-que)# bandwidth percent 50n1000v(config-pmap-c-que)#Designates the minimum guaranteed bandwidth for this traffic class as a percentage of total available bandwidth.Step 8(Optional) show policy-map [{[type qos ] [pmap-name-qos ]} | {type queuing [pmap-name-que ]}]Example :n1000v(config-pmap-c-que)# showpolicy-map type queuing Policy-vmotion Type queuing policy-maps ========================policy-map type queuing Policy-vmotionclass type queuing Match-vmotion bandwidth percent 50n1000v(config-pmap-c-que)#Displays the configuration for verification.Step 9exitExample:n1000v(config-pmap-c-que)# exit n1000v(config-pmap-que)#Exits policy-map type queueing configuration mode and returns you to policy-map configuration mode.Step 10exitExample:n1000v(config-pmap-que)# exit n1000v(config)#Exits policy-map configuration mode and returns you to global configuration mode.Step 11port-profile type ethernet name Example:n1000v(config)# port-profile type ethernet myppten1000v(config-port-prof)#Creates a port-profile and enters port-profile configuration mode.Step 12service-policy type queuing output name Example:n1000v(config-port-prof)#service-policy type queuing output my_pmtqn1000v(config-port-prof)#Creates a service-policy of type queuing.CommandPurposeCisco Nexus 1000V Quality of Service Configuration Guide, Release 4.2(1)SV1(5.1)OL-25383 -01Chapter 6 Configuring Class Based Weighted Fair QueueingVerifying the Class Based Weighted Fair Queueing ConfigurationVerifying the Class Based Weighted Fair Queueing ConfigurationTo verify the QoS queueing policy configuration, perform one of the following tasks:Example 6-1Display Policy Map T ype Queuingn1000v# show policy-map type queuing Policy-vmotionType queuing policy-maps ========================policy-map type queuing Policy-vmotion class type queuing Match-vmotion bandwidth percent 50Example 6-2Display Class Mapn1000v# show class-map type queuing Match-vmotionType queuing class-maps ========================Step 13show policy-map interface Example:n1000v(config-port-prof)# show policy-map interfacen1000v(config-port-prof)Displays the status of the global statistics and the configured policy maps on all interfaces.Step 14copy running-config startup-config Example:n1000v(config-port-prof)# copy running-config startup-config n1000v(config-port-prof)#(Optional) Saves the running configurationpersistently through reboots and restarts by copying it to the startup configuration.CommandPurposeCommandDescriptionshow policy map type queuing nameDisplays the queueing policy map configuration.See Example 6-1 Display Policy Map Type Queuing, page 6-7show class-map type queuing name Displays the queueing class map configuration.See Example 6-2 Display Class Map, page 6-7show policy-map interfaceDisplays the policy map interface configuration.See Example 6-3 Display Policy Map on Interface, page 6-8show running-config ipqosDisplays the QoS running configuration.Chapter6 Configuring Class Based Weighted Fair Queueing Verifying the Class Based Weighted Fair Queueing Configurationclass-map type queuing match-any Match-vmotionmatch protocol vmw_vmotionExample6-3Display Policy Map on Interfacen1000v# show policy-map interface ethernet 3/3Global statistics status : disabledEthernet3/3Service-policy (queuing) output: Policy-vmotionpolicy statistics status: enabledClass-map (queuing): Match-vmotion (match-any)Match: protocol vmw_vmotionbandwidth percent 50Example6-4Display Class Mapn1000v# show class-map type queuing Match-CosType queuing class-maps========================class-map type queuing match-all Match-Cosmatch cos 5Example6-5Display Service Policy on Interfacen1000v# show policy-map interface ethernet 3/3Global statistics status : disabledEthernet3/3Service-policy (queuing) output: Policy-Cospolicy statistics status: enabledClass-map (queuing): Match-Cos (match-all)Match: cos 5bandwidth percent 50Example6-6Display Service Policy on Interfacen1000v# show policy-map interface port-channel 1Global statistics status : disabledport-channel1Service-policy (queuing) output: Policy-vmotionpolicy statistics status: enabledCisco Nexus 1000V Quality of Service Configuration Guide, Release 4.2(1)SV1(5.1)OL-25383 -01Chapter6 Configuring Class Based Weighted Fair QueueingConfiguration Examples for Class-Based Weighted Fair Queueing Class-map (queuing): Match-vmotion (match-any)Match: protocol vmw_vmotionbandwidth percent 50Configuration Examples for Class-Based Weighted Fair QueueingExample6-7Allocating 50% of Bandwidth for vMotion T rafficconf tEnter configuration commands, one per line. End with CNTL/Z.class-map type queuing match-any Match-vmotionmatch protocol vmw_vmotionexitpolicy-map type queuing Policy-vmotionclass type queuing Match-vmotionbandwidth percent 50exitexitinterface ethernet 3/3service-policy type queuing output Policy-vmotionExample6-8Alocating 50% of Bandwidth for T raffic with CoS Value of 5conf tEnter configuration commands, one per line. End with CNTL/Z.class-map type queuing match-all Match-Cosmatch cos 5exitpolicy-map type queuing Policy-Cosclass type queuing Match-Cosbandwidth percent 50exitexitinterface ethernet 3/3service-policy type queuing output Policy-CosExample6-9Policy-Map with Multiple T raffic Classesconf tEnter configuration commands, one per line. End with CNTL/Z.class-map type queuing match-any class-vmotionmatch protocol vmw_vmotionexitclass-map type queuing match-any class-cos-2match cos 2exitpolicy-map type queuing policy-priority-vmotionclass type queuing class-vmotionbandwidth percent 60class type queuing class-cos-2bandwidth percent 40exitexitint po1service-policy type queuing output policy-priority-vmotionsh policy-map type queuing policy-priority-vmotionCisco Nexus 1000V Quality of Service Configuration Guide, Release 4.2(1)SV1(5.1) OL-25383 -01Chapter6 Configuring Class Based Weighted Fair Queueing Feature History for Class Based Weighted Fair QueueingType queuing policy-maps========================policy-map type queuing policy-priority-vmotionclass type queuing class-vmotionbandwidth percent 60class type queuing class-cos-2bandwidth percent 40conf tEnter configuration commands, one per line. End with CNTL/Z.int po1service-policy type queuing output policy-priority-vmotionendsh policy-map interface po1Global statistics status : disabledport-channel1Service-policy (queuing) output: policy-priority-vmotionpolicy statistics status: enabledClass-map (queuing): class-vmotion (match-any)Match: protocol vmw_vmotionbandwidth percent 60Class-map (queuing): class-cos-2 (match-any)Match: cos 2bandwidth percent 40Feature History for Class Based Weighted Fair Queueing This section provides the Class Based Weighted Fair Queueing release history.Feature Name Releases Feature InformationClass Based Weighted Fair Queueing 4.2(1)SV1(4)This feature was introduced.Cisco Nexus 1000V Quality of Service Configuration Guide, Release 4.2(1)SV1(5.1)OL-25383 -01。
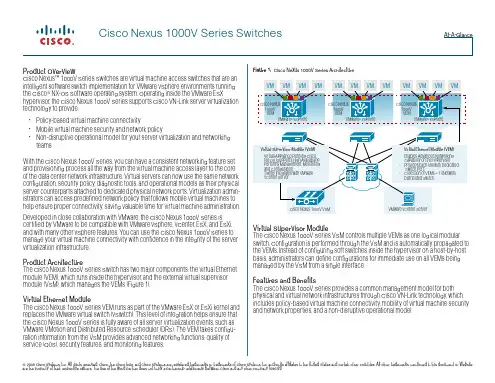
产品概述思科Nexus™ 1000V虚拟接入交换机是一款智能软件交换机,适用于VMware ESX环境。
思科Nexus 1000V在VMware ESX管理程序中运行,支持思科® VN-Link服务器虚拟化技术,提供:∙基于策略的虚拟机(VM)连接∙移动VM安全保护和网络策略,以及∙对服务器虚拟化和联网团队运行无干扰的操作模式。
在数据中心部署服务器虚拟化时,虚拟服务器的管理方式一般与物理服务器不同。
服务器虚拟化作为特殊部署对待,从而延长了部署所需时间,增加了服务器、网络、存储和安全管理员之间需要进行的协调工作。
而采用思科Nexus 1000V,您就能拥有一个从VM到接入层、汇聚层和核心层交换机的统一网络特性集和调配流程。
您的虚拟服务器能与物理服务器使用相同的网络配置、安全策略、工具和运行模式。
虚拟化管理员能充分利用预先定义的、跟随VM移动的网络策略,重点进行虚拟机管理。
这一全面的功能集能帮助您更快地部署服务器虚拟化并从中受益。
思科Nexus 1000V是与VMware密切合作的结晶,它与VMware虚拟基础设施完全集成,其中包括VMware Virtual Center、VMware ESX和ESXi。
您能使用思科Nexus 1000V来管理您的VM连接,确信能保持服务器虚拟化基础设施的完整性。
产品架构思科Nexus 1000V交换机有两个主要组件,即在管理程序内部运行的虚拟以太网模块(VEM)和管理VEM 的外部虚拟控制引擎模块(VSM)(参见图1)。
图1.思科Nexus 1000V架构虚拟以太网模块思科Nexus 1000V虚拟以太网模块是VMware ESX或ESXi内核的一部分,能够取代VMware虚拟交换机的功能。
VEM充分利用了思科和VMware共同开发的VMware 分布式虚拟交换机(DVS) API,为虚拟机提供高级网络功能。
这一集成确保思科Nexus 1000V完全了解所有服务器虚拟化活动,如VMware VMotion和Distributed Resource Scheduler (DRS)。
VN1000网络视频浏览软件简明操作说明书VN1000 N etwork Video Review SoftwareBrief User Manual北京金尼斯电子技术有限责任公司一、正常的开机与关机:VN1000必须正确开机/关机,对于开机,在运行VICONNET之前,系统需要一个启动过程,和普通PC机一样;对于关闭VN1000,特定过程要执行来避免数据丢失开机:鼠标双击桌面VICONNET图标,VICONNET软件将运行关机:首选的关机方法是:在操作界面下,鼠标点击“X”按钮,下面界面将出现:再点击“关机”按扭,系统将关闭程序,最后关机如果鼠标点击“SHUT DOWN”键后,系统无法关机,瞬时按下前面板的电源开关(此方法不推荐使用)第二章: VN1000软件操作一.登录用户要登录VICONNET系统,必须系统分配给它的用户名及密码,其允许的操作级别依据系统对它的的授权.在你的系统被注册为VN1000,VICONNET系统提供所有功能,在注册之前系统功能将限于浏览的部分功能.VIOCNNET管理员能配置用户自动登录,当设置完成后,不需输入用户名及密码,就能进入VICONNET系统。
登录VIOCNNET1.在你的工作站桌面,双击VICONNET图标(或者选择从开始选择VICONNET软件VICONNET登录窗口出视,显示最后用户的名字。
2.在用户名区域内,输入你分配的用户名。
如果你是一个管理员输入 admin 如果你是客户输入guest3.在密码区域输入你分配的密码。
4.点击“登陆”按钮显示VICONNET主窗口显示。
5.点击“登出”按钮,注销用户二.主窗口在登录VIOCNNET后,主窗口现显示,下面的图片显示VICONNET主窗口中的元素主要操作:浏览及控制摄象机1.选择显示模式按按钮,选择单画面;按按钮,选择四画面;按按钮,选择六画面;按按钮,选择九画面;按按钮,选择十六画面;按按钮,图象满屏。
CISCO路由器各个型号的详细介绍CISCO是全球知名的网络解决方案供应商之一,其路由器产品被广泛应用于各种企业和组织的网络架构中。
本文将详细介绍CISCO路由器的各个型号,包括其特点、适用场景等。
一、CISCO ISR 4000系列路由器CISCO ISR 4000系列路由器是CISCO路由器产品中较为常见的型号之一。
这一系列路由器具备高性能的处理能力和多功能的特点,能够满足中大型企业网络的需求。
其特点包括:1. 高性能处理器:这一系列路由器配备了高性能多核处理器,能够提供卓越的数据处理和转发能力,适用于大规模数据传输和复杂网络环境。
2. 高密度接口:ISR 4000系列路由器支持多种常见的网络接口类型,包括千兆以太网接口、光纤接口等,方便与不同设备进行连接和通信。
3. 统一管理:路由器内置了CISCO的集中式管理平台,可实现对多个路由器的统一管理和监控,简化了网络管理的复杂性。
4. 安全性能:ISR 4000系列路由器支持CISCO的网络安全技术,包括ACL(访问控制列表)、VPN(虚拟专用网络)等,能够有效保护企业网络的安全。
二、CISCO ASR 1000系列路由器CISCO ASR 1000系列路由器是专为高性能网络设计的路由器产品,适用于大型企业、运营商等高要求的网络环境。
其特点包括:1. 高可靠性:ASR 1000系列路由器采用了高可靠性设计,具备冗余电源、冗余接口等功能,提供稳定可靠的网络连接。
2. 高密度接口:路由器支持大量的接口类型,包括千兆以太网接口、10千兆以太网接口、光纤接口等,适应高密度的数据传输需求。
3. 智能流量管理:ASR 1000系列路由器配备了智能流量管理功能,能够在网络拥堵情况下进行智能分流和调度,提高网络的利用率和性能。
4. 高度可扩展:路由器支持模块化设计,可以根据需要添加不同类型的扩展模块,以满足不同场景下的需求。
三、CISCO Catalyst系列路由器CISCO Catalyst系列路由器主要面向企业和组织内部网络环境,其特点包括:1. 高性能交换:这一系列路由器采用快速交换技术,能够在企业内部网络中快速转发数据包,提供高性能的数据交换能力。
思科 ASR 1000 系列嵌入式服务处理器产品手册思科公开信息目录产品概述 (3)平台概述 (3)特性和优势 (4)使用案例 (4)平台支持和兼容性 (5)产品规格 (9)系统要求 (16)性能和扩展 (17)订购信息 (27)思科服务 (27)保修信息 (27)思科环境可持续性 (27)Cisco Capital (28)相关详细信息 (28)文档历史记录 (29)思科® ASR 1000 系列嵌入式服务处理器 (ESP) 可以处理思科 ASR 1000 系列汇聚多业务路由器的所有网络数据平面流量处理任务。
这些 ESP 在维持线路速度的同时支持激活并发增强网络服务,如加密、防火墙、网络地址转换(NAT)、服务质量 (QoS)、NetFlow 和许多其他功能。
图 1 显示了思科 ASR 1000 系列 ESP 100 和 ESP 200。
思科 ASR 1000 系列路由器部署于企业数据中心或大型办公室的广域网边缘以及运营商的入网点 (POP)。
此系列路由器依赖 ESP 的强大功能来汇聚多个流量和网络服务(包括加密和流量管理),并以线速通过广域网连接进行转发。
思科 ASR 系列提供从 2.5 到 200 Gbps 的路由器选项,包含多种型号和许可选项,以满足不同类型的组织和不同规模的位置对速度和预算的需求。
这些路由器的思科 ASR 1000 ESP 组件使用并行处理加快服务交付速度。
ESP 基于思科 QuantumFlow 处理器(QFP),以支持新一代硅片中的转发和队列。
ESP 以 20、40、100 和 200 Gbps 的数据平面转发吞吐量速率运行。
思科 ASR 1001-X、ASR 1001-HX、ASR 1002-HX 和 ASR 1002-X 路由器以及 100 及 200 Gbps ESP 共同引进第二代思科 QuantumFlow 处理器 (QFP) 硬件和软件架构。
ASR 1000 使用基于 QFP 的 ESP 作为核心,可以实现以下功能:●处理所有的基准包路由操作,包括 MAC 地址分类、第 2 层和第 3 层转发、QoS 分类和 NetFlow 数据分组计费●执行高级服务,例如 IPsec 加密、NAT、防火墙、AppNav、应用可视性与可控性 (AVC)、性能路由 (PfR)和定位器 ID 分离协议 (LISP);提供多种功能的第 2 层连接选项,如 MPLS 以太网 (EoMPLS)、虚拟专用局域网服务 (VPLS)、重叠传输虚拟化 (OTV) 和虚拟可扩展局域网服务 (VXLAN)平台概述ASR 1000 系列路由器支持以下嵌入式服务处理器:●思科 ASR 1000 系列 20 Gbps 嵌入式服务处理器●思科 ASR 1000 系列 40 Gbps 嵌入式服务处理器●思科 ASR 1000 系列 100 Gbps 嵌入式服务处理器●思科 ASR 1000 系列 200 Gbps 嵌入式服务处理器思科 ASR 1000 系列 ESP 100 和 200ESP 的主引擎是 Cisco QFP,是业内第一款可编程应用感知网络处理器。
Data SheetCisco Industrial Ethernet 1000 Series SwitchesProduct OverviewThe Cisco® Industrial Ethernet (IE) 1000 Series Switches are compact rugged switches aimed at operational technology (OT) users with limited IT network knowledge. The IE 1000 Series Switches provide an easy transformation from the legacy factory to digital solution. For machine builders and machine-to-machine (M2M) solutions, it is an attractive entry level product as a GUI-based, lightly-managed switch. The IE 1000 is a good fit for locations with harsh temperatures and small spaces and is Power over Ethernet (PoE) capable with zero IT management.The IE 1000 is ideal for industrial Ethernet applications where small and easy-to-be-managed hardened products are required, including factory automation, intelligent transportation systems, city-surveillance programs, building automations etc.The Cisco IE 1000 Series Switches complement the current industrial Ethernet portfolio of related Cisco industrial switches, such as the Cisco IE 2000, IE 3000, IE 4000 and IE 5000 Series managed Switches.The IE 1000 can be easily installed on your network. Through a user-friendly web device manager, the IE 1000 provides easy out-of-the-box configuration and simplified operational manageability to deliver advanced and secure multiservices over industrial networks.Features and BenefitsThe Cisco IE 1000 Series Switches are designed for low cost, low ports, and small sizes. They offer:●Scalability: Four models are available supporting 5, 6, 8 and 10 Ethernet ports, with Fast Ethernet (FE) andGigabit Ethernet (GE), copper and fiber uplinks options●Easy integration: Zero-touch IP discovery or Dynamic Host Configuration Protocol (DHCP)IP addressingand simple web GUI-based management●PnP (Plug and Play): Automates the process of provisioning the new devices in to the network by applyingconfigurations, installing required image without manual intervention.●Fast startup time: Starts 30 seconds from cold boot●Manageability: Web GUI interface, and diagnostics and analysis options through Simple NetworkManagement Protocol (SNMP) and syslog●Security: secure access; port-security; TACACS+ and RADIUS AAA Client: Security protocols to controlaccess into networks;●IEEE 802.1x security: Provides an authentication mechanism to devices wishing to attach to the network.Single host mode with MAC authentication bypass.●Minimize data load: VLAN aware, Internet Group Management Protocol (IGMP) and DHCP snooping tofilter unwanted data●Lightly-managed: Spanning-tree protocol (STP), Link Layer Discovery Protocol (LLDP), Cisco DiscoveryProtocol aware●Sticky-MAC: Enables the IE1K to retain MAC addresses it dynamically learns and avoid new devices toconnect on the port●BootP server with per-port support:When client sends a BootP request, the server responds with BootPresponse based on same DHCP pool configuration.●Gigabit uplink: Two fiber-optic SFP based uplink for up to 50 miles (80 kilometers) links●Industrial PoE: Up to eight PoE (IEEE 802.af) and PoE+ (802.3at) supported on selected models●Redundant voltage feeds, alarm relays support and DIN rail mount●Industrial environmental compliance and certifications: Ethernet/IP (CIP)Product Specifications●Maximum Forwarding Bandwidth 2.8Gbps●Maximum Switching Bandwidth 5.6GbpsDetailed Product InformationFigure 1 shows switch models, and Table 1 shows the Cisco IE 1000 Series Switches configuration information. Table 2 lists the SKUs for power supplies. Table 3 includes the 1000 product specifications. Table 4 lists software features. Table 5 includes compliance specifications. Table 6 outlines management and relevant industry standards.Figure 1. Cisco Industrial Ethernet 1000 Series SwitchesTable 1. Cisco IE 1000 Series Switches ConfigurationsTable 2. Power Supplies and Mounting Kit Available for Cisco IE 1000 Series Switches1 The entire power budget for the switch and PoE ports needs to stay within the power supply.2 The power supplies are not certified for smart grid and hazardous locations. These power supplies are IP20 rated.3 Power Supplies Datasheet Link: https:///c/en/us/products/collateral/switches/industrial-ethernet-switches/datasheet-c78-742180.htmlTable 3. Product SpecificationsTable 4. Cisco IE 1000 Software FeaturesTable 5. Compliance SpecificationsTable 6. Management and StandardsFigures 2 through 5 show the mechanical dimension details of the various IE 1000 models. Figure 2. IE1000-4T1T-LMFigure 3. IE1000-6T2T-LMFigure 4. IE1000-4P2S-LMFigure 5. IE1000-8P2S-LMWarranty InformationWarranty information for the Cisco IE 1000 Series Switches is available at https://www.cisco-/warrantyfinder.aspx.Cisco and Partner ServicesAt Cisco, we’re committed to minimizing our customers’ TCO, and we offer a wide range of services programs to accelerate customer success. Our innovative programs are delivered through a unique combination of people, processes, tools, and partners, resulting in high levels of customer satisfaction. Cisco Services helps you protect your network investment, optimize network operations, and prepare your network for new applications to extend network intelligence and the power of your business.Some of the key benefits our customers can receive from Cisco Services are:●Mitigating risks by enabling proactive or expedited problem resolution●Lowering TCO by taking advantage of Cisco expertise and knowledge●Minimizing network downtime●Supplementing your existing support staff so they can focus on additional productive activitiesFor more information about Cisco Services, visit Cisco Technical Support Services or Cisco Advanced Services athttps:///connectdots/serviceWarrantyFinderRequest?fl=sfCisco CapitalFlexible Payment Solutions to Help You Achieve Your ObjectivesCisco Capital makes it easier to get the right technology to achieve your objectives, enable business transformationand help you stay competitive. We can help you reduce the total cost of ownership, conserve capital, andaccelerate growth. In more than 100 countries, our flexible payment solutions can help you acquire hardware,software, services and complementary third-party equipment in easy, predictable payments. Learn more.For More InformationFor more information about the Cisco IE 1000 Series Switches, visit https:///go/ie1000 or contactyour local account representative.Printed in USA C78-737277-09 06/19。